manuals.online logo
Brands
  1. Home
  2. •
  3. Brands
  4. •
  5. AQUATECH
  6. •
  7. Camera Accessories
  8. •
  9. AQUATECH LUX Flash Housing User manual

AQUATECH LUX Flash Housing User manual

Instruction manual
LUX Flash Housing
Compatible with entire range of Sport Housings
Thank you for purchasing this AquaTech LUX Flash
Housing.
Overview:
The LUX Flash Housing features a brand new housing
design with an included Godox TT685 series flash,
creating a functional and versatile lighting solution in
the water. Designed specifically for the TT685 flashes,
the LUX borrows controls from our EVO and Elite II
Housings for superior control over all flash settings.
Safety locking clips from our Elite II housings secure the
LUX with even pressure on the HAR O-Ring seal and
require no tools for setup. The new quick-cam mount
connects to the supplied Pro Mount V3 without the
need for any additional tools. Easily remove the LUX or
interchange with your action camera on the Pro Mount
V3 when lighting is not required. Our 6 pin flash sync
system allows the LUX to support TTL and high-speed
sync (for Canon and Nikon only) in the water with
hard wired options available up to 30ft for underwater
lighting.
You can also combine the LUX with the new SYNC
Transmitter Housing to wirelessly trigger the LUX at
distances up to 100m above water, or slave another LUX
housing to the master unit for multiple lighting eects.
The Godox TT685 features a built in 2.4GHz X radio
system, oering the ability to control multiple flash
units, or to fire the unit wirelessly without needing to
attach any additional receivers. With a Guide Number of
60m/190ft at ISO 100 at 105mm, it also oers plenty of
power for many lighting situations. Whatever the shoot
calls for, the versatility of the LUX housing provides the
solution you need to capture images that will wow your
clients and fans alike.
You can also visit our website and YouTube channel for
more tips and information.
What’s in the box
• LUX Flash Housing (please choose the compatible
camera manufacturer option)
• Godox TT685 Flash (requires 4 x AA batteries not
included)
• Pro Mount V3
• Camera Hotshoe Connector
• AquaTech Flash Bulkhead
• M5 Stainless Steel screw
• 5mm allen key
Table of contents
• Whats in the box
• Nomenclature
• Initial setup
• Using the Lux Flash Housing underwater
• Safety information
• Maintenance and repair
• Limit of liability
• Warranty
• Servicing
• Returns
• Legals
1
Nomenclature
2
Safety Locking Clips
Quick Cam Mount
Polyurethane Body
Controls
Initial setup
• Additional Tools Needed: Flathead screwdriver,
Crescent wrench
• Open LUX Flash Housing
• Install four double AA batteries into right side of the
Godox Flash
• To install Godox flash into LUX Housing make sure
Godox Hotshoe is unlocked by spinning locking
wheel all the way to the right
• Then simply slide Godox flash into LUX flash
Hotshoe
• Then spin the locking wheel to the left to ensure
Godox is properly installed and secure
• Turn Godox Flash on, and lineup Lux Backplate
controls with Godox flash controls
• Then clamp down Backplate
• Remove the Flash Bulkhead plug from your Sport
Housing with a Flathead screwdriver turning counter
clockwise, install the supplied Flash Bulkhead onto
your Sport Housing making sure the two o-rings
are properly in place. Note: the additional Flash
Bulkhead will be found bagged with your grease,
hex key, Flash Sync Cable and camera hot shoe.
• Once Flash Bulkhead is in attach female end of
Camera Hotshoe into male end of recently installed
Flash Bulkhead
• Once the Flash Bulkhead is installed onto your
Sport Housing, attach the female end of the Camera
Hotshoe into male end of the Flash Bulkhead, slide
Camera Hotshoe into camera body
• Unscrew cap from Lux Flash Bulkhead and Housing
Flash Bulkhead.
• Remove caps from both ends of sync cord
• Install one end of Sync cord into Lux Flash Bulkhead
Ensure it is correctly lined up by aligning electrical
pins
• Move Sync cord cap forward and screw in clockwise
until secure
• Attach other end of Sync cord into housing
Bulkhead following the previous steps.
• Install supplied Flash Bulkhead by pulling through
the hole where the previous Flash Bulkhead was
• Take Crescent wrench and grip flat side of Flash
Bulkhead and begin to spin clockwise. Make sure
O-Ring is not pinched
• To install LUX Flash Housing you will need to
have the Pro Mount installed. Please refer to the
corresponding manual for Pro Mount installation
• Push Quick Cam Mount through the slot on the Pro
Mount and securely screw into place
• **After installing the provided additional Flash
Bulkhead onto your Sport Housing, please make
certain it is installed correctly by doing a “dunk”
test (without your camera installed). If there is any
moisture or water present after the “dunk” test is
performed, please contact AquaTech via contact@
aquatech.net so we can assist you with the reinstall
3
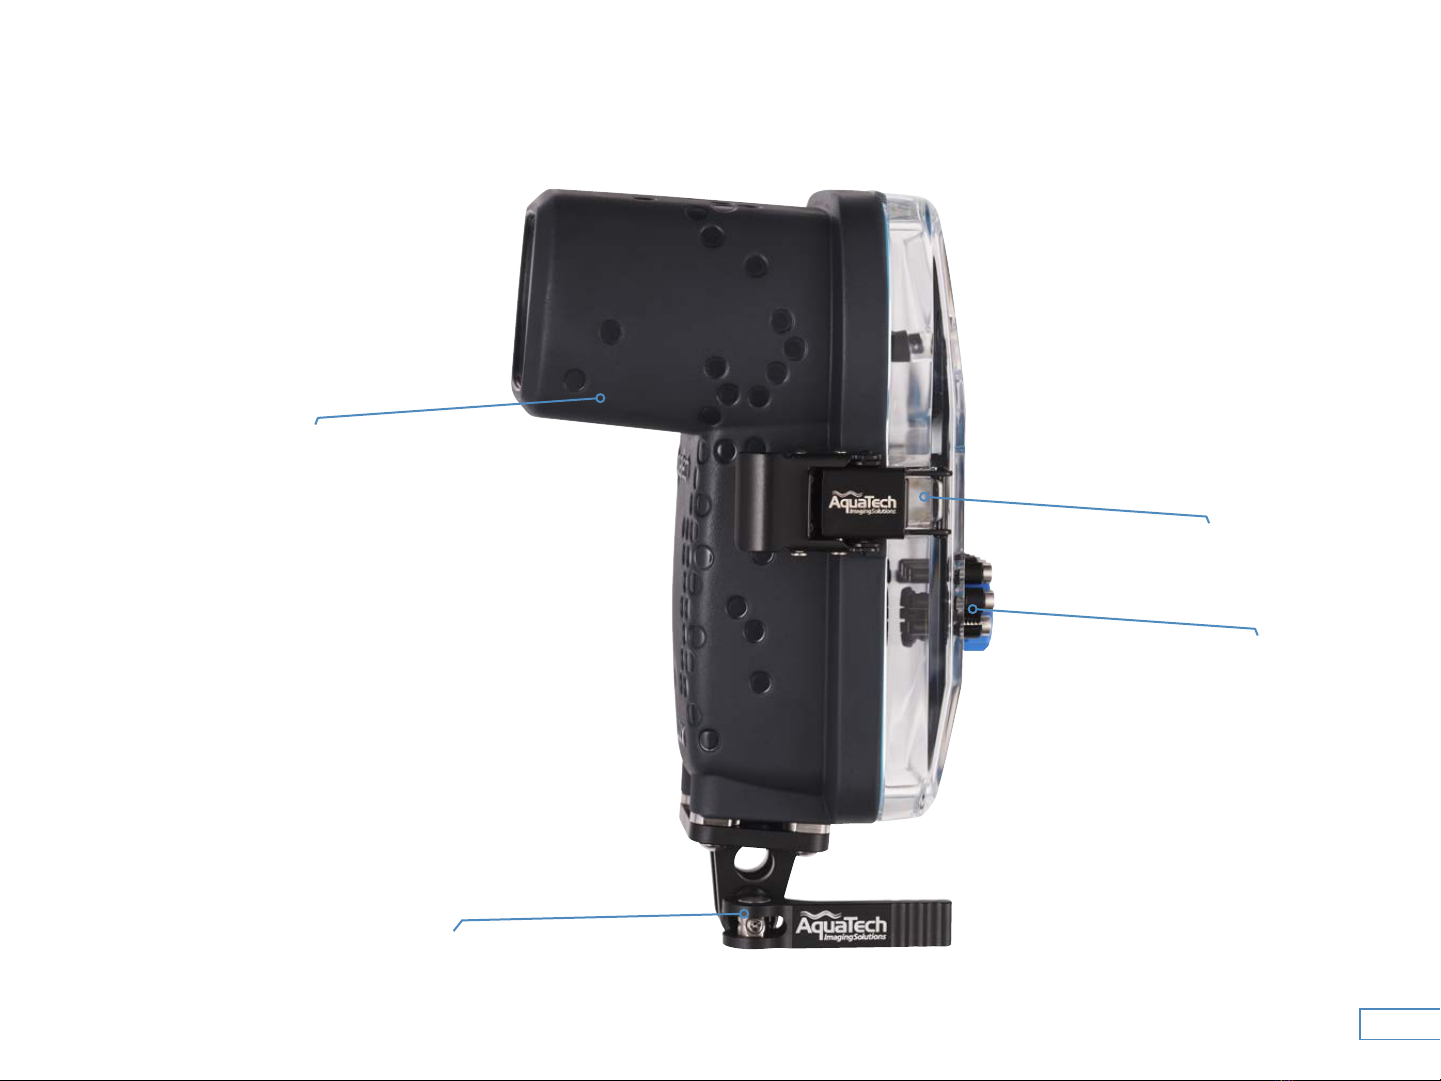
of the Sport Housing Flash Bulkhead. Note: when
not using your Lux Flash Housing, the supplied
Flash Bulkhead cap must be replaced. This Bulkhead
is a “dry connector’ and must never be exposed
to water. Either the Flash sync cable or the cap
must be on the Bulkhead at all times. This is very
important to recap the Bulkhead on your Sport
Housing if a Sync cable is not installed.
Using the LUX Flash Housing underwater
For best results please make sure you have carefully
followed all initial setup instructions prior to taking your
LUX Flash Housing underwater.
Safety information and warning
• Do not exceed depths of 10m/33ft.
• Do not leave your gear in temperatures greater than
50 C (125 F)
Maintenance and repair
With proper care your Flash Housing will last for many
years. If in time you do notice any problems that come
up or if there is any damage to the equipment please
contact AquaTech directly at service@aquatech.net for
repairs or servicing.
Limit of liability
In the event of a product warranty claim, AquaTech
is only liable up to the value originally paid for the
product.
Losses of associated equipment, income or any other
financial costs are not covered under this warranty,
under any circumstances.
4
Warranty - 1 year product warranty
We make every eort to ensure that our products
are made from the highest quality materials and
workmanship. Should you not be completely satisfied
with one of our products, we encourage you to contact
us so that we can promptly resolve any problem you
may be experiencing. Our company representatives will
deal with your issue quickly and decisively.
As many AquaTech products are often used in extreme
and volatile environments, we are unable to cover
for loss or damage of equipment, personal injury or
financial loss.
To reduce the risk of these losses occurring, we strongly
recommend you read the relevant product instructions
carefully and test the product before use.
What does the warranty cover?
This warranty covers any defects in materials or
workmanship, with exceptions stated below
What is not covered?
The warranty does not cover damage as the result
of normal wear and tear. Determination of what
constitutes normal wear and tear will be at the
discretion of AquaTech service centers. The warranty
guarantee only applies to the original purchaser of
the product when purchased from AquaTech direct or
through one of our authorized dealers. Therefore, we
may ask for proof of purchase. This warranty does not
cover for any loss of associated equipment such as
cameras, lenses or other associated equipment not sold
by AquaTech.
Loss of income, reputation or other financial expenses,
such as personal injury are also not covered by this
warranty. Shipping costs for returned products are the
responsibility of the customer.
How long does the coverage last?
This warranty runs for 1 year from the date your product
is received.
What will AquaTech do?
AquaTech will repair any defect that proves defective in
materials and workmanship. If repairing is not possible,
AquaTech will replace the product, or, oer a store credit
for the original purchase price, whichever is agreed to by
the customer and AquaTech / Retailer store.
How to get service?
Email contact@aquatech.net and we will advise where
to send your product. Alternatively, you may call:
USA: + 1 714 968 6946 Australia: + 61 2 4268 3550
Returns policy - AquaTech online customers only:
AquaTech oers a 14 day return policy for new items
purchased directly through our online store or at our
physical store. AquaTech will only provide exchanges or
store credit for change of mind or incorrectly ordered
products. AquaTech will not refund any shipping and
credit card costs. Please see our full return policy here.
The customer is responsible for shipping cost of the
returned items. A restocking charge may be applied in
some countries
5
How state law applies:
This warranty gives you specific legal rights, and you
may have other rights which vary according to the state
or country in which you are located.
Legals
Please practice extreme caution when diving into
deep water. Only use this product in settings that are
within yours or other’s capabilities. Serious injuries
or drowning could occur if you or others are not
competent for the prevailing conditions.
AquaTech (NSW) Pty. Ltd., incorporated in Australia.
Australian Business Number: 84 062 580 796

Other AQUATECH Camera Accessories manuals

AQUATECH Delphin User manual

AQUATECH

AQUATECH Delphin User manual

AQUATECH EDGE Pro Fuji X-T5 User manual

AQUATECH

AQUATECH EDGE Pro Fuji X-T5 User manual

AQUATECH Pocket Wizard User manual

AQUATECH

AQUATECH Pocket Wizard User manual

AQUATECH Sync Transmitter Housing User manual

AQUATECH

AQUATECH Sync Transmitter Housing User manual

AQUATECH EDGE User manual

AQUATECH

AQUATECH EDGE User manual

AQUATECH P Series User manual

AQUATECH

AQUATECH P Series User manual

AQUATECH P Series User manual

AQUATECH

AQUATECH P Series User manual

AQUATECH REFLEX User manual

AQUATECH

AQUATECH REFLEX User manual

AQUATECH Strike Flash User manual

AQUATECH

AQUATECH Strike Flash User manual

AQUATECH EDGE User manual

AQUATECH

AQUATECH EDGE User manual

AQUATECH Pro Mount Series User manual

AQUATECH

AQUATECH Pro Mount Series User manual

AQUATECH EVO III User manual

AQUATECH

AQUATECH EVO III User manual

AQUATECH Scout & Shadow User manual

AQUATECH

AQUATECH Scout & Shadow User manual

Popular Camera Accessories manuals by other brands

Vinten Vector 70 Maintenance manual

Vinten

Vinten Vector 70 Maintenance manual

BR Remote Micro L Head instructions

BR Remote

BR Remote Micro L Head instructions

Ikelite 6170.30 instruction manual

Ikelite

Ikelite 6170.30 instruction manual

SimpliPhi PHI 2.7 installation manual

SimpliPhi

SimpliPhi PHI 2.7 installation manual

Sony VF-R25NK operating instructions

Sony

Sony VF-R25NK operating instructions

INDELAC CONTROLS NEMA 4 Installation, operation & maintenance manual

INDELAC CONTROLS

INDELAC CONTROLS NEMA 4 Installation, operation & maintenance manual

Freefly MoVI M15 Troubleshooting

Freefly

Freefly MoVI M15 Troubleshooting

Digital Watchdog DWC-PMB-WLW quick start guide

Digital Watchdog

Digital Watchdog DWC-PMB-WLW quick start guide

Sony GP-AVT1 Good usage

Sony

Sony GP-AVT1 Good usage

Sena Bluetooth Pack user guide

Sena

Sena Bluetooth Pack user guide

Ikelite 6138 instruction manual

Ikelite

Ikelite 6138 instruction manual

Sony LA-EA2 operating instructions

Sony

Sony LA-EA2 operating instructions

Toshiba TLP848 product manual

Toshiba

Toshiba TLP848 product manual

Orion 5745 instruction manual

Orion

Orion 5745 instruction manual

Multiplex MULTIGYRO CSX 1-00092 installation instructions

Multiplex

Multiplex MULTIGYRO CSX 1-00092 installation instructions

Sunny INV 220V Series user manual

Sunny

Sunny INV 220V Series user manual

Philips SJB1142/37 datasheet

Philips

Philips SJB1142/37 datasheet

Lithionics Battery GT12V525A-F24 installation manual

Lithionics Battery

Lithionics Battery GT12V525A-F24 installation manual

manuals.online logo
manuals.online logoBrands
  • About & Mission
  • Contact us
  • Privacy Policy
  • Terms and Conditions

Copyright 2025 Manuals.Online. All Rights Reserved.