Aquatic AQ-DM-4U User manual

products with a watertight reputation
DIGITAL MEDIA LOCKER™
AQ-DM-4U
OWNERS MANUAL
PLEASE READ THIS INSTRUCTION MANUAL BEFORE INSTALLATION
AND OPERATION
DIGITAL MEDIA LOCKER™
for USB, iPod, iPhone & MP3 devices
AQ-DM-4U
DIR - REPEAT DIR + RANDOM

1. 12-pin Watertight Harness
The 12-pin harness supplies power and ground connections to the Digital Media Locker
and four (4) speaker channel output connections from the Digital Media Locker.
GETTING STARTED
2
www.aquaticav.com
AQ-DM-4U
•AQ-DM-4U Digital Media Locker™
•2-Way RF Wireless Remote Control (AQ-RFDM-4)
•USB to 30-pin iPod™ Cable
•3.5mm to 3.5mm Jack Cable
•Wiring Harness (AQ-UNH-2)
•Six (6) Stainless Steel Mounting Screws
•One (1) CR-2430 Battery
•Mounting Template
•Owners Manual
2. FM Radio Antenna Jack
Connect antenna (AQ-ANT-1 sold separetely) to female antenna receptacle. For best
FM performance make sure the antenna is extended to the highest achievable position.
3. Auxiliary Outputs
Allows external ampliers to be connected to power additional speakers.
4. 12V DC External Trigger
Allows for an external light or relay to be triggered (350mA max load).
CONTENTS
INSTALLATION
Do not cut or modify the 12-pin harness on the Locker side or warranty will be void.
1
2
3
4
FM Radio Antenna Jack
12-pin Watertight Harness
RCAAuxiliary Output
External 12V DC Trigger

GETTING STARTED
3
www.aquaticav.com
The AQ-DM-4U includes the universal harnessAQ-UNH-2 in order to connect the dock
to power and speakers.
All open wire connections should be soldered and protected against water and dust for
best long term performance.
1. Mounting templates are included. Aquatic
AV recommends using the ‘measure twice, cut
once’ method.
2. Once the mounting hole is complete, make
sure the outside surface is clean and clear
of debris. The Digital Media Locker has an
external water/dust proof gasket, but this
requires a clean surface for best performance.
3. The Digital Media Locker has six (6) front
screws. Drive the screws using a screw driver.
During nal mounting apply equal pressure
to all points for the best water/dust outer seal
performance.
4. Review all outside surfaces of the Digital
Media Locker to ensure proper water/dust seal.
This is important for long term environmental
protection performance for your digital media
device.
12-PIN HARNESS CONNECTION
MOUNTING THE UNIT
180mm
151mm
82mm140mm
58mm
91mm
2 Ohm
No lower than a 2 Ohm load should be used
or damage may occur to the Digital Media
Locker.
Make sure the polarity of speakers are
connected correctly.
2 Ohm
2 Ohm
2 Ohm
(White/strip)
AQ-DM-4U

GETTING STARTED
4
www.aquaticav.com
Remove the RF Wireless Remote control from the Digital Media Locker. Unscrew the
waterproof cap on the back of the remote control. Place the CR-2430 battery in the RF
Remote control and replace the water/dust proof cap.
REMOTE BATTERY INSTALL
POWER ON
REMOTE SYNCHRONIZING
If the pairing process is not effective, switch the locker off using the on/off button located
inside the door of the dock. Unplug the 12-pin Harness on the back of the Locker for 3
minutes. Reattach the Harness and repeat steps 1-6 above.
For any additional remote controls, you will also need to activate/synchronize those
remote controls by following the steps above.
If you loose your remote control and buy another new remote control, please follow the
above to start pairing before normal usage.
1. Turn the docking station OFF with the on/off button inside the door (the red LED
should not be illuminated when power is OFF).
2. Press the red (POWER) button on the remote.
3. Press and hold the (MODE) button until the LCD reads PAIR.
4. Continue to press the MODE button during step 5 below.
5. Turn the docking station ON (within 10 seconds) with the on/off button inside door
(the red LED will illuminate when power is ON).
6. The remote’s LCD should read WELCOME or show a mode position such as
RADIO, IPOD, or AUX IN.
Press the on/off button. ON will be indicated by a red LED.
For applications that require zero current draw, and where battery drain may occur, the
power button must be turned OFF. When the power button is in the OFF position the
red LED will not be lit.
For applications where a 12V battery is not used, such as in a Spa, the power button
can be left ON and the remote control can then be used to power on/off accordingly.
If the LCD displays “NO LINK” in either mode, this means the remote is out of reception
range. Move the remote closer to the Locker and try again.
AQ-DM-4U

LOCATION OF CONTROLS
5
www.aquaticav.com
1. Digital Media Locker Open/Close Latch & Protective Door
2. Power ON/OFF Button
3. Water/Dust Protection Inner Gasket
4. 3.5mm Aux Input for MP3 Devices
5. Power ON/OFF LED
6. Security Strap for digital media devices
7. USB Connector
8. Door Control Keypad
DIGITAL MEDIA LOCKER
The keypad on the door has a set of keys fewer than those on the remote but has exactly
the same functions correspondingly. This keypad allows you to operate the dock even under
no remote condition.
DOOR CONTROL KEYPAD
Buttons Music Mode FM Radio Mode
Power Press once: Toggle from Operation mode to Standby mode or vice-versa.
Mode Press once: Change the source.
Press and hold: Pair Press once: Change the source.
Press and hold: Pair
Volume
Up Press once: Volume up
Press and hold: Fast volume up Press once: Volume up
Press and hold: Fast volume up
Volume
Down Press once: Volume down
Press and hold: Fast volume down Press once: Volume down
Press and hold: Fast volume down
Play /
Pause Press once: Play/Pause
Press and hold: Play/Pause Press once: Toggle mute
Press and hold: Toggle mute
Fast
Rewind Press once: Previous track
Press and hold: Fast rewind Press once: Seek down
Press and hold: Toggle manual scanning
Fast
Forward Press once: Next track
Press and hold: Fast forward Press once: Seek up
Press and hold: Toggle to manual scanning
<<
<<
AQ-DM-4U

LOCATION OF CONTROLS
6
www.aquaticav.com
If your music player is connected via the Auxiliary input you will not be able to control track
or recieve track information.
REMOTE CONTROL
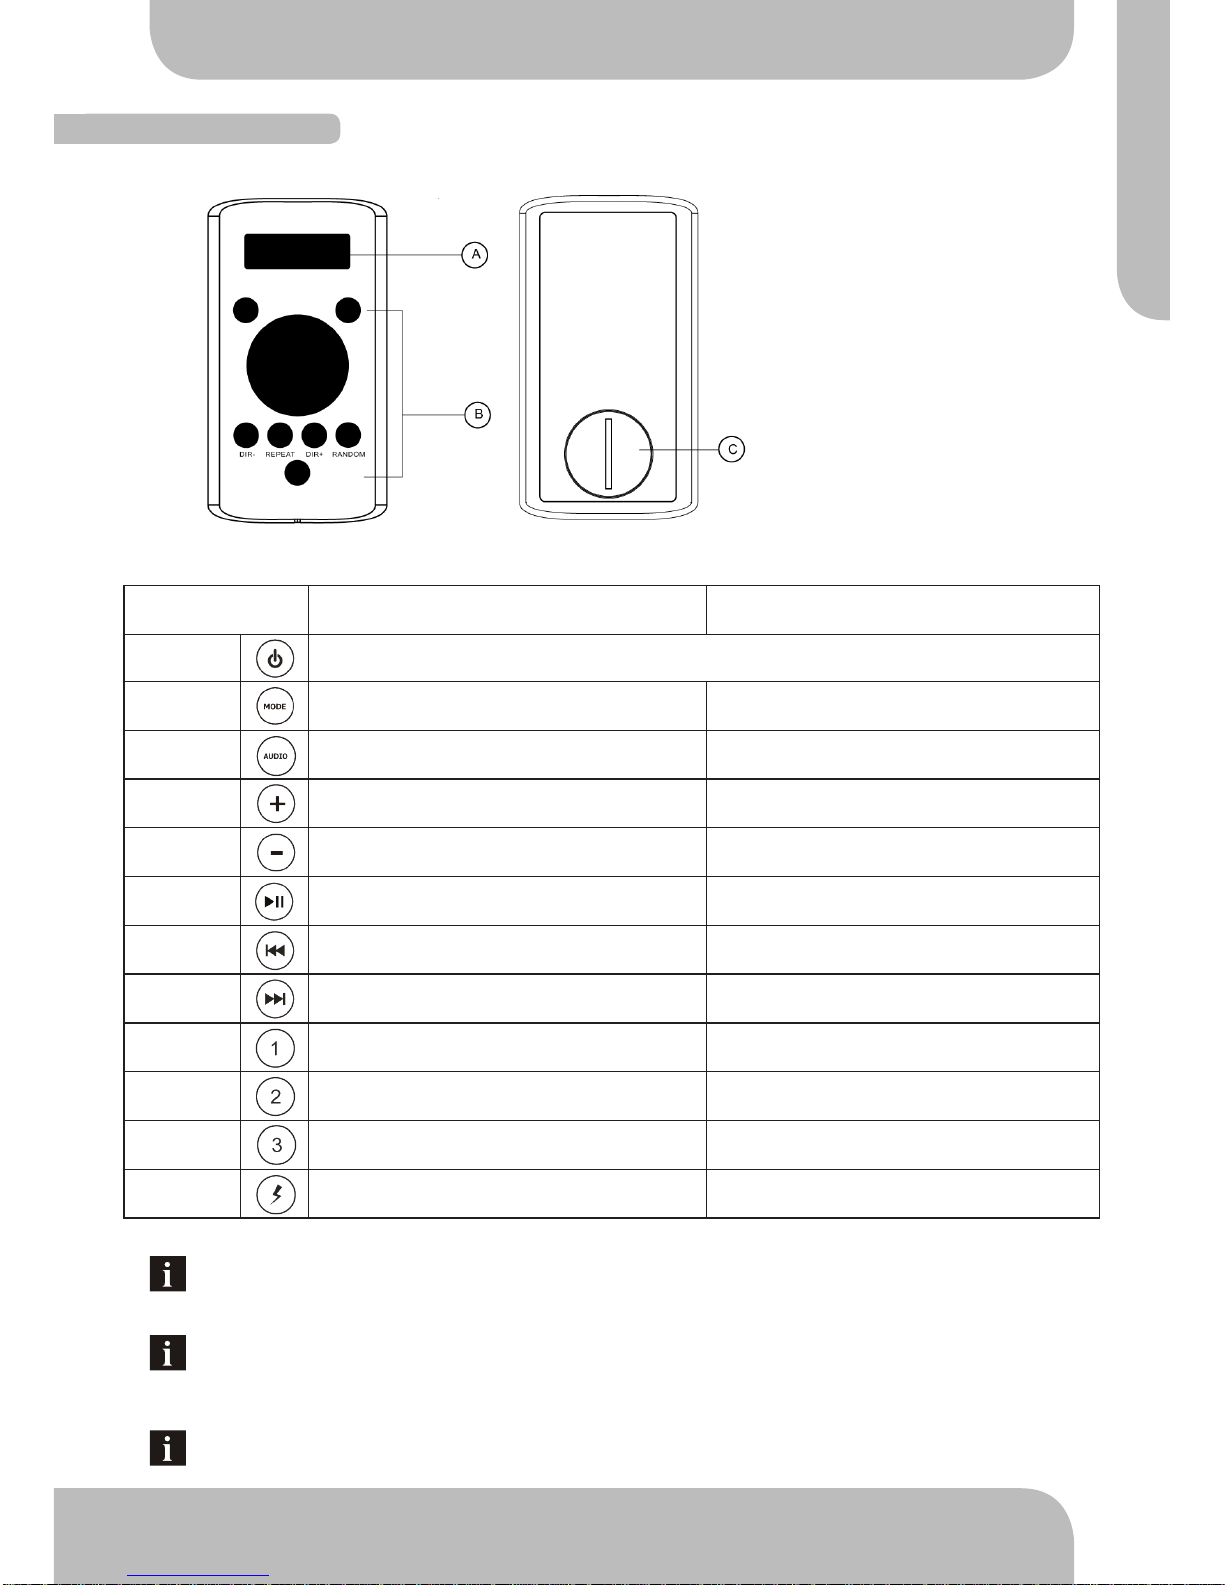
A. Remote Control LCD
B. Remote Control Keypad
C. Battery Door
Turn off DSP to access control of Bass and Treble
In order to prolong remote battery life the LCD will shut off in 20 seconds if no other button
is pressed. To turn remote back on press any key once and then press the command
desired.
Buttons Music Mode FM Radio Mode
Power Press once: Toggle from Operation mode to Standby mode or vice-versa.
Mode Press once: Change the source.
Press and hold: Pair Press once: Change the source.
Press and hold: Pair
Audio Press once: Enter BAS-TRE-BAL-FAD-DX-MONO-STEREO
Press and hold: Toggle USAto Euro tuning Press once: Enter BAS-TRE-BAL-FAD-DX-MONO-STEREO
Press and hold: Toggle USAto Euro tuning
Volume
Up Press once: Volume up
Press and hold: Fast volume up Press once: Volume up
Press and hold: Fast volume up
Volume
Down Press once: Volume down
Press and hold: Fast volume down Press once: Volume down
Press and hold: Fast volume down
Play /
Pause Press once: Play/Pause
Press and hold: Play/Pause Press once: Toggle mute
Press and hold: Toggle mute
Fast
Rewind Press once: Previous track
Press and hold: Fast rewind Press once: Seek down
Press and hold: Toggle manual scanning
Fast
Forward Press once: Next track
Press and hold: Fast forward Press once: Seek up
Press and hold: Toggle to manual scanning
1 / DIR - Press once: Back to previous folder
Press and hold: Back to previous folder Press once: Listen to FM preset station 1
Press and hold: Set preset FM station 1
2 / Repeat Press once: Repeat function
Press and hold: Repeat function Press once: Listen to FM preset station 2
Press and hold: Set preset FM station 2
3 / DIR + Press once: Foward to next folder
Press and hold: Foward to next folder Press once: Listen to FM preset station 3
Press and hold: Set preset FM station 3
12V Trigger /
Random Press once: Random playback function
Press and hold: Toggle external 12V power on/off Press once: No function
Press and hold: Toggle external 12V power on/off
AQ-DM-4U

LISTENING TO PLAYERS
7
www.aquaticav.com
1. Power up the Digital Media Locker
2. Attach your device to the USB cable inside the Digital Media Locker using the
appropriate USB adaptor.
3. Secure the device with the anchor straps provided.
4. Secure the Digital Media Locker’s protective door.
5. Press (POWER) on the remote control or Power button on the locker to turn it
ON.
6. Press (Mode) on the remote control to select USB mode. Use the buttons as
shown in the remote function chart.
LISTENING VIA USB
1. Power up the Digital Media Locker.
2. Attach your MP3 device to the 3.5mm connector.
3. Secure the device with the anchor straps provided.
4. Secure the Digital Media Locker’s protective door.
5. Press (Mode) on the remote control to select ‘AUX IN’ mode.
1. Press (VOLUME UP) once to increase the volume by 3 decibels.
2. Press (VOLUME DOWN) once to reduce the volume by 3 decibels.
3. Press and hold either or and the Digital Media Locker will increase or
decrease audio volume continuously.
LISTENING VIA 3.5MM JACK
ADJUST VOLUME LEVEL
Always ensure to connect and disconnect your media player with dry hands!
AQ-DM-4U

LISTENING TO FM RADIO
8
www.aquaticav.com
1. Press (MODE) on remote control to switch to FM radio mode.
ENTER FM RADIO MODE
If this is the first time you listen to FM radio, the default frequency will be 87.5MHz, as shown
on the remote LCD.
FM radio is only available when you are in the FM Radio mode.
1. Press (FAST REWIND) or (FAST FORWARD) to seek another station.
2. Press and hold either (FAST REWIND) or (FAST FORWARD) for manual
tuning back or forward.
TO SCAN OR NAVIGATE CHANNELS
SAVING RADIO CHANNEL TO MEMORY
1. If you want to save the current frequency into memory, press and hold , or
for more than 2 seconds. The station will be stored the to relevant button.
LISTENING TO SAVED RADIO MEMORY
1. Press the , or button once to listen to the station stored in button.
1. Make sure dock and remote are turned on and in ‘RADIO’ mode.
2. Hold down the (AUDIO) button for 3-5 seconds.
3. The remote will display ‘AREAUSA’ or ‘AREA EUR’ depending on which tuning
mode is currently selected.
4. Use the & buttons to switch between US or European modes.
5. Press (PLAY/PAUSE) to select the desired tuning mode.
6. Once you switch modes it will default to the FM station stored in ‘PRESET 1’.
US mode will increase and decrease the FM frequency in steps of 0.1 MHz, e.g. 88.5, 88.6,
88.7 MHz. EUR mode will increase and decrease the FM frequency in steps of 0.05 MHz,
e.g. 88.25, 88.30, 88.35 MHz.
SWITCH BETWEEN US & EURO FM MODES
AQ-DM-4U

OTHER FEATURES
9
www.aquaticav.com
Aquatic AV understands the need for more exible remote applications. With the Digital
Media Locker Aquatic AV has provided an independent 12V ‘accessory’ trigger, acti-
vated from the RF wireless remote. This could activate any 12V based device like 12V
lights or surveillance camera.
1. In any operational mode, press the (12V TRIGGER) key to activate. Press again
to deactivate.
2. We strongly recommend you speak to our technical service staff or your dealer if you
are considering using this feature.
EXTERNAL TRIGGER
DEVICE CHARGING
REMOTE CONTROL LCD AUTO OFF
When specied USB devices are connected to the USB connector the device battery
will charge.
To maximize battery life of the Remote Control, the LCD will be OFF if no key is
pressed for 20 seconds. To re-activate the LCD display, press any key once to bring
the remote control to normal operation.
Load on External Trigger should not exceed 350mA.
AQ-DM-4U

SPECIFICATIONS
10
www.aquaticav.com
TECHNICAL SPECIFICATIONS
Media
Supported media.......................................
Devicecharging.........................................
Devicecontrol............................................
Inputs
USB/iPod/iPhone.......................................
MP3...........................................................
Auxiliary.....................................................
Outputs
Pre-Out......................................................
FM Radio
FM pre-sets...............................................
US/Euro frequencies.................................
Power
Output voltage @ 2 Ohm..........................
Output voltage @ 4 Ohm..........................
Operation voltage......................................
Max current draw......................................
Standby current draw................................
Multi-environment Certifications
Waterproof / Dustproof..............................
Conformal PCB coating.............................
UVprotection.............................................
Salt/Fog protection....................................
Stainless Steel mountings.........................
USB/iPod/iPhone/MP3/FM
via USB
via Door Controls & RF Remote Control
USB 2.0
3.5mm Stereo Jack Socket
1x Stereo pair RCA
1x Stereo pair RCA (4V)
3
Yes
4x 72W
4x 45W
10.7V - 15.6V DC
7A
4mA
Yes (IP65 Digital Media Locker™)
Yes (IP66 Remote Control)
Yes
500 hours stable, ASTM D4329 compliant
500 hours stable, ASTM B117 compliant
Yes
180mm
151mm
82mm140mm
58mm
91mm
AQ-DM-4U
DIMENSIONS

WARRANTY INFORMATION
11
www.aquaticav.com
Aquatic AV offers a limited warranty of our products on the following terms:
Length of warranty
2 years on audio systems, electronics, speakers, and accessories (receipt required).
Coverage
This warranty covers only the original purchaser of a Aquatic AV product purchased from an authorized Aquatic AV dealer
in the United States. In order to receive service, the purchaser must provide Aquatic AV with a copy of the receipt stating
the customer name, dealer name, product purchased and date of purchase.
Defective products
Products found to be defective during the warranty period will be repaired or replaced (with a product deemed to be
equivalent) at Aquatic AV’s discretion.
What is not covered
Damage caused by accident, abuse, improper operations, water, theft. Any cost or expense related to the removal or
reinstallation of product. Service performed by anyone other than an authorized Aquatic AV service center. Any product
with the serial number or tamper labels defaced, altered, or removed. Subsequent damage to other components. Any
product not purchased from an authorized Aquatic AV dealer.
Limit on implied warranties
Any implied warranties including warranties of tness for use and merchantability are limited in duration to the period of
the express warranty set forth above. Some states do not allow limitations on the length of an implied warranty, so this
limitation may not apply. No person is authorized to assume for hawg wired any other liability in connection with the sale
of the product.
How to obtain service
You must obtain a return material authorization number (RMA) to return any product to Aquatic AV. You are responsible
for shipping charges of returned products to Aquatic AV.
FCC STATEMENT:
FCC ID:
MADE IN CHINA
This device complies with Part 15 of the FCC Rules. Operation is subject to the following two conditions: (1) this device may not cause harmful
interference, and (2) this device must accept any interference received, including interference that may cause undesired operation.
NOTE:
The equipment has been tested and found to comply with the limits for a Class B digital device, pursuant to Part 15 of the FCC Rules. These
limits are designed to provide reasonable protection against harmful interference in a residential installation. This equipment generates, uses
and can radiate radio frequency energy and, if not installed and used in accordance with the instructions, may cause harmful interference to
radio communications. However, there is no guarantee that interference will not occur in a particular installation.
If this equipment does cause harmful interference to radio or television reception, which can be determined by turning the equipment off and
on, the user is encouraged to try to correct the interference by one or more of the following measures:
• Reorient or relocate the receiving antenna.
• Increase the separation between the equipment and receiver.
• Consult the dealer or an experienced radio/TV technician for help.
The manufacturer is not responsible for any radio or TV interference caused by unauthorized modications to this equipment. Such
modications could void the user authority to operate the equipment.
Specications are subject to change. All rights reserved. Made in China.
Digital Media Locker is a trademark of Aquatic AV.
iPod and iPhone are trademarks of Apple Inc.
Doc V1.1
Please record the model and serial number[s] of your equipment in the space provided below as your
permanent record and will assist us with your factory warranty coverage. These numbers can be found on the
rear of the Digital Media Locker.
Model number[s]: Serial number[s]:

E-mail: info@aquaticav.com
US & Canada: 1 877 579 2782
International: +1 408 559 1668
Fax: +1 408 559 0125
www.aquaticav.com
Aquatic AV
282 Kinney Drive
San Jose, CA 95112, USA
products with a watertight reputation
Table of contents
Other Aquatic Remote Control manuals