Aqueon ProFlex Service manual

ProFlex
Sump Filtration
Installation Instruction Manual
Filtrado para depósito
de decantación
ProFlex
Instalación
Manual de instrucciones
Filtration de puisard
ProFlex
Installation
Manuel d’instructions
Central Aquatics™
5401 West Oakwood Park Drive
Franklin, WI 53132 September ‘09
2
IMPORTANT SAFETY INSTRUCTIONS
WARNING - To guard against injury, basic safety precautions should be observed
including the following:
1. READ AND FOLLOW ALL SAFETY INSTRUCTIONS FOR THE PROFLEX SUMP
AS WELL AS ANY DEVICES USED IN CONJUNCTION WITH THE PROFLEX SUMP.
2. DANGER – To avoid possible electric shock, special care should be taken since water is
employed in the use of aquarium equipment. For each of the following situations, do not
attempt repairs by yourself; return the appliance to an authorized service facility for service
or discard the appliance.
a. If the appliance shows any signs of abnormal water leakage, immediately unplug it from
the power source.
b.
Carefully examine the appliance after installation. It should not be plugged in if
there
is water on parts not intended to be wet.
c. Do not operate any appliance if it has a damaged cord or plug, or if it is malfunctioning
or has been dropped or damaged in any manner.
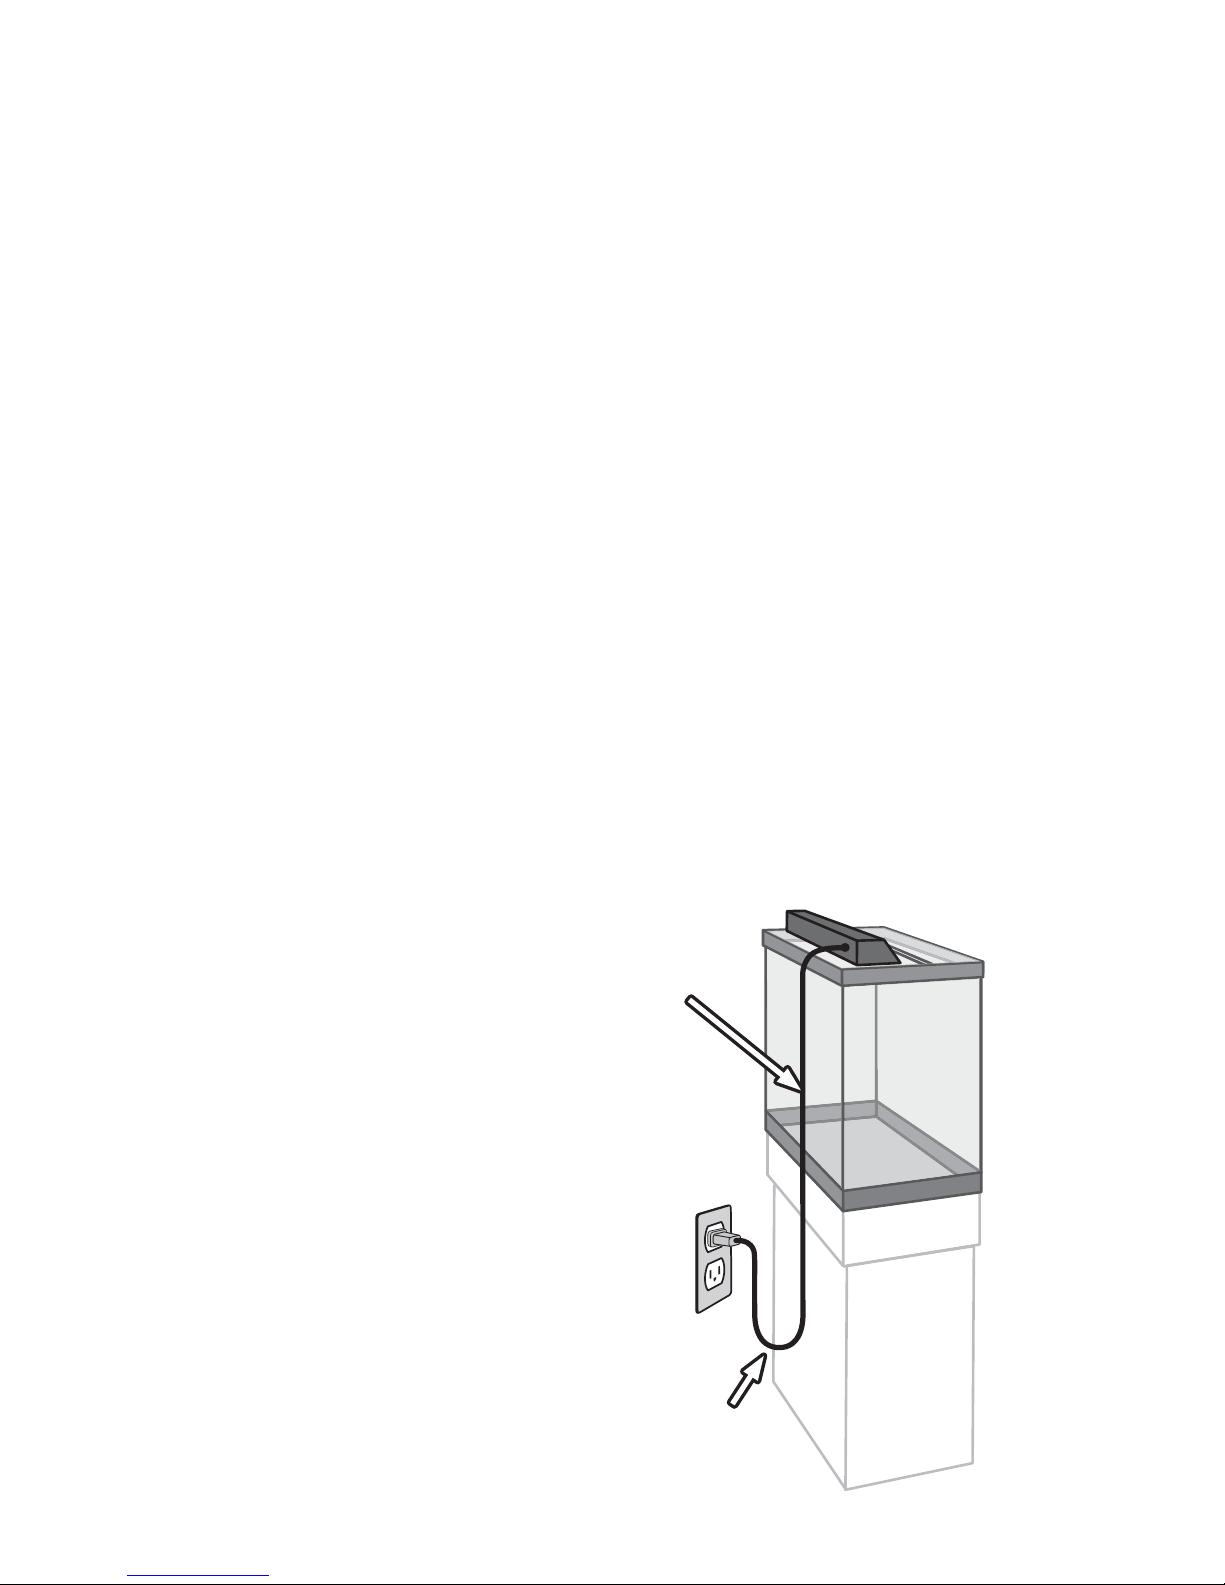
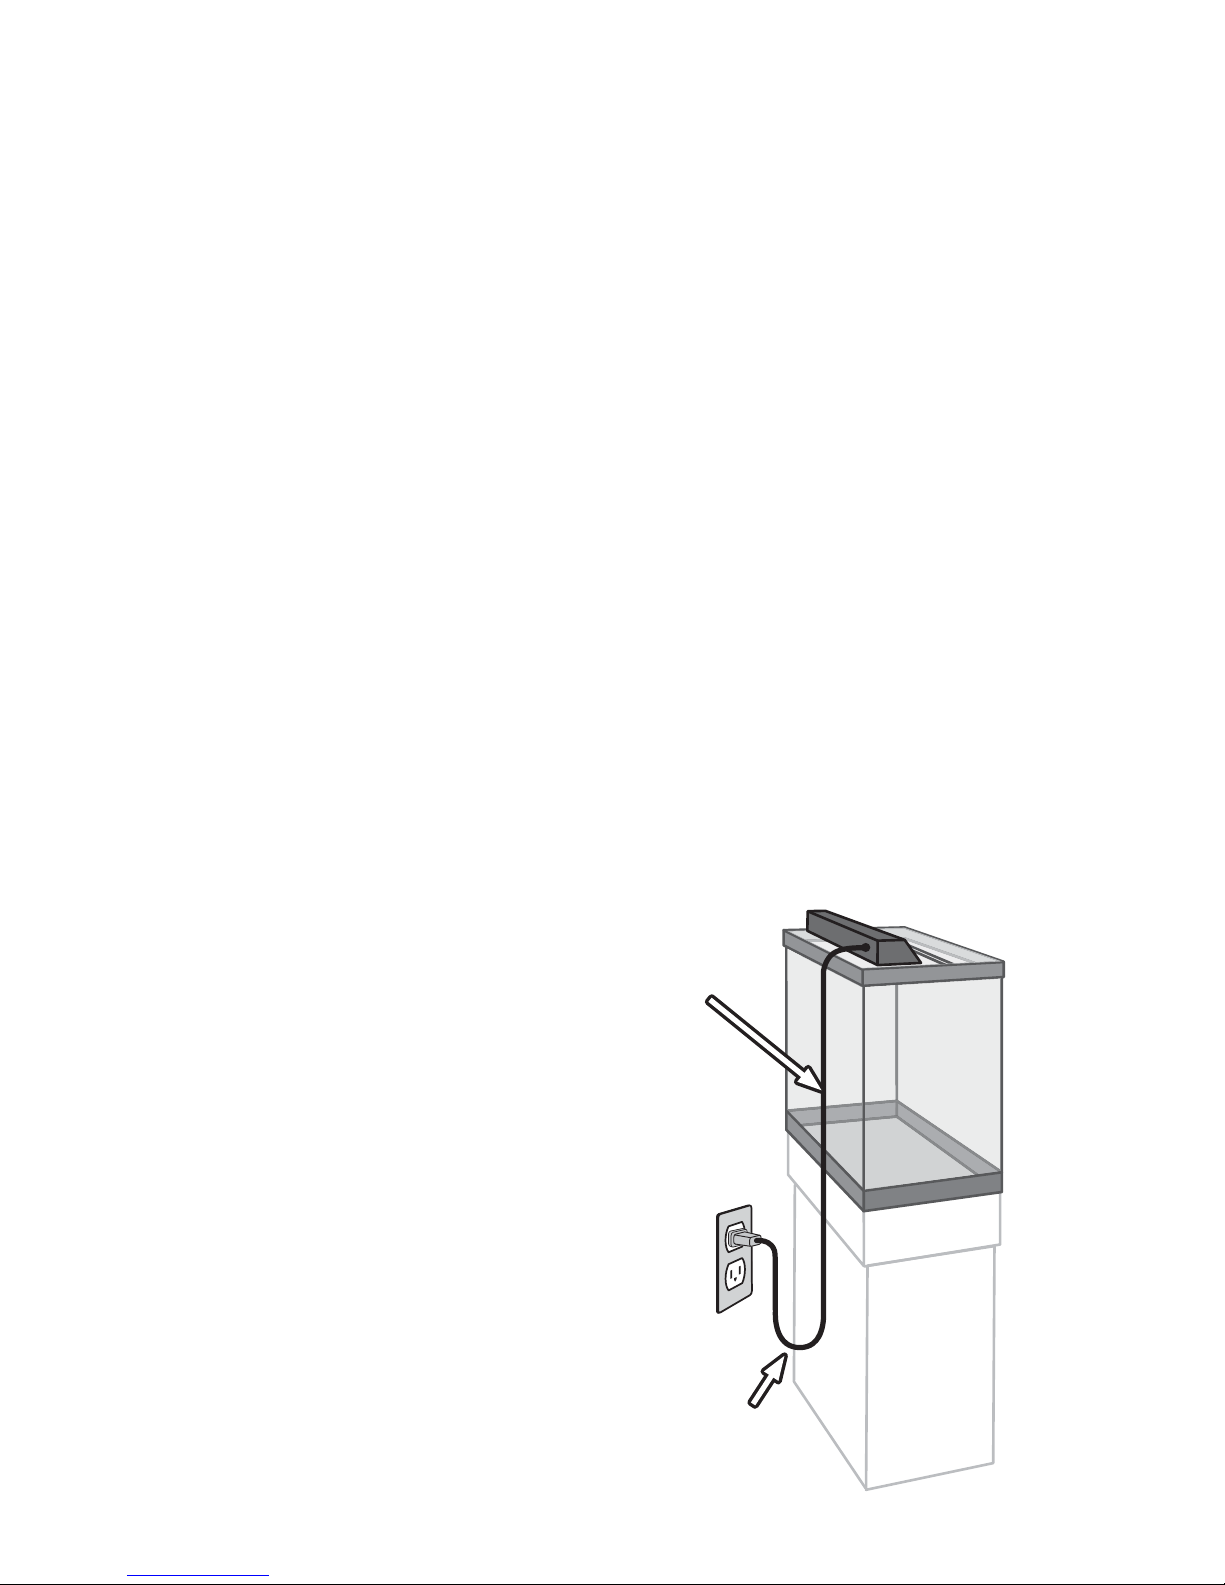
d. To avoid the possibility of the pump plug or receptacle getting wet, position aquarium stand
and tank to one side of a wall mounted receptacle to prevent water from dripping onto the
receptacle or plug.A “drip loop” shown in the figure below, should be arranged by the user
for each cord connecting an aquarium appliance to a receptacle. The “drip loop” is that part
of the cord below the level of the receptacle, or the connector if an extension cord is used,
to prevent water from traveling along the cord and coming in contact with the receptacle.
If the plug or receptacle does get wet, DO NOT unplug the cord. Disconnect the fuse or
circuit breaker that supplies power to the appliance. Then, unplug and examine for presence
of water in the receptacle.
3. Close supervision is necessary when any
appliance is used by or near children.
4. To avoid injury, do not contact moving parts or
hot parts such as heaters, reflectors, lamp bulbs,
and the like.
5. Always unplug an appliance from an outlet
when not in use, before putting on or taking off
parts, and before cleaning. Never yank cord to
pull plug from outlet. Grasp the plug and pull to
disconnect.
6. Do not use an appliance for other than intended
use. The use of attachments not recommended
or sold by the appliance manufacturer may
cause an unsafe condition.
7. Do not install or store the appliance where it will
be exposed to the weather or to temperatures
below freezing.
8. Make sure an appliance mounted on a tank is
securely installed before operating it.
POWER
SUPPLY
CORD
DRIP LOOP
AQUARIUM
TANK
3
9. Read and observe all the important notices on the appliance.
10. If an extension cord is necessary, a cord with a proper rating should be used. A cord rated for
less amperes or watts than the appliance may overheat. Care should be taken to arrange the
cord so that it will not be tripped over or pulled.
11. SAVE THESE INSTRUCTIONS.
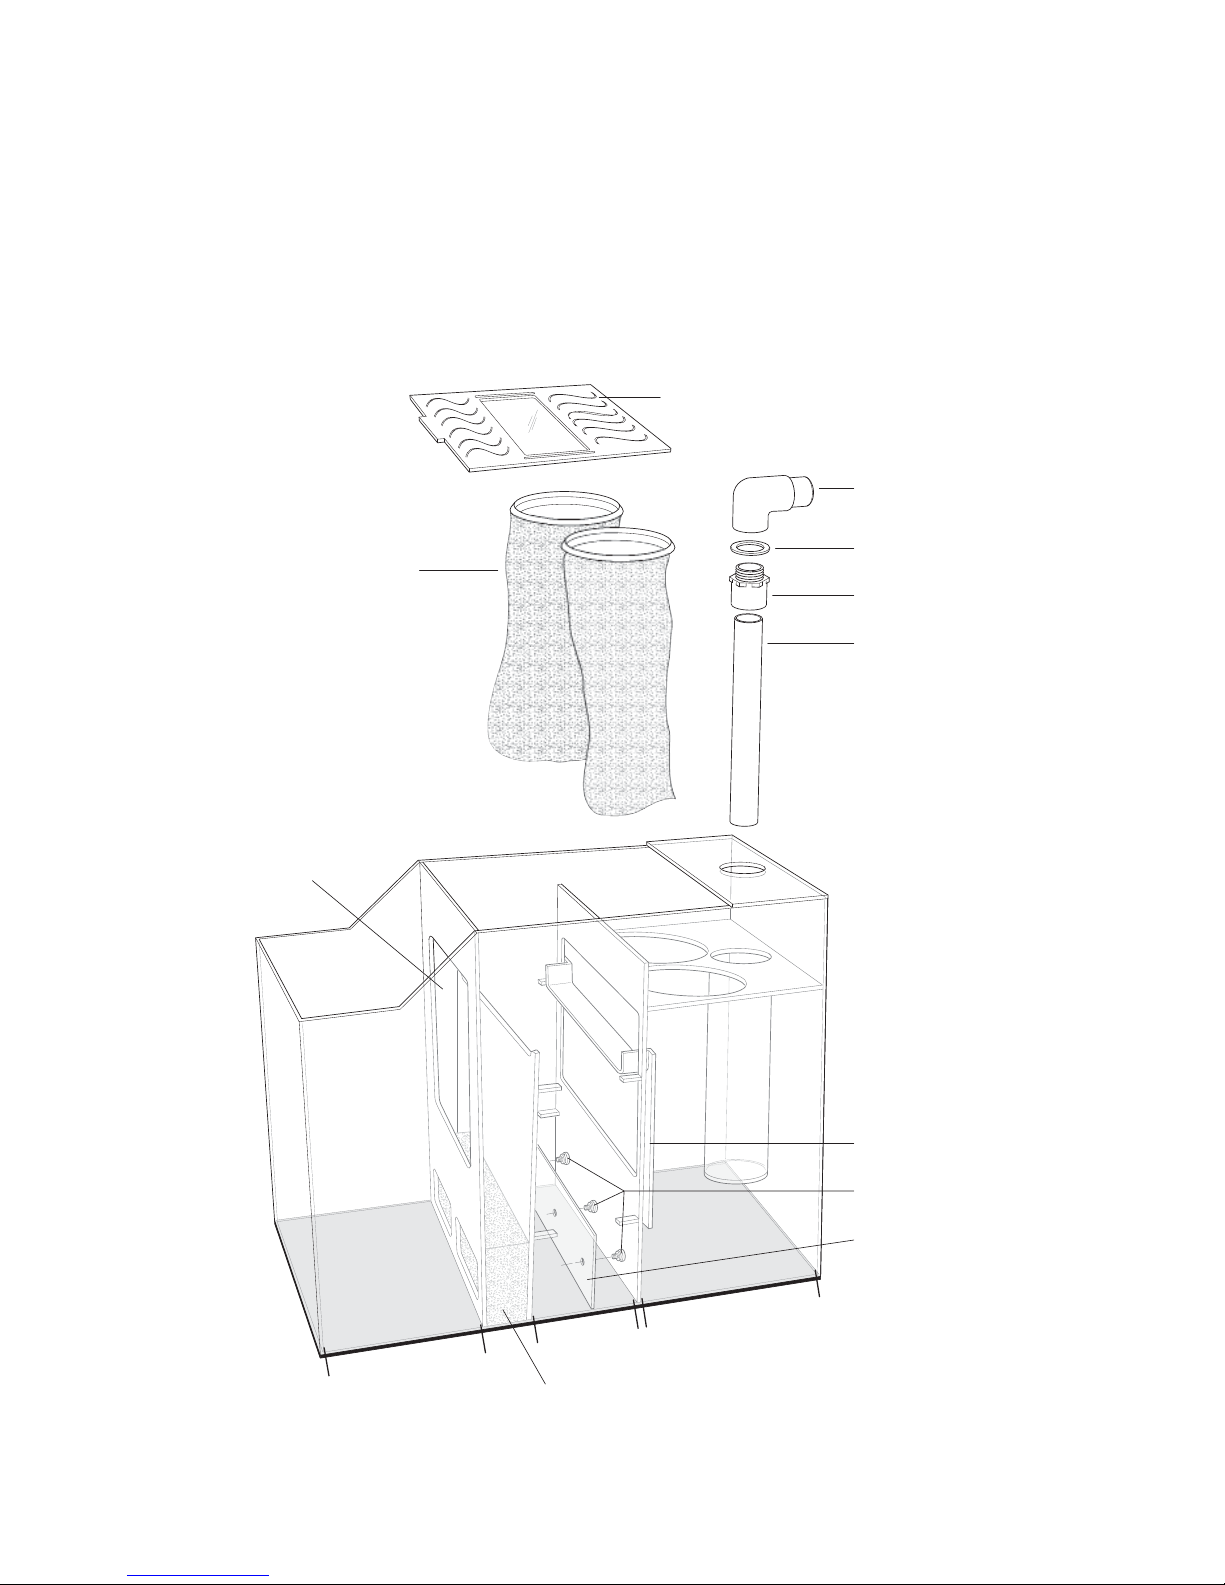
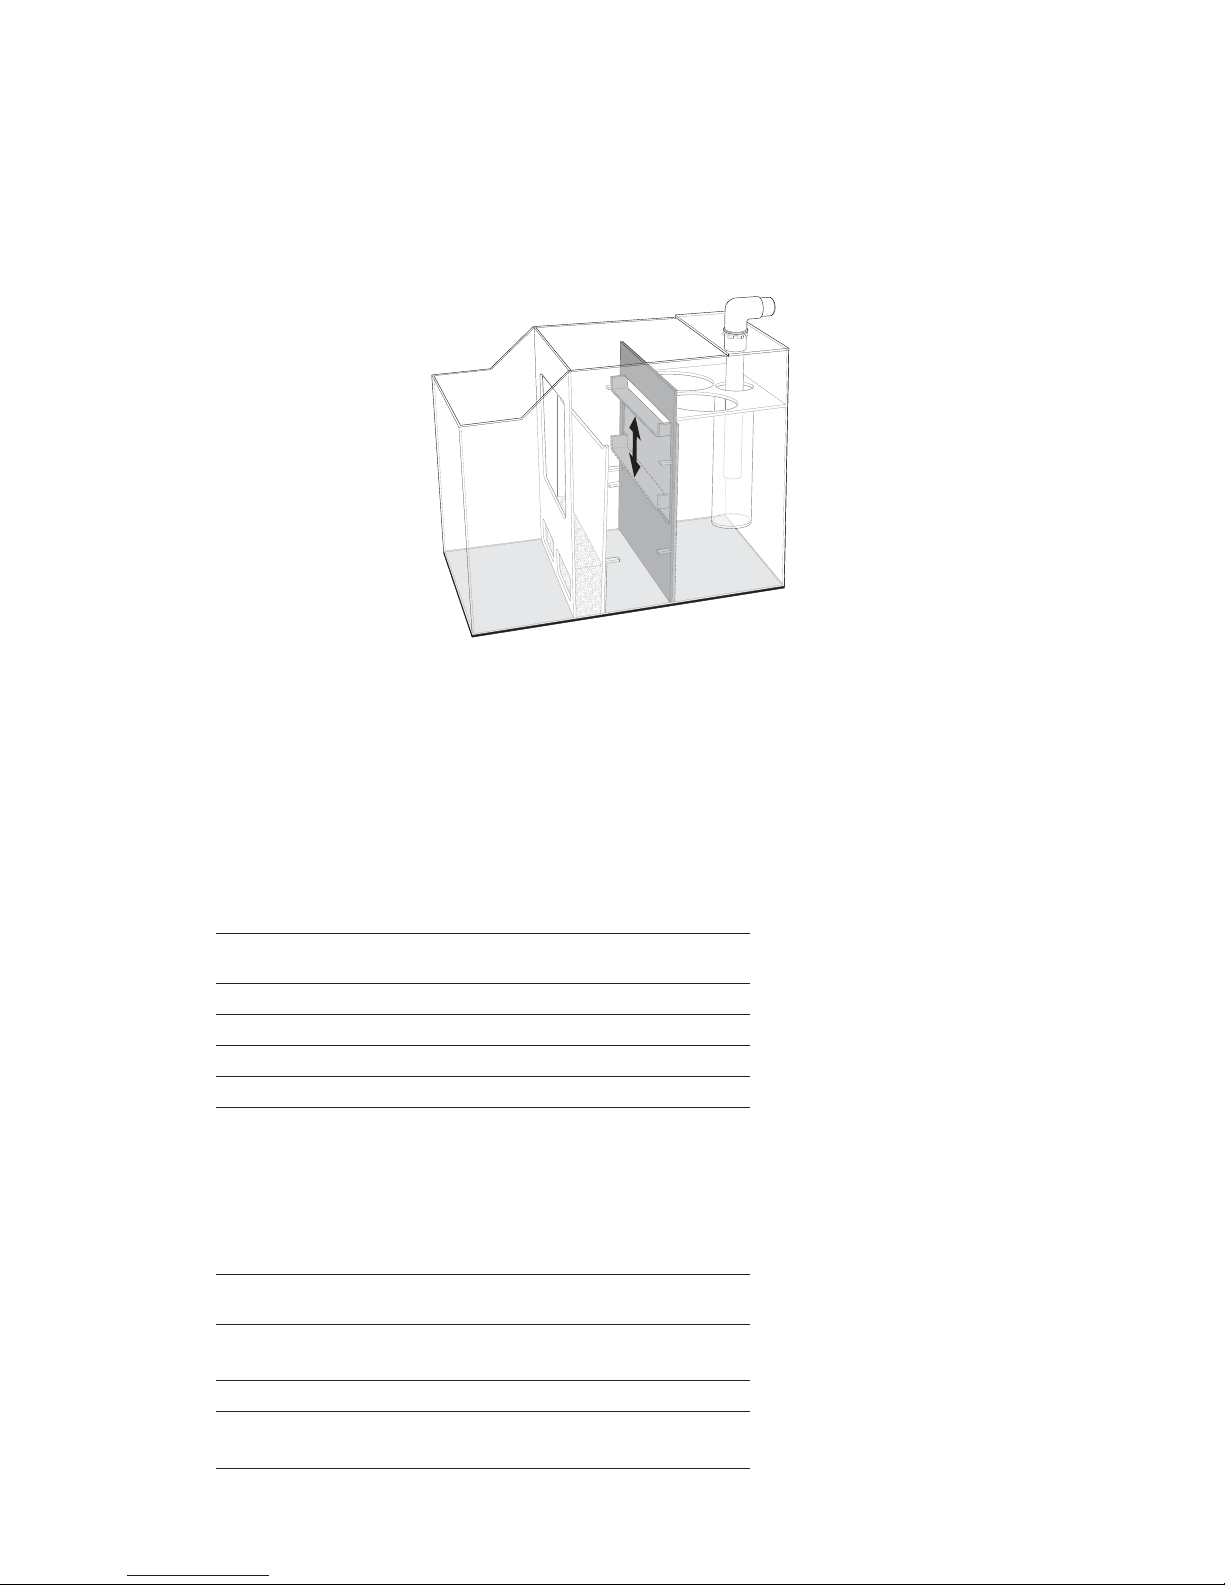
FILTER LID
FILTER BAGS
SKIMMER
DISCHARGE OPENING
INLET ELBOW
INLET GASKET
INLET PIPE
SUMP
BLOCK
WATER
RETAINING WALL
WATER RETAINING
WALL SCREWS
ADJUSTABLE
WALL
INLET ADAPTER
CHAMBER 3 CHAMBER 2 CHAMBER 1

4
Installation Instructions
“Berlin” Method
The “Berlin” Method is based on the use of the sump as a platform for a larger and more efficient
protein skimmer and the lack of any additional biological filtration other than that provided by the
live rock in the aquarium.
1. Unpack sump from protective cardboard wrapper.
2. Remove inlet fittings from inside filter sock.
3. Slide male pipe thread adapter on top of drain pipe positioned within bubble chamber.
4. Slide male pipe thread adapter up through drain hole(s) in lid of filter and screw female pipe
thread elbow onto adapter. Gasket should be on the top side of the filter lid.
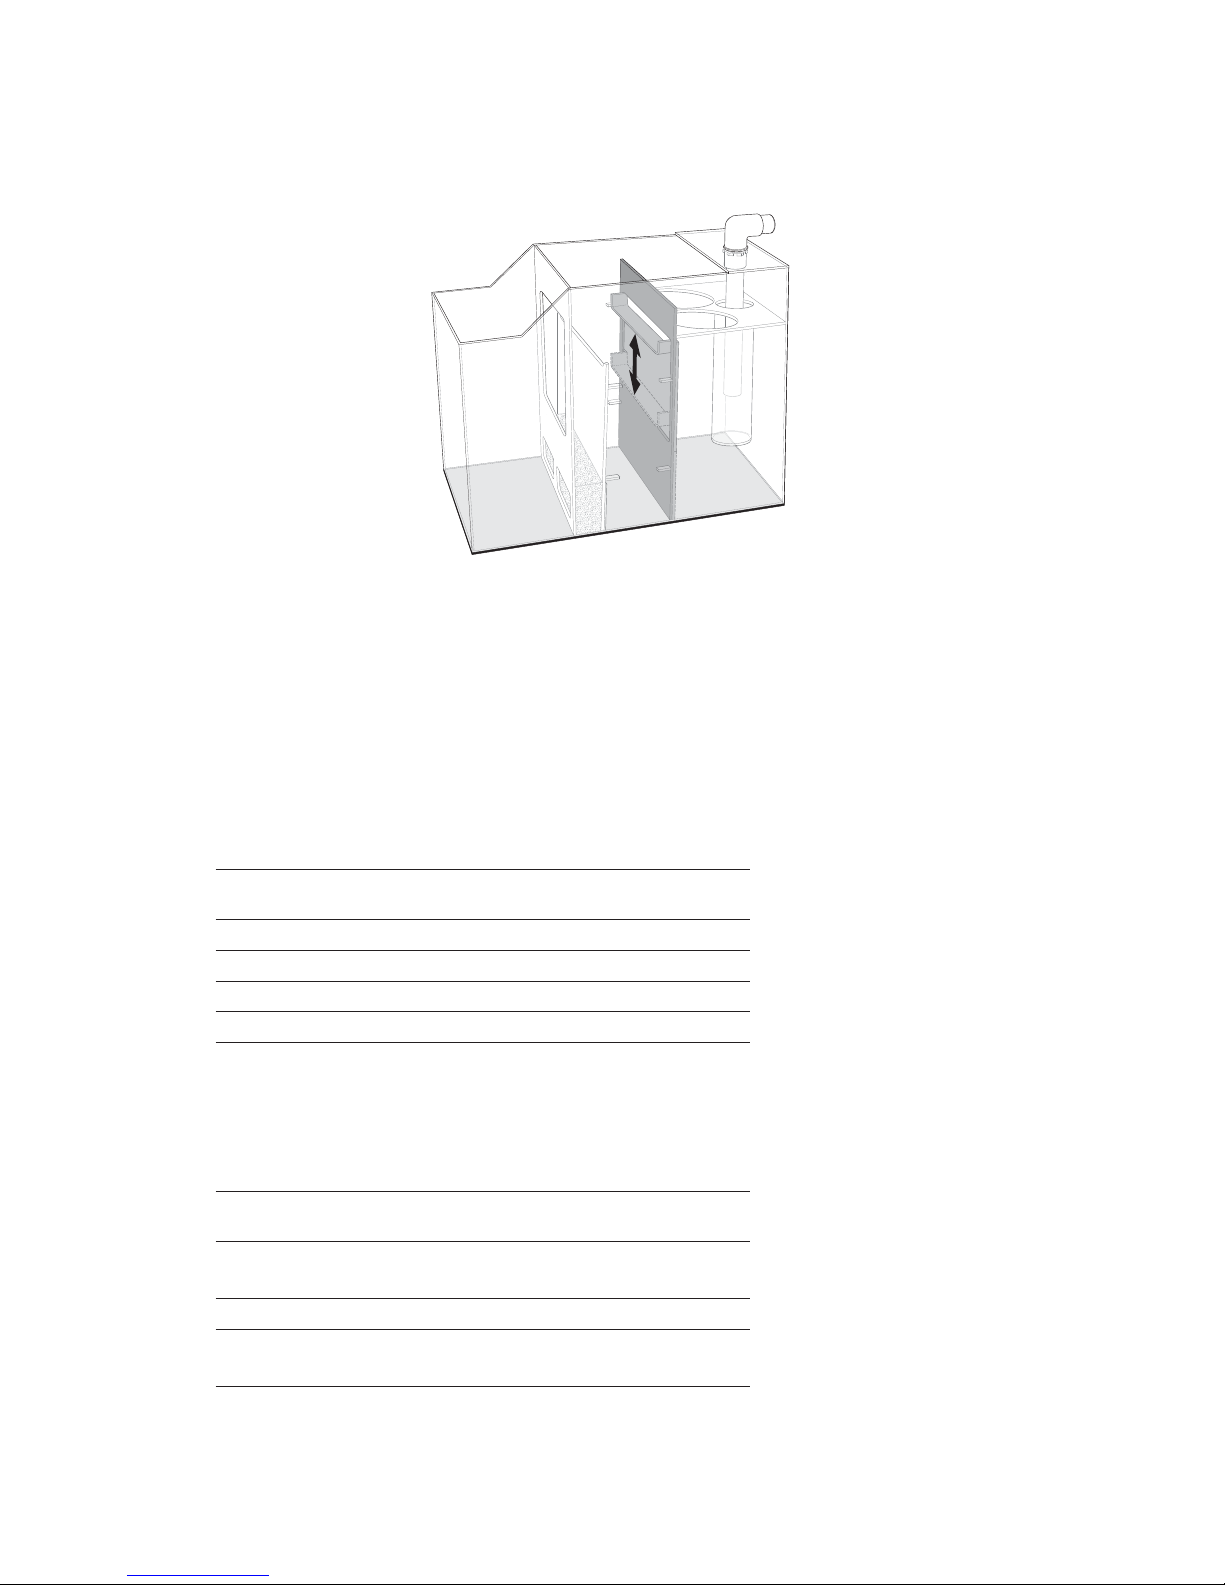
5. Remove the three retaining screws located at the bottom of chamber 2 that hold the water
diverter wall in place and remove the water diverter wall.
6. Slide adjustable wall down to the bottom of chamber 1.
7. Install skimmer into chamber 2.

5
Suggested Coralife
®
Protein Skimmers
CORALIFE PROFLEX PROFLEX PROFLEX PROFLEX
SUPER SKIMMER MODEL 1 MODEL 2 MODEL 3 MODEL 4
65 Berlin or
External only x
125 x x x
220 Berlin or
External only x
8. Place sump in desired position underneath aquarium.
9. Attach drain hose(s) from Megaflow™ overflow kit(s) or ProFlex overflow box(s) to inlet
elbow fitting(s).
10. Position submersible return pump within chamber 3.
11. Attach return tubing to pump outlet. Be sure the return tubing contains either a check valve
(not included) or a siphon break to prevent siphoning of the aquarium into the sump during
a power outage.
Suggested Aqueon
®
Submersible Pumps
AQUEON PROFLEX PROFLEX PROFLEX PROFLEX
SUBMERSIBLE PUMP MODEL 1 MODEL 2 MODEL 3 MODEL 4
2500 x
3000 x x
3500 x x x
4000 x x
12. As an alternative to a submersible pump the wall of chamber 3 can be drilled with a standard
hole-saw bit to accommodate a bulkhead fitting (not included) for use with an external
pump. A 1" bulkhead requires a 1 ¾" hole-saw bit. OBSERVE ALL APPLICABLE SAFETY
PRECAUTIONS WHEN WORKING WITH POWER TOOLS. IF UNSURE, CONSULT A TRAINED
PROFESSIONAL. CENTRAL AQUATICS WILL NOT HONOR WARRANTY AS A RESULT OF
DAMAGE CAUSED BY IMPROPER DRILLING.
Suggested pumps for external use
CORALIFE
TURBO SEA PROFLEX PROFLEX PROFLEX PROFLEX
EXTERNAL PUMP MODEL 1 MODEL 2 MODEL 3 MODEL 4
580-P x x
790-P x x
1100-P/1090 x x
1740-P/1270 x
6
Installation Instructions
“Refugium” Method
The “Refugium” Method is one of the most modern methods of reef aquarium filtration. In the
refugium method a “safe” zone is created in the filtration system that serves as a protected habitat
for microfauna such as copepods, rotifers, and other microinvertebrates as well as macroalgae
such as Chaetomorpha and Gracilaria to grow free from the predatory effects of fish and larger
invertebrates within the main aquarium. The microfauna consumes uneaten food and waste in
the aquarium and recycles it back into a natural food source for fish and corals as they migrate
downstream and back into the aquarium. The macroalgae in the refugium grows and absorbs
excess nitrogen and phosphate in the system reducing unwanted nuisance algae growth in the
main aquarium.
1. Unpack sump from protective cardboard wrapper.
2. Remove inlet fittings from inside filter sock.
3. Slide male pipe thread adapter on top of drain pipe positioned within bubble chamber.
4. Slide male pipe thread adapter up through drain hole(s) in lid of filter and screw female pipe
thread elbow onto adapter. Gasket should be on the top side of the filter lid.

7
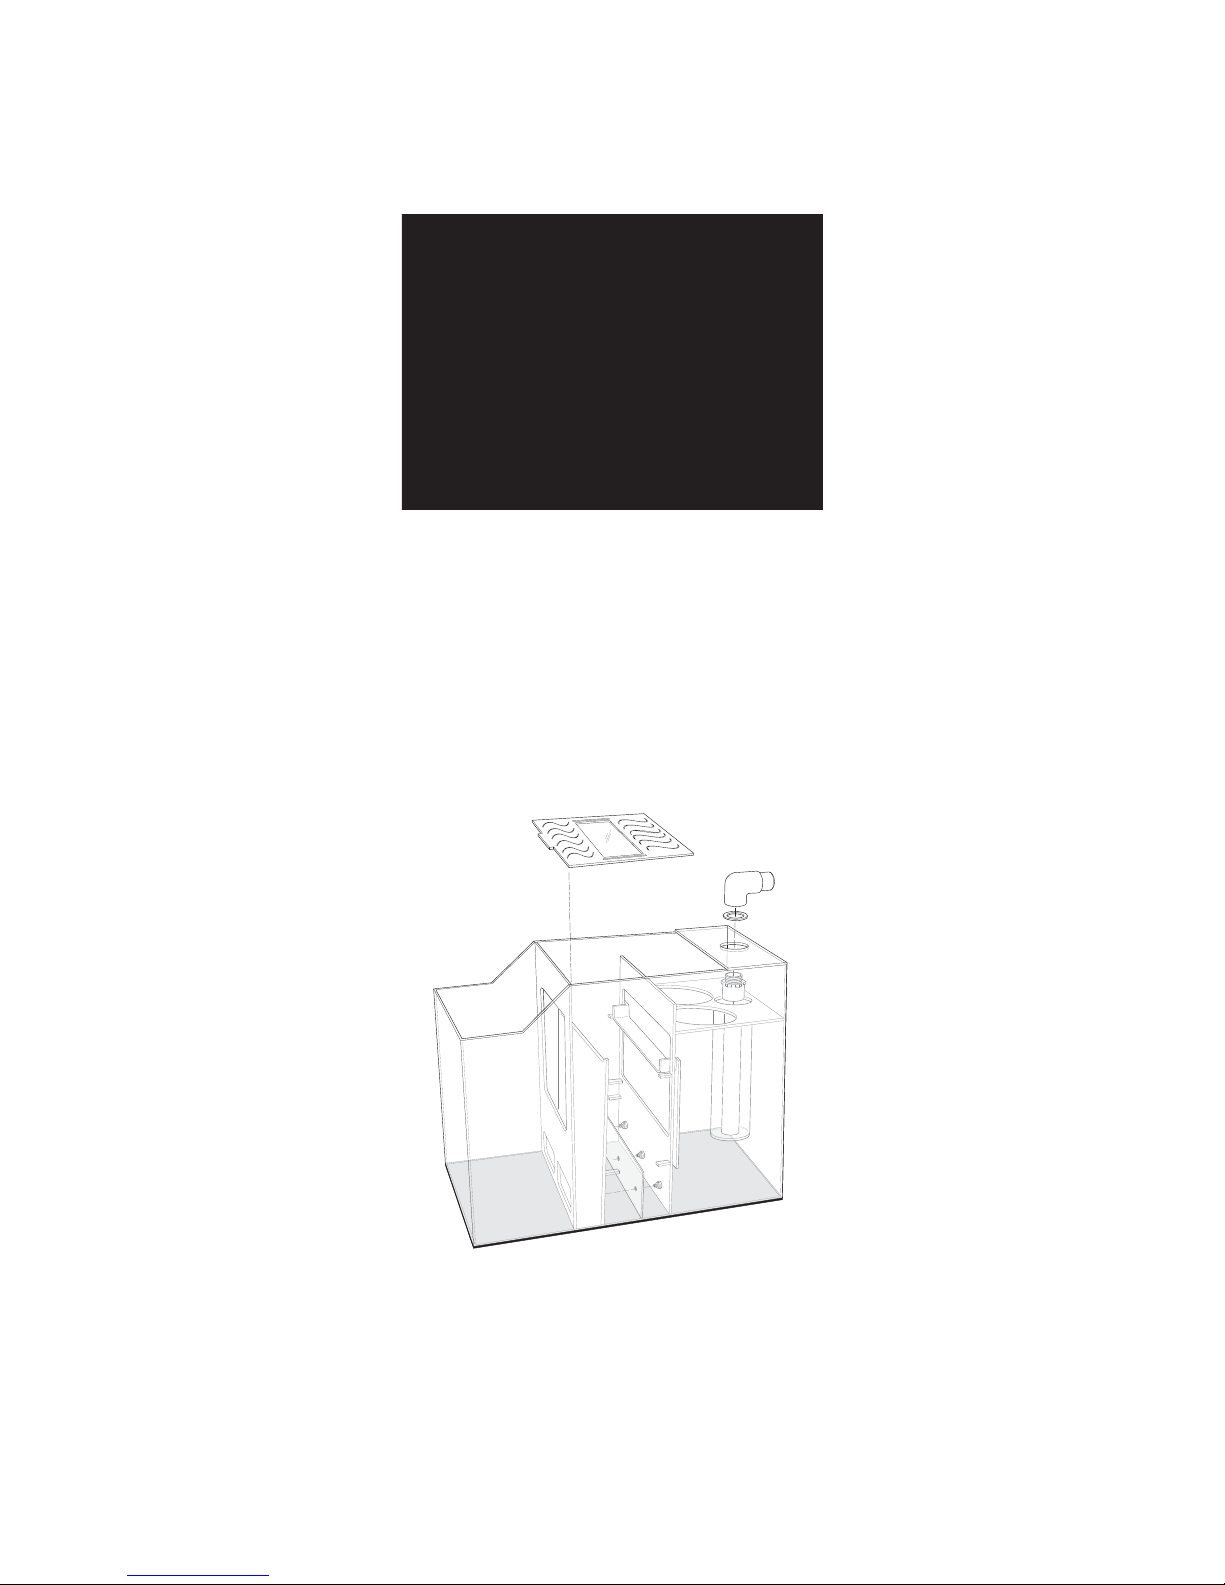
5. Slide adjustable wall up to the top of chamber 1.
6. Place sump in desired position underneath aquarium.
7. Place live rock rubble and/or live sand substrate into bottom of chamber 2.
8. Attach drain hose(s) from Megaflow™ overflow kit(s) or ProFlex overflow box(s) to inlet
elbow fitting(s).
9. Position submersible return pump within chamber 3.
10. Attach return tubing to pump outlet. Be sure the return tubing contains either a check valve
(not included) or a siphon break to prevent siphoning of the aquarium into the sump during a
power outage.
Suggested Aqueon
®
Submersible Pumps
AQUEON PROFLEX PROFLEX PROFLEX PROFLEX
SUBMERSIBLE PUMP MODEL 1 MODEL 2 MODEL 3 MODEL 4
2500 x
3000 x x
3500 x x x
4000 x x
11. As an alternative to a submersible pump the wall of chamber 3 can be drilled with a standard
hole-saw bit to accommodate a bulkhead fitting (not included) for use with an external
pump. A 1" bulkhead requires a 1 ¾" hole-saw bit. OBSERVE ALL APPLICABLE SAFETY
PRECAUTIONS WHEN WORKING WITH POWER TOOLS. IF UNSURE, CONSULT A TRAINED
PROFESSIONAL. CENTRAL AQUATICS WILL NOT HONOR WARRANTY AS A RESULT OF
DAMAGE CAUSED BY IMPROPER DRILLING.
Suggested pumps for external use
CORALIFE
TURBO SEA PROFLEX PROFLEX PROFLEX PROFLEX
EXTERNAL PUMP MODEL 1 MODEL 2 MODEL 3 MODEL 4
580-P x x
790-P x x
1100-P/1090 x x
1740-P/1270 x
12. Install Refugium light on top of clear opening on lid above chamber 2.
13. Other devices such as protein skimmers and chemical reactors can be set up within chamber 3
if appropriate to the design of the device. Or they can sit outside the sump with their inlets and
returns located within chamber 3.
Suggested Coralife
®
Protein Skimmers
CORALIFE PROFLEX PROFLEX PROFLEX PROFLEX
SUPER SKIMMER MODEL 1 MODEL 2 MODEL 3 MODEL 4
65 Berlin or
External only x
125 x x x
220 Berlin or
External only x
8
Installation Instructions
“Traditional” Method
This wet/dry method is used for freshwater or saltwater aquariums with heavy fish loads where
additional biological filtration is required.
1. Unpack sump from protective cardboard wrapper.
2. Remove inlet fittings from inside filter sock.
3. Slide male pipe thread adapter on top of drain pipe positioned within bubble chamber.
4. Slide male pipe thread adapter up through drain hole(s) in lid of filter and screw female pipe
thread elbow onto adapter. Gasket should be on the top side of the filter lid.
5. Remove the three retaining screws located at the bottom of chamber 2 that hold the water
diverter wall in place and remove the water diverter wall.
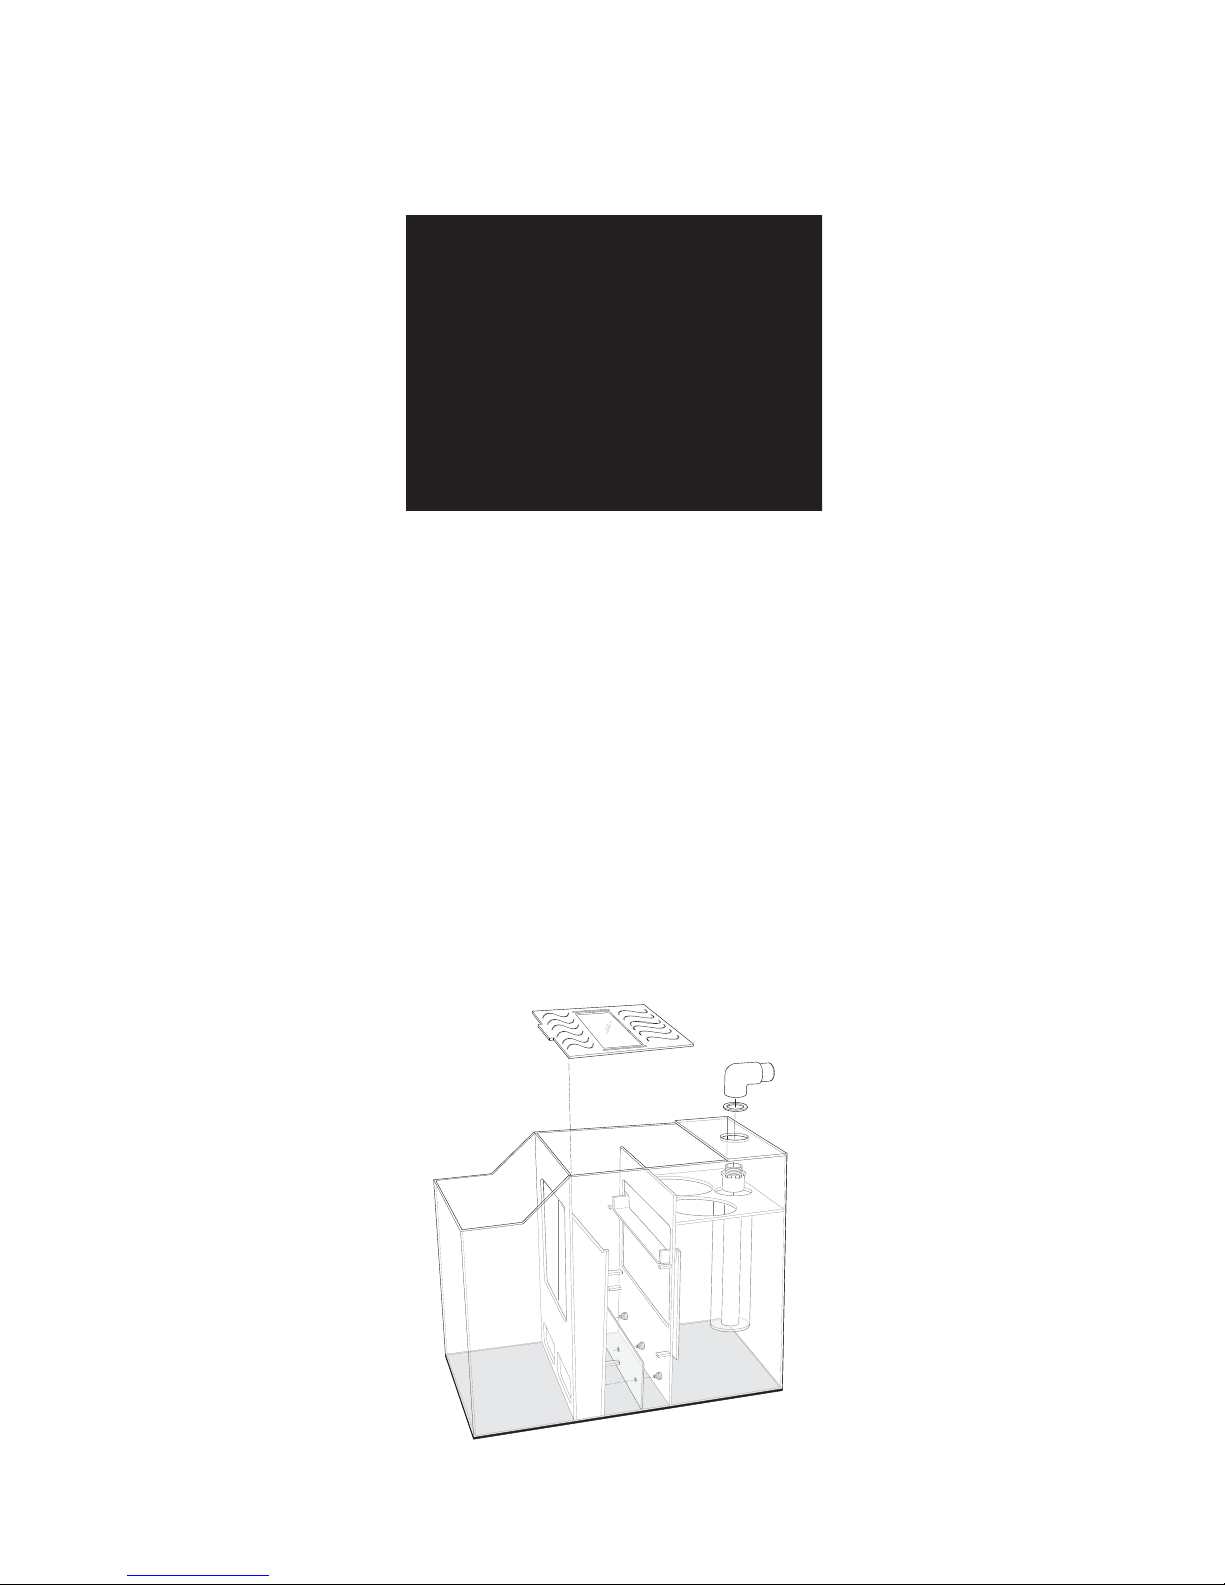
6. Place bottom tray of appropriately sized Biological Filter Kit (sold separately) on first row of
tabs in chamber 2.
7. Slide adjustable wall to top and hold in place with one hand.
8. Fill space above bottom tray in chamber 2 with biological media from Biological Filter Kit.
9
9. Position drip tray from Biological Filter Kit on top of second row of tabs in chamber 2.
10. Slide adjustable wall down so that spout rests on drip tray.
11. Place sump in desired position underneath aquarium.
12. Attach drain hose(s) from Megaflow™ overflow kit(s) or ProFlex overflow box(s) to inlet
elbow fitting(s).
13. Position submersible return pump within chamber 3.
14. Attach return tubing to pump outlet. Be sure the return tubing contains either a check valve
(not included) or a siphon break to prevent siphoning of the aquarium into the sump during a
power outage.
Suggested Aqueon
®
Submersible Pumps
AQUEON PROFLEX PROFLEX PROFLEX PROFLEX
SUBMERSIBLE PUMP MODEL 1 MODEL 2 MODEL 3 MODEL 4
2500 x
3000 x x
3500 x x x
4000 x x
15. Other devices such as protein skimmers and chemical reactors can be set up within chamber 3
if appropriate to the design of the device. Or they can sit outside the sump with their inlets and
returns located within chamber 3.
Suggested Coralife
®
Protein Skimmers
CORALIFE PROFLEX PROFLEX PROFLEX PROFLEX
SUPER SKIMMER MODEL 1 MODEL 2 MODEL 3 MODEL 4
65 Berlin or
External only x
125 x x x
220 Berlin or
External only x

10
16. As an alternative to a submersible pump the wall of chamber 3 can be drilled with a standard
hole-saw bit to accommodate a bulkhead fitting (not included) for use with an external
pump. A 1" bulkhead requires a 1 ¾" hole-saw bit. OBSERVE ALL APPLICABLE SAFETY
PRECAUTIONS WHEN WORKING WITH POWER TOOLS. IF UNSURE, CONSULT A TRAINED
PROFESSIONAL. CENTRAL AQUATICS WILL NOT HONOR WARRANTY AS A RESULT OF
DAMAGE CAUSED BY IMPROPER DRILLING.
Suggested pumps for external use
CORALIFE
TURBO SEA PROFLEX PROFLEX PROFLEX PROFLEX
EXTERNAL PUMP MODEL 1 MODEL 2 MODEL 3 MODEL 4
580-P x x
790-P x x
1100-P/1090 x x
1740-P/1270 x
Filling Instructions
Because these sumps can be used on aquariums with multiple footprints and plumbing
arrangements the following steps are necessary to determine the maximum safe water
level in the sump.
1. Prior to filling sump with water check to make sure all hose connections are tight and secure.
2. Fill chamber 1 with water so that it overflows and begins to fill chambers 2 and 3. Continue
until the water level in chamber 3 is approximately 1-2" above the top of the pump.
3. Fill aquarium with water until water just begins to flow through the overflow box. If using
a hang on type overflow box the siphon connecting the inner and outer boxes will need
to be primed at this time.
4. Turn on return pump and fill system with additional water until water level in chamber 3
is running steady 1-2" above the top of the pump.
5. Mark the water level in chamber 3 with a piece of masking tape or marker.
6. Turn off return pump and check that water does not siphon back into filter from return line.
If using a check valve no water should drain back through pump. If using a siphon break the
return should begin sucking air immediately and stop siphoning water in 1-2 minutes.
7. Wait 15 minutes to be sure water movement has completely ceased.
8. Mark the water level in the sump with a piece of tape or marker. If the sump overflowed,
the sump is either too small for the size of the aquarium or the anti-siphon device on the return
did not work properly.
9. Measure the distance between the two marks and add 1 inch.
10. Measure the calculated distance down from the top of the shortest wall in chamber 3 and
mark with the Maximum Water Level sticker. This is the maximum fill level of the sump.
The operating water level can be any level between this line and the top of the pump. When
operating, the sump should never be filled above this maximum water level mark to prevent
overflows during power outages.

11
Congratulations!
Your sump installation is now complete.
Maintenance Instructions
1. Always unplug any electrical devices associated with the filter when performing any
maintenance on the aquarium filter.
2. To clean the filter bags, remove them from the filter and turn inside out. Rinse under
freshwater to dislodge trapped dirt and debris. Soak overnight in a bucket containing 1 part
bleach to 10 parts water.
3. Rinse bags thoroughly under freshwater and then soak in a solution of water and dechlorinator
solution such as Kent
®
Pro Dechlorinator or Aqueon
®
Tap Water Conditioner for 1 hour or allow
to dry under the sun for 24 hours before use. Many experienced hobbyists will purchase an
additional set of filter bags so that one can be in use while the other set is being cleaned.
4. Clean the sump block at least once a month by rinsing under freshwater and replacing to
remove trapped dirt and debris.
5. Maintain the water level in the sump by adding only freshwater to the system to compensate
for water lost due to evaporation. Salt does not evaporate! Saltwater should not need to be
added unless water is being removed from the aquarium during a water change.
6. Salt creep and salt spray are inevitable results of any marine filtration system. Wipe down the
exterior of the sump and any accessories with a clean cloth dampened with warm freshwater
to remove any salt crust from surfaces on or around the filter regularly. The spread of salt creep
can be reduced by application of Coralife
®
Salt Creep Eliminator.
7. Keep electrical connections away from salt, salt creep and water.
12
Filtrado para depósito de decantación ProFlex
INSTRUCCIONES IMPORTANTES DE SEGURIDAD
ADVERTENCIA: Para evitar lesiones, se deben tomar precauciones básicas de
seguridad, entre otras, las siguientes:
1. LEA Y SIGA TODAS LAS INSTRUCCIONES DE SEGURIDAD PARA EL DEPÓSITO
DE DECANTACIÓN PROFLEX, ASÍ COMO PARA CUALQUIER DISPOSITIVO
UTILIZADO JUNTO CON EL DEPÓSITO DE DECANTACIÓN PROFLEX.
2. PELIGRO – Para evitar una posible descarga eléctrica se debe tener especial cuidado, ya que
se emplea agua en el uso del equipo del acuario. Para cada una de las siguientes situaciones,
no intente hacer reparaciones usted mismo. Devuelva el artefacto a una instalación autorizada
de servicio técnico para el mantenimiento o deseche el artefacto.
a. Si el artefacto muestra señales de una fuga anormal de agua, desenchúfelo inmediatamente
de la fuente de alimentación.
b. Examine cuidadosamente el artefacto después de la instalación. No debe enchufarlo si hay
agua en piezas que no deberían estar mojadas.
c. No haga funcionar ningún artefacto que tenga el cable o el enchufe dañados, o si está
funcionando de manera defectuosa o se ha caído o dañado de alguna manera.
d. Para evitar la posibilidad de que el enchufe de la bomba o el tomacorriente se mojen, coloque
el estante y el tanque del acuario a un lado de un tomacorriente montado en la pared, para
evitar que el agua caiga sobre el tomacorriente o el enchufe. El usuario debe hacer un “lazo
antigoteo”, que se muestra en la siguiente figura, en cada cable que conecte un artefacto
de acuario a un tomacorriente. El “lazo antigoteo” es la parte del cable que se encuentra
por debajo del nivel del tomacorriente o el conector, si se utiliza un cable de extensión, para
evitar que el agua viaje por el cable y entre en contacto con el tomacorriente.
Si el enchufe o tomacorriente se mojan, NO desenchufe el cable. Desconecte el fusible
o interruptor de circuito que le suministra
energía al artefacto. Luego, desenchufe
y examine el tomacorriente para ver si
hay agua.
3. Es necesaria la supervisión rigurosa cuando
cualquier artefacto es utilizado por niños o
cerca de éstos.
4. Para evitar lesiones, no toque las piezas movibles
o las piezas calientes tales como calefactores,
reflectores, bombillas de lámparas y otros similares.
5. Siempre desenchufe un artefacto del tomacorriente
cuando no lo utilice, antes de poner o sacar piezas
y antes de limpiarlo. Nunca le dé un tirón al cable
para sacar el enchufe del tomacorriente. Sostenga
el enchufe y tire para desconectar.
6. No utilice un artefacto para otra función que no sea
la prevista. El uso de conexiones no recomendadas
o vendidas por el fabricante del artefacto podría
producir una condición insegura.
7. No instale o almacene el artefacto a la intemperie o
a temperaturas menores a la de congelamiento.
CABLE DE
ALIMENTACIÓN
ELÉCTRICA
LAZO
ANTIGOTEO
TANQUE DEL
ACUARIO

13
8. Asegúrese de que el artefacto montado en un tanque este instalado de manera segura antes
de ponerlo en funcionamiento.
9. Lea y cumpla todas las notas importantes del artefacto.
10. Si es necesario utilizar un cable de extensión, se debe utilizar un cable con la clasificación
adecuada. Un cable con menor clasificación en amperios o vatios que el artefacto, puede
sobrecalentarse. Se debe tener precaución en la disposición del cable para evitar tropiezos
y tirones.
11. GUARDE ESTAS INSTRUCCIONES.
TAPA DEL FILTRO
BOLSAS DE FILTRO
ABERTURA DE DESCARGA
DEL ESPUMADOR
CODO DE ENTRADA
JUNTA DE ENTRADA
TUBERÍA DE ENTRADA
BLOQUEO DEL DEPÓSITO
DE DECANTACIÓN
PARED DE RETENCIÓN
DEL AGUA
TORNILLOS DE LA PARED
DE RETENCIÓN DEL AGUA
PARED AJUSTABLE
ADAPTADOR DE ENTRADA
CÁMARA 3 CÁMARA 2 CÁMARA 1

14
Instrucciones de instalación
Método “Berlín”
El método “Berlín” se basa en el uso del depósito de decantación como una plataforma para un
espumador de proteínas más grande y más eficiente y en la falta de cualquier filtración biológica
adicional mas que la que proporciona la roca viva en el acuario.
1. Desempaque el depósito de decantación de la envoltura protectora de cartón.
2. Retire los adaptadores de entrada desde el interior de la bolsa filtrante.
3. Deslice el adaptador roscado de la tubería macho sobre la tubería de drenaje ubicada dentro
de la cámara de burbujas.
4. Deslice el adaptador roscado de la tubería macho por el o los agujeros de drenaje en la tapa
del filtro y atornille el codo roscado de la tubería hembra en el adaptador. La junta debe estar
en la parte superior de la tapa del filtro.
5. Retire los tres tornillos de retención ubicados en la parte inferior de la cámara 2 que mantiene
la pared desviadora de agua en su lugar y retire la pared desviadora de agua.
6. Deslice la pared ajustable hacia la parte inferior de la cámara 1.
7. Instale el espumador en la cámara 2.
l
d
l
d
ó
i
d
d
i
ó

15
Espumador de proteína Coralife
®
sugerido
SUPER ESPUMADOR PROFLEX PROFLEX PROFLEX PROFLEX
CORALIFE MODELO 1 MODELO 2 MODELO 3 MODELO 4
65 Sólo Berlín o
externa x
125 x x x
220 Sólo Berlín o
externa x
8. Ponga el depósito de decantación en la posición deseada bajo el acuario.
9. Conecte las mangueras de drenaje desde los juegos para desborde Megaflow™
o las cajas para desborde ProFlex a la entrada de los adaptadores de codo.
10. Ubique la bomba sumergible de retorno dentro de la cámara 3.
11. Conecte la tubería de retorno a la salida de la bomba. Asegúrese de que la tubería de retorno
contenga una válvula de retención (no incluida) o un antisifón para evitar el sifonaje del acuario
al depósito de decantación durante un corte de energía.
Bomba sumergible Aqueon
®
sugerida
BOMBA SUMERGIBLE PROFLEX PROFLEX PROFLEX PROFLEX
AQUEON MODELO 1 MODELO 2 MODELO 3 MODELO 4
2500 x
3000 x x
3500 x x x
4000 x x
12. Como alternativa a la bomba sumergible, se puede perforar la pared de la cámara 3 con una
sierra perforadora para acomodar un accesorio de acople (no incluido) para el uso con una
bomba externa. Un acople de 1 pulg. requiere una perforación con una sierra perforadora
de 1 ¾ pulg. RESPETE TODAS LAS PRECAUCIONES DE SEGURIDAD APLICABLES AL
TRABAJAR CON HERRAMIENTAS MECÁNICAS. SI NO ESTÁ SEGURO, CONSULTE CON UN
PROFESIONAL CAPACITADO. CENTRAL AQUATICS NO ACEPTARÁ GARANTÍA EN EL CASO
DE QUE SE PRODUZCAN DAÑOS POR PERFORACIÓN INADECUADA.
Bomba sugerida para uso externo
BOMBA EXTERNA
TURBO SEA DE PROFLEX PROFLEX PROFLEX PROFLEX
CORALIFE MODELO 1 MODELO 2 MODELO 3 MODELO 4
580-P x x
790-P x x
1100-P/1090 x x
1740-P/1270 x
16
Instrucciones de instalación
Método “Refugio”
El método “Refugio” es uno de los métodos más modernos de filtración para acuario de arrecife. En
el método refugio se crea una zona “segura” en el sistema de filtración, que sirve como un hábitat
protegido para la microfauna como los copépodos, los rotíferos y otros microinvertebrados, como
también para microalgas como la Chaetomorpha y la Gracilaria, para crecer libre de los efectos
predatorios de los peces e invertebrados mayores dentro del acuario principal. La microfauna
consume el alimento sin comer y los desechos en el acuario y recicla a una fuente natural de
alimento para peces y corales, a medida que se trasladan corriente abajo y de vuelta al acuario.
La microalga en el refugio crece y absorbe el exceso de nitrógeno y fosfato en el sistema, lo que
reduce el crecimiento indeseado y molesto en el acuario principal.
1. Desempaque el depósito de decantación de la envoltura protectora de cartón.
2. Retire los adaptadores de entrada desde el interior de la bolsa filtrante.
3. Deslice el adaptador roscado de la tubería macho sobre la tubería de drenaje ubicada dentro
de la cámara de burbujas.
4. Deslice el adaptador roscado de la tubería macho por el o los agujeros de drenaje en la tapa
del filtro y atornille el codo roscado de la tubería hembra en el adaptador. La junta debe estar
en la parte superior de la tapa del filtro.

17
5. Deslice la pared ajustable hacia la parte superior de la cámara 1.
6. Ponga el depósito de decantación en la posición deseada bajo el acuario.
7. Ponga escombros de roca viva o substrato de arena viva en el fondo de la cámara 2.
8. Conecte las mangueras de drenaje desde los juegos para desborde Megaflow™ o las cajas
para desborde ProFlex a la entrada de los adaptadores de codo.
9. Ubique la bomba sumergible de retorno dentro de la cámara 3.
10. Conecte la tubería de retorno a la salida de la bomba. Asegúrese de que la tubería de retorno
contenga una válvula de retención (no incluida) o un antisifón para evitar el sifonaje del acuario
al depósito de decantación durante un corte de energía.
Bomba sumergible Aqueon
®
sugerida
BOMBA SUMERGIBLE PROFLEX PROFLEX PROFLEX PROFLEX
AQUEON MODELO 1 MODELO 2 MODELO 3 MODELO 4
2500 x
3000 x x
3500 x x x
4000 x x
11. Como alternativa a la bomba sumergible, se puede perforar la pared de la cámara 3 con una
sierra perforadora para acomodar un accesorio de acople (no incluido) para usar con una
bomba externa. Un acople de 1 pulg. requiere una perforación con una sierra perforadora
de 1 ¾ pulg. RESPETE TODAS LAS PRECAUCIONES DE SEGURIDAD APLICABLES AL
TRABAJAR CON HERRAMIENTAS MECÁNICAS. SI NO ESTÁ SEGURO, CONSULTE CON UN
PROFESIONAL CAPACITADO. CENTRAL AQUATICS NO ACEPTARÁ GARANTÍA EN EL CASO
DE QUE SE PRODUZCAN DAÑOS POR PERFORACIÓN INADECUADA.
Bomba sugerida para uso externo
BOMBA EXTERNA
TURBO SEA DE PROFLEX PROFLEX PROFLEX PROFLEX
CORALIFE MODELO 1 MODELO 2 MODELO 3 MODELO 4
580-P x x
790-P x x
1100-P/1090 x x
1740-P/1270 x
12. Instale la luz del refugio en la parte superior de la apertura libre en la tapa sobre la cámara 2.
13. Otros dispositivos como los espumadores de proteínas y los reactores químicos pueden
instalarse dentro de la cámara 3, si es apropiado para el diseño del dispositivo. O se pueden
colocar fuera del depósito de decantación con sus entradas y retornos puestos dentro de la
cámara 3.
Espumador de proteína Coralife
®
sugerido
SUPER ESPUMADOR PROFLEX PROFLEX PROFLEX PROFLEX
CORALIFE MODELO 1 MODELO 2 MODELO 3 MODELO 4
65 Sólo Berlín o
externa x
125 x x x
220 Sólo Berlín o
externa x
18
Instrucciones de instalación
Método “Tradicional”
Este método seco/mojado se utiliza en acuarios de agua dulce o agua salada con grandes
cantidades de peces en los que se necesita filtración biológica adicional.
1. Desempaque el depósito de decantación de la envoltura protectora de cartón.
2. Retire los adaptadores de entrada desde el interior de la bolsa filtrante.
3. Deslice el adaptador roscado de la tubería macho sobre la tubería de drenaje ubicada dentro
de la cámara de burbujas.
4. Deslice el adaptador roscado de la tubería macho por el o los agujeros de drenaje en la tapa
del filtro y atornille el codo roscado de la tubería hembra en el adaptador. La junta debe estar
en la parte superior de la tapa del filtro.
5. Retire los tres tornillos de retención ubicados en la parte inferior de la cámara 2 que mantiene
la pared desviadora de agua en su lugar y retire la pared desviadora de agua.
6. Coloque la bandeja inferior del Juego de filtro biológico (se vende por separado) del tamaño
adecuado en la primera fila de lengüetas de la cámara 2.
7. Deslice la pared ajustable a la parte superior y sosténgala en el lugar con una mano.
19
8. Llene el espacio sobre la bandeja inferior en la cámara 2 con material biológico del Juego de
filtro biológico.
9. Ponga la bandeja para goteo del Juego de filtro biológico sobre la segunda fila de lengüetas
en la cámara 2.
10. Deslice la pared ajustable hacia abajo para que la boquilla quede en la bandeja para goteo.
11. Ponga el depósito de decantación en la posición deseada bajo el acuario.
12. Conecte las mangueras de drenaje desde los juegos para desborde Megaflow™ o las cajas
para desborde ProFlex a la entrada de los adaptadores de codo.
13. Ubique la bomba sumergible de retorno dentro de la cámara 3.
14. Conecte la tubería de retorno a la salida de la bomba. Asegúrese de que la tubería de retorno
contenga una válvula de retención (no incluida) o un antisifón para evitar el sifonaje del acuario
al depósito de decantación durante un corte de energía.
Bomba sumergible Aqueon
®
sugerida
BOMBA SUMERGIBLE PROFLEX PROFLEX PROFLEX PROFLEX
AQUEON MODELO 1 MODELO 2 MODELO 3 MODELO 4
2500 x
3000 x x
3500 x x x
4000 x x
15. Otros dispositivos como los espumadores de proteínas y los reactores químicos pueden
instalarse dentro de la cámara 3 si es apropiado para el diseño del dispositivo. O se pueden
colocar fuera del depósito de decantación con sus entradas y retornos puestos dentro de la
cámara 3.
Espumador de proteína Coralife
®
sugerido
SUPER ESPUMADOR PROFLEX PROFLEX PROFLEX PROFLEX
CORALIFE MODELO 1 MODELO 2 MODELO 3 MODELO 4
65 Sólo Berlín o
externa x
125 x x x
220 Sólo Berlín o
externa x

20
16. Como alternativa a la bomba sumergible, se puede perforar la pared de la cámara 3 con una
sierra perforadora para acomodar un accesorio de acople (no incluido) para usar con una
bomba externa. Un acople de 1 pulg. requiere una perforación con una sierra perforadora
de 1 ¾ pulg. RESPETE TODAS LAS PRECAUCIONES DE SEGURIDAD APLICABLES AL
TRABAJAR CON HERRAMIENTAS MECÁNICAS. SI NO ESTÁ SEGURO, CONSULTE CON UN
PROFESIONAL CAPACITADO. CENTRAL AQUATICS NO ACEPTARÁ GARANTÍA EN EL CASO
DE QUE SE PRODUZCAN DAÑOS POR PERFORACIÓN INADECUADA.
Bomba sugerida para uso externo
BOMBA EXTERNA
TURBO SEA DE PROFLEX PROFLEX PROFLEX PROFLEX
CORALIFE MODELO 1 MODELO 2 MODELO 3 MODELO 4
580-P x x
790-P x x
1100-P/1090 x x
1740-P/1270 x
Instrucciones de llenado
Dado que estos depósitos de decantación se pueden utilizar en acuarios con múltiples huellas y
arreglos de tuberías, los siguientes pasos son necesarios para determinar el nivel de agua máximo
de seguridad en el depósito de decantación.
1. Antes de llenar el depósito de decantación con agua, revise todas las conexiones de las
mangueras para asegurarse de que estén firmes y seguras.
2. Llene la cámara 1 con agua de manera que se desborde y comience a llenar la cámara 2 y
3. Continúe hasta que el nivel de agua en la cámara 3 sea de aproximadamente 2,5 a 5,1 cm
(1 a 2 pulg.) sobre la parte superior de la bomba.
3. Llene el acuario con agua hasta que ésta comience a fluir por la caja para desborde. Si
utiliza una caja para desborde tipo colgante, el sifón que conecta las cajas interna y externa
necesitará ser imprimado en esta oportunidad.
4. Encienda la bomba de retorno y llene el sistema con más agua, hasta que el nivel de agua
en la cámara 3 esté corriendo de manera estable a 2,5 a 5,1 cm (1 a 2 pulg.) sobre la parte
superior de la bomba.
5. Marque el nivel de agua en la cámara 3 con un trozo de cinta para enmascarar o un marcador.
6. Apague la bomba de retorno y revise que el agua no tenga el efecto sifón de vuelta al filtro
desde la tubería de retorno. Si utiliza una válvula de retención, no debería drenar de regreso a
la bomba. Si utiliza un antisifón, el retorno debería comenzar a absorber aire inmediatamente y
detener el sifonaje de agua en 1 ó 2 minutos.
7. Espere 15 minutos para asegurarse de que el movimiento de agua se haya detenido por
completo.
8. Marque el nivel de agua en el depósito para decantación con un trozo de cinta para
enmascarar o un marcador. Si el depósito para decantación se desborda, se debe a que es
muy pequeño para el tamaño del acuario o el dispositivo antisifón en el retorno no funcionó de
manera adecuada.
9. Mida la distancia entre las dos marcas y agregue 2,5 cm (1 pulg.).
Table of contents
Languages:
Other Aqueon Water Filtration System manuals


Popular Water Filtration System manuals by other brands


Trojan Technologies
Trojan Technologies TrojanUVMax Pro10 owner's manual

Schako
Schako FKU Instructions for installing

HydroLogic
HydroLogic HL 33021 instructions

Klimawent
Klimawent STRONG-2000-N Use and maintenance manual

Angelo Decor
Angelo Decor 1500 quick start guide

Dantherm
Dantherm ELITE 400 Service manual

3M
3M Filtrete Standard Use & care guide

Ferplast
Ferplast BLUWATERFALL user manual

Reece
Reece BWT Multi C 1000 Installation and operating manual

TeichTip
TeichTip SUNSUN CPF-50000 Operation manual

3M
3M AP902 Series Installation and operating instructions

KOGANEI CORPORATION
KOGANEI CORPORATION FRZ Series instruction manual