Aquila T2 Mk III Taximeter User manual

T2 Mk III Taximeter User Guide. © Aquila Electronics Limited
This manual describes the operation o the T2 Mk III Taximeter once
correctly installed and con igured by an authorised Aquila Taximeter
Dealer. Aquila Electronics Limited reserve the right to change the
speci ication o its products without notice. I any urther in ormation is
required, please contact your local dealer.
N00539 Issue 2. June 2019
T2 Mk III Taximeter
User Guide

T2 Taximeter User Guide. © Aquila Electronics Limited
Contents
1 The Basics o the T2 Mk III Taximeter............................................................1
Basic Operation o the T2.................................................................................2
2 Operating Modes............................................................................................3
2.1 Power Up Test..........................................................................................3
2.2 Standby Mode...........................................................................................3
2.3 FOR HIRE Mode.......................................................................................4
2.4 HIRED Mode.............................................................................................5
2.5 STOPPED Mode.......................................................................................7
3 Tari s, Options and PIN Numbers..................................................................8
3.1 Tari s........................................................................................................8
3.2 Tari Code................................................................................................8
3.3 Pre-loaded Tari s.....................................................................................8
3.4 Receipt Programs.....................................................................................8
3.5 PIN Numbers............................................................................................9
3.6 Entering a PIN Number.............................................................................9
4 The User Menus...........................................................................................10
4.1 User Menus: Totals.................................................................................11
4.1.1 The 3 Sets o Totals..........................................................................12
4.1.2 Items in each set o Totals................................................................12
4.1.3 Clearing the “Temporary” Totals Set................................................12
4.2 User Menus: “Print Out”..........................................................................13
4.3 User Menus: In o.....................................................................................14
4.3.1 Serial Number...................................................................................14
4.3.2 Tari Number....................................................................................14
4.3.3 Receipt Number................................................................................16
4.3.4 So tware Version and So tware Checksum......................................16
4.3.5 Time o Day.......................................................................................16
4.3.6 Date...................................................................................................17
4.3.7 Calibration (k value)..........................................................................18
4.3.8 In o Menu: Pulse Count....................................................................19
4.3.9 Speed Display...................................................................................20
4.4 User Menus: Features............................................................................20
4.4.1 Beep On/O ......................................................................................20
4.4.2 Display and Keypad Brightness........................................................21
4.4.3 “LTI” Feature.....................................................................................21
4.4.4 Display Test......................................................................................22
4.4.5 Date Stop..........................................................................................23
Setting the Date Stop Date..........................................................................24
Date Stop Warning Messages.....................................................................24
5 The T2’s Battery and Clock..........................................................................26
5.1 Setting the Clock.....................................................................................26
6 Product Speci ications..................................................................................27
T2 Taximeter User Guide. © Aquila Electronics Limited
1 The Basics of the T2 Mk III Taximeter
Note: The Rate, Fare and Extras displays are used or other purposes in
various menus and options.
The diagram o the next page shows how the T2’s basic operations work.
Following this there are descriptions o each o the T2’s operating modes and
the unctions available in each mode.
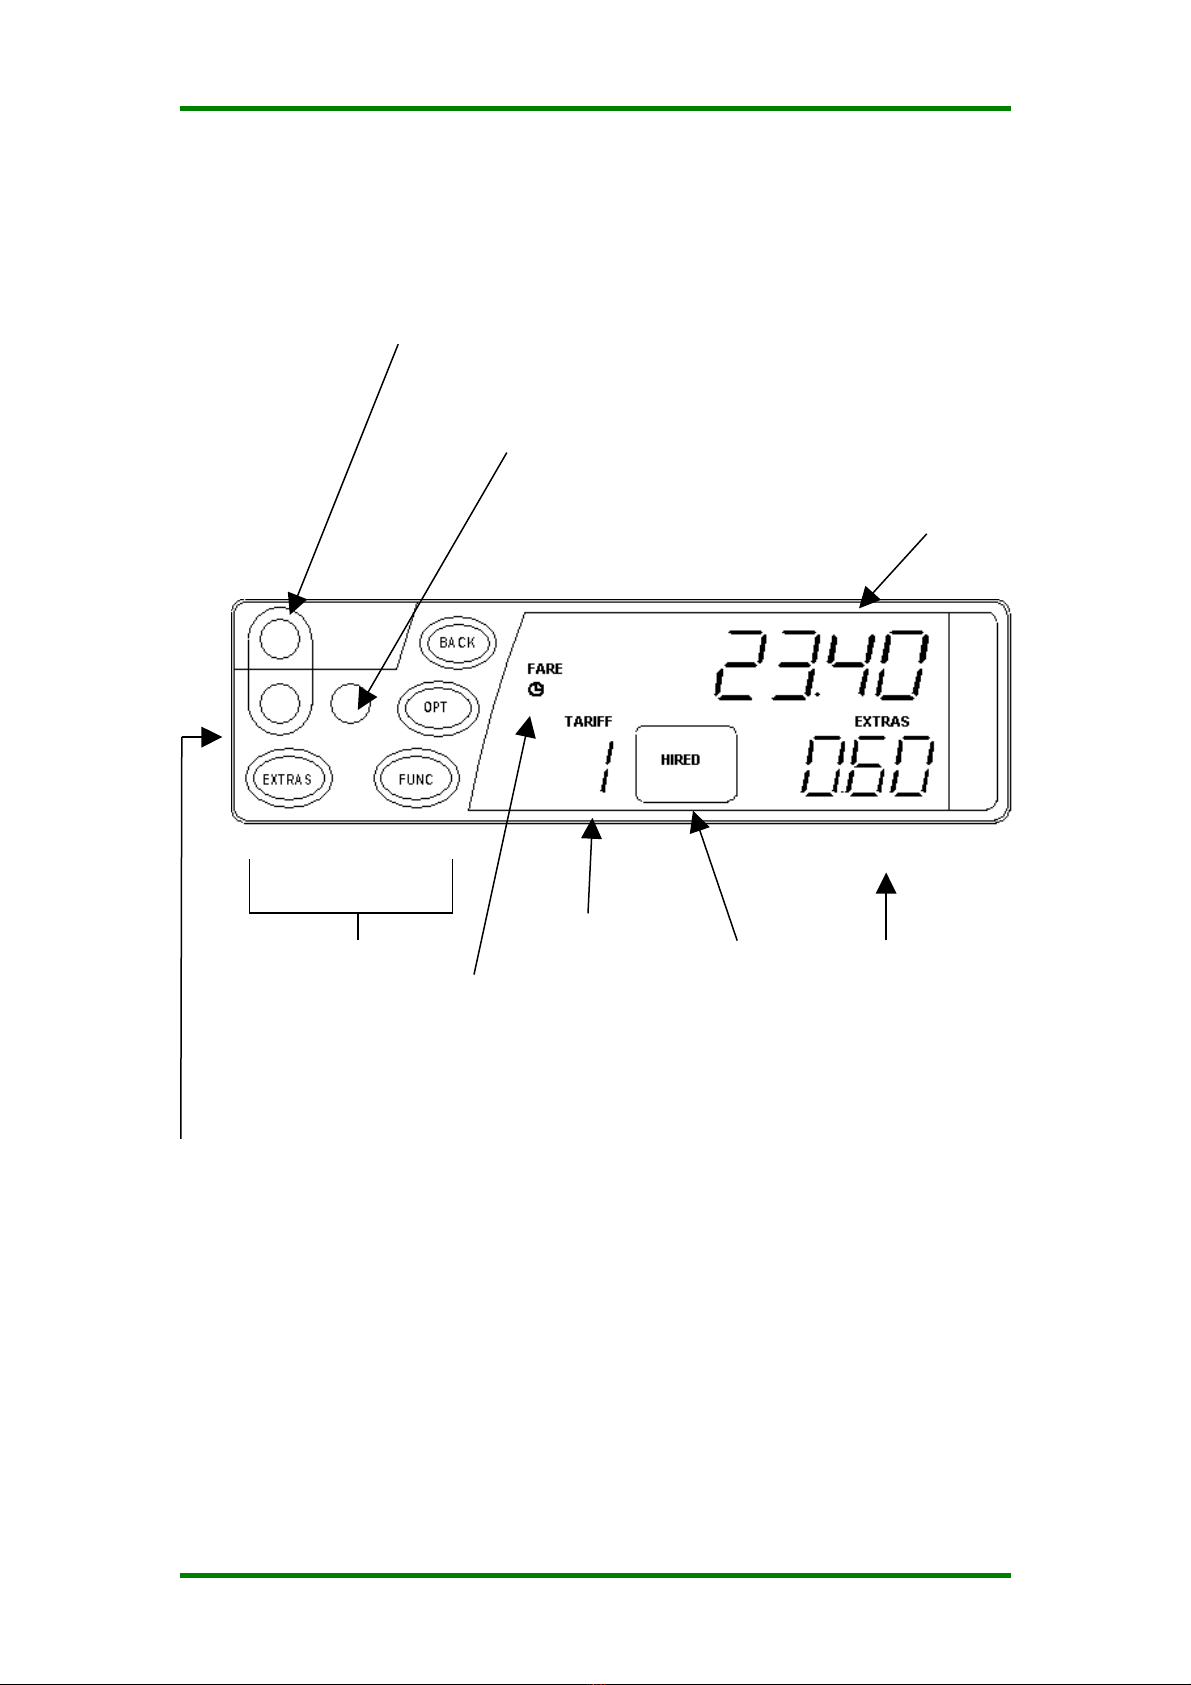
1
Mode
Indicator
Buttons
Tari Seal: This sealing point
secures the Tari Programming
connector.
Vehicle Seal: This sealing point
secures the screw holding the T2 to
its mounting bracket.
Meter Seal: This sealing point secures the
screw holding the T2’s ront and rear case
together and prevents access to internal
parts.
Fare Display
Extras Display
Rate/Tari
Display
Time-mode
indicator

T2 Mk III Taximeter User Guide. © Aquila Electronics Limited
Press EXTRAS to add
extras. Hold EXTRAS
down and press BACK to
clear extras (i allowed in
tari )
Press FUNC to start
the journey (go to
HIRED MODE)
FOR HIRE
MODE
HIRED
MODE
STOPPED
MODE
STANDBY
MODE
STOPPED
MODE
(SHOWING
TOTAL FARE)
Press FUNC to turn the meter on
and get ready or the irst journey
(go to FOR HIRE mode).
Press FUNC to end the
current job, clear the
display, send details to
the totals memory and
get ready or the next
journey (go to FOR HIRE
mode)
Press FUNC to
end the journey
(go to STOPPED
mode)
Press OPT to add
the Fare+Extras.
Press it again to
separate them.
Press EXTRAS to
add extras.
Press EXTRAS to
add extras
Basic Operation of the T2
2
T2 Taximeter User Guide. © Aquila Electronics Limited
2 Operating Modes
2.1 ower Up Test
From so tware version 49.00, the T2 per orms an extended power up sel -
test be ore commencing normal operation. There is there ore a ew
seconds' delay. This is only carried out when power is disconnected and
then re-connected.
I the test is unsuccess ul, the keypad backlighting lashes. I this occurs,
then please contact your dealer or advice.
In some circumstances, the T2 may display other error messages after the
self -test process.
2.2 Standby Mode
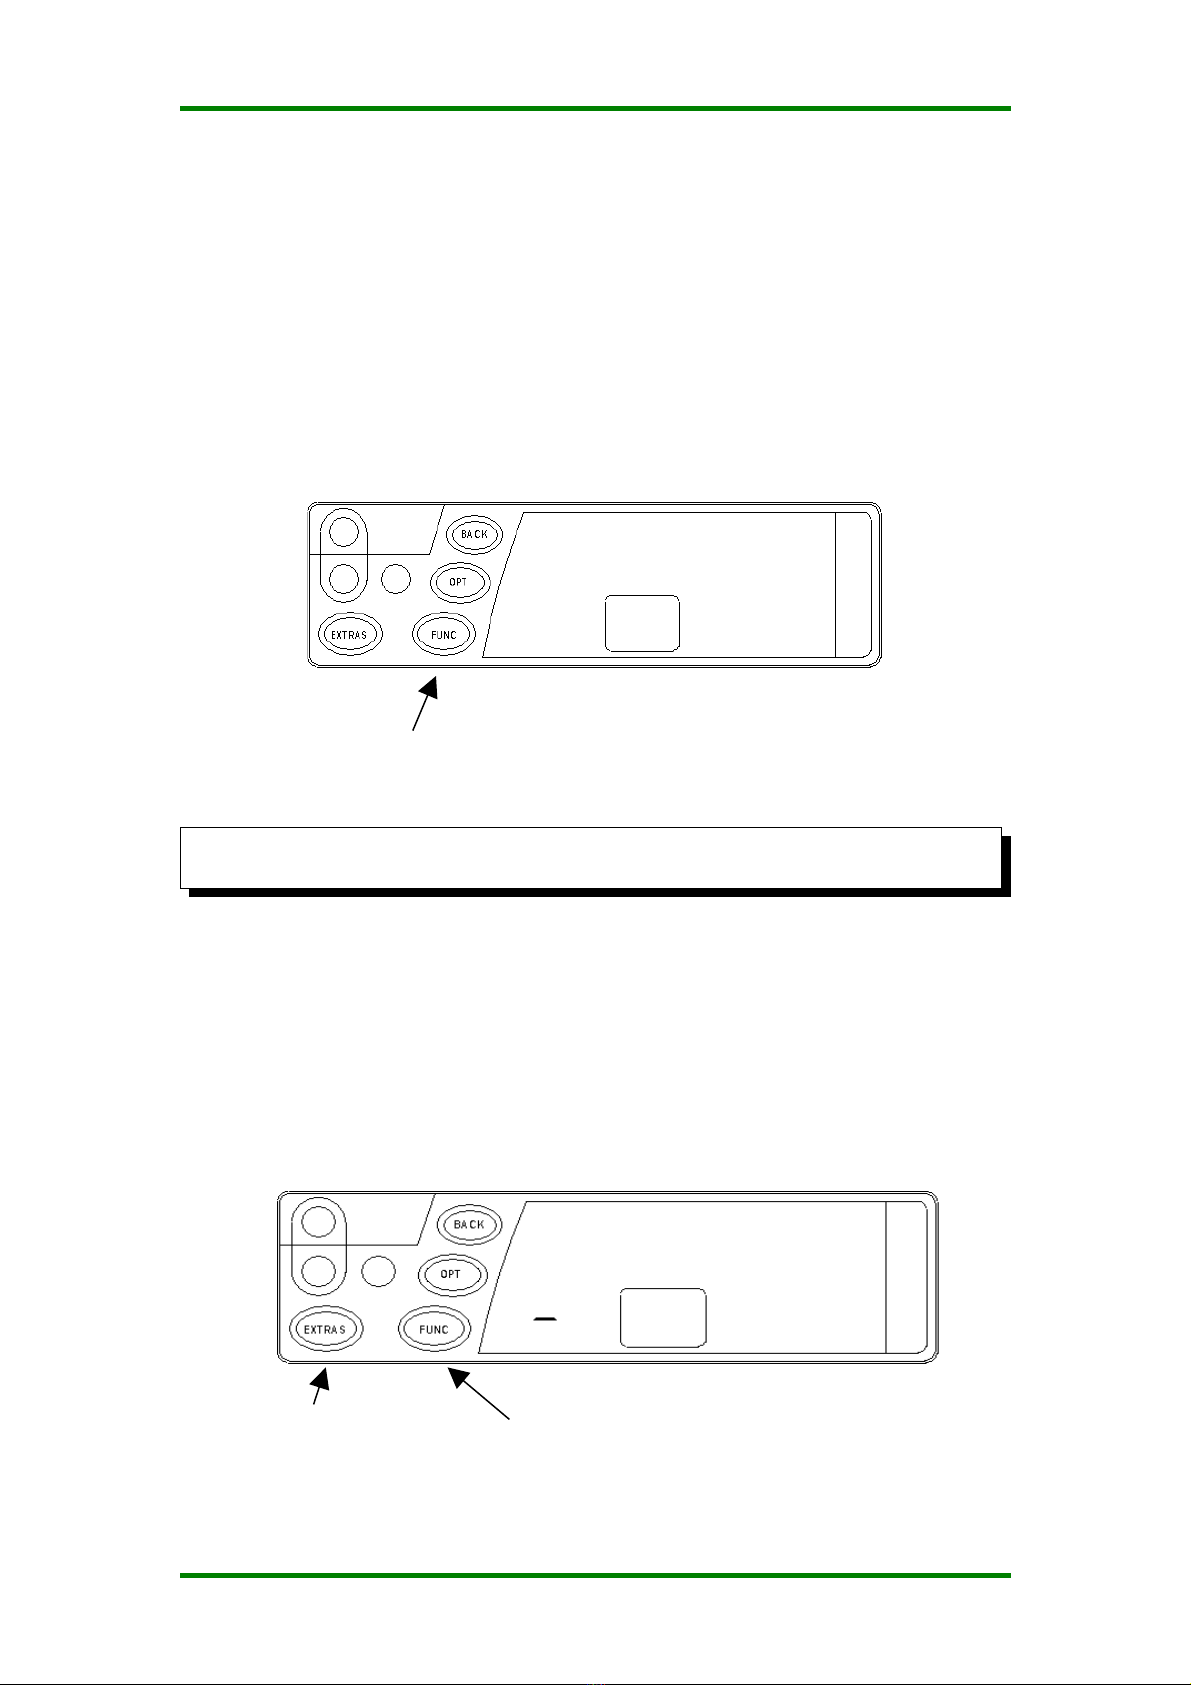
A ter the T2 is irst powered up, it enters STANDBY mode. The display is
completely blank except or a dash which appears in the Rate Digit i the
vehicle moves.
Access to the User Menu system is available rom Standby mode. (See
section 4)
Optional Feature: A time o day clock may be displayed or 30 seconds i
the vehicle moves.
Press
EXTRAS to
enter the
User Menu
System
Press FUNC to
enter FOR HIRE
mode
3
SOFTWARE CHECKSUM
FAILURE: All buttons lashing
T2 Mk III Taximeter User Guide. © Aquila Electronics Limited
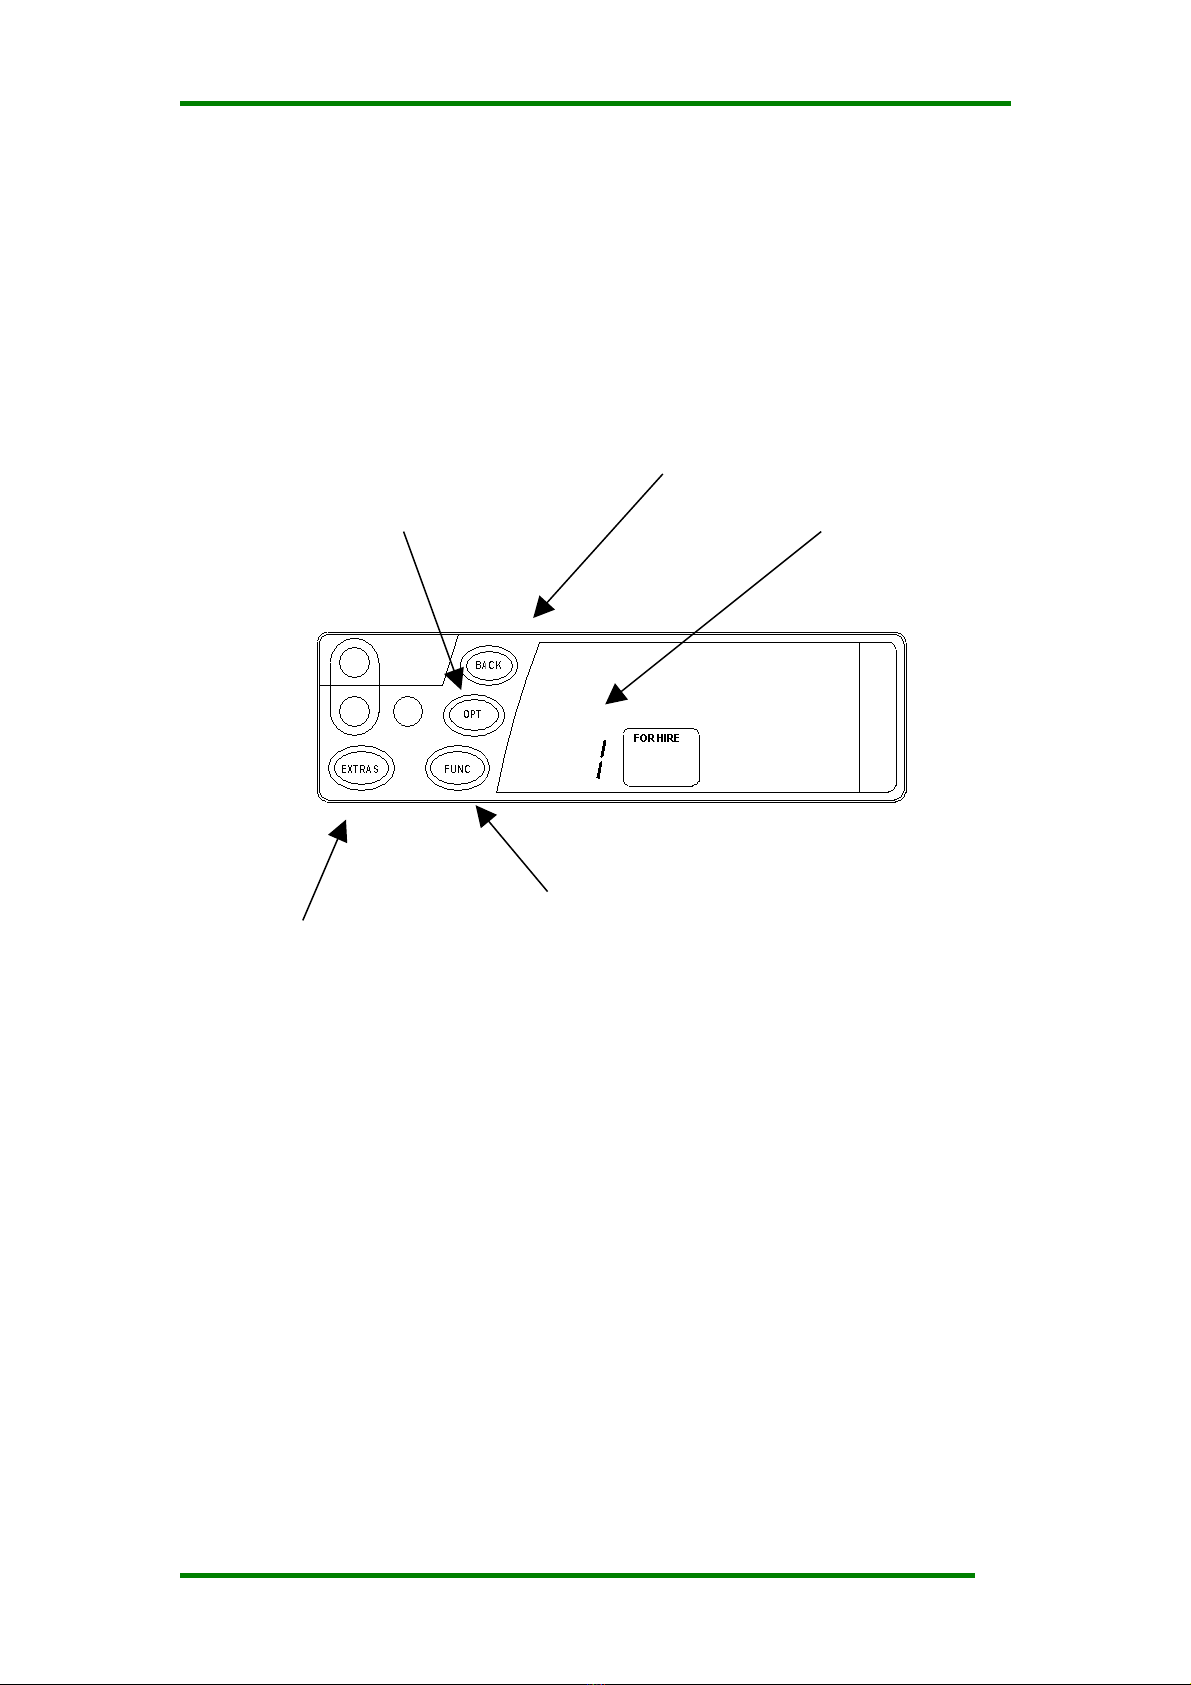
2.3 FOR HIRE Mode
In FOR HIRE mode, the T2 displays the currently selected rate and allows
manual rate selections to be made i these are included in the tari .
Optional Feature: The T2 may optionally display a time o day clock in the
Fare Display i allowed in the tari .
In FOR HIRE mode, the T2 may illuminate the roo sign o your vehicle.
This depends, however, on the tari program in the meter.
Rate currently
selected
Press OPT to select the
rate the T2 will charge.
The e ect o this button
depends on the tari in
the meter.
Press EXTRAS to
enter the USER
MENU
Press FUNC to
enter HIRED
mode.
Press BACK
to go back to
STANDBY.
4

T2 Taximeter User Guide. © Aquila Electronics Limited
2.4 HIRED Mode
HIRED mode is the mode in which the T2 calculates the are based on a
combination o time and distance. As soon as the meter is placed in
HIRED mode, it begins to calculate the are based on the tari
programmed into it.
There are some conditions which will prevent the T2 rom entering HIRED
mode rom FOR HIRE mode. These include:
1. The Date Stop Feature
2. The absence o a tari program
3. I the meter’s clock is not set and the tari is “calendar controlled”
In case o items 2 and 3, please contact your dealer or assistance. The
Date Stop eature is described in Section 4.4.5.
The EXTRAS
added so ar.
The current Fare
The currently
selected
charging rate
Press OPT to change
the rate the T2 is
charging. The e ect o
this button depends on
the tari in the meter.
Press BACK to
pause the are
calculation or display
the speedometer .
(See page 6)
Press EXTRAS
to add extras
(See Page 6) Press FUNC to
go to STOPPED
mode
5

T2 Mk III Taximeter User Guide. © Aquila Electronics Limited
Functions in HIRED Mode
I enabled in the tari program, the BACK button can be pressed to pause
the are calculation. In this case the are is “ rozen” until the BACK button
is pressed again. To indicate that the are is paused, the HIRED and
STOPPED legends lash alternately. When re-started, the are starts rom
the point at which it was paused. This eature is sometimes called “dead-
stop”.
I enabled in the tari program, the T2 may display a speedometer in the
EXTRAS display area. This is only available i there are no extras currently
shown. To turn the speedometer on or o , press the BACK button. I the
“pause” unction above is also available, hold the BACK button down or 2
seconds to activate the speedometer.
“ Multiple Extras”
The Multiple Extras unction o the T2 allows the selection rom a number
o possible extras amounts, each relating to charges or di erent types o
are supplements.
For example, the tari may contain a Multiple Extras table including:
Item Extras
amount
Max
number of
items
Descriptive
Word
Luggage £0.20 5 “LUGG”
Passengers
in excess o
one
£0.15 4 “PASS”
Airport
Charge
£1.50 1 “AirP
I the tari programmed into the meter contains “Multiple Extras”, then the
operation o the EXTRAS button is altered.
4. The irst time the EXTRAS button is pressed, the T2 displays the
Descriptive Word rom or the presently selected Multiple Extras item, eg,
“LUGG” or “Luggage”.
5. To scroll through the list o Extras items, keep holding down the EXTRAS
button and press the FUNC button until the required item is reached.
6. To add the Extras Amount, release the EXTRAS button, and then press
and release it again.
The T2 will only allow the permitted number o Extras increments to be
added (ie: up to 5 “Luggage” charges in the above example).
Note: Since the T2 (in common with most taximeters includes time in the
fare calculation in HIRED mode, it is not appropriate to do in-vehicle
distance related accuracy testing in HIRED mode. STOPPED mode should
be used for this purpose.
6
T2 Taximeter User Guide. © Aquila Electronics Limited
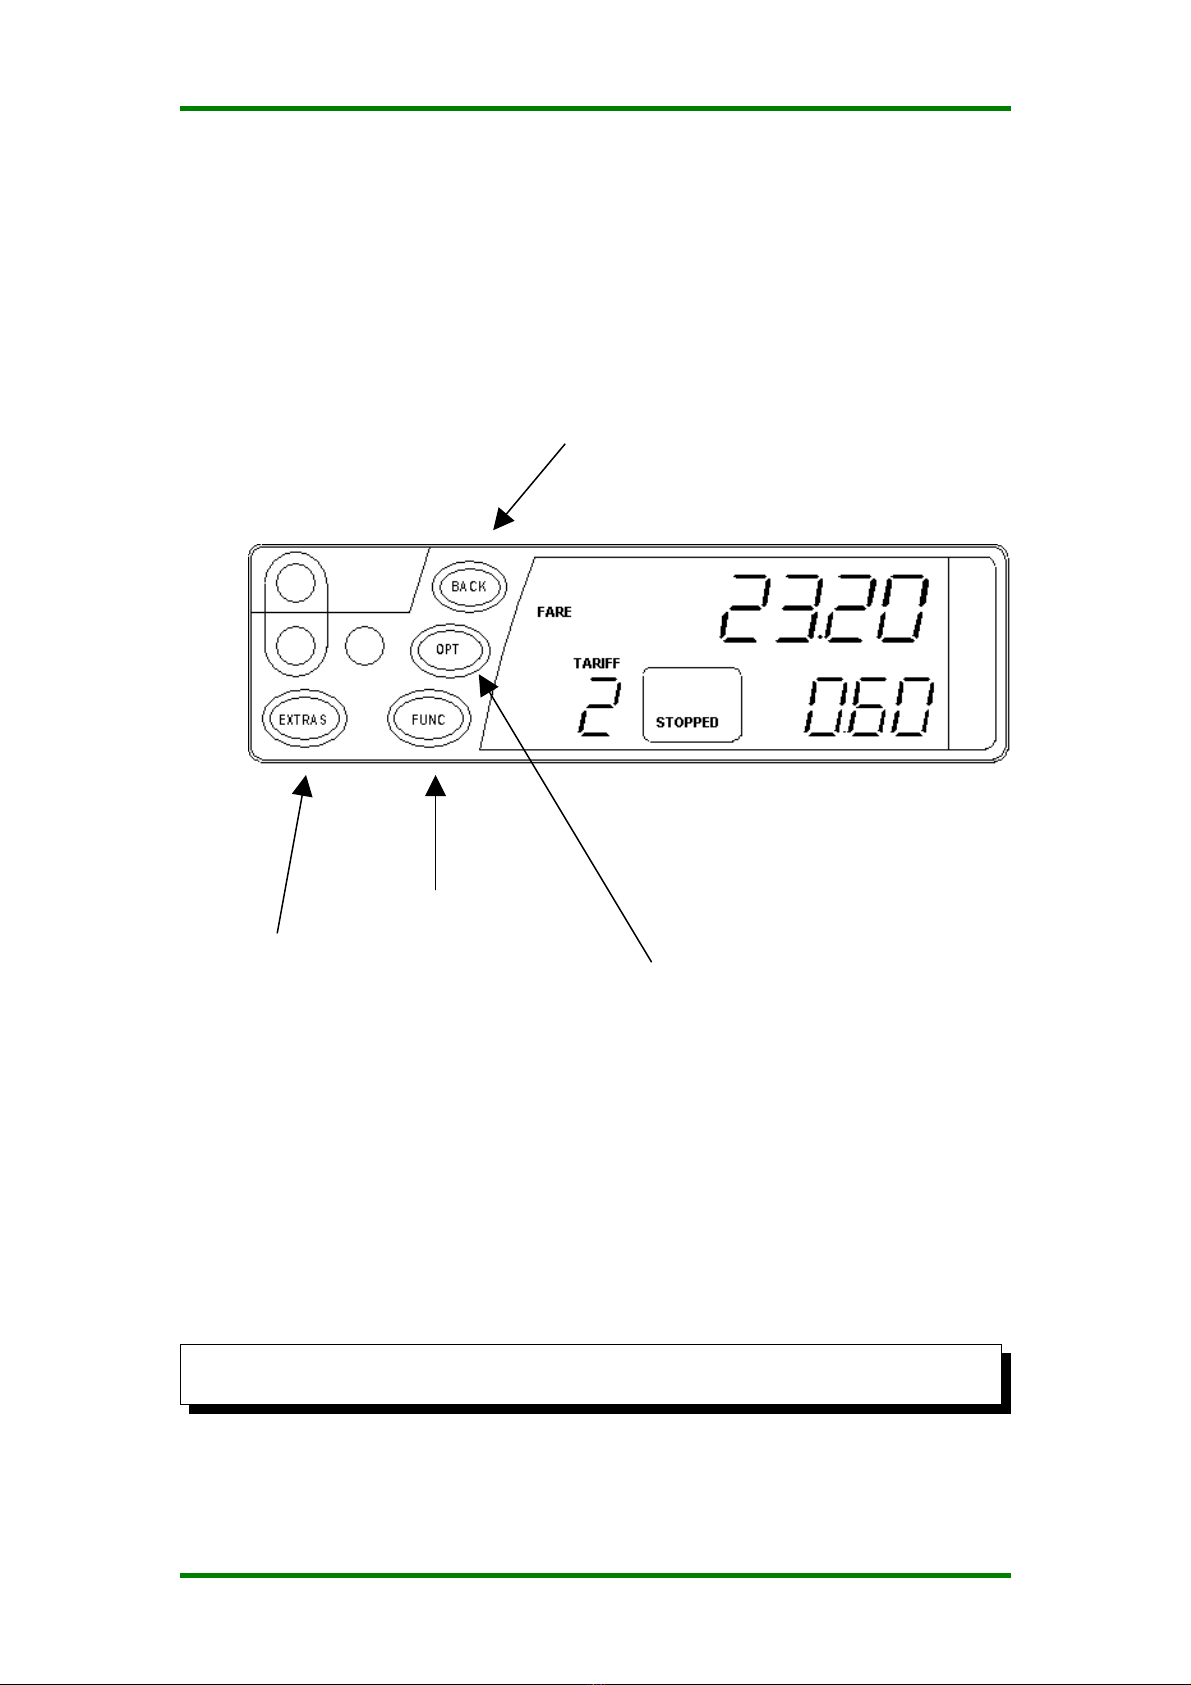
2.5 STO ED Mode
The T2 is normally placed in STOPPED mode at the end o the journey and
le t there until the passenger has paid the are. In this mode, the time
element o the are calculation is stopped, but the taximeter continues to
calculate the are on the basis o distance only.
I the T2 is programmed to do so, pressing the OPT button in STOPPED
mode will cause the are and extras to be added together and the legend
“TOTAL FARE” to be illuminated. The exact behaviour o this eature has
several possible options. I you require any urther in ormation, please
contact your dealer.
Since the T2 continues to calculate the fare on a distance basis only,
STOPPED mode may be used for in-vehicle testing.
Press BACK to
go back to
HIRED mode
(See below)
Press OPT to add
the are and extras
together (See
Below)
Press FUNC to
go back to FOR
HIRE mode.
Press EXTRAS
to add extras.
7

T2 Mk III Taximeter User Guide. © Aquila Electronics Limited
3 Tariffs, Options and IN Numbers
This section explains some basic principles as they apply to the T2 Taximeter.
3.1 Tariffs
A taximeter needs to be programmed with a tariff in order or it to charge
the correct ares and comply with the needs o your business and local
regulations.
The T2 is programmed with a tari by your dealer. As well as the charging
in ormation, the tari also includes:
In ormation about calendar dates, times and days o the week or so-
called “calendar” tari s.
The dates and times to change the clock orwards and backwards or
Summer and Winter time.
Con iguration o options such as the totalling o the are and extras in
stopped mode
Con iguration o the circuits used to activate the roo sign lamp(s) on the
vehicle.
Because of this, the behaviour of an T2 can change greatly depending on
the tariff programmed into it. If you require any help with the operation of
your taximeter, please contact your local dealer.
3.2 Tariff Code
Tari programming in ormation is generated by sta at Aquila Electronics in
conjunction with local dealers. In order to keep an accurate record o the
large number o programs written, and to assist in the diagnosis o
problems, every Aquila tari is uniquely numbered This number can be
displayed in the “In o” user menu (See section 4.3.2).
If given this number, staff at Aquila can quickly find out how your T2 has
been programmed and answer any queries you may have.
3.3 re-loaded Tariffs
A special “Pre-Loaded” tari programme can be created. This kind o tari
programme takes e ect rom a speci ied date and time. I a tari o this kind
is inserted into the T2, it keeps two separate tari programmes in its
memory, and chooses which one to use based on the date and time. This
eature is used to allow tari s to be inserted into the T2 be ore they are to
take e ect.
3.4 Receipt rograms
The T2 can optionally be programmed with one or more receipts or printing
on a suitable Receipt Printer. Like the tari program, the Receipt Program
has a unique code number which can be used to identi y it to your dealer.
8
T2 Taximeter User Guide. © Aquila Electronics Limited
3.5 IN Numbers
A PIN number is used to control access to the Date Stop eature (See
section 4.4.5)
The term PIN is borrowed rom the banking industry and stands or
“Personal Identi ication Number”.
The T2 uses six-digit PIN numbers with each digit taking a possible value
o 1,2,3, or 4. This allows PIN’s to be entered directly into the meter using
the ive buttons, and provides 4096 combinations.
The PIN number is unique to each T2 and may not be changed.
The Date Stop PIN number for your T2 can be obtained from your dealer.
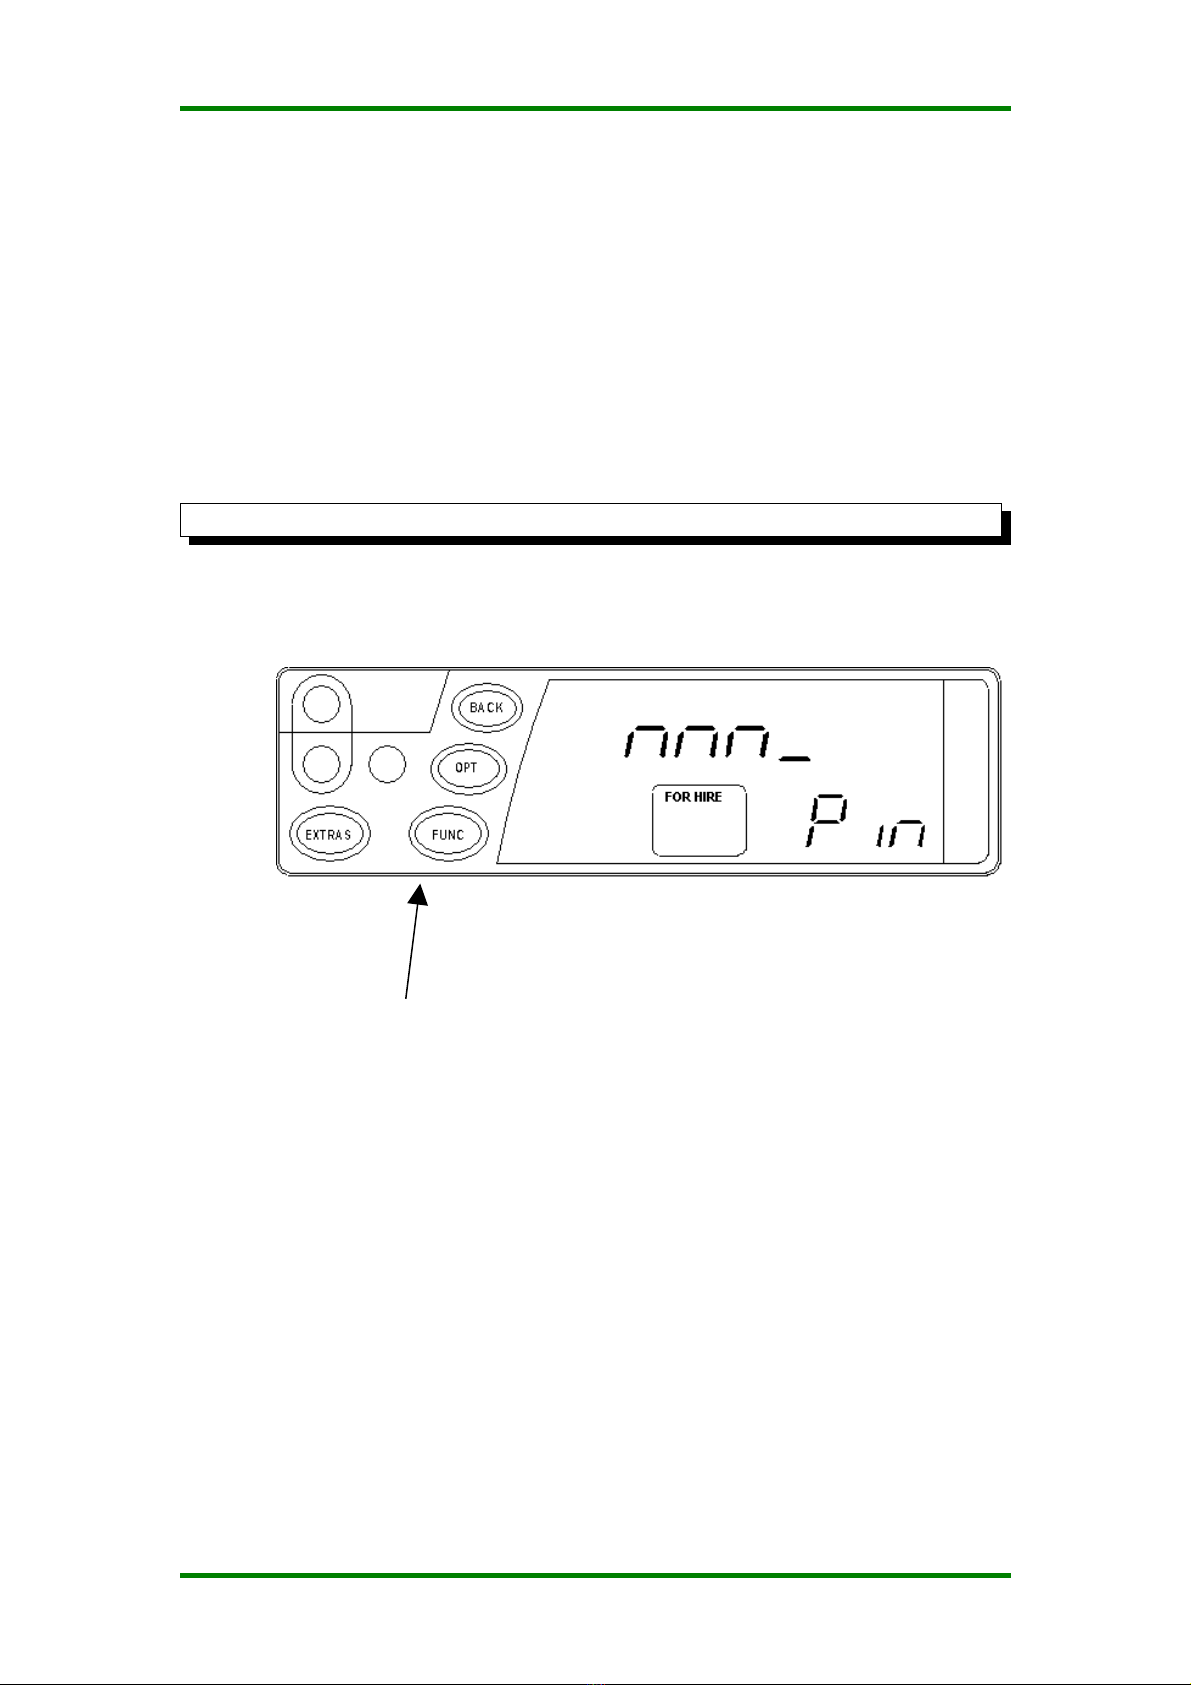
3.6 Entering a IN Number
When a PIN is required, the T2’s display looks like:
For example, the PIN number 413211 would be entered as:
BACK, EXTRAS, OPT, FUNC, EXTRAS, EXTRAS
I no keys are pressed or approximately 30 seconds, the PIN entry times
out.
Enter the 6-digit PIN using
the buttons or the
numbers 1 to 4.
9

T2 Mk III Taximeter User Guide. © Aquila Electronics Limited
4 The User Menus
The T2’s user menus allow:
In ormation to be read out o the meter, including the totals in ormation
Certain unctions o the meter and meter/vehicle inter ace to be tested
Certain eatures o the meter to be enabled, disabled or con igured
The User Menus are available when the T2 is in FOR HIRE or STANDBY
modes. To access the menu system, press the EXTRAS button in either o
these modes (see Sections 2.2 and 2.3).
The User Menus include the ollowing sections:
Section Description
Totals Allows access to read the meter’s totals in ormation. The
meter’s totals may also be con igured and reset in this
section.
Print Out This section is available i the T2 has a receipt program in
place, and is used to print out receipts on an optional printer.
In o Allows access to various “In ormation” items.
Features Allows access to various eatures.
To move between the sections, press the EXTRAS button.
To select one o the sections, press FUNC
To move between the sub-menus, press EXTRAS
To back out o an item, press BACK. To exit completely, press BACK
repeatedly.
I no button is pressed or a continuous period o 10 seconds, the T2
automatically leaves the User Menus and goes back to the previous mode.
Most o the menu items also time-out in a similar way.
10
Press EXTRAS to
move between the
menus.
T2 Taximeter User Guide. © Aquila Electronics Limited
4.1 User Menus: Totals
The T2 stores running totals o your earnings and other journey in ormation
or later recall. To access the totals, press OPT rom the “Totals” prompt.
Totals item.
See table in
Section 4.1.2
Totals set.
See table in
Section
4.1.1.
The Total
Press OPT to
change totals set
Press EXTRAS
to change the
totals item.
Press BACK to
leave the Totals
Display.
Press BACK with
EXTRAS held down to
clear the “temporary”
Totals set. Other totals
may not be reset. (See
section 4.1.3)
11

T2 Mk III Taximeter User Guide. © Aquila Electronics Limited
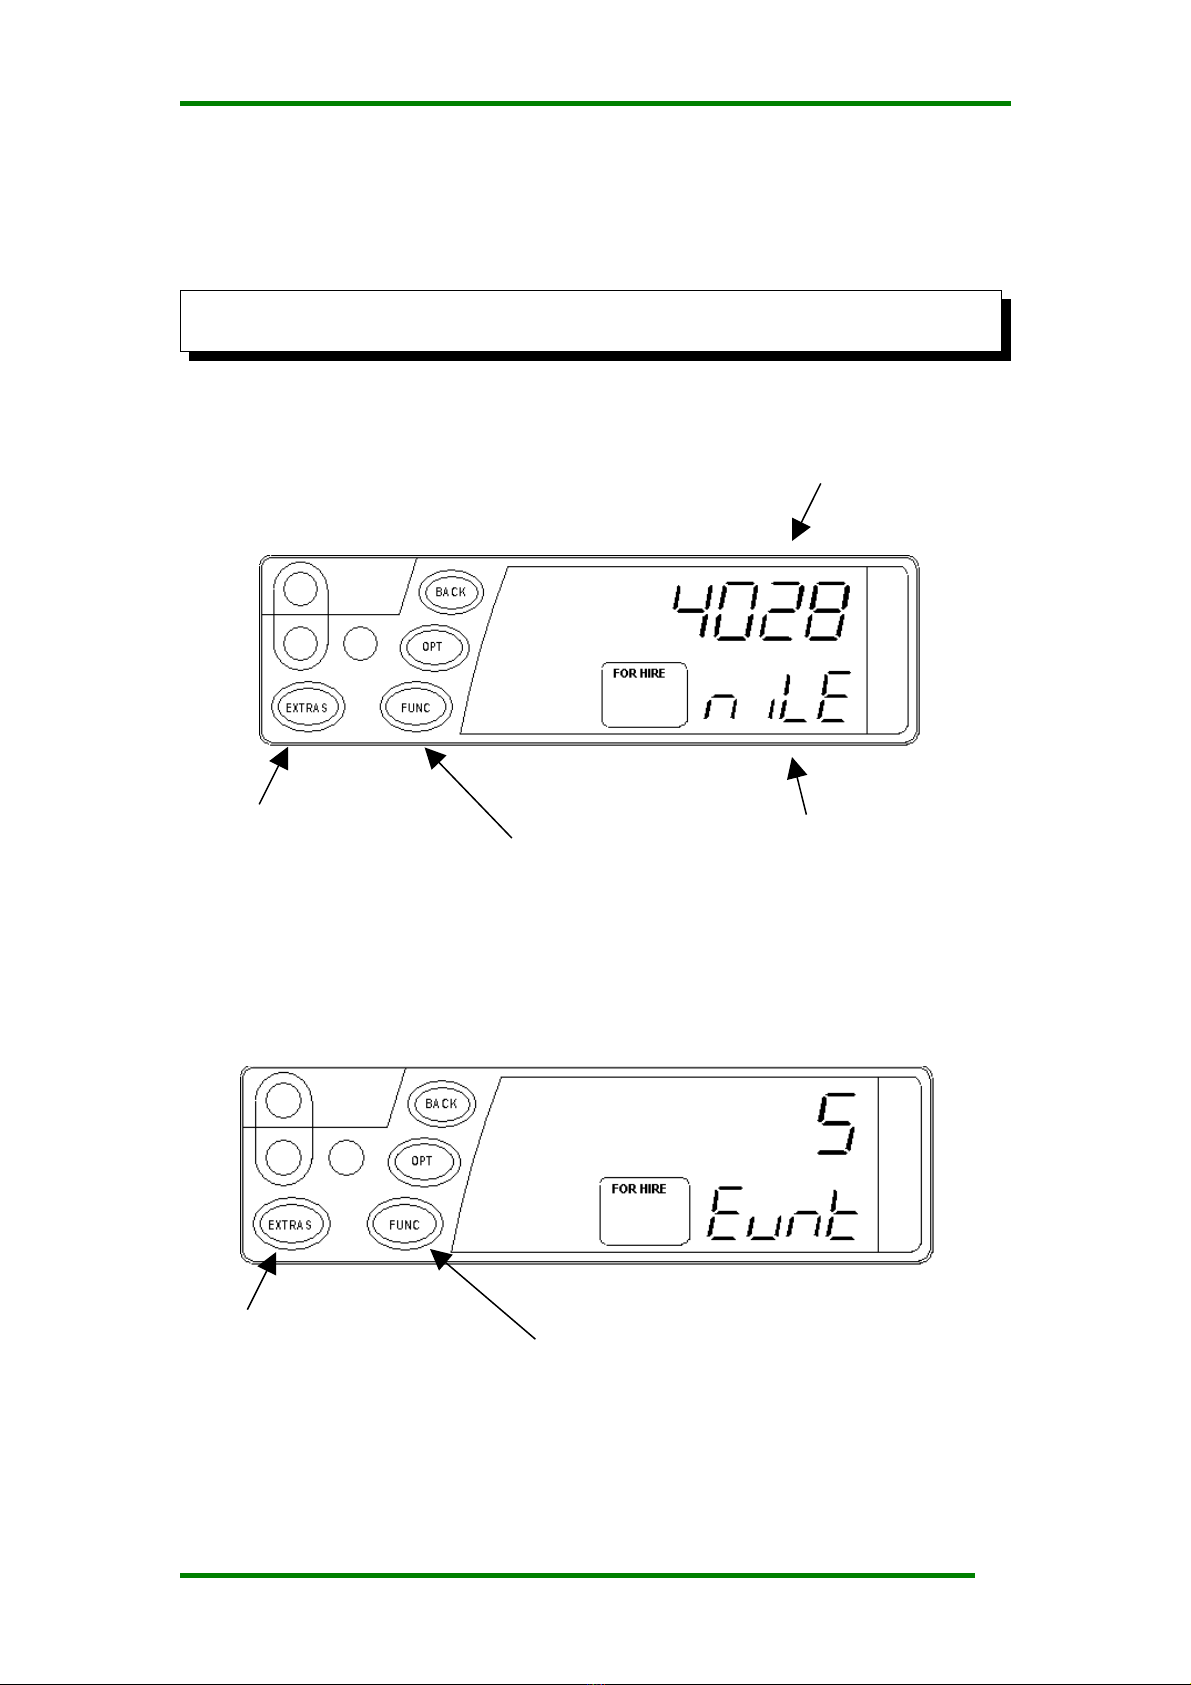
4.1.1 The 3 Sets of Totals
Three separate sets o totals are stored:
Display Description
t “Temporary Totals”. These may be reset by
user.
p “Permanent Totals”.
L “Last Journey” totals. This set represents the
last journey only.
4.1.2 Items in each set of Totals
Each set o totals includes the ollowing items:
Display Description Included In Last
Journey Totals
tE Total Earnings = Fares + Extras + Tips
F Fares
E Extras
Hr Hirings
td Total Distance travelled including
between hirings
pd Paid Distance: Distance travelled while
hired.
(Paid distance during
last Journey)
Ud Unpaid Distance: Distance while not
hired
(Unpaid distance since
last recorded journey)
nJ “No Jobs”: Number o journeys
“aborted” by a long power interruption.
(Number o “No Job”
journeys since last
recorded journey)
PU “Power Ups”: Count o number o times
power has been applied to the T2
In the case o the “Last Journey” totals, the “Hirings” total is absent. Some
o the other items have the meanings a indicated in the table above.
4.1.3 Clearing the “Temporary” Totals Set
It is possible to clear the “Temporary” totals set by holding down the
EXTRAS button and pressing BACK when the Temporary Totals are being
viewed (“t” in the Extras window)
12

T2 Taximeter User Guide. © Aquila Electronics Limited
4.2 User Menus: “ rint Out”
The “Print Out” menu option is only available if a receipt programme has
been inserted into the T2. Its correct use also requires the connection of a
suitable Receipt Printer.
Assuming that a receipt printer is connected to the T2 and switched on, a
receipt may be printed:
I only one receipt choice is available, pressing FUNC will print it.
I more than one receipt choice is available, pressing FUNC gains access
to a menu o the choices.
Press FUNC to print a receipt. I more than
one receipt has been programmed, a sub-
menu is displayed instead.
Press EXTRAS
to move to the
next item.
Press EXTRAS to move
to the next receipt. Press FUNC to
print the selected
receipt.
13

T2 Mk III Taximeter User Guide. © Aquila Electronics Limited
4.3 User Menus: Info
The in o menu contains a series o items giving in ormation about the meter
and its status.
4.3.1 Serial Number
This entry shows the T2’s serial number which should match the number
printed on the ront panel.
4.3.2 Tariff Number
See sections 3.1 and 3.2 for details of the tariff numbering scheme.
This item shows the Tari Number o the tari currently programmed into
the T2. I there is no tari installed, “no trF” is shown.
Pressing and holding FUNC at this point displays the Tari Programming
event counter and associated in ormation.
Press EXTRAS to move
to the next item.
14
Press EXTRAS to move
to the next item.
Press and hold FUNC
to display the event
counter in ormation.

T2 Taximeter User Guide. © Aquila Electronics Limited
If the T2 contains a “pre-loaded” tariff (See section 3.3 , then there is a
further entry in the menu showing the pre-loaded tariff number, or the “old”
tariff number if the pre-loaded tariff is active at the current date and time.
Pressing and holding FUNC displays the Tari Programming event counter:
Hold FUNC down and press EXTRAS to move to the next item (the date o
the last tari programming operation):
The third item is the identity (serial number) o the Tari Programmer used
by the dealer to program the tari :
15
Press EXTRAS to move
to the next item. Hold FUNC down
Press EXTRAS to move
to the next item. Hold FUNC down

T2 Mk III Taximeter User Guide. © Aquila Electronics Limited
4.3.3 Receipt Number
See section 3.4 for details of the receipt number.
If there is no receipt programme in the T2, the text “no rcP” is shown.
4.3.4 Software Version and Software Checksum
This item shows the version o the so tware in the T2.
You may need to tell your dealer the software version in the event of a
query.
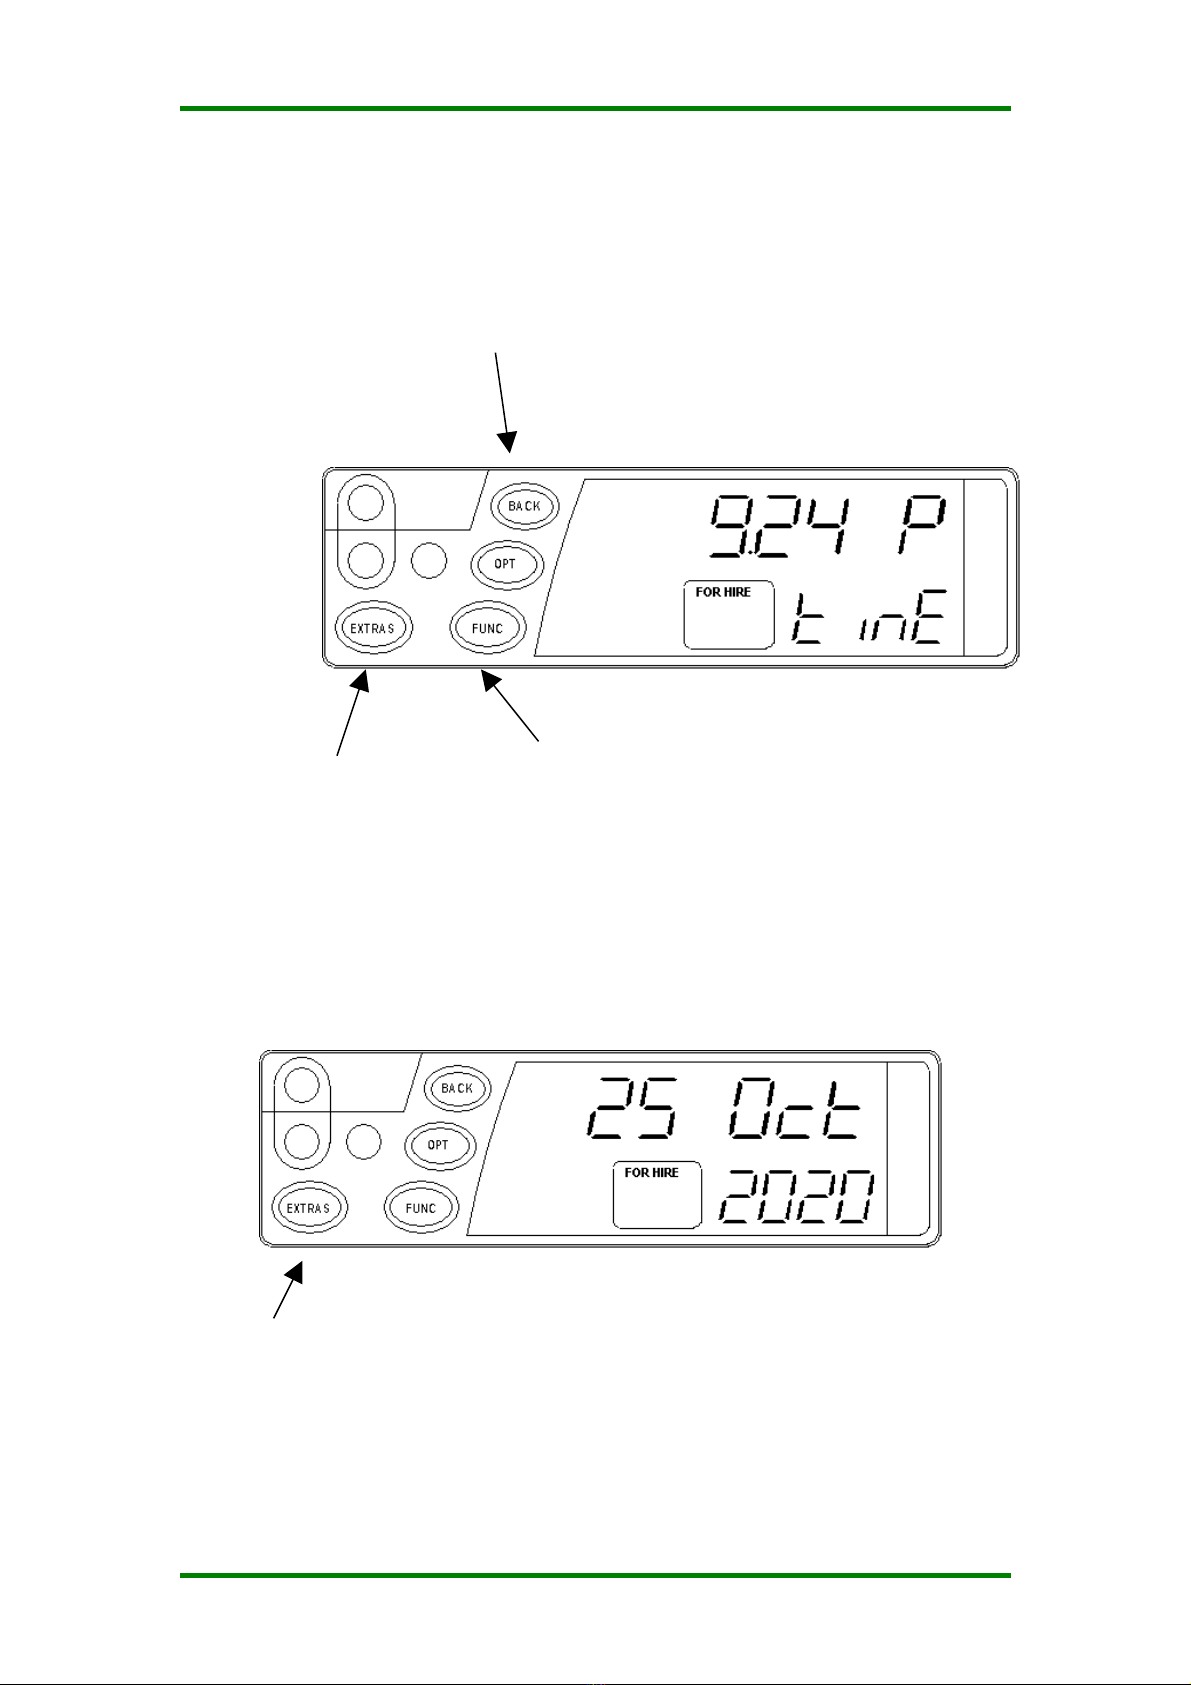
4.3.5 Time of Day
You can change the time between 12hour and 24hour format here. You
can also make minor adjustments to the time to allow for the accuracy of
the T2’s clock.
Press EXTRAS to move to
the next item.
16
Press and hold FUNC to display
the so tware checksum.
Press EXTRAS to move
to the next item.
T2 Taximeter User Guide. © Aquila Electronics Limited
4.3.6 Date
Press and hold down
FUNC to adjust the
time and 12/24 hour
clock display.
Press EXTRAS with
FUNC held down to
change between 12
and 24 hour clock.
Press BACK, with FUNC held down to
adjust the time orwards, OPT to adjust
the time backwards.
Press EXTRAS to move
to the next item.
17
T2 Mk III Taximeter User Guide. © Aquila Electronics Limited
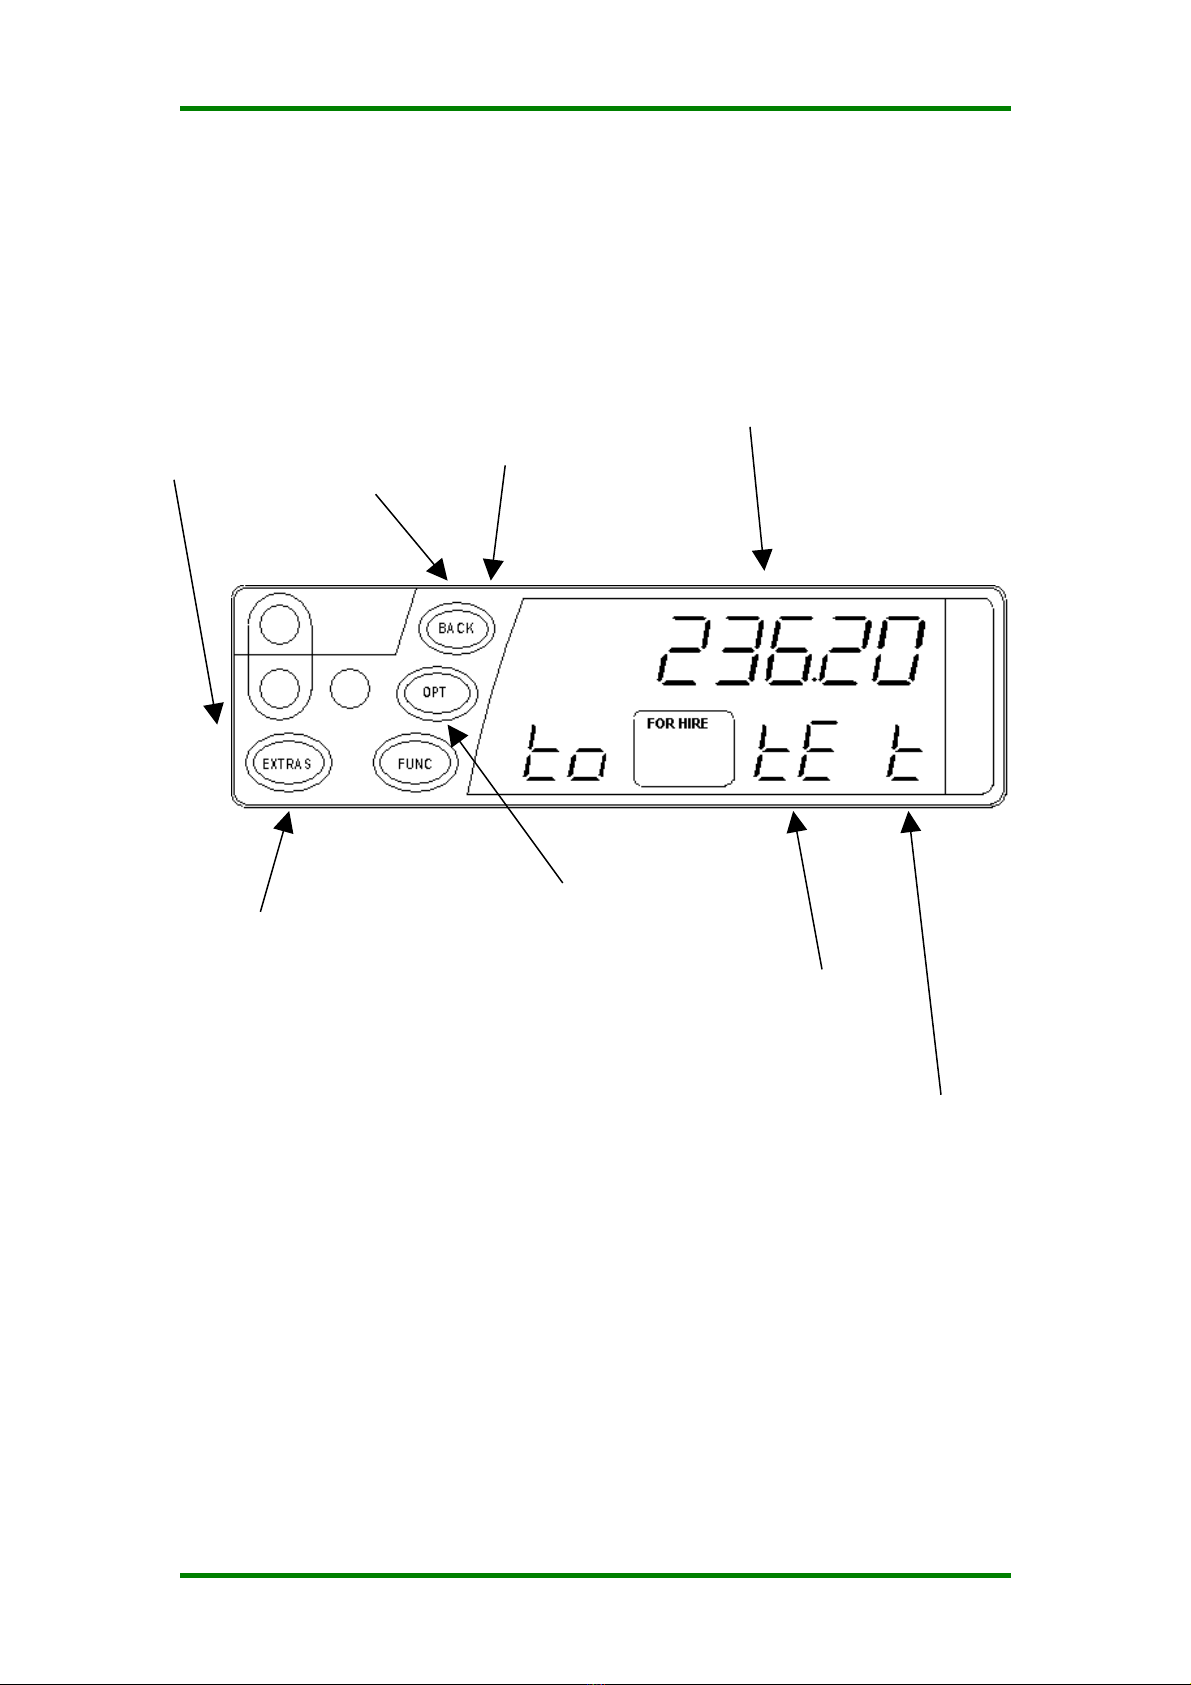
4.3.7 Calibration (k value)
The T2 is programmed by your dealer with a number o pulses per
mile/kilometre. This item allows you to check the value.
You may need to provide this information to your dealer in the case of a
query.
Press and hold the FUNC button to show the calibration event
counter:
Holding FUNC down and pressing extras moves to the calibration event
date display.
18
Press EXTRAS to move
to the next item. Hold FUNC down
Calibration number in
pulses per mile or
kilometre.
Press EXTRAS to move
to the next item. Display shows
“CAL/miLE” or
“CAL/metr” (“Metric”).
Press and hold FUNC
to display event
counter.
Table of contents
Other Aquila Measuring Instrument manuals


Popular Measuring Instrument manuals by other brands


IS Technologies
IS Technologies SONDAR 5000 user manual

Apex Digital
Apex Digital Leto user manual

Brugg Pipesystems
Brugg Pipesystems GERMANPIPE LMS 120 Operating and service instructions

Camille Bauer
Camille Bauer SINEAX CAM operating instructions

Murata
Murata DATEL ACM20 Application note

Hanna Instruments
Hanna Instruments HI96738 user manual


