AQUOR House Hydrant V2+ User manual

Aquor®House Hydrant V2+
ASSE 1019A CERTIFIED / meets IAPMO/cUPC
3
www.aquorwatersystems.com
(800) 458-1749
Overview
OVERVIEW
Aquor House Hydrant V2+
The Aquor®House Hydrant is a flush-mounted
hydrant with twist-lock connection system designed
for outdoor use.
The house hydrant is intended to be installed in
the exterior walls of homes and buildings. Upon
disconnection, a small amount of water self-drains
from the outlet. The Aquor® hose connector has a
built-in vacuum breaker for code approved
anti-siphon protection.
INCLUDED IN THIS KIT
x1 Stainless Steel Hydrant
x1 Hose Connector (CN-S1)
x1 Debris Cover
x4 #10 1.5” Mounting Screws
Read this entire instruction sheet before installing to ensure proper
installation. The information in this manual is subject to change
without notice.
Hydrant can only provide freeze protection when disconnected and
allowed to drain.
Intended for irrigation use and outdoor watering. Shall not be
subjected to more than (12) hours of continuous water pressure as
directed by ASSE code requirements.
Installation must comply with local codes and ordinances.
Please leave this manual with the property owner after completing the
hydrant installation.
FEATURES & BENEFITS
• Allows user to access water instantly by
connecting under full water pressure.
• Integral vacuum breaker in faceplate provides
anti-siphon protection.
• Robust O-ring connection system ensures a
reliable leak-proof seal, even at high water
pressures.
• Stainless steel operating rod and pressure-closed
valve provide zero-maintenance reliability for
years.
• Hydrant automatically self-drains upon
disconnection to provide freeze protection.
• Hydrant comes standard with ” female NPT
inlet. Rotatable 90° elbow and other optional
inlets available.
• Any ” accessory (e.g. water timers, splitters,
regulators) can be attached to end of hose
connector.
• Aquor®hose connector contains integral check
valve for additional backflow protection.

Aquor®House Hydrant V2+
ASSE 1019A CERTIFIED / meets IAPMO/cUPC
5
www.aquorwatersystems.com
(800) 458-1749
. PREPARE WALL
Determine the location for the hydrant. The
hydrant’s inlet must be installed into a heated area
of the structure that will not drop below freezing.
Before installation, make sure there is adequate work
room for securing the hydrant to the supply line.
Prepare the mounting surface and entry hole.
Aquor®House Hydrants require a vertical and
smooth mounting surface to ensure proper
installation and draining. Depending on the exterior
wall surface, a mounting block may be required
to provide a vertical and smooth mounting spot.
Mounting blocks can be commonly
found in hardware stores,
or can be made on-site
with materials such as
wood, fiber-cement, or
PVC trim board. Aquor®
mounting blocks can
be found on our website.
Installation
INSTALLATION
. SECURE HYDRANT TO WALL
Pre-pilot the mounting holes. Make sure to insert the
debris cover wedge behind the hydrant faceplate for
accurate markings.
Using a 1 /” hole saw, bore the entry hole through
the wall (and mounting block if using one) in the
desired location. Ensure the entry hole is vertically
level.
Tip: If enlarging an existing hole, try
cutting a dowel of the appropriate size
to use as a guide for the hole saw.
Tip: Use a low speed setting or a hand screwdriver
to avoid stripping the fasteners.
If drilling through a deep wall, you may
need to accommodate for the hydrant’s
downward angle.
A. Drill one 1 /”
(39 mm) hole.
B. Drill another
1 /” (39 mm)
hole below it,
1 /” (39 mm)
vertically on center.
C. Remove the
remaining material
to get the right
size for the hydrant.
1/”
(39 mm)

Aquor®House Hydrant V2+
ASSE 1019A CERTIFIED / meets IAPMO/cUPC
7
www.aquorwatersystems.com
(800) 458-1749
With the cover wedge behind the faceplate flange
secure the hydrant to the wall. x4 #10 1.5” stainless
steel screws are provided.
Cover wedge
behind faceplate
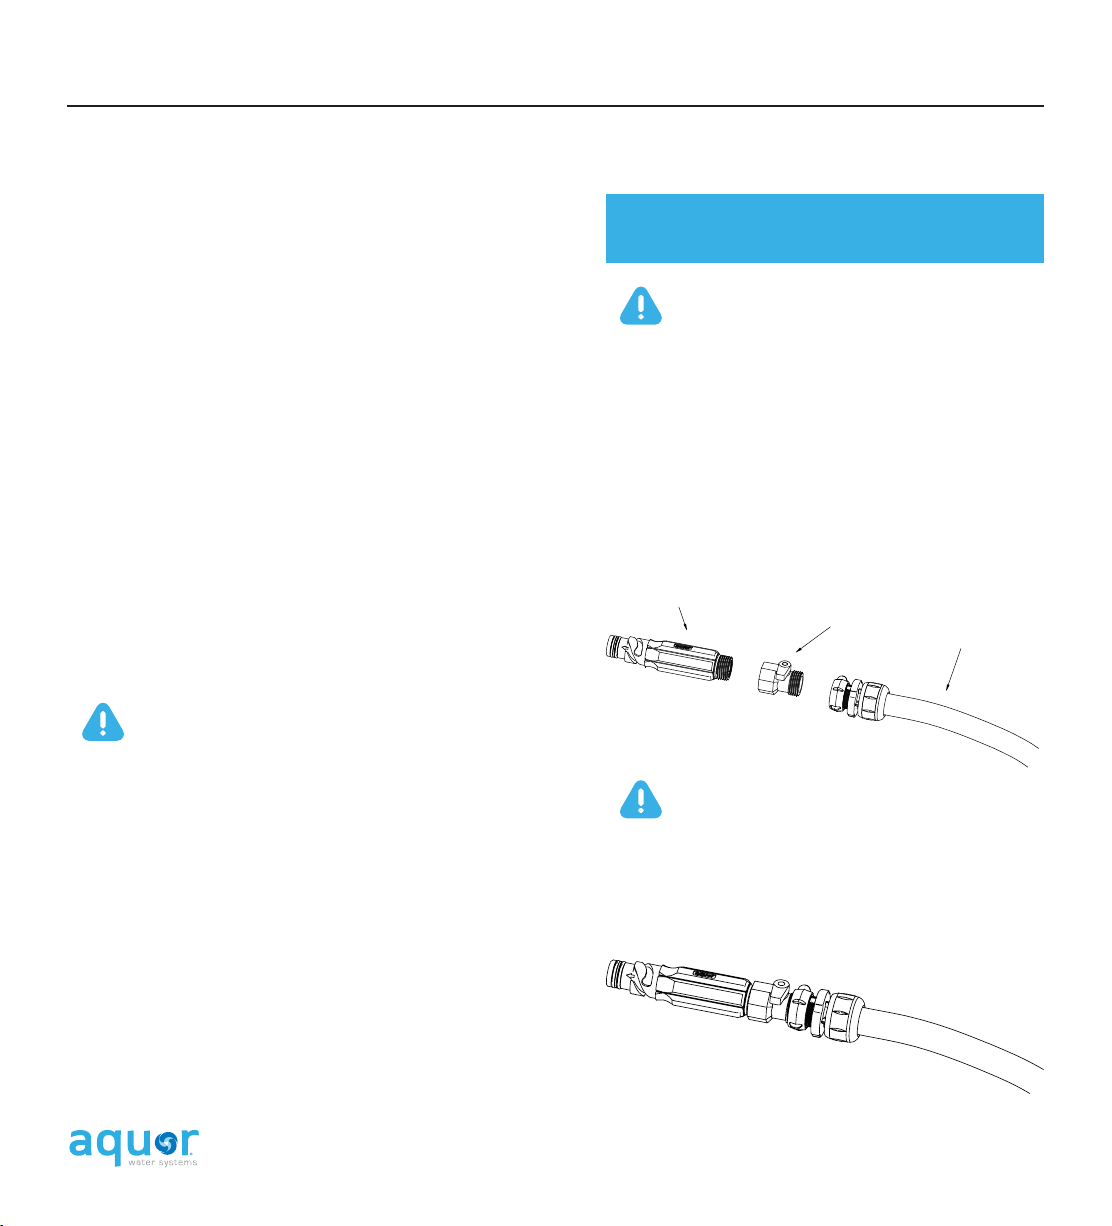
With the appropriate fitting installed, re-attach the
inlet to the hydrant body.
INSTALLATION
Tip: Drilling into brick or stone? Consider using
specialized fasteners and/or anchors. We also
manufacture optional stainless steel mounting plates
to space the mounting holes out further if needed.
After securing, test the cover to make sure it opens
and closes properly.
Tip: The inlet is on an O-ring seal. It’s designed to
rotate up to one turn while still keeping a watertight
seal. This is useful for alignment, especially for the
optional 90° elbow inlets. Tighten the inlet until it
stops, then rotate back to the desired spot. This seal
is rated to 250 PSI.
. CONNECT TO PLUMBING
With the appropriate fitting threaded in, connect the
hydrant to your plumbing system.
Hand-tight is fine; do not over-torque the
hydrant’s body connection. Do NOT apply
teflon tape or any kind of sealant to the
hydrant’s body threads.
. ATTACH FITTING
Proceed to the interior of the wall. Before attaching
a fitting, unscrew the hydrant’s rear inlet from the
main hydrant body.
The hydrant’s default inlet is ” NPT (f). Other
optional inlet styles are available.
Thread in the appropriate ” NPT fitting for your
plumbing type, wrapped in teflon tape then pipe-
joint compound. Firmly tighten with a wrench.
Aquor®House Hydrant V2+
ASSE 1019A CERTIFIED / meets IAPMO/cUPC
9
www.aquorwatersystems.com
(800) 458-1749
Tip: With copper plumbing and a V2+ series hydrant,
we recommend adding a shut-o valve and service
panel for maintenance access.
Common ways of connecting to PEX include crimp
rings, expansion tools, and push-fit adapters.
Complete the installation by turning on the water
supply.
Tip: With PEX tubing, we recommend adding an
expansion loop inside the wall if possible. This
allows the entire hydrant and fitting assembly to
be inspected and serviced from the exterior of the
building, if ever needed.
Depending on the type of plumbing, it will vary how
the hydrant connects. Common ways of connecting
to copper plumbing include soldering and push-fit
adapters.
Before plugging in, attach a garden hose to
the Aquor®hose connector.
Use a closed-end, such as a nozzle, on the hose
to create back pressure. Connect to the hydrant
and water should pressurize the hose immediately.
Disconnect and ensure the hydrant drains, then
remains leak-free.
Inspect the hydrant and plumbing connections for
any leaks.
INSTALLATION & OPERATION
Operation
Operating Aquor® House Hydrants is a simple
process. Water starts flowing through the hydrant
when the hose connector is plugged in. Turn o the
hydrant by unplugging the hose connector.
Attach the Aquor®hose connector to any garden
hose. It can stay attached; there is no need to
remove it every use. Before storage, depressurize
your hose by squeezing the nozzle on the other end.
Always remove hose during freezing
temperatures.
Use any accessory as you would with a traditional
bib. Inline ball valves, timers, splitters, vacuum
breakers, and etc. can be attached to the connector.
Some Aquor®hose connectors have a
one-way check valve to prevent water
from spraying when you disconnect.
Aquor®Hose Connector
Ball Valve (optional)
Any Garden Hose

Aquor®House Hydrant V2+
ASSE 1019A CERTIFIED / meets IAPMO/cUPC
11
www.aquorwatersystems.com
(800) 458-1749
Nibs on hydrant faceplate
To connect: Line up the three helical grooves on
the hose connector with the three nibs on the
hydrant faceplate. Simultaneously push and twist
the connector clockwise in a smooth motion. Make
sure to align the grooves fully and push in before
twisting. Water flow will start instantly when the
connector is engaged.
To disconnect: Push the connector in slightly,
then untwist counter-clockwise. The hydrant will
self-drain any remaining water left in the body.
The water will drain for the few moments, this is
perfectly normal.
Remember to depressurize your hose before
storage. It’s best to disconnect the hydrant when
not in use. For the longest lifespan, store your
Aquor® hose connectors out of the elements.
Connect hose to hose
connector before
connecting to hydrant.
Grooves on hose connector
OPERATION
Bayonet locking design keeps
connector secure when engaged
Tip: If you leave the Aquor®connector attached to
your garden hose, make sure to depressurize the
hose after use. Temperature changes can cause
water inside to expand, causing excessive pressure
on the connector’s internal check valve (and your
nozzle or accessories) over time.
For installation or other technical questions, please
call our customer service team at 1-800-458-1749.

Aquor®House Hydrant V2+
ASSE 1019A CERTIFIED / meets IAPMO/cUPC
13
www.aquorwatersystems.com
(800) 458-1749
Aquor®hydrants leave the factory fully tested
and operational. They are treated with an FDA
approved lubricant where needed. The hydrant
requires no scheduled maintenance to provide a
long operational life. If a problem does arise, all the
serviceable components are oered in repair kits
(see page 15).
It’s best to disconnect the hydrant when not in use.
The hydrant can only oer freeze protection when
disconnected. We recommend unplugging after
each use.
For freeze protection, the hydrant does not need
to be covered any further. As long as it has been
disconnected, allowed to drain, and the ambient
temperature inside the wall remains above freezing,
the hydrant and the plumbing will be protected.
Storing your hose connectors out of the elements
can prolong their lifespan. You can drain your
hose and bring it inside - the internal check valve
prevents any unwanted draining afterwards, so your
floor stays dry.
Protect the hose connector’s O-rings. They are
designed for extremely long lifespans if used
properly. Use care not to snag the connector
O-rings on the hydrant nibs. When connecting, line
up the grooves before attempting to push or twist.
Maintenance
MAINTENANCE
Routine cleaning with soap and water is usually
sucient to maintain the corrosion resistance and
appearance of the marine-grade stainless steel. Use
a soft brush to remove any accumulated dirt, then
rinse with clean water. Use stainless steel polish as
needed.
If you have hard water buildup, the hydrant can be
completely disassembled for service or cleaning
if needed. The inner valve and stem are accessed
through the rear.
We recommend replacing the internal valve once
every 20 years, or as needed. You may periodically
clean and lubricate the O-ring if there is mineral
buildup.

Aquor®House Hydrant V2+
ASSE 1019A CERTIFIED / meets IAPMO/cUPC
15
www.aquorwatersystems.com
(800) 458-1749
Hydrant
1. Rear Valve Housing (Inlet)
2. Valve Spring
3. Hydrant Body O-Ring
4. Inner Valve O-Ring
5. Operating Rod
6. Hydrant Body
Parts Description
7. Vacuum Breaker Washer
8. Vacuum Breaker Valve
9. Vacuum Breaker Seal
10. Vacuum Breaker Retainer
11. Vacuum Breaker Spring
12. Vacuum Breaker Cover
A
B
1
17
18 19 20
2345
A
C
Debris Cover
13. Debris Cover Gasket
14. Debris Cover Wedge
15. Debris Cover Nut & Bolt
16. Debris Cover
PARTS DESCRIPTION
Hose Connector
17. Connector O-Rings
18. Connector Body
19. Check Valve O-Ring
20. Check Valve
21. Check Valve Spring
22. Check Valve Retainer
Need Parts? Stem Replacement Kits available in 2”, 4”, 6”,
8”, 10”, and 12” , Vacuum Breaker Replacement
Kits , and Hose Connector O-Ring Kits are available.
For help, email us at contact@aquorwatersystems.com
or call us at 1-800-458-1749.
A
B
C
C
22
21
6
13 14
15
16
7 8 9 10 11 12
B

Aquor®House Hydrant V2+
ASSE 1019A CERTIFIED / meets IAPMO/cUPC
17
www.aquorwatersystems.com
(800) 458-1749
Technical Specs
TECHNICAL SPECS
In the Box
Backflow Protection
Inlet x Outlet
Operating Temperature
Operating Water Pressure
Flow Rate
Plumbing Compatibility
Hydrant Material
Connector Material
O-Ring Material
Cover Material
Certifications
Warranty
SKU
SKU
VBHP002
VBHP004
VBHP006
VBHP008
VBHP010
VBHP012
Stem Length (A)
2” Hydrant
4” Hydrant
6” Hydrant
8” Hydrant
10” Hydrant
12” Hydrant
Overall Length (B)
4 /” (114 mm)
5 /” (141 mm)
7 /” (192 mm)
9 /” (241 mm)
11 /” (292 mm)
13 /” (343 mm)
Optional 90° elbow inlets reduce overall length by 1/2”(13 mm).
Hydrant, Debris Cover, Hose
Connector, x4 #10 1.5” Mount-
ing Screws, Install Instructions
Yes, built-in vacuum breaker
1/2 “ NPT (f) x 3/4” GHT (m)
33 -140 °F
25-125 PSI
6.8 GPM @ 52 PSI
All (PEX recommended)
316L Stainless Steel
Acetal Resin Polymer
Fluorocarbon Rubber
ASA Thermoplastic
ASSE 1019A, meets IAMP/cUPC
10 Years stainless steel,
5 Years polymer
VBHP002, VBHP004,
VBHP006, VBHP008,
VBHP010, VBHP012

Aquor®House Hydrant V2+
ASSE 1019A CERTIFIED / meets IAPMO/cUPC
19
www.aquorwatersystems.com
(800) 458-1749
TECHNICAL SPECS
VBHP
STEM LENGTH: "
OVERALL LENGTH: - /"
Close-Couple House Hydrant V2+
VBHP
STEM LENGTH: "
OVERALL LENGTH: - /"
4" House Hydrant V2+

Aquor®House Hydrant V2+
ASSE 1019A CERTIFIED / meets IAPMO/cUPC
21
www.aquorwatersystems.com
(800) 458-1749
TECHNICAL SPECS
VBHP
STEM LENGTH: "
OVERALL LENGTH: - /"
6" House Hydrant V2+
VBHP
STEM LENGTH: "
OVERALL LENGTH: - /"
8" House Hydrant V2+

Aquor®House Hydrant V2+
ASSE 1019A CERTIFIED / meets IAPMO/cUPC
23
www.aquorwatersystems.com
(800) 458-1749
TECHNICAL SPECS
VBHP
STEM LENGTH: "
OVERALL LENGTH: - /"
10" House Hydrant V2+
VBHP
STEM LENGTH: "
OVERALL LENGTH: - /”
12" House Hydrant V2+

Aquor®House Hydrant V2+
ASSE 1019A CERTIFIED / meets IAPMO/cUPC
25
www.aquorwatersystems.com
(800) 458-1749
No water flow when connected.
Water leaking from plumbing connection.
Water leaking from hydrant body-to-inlet connection.
Troubleshooting
PROBLEM
TROUBLESHOOTING
First you’ll want to identify whether the issue is in the
hydrant, or the hose connector.
Make sure water supply is live to the hydrant. Try
depressing the hydrant valve with your thumb to test for
pressure. If the water pressure is live, the issue is likely
the hose connector.
Inspect the hose connector to see if the internal check-
valve is stuck. In variable weather conditions, if left
pressurized outside, water expansion may cause the
check valve to seize.
If the hose connector has a ball-valve, make sure it is on.
For threaded fittings, re-wrap with 4-5 wraps of teflon
tape, followed by a layer of pipe-joint compound. Firmly
tighten with wrenches.
For PEX specific fittings, ensure a compatible PEX tubing
type and installation tool are being used. Check fitting
dimensions for spec.
Inspect the O-ring between the rear valve housing (inlet)
and hydrant body. The inlet can be backed o up to
on full rotation without losing a watertight seal. Ensure
no teflon tape or sealant is applied. Inlet should thread
smoothly.
SOLUTION

Aquor®House Hydrant V2+
ASSE 1019A CERTIFIED / meets IAPMO/cUPC
27
www.aquorwatersystems.com
(800) 458-1749
Correct order of vacuum breaker assembly
Water leaking from the hydrant main outlet when
disconnected.
Water leaking from
vacuum breaker
when connected.
Water sprays from the vacuum breaker when
connecting.
Hose connector won’t stay plugged in.
Water leaking from the hydrant main outlet (front) when
connected.
PROBLEM
TROUBLESHOOTING
A slow leak may indicate a stuck or bent internal rod, or
damaged O-ring.
First, try to reset the valve from the front. Shut-o water
supply and use needlenose pliers to press in and rotate
the internal operating rod. Resistance could indicate a
piece of debris behind the valve.
If leak persists, remove the internal operating rod from
the hydrant by unscrewing the rear inlet from the body.
Inspect the O-ring and stem for any damage, remove
debris or replace assembly if needed.
First, ensure water pressure is between 25-125 PSI.
Pressure that is too high or too low can cause issues with
backflow preventers.
Next, test with a second hose connector. If the issue
persists, replace the faulty hose connector.
A small burst of water when connecting or disconnecting
is normal due to pressure.
If the spray or leak persists, inspect the vacuum breaker
washer and replace if needed.
Ensure water pressure is not too low. The hydrant uses
water pressure to seal, and is designed for pressures of
25-125 PSI. If you are installing the hydrant on a well
or low-pressure system, contact us for a higher weight
hydrant valve spring, or add a pressure booster.
First, make sure the vacuum- breaker is not leaking.
Inspect hose connector O-rings for damage, replace or
lubricate if needed.
SOLUTION

Aquor®House Hydrant V2+
ASSE 1019A CERTIFIED / meets IAPMO/cUPC
29
www.aquorwatersystems.com
(800) 458-1749
Hose connector is dicult to connect or disconnect.
Warranty
PROBLEM
TROUBLESHOOTING, WARRANTY, & CONTACT
For any questions, please get in touch with our customer
service team at contact@aquorwatersystems.com or call
us at 1-800-458-1749 Mon-Fri 9AM-4PM.
Contact Us
Try squeezing your hose nozzle while simultaneously
disconnecting.
If left outdoors in variable weather, water expansion
may have caused the connector’s internal check-valve
to seize. Try disassembling or removing the connector’s
check valve. Test with a dierent hose connector.
There may be a piece of debris stuck in the hydrant’s
main valve. Shut o the water supply, then test the
valve’s forward/back operation with your thumb or a
tool. It should operate smoothly. If needed, remove
hydrant’s operating rod by unscrewing the rear inlet.
If the issue occurs gradually over time, try cleaning the
hydrant’s outlet and lubricating the connector O-rings.
SOLUTION
We stand behind every product we make. Aquor
oers a 10 year warranty on all stainless steel
components and 5 years on all polymer components.
Our mission is to manufacture the highest quality
water connectors possible, engineered to last
decades of frequent use.
Visit our website to activate
your product warranty.
www.aquorwatersystems.com
/pages/warranty-registration
This manual suits for next models
8
Table of contents
Other AQUOR Plumbing Product manuals


Popular Plumbing Product manuals by other brands


Bradley
Bradley S19-210FW Installation

Axor
Axor Citterio 39037003 Instructions for use/assembly instructions

Tylo
Tylo Sauna i1515 Corner manual

Signature Hardware
Signature Hardware BEASLEY 948676 manual

DURAVIT
DURAVIT Inipi 7509 Series Mounting instruction

Symmons
Symmons Canterbury 4-163 Operation & maintenance manual


