Arcam ST5 User manual

©
ARCAM ST5 Owner's Manual EN
–
Harman
International Industries, Incor orate
d.
Features, s ecifications, and a earance subject to change without notice.
ST5
Owner’s Manual
Download the setu a :

2 ARCAM ST5 Owner's Manual EN
IMPORTANT SAFETY INSTRUCTIONS
1. Read these instructions.
2. Kee these instructions.
3. Heed all warnings.
4. Follow all instructions.
5. Clean only with a dry cloth.
6. Do not block any ventilation o enings. Install this a aratus
in accordance with the manufacturer’s instructions.
7. Do not install this a aratus near any heat sources such as
radiators, heat registers, stoves or other a aratus that
roduce heat.
8. Do not defeat the safety ur ose of the olarized or
grounding-ty e lug. A olarized lug has two blades with
one wider than the other. A grounding-ty e lug has two
blades and a third grounding rong. The wide blade or the
third rong is rovided for your safety. If the rovided lug
does not fit into your outlet, consult an electrician for
re lacement of the obsolete outlet.
9. Protect the ower cord from being walked on or inched,
articularly at lugs, convenience rece tacles and the oint
where they exit from the a aratus.
10. Use only attachments/accessories s ecified by the
manufacturer.
11. This equi ment is designed for use in moderate climates
with a maximum tem erature of 35℃.
12. Use only with the cart, stand,
tri od, bracket, or table s ecified
by the manufacturer or sold with
the a aratus. When a cart is used,
use caution when moving the
cart/a aratus combination to
avoid injury from ti -over.
13. Un lug this a aratus during lightning storms or when
unused for long eriods of time.
14. Refer all servicing to qualified service ersonnel. Servicing is
required when the a aratus has been damaged in any way,
such as when the ower-su ly cord or lug is damaged,
liquid has been s illed or objects have fallen into the
a aratus, or the a aratus has been ex osed to rain or
moisture, does not o erate normally or has been dro ed.
15. To disconnect this a aratus from the AC mains com letely,
disconnect the ower-su ly cord lug from the AC
rece tacle.
16. The mains lug of the ower-su ly cord shall remain
readily o erable.
17. This a aratus is intended to be used only with the ower
su ly and/or charging cable rovided by the manufacturer.
WARNING: TO REDUCE THE RISK OF FIRE OR ELECTRIC SHOCK, DO NOT EXPOSE THIS APPARATUS TO RAIN OR
MOISTURE.
•Do not use this a aratus near water.
•Do not ex ose this a aratus to dri ing or s lashing, and ensure that no objects filled with liquids, such as
vases, are laced on the a aratus.
CAUTION
RISK OF ELECTRIC SHOCK. DO NOT OPEN.
THIS SYMBOL ON THE PRODUCT MEANS THERE IS
UNINSULATED, DANGEROUS VOLTAGE
WITHIN THE
PRODUCT ENCLOSURE THAT MAY PRESENT A RISK
OF ELECTRICAL SHOCK.
THIS SYMBOL ON THE PRODUCT MEANS THERE
ARE IMPORTANT OPERATING AND MAINTENANCE
INSTRUCTIONS IN THIS GUIDE.
Visit the roduct age at ARCAM.co.uk and download the Safety Sheet for a full list of safety instructions.
Class II Product
This equi ment is a Class II or double insulated electrical a liance. It has been designed in such a way that it does
not require a safety connection to electrical earth (“ground” in the U.S.).

3 ARCAM ST5 Owner's Manual EN
Table o Contents
IMPORTANT SAFETY INSTRUCTIONS ............................................................................................................................................2
Table o Contents ........................................................................................................................................................................3
Package Contents ........................................................................................................................................................................4
Placing The Unit ...........................................................................................................................................................................4
Front Panel ..................................................................................................................................................................................5
Rear Panel ...................................................................................................................................................................................5
Remote Control ...........................................................................................................................................................................6
Dis lay Control .................................................................................................................................................................................6
Preset Selection ...............................................................................................................................................................................6
Connecting the Streamer .............................................................................................................................................................7
Wired Network Connection: ............................................................................................................................................................7
Wi-Fi Connection: ............................................................................................................................................................................7
Analog Audio Connection ................................................................................................................................................................8
Digital Audio Connection .................................................................................................................................................................9
Control Connection ........................................................................................................................................................................10
Operation .................................................................................................................................................................................. 11
Power .............................................................................................................................................................................................11
Auto Standby .................................................................................................................................................................................11
Playback .........................................................................................................................................................................................11
USB ............................................................................................................................................................................................ 11
Menu ......................................................................................................................................................................................... 12
Menu Tree .....................................................................................................................................................................................12
Supported File Formats ............................................................................................................................................................. 12
Troubleshooting ........................................................................................................................................................................ 13
Speci ications ............................................................................................................................................................................ 13
Trademarks and Licenses ........................................................................................................................................................... 15

4 ARCAM ST5 Owner's Manual EN
Thank you or choosing ARCAM
ARCAM has been roducing s ecialist Hi-Fi and home cinema roducts offering state of the art sound quality for over
45 years. The ARCAM ST5 is the latest in a long line of award-winning digital audio roducts extending back to our
first CD layer that we created, the ARCAM Delta 70 in 1986, and the world’s first se arate DAC, the Delta Black Box
in 1988.
The ARCAM ST5 rovides an inclusive feature set su orting most smart hones and tablets, as well as o ular
streaming services. Connect the ST5 to your home network with Wi-Fi or Ethernet to enjoy instant layback using
A le Air lay2 or Google Chromecast. The ST5 will layback music directly from S otify Connect and Tidal Connect;
and for ower users the ST5 is Roon Ready.
In the unlikely event of any fault, or you require technical assistance, lease contact our dedicated su ort teams by
email using luxurysu [email protected]m, or by tele hone using +44 (0) 1707 668012 or +1 888 691 4171. Or, if you
sim ly require further information about ARCAM roducts, our network of dealers will be ha y to hel you. Further
information can also be found on the ARCAM website at ARCAM.co.uk.
Package Contents
ARCAM ST5 streaming music layer
IR remote
2x AAA batteries for the remote control
Region s ecific ower cords
RJ11 control cable
Quick start guide
Safety and com liance document
Placing The Unit
Place the streamer on a level, firm surface, avoiding direct sunlight and sources of heat or dam .
Do not lace the ST5 on to of an am lifier or other source of heat.
Make sure the remote-control receiver to the left of the front anel dis lay is unobstructed, otherwise this
will im air the use of the remote-control.
Do not lace your record deck on to of this unit. Record decks are very sensitive to the noise generated by
mains ower su lies which will be heard as a background ‘hum’ if the record deck is too close.
The normal function of the unit may be disturbed by strong electromagnetic interference. If this occurs,
sim ly reset the unit with the ower button, or move the unit to another location.
This roduct offers the user the o tion to deactivate ower management functions. Note that doing this this will
increase energy consum tion of the roduct.

5 ARCAM ST5 Owner's Manual EN
Front Panel
Rear Panel
C
o
ntrol
Use with
su lied Control
Cable to control
a
n ARCAM Radia
Am lifier
Display
Power Input
Connect the
su lied ower
cable here
Power Switch
Switch on or off
Analog Outputs
Connect these out uts
to an analog in ut on
your am lifier
Digital Outputs
Connect either of these
out uts to a digital
in ut on your DAC or
am lifier
USB Socket
Connect USB stick
for layback of
music files
Ethernet
Socket
Connect this to
your home
network when
not using Wi-Fi

6 ARCAM ST5 Owner's Manual EN
Remote Control
Note: Incorrect use of batteries can have hazardous results. Do not mix old and new batteries
together. Do not use non-identical batteries together. Although they may look similar,
different batteries may have different voltages. Ensure the batteries are inserted in the correct
direction.
Remove batteries from equi ment that is not going to be used for a month or more. When
dis osing of used batteries, lease com ly with governmental or local regulations that a ly in
your country or area.
Display Control
Press the button on the remote control to turn the dis lay on or off.
Preset Selection
To select a preset radio station, ress the left or right navigation buttons.Press the select button when you
see the reset you wish to lay.
Toggle Standby O eration
Menu Navigation
Center button to select
Volume Control
(for ARCAM am s only)
Mute On or Off
(for ARCAM am s only)
Dis lay Brightness
Trans ort Keys (Play/Pause, Ski back/forward)
Menu button
Music info button
7 ARCAM ST5 Owner's Manual EN
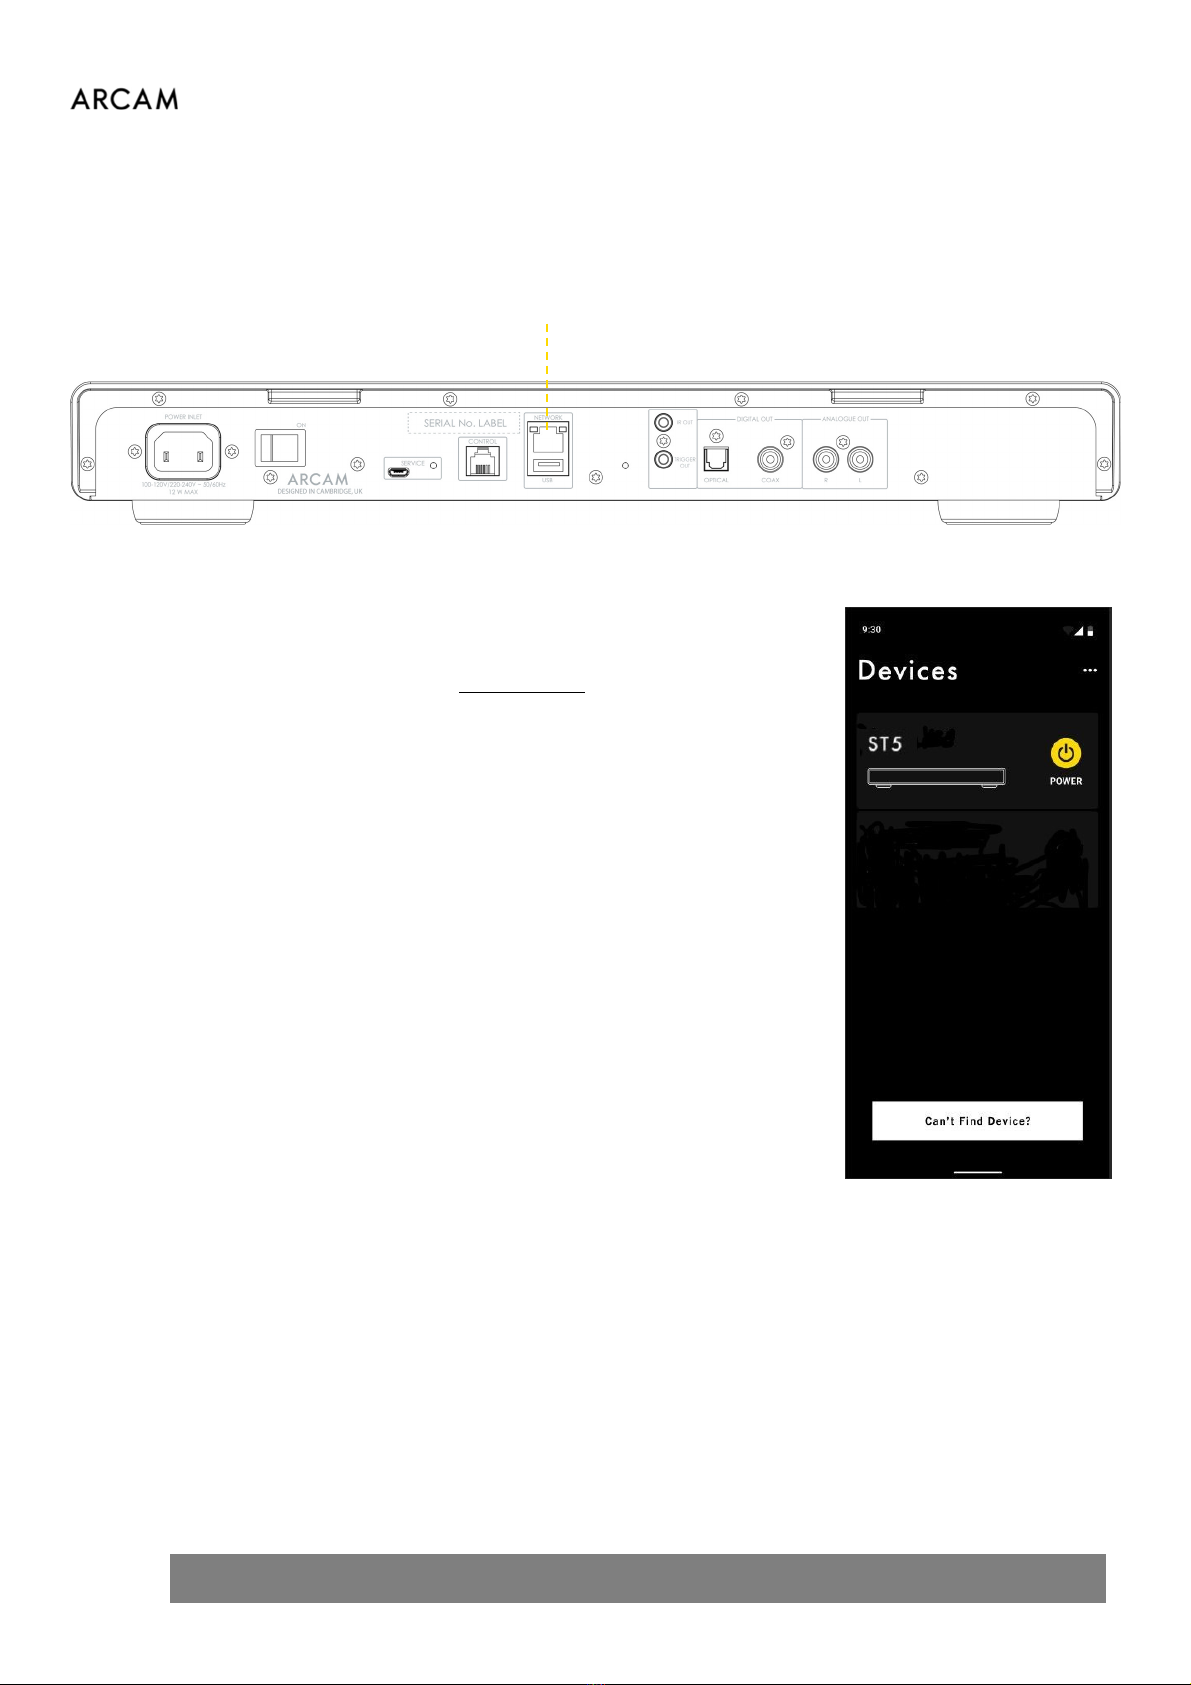
Connecting the Streamer
Wired Network Connection:
Wi-Fi Connection:
To make a Wi-Fi connection, download the ARCAM Radia a to your
smart hone or tablet. Links are on the front age of this manual.
Power on the ARCAM ST5 streamer and o en the a to discover it after the
ST5 is Ready. Select it and follow the rom ts to connect it to your Wi-Fi
network.
Alternatively, you can connect the ARCAM ST5 to your Wi-Fi network using
Apple Airplay speaker setup in the Wi-Fi settings of your A le device, or the
Google Home app in both Android and A le devices.
Ethernet Socket
Connect this to your
home network using a Cat
5e or Cat 6 cable
8 ARCAM ST5 Owner's Manual EN
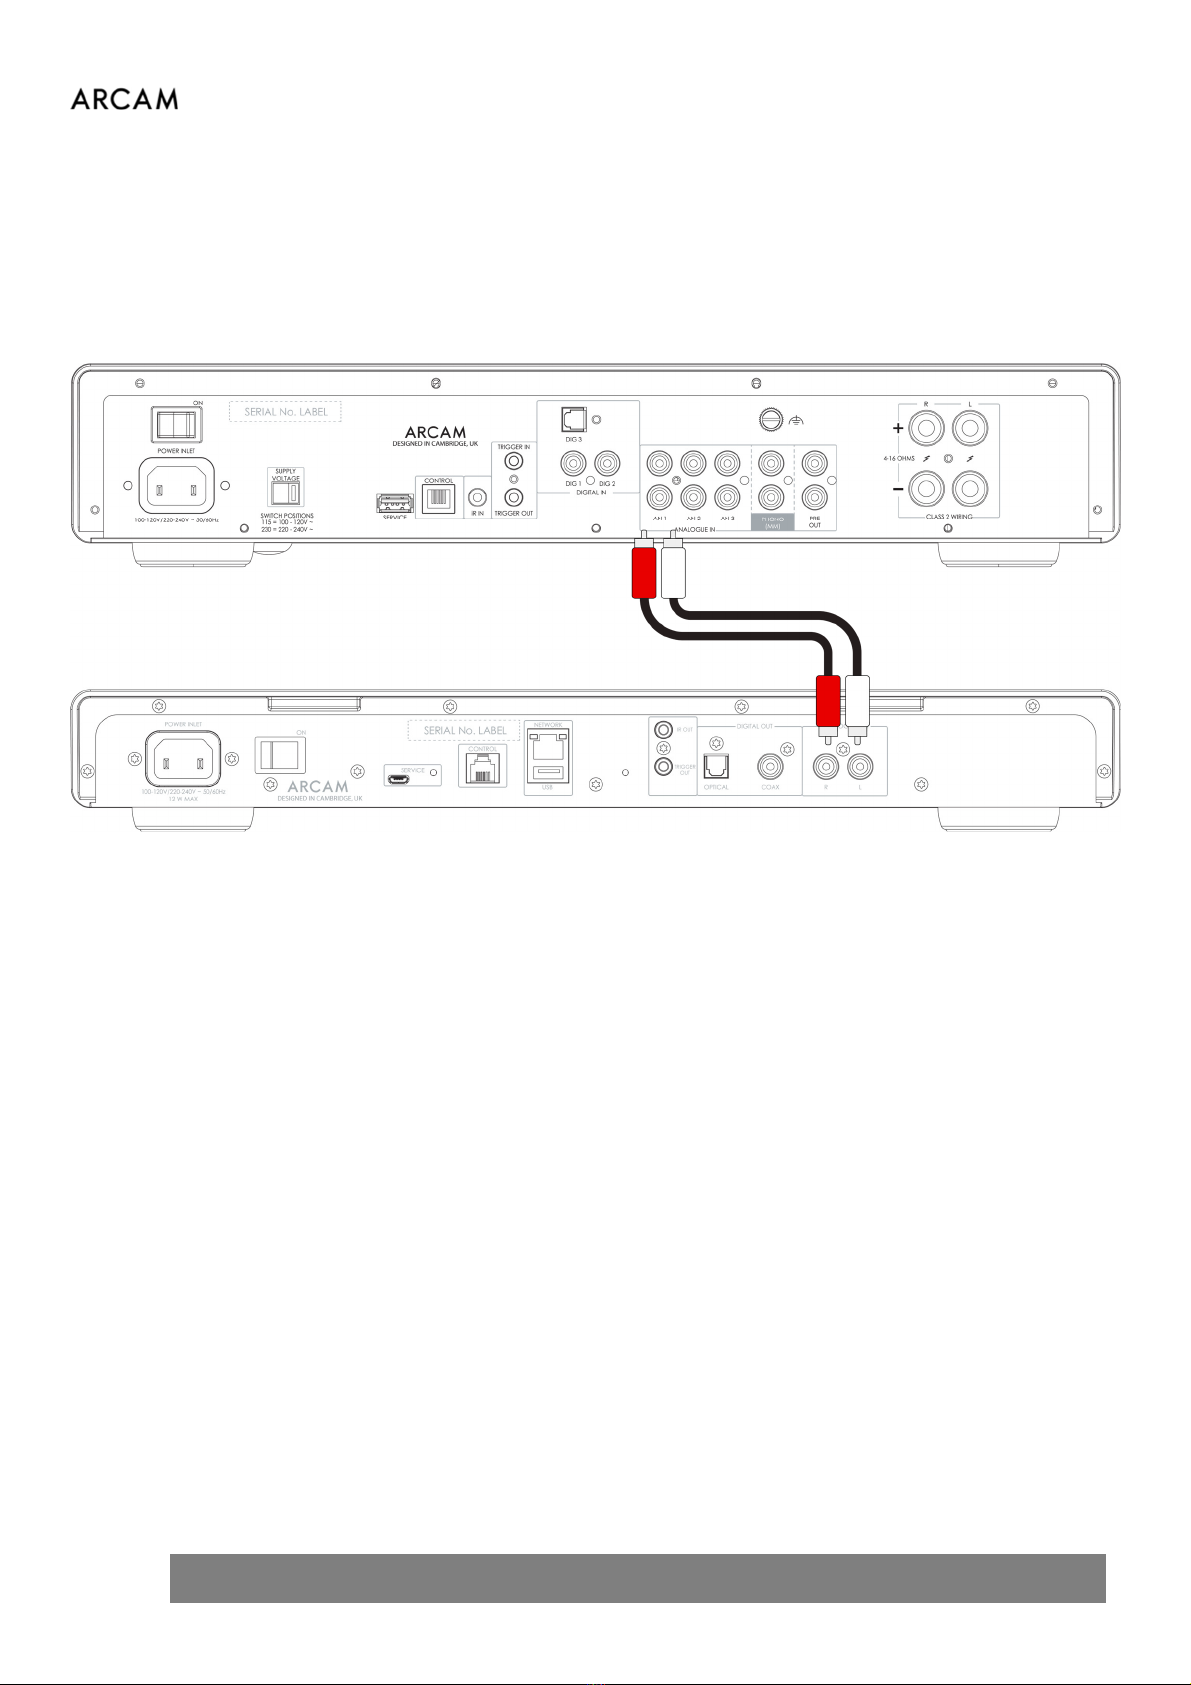
Analog Audio Connection
Ste 1, ensure ower is disconnected from the Streamer and Am lifier.
Ste 2, using analog interconnect cables, connect the right (R), red terminal of the analog out ut on the streamer to
the right (R), usually red terminal of an analog in ut on your am lifier.
Ste 3, connect the left (L), white terminal of the analog out ut on the streamer to the left (L), usually white terminal
of an analog in ut on your am lifier.
Top Tips
After making connections: switch the am lifier on with no in ut and reduce the volume to minimum. Select
the in ut that corres onds to your connection, and then slowly increase the volume to a suitable listening
level to avoid loud sounds or roduct damage in the event of incorrect connection.
If you are unsure as to how your system should be connected, lease contact your JBL dealer who will be
ha y to hel you.

9 ARCAM ST5 Owner's Manual EN
Digital Audio Connection
Ste 1, ensure ower is disconnected from the streamer and am lifier.
Ste 2, using a digital coax interconnect cable, connect the digital coaxial out ut on the streamer to a digital coaxial
in ut on your am lifier.
Alternatively, using an o tical Toslink interconnect cable, connect the digital o tical out ut to a digital o tical in ut
on your am lifier.
Note 1: Digital out uts are disabled by default. To use a Digital out ut, change the
Output Type in the settings menu. To use the menu, see Page 12
Note 2: Variable out ut is not available when Digital out ut is enabled. When Digital
out ut is selected, Output Volume will default to Fixed.
Top Tips
After making connections: switch the am lifier on with no in ut and reduce the volume to minimum. Select
the in ut that corres onds to your connection, and then slowly increase the volume to a suitable listening
level to avoid loud sounds or roduct damage in the event of incorrect connection.
If you are unsure as to how your system should be connected, lease contact your JBL dealer who will be
ha y to hel you.

10 ARCAM ST5 Owner's Manual EN
Control Connection
The Control connection allows for the ARCAM ST5 to synchronise with, and control an ARCAM Radia series am lifier.
When streaming, it allows for the combination of streamer and am lifier to act as one, whilst enjoying the benefits
of com onent devices with se arate chassis and ower su lies.
The control cable is su lied in the box with the ARCAM ST5.
Com lete the following ste s to enable this feature:
1. Ensure ower is disconnected from the Streamer and Am lifier.
2. Connect either an analogue or digital audio connection from the out ut of the ST5 to an in ut of the ARCAM
am lifier.
3. Connect the control cable from the ST5 CONTROL socket to the CONTROL socket on the ARCAM am lifier.
4. Power on both ST5 and ARCAM am lifier.
5. In the ST5 settings menu, change the Volume Output o tion to EXTERNAL.
6. In the ST5 settings menu, change the Output Type to Analogue or Digital (DIG CORE) to match the audio
connection ty e used.
7. In the ARCAM am lifier, change the Streamer Input o tion in the System Settings menu to match the in ut
that you have connected the ST5 into.
Top Tips
There is a Maxmium Output Volume when connected to an external am lifier to revent accidental
excessive volume jum s. The default maximum is 40. This value can be changed in the menu of the ST5. To
use the menu, see age 12.
Table of contents
Other Arcam Amplifier manuals

Arcam
Arcam Integrated Amplifier User manual

Arcam
Arcam Digital Pre -Amplifier Delta 110 User manual

Arcam
Arcam FMJ MS250 User manual

Arcam
Arcam Delta 120 User manual

Arcam
Arcam AVR360 User manual

Arcam
Arcam FMJ P7 User manual

Arcam
Arcam Delta 290 User manual

Arcam
Arcam AVR400 User manual

Arcam
Arcam rHEAD Instruction manual

Arcam
Arcam DiVA A65 User manual

Arcam
Arcam rPhono Instruction manual

Arcam
Arcam FMJ C49 User manual

Arcam
Arcam DiVA A70 User manual

Arcam
Arcam P7 User manual

Arcam
Arcam Delta 60 User manual

Arcam
Arcam Multichannel Power Amplifier User manual

Arcam
Arcam P1 User manual

Arcam
Arcam C30, P35 User manual

Arcam
Arcam FMJ A18 User manual

Arcam
Arcam Delta 290 User manual


