elephantrunkTM
1Coloca tu elephantrunk en el lugar deseado, con la
ayuda de alguien más.
El servicio de entregas debe poder tener acceso libre a su elephantrunk para realizar sus entregas.
Elige una ubicación protegida, tal como sobre un porche o bajo un alero, y lejos de aspersores.
Puedes anclar tu elephantrunk a una superficie dura o de madera. Necesitará que perfores un orificio dentro de la superficie, así que
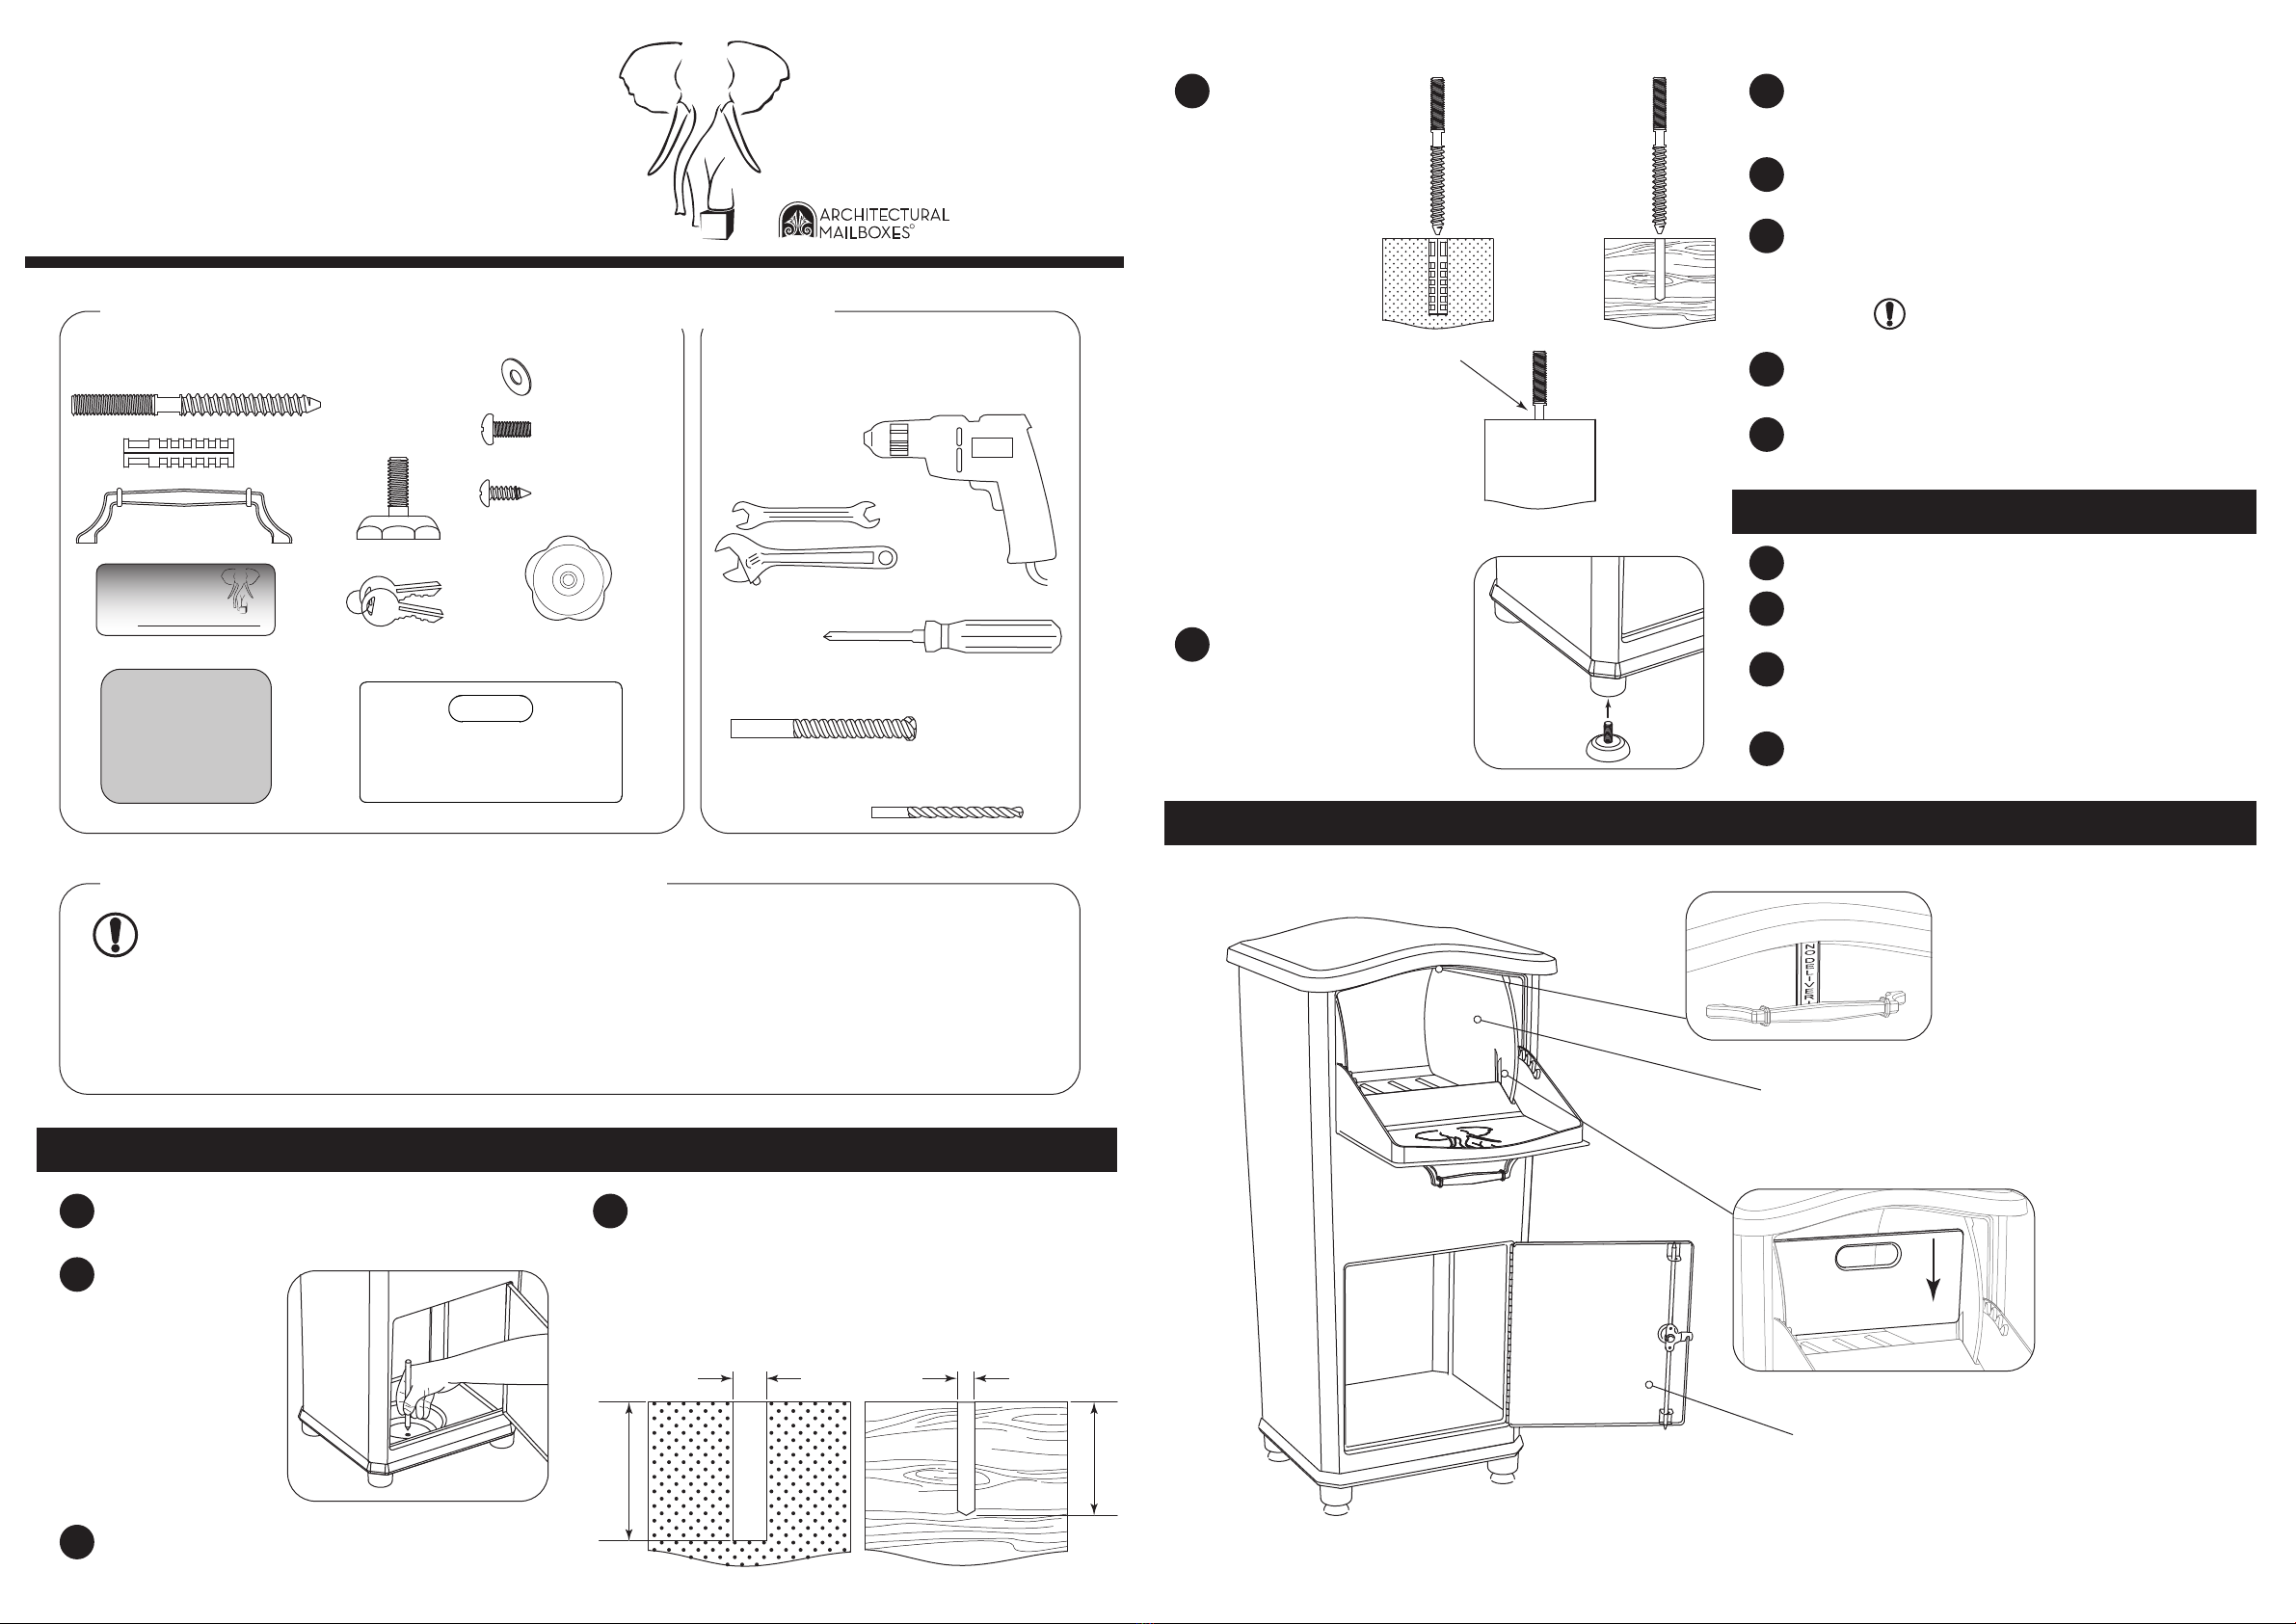
asegúrate de elegir la ubicación correcta.
parcel drop
2Abre la puerta
inferior y marca el
suelo a través del
orificio en el piso.
4Perfora un orificio donde marcaste el suelo:
Para superficies duras (por ejemplo, un pasillo de piedra, o un
bloque de concreto), taladra un orificio de 2.5” (aprox 6.4 cms.) de
profundidad en la marca con una broca de concreto de 5/8”.
Para madera (por ejemplo una cubierta o un porche), taladra un
orificio piloto de 2” (aprox 5.1 cms.) de profundidad en la marca,
usando una broca de madera de 1/4”.
2.5” para el
taquete expansivo
2.0” para
madera
oricio de 5/8” oricio de 1/4”
Hardware y partes (incluidas) Herramientas (no incluidas)
x 1, tornillo de montaje
x 1, taquete expansivo
(si vas a instalar sobre
superficies duras)
x 1, arandela
x 1, placa
elephantrunkTM
This address is equipped with an
parcel drop
location:
www.architecturalmailboxes.com © Architectural Mailboxes, LLC, 2012. Rev I
x 1, agarradera
x 1, cojín
x 4, tornillos para la placa
x 2, tornillos para la agarradera
desarmador de cruz
- o -
llave inglesa
broca de 1/4” para madera (si vas a instalar
sobre una cubierta/porche de madera)
broca para concreto de 5/8” (si vas a
instalar sobre superficies duras)
taladro adecuado para taladrar concreto o madera
x 2, llaves
x 1, manija de montaje
instalación del elephantrunk
Desempaca cuidadosamente las partes y el hardware del elephantrunk.
Elige dónde colocar tu elephantrunk
3Después que hayas marcado el suelo, haz a un lado
el elephantrunk antes de continuar.
7Con ayuda, levanta el elephantrunk sobre el tornillo
instalado alineando el tornillo a través del orificio en
el piso. NO lo fijes en el lugar con la manija de
montaje aún.
8Nivela el elephantrunk ajustando las patas hacia
arriba y abajo.
10 Coloque el cojín sobre el piso sobre la manija
de montaje.
11 Abra la puerta superior y adjunte la agarradera con
los dos tornillos de la agarradera.
Para activar tu garantía, registra tu producto en:
www.architecturalmailboxes.com/registration
4
2Escribe la ubicación de tu elephantrunk sobre la placa
con un marcador permanente.
3Adjunta la placa a tu entrada delantera en una
ubicación claramente visible para que el mensajero
sepa dónde colocar tus artículos.
5Para superficies
duras:
Quita todos los residuos del
orificio, e inserta el taquete
expansivo para que se alinee
con la superficie. Atornilla el
tornillo de montaje dentro del
taquete expansivo.
Para madera:
Atornilla el tornillo de
montaje directamente
dentro de la
superficie.
Usa la porción hexagonal en el
centro del tornillo para atornillarlo
en el orificio.
Para ambas instalaciones, atornilla
a fondo de manera que la porción
hexagonal toque la superficie.
x 1, partición saliente
6Atornilla cuidadosamente las
cuatro patas niveladoras
dentro de cada pierna pata
hasta a medio camino.
x4
uso del elephantrunk
instalación de la placa
El tambor de entradas puede aceptar paquetes
de hasta 11.7” x 7.2” x 9.8”
(aprox. 29.72 cms. x 18.29 cms. x 24.89 cms.)
© 2012, Architectural Mailboxes, LLC Rev. A
Desliza la partición
saliente dentro de los
surcos para retener tu
paquete saliente para la
recolección posterior.
Gira hacia abajo el indicador de “NO
DELIVERIES” para suspender las
entregas.
Recupera tus paquetes desbloqueando la puerta
inferior.
NOTA: NO se pretende que el elephantrunk para recibir paquetes sustituya al buzón. Su objetivo
principal es recibir entregas de paquetes.
9Coloca la arandela sobre el tornillo y atornilla la
manija de montaje. La manija solamente requiere
apretarse con la mano.
Si la aprietas demasiado con una herramienta
puedes dañar el piso e invalidar tu garantía.
R
by
Llámanos al (800) 464-7491 o envíanos un correo electrónico a
¡Somos todo oídos!
x 4, patas para nivelar 1Quita la cubierta protectora de plástico de la placa.