Arcos Burn Navigator Active User manual

February 2021 Burn Navigator Active Manual-1153
Version 6.4.2 Revision A
Burn Navigator® Active
User’s Manual

Burn Navigator® User’s Manual Page 2
Contents
Description............................................................................................................................3
Intended Use .........................................................................................................................3
Safety Information.................................................................................................................3
Use Warnings....................................................................................................................3
Incoming Device Setup, Cleaning & Maintenance, Handling.................................................5
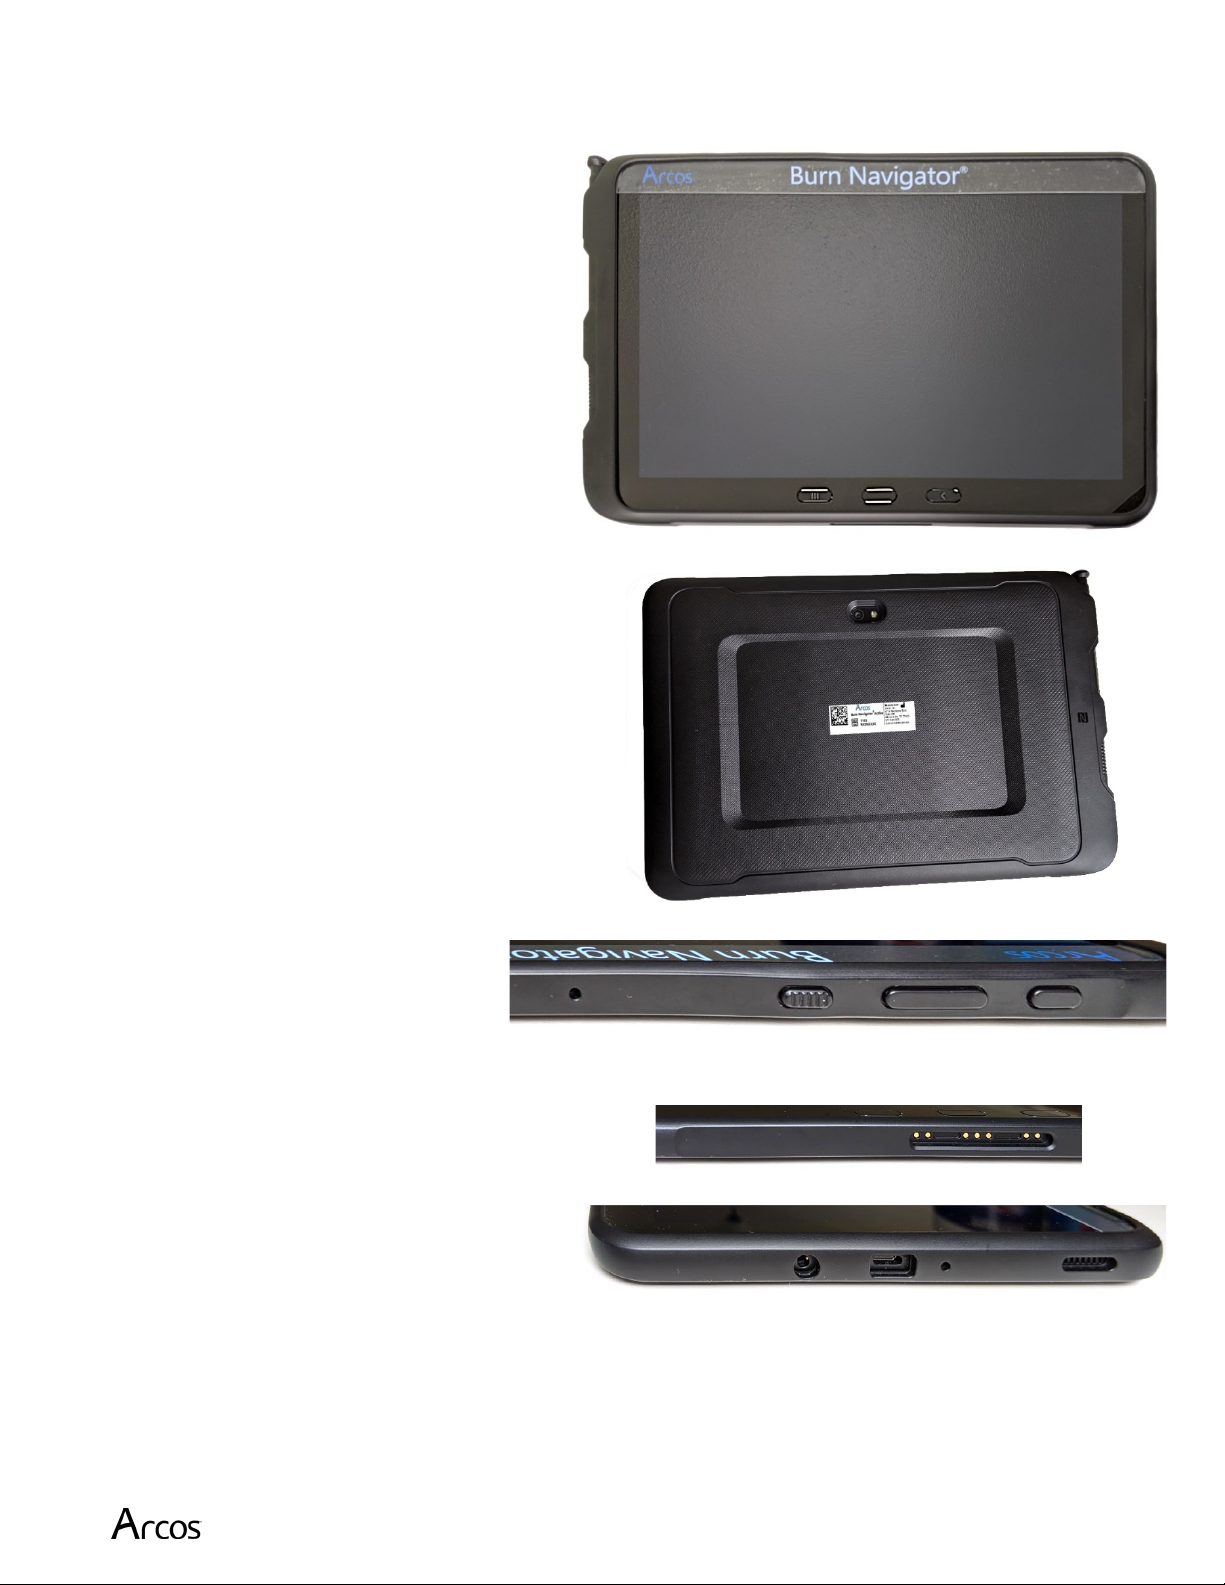
Tablet Description .................................................................................................................7
First-time Operation ..............................................................................................................8
Using the Burn Navigator App ............................................................................................10
Splash screen ..................................................................................................................10
Main Menu .....................................................................................................................10
Training Mode ................................................................................................................10
New Patient Setup...........................................................................................................11
Checklist .........................................................................................................................15
Training Mode ................................................................................................................15
Hourly Fluid Updates......................................................................................................16
Patient Resuscitation Screens ..........................................................................................19
Top Bar ......................................................................................................................19
Screen Tabs ................................................................................................................19
Functional Buttons......................................................................................................20
Hourly Update ............................................................................................................20
Stop Burn Navigator...................................................................................................20
Enter Notes.................................................................................................................21
Enter Checklist ...........................................................................................................21
Next Update................................................................................................................21
Home..........................................................................................................................22
Updating Pump Rate...................................................................................................22
Notes ..........................................................................................................................24
I/O Table ....................................................................................................................25
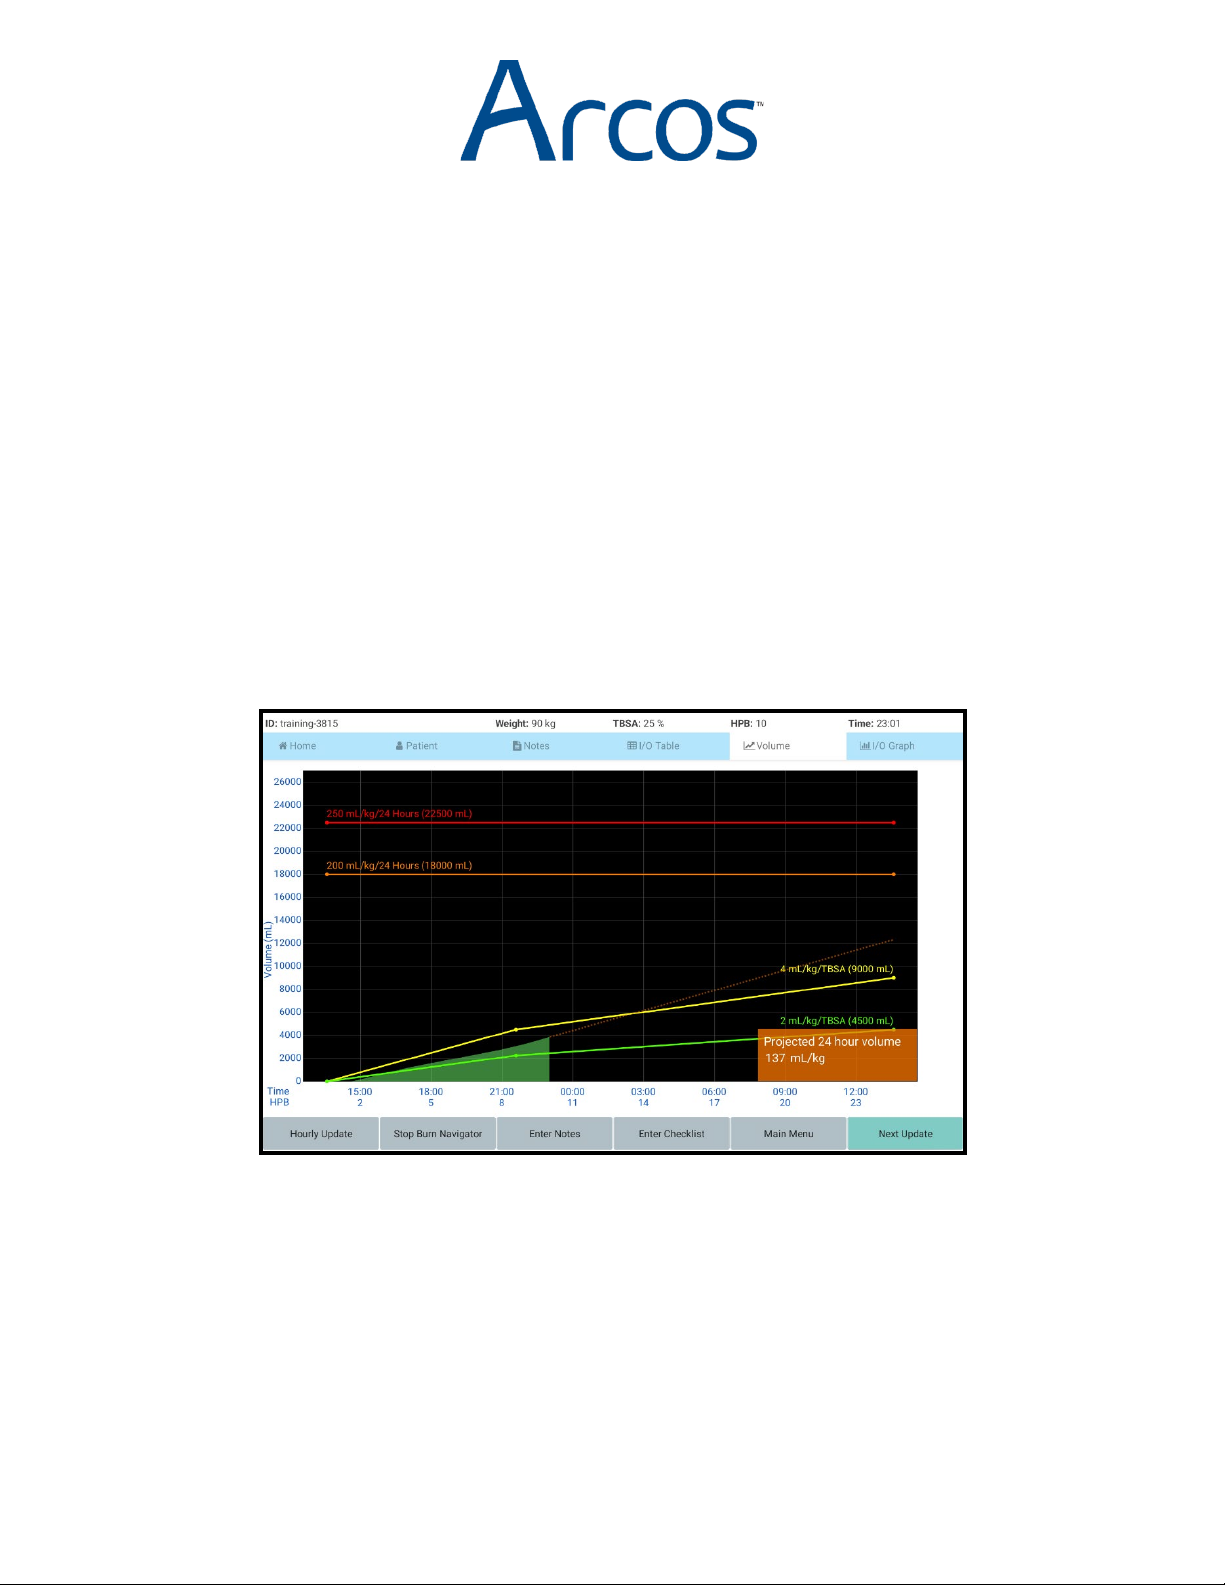
Volume.......................................................................................................................27
24 hour fluid projection ..............................................................................................27
I/O Graph ...................................................................................................................28
Safety Features....................................................................................................................29
Settings ...............................................................................................................................31
Burn Nav Web integration...................................................................................................32
Handoff...............................................................................................................................33
Bluetooth Handoff...........................................................................................................33
Manual Handoff..............................................................................................................33
Web Handoff ..................................................................................................................34
Software Updates ................................................................................................................34
Security and Privacy Safeguards & Best Practices ...............................................................35
FAQ – Frequently Asked Questions ....................................................................................36
Troubleshooting ..................................................................................................................38
Software Warnings, Alerts, and Messages ...........................................................................39
Hardware Information .........................................................................................................44
Service & Technical Support ...............................................................................................50
Copyright ............................................................................................................................50
Trademarks .........................................................................................................................50
Index ...................................................................................................................................51

Burn Navigator® User’s Manual Page 3
Description
Burn Navigator® is a Clinical Decision Support tool to help health care providers manage IV
fluid therapy for adult and pediatric severe burn patients. Each Burn Navigator device allows
resuscitation of only one patient at a time.
Intended Use
The Burn Navigator is indicated for use in the care of adult patients with 20% or more Total
Body Surface Area (TBSA) burned, or pediatric patients, 24 months old or older, weighing at
least 10 kg with 15% or more TBSA burned, as a fluid resuscitation monitor and calculator
for hourly fluid recommendations.
The Burn Navigator is intended to be used for burn patients of all ages, co-morbidities and
weights from 1 to 400 kg as a fluid resuscitation monitor.
The Burn Navigator is intended to be initiated within 24 hours of the burn incident and to be
used no longer than 72 hours post burn. The Burn Navigator is not intended for use in the
care of patients weighing over 400kg.
Users are expected to have clinical training in emergency or critical care at a physician or
nurse level.
The Burn Navigator can be used after Foley catheter insertion until the fluid resuscitation
phase is complete.
The Burn Navigator is intended to be used in Burn Intensive Care Units, during patient
transport and in other critical care environments where fluid resuscitation is performed.
Safety Information
Use Warnings
The Burn Navigator® provides fluid recommendations for critically burned
patients. Users should always rely on their clinical judgment when making decision
regarding patient care. The Burn Navigator recommendations are not a substitute
for clinical judgment.
WARNING! Gross myoglobinuria may require a high target urine output range.
Consult attending physician regarding appropriate UO range.
WARNING! The Burn Navigator uses Urine Output as a surrogate for general organ
perfusion. If Urine Output is not or no longer a good surrogate for organ perfusion

Burn Navigator® User’s Manual Page 4
in a particular patient, such as can happen with acute renal failure or use of
diuretics, consult with attending physician for appropriate fluid therapy.
WARNING! The Weight-based protocol is not intended for patients weighing less
than 10 kg, because immature kidneys may not regulate output during
hypovolemia.
WARNING! Patients with inhalation injuries may need a higher rate of fluid
resuscitation than the Burn Navigator algorithm recommends. Consult physician
regarding appropriate fluid rates for a patient with an inhalation injury.
WARNING! Giving fluids in addition to the primary resuscitation fluid may require
an adjustment to the fluid infusion rate by the user, different from the rate
recommended by Burn Navigator.The attending physician should be contacted to
determine the appropriate fluid infusion rate.
MR Unsafe. The Burn Navigator should not be used during a magnetic resonance
imaging (MRI) procedure. Do not use the Burn Navigator in the same room or an
adjacent room to the room where an MRI procedure is being performed. Consult
the MRI device manual to determine the appropriate safe distance of use.
Essential Performance:The Burn Navigator provides fluid therapy
recommendations for serious burn patients. If the Burn Navigator fails to
generate a recommendation, clinicians will use an alternative guide to fluid
resuscitation (e.g. Parkland or Modified Brooke formulas). The generation of a
recommendation is not considered essential performance for patient safety. The
other Burn Navigator features provide additional views to aid clinical judgment
and also are not considered essential performance for patient safety.
The Burn Navigator needs special precautions regarding electromagnetic
compatibility (EMC) and needs to be installed and put into service according to
the EMC information provided in this manual.
The Burn Navigator should not be used adjacent to or stacked with other
equipment. If adjacent or stacked use is necessary, observe the device to verify
normal operation in the configuration in which it will be used.
Portable and mobile radio-frequency (RF) communications equipment can affect
medical electrical equipment.

Burn Navigator® User’s Manual Page 5
Incoming Device Setup, Cleaning & Maintenance, Handling
Incoming device setup
•Connect to the internet via Wi-Fi to check for updates and ensure you have the latest
software version. The product will also automatically synchronize its clock when
connected to the internet.
•Enable Bluetooth and location if desired. Bluetooth must be enabled in order to send
patient files to other devices. To receive patients, location must also be enabled. The Burn
Navigator software does not use, save, or transmit location data.
•Check battery status and recharge the battery if needed.The battery level will be shown
when the device is powered off or on standby while connected to the charger. To check the
battery level during use, press the Menu key and note the battery icon at the top right of the
screen.
•Go to Settings > Admin Settings within the app, and select the patient identifier field label.
Cleaning & Maintenance
Cleaning and maintenance items are categorized by frequency.
During patient care:
•Disinfect the device and screen with a disinfectant wipe, such as an alcohol swab,
CaviCide® wipe, Clorox Bleach® wipe or other germicidal wipe as needed.
After each patient:
•Disinfect the device and screen with a disinfectant wipe, such as an alcohol swab or
CaviCide® wipe.
•If the tablet has crossed time zones during patient care, connect to the internet via Wi-Fi to
synchronize the date, time and time zone. No patient data is transmitted by this process.
•Properly shut down the device.
•Recharge the Burn Navigator batteries.
•Before putting the device away, be sure to wipe off any moisture.
Quarterly:
•Connect the device to the internet to synchronize the clock and check for software updates.
•Delete unneeded patient files.
Twice a Year:
•Adjust the time based on any daylight savings time changes.
CAUTION
•Do not use ester contained agent, strong alkaline agent, benzene or thinner since it may
adversely affect the surface causing discoloration, etc. Do not use commercially-available
household cleaners and cosmetics, as they may contain components harmful to the surface.
•Do not apply water or detergent directly to the computer since liquid may enter inside of the
computer and cause malfunction or damage.

Burn Navigator® User’s Manual Page 6
Operational environment
Place the computer on a flat stable surface. Do not place the computer upright or turn it over. If the
computer is exposed to an extremely strong impact, it may become damaged.
Do not expose the skin to this product when using the product in a hot or cold environment. If the computer
is wet in temperatures of 0 °C {32 °F} or below, freeze damage may occur. Make sure to dry off the computer
in such temperatures.
•Do not place the computer in the following areas, otherwise the computer may be damaged.
oNear electronic equipment. Image distortion or noise may occur.
oIn extremely high or low temperature.
•As the computer can become hot during operation, keep it away from items that are sensitive to heat.
Handling cautions
This tablet is designed to minimize shock to parts such as the LCD, but no warranty is provided against any
trouble caused by shock. Be extremely careful when handling the tablet .
•When carrying the tablet:
oTurn off the display.
oRemove all connected peripheral devices and cables.
oDo not drop or hit the tablet against solid objects.
•When traveling by aircraft, take the tablet in your carry-on bag rather than checked luggage. When using
the device aboard an airplane, follow all airline policies and instructions from crew.
•When in a moving vehicle, keep the tablet inside a protective bag or case while not in use. When the
tablet is in use, ensure it is sufficiently secured to prevent sliding and/or dropping.
•Do not attempt to operate the tablet while driving.
•When carrying a spare battery, put it in a plastic bag to protect its terminals.
•Be careful not to get injured by dropping or getting hit when carrying the tablet.
•Use only your finger, gloves, or the included stylus to operate the touchscreen. Do not place any object
on its surface and do not press down strongly with sharp-pointed or hard objects that may leave marks
(e.g., nails, pencils and ball point pens).
•Do not use the touchscreen when dust or dirt (e.g., oil) is on the screen. Otherwise foreign particles can
scratch the screen surface or obstruct the stylus pen operation.
•Use the stylus pen only for touching the screen. Using it for any other purpose may damage the stylus
and result in scratches on the screen.

Burn Navigator® User’s Manual Page 7
Tablet Description
The Burn Navigator Active device uses a Samsung Galaxy Tab Active Pro tablet.
Front
1. Display
2. Back key
3. Home key
4. Menu key
Back
5. Camera
6. Stylus receptacle
Top
7. Power key
8. Volume Up/Down keys
9. Active key
10. Microphone
Bottom
11. Docking connector
Right
12. 3.5mm audio jack
13. USB 3.1 Type-C port
14. Microphone
15. Speaker
1
4 3 2
5
6
10 9 8 7
11
12 13 14 15

Burn Navigator® User’s Manual Page 8
First-time Operation
AC-USB 3.1 Adapter (1)
& USB A-to-C 3.5’ Cable (1)
CMP-1805
Protective Cover (1)
CMP-1803
Battery Pack (1)
CMP-1806
Stylus (1)
CMP-1804
Installing or Replacing the Battery
The tablet ships with a battery pre-installed. To replace the battery, do the following:
1. Power off the tablet.
2. Remove the protective cover from the tablet.
3. Remove the battery compartment cover.
4. Remove the old battery if present.
5. Insert the new battery with the label facing up and the battery terminals aligned with the contact pins on
the device.
6. Replace the battery compartment cover and protective cover.
CAUTION
•Make sure the battery compartment cover is securely snapped in place when carrying the device.
•Do not expose the battery to water or any other liquid.
•Do not attempt to charge the battery using methods other than specified. Do not short the battery
terminals. Do not attempt to overcharge the battery.
•Do not touch the terminals on the battery pack or the tablet. Doing so can make the terminals dirty or
damaged and may cause malfunction of the battery pack and/or the tablet.
•Monitor the device for signs of battery failure, such as frequent overheating, or swelling of the battery
pack. Continued use of a failing battery may cause permanent damage to the tablet, and creates risk of
fire. Stop use of the tablet immediately and replace the battery if failure is suspected.

Burn Navigator® User’s Manual Page 9
About the battery for this tablet
•Check the battery level regularly. Charge the battery as needed or when the battery level drops below 20
percent. To extend the lifetime of the battery, disconnect the charger once the battery level is above 80
percent.
•Time to full charge: Approximately 3 hours
•Rechargeable batteries will degrade and lose capacity over time. This battery is designed to withstand
about 300 to 500 full charge cycles before capacity loss becomes significant. We recommend replacing
the battery every 2 to 5 years depending on frequency of use.
WARNING!
The use of accessories other than those specified above may result in increased electromagnetic emissions
or decreased electromagnetic immunity of the Burn Navigator.
Handling the AC adapter
•Problems such as sudden voltage drops may arise during periods of thunder and lightning. Since this
could adversely affect the device, an uninterruptible power source (UPS) is highly recommended unless
running from the battery pack alone.
Turn on the tablet
Press and hold the Power button (item 6 on page 7 of this manual) until the boot screen is displayed and
wait for the device to boot. The Burn Navigator software will launch automatically.
Powering off the tablet
Press and hold the Power button for 1 second to display the shut down menu.
Accessing device settings
Press and hold the Active button for 1 second to open the Android™ settings screen. Note that for security
reasons, some settings will be locked.
Press the Back or Home key, or press the Power key twice quickly, to return to the Burn Navigator app.
NOTE: This covers Android system settings. For Burn Navigator app settings, see page 31.
Task list
Press the Menu key to display the task list. You can close apps by swiping them up and off the screen.
NOTE: The Burn Nav app will always be present. Closing it will cause the app to restart. Restarting the app
this way will lose all data in entry screens, forms, or wizards not yet completed; however, data already
entered (e.g. fluid updates previously completed) will not be lost.

Burn Navigator® User’s Manual Page 10
Using the Burn Navigator App
CAUTION
Before using the Burn Navigator, assess the patient and perform any lifesaving
interventions needed. The Burn Navigator is a fluid calculator and does not provide
direct therapy to the patient.
Splash screen
When the app starts, you will see the splash screen. Press “OK” to close the splash screen and
go to the main menu.
Main Menu
The main menu shows a list of patient records stored
on the device. Active patients (blue) are those
currently being resuscitated; inactive patients
(orange) are those whose resuscitation has ended.
Burn Navigator supports up to 6 active patients at
one time. There is no maximum number of inactive
patient records.
To switch between the lists of active and inactive
patients, press the “Review Records” / “Active Patients” button.
Select a patient record in the list to view it. If an active patient has a pending alert, an alert
icon will be displayed next to it.
To delete an inactive patient record, press the delete icon (⊗) next to it. You will be asked to
confirm. If you are sure you want to delete the record, select “Yes”. Deleted records are
gone forever and cannot be recovered.
Training Mode
If you haven’t used the Burn Navigator before, you can use the Training Mode to familiarize
yourself with the software and features.
To enter Training Mode, press the “Training Mode” button on the main menu.
You can use all the features of Burn Navigator while in Training Mode. You will also be able
to advance time to go through several hourly fluid updates in minutes.

Burn Navigator® User’s Manual Page 11
New Patient Setup
From the Main Menu, press “Start New Patient” or
“Training Mode”.
1. If you chose “Training Mode”, there will be an
automatically generated patient ID. Otherwise,
select the patient ID field and enter the patient ID
using the touch keyboard that appears.
If you enter a patient ID that starts with “training”, then the new patient will be started in
training mode.
ALERT: To protect the patient’s privacy, we recommend against using the patient’s name,
MRN, or any other personally identifying information (PII) as the patient ID.
2. Next enter the patient weight.
a. You can enter weight in kilograms (kg) or
pounds (lbs).
b. A number pad will appear for you to enter the
weight.
c. The Burn Navigator will display the weight in
kg for the rest of the resuscitation.
After you enter the weight, press “Next” to go to the next screen.
You will be asked if the patient has any confounders.
Special consideration regarding resuscitation is required
with the presence of any of these confounders:
myoglobinuria, high blood alcohol content,
hyperglycemia or end stage renal disease or congestive
heart failure.
ALERT:If you answer yes to any of these questions, consult with the Attending Physician
to determine appropriate fluid therapy.

Burn Navigator® User’s Manual Page 12
3. Choose the protocol.
a. Adult predictive algorithm: Targets 30-50 mL/hr
Urine Output (UO). This protocol uses the Salinas
algorithm developed by the US Army Burn Center
(Salinas, J et al, Computerized decision support system
improves fluid resuscitation following severe burns: An
original study, Crit Care Med 2011, 39(9), 2031-8). The
Salinas algorithm uses the trend of the last three hours of
UO to recommend the next hour’s IV infusion rate. The
Salinas algorithm will go up to the hourly cap chosen by
your medical director (e.g., 15% or 20% each hour). See
the Burn Navigator Administrator’s Manual for changing
the hourly cap.
The Adult predictive protocol is recommended for most adult patients without
resuscitation confounders. Consult with the attending physician before using this
protocol on a patient with a confounder.
b. Custom protocol:
The custom protocol allows clinicians to set a
target Urine Output range in mL or mL/kg each
hour. The other unit (either mL/kg or mL) is
calculated in gray below.
If the patient’s UO is not in target, then the Custom Protocol will recommend
increasing or decreasing the IV fluid rate by 10%. The custom protocol is limited to
10% changes each hour.
c. Monitor only: This mode does not provide hourly recommendations, but does provide
resuscitation graphs, alerts and the 24 hour fluid projection. This mode is
recommended when urine output is not a good surrogate of general organ perfusion
(such as acute renal failure or with diuretics), or when the physician does not want to
use another protocol.

Burn Navigator® User’s Manual Page 13
4. Enter the total burned surface area (TBSA).
Diagrams are provided for reference. Use the age
group radio buttons change the displayed diagram.
CAUTION: Only include 2nd and 3rd degree burns
when calculating the TBSA!
5. Patient height is an optional field for the Adult predictive
protocol.
Note: Body surface area is calculated using the Haycock
algorithm.
6. Enter elapsed time since burn occurred. How long ago did
the burn happen?
Note:There are two separate number fields: one for hours
and one for minutes.
The software will calculate the time of burn using your local
time and the number of hours and minutes elapsed since the
burn occurred.
7. Next enter how much fluid the patient has
received from the time of burn until now.
a. Then enter the urine output from time of
burn until now.
b. If you don’t know either answer, you may
skip the questions by pressing “Next”. You can add this data later on the Patient tab.

Burn Navigator® User’s Manual Page 14
8. On the Recommendation screen, you may choose
the primary resuscitation fluid type. Lactated
Ringer’s is selected by default.
a. Options include albumin protocols, where the
primary fluid to be titrated is composed of, e.g.,
2/3 LR and 1/3 Albumin 5%. If you choose one of
these protocols, you will see the calculated rate for
each fluid under the “Recommended rate” and
“Enter new rate” fields.
9. Based on a doctor’s order and patient condition, you
may select the formula for the initial rate. The
recommended rate will be the value calculated by
the initial formula, but only as high as 2,000 mL/hr
or as low as 100 mL/hr or 20 mL/hr (based on
Adult predictive or Weight-based protocols). The
recommendation is shown with a gray background.
a. Note: the minimum rate can be changed on the Patient screen after you’ve started the
resuscitation.
10. You may choose a different rate by pressing the white field at the bottom right.
You have now completed the New Patient setup!
After starting a new patient, you will be taken to the resuscitation tabs.

Burn Navigator® User’s Manual Page 15
Checklist
After you start a new patient, a pop-up message will
ask you to complete a patient assessment checklist.
Press “Yes”.
On the checklist screen you can enter vitals and labs,
as well as completing extremities steps and
observations.
The Checklist allows you to track other indicators of
resuscitation status other than urine output.
Currently, the Checklist data is not used in the recommendation protocols and is optional.
The software will prompt you to do a checklist when you start resuscitation and every 6
hours later. You can enter checklist data when you want by pressing the “Enter Checklist”
button on the Home screen.
If you don’t know some data for the checklist, you can leave that field blank.
Note: If a pulse is detectable by Doppler only, select “weak”.
Training Mode
In Training Mode, you can advance time to the next hourly update by pressing the
“Next Update” button in the bottom right of the Home screen.
When you load a Training Mode patient, the clock will advance automatically to the time of
the last fluid update or infusion rate change, if it is in the future compared to real time. The
clock will reset to the correct time when you close the training patient file.

Burn Navigator® User’s Manual Page 16
Hourly Fluid Updates
The Fluid Update Wizard (series of screens) will
appear automatically when it is time to do an hourly
fluid update.
The Urine Data screen shows the “From” and “To”
times for this update.
a. The “From:” time is the last time you entered
data (new patient setup or last hourly update).
b. The “To:” time is the current time.
c. The Burn Navigator will calculate and display the number of minutes between the
From and To times. The “From:” and “To:” times are not editable.
1. Enter the urine output volume for this time period.
a. If a urimeter was connected for nearly all (approximately 90%) of the last update
period, the Burn Navigator will auto-fill the measured UO value.
b. If the urine output is unknown for some reason, then check the box on the bottom left.
c. Burn Navigator will calculate and display the urine output in mL/kg/hr.
d. The “To:” time will be frozen after the urine output is entered. Before this, it will
continue to increment with the current time.
2. On the Fluids Given screen, verify the primary fluid
and the infusion volume for this time period.
a. The gray boxes on top show the From and To
times from the last screen, as well as the time
duration.
b. The second row shows the primary resuscitation
fluid type.
c. On the third row, the white field shows the primary fluid infusion rate based on the
last setting given to Burn Navigator. The blue field shows the primary fluid infusion
volume based on the rate and time duration.
PLEASE NOTE!
•If you’ve changed the rate during the hour from the Home screen, then Burn
Navigator will calculate the volume based on how long the Home screen pump was
at Rate 1, Rate 2, etc., then calculate the average rate for the whole update.
•You can change the rateby pressing the white field. If you change the rate, Burn
Navigator will change the volume for the update accordingly.

Burn Navigator® User’s Manual Page 17
•The Burn Navigator does not communicate with your fluid infusion pump(s), so it
does not know when or by how much you may have changed pump flow rates during
the time period, unless you update the pump setting changes timely on the Home
screen or provide the total volume during the fluid update.
•If a bolus of the primary resuscitation fluid was given, then you can add the bolus to
the total volume given. The algorithm will include the bolus when determining the
next recommendation. If you don’t want the algorithm to include the bolus volume
for the next recommendation, then add the bolus volume to the next screen,
Additional Fluids, instead.
3. On the Additional Fluids screen, add any fluids
given to the patient in addition to the primary
resuscitation fluid.
a. Press “Select fluid type…” to see a list of
Additional Fluid options.
b. Check the “Repeat” box to have that fluid type
and volume show up for the next update.
Repeated additional fluids are included in the
24-hour projection.
c. You can press the “X” to delete the fluid type.
d. If you don’t see the fluid you gave on this screen,
then choose the bottom option, “Any Other
Fluids,” and write a note to identify the fluid
type.
Note: Provide all additional fluids as a volume for
the time period.
4. You may or may not see the Safety Questions screen.
This screen asks if the patient is hypotensive,
hyperglycemic, on pressors or on diuretics.These
questions are asked when the algorithm recommends
decreasing fluids. You must answer Yes or No to each
question to proceed.
ALERT:If you answer yes to any of these questions,
consult with the Attending Physician to determine appropriate fluid therapy.
CAUTION: Use clinical judgment to determine if your patient is hypotensive.
CAUTION: If the patient is on pressors, ask the attending physician if the pressors can be
reduced rather than decreasing the primary fluid rate.

Burn Navigator® User’s Manual Page 18
5. Next, you’ll see the New Rate screen. This screen
shows you the previous rate and the
recommended rate with a percent change
indicator. You may enter a different fluid rate
by pressing the white box indicating “New
rate.”
a. In Monitor Only mode, you won’t see a
recommendation. You will see a red message
reminding you that you are in Monitor Only
mode. Press the white box to enter the new
rate.
6. If you enter a rate different from the recommendation, the Burn Navigator will ask you to
enter the rationale, the attending physician’s name and your own name. The Burn
Navigator will create a note (on the Status screen) with the rationale you select. The
rationale screen does not show up in Monitor Only mode.
a. Note: In Monitor Only mode there is no UO-
based recommendation.
You have now completed the Hourly Fluid Update! You will be taken back to the
resuscitation tabs.
Monitor Only mode
Adult Predictive Algorithm mode

Burn Navigator® User’s Manual Page 19
Patient Resuscitation Screens
The patient resuscitation screens show a top bar, a row of six tabs to select the six patient
resuscitation screens, and a row of functional buttons along the bottom of the first three
screens.
Top Bar
The top bar shows the Patient ID, patient weight and TBSA, the current Hour Post Burn
(HPB), and the current time.
Hours Post Burn (HPB)
Hours Post Burn (HPB) is a measure of time, in hours, after a burn has occurred. The HPB
count is iterated at the top of the hour (e.g., 04:00, 11:00), so one HPB represents a clock
hour (e.g. 04:00 – 04:59). The clock hour in which a patient is burned is considered HPB 0.
For example, if a patient’s burn occurred at 07:20, the HPBs would be numbered:
07:00 – 07:59 HBP 0
08:00 – 08:59 HBP 1
09:00 – 09:59 HBP 2, and so on.
Android System Status Bar
The Android system status bar is normally hidden during the resuscitation screens. It can be
revealed by pressing the Menu key on the device to show the running apps list. This displays
the current time, battery level, Wi-Fi connection status, and Bluetooth status.
You will see a low battery pop-up alert when the battery level is approximately 15%.
Note: When you see the low battery message, immediately plug in the Burn Navigator or
transfer your data to another Burn Navigator device.
Screen Tabs
Immediately below the top bar are six tabs to select the six patient resuscitation screens:
Home, Patient, Notes, I/O Table, Volume, I/O Graph.

Burn Navigator® User’s Manual Page 20
Functional Buttons
Along the bottom of the Home, Patient and Notes screens is a row of Functional buttons.
The “Next Update” button is visible only in Training Mode.
Note that for an inactive patient file, the only available action is Main Menu:
Hourly Update
The first button, “Hourly Update” provides two functions.
1) If it is time for an hourly fluid update, pressing this button will take you through the
Hourly Fluid Update screens.
2) If you have entered an Hourly Fluid Update within the last 10 minutes (the “grace
period”) and another hourly fluid update is not due, then you can press this button to
redo the last fluid update. You will be given a new fluid recommendation if you use
this button.If you redo an update and you enter new values, those values will not
show up as edited in the I/O Table.
If an hourly update is not due and it has been more than 10 minutes from your last hourly
update when you press this button, then you will see a message saying it is not yet time for a
new hourly update and more than 10 minutes have passed since the last hourly update.
Note: To edit past hourly fluid updates, go to the I/O Table and touch the column
representing the time period you want to edit.
Stop Burn Navigator
The “Stop Burn Navigator” button will end decision support for the current patient. Once
decision support has ended, the patient will be moved to the inactive patients list.
CAUTION: Once decision support has been ended for this patient, you will not be able
to perform any new hourly fluid updates or change any information!
If “Rationale required when ending decision
support” is enabled in Admin Settings, then when
you press the Stop Burn Navigator button, you will
be asked to select a rationale for ending decision
support, as shown.
Otherwise, you will simply be asked twice to
confirm ending decision support for this patient.
Table of contents
Other Arcos Medical Equipment manuals