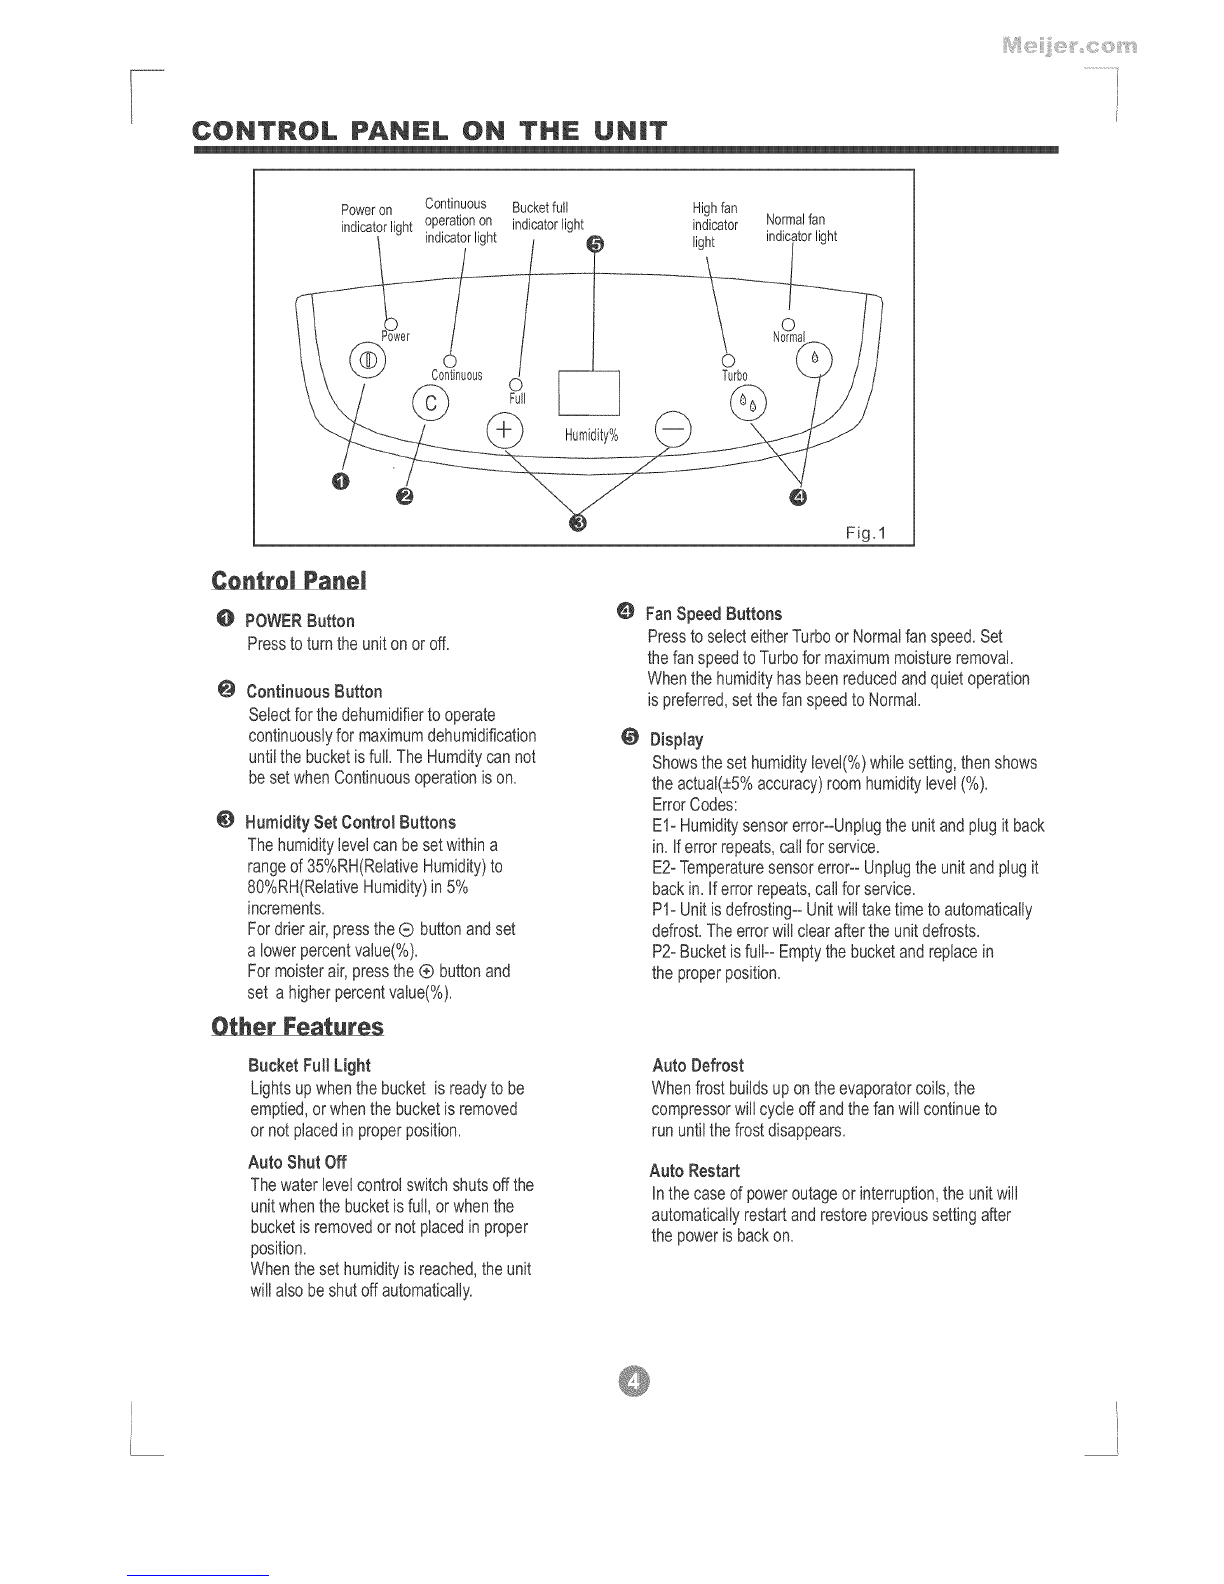
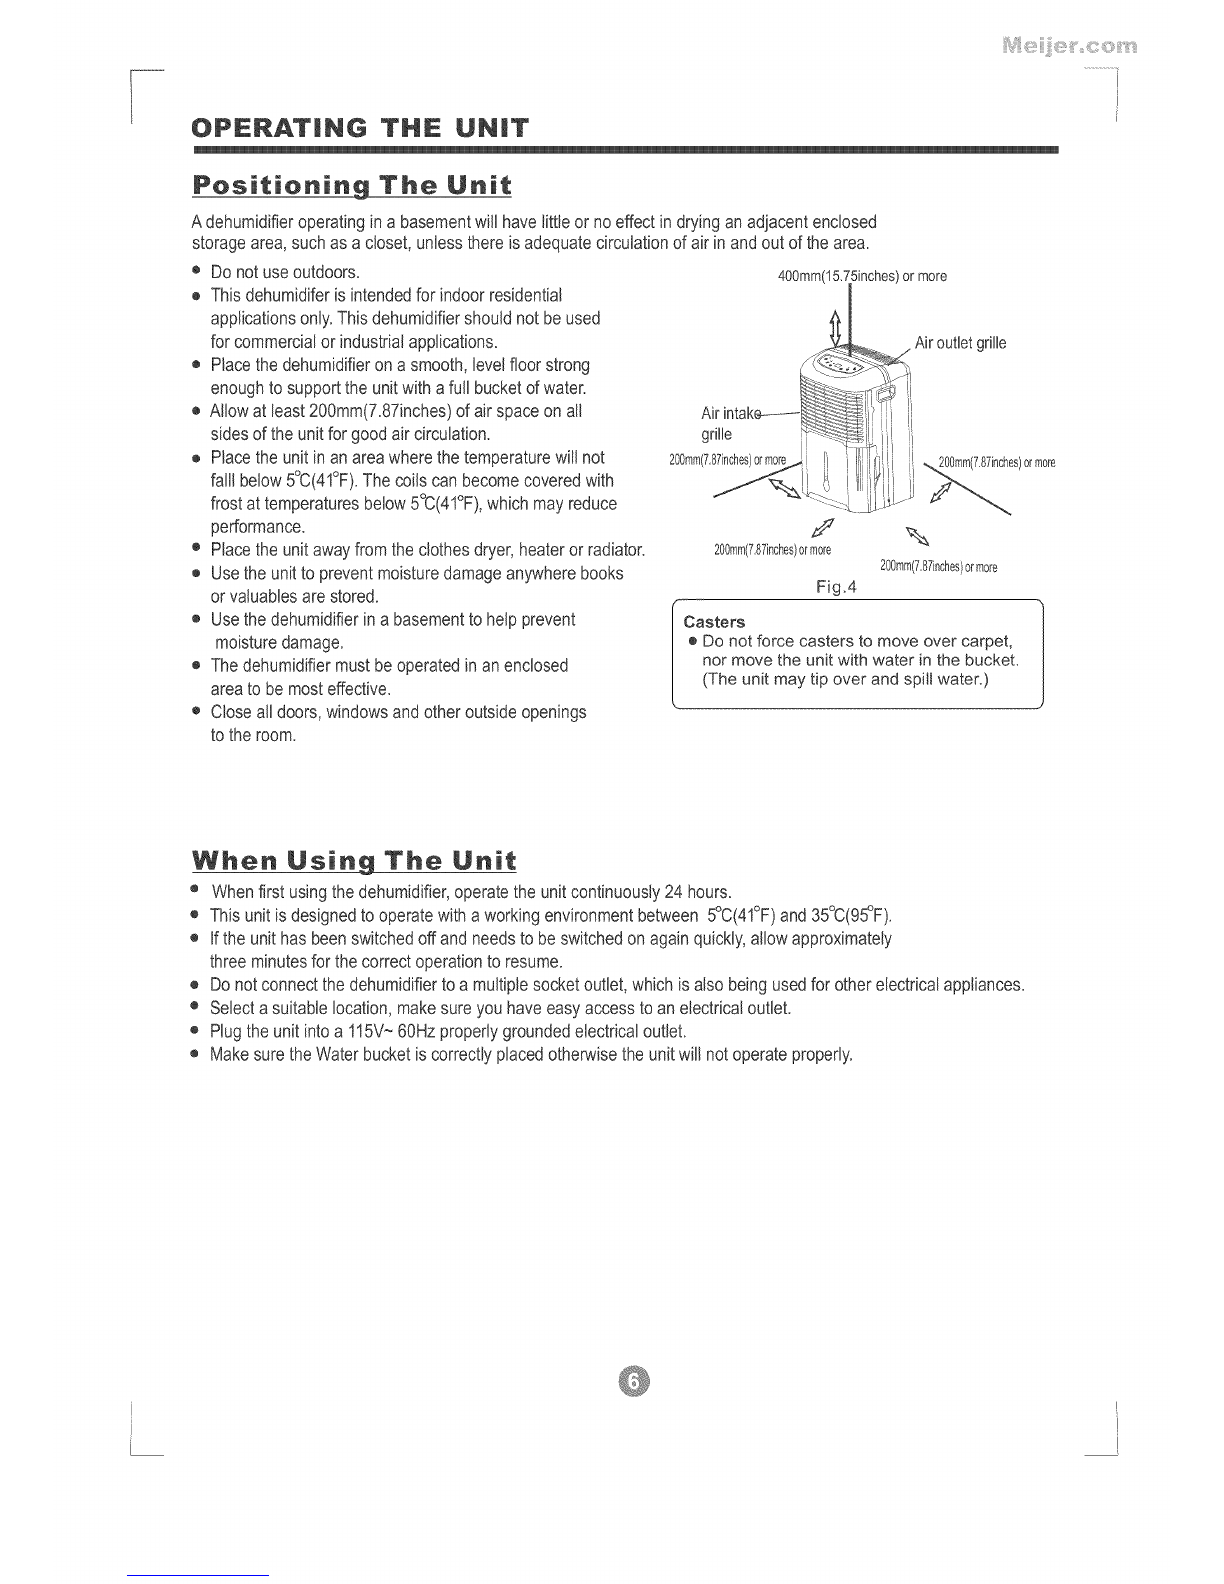
Arctic King rev11/45 User manual

I

Tarjetade Registracien de Pmducto
Es sencillo! Cumple y envia su Tarjeta de Registracion de Producto hoy!
Nombre I I I I II II I II I
Direcci6n
Ciudad
Tel6fono(OpcbnaU)
Direction de E°mail(Opdona0 [
Estado _ C6digo
postaU
Donde Comprado
1 1 1 1
Numero de Modelo Numero de Sede Mes Dia Ano
REV 11/04 Fecha de la compra
Product Registration Card
It's simple! Complete and mail your Product Registration Card today!
Name
A_ssl I I
C_t7 I I I II
Phone (optionaOII I
Eomail Address (Optional)[
Where Purchased I I
State L_Zip
1Model Number I 1
REV 11/04
1 1
Serial Number Month Day Year
Date of Purchase

9Z6_-gZ_8£ 94 9VEIOa
_;_;_3_LS £S ±SHz MN £0I;0_
EI3_LN30 NOIIVNZSI©3EI ±oRaOEld
clEIOO VOIEI3IAIV v3all!_
I"II'W"P"I"IW"I"PIPI"'I"II'"IW'"II"'II"I
3EI3H
dl/IVLS
qOV7d
e6e_sod
JedoJd_noq_!M
JeA
SAFETY PRECA UTiONS
Warning ................................................................................................................................. 2
Caution .................................................................................................................................. 2
Electrical information ............................................................................................................. 3
CONTROL PANEL ON THE UNIT
Control panel ........................................................................................................................... 4
Other features ......................................................................................................................... 4
IDENTIFICATION OF PARTS
Identification of parts ............................................................................................................ 5
OPERA TiING THE UNIT
Positioning the unit ............................................................................................................... 6
When using the unit .............................................................................................................. 6
Removing the collected water ............................................................................................... 7
CARE AND MAINTENANCE
Care and cleaning the dehumidifier ...................................................................................... 8
TROUBLESHOOTING TIPS
Troubleshooting tips ............................................................................................................. 9
WARRANTY INFORMATION
Customer service information ............................................................................................. 10

SAFETY PRECAUTIONS
To prevent injury to the user or other people and property damage, the following instructions must be
followed. Incorrect operation due to ignoring of instructions may cause harm or damage. The
seriousness is classified by the following indications.
I... This symbol indicatesthe possibility of death or serious injury. "_J
_CAUTION symbol possibility injury or damage propertyj
This indicates the of to
[] Meanings of symbols used inthis manual are as shown below.
_ Never do this.
A_ways do this.
(A WAR. .GI
o Otherwise, it may cause electric o It may cause electric shock or fire o It may cause electric shock or fire.
shock or fire due to excess heat due to heat generation.
generation.
® It may cause electric shock or
fire due to heat generation.
o It may cause fire and electdc
shock.
® It may cause electric shock.
o It may cause failure of machine
or electric shock.
o It may cause an explosion or fire. ® It contains contaminants and
could make you sick.
® Lack of ventilation can cause
overheating and fire.
® Plastic parts may melt and cause
a fire.
® It may cause electrical shock or
injury.
® It may cause electric shock.
CAUTio.I
• Water may enter the unit and
degrade the insulation. It may
cause an electric shock or fire.
If the unit falls over, it may
cause water to spill and
damage belongings, or
cause electrical shock or
fire. J

SAFETY PRECAUTIONS
® A lack of air flow can lead
to overheating and fire. Infants, cNIdren, elderly people,
and people not senstive to
humidity.
® This will cause the unit
deterioration due to
chemicals and solvents
dissolved in the air.
® Do not clean unit when
power is on as it may cause
fire and electric shock, it may
cause an injury.
oThere is danger of fire or
electric shock. ® You may be injured if you
faIt or if the unit fails over.
0Operation without filters
may cause failure.
This unit is grounded through the
power cord plug when plugged
into a matching wall out_et.
® It may cause failure of
appliance or accident. ®Water may spill inside the
unit, causing insulation
failure and electrical
shock or fire. J
Electrical lnfermatien
e The nameplate is located on the rear panel of the unit and
contains electrical and other technical data specific to this
unit.
e Be sure the air conditioner is properly grounded. To minimize
shock and fire hazards, proper grounding is important. The
power cord is equipped with a three-prong grounding plug
for protection against shock hazards.
e Your air conditioner must be used in a properly grounded wall
receptacle. If the wall receptacle you intend to use is not
adequately grounded or protected by a time delay fuse or
circuit breaker, have a qualified electrician install the proper
receptacle.
® Ensure the receptacle is accessible after the unit installation.
® Do not use extension cords or an adapter plug with this
unit. However, if it is necessary to use an extension cord,
use an approved air conditioner extension cord only (available
at most local hardware stores).
o To avoid the possibility of personal injury, always disconnect
the power supply to the unit before installing or servicing.

CONTROL PANEL ON
Poweron Continuous Bucketfull Highfan
indicatorlight operationon indicatorlight indicator Normalfan
indicatorlight light indicatorlight
O
Continuous Turbo
_ntrol PaneJ
0 POWERButton
Presstoturntheunitonoroff.
@ContinuousButton
Selectforthedehumidifiertooperate
continuouslyfor maximumdehumidification
untilthebucketisfull.TheHumditycannot
besetwhenContinuousoperationison.
O Humidity SetControl Buttons
Thehumiditylevelcanbesetwithina
rangeof35%RH(RelativeHumidity)to
80%RH(RelativeHumidity)in5%
increments.
Fordrierair,pressthe(9 buttonandset
a lowerpercentvalue(%).
Formoisterair,pressthe® buttonand
set a higherpercentvalue(%).
Other Features
BucketFult Light
Lightsupwhenthebucketisreadytobe
emptied,orwhenthebucketisremoved
or notplacedinproperposition.
Auto ShutOff
Thewaterlevelcontrolswitchshutsoffthe
unitwhenthebucketisfull,orwhenthe
bucketisremovedor notplacedinproper
position.
Whenthesethumidityisreached,theunit
willalsobeshutoffautomatically.
Humidity%
O
Normal
_]_ FanSpeedButtons
PresstoselecteitherTurboorNormalfanspeed.Set
thefanspeedto Turboformaximummoistureremoval.
Whenthehumidityhasbeenreducedandquietoperation
ispreferred,setthefanspeedto Normal.
@Disptay
Showsthesethumiditylevel(%)whilesetting,thenshows
theactual(+5%accuracy)roomhumiditylevel(%).
ErrorCodes:
El- Humiditysensorerror--Unplugtheunitandplugitback
in.Iferrorrepeats,callforservice.
E2-Temperaturesensorerror--Unplugtheunitandplugit
backin.Iferrorrepeats,callforservice.
P1-Unitisdefrosting--Unitwilltaketimetoautomatically
defrost.Theerrorwillclearaftertheunitdefrosts.
P2-Bucketisfull--Emptythebucketandreplacein
theproperposition.
Auto Defrost
Whenfrostbuildsupontheevaporatorcoils,the
compressorwillcycleoffandthefanwillcontinueto
rununtilthefrostdisappears.
Auto Restart
Inthecaseofpoweroutageor interruption,theunitwill
automaticallyrestartandrestoreprevioussettingafter
thepowerisbackon.

Front
Handle'N Air outlet Control panel Air outlet
Control _X grille grille
Water bucket
Water level
window
Air intake
grille
Water bucket
Water level
window
Handle
Fig.2
NOTE: All the pictures in the manual are for explanation only. The actual shape of the
unit you purchased may be a little different, but the operations and functions
are the same.
Rear
Air Outlet grille
Air filter_j"
Power cord hook or Band j
Drain hose outlet
Caster Power Cord Plug
Accessory: Drain hose adaptor (1 pc)
Drain hose (1 pc)
Screws (2 pcs)
Fig.3

OPERATING THE UNIT
Positioning The Unit
A dehumidifieroperatingina basementwill havelittleor noeffect indryingan adjacentenclosed
storagearea,suchas a closet,unlessthereis adequatecirculationofair in and outof thearea.
® Do notuseoutdoors.
® Thisdehumidiferisintendedfor indoorresidential
applicationsonly.This dehumidifiershouldnot be used
forcommercialor industrialapplications.
® Placethe dehumidifieron a smooth,levelfloorstrong
enoughto supportthe unitwith afull bucketdwater.
® Allowat least200mm(7.87inches)of airspaceon all
sidesof theunitfor goodair circulation.
® Placethe unitin an areawherethe temperaturewill not
falll below5°C(41°F).Thecoilscan becomecoveredwith
frostat temperaturesbelow5°C(41°F),whichmay reduce
performance.
® Placetheunitawayfrom theclothesdryer,heateror radiator.
® Use theunitto preventmoisturedamageanywherebooks
or valuablesare stored.
® Use thedehumidifierin a basementto helpprevent
moisturedamage.
® Thedehumidifiermustbe operatedin an enclosed
areato be mosteffective.
® Closeall doors,windowsand otheroutsideopenings
to theroom.
400mm(15,) iinches)or more
rille
grille
S
200mm(7,87inches)ormore
Fig.4
es)ormore
200mm(7.87inches)ormore
Casters
® Do not force casters to move over carpet,
nor move the unit with water in the bucket.
(The unit may tip over and spitt water.)
When
@
O
@
@
@
@
@
UsingThe Unit
Whenfirst usingthedehumidifier,operatetheunitcontinuously24 hours.
Thisunitis designedtooperatewith a workingenvironmentbetween 5°0(41°F)and 35°C(95°F).
Ifthe unithas beenswitchedoff and needsto be switchedon again quickly,allowapproximately
threeminutesfor thecorrectoperationtoresume.
Donotconnectthe dehumidifiertoa multiplesocketoutlet,whichis also beingusedforotherelectricalappliances.
Selecta suitablelocation,makesureyouhave easy accesstoan electricaloutlet.
Plugtheunit intoa 115V~60Hz properlygroundedelectricaloutleL
MakesuretheWaterbucketiscorrectlyplacedotherwisethe unitwill notoperateproperly.

CARE AND MAINTENANCE
Removing The Coiiec:ted Water
There are two ways to remove collected water.
1. Use The Bucket
® When the bucket is full, the unit will automatically stop
running, and the Furl indicator Uightwifl flash.
® Slowly pull out the bucket. Hold left and right handles
securely, and carefully puff out straight so water will
not spill. Do not put the tank on the floor because the
bottom of the bucket is not flat. Otherwise the bucket
will fail and cause the water to spill.
® Pour the water and replace the bucket.The bucket
must be in place and securely seated for the
dehumidifier to operate.
® The unit wHI restart when the bucket is replaced
in proper position.
NOTE:
® When you remove the bucket, do not touch any parts
inside the unit. Doing so may damage the product.
® Be sure to push the bucket gently all the way into the
unit. Banging the bucket against anything or failing to
push it in securely may cause the unit not to operate.
2. Continuous Draining
Water can be automatically emptied into a floor
drain by attaching the unit with a drain hose.
® Removethe waterbucketfrom thefront ofthe unit,youwill
finda sectionof hoselocatedabovethe bucket.
® Removetherubberplug fromthe backofthe unit(seeFig.8).
® insertthe drainhosethroughthe holein the backofthe unit
and securelypress itontotheconnectoron thefront ofthe
unit(seeFig.9). Thenleadthedrain hose tothefloor drainor
a suitabledrainagefacility.
® Replacethe bucketin the unit.Thebucketmustbe in place
and securelyseated.
1. Putl out the bucket a little.
Fig.5
2. Hold both sides of the bucket
securely, and putl itout from
the unit.
Fig.6
3. Pour the water out.
Jf
Fig.7
into the drain
hole
NOTE: When the continuous drain feature is not being
used, remove the drain hose from the connector and
attach the back drain hole with the rubber plug.
Fig.8
rain hose
Coooector
Fig,9

CARE AND MAINTENANCE
Care And Cleaning Of The Dehumidifier
Turn the unit off and re_ove the plug
from the walt outtet before cleaningo
1o CIlean the Grille and Case
® Use water and a mild detergent. Do not use bleach
or abrasives.
® Do not splash water directly onto the unit. Doing
so may cause an electrical shock, cause the insulation
to deteriorate, or cause the unit to rust.
® The air intake and outlet grilles can get soiled easily, so
use a vacuum facility or brush to clean.
2. Clean the bucket
Every few weeks, clean the bucket to prevent growth of
mold,mildew and bacteria. Fill the bucket with clean water
and add a little mild detergent. Swish itaround in the
bucket,empty and rinse.
NOTE: Do not use a dishwasher to clean the bucket.
After cleaning, the bucket must be in place and securely
seated to operate.
oP
3. Ctean the air fi|ter
The air filter behind the front grille should be
checked and cJeaned at least every 30 days
or more often if necessary.
NOTE: DO NOT RINSE OR PUT THE FILTER
mNAN AUTOMATIC DESHVVASHER.
Fig,A
Fig,B
To remove:
®Grip the tab on the filter and pull itout as shown
in Fig.A.
®Clean the filter with warm, soapy water. Rinse and
let the filter dry before replacing it. Do not clean the
filter in a dishwasher.
To attach:
Insert the air filter into the unit from the side and push
it in. See Fig.C
CAUTION:
®DO NOT operate the unit without a filter because
dust win block it and reduce performance. Band_
4. When not using the unit for a long time
• After turning off the unit, wait one day before L
emptying the tank.
®Clean the unit, bucket and air filter.
®Wrap the cord and bundle it with the band or twist
the excess cord onto the power cord hook.
®Cover the unit with a plastic bag.
®Store the unit upright in dry, weN-ventilated place.
Fig,C
Powercord

TROUBLESHOOTING TiPS
Before calling for service, review the chart below first.
Unit does not start
o Make sure the plug is pushed completely into the outlet.
IIHlll_ Check the house fuse/circuit breaker box.
Dehumidifier has reached its preset level or bucket is full.
Bucket is not in the proper position.
Dehumidifier does not
dry the air as it should
The unit makes a _oud
oise when operating
fo Do not allow enough time to remove the moisture.
® Make sure there are no curtains, blinds or furniture blocking the
front or back of the dehumidifier.
• The humidity control may not be set low enough.
• Check that all doors, windows and other openings are securety
dosed.
® Room temperature is too low, below 5°C(41°F).
o There is a kerosene heater or something giving off water vapor
in the room.
J
• The air fitter is blocked.
• The unit is not placed upright as it shoutd be.
® The floor surface is not level.
Frost appears on the 1
Nater on floor
EI, E2, P1 or P2 appear
in the display
llllllll_ ! o This is normal. The dehumidifier has Auto defrost feature.
_o Hose to connector or hose connection may be loose.
IllllllllI_ I ® Intend to use the bucket to collect water, but the back
drain plug is removed.
_ IoTheseareerrorcodes. SeetheCONTROLPANELSONTHE !
IIHIIII DEHUMIDIFIER section.

Your product is protected by this warranty:
Warranty service must be obtained from Midea Consumer Services or an authorized Midea servicer.
FULL TWO-YEAR
WARRANTY
LIMITED 3RD-5 TM
YEAR WARRANTY
(sealed system)
WARRANTY
PERIOD
Two year from ofiginam
purchase date
Third through fifth
years from originam
purchase date
MIDEA, THROUGH ITS
AUTHORIZED SERVICERS, WILL:
Pay aimcosts for repairing or replacing
parts of this appliance which prove to
be defective in materials or
workmanship.
Repair or replace any parts in the
Seamed Refrigeration System
(compressor,
condenser, evaporator and tubing)
proves to be defective in matedaNs
workmanship.
THE CONSUMER WILL BE
RESPONSIBLE FOR:
Transportation and costs of service cans that
are listed under NORMAL RESPONSiBiLITIES
OF THE CONSUMER*
Diagnostic, removal, transportation and
reinstaHation costs required because of service.
Costs for labor, parts and transportation
other than with respect to the Sealed
Refrigeration System.
Midea replacemeut parts shall be used aud will be warrauted only for the period remaining on the oHgiuai warranty°
NORMAL RESPONSIBmUTmES OF THE CONSUMER*
This warranty applies only to products in ordinary househomd use, and the consumer is responsible for the items listed below:
1. Proper use of the appmiancein accordance with instructions provided with the product.
2. Proper installation by an authorized service professionaN in accordance with instructions provided with the appHiance and in accordance with aH
local plumbing, electrical and /or gas codes.
3. Proper connection to a grounded power supply of sufficient voltage, replacement of blown fuses, repair of loosen connections or defects in
house wiring.
4. Expenses for making the appHiance accessibNe for servicing.
5. Damages to finish after installation.
EXCLUSIONS
This warranty does not cover the following:
1) Failure caused by damage to the unit whimein your possession (other than damage caused by defect or maffunction), by its improper
instaNmation,or by unreasonabme use of the unit, including without Himitation,failure to provide reasonabme and necessary maintenance or to
fommowthe written mnstammationand Operating mnstructions.
2) Damages caused by services performed by persons other than authorized Midea servicers; use of parts other than Midea repHacement parts;
obtained from persons other than such Midea customer service; or externaN causes such as abuse, misuse, inadequate power suppmy.
3) mfthe unit is put to commercial, business, rentam,or other use or appmicationother than for consumer use, we make no warranties, express or
implied, including but not limited to, any implied warranty of merchantability or fitness for particular use or purpose.
4) Products without originamseriaN numbers or products that have seriamnumbers which have been aHteredor cannot be readimydetermined.
Note: Some states do not allow the exclusion or limitation of incidental or consequential damages. So this limitation or exclusion may not apply to you.
mFYOU NEED SERVICE
Keep your bill of sale, delivery slip, or some other appropriate payment record.
The date on the bill established the warranty period should service be required.
mfservice is performed, it is your best interest to obtain and keep aHreceipts.
This written warranty gives you specific Negalrights. You may also have other rights that vary from state to state.
Service under this warranty must be obtained by following these steps, in order:
I. Contact Midea Consumer Services or an authorized Midea servicer at 1-866-747-4332
2. mfthere is a question as to where to obtain service, contact our consumer remations Department.
Table of contents
Other Arctic King Dehumidifier manuals