ARDES AR1S40 User manual

Attenzione : leggere attentamente le avvertenze
contenute nel seguente libretto in quanto forniscono
importanti indicazioni riguardanti la sicurezza di
installazione, d’uso e di manutenzione.
Istruzioni importanti da conservare per ulteriori
consultazioni.
Questo apparecchio può essere utilizzato da bambini
dagli 8 anni in su e da persone con ridotte capacità
siche, sensoriali o mentali o con mancanza di esperienza
o conoscenza se a loro è stata assicurata un’adeguata
sorveglianza oppure se hanno ricevuto istruzioni circa
l’uso in sicurezza dell’apparecchio e hanno compreso
i pericoli correlati. I bambini non devono giocare con
l’apparecchio. Le operazioni di pulizia e di manutenzione
non devono essere eettuate da bambini a meno che
non abbiano più di 8 anni e siano sorvegliati.
Mantenere l’apparecchio e il suo cavo fuori dalla portata
dei bambini con meno di 8 anni.
L’apparecchio non deve essere fatto funzionare per
mezzo di un temporizzatore esterno o con un sistema di
comando a distanza separato.
Le superci sono soggette a diventare calde durante
l’uso.
Per la pulizia dell’apparecchio, fare riferimento al
paragrafo MANUTENZIONE.
Se il cavo di alimentazione dovesse essere danneggiato,
deve essere sostituito solamente presso i centri di
assistenza autorizzati dal costruttore in modo da prevenire
ogni rischio.
Non alimentare l’apparecchio se le piastre non sono
montate correttamente.
AR1S40
ISTRUZIONI D’USO
BISTECCHIERA

Avvertenze IT
Conservare la garanzia, lo scontrino scale e il libretto istruzioni per ogni ulteriore consultazione.
Dopo aver tolto l’imballaggio assicurarsi dell’integrità dell’apparecchio e in caso di visibili danneggiamenti non
utilizzarlo e rivolgersi a personale professionalmente qualicato.
Non lasciare parti dell’imballo alla portata dei bambini, né utilizzarlo come gioco: è un apparecchio elettrico e
come tale va considerato.
Prima di collegare l’apparecchio, assicurarsi che la tensione presente nella presa di corrente, corrisponda a
quella indicata nei dati di targa.
La sicurezza elettrica di questo apparecchio è assicurata solamente quando lo stesso è collegato ad un ecace
impianto di messa a terra.
Nel caso in cui la spina e la presa non siano compatibili, far sostituire la presa con un tipo adatto da personale
professionalmente qualicato.
Non utilizzare adattatori o prolunghe che non siano rispondenti alle vigenti normative di sicurezza o che superino
i limiti delle portate in valore della corrente.
Staccare l’apparecchio dalla rete di alimentazione quando non è utilizzato e assicurarsi che sia spento.
Non tirare il cavo di alimentazione o l’apparecchio stesso per staccare la spina dalla presa di corrente.
L’uso di un qualsiasi apparecchio elettrico comporta l’osservanza di alcune regole fondamentali, in particolare:
- Non toccare l’apparecchio con mani bagnate o umide.
- Non utilizzare l’apparecchio a piedi nudi.
- Non lasciare l’apparecchio esposto ad agenti atmosferici (pioggia, sole).
- Non sottoporlo ad urti.
Nel caso vi sia un guasto o un funzionamento anomalo dell’apparecchio staccare immediatamente la spina, non
manometterlo e rivolgersi ad un centro assistenza autorizzato.
Nel qualcaso si decida di non utilizzare più questo tipo di apparecchio, è opportuno renderlo inoperante,
tagliando il cavo di alimentazione, ovviamente dopo averlo disinserito dalla presa di corrente.
L’apparecchio è stato costruito e concepito per funzionare in ambienti domestici secondo quanto indicato nelle
istruzioni ; pertanto ogni altro uso è da considerarsi improprio e quindi pericoloso.
Non usare l’apparecchio all’aperto.
Per motivi di sicurezza l’apparecchio non può essere smontato.
Durante l’uso tenere l’apparecchio su di una supercie piana e stabile.
Non appoggiare l’apparecchio su superci inadatte e non resistenti al calore.
Per evitare contatti accidentali con parti calde da parte dei bambini, utilizzare l’apparecchio su piani di appoggio
alti almeno 85 cm. dal suolo.
Lasciare libero lo spazio attorno a tutte le altre superci dell’apparecchio e non sovrapporre oggetti.
Tenere il cavo lontano da fonti di calore.
Non posizionare l’apparecchio sopra o sotto ad altri forni, forni a micronde o vicino a fornelli a gas.
Non movimentare l’apparecchio quando funziona, quando è caldo e quando è collegato all’alimentazione.
2
Informazioni tecniche IT
1 - Maniglia
2 - Termostato regolabile
3 - Pulsante di apertura 180°
4 - Spia di accensione
5 - Spia termostato
6 - Vaschetta per la raccolta dei liquidi
7 - pulsante per il rilascio della piastra
Dati tecnici : vedere etichetta sull’apparecchio
Istruzioni d’uso IT
Primo utilizzo
Prima di utilizzare l’apparecchio per la prima volta far funzionare l’apparecchio a vuoto ( per circa 2 minuti, no
a quando la luce verde si spegne) in locale ben aerato per eliminare odori e fumi dovuti ad eventuali residui di
lavorazione sulle parti interne dell’apparecchio.
Disinserire la spina dalla presa di corrente e lasciare rareddare l’apparecchio.
Nota: quando si utilizza questo apparecchio per la prima volta, si potrebbe notare del fumo. Questo è normale
a causa del riscaldamento iniziale dei componenti interni.
Pulire le piastre come specicato nel paragrafo MANUTENZIONE.
1
4
3
25
6
7
7

3
UTILIZZO DELLA GRIGLIA A CONTATTO
Controllare che la vaschetta per la raccolta dei liquidi sia posizionata correttamente e inserita no a ne corsa
altrimenti i residui del cibo potrebbero colare fuori dall’apparecchio e sporcare la supercie di appoggio.
Spalmare leggermente le piastre di cottura con un pò di burro o olio da cucina.
Chiudere la griglia ed inserire la spina di rete nella presa di corrente. Regolare il termostato (2) nella posizione
desiderata a seconda del tipo di alimento e del livello di cottura preferito (si consiglia di utilizzare la posizione
media per i panini e la posizione MAX per la carne). La spia di alimentazione rossa (4) si illumina e la spia
verde (5) è spenta.
Attendere nché la luce verde si accende. L’apparecchio ha raggiunto la temperatura corretta per l’uso.
Aprire la griglia utilizzando la maniglia (1) ed inserire gli alimenti sulla griglia inferiore (è possibile cucinare
panini, burger, pezzi di carne senza osso e verdure).
I panini vanno posizionati nella parte posteriore della griglia. Se si decide di cucinare alimenti dierenti, è
importante che questi abbiano circa lo stesso spessore in modo che la griglia superiore aderisca in modo
uniforme sugli stessi. Chiudere la griglia superiore.
Il tempo di cottura varia in base agli alimenti, alla temperatura impostata ed ai gusti personali.
Per i panini, il tempo di cottura indicativo va da 3 a 6 minuti. E’ possibile controllare lo stato della cottura
sollevando la griglia superiore.
Nota: Durante la cottura, la spia verde si accende e si spegne per mantenere l’apparecchio alla temperatura
corretta.
Terminata la cottura, sollevare la griglia superiore ed utilizzare un utensile non metallico (ad es. spatola di legno)
per rimuovere gli alimenti. Non utilizzare utensili da cucina taglienti o abrasivi.
Dopo l’uso, scollegare l’apparecchio dalla presa di corrente ed attendere che si rareddi. Pulire l’apparecchio
come indicato nel paragrafo MANUTENZIONE.
UTILIZZO COME GRIGLIA APERTA 180°
Per aprire la griglia a 180° è suciente tenere premuto il pulsante laterale (3) e utilizzando
la maniglia ruotare la piastra superiore no all’apertura completa.
Spalmare leggermente le piastre di cottura con un pò di burro o olio da cucina.
Inserire la spina nella presa di corrente e regolare il termostato nella posizione desiderata.La
spia di alimentazione rossa è accesa e la spia verde è spenta.
Attendere nché la luce verde si accende. L’apparecchio ha raggiunto la
temperatura corretta per l’uso ed è possibile posizionare gli alimenti da
cucinare.
Dopo l’uso, scollegare l’apparecchio dalla presa di corrente ed attendere che si
rareddi. Pulire l’apparecchio come indicato nel paragrafo MANUTENZIONE.
RIMOZIONE DELLE PIASTRE
Scollegare sempre l’apparecchio e lasciarlo rareddare prima di rimuovere le piastre di cottura.
Individuare i pulsanti di rilascio della piastra (7) sulla parte anteriore dell’apparecchio. Premere il pulsante e la
piastra si aprirà leggermente dalla base. Aerrare la piastra con due mani, estrarla da sotto le stae di metallo
e sollevarla dalla base. Premere sull’altro pulsante di rilascio della piastra per rimuovere l’altra piastra di cottura
nel modo corretto.
MONTAGGIO DELLE PIASTRE
Piastra inferiore - inserire la piastra nelle guide posizionate nella parte posteriore; premere la parte anteriore
della piastra no allo scatto.
Piastra superiore - inserire la piastra nelle guide posizionate nella parte inferiore; premere la parte superiore
della piastra no allo scatto.
Manutenzione IT
Disinserire la spina dalla presa di corrente prima di eettuare qualsiasi operazione di pulizia e manutenzione.
Pulire l’apparecchio solamente quando è freddo.
Rimuovere i residui alimentari dalle piastre.
Rimuovere le piastre dall’apparecchio come indicato nel paragrafo RIMOZIONE DELLE PIASTRE e rimuovere
la vaschetta di recupero liquidi.
Lavare le piastre e la vaschetta con detersivo per stoviglie; non utilizzare pagliette o altri mezzi abrasivi che
potrebbero danneggiare il rivestimento antiaderente.
Non lavare in lavastoviglie.
Dopo la pulizia, solo quando sono completamente asciutte, rimontare le piastre (vedi MONTAGGIO DELLE
PIASTRE) e la vaschetta.
La pulizia esterna dell’apparecchio, deve essere eettuata con un panno morbido e leggermente umido.
Non utilizzare sostanze, liquidi o panni eccessivamente bagnati, perché eventuali inltrazioni potrebbero
danneggiare l’apparecchio irreparabilmente.
NON IMMERGERE MAI L’APPARECCHIO IN ACQUA.

4
Attention : read this booklet carefully it contains
important instructions for a safe installation, use
and maintenance.
Important instructions to be kept for future reference.
This unit can be used by children aged 8 and above and
individuals with reduced physical, sensory or mental
capacity, or lack of experience or knowledge, if they are
provided with adequate supervision or have received
instructions regarding the use of safety equipment and
that they understand the risks related.
Children must not play with the unit. Cleaning and user
maintenance shall not be made by children unless they
are older than 8 and supervised.
Keep the equipment and its cable out of reach of children
younger than 8 years of age.
The appliance must never be operated by means of an
external timer or with a separate remote control system.
The surfaces are subject to heating up during use.
To clean the appliance, refer to the MAINTENANCE
chapter.
If the power cable is damaged, it must be only be replaced
at service centres authorised by the manufacturer in
order to prevent any risks.
Do not turn the device on if the plates are not correctly
assembled.
AR1S40
INSTRUCTIONS FOR USE
Contact grill

5
Warnings EN
After removing the packaging, check the appliance for any signs of damage. In case of visible damage, do not
use it and contact a qualied technician.
Do not leave parts of the packaging within the reach of children.
This appliance is not a children’s toy: it is an electrical device and must be treated with the necessary caution.
Before connecting the appliance, make sure that the power supply voltage matches the indication on the data
plate.
Electrical safety of this appliance is assured only if it has been connected to an eective earthing system.
If the plug and socket are not compatible, the socket has to be replaced with a suitable type by skilled persons.
Do not use adapters or extension cables which do not meet current safety standards or that exceed the current
carrying capacity limits.
Unplug the appliance from the mains when not in use.
Do not tug on the power cable or on the appliance itself to remove the plug from the socket.
The use of any electrical appliance requires that a number of basic rules are observed, namely:
- Never touch the appliance with wet or humid hands.
- Do not use the appliance when barefoot.
- Do not leave the appliance exposed to weathering (rain, sunlight).
- Do not subject it to rough handling.
In case of failure, disconnect it at once. Do not attempt to repair it, but take it to a service centre approved by
the manufacturer.
If you decide you do not want to use this appliance any longer, disable it by cutting the power cable of course,
after disconnecting it from the socket.
In case of a breakdown or malfunctioning of the appliance, disconnect it at once. Do not attempt to repair it, but
take it to a service centre approved by the manufacturer.
The appliance was created and designed for use in domestic environments as indicated in the instructions. Any
other use is therefore considered improper and thus dangerous.
Do not use the appliance out of doors.
For safety reasons, the appliance should never be opened.
During use, rest the appliance on a at surface.
To prevent children from accidentally touching hot components, use the appliance on surfaces that are at least
85 cm high.
Leave space around all other surfaces of the appliance and do not cover with other objects.
Do not place the cord near sources of heat.
Do not place the appliance above or below other ovens, microwave ovens or close to gas stoves.
Technical informations EN
1 - Handle
2 - Adjustable thermostat
3 - 180° opening pushbutton
4 - Power on light
5 - Thermostat indicator light
6 - Drip tray
7 - Plate release button
Technical data indicated on the appliance.
1
4
3
25
6
7
7
EN
Instructions for use
First use
Before using the device for the rst time, operate it while empty (for about 2 minutes, until the green light turns
o) in a well-ventilated area to eliminate any odours and fumes due to possible residual traces from production
on the internal parts of the device.
Remove the plug from the power outlet and let the device cool down.
NB: when the device is used for the rst time, some smoke may be visible.
This is normal due to the initial heating of the internal components.
Clean the plates as specied in the MAINTENANCE section.

6
EN
Maintenance
Disconnect the plug from the socket and let the appliance cool down well before cleaning it.
In order to clean the appliance, use a soft or slight damp cloth.
To clean, open the appliance and remove food residues from the plates.
Remove the any traces of food from the plates.
Remove the plates from the device as indicated in the section REMOVING THE PLATES and empty the drip
tray.
Clean the plates and drip tray with washing-up liquid. Do not use scourers or other abrasive pads which may
damage the non-stick coating.
Do not wash in the dishwasher.
After cleaning and only when completely dry, re-assemble the plates (see ASSEMBLING THE PLATES) and
drip tray.
Do not use very wet substances, liquids or cloths to prevent water from entering into the appliance and irreparably
damaging it.
NEVER IMMERSE THE APPLIANCE INTO THE WATER.
USE OF THE CONTACT GRILL
Check that the drip tray is correctly positioned and ush against the device, otherwise food may leak out of the
device and dirty the counter top.
Lightly coat the cooking plates with a little butter or cooking oil.
Close the grill and insert the power plug into the power outlet.
Adjust the thermostat (2) to the required setting depending on the type of food and preferred cooking level (we
recommend using the medium setting for sandwiches and MAX setting for meat).
The red power light (4) turns on and the green light (5) is o.
Wait until the green light turns on.
The device has reached the correct operating temperature.
Open the grill using the handle (1) and insert the food on the lower grill (it is possible to cook sandwiches,
burgers, meat without bones and vegetables).
Sandwiches must be placed at the rear of the grill.
If you decide to cook dierent foods, they must be roughly the same thickness, so that the upper grill presses
evenly on them.
Close the upper grill.
The cooking time varies depending on the food, temperature setting and personal taste.
The standard cooking time for sandwiches ranges from 3 to 6 minutes.
You can check the cooking process by lifting the upper grill.
NB:
During cooking, the green light turns on and o in order to maintain the device at the correct temperature.
When cooking has been completed, lift the upper grill and use a non-metallic tool (e.g. a wooden spatula) to
remove the food.
Do not use sharp or abrasive kitchen tools.
After use, disconnect the device from the power outlet and wait until it has cooled down.
Clean the device as indicated in the MAINTENANCE section.
USE AS OPEN GRILL 180°
To open the grill to 180°, simply press and hold the side button (3) and using the handle,
rotate the upper plate until fully opened.
Lightly coat the cooking plates with a little butter or cooking oil.
Insert the plug in the power outlet and adjust the thermostat to the required position. The red
power light is on, while the green light is o.
Wait until the green light turns on.
The device has reached the correct operating temperature and you can now
place the food on the grill.
After use, disconnect the device from the power outlet and wait until it has
cooled down.
Clean the device as indicated in the MAINTENANCE section.
REMOVING THE PLATES
Always disconnect the device from the power supply and let it cool down before removing the cooking plates.
Locate the plate release buttons (7) on the front of the device.
Press the button and the plate will detach slightly from the base.
Grasp the plate with two hands, pull it out from under the metal brackets and lift it o the base.
Press the other plate release button to correctly remove the second cooking plate.
ASSEMBLING THE PLATES
Lower plate - insert the plate in the guides located on the rear, press the front of the plate until you hear it click.
Upper plate - insert the plate in the guides located on the lower part, press the upper part of the plate until you
hear it click.

7
Attention : lire soigneusement les avertissements
contenus dans le mode d’emploi qui fournit des
indications importantes concernant la securité de
l’installation, d’usage et d’entretien.
Instructions importantes à conserver pour tout autre
consultation.
Cet appareil peut être utilisé par les enfants de plus de
8 ans et par les personnes aux capacités physiques,
sensorielles ou mentales réduites ou n’ayant pas
susamment d’expérience ou de connaissance à
condition que ces derniers soient surveillés ou bien
qu’ils aient reçus des instructions sur l’utilisation en
toute sécurité de l’appareilet qu’ils aient compris les
dangers liés à l’utilisation de l’appareil.Les enfants ne
doivent pas jouer avec l’appareil. Les opérations de
nettoyage et d’entretien ne doivent pas être eectuées
par des enfants de moins de 8 ans sans surveillance.
Maintenir l’appareil et le câble hors de la portée des
enfants de moins de 8 ans.
L’appareil ne doit être mis en fonction ni avec un
temporisateur extérieur ni avec un système de
commande à distance séparé.
Les surfaces peuvent devenir tres chiude pendant
l’utilisation.
Pour le nettoyage de l’appareil, se référer au paragraphe
ENTRETIEN.
Si le câble d’alimentation devait être endommagé, il faut le
remplacer uniquement auprès des centres d’assistance
autorisés par le constructeur, an de prévenir chaque
risque.
N’alimentez pas l’appareil si les plaques ne sont pas
correctement montées.
AR1S40
MODE D’EMPLOI
SANDWICH MAKER

FR
Avvertissements
Conservez la garantie, le ticket de caisse et le mode d’emploi pour tout autre consultation.
Après le déballage, vériez l’intégrité de l’appareil. En cas de dommage, n’utilisez pas l’appareil et appelez
subitement le personnel qualié.
Ne laissez jamais les parties de l’emballage auprès des enfants, ne les utilisez pas en tant que jouets: il s’agit
d’un appareil électrique, il ne doit pas être utilisé autrement.
Avant de brancher l’appareil, vériez si la tension de la prise de courant correspond à celle qui est indiquée sur
la plaque.
La sécurité électrique de cet appareil n’est assurée que s’il est branché à une installation de mise à la terre
ecace.
Si la che et la prise ne sont pas compatibles, faites remplacer la prise avec un type adéquat par un personnel
qualié. N’utilisez pas adaptateurs ou rallonges non conformes aux normes de sécurité ou qui dépassent les
limites des débits en valeur du courant.
Il est conseillé de dérouler complètement le câble d’alimentation dans toute sa longueur, en évitant ainsi des
éventuelles surchaues.
Débranchez l’appareil du secteur si vous ne l’utilisez.
Ne tirez pas le câble d’alimentation ou l’appareil pour extraire la che dela prise de courant.
L’utilisation de tout les appareils électriques demande le respect de quelques règles fondamentales, en
particulier:
- Ne pas toucher l’appareil avec les mains mouillées ou humides.
- Ne pas utiliser l’appareil pieds-nus.
- Ne pas soumettre l’appareil aux agents atmosphériques (pluie, soleil).
- Éviter tout type de choc.
Dans le cas de défaut ou de mauvais fonctionnement, débranchez immédiatement l’appareil qui risque d’être
endommagé davantage, et adressez-vous au Service Après-Vente autorisé.
Si vous décidez de ne pas utiliser l’appareil, il est nécessaire de le rendre inopérant en coupant le câble
d’alimentation après l’avoir débranché.
L’appareil a été conçu et réalisé pour fonctionner dans des environnements domestiques et conformément
aux instructions fournies. Par conséquent, tout autre utilisation doit être considérée comme incorrecte et donc
dangereuse.
Pour des raisons de sécurité, n’ouvrez pas l’appareil.
Pendant l’utilisation, l’apareil doit être appuyé sur une surface plate.
Pour empêcher aux enfants de toucher accidentellement les composants chauds, utilisez l’apareil sur des
surfaces qui sont hauts au moins 85 cm.
Laisser libre l’espace autour de toutes les autres surfaces de l’appareil et ne pas superposer d’objets.
Maintenir le câble à distance de toute source de chaleur.
Ne pas poser l’appareil au-dessus ou en dessous d’autres fours, de fours à micro-ondes ou près de cuisinières
à gaz.
Ne pas déplacer l’appareil durant son fonctionnement, lorsqu’il est chaud et lorsqu’il est raccordé à l’alimentation.
Informations techniques FR
1
4
3
25
6
7
7
1 - Poignée
2 - Thermostat réglable
3 - Bouton d’ouverture à 180°
4 - Témoin de mise en marche
5 - Témoin thermostat
6 - Plateau lèchefrites pour la récupération
des liquides
7 - bouton pour libérer la plaque
Dates tecniques indiqués sur l’appareil.
FR
Mode d’Emploi
Première utilisation
Avant d’utiliser l’appareil pour la première fois, faites-le fonctionner à vide (pendant environ 2 minutes, jusqu’à
ce que le voyant vert s’éteigne) dans une pièce bien ventilée an d’éliminer les odeurs et les vapeurs dues aux
résidus de traitement sur les parties internes de l’appareil.
Débranchez la che de la prise secteur et laissez refroidir l’appareil.
Remarque : lors de la première utilisation de cet appareil, vous remarquerez peut-être de la fumée.
Ceci est normal en raison du chauage initial des composants internes.
Nettoyez les plaques selon les instructions de la section ENTRETIEN.
8

9
FR
Entretien
Débranchez l’appareil et laissez refroidir avant d’eectuer toute opération de nettoyage.
Pour le nettoyage de l’appareil, utilisez un chion légèrement humide.
Éliminez les résidus alimentaires des plaques.
Retirez les plaques de l’appareil comme décrit au paragraphe « RETRAIT DES PLAQUES » et retirez la
lèchefrite.
Lavez les plaques et le plateau avec du produit vaisselle ; n’utilisez pas de laine d’acier ni d’autres produits
abrasifs susceptibles d’endommager le revêtement antiadhésif.
Ne pas laver au lave-vaisselle.
Après le nettoyage, réassemblez les plaques (voir ASSEMBLAGE DES PLAQUES) et le plateau, une fois
celles-ci parfaitement sèches.
N’IMMERGEZ JAMAIS L’APPAREIL DANS L’EAU.
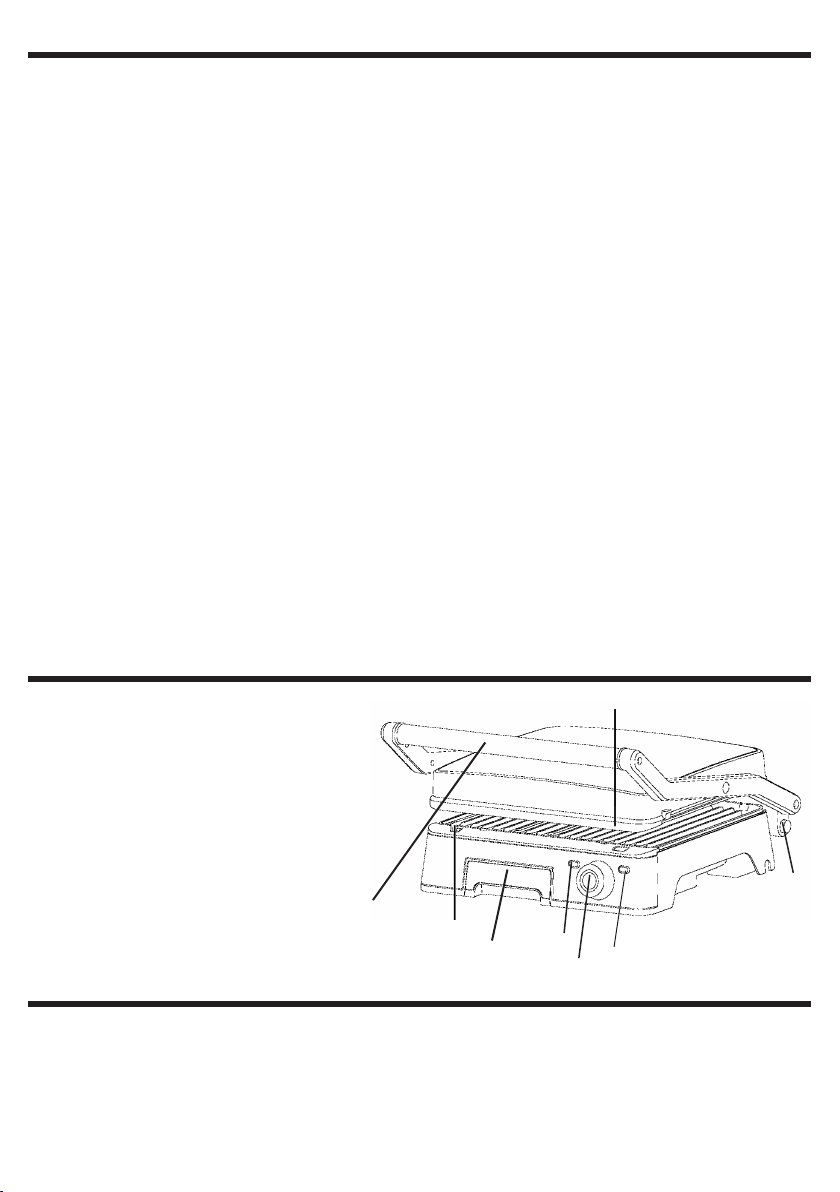
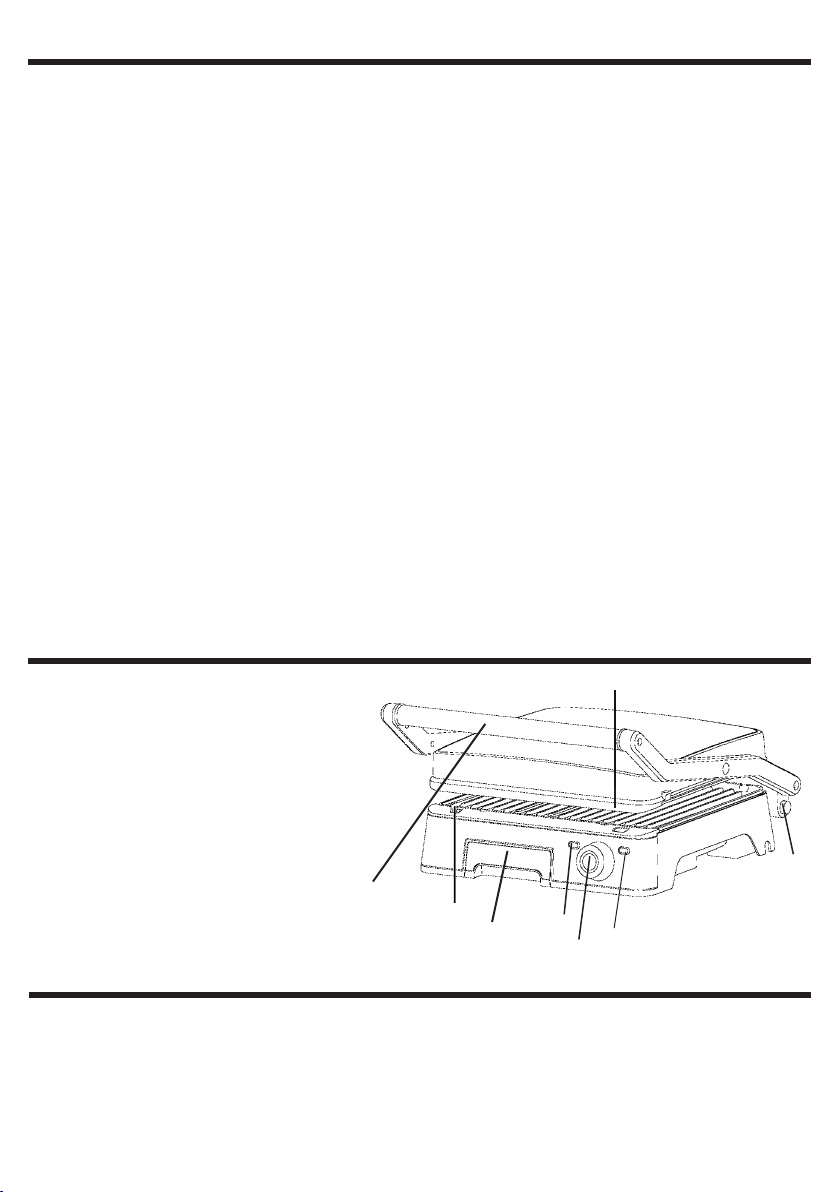
UTILISATION DE LA GRILLE À CONTACT
Vériez que le plateau lèchefrites est correctement positionné et inséré jusqu’au n de course, pour éviter que
les résidus d’aliments puissent s’échapper de l’appareil et salir la surface d’appui.
Étalez une légère couche de beurre ou d’huile sur les plaques de cuisson.
Fermez la grille et branchez la che secteur à la prise.
Réglez le thermostat (2) à la position souhaitée en fonction du type d’aliment et du niveau de cuisson souhaité
(il est recommandé d’utiliser la position moyenne pour les sandwichs et la position MAX pour la viande).
Le voyant d’alimentation rouge (4) s’allume et le voyant vert (5) est éteint.
Attendez que le voyant vert s’allume.
À ce stade, l’appareil a atteint la bonne température d’utilisation.
Ouvrez le gril avec la poignée (1) et placez les aliments sur le gril inférieur (vous pouvez faire cuire des
sandwichs, des hamburgers, des morceaux de viande sans os et des légumes).
Les sandwichs doivent être placés à l’arrière du gril.
Si vous décidez de cuisiner d’autres aliments, il est important qu’ils aient à peu près la même épaisseur an que
le gril supérieur adhère uniformément sur eux.
Fermez la grille supérieure.
Le temps de cuisson varie en fonction des aliments, de la température réglée et des goûts personnels.
Pour les sandwichs, le temps de cuisson indicatif varie de 3 à 6 minutes.
Il est possible de vérier l’état de cuisson en soulevant la grille supérieure.
Remarque :
Pendant la cuisson, le voyant vert s’allume et s’éteint pour que l’appareil soit constamment à la bonne
température.
Une fois la cuisson terminée, soulevez la grille supérieure et utilisez un outil non métallique (par exemple, une
spatule en bois) pour retirer les aliments.
N’utilisez pas d’ustensiles de cuisine coupants ou abrasifs.
Après utilisation, débranchez l’appareil de la prise secteur et attendez qu’il refroidisse.
Nettoyez l’appareil comme décrit au paragraphe ENTRETIEN.
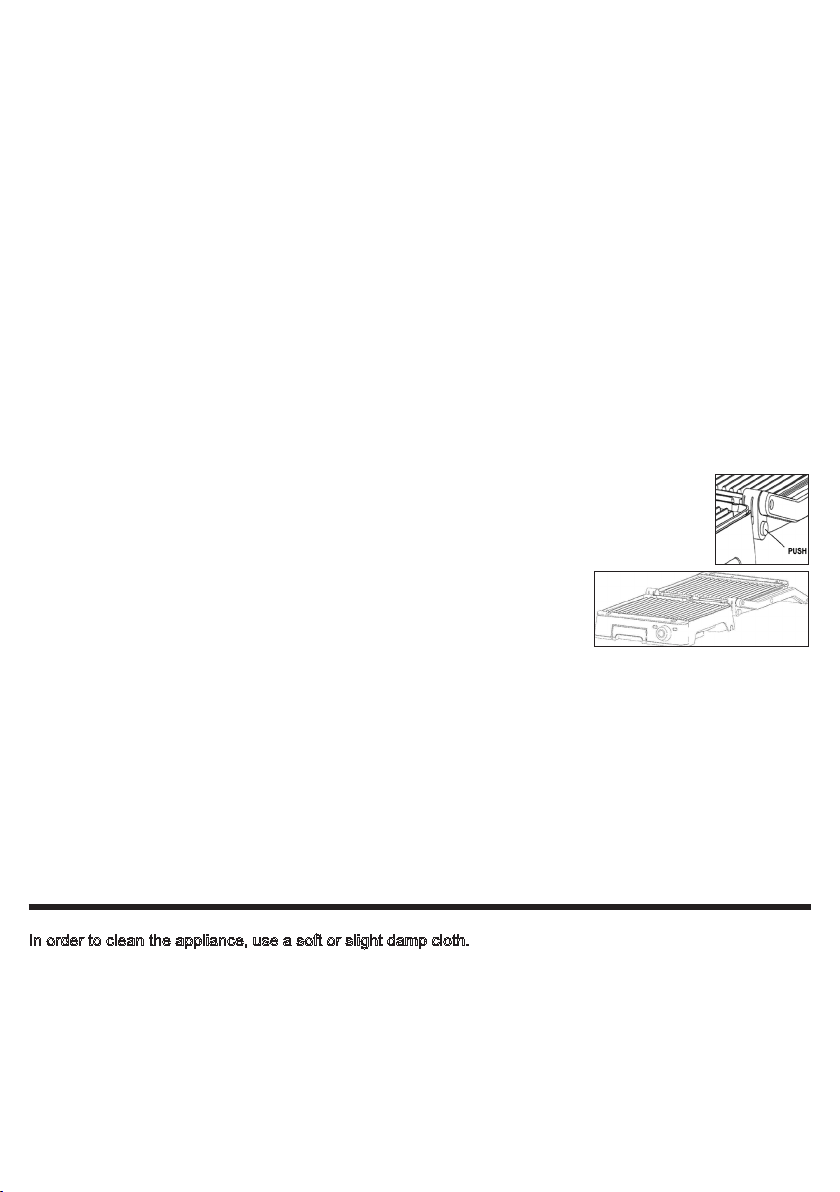
UTILISER COMME GRILLE OUVERTE 180 °
Pour ouvrir la grille à 180 °, maintenez tout simplement le bouton latéral enfoncé (3) et servez-
vous de la poignée pour faire pivoter la plaque supérieure jusqu’à ce qu’elle soit complètement
ouverte.
Étalez une légère couche de beurre ou d’huile sur les plaques de cuisson.
Branchez la che à la prise secteur et réglez le thermostat à la position souhaitée. Le voyant
d’alimentation rouge est allumé et le voyant vert est éteint.
Attendez que le voyant vert s’allume.
À ce stade, l’appareil a atteint la bonne température d’utilisation et vous pouvez
placer les aliments à cuire.
Après utilisation, débranchez l’appareil de la prise secteur et attendez qu’il
refroidisse.
Nettoyez l’appareil comme décrit au paragraphe ENTRETIEN.
RETRAIT DES PLAQUES
Débranchez toujours l’appareil et laissez-le refroidir avant de retirer les plaques de cuisson.
Repérez les boutons de déverrouillage de la plaque (7) à l’avant de l’appareil.
Appuyez sur le bouton et la plaque s’ouvrira légèrement à partir de la base.
Saisissez la plaque à deux mains, retirez-la de dessous les supports métalliques et soulevez-la de la base.
Appuyez sur le bouton de dégagement de l’autre plaque pour retirer cette dernière correctement.
MONTAGE DES PLAQUES
Plaque inférieure - insérez la plaque dans les guides situés à l’arrière ; appuyez sur le devant de la plaque
jusqu’à ce que vous entendiez un déclic.
Plaque supérieure - insérez la plaque dans les guides situés dans la partie inférieure ; appuyez sur le haut de
la plaque jusqu’à ce que vous entendiez un déclic.

Achtung : lesen sie die in diesem heftchen stehenden
anweisungen sorgfältig.
Sie geben ihnen nützliche hinweise hinsichtlich
der sicherheit des gerätes, der anwendung und der
instandhaltung.Wichtigehinweisebitteaufbewahren
für späteres nachlesen.
Dieses gerät kann sowohl von kindern ab 8 jahren alsauch
von körperlich, sensorisch oder geistig eingeschränkten
personen bzw. Von personen ohne erfahrung oder
ohne wissen genutzt werden, wenn sie von einer
geschulten person beaufsichtigt werden oder wenn sie
anweisungen zum sicheren einsatz des gerätes erhalten
haben und wenn sie die entsprechenden gefahren
verstanden haben. Kinder dürfen mit dem gerät nicht
spielen. Reinigungs- und wartungsarbeiten dürfen nur
von kindern durchgeführt werden, wenn diese älter als
8 jahre sind und während der arbeiten beaufsichtigt
werden.Gerät und kabel müssen ausser reichweite für
kinder unter 8 jahren platziert werden.
Die oberächen erhitzen sich während des gebrauchs.
Für die Reinigung des Geräts, siehe Abschnitt
WARTUNG
Das gerät darf nicht mittels einer externen zeitschaltuhr
oder einem separaten fernsteuersystem betrieben
werden.
Falls das Versorgungskabel beschädigt ist, dann darf
dieses nur durch einen, vom Hersteller genehmigten,
Kundendienst ausgetauscht werden, um jegliches
Risiko vorzubeugen.
Schließen Sie das Gerät nicht an das Stromnetz an,
wenn die Platten nicht richtig montiert sind.
AR1S40
BEDIENUNGSANLEITUNG
KONTAKTGRILL
10

DE
Anmerkungen
Garantiebescheinigung, skalische Quittung und Bedienungsanleitung für jede spätere Konsultation bitte
aufbewahren.
Nach Entfernen der Verpackung vergewissere man sich der Integrität des Gerätes und sollte man bei dieser
Überprüfung sichtbare Beschädigungen festestellen, das Gerät nicht benutzen und sich direkt an qualiziertes
Fachpersonal wenden.
Keinerlei Verpackungsteile für Kinder zugänglich zurücklassen, das Gerät auch nicht als ein Spielzeug
verwenden: es ist ein Elektrogerät und als solches zu behandeln.
Bevor man das Gerät an die Netzspannung anschließt, stelle man sicher daß die an der Steckdose liegende
Spannung auch derjenigen des Typenschildes des Gerätes entspricht.
Die Sicherheit dieses Gerätes ist nur dann gewährleistet wenn das Gerät auch an eine leistungsfähige
Erdungsanlage angeschlossen ist.
Sollten Stecker und Steckdose nicht kompatibel sein, so lasse man die Steckdose durch eine passende
Steckdose ersetzen. Diese Arbeit ist von einem qualizierten Fachmann durchzuführen. Keine Adapter oder
Verlängerungsschnuren verwenden die nicht den Forderungen der gegenwärtig geltenden Sicherheitsnormen
genügen oder die die Stromgrenzwerte überschreiten.
Trennen Sie das Gerät vom Stromnetz, wenn es nicht verwendet wird.
Am Netzkabel oder am Gerät selbst nicht ziehen um Stecker aus der Steckdose herauszuziehen.
Der Gebrauch irgendeines Elektrogerätes erfordert immer die Beachtung einiger grundlegenden Regeln und
zwar insbesondere:
- Man darf niemals das Gerät mit nassen oder feuchten Händen berühren.
- Das Gerät niemals barfuß benutzen.
- Das Gerät nicht den Witterungseinüssen ausgesetzt lassen (Regen, Sonnenstrahlung).
- Gerät nicht Schlag-oder Stoßbeanspruchungen aussetzen.
Es ist zu empfehlen, das Netzkabel für seine ganze Länge abzuwickeln um somit eventuelle Überhitzungen zu
vermeiden.
Sollte man sich dafür entscheiden diesen Gerätetyp nicht mehr zu benutzen, so ist es angebracht das Gerät
unbenutzbar zu machen durch Abschneiden des Netzkabels, natürlich nach dessen Abtrennung von der
Steckdose.
Bei Erscheinen einer Störung bzw. einem nicht einwandfreien Betrieb des Gerätes hat man sofort den Stecker
zu ziehen, keinerlei Eingri am Gerät vorzunehmen und sich an eine zugelassene Service-Werkstatt zu wenden.
Das Gerät wurde für die Verwendung in häuslicher Umgebung entworfen und gebaut, gemäß den Angaben in
der Anleitung; deshalb gilt jede andere Verwendung als unsachgemäß und daher gefährlich.
Aus Sicherheitsgründen darf das Gerät nicht geönet werden.
Während des Gebrauches ist das Gerät auf einer ebenen Fläche zu halten.
Zur Vermeidung von unbeabsichtigten Berührungen mit heißen Teilen seitens Kindern sollte das Gerät auf
Grundplatten gesetzt werden deren Abstand vom Boden mindestens 85 cm betragen muß.
Den Raum um alle anderen Oberächen des Gerätes freihalten und keine Gegenstände übereinanderlegen.
Halten Sie das Kabel von Wärmequellen fern.
Stellen Sie das Gerät nicht auf oder unter andere Backöfen, Mikrowellenöfen oder in die Nähe von Gasherden.
Das Gerät nicht bewegen, wenn es in Betrieb ist, wenn es heiß ist und wenn es an die Stromversorgung
angeschlossen ist. DE
Technische informationen
11
1 - Gri
2 - Einstellbares Thermostat
3 - 180° Önungstaste
4 - Betriebskontrolllämpchen
5 - Thermostatkontrolllämpchen
6 - Flüssigkeitssammelbehälter
7 - Taste zum Lösen der Platte
Technischen Daten auf dem Gerät geleigt.
1
4
3
25
6
7
7
DE
Gebrauchsanweisung
Erste Anwendung
Bevor Sie das Gerät zum ersten Mal in Betrieb nehmen, betreiben Sie es in einem gut belüfteten Raum leer (etwa
2 Minuten lang, bis das grüne Licht erlischt), um Gerüche und Dämpfe aufgrund von Verarbeitungsrückständen
an den Innenteilen des Geräts zu beseitigen.

DE
Wartung
Vor dem Reinigen des Gerätes hat man immer das Netzkabel aus der Steckdose herauszuziehen und Gerät
völlig abkühlen lassen. Zum Reinigen des Gerätes einen weichen und leicht feuchten Lappen benutzen.
Befreien Sie die Platten von Speiseresten.
Entfernen Sie die Platten aus dem Gerät, wie im Abschnitt ENTFERNEN DER PLATTEN angegeben, und
entfernen Sie den Flüssigkeitssammelbehälter.
Reinigen Sie die Platten und und den Behälter mit Spülmittel; verwenden Sie keine Stahlwolle oder andere
scheuernde Utensilien, die die Antihaftbeschichtung beschädigen könnten.
Nicht im Geschirrspüler reinigen.
Montieren Sie die Platten und den Behälter nach der Reinigung erst dann wieder, wenn sie komplett trocken
sind (siehe MONTAGE DER PLATTEN).
Verwenden Sie keine nassen Stoe, Flüssigkeiten oder sehr nasse Tücher, da eventuell eindringendes Wasser
das Gerät irreparabel beschädigen kann.
NIEMALS DAS GERÄT IN WASSER TAUCHEN.
Ziehen Sie den Stecker aus der Steckdose und lassen Sie das Gerät abkühlen.
Hinweis: bei der ersten Verwendung dieses Geräts kann es zu Rauchentwicklung kommen.
Dies ist aufgrund der ersten Erwärmung der inneren Bauteile normal.
Reinigen Sie die Platten wie im Abschnitt WARTUNG angegeben.
GEBRAUCH DES KONTAKTGRILLS
Stellen Sie sicher, dass der Flüssigkeitssammelbehälter bis zum Endanschlag richtig positioniert und eingesetzt
ist, andernfalls könnten Speisereste aus dem Gerät austreten und die Auageäche verschmutzen.
Die Platten mit etwas Butter oder Speiseöl bestreichen.
Schließen Sie den Grill und stecken Sie den Netzstecker in die Steckdose.
Stellen Sie den Thermostat (2) je nach Art der Speise und der bevorzugten Garstufe auf die gewünschte Position
ein (es wird empfohlen, für Brötchen die mittlere Position und für Fleisch die Position MAX zu verwenden).
Die rote Betriebsanzeige (4) leuchtet auf und die grüne Anzeige (5) ist ausgeschaltet.
Warten Sie, bis das grüne Licht aueuchtet.
Das Gerät hat die richtige Betriebstemperatur erreicht.
Önen Sie den Grill mit dem Gri (1) und legen Sie die Speisen auf den unteren Rost (es können Sandwiches,
Burger, Fleischstücke ohne Knochen und Gemüse zubereitet werden).
Sandwiches sollten im hinteren Bereich des Grills platziert werden.
Bei der gleichzeitigen Zubereitung verschiedener Speisen ist darauf zu achten, dass sie etwa gleich dick sind,
damit der obere Rost gleichmäßig auiegt.
Schließen Sie den oberen Rost.
Die Garzeit variiert je nach Speisen, eingestellter Temperatur und persönlichem Geschmack.
Die empfohlene Garzeit für Sandwiches beträgt 3 bis 6 Minuten.
Sie können den Garfortschritt überprüfen, indem Sie den oberen Rost anheben.
Hinweis:
Um das Gerät auf der richtigen Temperatur zu halten, schaltet sich die grüne Kontrollleuchte während des
Garvorgangs ein und aus.
Heben Sie am Ende des Garvorgangs den oberen Rost an und entfernen Sie die Speisen mit einem
nichtmetallischen Utensil (z.B. Holzspatel).
Verwenden Sie keine scharfen oder scheuernden Küchenutensilien.
Trennen Sie das Gerät nach der Verwendung von der Stromversorgung und warten Sie, bis es abgekühlt ist.
Reinigen Sie das Gerät wie im Abschnitt WARTUNG angegeben.
VERWENDUNG ALS OFFENER GRILL 180°
Um den Grill um 180° zu önen, halten Sie einfach die seitliche Taste (3) gedrückt und drehen Sie
die obere Platte mit dem Gri, bis sie vollständig geönet ist.
Die Platten mit etwas Butter oder Speiseöl bestreichen.
Stecken Sie den Stecker in die Steckdose und stellen Sie den Thermostat auf die gewünschte
Position. Die rote Betriebsanzeige leuchtet auf und die grüne Anzeige ist ausgeschaltet.
Warten Sie, bis das grüne Licht aueuchtet.
Das Gerät hat die richtige Temperatur erreicht und das Gargut kann positioniert
werden.
Trennen Sie das Gerät nach der Verwendung von der Stromversorgung und
warten Sie, bis es abgekühlt ist.
Reinigen Sie das Gerät wie im Abschnitt WARTUNG angegeben.
ENTFERNEN DER PLATTEN
Ziehen Sie immer den Netzstecker und lassen Sie das Gerät abkühlen, bevor Sie die Kochplatten entfernen.
Suchen Sie die Tasten zum Lösen der Platte (7) an der Vorderseite des Geräts.
Drücken Sie die Taste und die Platte löst sich leicht von der Basis.
Nehmen Sie die Platte mit zwei Händen, ziehen Sie sie unter den Metallbügeln heraus und heben Sie sie von
der Basis.
Drücken Sie die Loslösetaste der anderen Platte, um diese korrekt zu entfernen.
MONTAGE DER PLATTEN
Untere Platte - führen Sie die Platte in die Schienen des hinteren Bereichs ein; drücken Sie gegen die Vorderseite
der Platte, bis sie einrastet.
Obere Platte - führen Sie die Platte in die Schienen des unteren Bereichs ein; drücken Sie gegen die Oberseite
der Platte, bis sie einrastet.

13
Atencion : leer atentamente las advertencias contenidas
en el presente folleto,ya que contienen importantes
indicaciones acerca de laseguridad de instalación, uso
y mantenimiento.
Instrucciones importantes que hay que conservar para
sucesivas consultas.
Este aparato puede ser utilizado por niños de 8 años en
adelante y por personas con las capacidades físicas,
sensoriales o mentales disminuidas o con falta de
experiencia o conocimiento siempre y cuando se haya
asegurado su adecuada vigilancia o hayan recibido
instrucciones acerca del uso seguro del aparato y hayan
comprendido los correspondientes peligros. Los niños
no deben jugar con el aparato. Las operaciones de
limpieza y mantenimiento no deben ser efectuadas por
niños a menos que no tengan más de 8 años y estén
vigilados.
Mantener el aparato y su cable fuera del alcance de los
niños menores de 8 años.
Las supercies pueden calentarse durante el uso.
El aparato no debe ser puesto en funcionamiento
mediante un temporizador externo o con un sistema de
mando a distancia separado.
Para la limpieza del aparato, hacer referencia al párrafo
MANTENIMIENTO.
Si el cable de alimentación se dañara, debe ser sustituido
solamente en los centros de asistencia autorizados por
el fabricante, de modo de prevenir todo riesgo.
No suministrar energía al aparato si las placas no están
montadas correctamente.
AR1S40
FOLLETO DE INSTRUCCIONES
PLACA GRILL

14
ES
Advertencias
Conservar la garantía, el recibo y el presente folleto de instrucciones para sucesivas consultas.
Después de haber sacado el embalaje asegurarse de la integridad del aparato y en caso de visibles daños no
utilizarlo y contactar con el establecimiento distribuidor.
No dejar partes del embalaje al alcance de los niños. El aparato no se debe utilizar como un juguete; es un
aparato eléctrico y así debe ser considerado.
Antes de conectar el aparato asegurarse de que la tensión presente en la toma de corriente corresponda a la
indicada en las características nominales.
La seguridad eléctrica de este aparato se garantiza solamente cuando está conectado con una ecaz puesta
a tierra.
En el caso de que la toma y el enchufe no sean compatibles, hacer reemplazar la toma por personal calicado
con una del tipo adecuado.
No utilizar adaptadores o extensiones que no correspondan a las vigentes normativas de seguridad o que
superen los límites de carga de la corriente.
Se aconseja desenrollar completamente el cable de alimentación en toda su longitud evitando de este modo
eventuales recalentamientos.
Desconectar el aparato de la red de alimentación cuando no se utilice.
No tirar el cable de alimentación o el mismo aparato para desconectar el enchufe de la toma de corriente.
El uso de cualquier aparato eléctrico requiere el respeto de algunas reglas fundamentales, en particular:
- No tocar el aparato con las manos mojadas o húmedas.
- No dejar el aparato expuesto a la acción de agentes atmosféricos (lluvia, sol).
- No someterlo a choques.
En caso de que se produjera un desperfecto o un funcionamiento anómalo del aparato desconectar
inmediatamente el enchufe, no abrir el aparato y contactar con el establecimiento distribuidor.
En caso de que no se desee utilizar más este tipo de aparato, es necesario inactivarlo cortando el cable de
alimentación naturalmente después de haber desconectado la toma de corriente.
El aparato se ha fabricado y concebido para funcionar en ambientes domésticos de acuerdo con lo indicado en
las instrucciones, así pues, cualquier otro uso debe considerarse impropio y, por tanto, peligroso.
Por motivos de seguridad, no es posible abrir el aparato.
Durante el uso colocar el aparato en una supercie plana.
Para evitar que los niñios toquen accidentalmente partes calientes, utilice el aparato en supercies que son por
lo menos 85 cm altos.
Dejar libre el espacio alrededor de las demás supercies del aparato y no sobreponer objetos.
Mantener el cable lejos de fuentes de calor.
No ubicar el aparato encima o debajo de otros hornos convencionales, microondas o cerca de quemadores a
gas.
No movilizar el aparato cuando funciona, cuando está caliente y cuando está conectado a la alimentación.
ES
Características técnicas
1 - Tirador
2 - Termostato regulable
3 - Pulsador de apertura 180°
4 - Indicador luminoso de encendido
5 - Indicador luminoso termostato
6 - Bandeja colectora para líquidos
7 - botón de desbloqueo de la placa
Datos de placa sobre el aparato.
1
4
3
25
6
7
7
ES
Istrucciones de uso
Primer uso
Antes de utilizar el aparato por primera vez, hacer funcionar el aparato vacío (durante unos 2 minutos, hasta
que se apague la luz verde) en un lugar bien ventilado para eliminar los olores y humos debidos a cualquier
residuo de elaboración en las partes internas del aparato.
Desconectar el enchufe de la toma de corriente y dejar que el aparato se enfríe.
Nota: cuando se utiliza esta unidad por primera vez, puede que note humo.
Esto es normal debido al calentamiento inicial de los componentes internos.
Limpiar las placas como se especica en el párrafo MANTENIMIENTO.

15
ES
Mantenimiento
Este aparato no precisa especiales operaciones de mantenimiento.Antes de limpiar el aparato desconectarlo
de la toma de corriente y dejarlo enfriar completamente.
Para limpiar el aparato utilizar un paño suave y ligeramente humedecido.
Retirar los residuos alimenticios de las placas.
Retirar las placas del aparato como se indica en la sección EXTRACCIÓN DE LAS PLACAS y retirar la bandeja
de recuperación de líquido.
Lavar los platos y la bandeja con detergente para platos; no utilizar almohadillas de lana u otros medios
abrasivos que puedan dañar el revestimiento antiadherente.
No lavar en el lavavajillas.
Después de la limpieza, sólo cuando estén completamente secas, volver a colocar las placas (véase MONTAJE
DE LAS PLACAS) y la bandeja.
No utilizar sustancias, líquidos o paños excesivamente mojados ya que las posibles inltraciones podrían dañar
el aparato de modo irreparable.
NO SUMERGIR JAMAS EL APARATO EN EL AGUA.
USO DE LA REJILLA A CONTACTO
Controlar que la bandeja de recogida de líquidos esté correctamente colocada e insertada hasta el nal del
recorrido; de lo contrario, los residuos de alimentos podrían salirse del aparato y ensuciar la supercie de
apoyo.
Untar ligeramente las placas de cocción con un poco de mantequilla o aceite de cocina.
Cerrar la rejilla e introducir el enchufe en la toma de corriente.
Ajustar el termostato (2) en la posición deseada en función del tipo de alimento y del nivel de cocción preferido
(recomendamos utilizar la posición media para los bocadillos y la posición MÁX para la carne).
El indicador de alimentación rojo (4) se ilumina y el indicador verde (5) está apagado.
Esperar hasta que se encienda la luz verde.
El aparato ha alcanzado la temperatura correcta para su uso.
Abrir la parrilla con el mango (1) y colocar los alimentos en la parte inferior de la parrilla (puede cocinar
bocadillos, hamburguesas, trozos de carne deshuesada y verduras).
Los bocadillos deben colocarse en la parte trasera de la parrilla.
Si decide cocinar diferentes alimentos, es importante que tengan aproximadamente el mismo grosor para que
la parrilla superior se adhiera uniformemente a ellos.
Cerrar la parrilla superior.
El tiempo de cocción varía en función de los alimentos, de la temperatura programada y de los gustos personales.
Para los bocadillos, el tiempo aproximado de cocción es de 3 a 6 minutos.
Es posible controlar el estado de cocción levantando la parrilla superior.
Nota:
Durante la cocción, el indicador luminoso verde se enciende y se apaga para mantener el aparato a la
temperatura correcta.
Finalizada la cocción, levantar la parrilla superior y utilizar un utensilio no metálico (por ejemplo, una espátula
de madera) para retirar los alimentos.
No utilizar utensilios de cocina alados o abrasivos.
Después del uso, desenchufar el aparato de la toma de corriente y esperar a que se enfríe.
Limpiar el aparato como se indica en el párrafo MANTENIMIENTO.
USO COMO PARRILLA ABIERTA 180°
Para abrir la parrilla a 180°, basta con mantener pulsado el botón lateral (3) y con el mango girar
la placa superior hasta que se abra completamente.
Untar ligeramente las placas de cocción con un poco de mantequilla o aceite de cocina.
Introducir el enchufe en la toma de corriente y regular el termostato en la posición deseada. El
indicador luminoso rojo de alimentación está encendido y el indicador verde está apagado.
Esperar hasta que se encienda la luz verde.
El aparato ha alcanzado la temperatura correcta de uso y es posible colocar los
alimentos que se van a cocinar.
Después del uso, desenchufar el aparato de la toma de corriente y esperar a
que se enfríe.
Limpiar el aparato como se indica en el párrafo MANTENIMIENTO.
EXTRACCIÓN DE LAS PLACAS
Desconectar siempre el aparato y dejarlo que se enfríe antes de retirar las placas de cocción.
Localizar los botones de desbloqueo de la placa (7) en la parte delantera del aparato.
Presionar el botón y la placa se abrirá ligeramente desde la base.
Agarrar la placa con las dos manos, tirar de ella para sacarla de abajo de los soportes metálicos y levantarla
de la base.
Presionar el otro botón de liberación de la placa para retirar la otra placa de cocción correctamente.
MONTAJE DE LAS PLACAS
Placa inferior - introducir la placa en las guías colocadas en la parte posterior; presionar la parte frontal de la
placa hasta que haga clic.
Placa superior - introducir la placa en las guías colocadas en la parte inferior; presionar la parte superior de la
placa hasta que haga clic.

16
Fygyelem : olvassa el gyelmesen a mellékelt
használati útmutatót a készülék biztonságos
használatához és a megfelelő karbantartás érdekében
ez az útmutató fontos információkattartalmaz kérjük
őrizze meg.
Ezt a készüléket nem használhatják 8 évesnél atalabb
gyermekek, korlátozott zikai, mentális vagy érzékelési
képességű személyek, továbbá olyan személyek, akik
nem rendelkeznek tapasztalattal vagy kellő ismerettel
a használat kapcsán, hacsak nincsenek megfelelő
felügyelet alatt, vagy nem kaptak tájékoztatást a
biztonságos használattal kapcsolatban, és meg nem
értették a vonatkozó veszélyeket.Gyermekek nem
játszhatnak a készülékkel. A karbantartást és a tisztítást
nem végezhetik gyermekek, kivéve, ha a gyermekek
betöltötték 8. Életévüket és felügyelet alatt vannak.
Tartsa a készüléket és a tápkábelt 8 évesnél atalabb
gyermekek által nem elérhető helyen.
A készüléket nem szabad külső időzítővel és külön
távirányítóval használni.
A felületek használat során felmelegedhetnek.
A készülék tisztításához hivatkozzon a KARBANTARTÁS
c. szakaszra.
Ha a hálózati csatlakozó megsérült annak cseréje, csak
szakember általa megfelelő szervizben lehetséges.
Ne kapcsolja be a készüléket, ha a főzőlapok nincsenek
helyesen beszerelve.
AR1S40
HASZNÁLATI UTMUTATÓ
ELEKTROMOS GRILL

HU
Figyelmeztetés
A vásárláskor kapott számlát, a jótállást és a használati útmutatót őrizze meg esetleges későbbi felhasználásra.
A csomagolás eltávolítása után győződjön meg arról, hogy a készüléken nem található sérülés.
Látható sérülés esetén,ne használja azt, minden esetben forduljon szakemberhez.
A csomagolás egyes részeit ne hagyja kisgyermek számára elérhető helyen.
A készülék nem gyerekjáték, elektromos berendezés, ezért fontos a biztonsági előírások betartása.
A csatlakoztatás előtt győződjön meg arról, hogy a hálózati feszültség megegyezik-e a készülék adattábláján
található adatokkal.
Ha a hálózati csatlakozó nem megfelelő, ezt csak hozzáértő,képzett szakember által lehet kicserélni. Ne
használjonolyan adaptert vagy hosszabbító kábelt, amely nem felel meg a biztonsági el őírásoknak vagy nem
rendelkezik a készülék áramellátáshoz szükséges kapacitással.
A készülék esetleges meghibásodása esetén, elsőként húzza ki a dugót a csatlakozó aljzatból. Ne próbálja
megjavítani a készüléket, minden esetben forduljon a gyártó által megjelölt szervizhez.
Ha a megfelelő és rendeltetészerű használat ellenére a készülék meghibásodna soha ne próbálja megjavítani,
minden esetben forduljon a gyártó által megjelölt szervizhez, ahol megfelelő szakembereket talál a hiba miel
őbbi szakszeru kijavítására.
Az elektromos készülékekre vonatkozóan vannak bizonyos általános szabályok, melyek betartása minden
esetben kötelező:
- Soha ne érintse a készüléket vízes vagy nedves kézzel!
- Ne tegye ki a készüléket széls őséges id őjárásnak! (erős napsütés, eső).
- Ne tegye ki a berendezést erős ütésnek vagy más durva zikai behatásoknak!
Amennyiben meghibásodást tapasztal, ne próbálja megjavítani a készüléket, minden esetben forduljon
szakemberhez a gyártó által megjelölt szervizben.
Ha a készüléket már soha többet nem használja, húzza ki a dugót az elektromos hálózatból, majd vágja le a
csatlakozó kábelt.
Húzza ki a kábelt a teljes hosszában a túlmelegedés elkerülése érdekében.
Ez a készülék otthoni használatra készült. Minden más jellegű
felhasználás veszélyes és tilos!
Ne használja a készüléket kültéren.
Ne helyezze a készüléket egyenetlen vagy nem hőálló felületre.
A készülék forró részei a gyermekek számára veszélyesek, ezért az esetleges sérülések elkerülése érdekében,
helyezze el úgy azt, hogy az a padlótól legalább 85 cm magasságban legyen.
A készülék egyéb felületei körül hagyja szabadon a területet és ne tegyen rá tárgyakat.
Tartsa távol a kábelt.
Ne helyezze a készüléket vagy más mikrohullámú sütők kemencék gáz tűzhelyek közelében.
Ne mozgassa a készüléket üzemelés közben, amikor meleg és amikor hálózatra van kapcsolva.
Műszaki adatok HU
17
1 - Fogantyú
2 - Szabályozható termosztát
3 - 180°-ig nyitó gomb
4 - Bekapcsolási jelzőfény
5 - Termosztát jelzőfény
6 - Folyadékgyűjtő tartály
7 - gomb a főzőlap kioldásához
A műszaki adatok a készüléken vannak
feltüntetve.
1
4
3
25
6
7
7
Használati utmutató HU
Első használat
A készülék első alkalommal történő használata előtt üzemeltesse a készüléket üresen (lb. 2 percig, amíg a
zöld fény fel nem gyullad), jól szellőző helyiségben, a készülék belső részeire lerakódott, a megmunkálásból
származó esetleges maradványok által okozott szagok és füstök eltávolítása érdekében.
Húzza ki a villásdugót a fali csatlakozóból és hagyja a készüléket kihűlni.
Megj.: a készülék első alkalommal történő használatakor füstöt lehet észlelni.
Ez egy normális jelenség, melyet a belső részek kezdeti felmelegedése okoz.
Tisztítsa meg a főzőlapokat a KARBANTARTÁS szakaszban leírtakat követve.

18
HU
Karbantartás
Húzza ki a készülék cstalakozó zsinórját a csatlakozó aljzatból és hagyja a készüléket kihűlni mielőtt elkezdené
tisztítani.
A tisztításhoz használjon puha vagy enyhén nedves kendőt.
Távolítsa el a főzőlapokról az ételmaradványokat.
Vegye ki a főzőlapokat a készülékből, a FŐZŐLAPOK ELTÁVOLÍTÁSA szakaszban leírtak szerint, és vegye ki
a folyadékgyűjtő tartályt.
Mossa el a főzőlapokat és a tartályt mosogatószerrel; ne használjon dörzsszivacsot vagy más súroló eszközt,
mert azok felsérthetik a tapadásgátló bevonatot.
Ne mossa mosogatógépben.
Tisztítás után, amikor teljesen megszáradtak, szerelje vissza a főzőlapokat (lásd A FŐZŐLAPOK BESZERELÉSE
szakaszt) és a tartályt.
Ne használjon semmilyen folyadékot, vizes, nedves ruhát, megakadályozandó, hogy a készülékbe folyadék
kerüljön és visszafordíthatatlanul megrongálja azt.
SOHA NE MERÍTSE A KÉSZÜLÉKET VÍZBE.
AZ ÉRINTKEZŐ RÁCS HASZNÁLATA
Vizsgálja meg, hogy a folyadékgyűjtő tartály megfelelően legyen behelyezve és ütközésig legyen benyomva,
ellenkező esetben az ételmaradványok kifolyhatnak a készülékből és összekoszolhatják a támasztó felületet.
Enyhén kenje meg a főzőlapokat egy kis vajjal vagy étolajjal.
Zárja le a rácsot és illessze a villásdugót a fali csatlakozóba.
Állítsa a hőfokszabályozót (2) a kívánt állásba az élelmiszer típusától és a kedvelt főzési szinttől függően
(javasoljuk, hogy köztes állást használjon a szendvicsekhez és MAX állást a húshoz).
A piros áramellátás jelzőfény (4) felgyullad és a zöld jelzőfény (5) kialszik.
Várjon, amíg a zöld jelzőfény felgyullad.
A készülék elérte a használatnak megfelelő hőmérsékletet.
Nyissa ki a rácsot a fogantyú (1) segítségével és helyezze az élelmiszereket az alsó rácsra (szendvicseket,
burgereket, csont nélküli hús darabokat és zöldséget lehet sütni).
A szendvicseket a rács hátsó részére kell helyezni.
Ha a fentiektől eltérő élelmiszereket szeretne sütni, fontos, hogy azok nagyjából egyforma vastagságúak
legyenek azért, hogy a felső rács egyenletesen illeszkedjen rájuk.
Engedje le a felső rácsot.
A sütési idő az élelmiszerek, a beállított hőmérséklet és az egyényi ízlés függvényében változik.
A szendvicsek sütési ideje 3 - 6 perc.
A felső rácsot felemelve lehet megvizsgálni a sütés állapotát.
Megj.:
Sütés közben a zöld jelzőfény felgyullad és kialszik azért, hogy a készüléket a megfelelő hőmérsékleten tartsa.
Sütés végén emelje fel a felső rácsot és használjon nem fémből készült szerszámot (pl. fa lapátot) az
élelmiszerek kivételéhez.
Ne használjon éles vagy karcoló konyhai szerszámokat.
Használat után válassza le a készüléket a hálózatról, hogy kihűljön.
Tisztítsa meg a készüléket a KARBANTARTÁS szakaszban leírtak szerint.
180 FOKBAN NYITOTT GRILLSÜTŐKÉNT TÖRTÉNŐ HASZNÁLAT
A sütőrács 180 fokban való nyitásához elegendő lenyomni az oldalsó gombot (3) és a fogantyú
segítségével a felső főzőlapot addig kell forgatni, amíg teljesen nyitva nem lesz.
Enyhén kenje meg a főzőlapokat egy kis vajjal vagy étolajjal.
Illessze a villásdugót a fali csatlakozóba és állítsa a hőfokszabályozót a kívánt állásba. A piros
áramellátás jelzőfény felgyullad és a zöld jelzőfény kialszik.
Várjon, amíg a zöld jelzőfény felgyullad.
A készülék elérte a használatnak megfelelő hőmérsékletet és el lehet helyezni
a főzni kívánt élelmiszereket.
Használat után válassza le a készüléket a hálózatról, hogy kihűljön.
Tisztítsa meg a készüléket a KARBANTARTÁS szakaszban leírtak szerint.
A FŐZŐLAPOK ELTÁVOLÍTÁSA
Mindig válassza le a készüléket a hálózatról és várja meg, amíg kihűl, mielőtt leveszi a főzőlapokat.
Keresse meg a főzőlap (7) kioldó gombjait a készülék elülső részén.
Nyomja le a gombot és a főzőlap kissé kinyílik az alapról.
Mindkét kezével fogja meg a főzőlapot, emelje le az alatta lévő fém kengyelekről és emelje le az alapról.
Nyomja meg a főzőlap másik kioldó gombját annak érdekében, hogy a másik főzőlapot megfelelően tudja
eltávolítani.
A FŐZŐLAPOK BESZERELÉSE
Alsó főzőlap - illessze a főzőlapot a hátsó részen elhelyezett vezetősínekbe; nyomja le a főzőlap elülső részét
kattanásig.
Felső főzőlap - illessze a főzőlapot az elülső részen elhelyezett vezetősínekbe; nyomja le a főzőlap felső részét
kattanásig.

19
Upozornění: pozorně si přečtěte varování, která jsou
uvedena v následující příručce, protože poskytují
důležité pokyny týkající se bezpečnosti, instalace,
použití a údržby.
Důležité pokyny, které je třeba uschovat z důvodu
dalších konzultací.
Toto zařízení mohou používat děti od 8 let a osoby
se sníženými fyzickými, smyslovými nebo duševnými
schopnostmi nebo osoby bez zkušeností nebo znalostí,
když jim byl zajištěn vhodný dozor nebo když dostaly
pokyny ohledně bezpečného použití zařízení a pochopily
související nebezpečí. Děti si nesmí hrát se zařízením.
Úkony čištění a údržby nesmí provádět děti, s výjimkou
případu, kdy je jim více než 8 let a jsou pod dozorem.
Udržujte zařízení a jeho kabel mimo dosah dětí, kterým
je méně než 8 let.
Povrchy se stávají teplými během použití.
Pro čištění spotřebiče nahlédněte do oddílu ÚDRŽBA.
Zařízení nesmí být nastaveno pro fungování s externím
časovým spínačem nebo s odděleným systémem
dálkového ovládání.
Při poškození napájecího kabelu je třeba nechat provést
jeho výměnu v servisních střediscích autorizovaných
výrobcem.
Nenapájejte spotřebič, pokud desky nejsou správně
namontovány.
AR1S40
NÁVOD K POUŽITÍ
ELEKTRICKÝ GRIL

Uschovejte si záruku, účtenku a příručku pro jakékoli další nahlédnutí.
Po vyjmutí zařízení z obalu se ujistěte o jeho neporušenosti a v případě viditelných poškození jej nepoužívejte
a obraťte se na odborně kvalikovaný personál.
Nenechávejte části obalu v dosahu dětí ani obal nepoužívejte jako hru: jedná se o elektrické zařízení a je třeba
s ním podle toho zacházet.
Před připojením zařízení se ujistěte, že napětí, které se nachází v proudové zásuvce, odpovídá tomu, které je
uvedeno na identikačním štítku.
V případě, že zástrčka a zásuvka nejsou vzájemně kompatibilní, nechte vyměnit zásuvku za jinou zásuvku
vhodného druhu odborně kvalikovaným personálem. Nepoužívejte adaptéry nebo prodlužovací kabely, které
neodpovídají platným bezpečnostním předpisům nebo které překračují mezní hodnoty proudového odběru.
Když se zařízení nepoužívá, odpojte jej od elektrické sítě.
Pro vytažení zástrčky ze zásuvky netahejte za napájecí kabel ani za samotné zařízení.
Použití jakéhokoli elektrického zařízení vyžaduje dodržení několika základních pravidel, konkrétně:
- Nedotýkejte se zařízení mokrýma nebo vlhkýma rukama.
- Toto zařízení nesmí být používáno (včetně úkonů čištění a údržby) dětmi nebo osobami se sníženými fyzickými,
smyslovými nebo duševními schopnostmi nebo osobami bez zkušeností a znalostí.
Děti musí být pod dozorem, abyste se ujistili, že si nehrají se zařízením.
- Nepoužívejte zařízení s bosýma nohama.
- Nenechávejte zařízení vystaveno působení atmosférických vlivů (déšť, sůl).
- Nevystavujte jej nárazům.
V případě výskytu poruchy nebo poruchové činnosti zařízení okamžitě odpojte zástrčku, neprovádějte na něm
neoprávněné zásahy a obraťte se na autorizované servisní středisko.
V případě, že se rozhodnete tento druh zařízení již nepoužívat, je vhodné jej uvést do nepoužitelného stavu
odstřižením napájecího kabelu, samozřejmě po vytažení zástrčky ze zásuvky elektrické sítě.
Při poškození napájecího kabelu je třeba nechat provést jeho výměnu v servisních střediscích autorizovaných
výrobcem.
Zařízení bylo vyrobeno a vyprojektováno, aby fungovalo v domácím prostředí podle toho, co je uvedeno v
návodu; proto jakékoli jiné použití je považováno za nevhodné a tedy nebezpečné.
Nepoužívejte zařízení venku.
Z bezpečnostních důvodů se zařízení nesmí otevírat.
Nepokládejte zařízení na nevhodné povrchy, které nejsou odolné vůči teplu.
Během používání udržujte zařízení na rovném povrchu.
Nepokládejte zařízení na nevhodné povrchy a povrchy, které neodolávají teplu.
Abyste zabránili náhodným kontaktům dětí s teplými částmi, používejte zařízení na opěrných deskách ve výšce
alespoň 85 cm od podlahy.
Nechte volný prostor kolem všech ostatních povrchů spotřebiče a nepokládejte na něj žádné předměty.
Uchovávejte kabel daleko od zdrojů tepla.
Neumisťujte zařízení nad nebo pod jiné pece, mikrovlnné trouby nebo blízko plynových vařičů.
Nemanipulujte se spotřebičem, když je v provozu, když je horký a když je zapojený do elektrické sítě.
CZ
Varování
Technické informace CZ
20
1 - Rukojeť
2 - Nastavitelný termostat
3 - Tlačítko pro otevření 180°
4 - Kontrolka zapnutí
5 - Kontrolka termostatu
6 - Sběrná miska tekutin
7 - Tlačítko pro uvolnění desky
Technické parametry: viz štítek na zařízení.
1
4
3
25
6
7
7
Pokyny pro použití CZ
První použití
Před prvním použitím nechte spotřebič fungovat naprázdno (asi 2 minuty, dokud nezhasne zelené světlo)
v dobře větrané místnosti, aby se odstranily zápach a výpary způsobené zbytky ze zpracování na vnitřních
částech spotřebiče.
Other manuals for AR1S40
1
Table of contents
Languages:
Other ARDES Grill manuals
Popular Grill manuals by other brands

Brinkmann
Brinkmann Natural Gas Conversion Kit installation manual

Pit Boss
Pit Boss PBMEMUU001 Assembly and operation instructions

Sterling Forge
Sterling Forge 720-0322 Use and care guide

Neumaerker
Neumaerker E-6P operating manual

TEFAL
TEFAL DECO SATIN RE135812 manual

Greystone
Greystone CF-RVOG2-1 instruction manual