manuals.online logo
Brands
  1. Home
  2. •
  3. Brands
  4. •
  5. Areca
  6. •
  7. Adapter
  8. •
  9. Areca ARC-1686-2NOD User manual

Areca ARC-1686-2NOD User manual

This manual suits for next models

2

Other Areca Adapter manuals

Areca ARC-1886-6N2I User manual

Areca

Areca ARC-1886-6N2I User manual

Areca ARC-1203-2i User manual

Areca

Areca ARC-1203-2i User manual

Areca ARC-1330 Series User manual

Areca

Areca ARC-1330 Series User manual

Areca ARC-1886-8I User manual

Areca

Areca ARC-1886-8I User manual

Areca ARC-1110 User manual

Areca

Areca ARC-1110 User manual

Areca ARC-1203-2i User manual

Areca

Areca ARC-1203-2i User manual

Areca ARC-1883i User manual

Areca

Areca ARC-1883i User manual

Popular Adapter manuals by other brands

Mini Gadgets BB2Outlet user manual

Mini Gadgets

Mini Gadgets BB2Outlet user manual

LSI LSISAS3442E-R Quick installation guide

LSI

LSI LSISAS3442E-R Quick installation guide

Moeller BBA -16 Series installation instructions

Moeller

Moeller BBA -16 Series installation instructions

Acer MWA3 quick start guide

Acer

Acer MWA3 quick start guide

Connect Tech ADG095 user guide

Connect Tech

Connect Tech ADG095 user guide

cable matters 604002 user manual

cable matters

cable matters 604002 user manual

Solwise PL-85PEW Easy start

Solwise

Solwise PL-85PEW Easy start

HP Photosmart 7100 user guide

HP

HP Photosmart 7100 user guide

HP E2494A installation guide

HP

HP E2494A installation guide

StarTech.com USB150WN1X1 quick start guide

StarTech.com

StarTech.com USB150WN1X1 quick start guide

Lindy 43198 user manual

Lindy

Lindy 43198 user manual

A&D AD-8527 instruction manual

A&D

A&D AD-8527 instruction manual

Motorola WU830G user guide

Motorola

Motorola WU830G user guide

Hawking HUF2 Specifications

Hawking

Hawking HUF2 Specifications

Allen-Bradley E3 Plus installation instructions

Allen-Bradley

Allen-Bradley E3 Plus installation instructions

Trust BT-2210Tp manual

Trust

Trust BT-2210Tp manual

HP NC7170 overview

HP

HP NC7170 overview

Uconnect BLE-485C user manual

Uconnect

Uconnect BLE-485C user manual

manuals.online logo
manuals.online logoBrands
  • About & Mission
  • Contact us
  • Privacy Policy
  • Terms and Conditions

Copyright 2025 Manuals.Online. All Rights Reserved.

www.areca.com.tw
M.2 NVMe Hardware
RAID Adapters
ARC-1686-2NOD/4NOD/6NOD
Quick Installation Guide
Checklist
Inspect ARC-1686 M.2 RAID adapter from the package. If it
appears damaged, or if any items of the contents listed below
are missing or damaged, please contact your dealer or
distributor.
Step 1: Unpack
1 x RAID adapter in an ESD-protective bag
1 x ARC-1686 quick installation guide
Dual Core RAID-on-Chip (ROC) 1.6GHz processor
PCIe Gen 4.0 x8 lane host interface
Device interface PCIe Gen4 NVMe/6Gbps SATA per M.2 slot
Support both 2280 and 22110 form factor M.2 drives
•
•
Adapter Architecture
•
•
•
•
Step 3: Power PC/Server Off and Discoennect Power Cable
Remove the mounting screw and existing bracket from the
rear panel behind the selected PCIe 4.0 slot. Align the
gold-fingered edge on the card with the selected PCIe 4.0
slot. Press down gently but firmly to ensure that the card is
properly seated in the slot. Then, screw the bracket into the
computer chassis.
Step 4: Install the RAID Adapters
Step 2: Mount the M.2 NVMe SSD
(1) Remove four screws that secure unit’s front panel
If you use 2280 M.2 NVMe SSD...
(2) Gently insert the SSD into slot and fasten SSD with the
board latch
(3) Repeat steps 2 to 3 to install the remaining SSDs
Step 7: Install ArcHTTP Proxy Server
ArcHTTP has to be installed for GUI RAID console (MRAID
storage manager) to run. It is used to launch the web browser
MRAID storage manager. It also runs as a service or daemon
in the background that allows capturing of events for mail and
SNMP traps notification.
Follow the steps below to install the ArcHttp utility.
1. Download ArcHttp proxy server (or MRAID software) from
Areca website:
2. Follow the steps on the user manual to complete the
installation
If you need additional information about installation and
start-up of this function, see the ArcHTTP Proxy Server
Installation section in Chapter 5 of the user manual. For SNMP
agent function, please refer to Appendix C of the user manual.
https://www.areca.com.tw/support/downloads.html
Step 5 : Power up the System
Step 6: Install the Adapter Driver
Please refer to Chapter 4 “Diver Installation” of the user
manual for the detailed installation procedure.
If you use 22110 M.2 NVMe SSD...
(※2) Turn the latch 90° clockwise or counterclockwise to
remove it and also remove six screws on the board
(※3) Gently insert the SSD into slot, meawhile put the screw
into the groove and fasten the screw to secure SSD
(※4) Repeat steps ※2 to ※3 to install the remaining SSDs
(5) Refasten four screws to secure unit’s front panel
PCMac Pro
ARC-1686-xNOD
www.areca.com.tw Quick Installation Guide
3. Locate “ARC-1686-XNOD Web Management” and launch the
selected MRAID storage manager.
See chapter 6 of ARC-1686-XNOD user manual for information
on customizing your RAID volumes using MRAID storage manager.
•
•
If you need more detail information, please download user manual from the website below:
• https://www.areca.com.tw/products/nvme-1686-nod.html
• https://www.areca.com.tw/support/downloads.html
※Method 2: MRAID Storage Manager From ArcHTTP
1. Start ArcHTTP– Browser Edition:
(1) In Windows, right-click on “Start” menu and choose
“Programs”. Clicking “MRAID” program icon starts the
ArcHTTP utility (From the Start menu, choose Programs >
MRAID > ArcHTTP).
(2) On a Mac, there is one MARID icon showing on your desktop.
This icon is for you to start up the ArcHTTP utility.
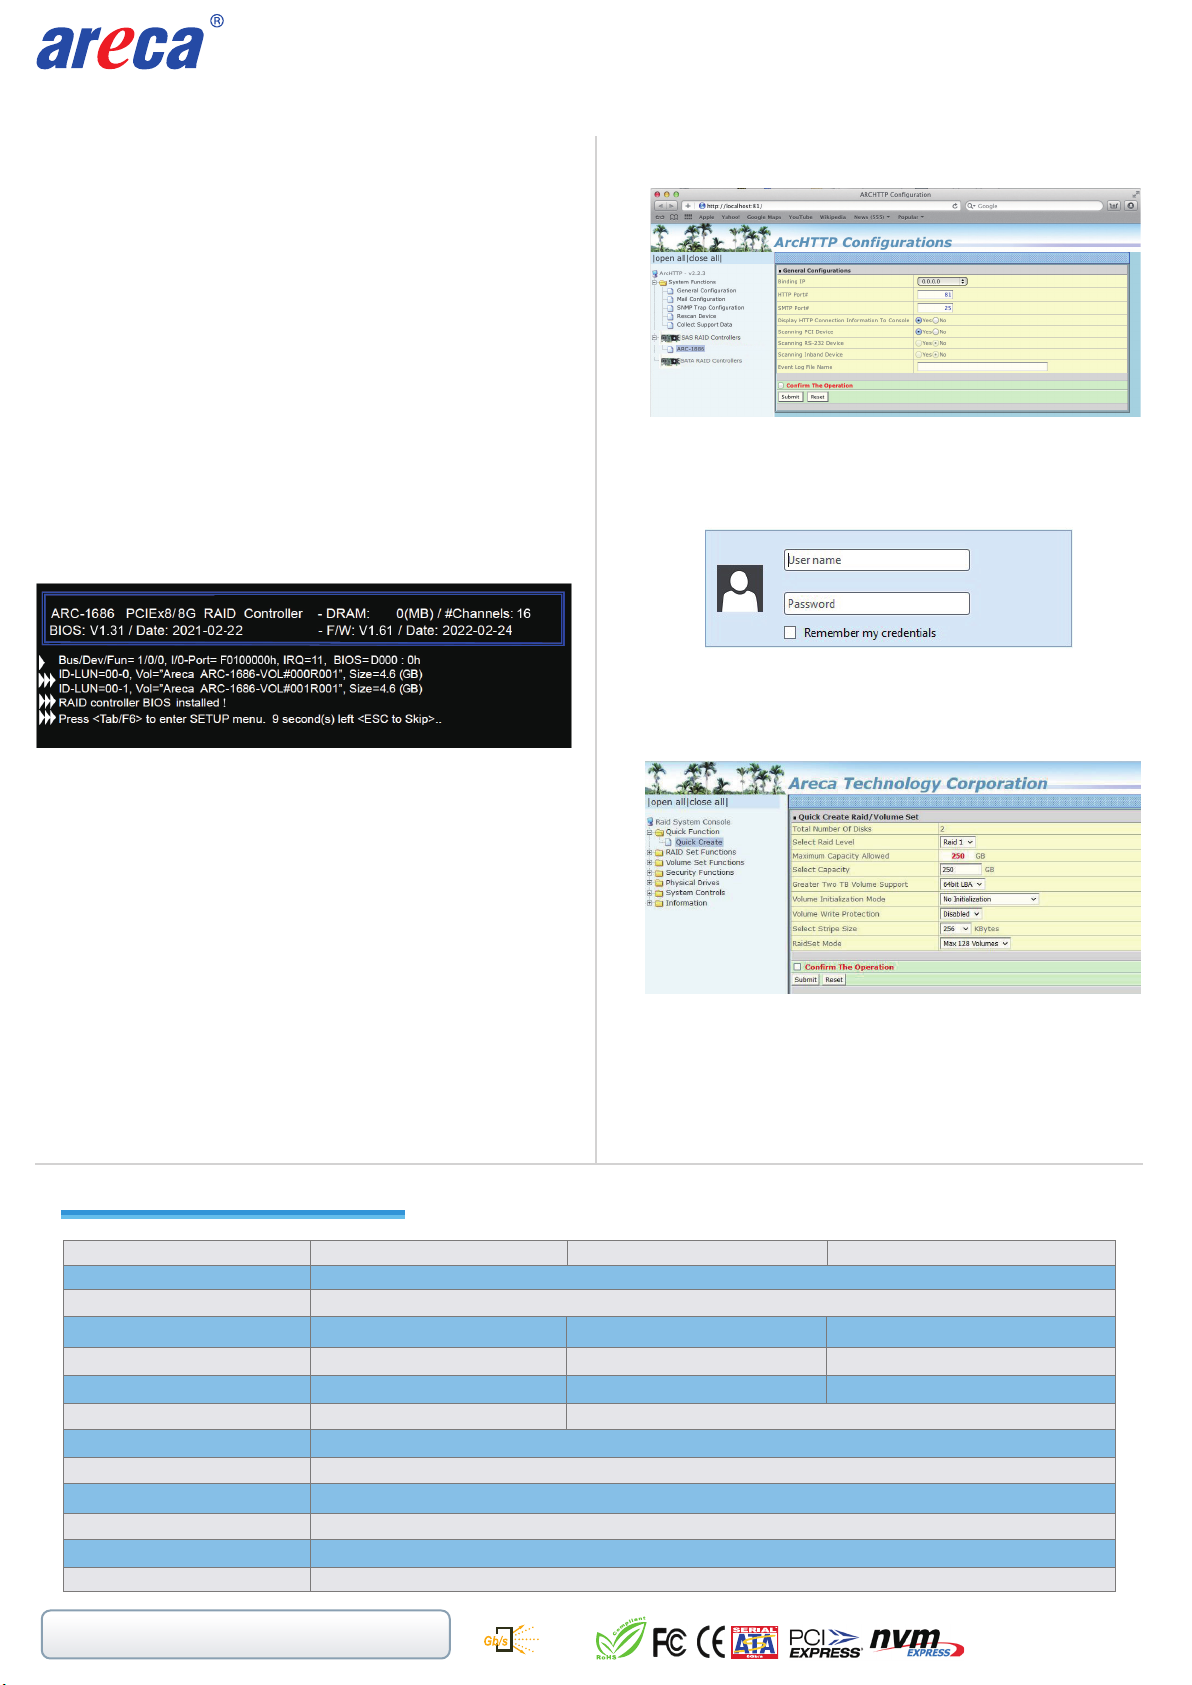
2. When you double-click on the “ArcHTTP64”, it shows all RAID
adapters available on the system and create an individual RAID
adapter icon located on left column of the “ArcHTTP Configura-
tions” screen.
5. Click on the “Quick Create” in the main menu, your volume is
automatically configured based on the number of disks in your
system. You can create a RAID set associated with exactly one
volume set.
4. Type the User Name and Password when the login page prompt.
The RAID adapter default User Name is “admin” and Password
is “0000”. After logging in, the MRAID storage manager process
starts.
ARC-1686-2NOD ARC-1686-4NOD ARC-1686-6NOD
Model Name
I/O Processor
Host Interface
Form Factor
Device Connector
Max M.2 Devices Support
RAID Level
Device Interface
Management Port
Power Loss Protection (PLP) Support
Individual NVMe Power Disable Feature
Hold-up Supercapacitor
Software Package
64.41(H) x 167.65(L) mm 107.2(H) x 205(L) mm 107.2(H) x 262(L) mm
PCIe 4.0 x8 Lanes
0, 1, Single Disk(Single/Dual), JBOD 0, 1(Simple/Multi Mirroring), 10, Single Disk(Single/Dual/Triple) or JBOD.
Yes
Yes
On-board
Same as ARC-1886 Tri-Mode RAID Adapter
In-Band: PCIe
12Gb/s SAS, 6Gb/s SATA, Gen 4.0 PCIe (NVMe)
4 x M.2 Connector 6 x M.2 Connector2 x M.2 Connector
4 x NVMe[x4] 2 x NVMe[x4] + 4 x NVMe[x2]2 x NVMe[x4]
Tri-Mode Dual Core ARM A15 1.6GHz ROC
ARC-1686-xNOD Specications
2700-1M1686-OD10
TEL:886-2-87974060 FAX: 886-2-87975970
Technical Support: [email protected] Sales: [email protected]
Serial
Attached
SCSI
12
1. Power on your computer. When prompted, press Tab or F6.
2. The McBIOS RAID manager window appears showing a selection
dialog box listing the RAID adapters, select your adapter, then
press Enter to show the McBIOS RAID manager message.
3. Follow the McBIOS RAID manager to complete the configuration.
※Method 1: McBIOS RAID Manager (Not For Mac User)
The McBIOS RAID manager is a menu-driven program, residing
in the firmware, which allows you to scroll through various menus
and sub-menus and select among the predetermined configuration
options.
Step 8: Configure RAID Set & Volume Set
You can create and configure a RAID adapter using any of
these tools:
• McBIOS RAID Manager
— BIOS-based menus and keyboard navigation.
• MRAID Storage Manager
— Web browser firmware-based manager, which is accessible via
the web browser installed on your operating system through
ArcHttp utility.