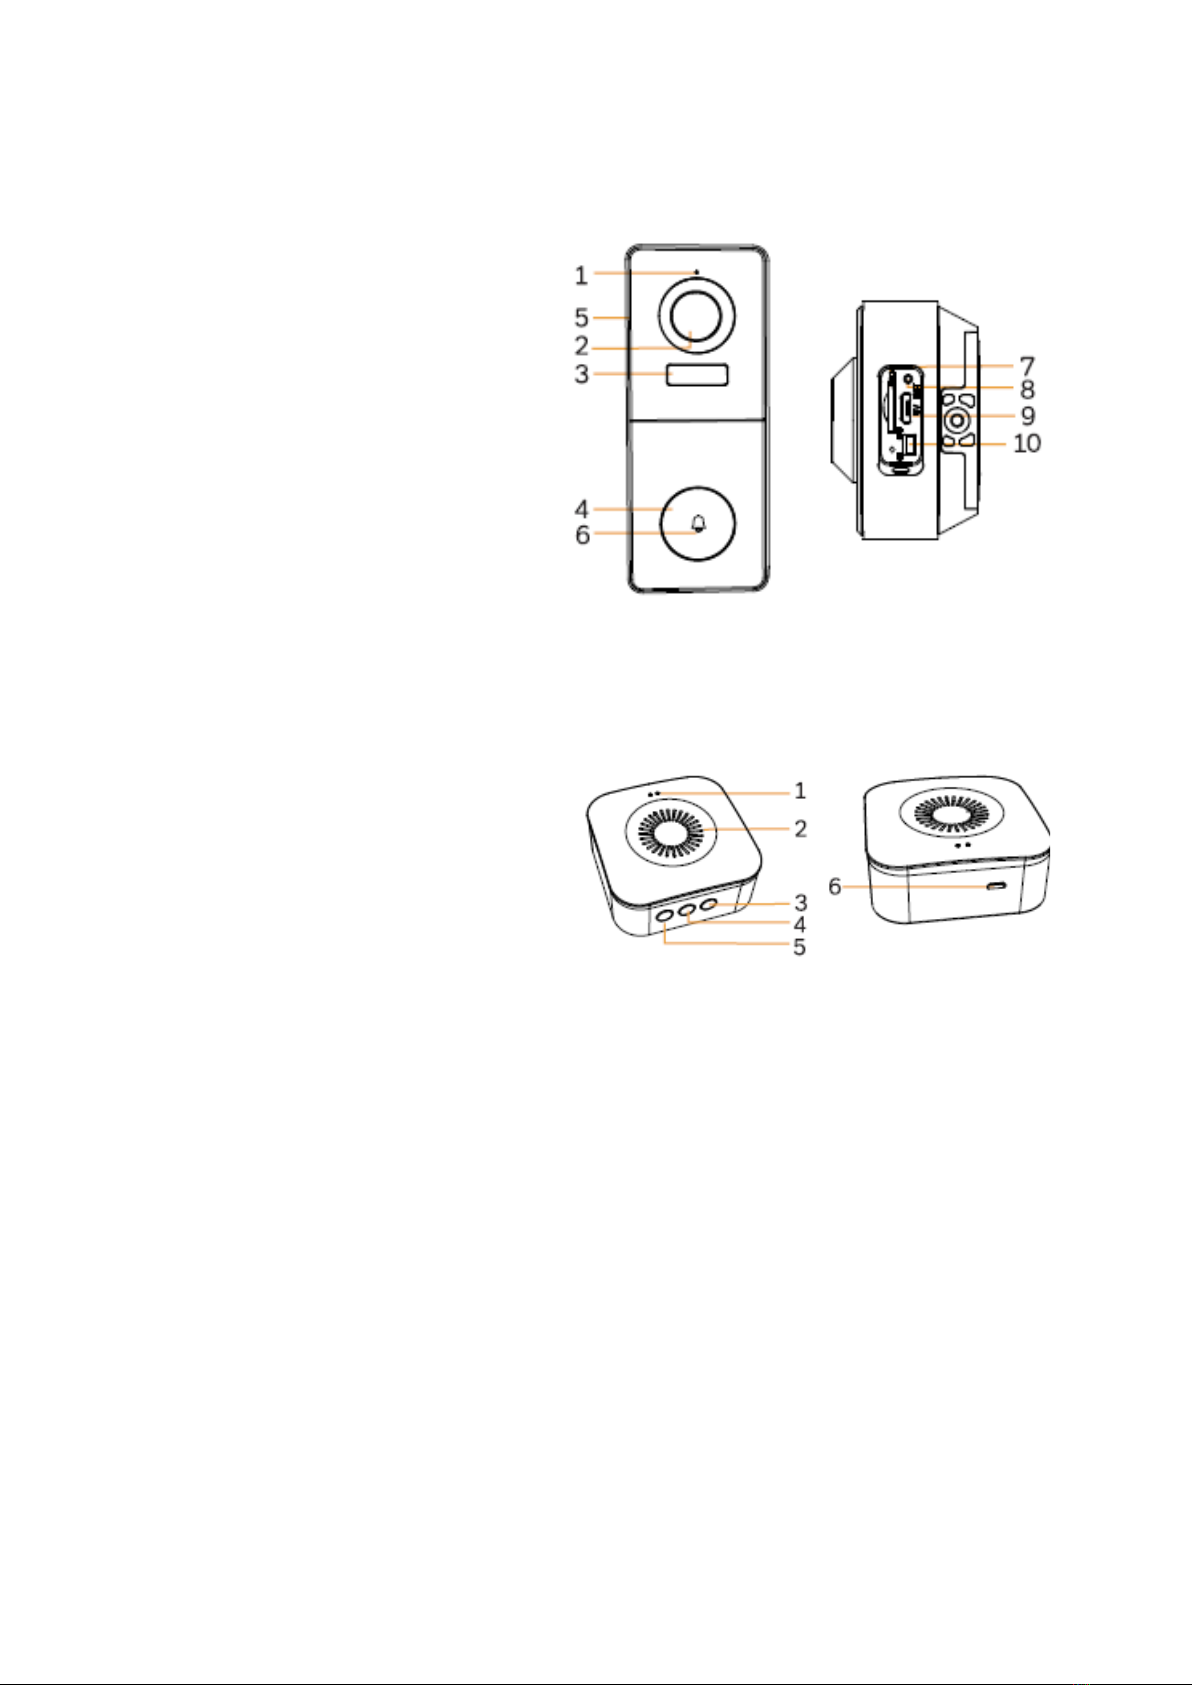
Arenti 14T User manual

Arenti Bell
User Manual • Uživatelský manuál •
Užívateľský manuál • Használati utasítás •
Benutzerhandbuch

2
English
3-14
Čeština
15-26
Slovenčina
27-38
Magyar
39-50
Deutsch
51-62

3
The product user guide contains product features, how to use, and the operating
procedure. Read the user manual carefully to get the best experience and avoid
unnecessary damage. Keep this manual for future reference. If you have any questions
or comments about the device, please contact the customer line.
✉www.alza.co.uk/kontakt
✆+44 (0)203 514 4411
Importer
Alza.cz a.s., Jankovcova 1522/53, Holešovice, 170 00 Praha 7, www.alza.cz

4
Quick Start Guide
Packing list
Camera 1X
Power adaptor 1X
USB cable 1X
Chime 1X
Screws 3X
Screwdriver 1X
Warning sticker 1X
3M sticker 2X
Quick guide 1X
Bracket 1X*
*The bracket is attached to the camera.

5
Product description
1. Microphone
2. Lens
3. PIR
4. Doorbell button
5. Speaker
6. LED indicator
7. SD card slot
8. Reset
9. DC5V USB
10. Device ON/OFF
1. LED indicator
2. Speaker
3. Ringtone
4. Volume
5. Function button
6. Micro USB

6
Notice
To reset the device, press and hold the reset button for 5s.
The camera beeps when the operation is complete.
LED indicator of camera:
Flashing red light (slow)
Wait for network config
Flashing red light (fast)
Connecting the network
Fixed red light
Network is malfunctional
Fixed blue light
Camera is working correctly
LED indicator of chime:
Flashing red light
Wait for pairing
Fixed blue light
Succeed to pair
Installation
Installation with screws
1. Fix the bracket to the wall with the mounting screws.
2. Install the camera in the bracket and lock it with the screw.

7
Installation with 3M sticker
1. Lock the bracket to camera with the screw at the bottom.
2. Stick the adhesive tapes to the bracket.
3. Stick the other side of adhesive tapes to the wall.

8
Product Configuration
Step 1 Turn on your camera.
Step 2 Connect your smartphone to the Wi-Fi network.
Step 3 Download Arenti app from the App Store or Google Play depending on your
device.
Step 4 Launch the App and sign up for the first use.
Step 5 Follow the on-screen instructions to add your camera.
For more information, scan the QR code.
Notice
If you have multiple cameras, please follow step 5 again to add devices one by one.
To change Wi-Fi network, please restore the camera to factory settings and follow step 5
to add the camera.

9
Chime Pairing
1. Short press " " (within 2 seconds), the status light flashes red slowly and the chime
will be in pairing mode.
During the pairing mode, it will blink red.
2. Press the doorbell button to pair, when the chime status light turns off, and the song
will play automatically, the chime pairing is successful at this time.
Description:
1. The chime can connect to maximum eight doorbells.
2. When the chime is in pairing mode, press the " " again (within 2 seconds), the
chime will automatically exit the pairing mode.
3. After adding the chime successfully, the volume will be adjusted to the maximum
automatically. When it is at the minimum volume, it will return to the maximum volume
after pressing " ".
4. Each press " ", will play the next song along with blinking blue light.

10
When playing ringtone, it will blink blue

11
Specifications
Sensor type
1/2.7" CMOS
Min. brightness
Colour 0.01Lux@F1.2
Resolution
3 Mega pixels
Lens
3,2 mm F 2.0
Shutter
1/25-1/100,000 per second
Infrared
High power LED with ICR
Infrared distance
5 meters
FOV
130°
Video compression
H.264
Bit rate
32Kbps –2 Mbps
Max resolution
2304 x 1296
Framerate
1 - 12 per second
Picture settings
Support HD/SD; support flip
Storage
SD card (Max 128GB)
Audio
Two-way audio
Protocols
HTTP, DHCP, DNS
Wi-Fi standard
IEEE802.11b/g/n
Frequency
2.4 GHz - 2.4835 GHz
Wi-Fi encryption
WPA-PSK/WPA2-PSK
Security
AES128
Working temperature
-20℃~50℃
Power
DC5V,1A
Consumption
4.5W MAX
Size (mm)
143x57x36
Battery
6700 mAh
Standby consumption
200 μA (average)
Work consumption
220 mA (IR off)
Standby time
10 months
Working time
3 months (10 times wake up per day)
PIR Detection Angle
7m (Max.)
PIR Detection Angle
100°

12
Warranty Conditions
A new product purchased in the Alza.cz sales network is guaranteed for 2 years. If you
need repair or other services during the warranty period, contact the product seller
directly, you must provide the original proof of purchase with the date of purchase.
The following are considered to be a conflict with the warranty conditions, for which the
claimed claim may not be recognized:
•Using the product for any purpose other than that for which the product is intended
or failing to follow the instructions for maintenance, operation and service of the
product.
•Damage to the product by a natural disaster, the intervention of an unauthorized
person or mechanically through the fault of the buyer (e.g. during transport, cleaning
by inappropriate means, etc.).
•Natural wear and aging of consumables or components during use (such as
batteries, etc.).
•Exposure to adverse external influences, such as sunlight and other radiation or
electromagnetic fields, fluid intrusion, object intrusion, mains overvoltage,
electrostatic discharge voltage (including lightning), faulty supply or input voltage and
inappropriate polarity of this voltage, chemical processes such as used power
supplies, etc.
•If anyone has made modifications, modifications, alterations to the design or
adaptation to change or extend the functions of the product compared to the
purchased design or use of non-original components.

13
EU Declaration of Conformity
Identification data of the manufacturer's / importer's authorized representative:
Importer: Alza.cz a.s.
Registered office: Jankovcova 1522/53, Holešovice, 170 00 Prague 7
IČO: 27082440
Subject of the declaration:
Title: Arenti Bell
Model / Type: 14T
The above product has been tested in accordance with the standard(s) used to
demonstrate compliance with the essential requirements laid down in the Directive(s):
Directive No. (EU) 2014/53/EU
Directive No. (EU) 2011/65/EU as amended 2015/863/EU
Prague, 27.8.2021

14
WEEE
This product must not be disposed of as normal household waste in accordance with
the EU Directive on Waste Electrical and Electronic Equipment (WEEE - 2012/19 / EU).
Instead, it shall be returned to the place of purchase or handed over to a public
collection point for the recyclable waste. By ensuring this product is disposed of
correctly, you will help prevent potential negative consequences for the environment
and human health, which could otherwise be caused by inappropriate waste handling of
this product. Contact your local authority or the nearest collection point for further
details. Improper disposal of this type of waste may result in fines in accordance with
national regulations.

15
Vážený zákazníku,
děkujeme Vám za zakoupení našeho produktu. Prosíme, pečlivě si přečtěte následující
instrukce před prvním použitím a uživatelský manuál si uschovejte pro pozdější užití.
Zejména dbejte na bezpečnostní pokyny. Pokud máte jakékoliv dotazy či připomínky
ohledně přístroje, prosíme, obraťte se na zákaznickou linku.
✉www.alza.cz/kontakt
✆+420 255 340 111
Dovozce
Alza.cz a.s., Jankovcova 1522/53, Holešovice, 170 00 Praha 7, www.alza.cz

16
Stručný návod k použití
Seznam balení
Kamera 1X
Napájecí adaptér 1X
Kabel USB 1X
Zvonění 1X
Šrouby 3x
Šroubovák 1X
Výstražná nálepka 1X
Nálepka 3M 2X
Rychlý průvodce 1X
Držák 1X*
*Držák je připevněn ke kameře.

17
Popis produktu
1. Mikrofon
2. Objektiv
3. PIR
4. Tlačítko zvonění
5. Reproduktor
6. Indikátor LED
7. Slot pro kartu SD
8. Reset
9. USB DC5V
10. Zapnutí/vypnutí zařízení
1. Indikátor LED
2. Reproduktor
3. Vyzváněcí tón
4. Hlasitost
5. Funkční tlačítko
6. Micro USB

18
Oznámení
Chcete-li zařízení resetovat, stiskněte a podržte tlačítko Reset po dobu 5 s.
Po dokončení operace kamera pípne.
Indikátor LED kamery:
Bliká červené světlo (pomalu)
Čekání na konfiguraci sítě
Bliká červené světlo (rychle)
Připojení sítě
Stálé červené světlo
Síť je nefunkční
Stálé modré světlo
Kamera pracuje správně
LED indikátor zvonění:
Bliká červené světlo
Počkejte na spárování
Stálé modré světlo
Párování dokončeno
Instalace
Instalace pomocí šroubů
1. Připevněte držák ke stěně pomocí montážních šroubů.
2. Nainstalujte kameru do držáku a zajistěte ji šroubem.

19
Instalace pomocí nálepky 3M
1. Zajistěte držák ke kameře šroubem ve spodní části.
2. Nalepte lepicí pásky na držák.
3. Přilepte druhou stranu lepicích pásek na stěnu.

20
Konfigurace produktu
Krok 1 Zapněte kameru.
Krok 2 Připojte smartphone k síti Wi-Fi.
Krok 3 Stáhněte si aplikaci Arenti z App Store nebo Google Play v závislosti na vašem
zařízení.
Krok 4 Spusťte aplikaci a zaregistrujte se pro první použití.
Krok 5 Podle pokynů na obrazovce přidejte kameru.
Další informace získáte naskenováním kódu QR.
Oznámení
Pokud máte více kamer, postupujte znovu podle kroku 5 a přidejte zařízení jedno po
druhém.
Chcete-li změnit síť Wi-Fi, obnovte tovární nastavení fotoaparátu a podle kroku 5 přidejte
kameru.
Table of contents
Languages:
Other Arenti Accessories manuals
Popular Accessories manuals by other brands

Takex
Takex PR-5B instruction manual

lbx
lbx INCR-070-001 user manual

Azbil
Azbil HTY78 Specifications & instructions

Hubbell
Hubbell NX Distributed Intelligence NXSMP-LMI Installation and operation instructions

Panasonic
Panasonic TY-TPEN6 - Stylus - Wireless operating instructions

Orno
Orno OR-AE-1303 manual

Masterplug
Masterplug BDCPL30 instruction manual

Baumer
Baumer 10P8914/S35A manual

Detcon
Detcon DM-700 instruction manual

Audio Technica
Audio Technica UniMix AT8681 Product information

Heat Controller
Heat Controller Flow Controllers Installation, operation & maintenance manual

Yaesu
Yaesu RF UTUNING KIT installation manual