Argus cosina 704 User manual

|
argus/cosina
|
Super
Eight
‘Electric
Zoom
~
Reflex
Movie
Camera

sk
<.

With
the
purchase
of
your
argus/cosina
super
eight
camera
you
have
joined
an
entirely
new
generation
of
movie
makers
who
enjoy
a
completely
different
system
of
filming
and
showing
home
movies.
There
are
no
film-speed
dials
to
adjust,
no
filters
to
install
or
re-
move.
No
exposure
factors
to
calculate-in
short,
no
bother
or
worries
at
all!
The
film
cartridge
and
the
new
automatic
system
built
into
your
camera
do
everything
for
you
—
nothing
is
left
for
you
to
do
except
set
the
frame
speed
desired
and
have
fun
making
movies.
You
fever
even
touch
the
film.
en
achetent
votre
caméra
argus/cosina’Super-8”
vous
voila
membre
de
cette
nouvelle
génération
de
cinéastes
qui
emploient
une
nouvelle
technique
de
prise
de
vues
et
projection
de
films
d’amateur.
II
n'y
a
pas
de
sélection
de
vitesses
4
régler,
pas
de
filtres
A
monter
ou
a
en-
lever.
Pas
d’exposition
a
calculer,
bref
ne
vous
souciez
de
rien!
Le
chargeur
une
fois
installé,
le
systeme
automatique
s‘occupe
du
reste.
Mettez
la
vitesse
désirée
et
filmez.
Vous
n’avez
méme
pas
a
touchér
le
film.

SPECIFICATIONS
OF
argus/cosina
MOVIE
CAMERAS
Lens:
Exposure
Control:
Model
704
Cosinon
f/1.8
9~36
mm
zoom
lens
(electric
zoom;
manual
zoom
provision)
Model
706
Cosinon
f/1.8
8~48
mm
zoom
lens
(electric
zoom;
manual
zoom
provision)
Fully
automatic
Thru-
the-Lens
CdS
exposure
control;
manual
expo-
sure
control
optional;
ASA
range
25,
40,
64,
100
and
160
Fully
automatic
Thru-
the-Lens
CdS
exposure
control;
manual
expo-
sure
control
optional;
ASA
range
25,
40,
64,
100
and
160
Model
708
Cosinon
f/1.7
8~64
mm
zoom
lens
(electric
zoom;
manual
zoom
provision)
Fully
automatic
Thru-
the-Lens
CdS
exposure
control;
manual
expo-
sure
control
optional;
ASA
range
25, 40,
64,
100,
160
and
250
Viewfinder:
Focusing:
Filming
Speeds:
Other
Features:
(3)
Thru-the-Lens
reflex
viewfinder
with
provision
for
eyesight
correction,
aper-
ture
scale,
lens
opening
and
Over/Under
exposure
warning
signal
except
Madel
708iwhich
has
microprism
viewfinder.
Focus
adjustment
by
rotation
of
the
focusing
ring;
universal
focus
provision
12,
18
and
24
fps.
plus
single-frame
exposure;
electric
motor
drive
powered
by
four
1.5V
AA-
size
batteries
Built-in
Type
A
filter,
automatic
resetting
footage
counter,
shutter
release
con-
trol
lever,
battery
tester,
remote
control,
fold-away
hand
grip

MANUAL
ZOOM
CONTROL
RING
COMMANDE
MANUELLE
DU
ZOOM
LENS
OBJECTIF
FOCUSING
RING
ECHELLE
DISTANCES
SHUTTER
RELEASE
CONTROL
LEVER
ERROU
DE LA
GACHETTE
DECLENCHEMENT
CABLE
RELEASE
SOCKET
PRISE
DU
CABLE
DECLENCHEMENT
FILM
TYPE
WINDOW
INDICATEUR
DU
TYPE
DE
FILM
FILM
SPEED
CONTROL
LEVER
TRIGGER
RELEASE
GACHETTE
DECLENCHEMENT
LEVIER
DE
SELECTION
DE
VITESSES
LOCK
BUTTON
TRIPOD
SOCKET
TREPIED
POUSSOIR
DE
VERROUILLAGE
DE
POIGNEE
me
FOLD
AWAY
PISTOL
GRIP
~—
pIOGNEE
REPLIABLE

EXPOSURE
CONTROL
RING
BOUTON
CONTROLE
AUTO-MANUEL
MERCURY
BATTERY
COMPARTMENT
COMPARTIMENT
POUR
PILE
ELECTRIC
ZOOM
BUTTON
COMMANDE
AUTO-ZOOM
FILM
COMPARTMENT
COVER
LATCH
VERROUILLAGE
PORTE
CHARGEMENT
poi
DU
FILM
7
FILM
COMPARTMENT
COVER
PORTE
CHARGEMENT
DU
FILM
.
——
VIEWFINDER
PRISE
DE
VUES
FINDER
FOCUSING
KNOB
COMMANDE
POUR
MISE
AU
POINT
REMOTE
CONTROL
SOCKET
BOUTON
DE
COMMANDE
A
DISTANCE
BATTERY
TEST
BUTTON
POUSSOIR
CONTROLE
DES
PILES
MOTEUR
BATTERY
TEST
INDICATOR
AU
MERCURE
INDICATEUR
DE
TENSION
BATTERY
COMPARTMENT
LOGEMENT
POUR
PILES

The
first
time
you
take
the
camera
out
of
its
box,
there
are
a
few
things
to
get
ready
before
you
start
filming:
1
Install
batteries
to
power
your
camera’s
electric
drive.
2
Install
the
small
battery
that
powers
your
camera’s
automatic
electric-eye
exposure
control.
3
Insert
an
instant-loading
film
cartridge.
...
and
you
are
ready
for
the
first
scene.
However,
we
suggest
you
read
through
all
of
these
instructions
before
you
load-up
and
start
shooting.
After
the
batteries
have
been
installed
and
the
film
cartridge
is
in
place,
setting
the
camera’s
Automatic-Manual
Control
to
AUTO
and
unlocking
the
Trigger
Release
are
all
you
ever
have
to
do
to
get
ready
for
filming!
When
you
have
exposed
all
of
the
film,
open
the
camera,
remove
the
cartridge
and
send
it
off
for
processing,
insert
another
cartridge
and
continue
shooting!

RETRACTED
POSITION
POSITION
EN
RETRAIT
LOCK
BUTTON
BOUTON
VERROU
EXTENDED
POSITION
POSITION
EN
EXTENSION
TRIPOD
SOCKET
ATTACHE
TREPIED
Your
argus/cosina
700
series
camera
features
a
retractable
PISTOL
GRIP
which
folds
back
against
the
base
of
the
camera
for
easy
stor-
age
when
not
in
use.
To
extend
the
grip,
grasp
the
bottom
of
the
camera
in
the
cup
of
your
right
hand,
press
down
on
the
pistol
grip
,LOCK
BUTTON
with
your
thumb
and
swing
the
grip
down
and
for-
ward
until
it
locks.
Reversing
this
procedure,
(pressing
the
button
and
swinging
the
grip
back
and
upwards)
locks
it
against
the
bottom
of
the
camera
again.
With
this
grip
in
the
retracted
position,
the
camera
can
be
mounted
on
a
tripod,
using
the
TRIPOD
SOCKET
provided.
POIGNEE
PISTOLET
Votre
camera
argus/cosina
700
a
une
PIOGNEE
PISTOLET
rabettable
sous
votre
caméra
et
en
réduit
|’encombrement.
Pour
déplier
la
poignée
prenez
le
dessous
de
la
caméra
dans
la
main
droite,
enfoncez
le
bouton
de
verrouillage
de
poignée
avec
le
pouce
et
rabattez
la
poignée
vers
I’avant
jusqu’a
enclenchement.
L’opération
inverse
(appuyer
sur
le
poussoir
de
verrouillage
de
poignée
et
rabattre
la
poignée
vers
le
haut)
verrouilla
la’
poignée
contre
le
fond
de
la
caméra.
Quand
la
poignée
est
rebattue
il
est
possible
de
monter
la
caméra
sur
un
repied
en
utilisant
|’attache-
trépied
a
cet
effect.

INSTALLING
DRIVE
BATTERIES
With
the
pistol
grip
extended,
open
the
DRIVE
BATTERY
COM-
PARTMENT
by
turning
counterclockwise
the
BATTERY
COVER
LOCK
KNOB.
Take
out
the
BATTERY
CASE
and
install
four
size
“AA”
penlight
batteries
according
to
the
positive-negative
markers
inside
the
BATTERY
CASE.
Return
BATTERY
CASE
to
proper
position
in
the
PISTOL
GRIP,
close
and
lock
the
battery
cover
securely.
COMMENT
PLACER
LES
PILES
MOTEUR
Lorsque
la
poignée
pistolet
est
tirée,
ouvrez
le
logement
pout
piles
en
tournant
le
verrou
du
logement
pour
piles
dans
le
sens
contraire
des
aiguilles
d'une
montre.
Sortez
le
boitier
4
piles
et
installez
quatre
piles
de
type
“AA”,
en
respectant
les
marques
positives
et
négatives
dans
le
boftier.
Remettez
le
boftier
dans
la
poignée
pistolet
en
posi-
tion
correcte,
puis
fermez
et
verrouillez
soigneusement
le
logement
pour
piles.
*montrez
la
photo
du
boitier
et
de
la
poignée
pistolet
en
position
ouverte
comme
4
la
page
2
du
livret
de
mode
d'emploi
Cosina
BATTERY
COMPARTMENT
LOGEMENT
POUR
PILES
MOTEUR

TRIGGER
RELEASE
GACHETTE
DECLENCHEMENT
Press
the
TRIGGER
RELEASE
briefly
to
see
that
power
is
being
supplied
properly.
If
motor
does
not
run,
check
battery
installation
for
correct
position
and
contact.
(Reversing
the
polarity
position
of
the
batteries
will
cause
the
camera
mechanism
and
zoom
lens
drive
to
run
backwards.)
Your
Argus
dealer
can
supply
you
with
several
types
of
batteries.
Some
are
high-energy
types
which
provide
much
longer
life.
Any
of
the
following
kinds
are
suitable
and
will
provide
approximately
the
life
shown,
depending
on
their
age,
temperature
conditions
and
other
variables
which
affect
battery
life.
STANDARD
CARBON
ZINC
..
. .
up
to
4
cartridges
HEAVY
DUTY
CARBOK
ZINC.
.
.
up
to
6
cartridges
MANGANESE-ALKALINE
...
.
up
to
20
cartridges
MERCURY
i
ita
on
up
to
28
cartridges
Weak
batteries
will
slow
the
camera’s
filming
speed
and
cause
action
to
be
greatly
exaggerated
on
the
screen.
It
is
a
good
idea
to
frequently
check
the
energy
remaining
in
your
batteries
and
replace
them
with
a
fresH
set
at
the
first
sign
of
weakness.

(13)
BATTERY
TEST
BUTTON
BOUTON
CONTROLE
PILES
BATTERY
TEST
INDICATOR
INDICATEUR
DE
TENSION
BATTERY
TEST
When
the
batteries
are
first
installed
and
evéry
time
you
use
the
camera,
depress
the
BATTERY
TEST
button
and
note
the
position
of
the
ENERGY
LEVEL
INDICATOR.
If
it
appears
anywhere
in
the
clear
zone,
the
right
hand
section
of
the
meter,the
batteries
are
still
good.
If
not
the
batteries
are
too
weak
to
operate
the
camera
properly
and
should
be
replaced.

BATTERY
COVER
COUVERCLE
DE
PILE
BOITIEF
BATTERY
COMPARTMENT
COMPARTIMENT
POUR
PILE
LENS
OPENING
INDICATOR
WARNING
ZONE
INDICATEUR-DIAPHRAGME
ZONE-AVERTISSEMENT
//.
ELECTRIC
EYE
SYSTEM
This
system
is
powered
by
a
1.35-volt
mercury
battery.
(One
is
sup-
plied
with
your
camera
in
a
slot
in
the
plastic
packing.)
To
install
the
battery,
first
turn
the
battery
cover
in
the
direction
of
the
arrow
approximately
one
turn
to
the
open
position.
Insert
the
battery
in
the
compartment
positive
(+)
side
facing
up.
Replace
the
cover
by
re-
versing
the
removal
procedure,
and
pressing
down
slightly
while
turning
to
CLOSE.
Instead
of
weakening
slowly,
this
kind
of
battery
generally
fails
al-
most
immediately
when
it
becomes
exhausted.
To
check
your
bat-
tery’s
condition,
look
through
the
Data
Scope
viewfinder
while
the
camera
is
pointed
toward
any
brightly
lighted
scene.
(Be
sure
the
camera
is
set
on
AUTO.)
If
the
battery
is
still
good,
the
electric-eye
mechanism
will
respond
rapidly,
showing
a
movement
of
the
LENS-
OPENING
INDICATOR
away
from
the
red
WARNING
ZONE.

AUTOMATIC
-MANUAL
CONTROL
The
electric
eye
exposure
control
takes
power
from
the
battery
only
when
the
EXPOSURE
CONTROL
DIAL
isin
the
AUTO
or
MANUAL
position.
When
the
camera
is
not
in
use
move
the
EXPOSURE
CON-
TROL
DIAL
tothe
OFF
position
and
the
circuit
is
then
automatical-
ly
off
to
conserve
power.
If
a
fresh
battery
is
needed
your
Argus
dealer
can
supply
you
with
the
proper
replacement
type
(MALLORY
PX-
13,
EVEREADY
EPX-13,
BURGESS
HPX-13,
or
equivalent.)
Set
EXPOSURE
CONTROL
DIAL
to
AUTO
position
whenever
you
want
to
use
the
automatic
exposure
control
system.
When
set
on
AUTO,
the
camera’s
lens
opening
will
automatically
increase
and
de-
crease,
while
you
are
filming,
continually
adjusting
for
correct
ex-
posure
in
all
suitable
light
conditions.
‘‘Suitable’’
conditions
exist
whenever
the
EXPOSURE
INDICATOR
in
the
VIEWFINDER
shows
any
area
of
the
aperture
other
than
the
red
warning
zone.
If
the
red
warning
zone
is
visible
at
the
exposure
indicator
marker,
there
is
in-
sufficient
light
for
correct
exposure
and
you
should
stop
filming.
The
lens
opening
being
set
by
the
electric
eye
(f
1.8
to
f
22)
is
always
visible
in
the
viewfinder
when
the
EXPOSURE
INDICATOR
is
set
on
AUTO.

You
can
use
this
feature
as
a
light
meter
to
determine
the
proper
lens
setting
for
unusual
conditions
where
the
electric-eye
may
provide
an
undesirable
exposure.
For
instance,
if
your
principal
subject
is
an
extremely
dark
one
and
inan
extremely
light
background,
or
if
your
subject
is
strongly
back-
lighted,
you
may
elect
to
use
a
manual
setting.
With
the
automatic-manual
control
set
on
AUTO,
hold
the
camera
aimed
at
your
subject
at
close
range
(so
as
to
exclude
the
contrasting
background
from
view)
and
note
the
lens-opening
setting
in
the
viewfinder.
Then
return
to
your
shooting
position
and
turn
the
ex-
posure
control
indicator
dial
toward
MANUAL
until
the
desired
setting
is
‘‘fixed’’
in
the
viewfinder.
Now
shoot
the
scene
at
this
MANUAL
setting.
Be
sure
to
return
the
control
to
AUTO
position
when
you
want
to
resume
automatic
exposure.
Moving
the
dial
to
OFF
position
locks
the
electric-eye
mechanism
against
damage
by
sudden
jolts
or
vibra-
tions.
The
control
should
be
set
on
OFF
position
whenever
the
came-
ra
is
stored
or
shipped
for
any
reason.

(21)
TRIGGER
RUN-LOCK
LEVER
DETENTE
OU
VERT-FERME
LEVIER
TRIGGER
RELEASE
GACHETTE
DE
DECLENCHEMENT
Remember,
whenever
you
want
automatically
exposed
movies,
you
must
keep
this
control
set
on
AUTO.
Check
frequently
to
see
that
it
has
not
been
unintentionally
moved
between
scenes,
and
be
alert
for
free
movement
of
the
lens-opening
in
the
indicator
zone
of
the
view-
finder
while
filming.
SHOOTING
There
are
three
ways
to
operate
the
camera:
(1)
with
the
TRIGGER
RELEASE
for
normal
filming
with
camera
hand-held;
(2)
with
the
REMOTE
CONTROL
CORD
for
filming
with
camera
on
a
tripod;
(3)
with
aCABLE
RELEASE
for
single-frame
filming.
For
continuous
filming
lever
is
first
set
to
RUN
then
moved
to
the
L
&
R.L
position
while
pressing
the
shutter
release
trigger.
With
the
camera
On
a
tripod
you
can
get
in
the
picture
yourself!
To
stop
the
camera
move
the
TRIGGER
RELEASE
LEVER
to
RUN
position
and
let
the
release
return
forward.
You
can
move
the
release
lever
to
the
L
&
R.L
position
as
a
safety
lock
on
the
release
in
its
forward
position
to
prevent
running
the
camera
accidentally
whenever
it
is
left
unattended.

PRISE
DE
COMMANDE
A
DISTANCE
REMOTE
CONTROL
SOCKET
i
CABLE
RELEASE
SOCKET
|
PRISE
DU
CABLE
DECLENCHEMENT
A
remote
control
cord
(available
from
your
Argus
dealer)
can
be
attached
in
the
REMOTE
CONTROL
SOCKET.
When
installed,
de-
press
the
trigger
release
all
the
way
and
lock
it
in
the
RUN
position
with
the
release
lock
lever.
Locking
the
release
in
this
way
will
not
run
the
camera.
Filming
is
then
started
by
pushing
the
remote
con-
trol
switch
to
ON.
A
cable
release
(available
from
your
Argus
dealer)
can
be
attached
in
the
CABLE
RELEASE
SOCKET.
Any
ASA
American-thread
release
will
fit.
The
cable
release,
when
depressed,
starts
the
camera's
drive
motor
and
permits
a
single
frame
at
a
time
to
be
exposed
for
making
titles,
animated
sequences,
or
time-lapse
movies.
NOTE:
The
camera
motor
will
continue
to
run
as
long
as
the
cable
release
is
depressed,
but
the
shutter
is
activated
to
expose
only
one
frame
each
time
you
depress
and
release
the
cable
plunger.
Remote
control
and
single
frame
filming
should
be
done
on
a
tripod.

CARTRIDGE
CHARGEUR
COVER
RELEASE
LATCH
VERROU
PORTE
ARRIERE
VK
CARTAOSE
CHARGEMENT
DE
FILM
INSERTING
THE
FILM
CARTRIDGE
The
remarkable
Super
8
cartridge
is
the
key
to
all
of
the
effortless,
trouble-free,
no-worry
features
which
argus/cosina
has
built
into
your
camera.
A
tiny
portion
of
film
is
exposed
at
the
front
edge
of
the
cartridge,
ready
to
engage
automatically
with
your camera's
drive
and
shutter
mechanism.
All
the
old
fashion,
complicated
systems
for
home
movie
making
are
eliminated.
Instead,
you
simply
open
the
camera
by
pushing
the
COVER
RELEASE
LATCH
in
direction
of
the
arrow
and
the
camera
cover
will
automatically
swing
open.
Insert
the
film
cartridge,
label-
side
up,
—
to
window
and
press
it
gently
toward
the
taking
lens
and
close
cover.
You're
ready
to
shoot
after
only
a
one
second
press
of
the
trigger
to
take-up
the
exposed
leader.
1
The
camera’s
FOOTAGE
COUNTER
is
automatically
reset
to
0
and
will
indicate
the
number
of
feet
exposed
in
the
cartridge.
When
the
counter
reaches
50,
stop
taking
picture,
but
continue
to
run
the
camera
for
a
few
seconds
to
wind
the
film
through
the
cartridge
to
the
end.
(The
motor
will
seem
to
speed-up
slightly
when
the
end
of
the
film
is
reached.)

The
FILM
SPEED
for
the
type
of
film
in
your
cartridge
is
auto-
matically
set
in
your
camera’s
electric-eye
exposure
system
as
soon
as
you
close
the
cover.
This
is
accomplished
by
a
special
sensor
built
into
your
camera.
(For
film
speed
A.S.A.
range
see
specifications
page
2)
ta
SENSIBILITE
DU
FILM
seton
le
type
de
film
dans
votre
chargeur
est
transmis
automatiquement
dans
le
systéme
diaphragme
par
oeil
électronique
aussitot
que
vous
refermez
la
porte
arriere.
Ceci
est
possible
grace
a
un
dispositif
special
incorporé
dans
votre
caméra
(pour
les
différentes
sinsibilités
de
film
ASA
voyez
le
scractéristiques
a
la
page
2)
jp

MOVIES
INDOORS
As
soon
as
you
attach
your
movie
light
in
the
slot
on
top
of
your
camera
another
built
in
sensor
automatically
moves
the
filter
away
from
the
lens.
Should
you
use
—
off
camera
light
source
you
must
place
the
special
key
bracket
furnished
with
your
camera
in
the
same
slot
provided
for
your
movie
light.
The
built-in
type—A
filter
is
for
use
in
outdoor
movie
filming
only.
It
is
always
in
the
lens
position
unless
moved
by
means
as
described
above.
PRISE
DE
VUE
A
L’INTERIEUR
Dés
que
vous
attachez
le
spot
caméra
dans
I’enclencheur
audessus
de
la
caméra
un
autre
dispositif
écarte
automatiquement
le
filtre
de
Pobjectif.
Au
cas
ot
vous
employez
une
source
de
lumiére
séparée
de
la
caméra
placez
la
tige
spéciale
fournie
avec
la
camera
dans
I’enclencheur
que
yous
utilisez
pour
le
spot
caméra.
Le
filtre
de
type
A
incorporé
n’‘est
utilise
que
pour
les
prises
de
vue
@
l’exterieur.
||
est
toujours
en
position
devent
|’objectif
4
moins
qu'il
ne
soit
déplacé
comme
indiqué
ci-dessus.

é
‘
—
MANUAL
ZOOM
CONTROL
RING
COMMANDE
MANUELLE
DU
ZOOM
FINDER
FOCUSING
KNOB
COMMANDE
POUR
MISE
AU
POINT
FOCUSING
THE
LENS
Your
camera
has
a
reflex
viewfinder
which
lets
you
see
exactly
what
will
be
recorded
on
the
film.
To
focus
through
the
viewfinder
you
must
first
adjust
the
camera
to
your
eye.
Instructions
for
this
and
the
focusing
operation
are
illustrated
below.
adjust
camera
to
your
eye
by:
1.
Pressing
zoom
button
‘‘T”’
to
set
lens
at
extreme
tele-
photo
position.
2.
Set
the
focus
ring
to
infinity.
3.
Viewing
a
distant
scene
(infinity
distance)
rotate
view-
finder
focus
knob
until
image
appears
sharp-&
clear.
Focus
camera
by
following
step
1
above
and
then
while
viewing
scene
to
be
taken,
rotate
lens
focusing
ring
until
image
in
the
view-
finder
appeals
sharp
&
clear.
You
are
now
ready
to
shoot
pictures
at
this
distance
throughout
the
zoom
range
from
telephoto
to
wide
an-
gle.
For
Model
708,
you
have
additional
aid
ofasplit
image
viewfinder.
Simply
select
any
vertical
line
in
scene
being
shot
and
move
lens
ring
until
image
in
upper
half
of
circle
is
aligned
with
image
in
lower
half
of
circle
and
you
will
have
a
critically
sharp
picture.
This manual suits for next models
2
Table of contents
Other Argus Digital Camera manuals

Argus
Argus C-33 User manual

Argus
Argus DC-6340 User manual

Argus
Argus DC1512 User manual

Argus
Argus QC-3195B User manual

Argus
Argus QC-3195B User manual

Argus
Argus Argus DC-3185 User manual

Argus
Argus DC1510 User manual

Argus
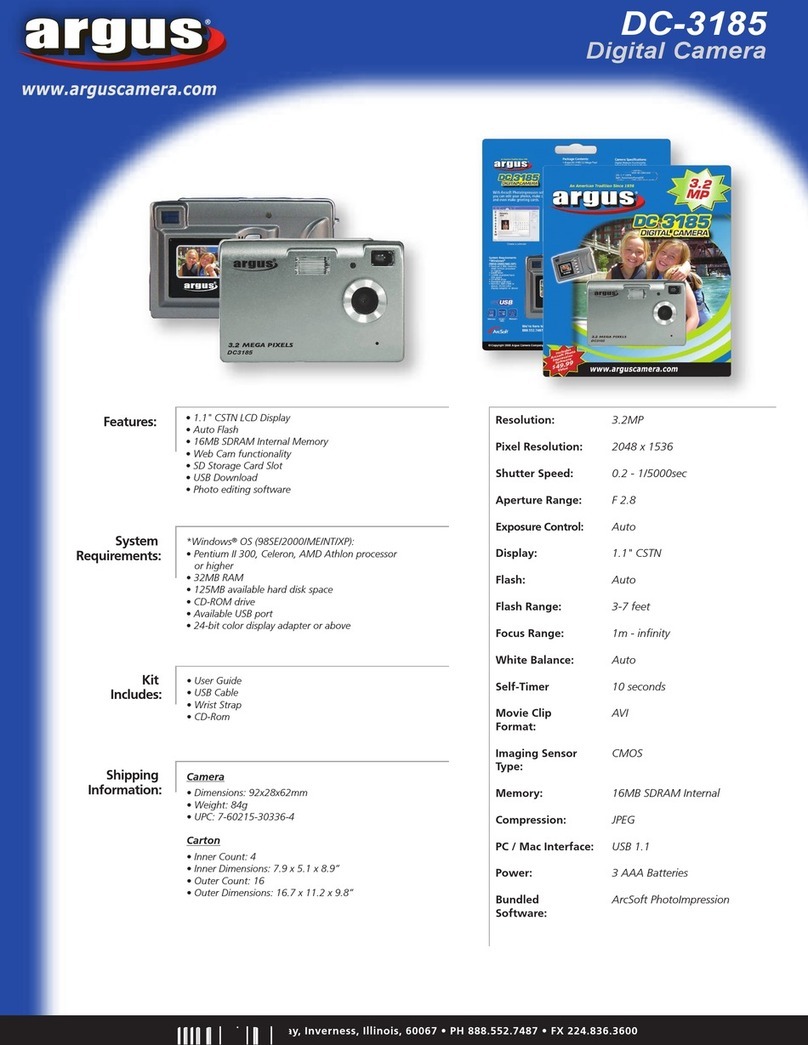
Argus DC-3185 User manual

Argus
Argus Argus DC-5195 User manual
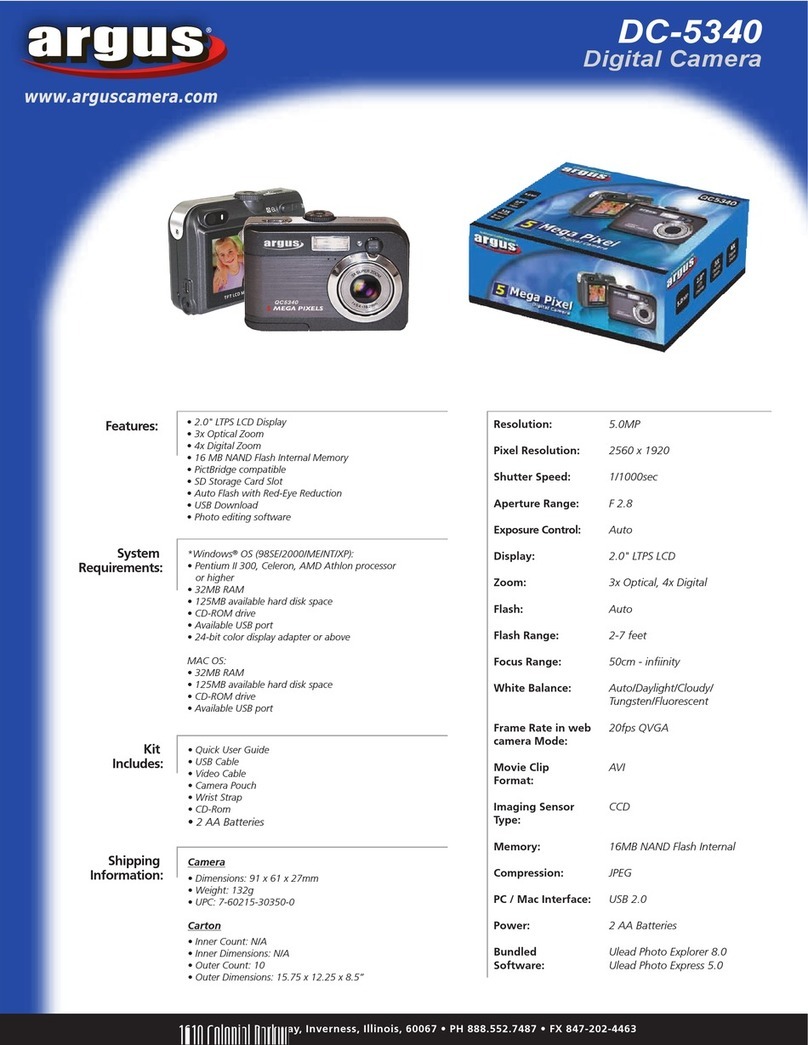
Argus
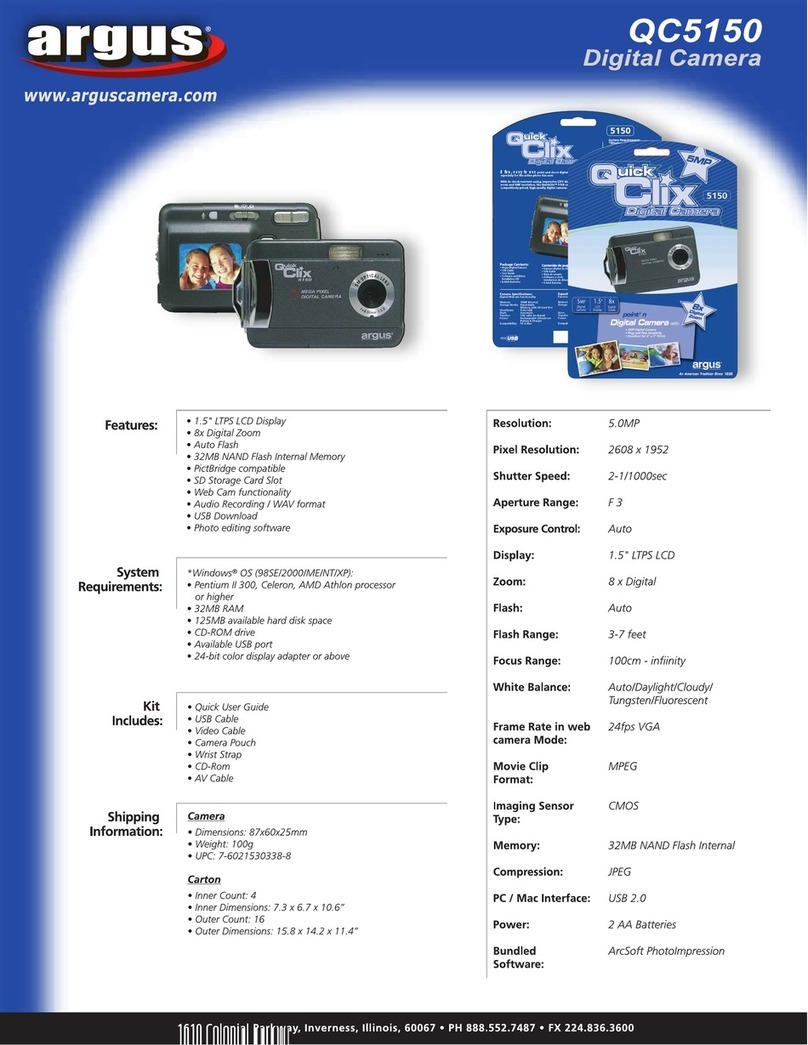
Argus DC-5150 User manual

Argus
Argus DCM-098 User manual

Argus
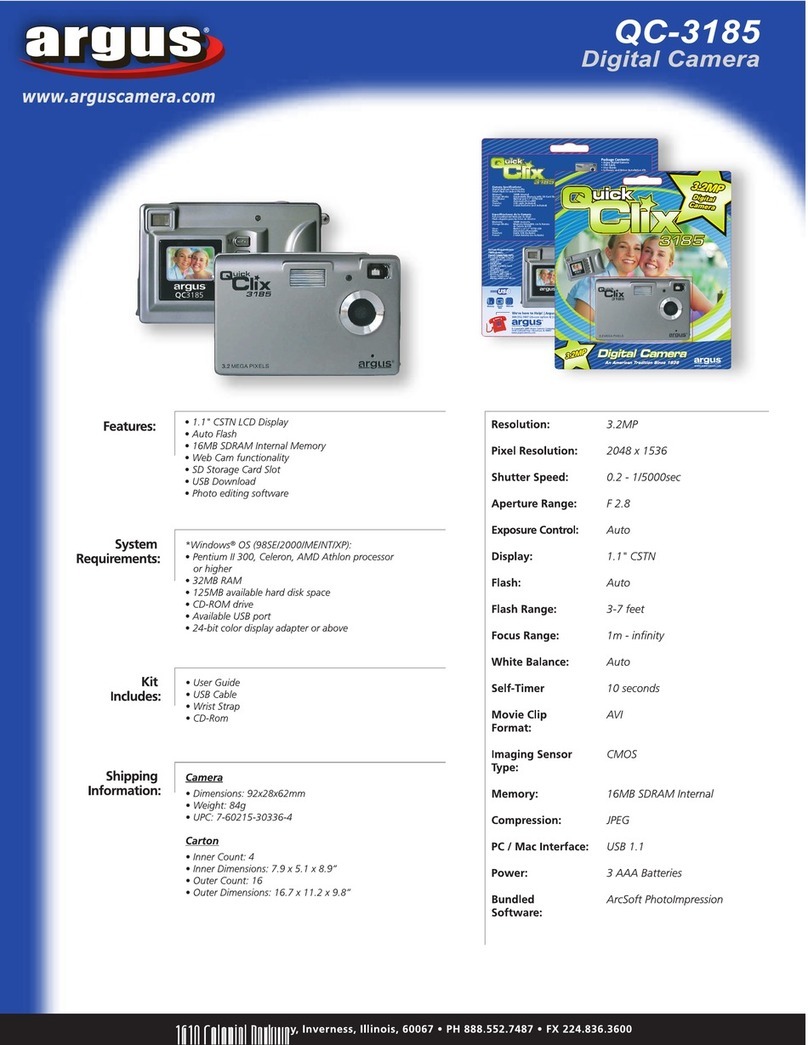
Argus QC-3185 User manual
Argus
Argus DC-3190 User manual

Argus
Argus Mi-TIC Series User manual
Argus
Argus Argus DC-1512E User manual

Argus
Argus DC1500 User manual

Argus
Argus DC-2185 User manual

Argus
Argus Argus DC-5190 User manual

Argus
Argus Argus DC-2185 User manual

Argus
Argus 127 Product information sheet