manuals.online logo
Brands
  1. Home
  2. •
  3. Brands
  4. •
  5. ARKA
  6. •
  7. Aquarium
  8. •
  9. ARKA Aquatics Core ACS120 User manual

ARKA Aquatics Core ACS120 User manual

This manual suits for next models

2

Other ARKA Aquarium manuals

ARKA REEF CERAMICS User manual

ARKA

ARKA REEF CERAMICS User manual

ARKA Aquatics Core BP500 User manual

ARKA

ARKA Aquatics Core BP500 User manual

Popular Aquarium manuals by other brands

Tetra Bubbling LED Kit 1 Gallon Hexagon Quick setup guide

Tetra

Tetra Bubbling LED Kit 1 Gallon Hexagon Quick setup guide

AquaLighter Aquascape quick start guide

AquaLighter

AquaLighter Aquascape quick start guide

EHEIM 600 T operating instructions

EHEIM

EHEIM 600 T operating instructions

Red Sea REEFER XL300 Assembly manual

Red Sea

Red Sea REEFER XL300 Assembly manual

AutoAqua Smart Stir SS-100 manual

AutoAqua

AutoAqua Smart Stir SS-100 manual

eKoral eKoral Pro user manual

eKoral

eKoral eKoral Pro user manual

fish mate F14 instructions

fish mate

fish mate F14 instructions

Amtra VEGA manual

Amtra

Amtra VEGA manual

JBL PRO SILENT S-100 Instructions for use

JBL

JBL PRO SILENT S-100 Instructions for use

Innovative Marine MightyJet 8500 Mini How to use

Innovative Marine

Innovative Marine MightyJet 8500 Mini How to use

SuperFish Planty 25 Warranty and manual

SuperFish

SuperFish Planty 25 Warranty and manual

Royal Exclusiv Bubble King DeLuxe 300 datasheet

Royal Exclusiv

Royal Exclusiv Bubble King DeLuxe 300 datasheet

Sera Marin Precision Biotop LED Cube 130 Instructions for installation and use

Sera

Sera Marin Precision Biotop LED Cube 130 Instructions for installation and use

Commodity Axis ViaAqua Titanium Heater manual

Commodity Axis

Commodity Axis ViaAqua Titanium Heater manual

JBL CRISTALPROFI i60 greenline manual

JBL

JBL CRISTALPROFI i60 greenline manual

GNC BluRayPro manual

GNC

GNC BluRayPro manual

JBL Blanki Set quick start guide

JBL

JBL Blanki Set quick start guide

Red Sea REEFER XL300 Assembly manual

Red Sea

Red Sea REEFER XL300 Assembly manual

manuals.online logo
manuals.online logoBrands
  • About & Mission
  • Contact us
  • Privacy Policy
  • Terms and Conditions

Copyright 2025 Manuals.Online. All Rights Reserved.

Hinweise
1. Für die bestmögliche Leistung reinigen Sie den Schaumtopf regelmäßig. Verwenden Sie zum Reinigen einen Schwamm und warmes
Wasser. Vermeiden Sie den Gebrauch von Seife oder Chemikalien!
2. Es kann 2 bis 4 Wochen dauern, bis der Abschäumer aufgrund winziger produktionsbedingter Ölmengen oder Reststoen seine optimale
Leistung erreicht. Die Abschäumerleistung kann während dieser Zeit unregelmäßig sein. Geben Sie dem Abschäumer genügend Zeit
zum Einlaufen, bevor Sie irgendwelche Einstellungen vornehmen.
3. Regelmäßige Wartung (etwa alle 3 Monate) der Pumpe gewährleistet eine lange Lebensdauer und maximale Leistung des Abschäumers.
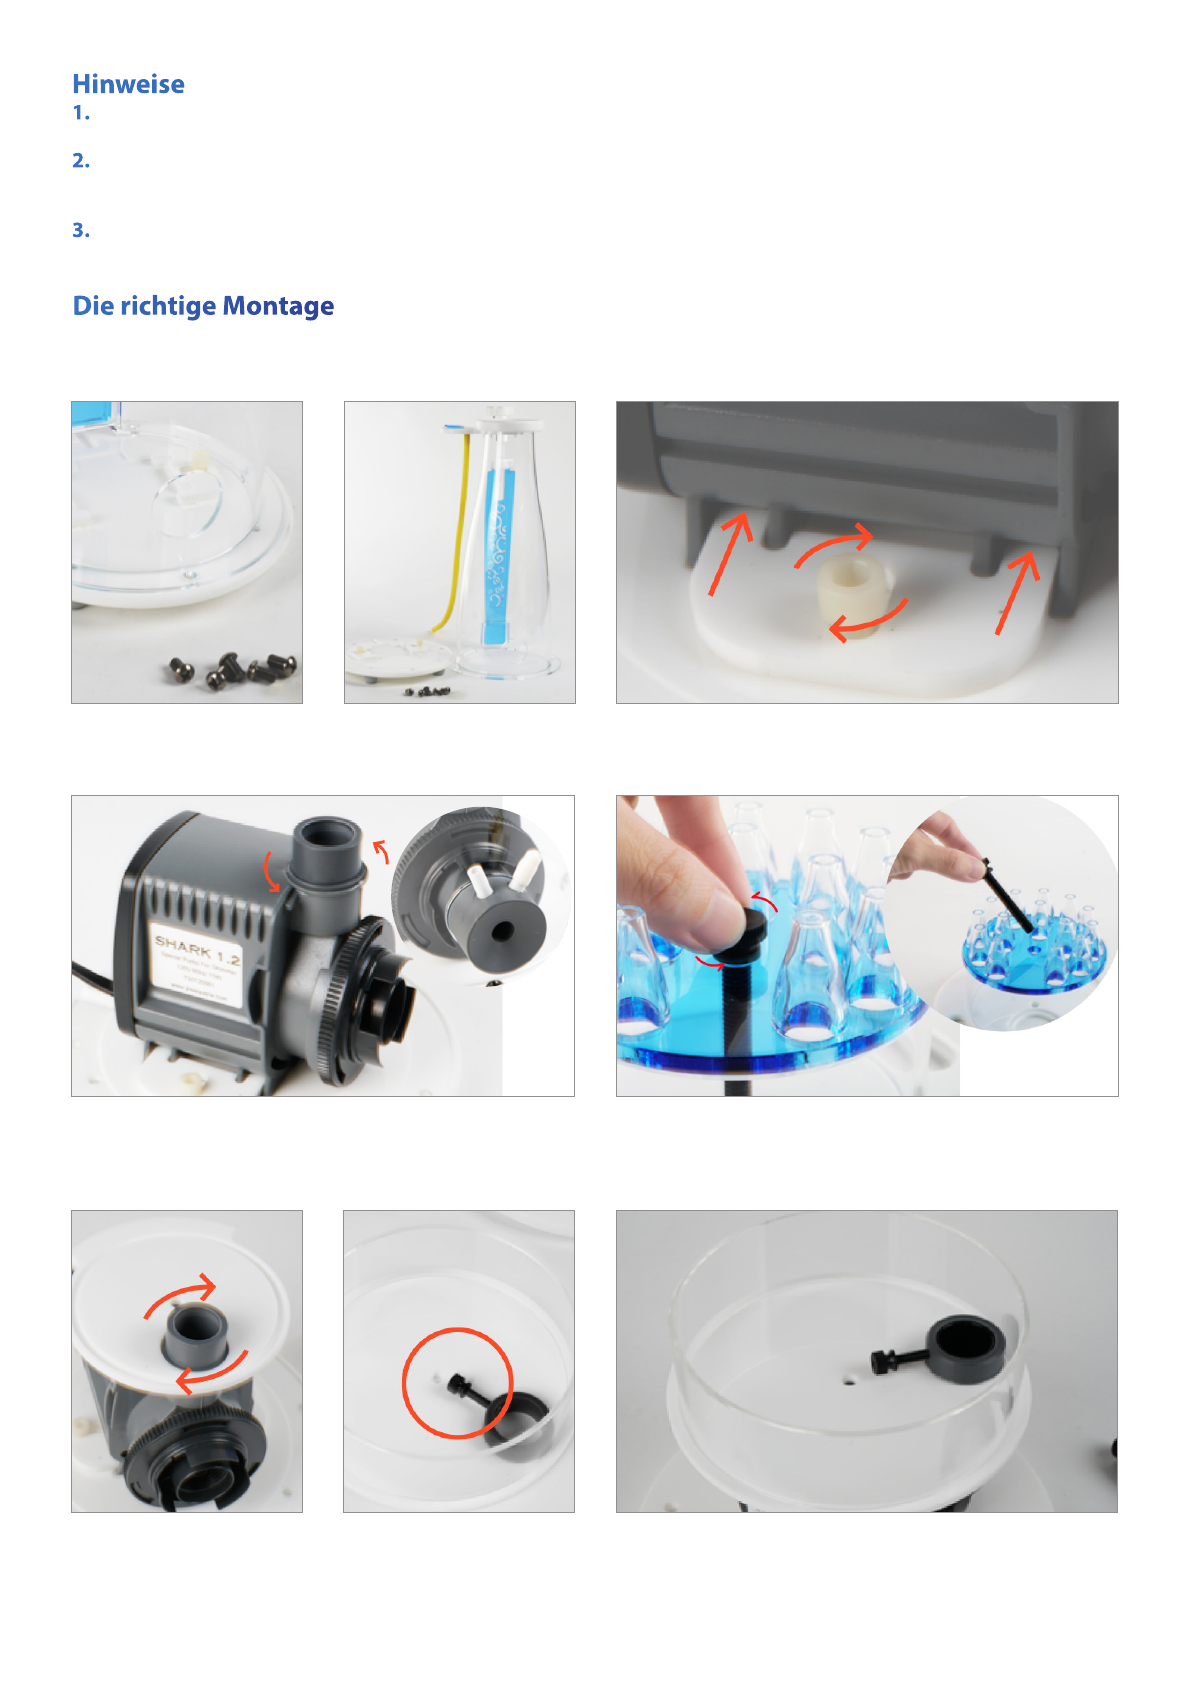
Lösen Sie die Gehäuseschrauben von der Basisplatte und nehmen
Sie das Gehäuse ab.
Befestigen Sie die Pumpe an der Basisplatte.
Die richtige Montage
Nehmen Sie die Venturi-Düse ab.
* Nur beim ACS120: Lösen Sie den Anschluss an der Pumpe für den
nächsten Schritt, um den Diusor zu befestigen.
Lösen Sie die zentrale Schraube, um die Diusorplatte abzunehmen.
Reinigen Sie alle Einzelteile, bevor Sie den Abschäumer an Ihr Aquarium anschließen. Verwenden Sie hierfür ausschließlich warmes Wasser
und verzichten Sie auf Reinigungsprodukte auf Alkoholbasis. Bitte beachten Sie, dass auf Acryl leicht Kratzer entstehen können.
*
ACS120: Bringen Sie den Diu-
sorsockel an der Pumpe an und
ziehen Sie den Anschluss fest.
ACS180 & ACS280: Lösen Sie die Schraube neben dem Deckel und setzen Sie die Platte auf die Pumpe.
Anschließend ziehen Sie die Schraube wieder fest. Achten Sie darauf, dass sich die Platte genau in der
Mitte der Basisplatte bendet.
Recommendations
1. For best performance, please clean the collection cup frequently. Use a sponge and warm water to clean it.
Do not use any soap or chemicals to clean the collection cup!
2. Regular maintenance of the pump will ensure a long life and maximum performance: recommended every 3 months.
3. It may require 2 – 4 weeks for the skimmer to reach maximum performance due to tiny amounts of oil or remnants left from manu-
facturing. Skimmer performance may be erratic during this time and be sure to allow ample time for the skimmer to break-in before
making adjustments.
Unscrew the body screws from the base plate, and pick up the skim-
mer body.
Attach the pump to the base plate.
Assembly
Take o the venturi.
* Only for ACS120: Loosen the tting on the pump for next step to
attach the diuser.
ACS120: Attach the diuser
base to the pump and tighten
the tting.
Unscrew the center screw to take o the diuser plate.
ACS180 & ACS280: Loosen the screw beside the cap and put the plate on the pump then screw back,
make sure the plate is in the center of the base plate.
Clean all parts before you connect the skimmer to your aquarium. Use only warm water and do not use alcohol-based cleaning products. Use
caution when handling as acrylic scratches easily.
*