Arkiti HS1-U2UJS User manual

Home Station User Guide
Home Station - Multimedia Center
Date: July 10, 2008 - v1.0
Firmware: v2.0.20.77
Models: HS1-U2UJS, HS2-U2UJS, HS3-U2UJS
The diagrams and images contained in this manual may not fully represent the product that you are using
and are there for illustration purposes only.

Home Station User Guide
Table of Contents
1INTRODUCTION..........................................1
1.1 PACKAGE CONTENTS.............................1
1.2 SYSTEM REQUIREMENTS .......................1
1.2.1 Supported Operating Systems:.......1
1.2.2 Supported File Systems:.................1
1.2.3 Supported Languages:....................1
1.3 SUPPORTED FILE FORMATS ...................2
1.3.1 Video File Formats:.........................2
1.3.2 Video Outputs:................................2
1.3.3 Audio File Formats:.........................2
1.3.4 Audio Outputs:................................2
1.3.5 Picture Formats:..............................2
1.4 AVAILABLE MODELS...............................2
1.5 DETAILED VIEW .....................................3
1.5.1 Front View.......................................3
1.5.2 Rear View........................................3
1.6 HOME STATION FEATURES .....................4
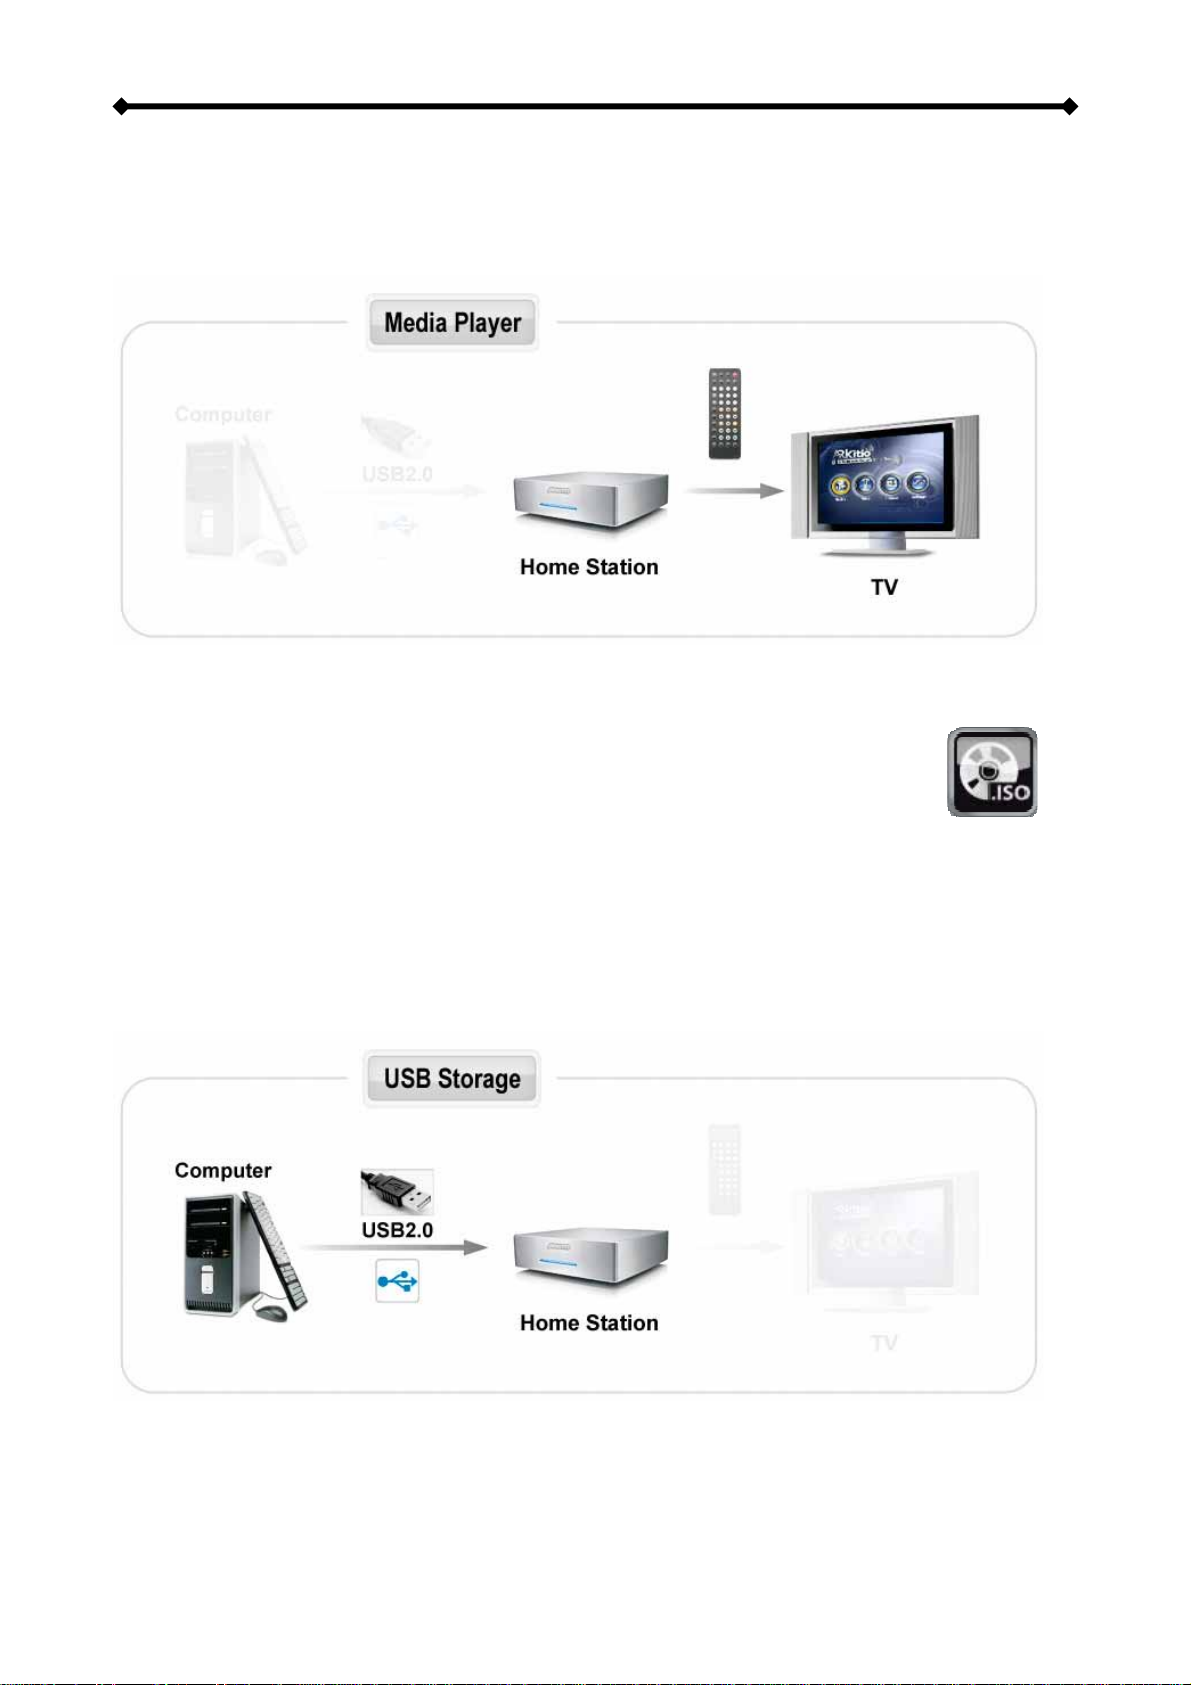
1.6.1 Media Player...................................4
1.6.2 ISO Playback ..................................4
1.6.3 USB Drive .......................................4
1.7 QUICK INSTALLATION GUIDE...................5
2SYSTEM SETUP .........................................6
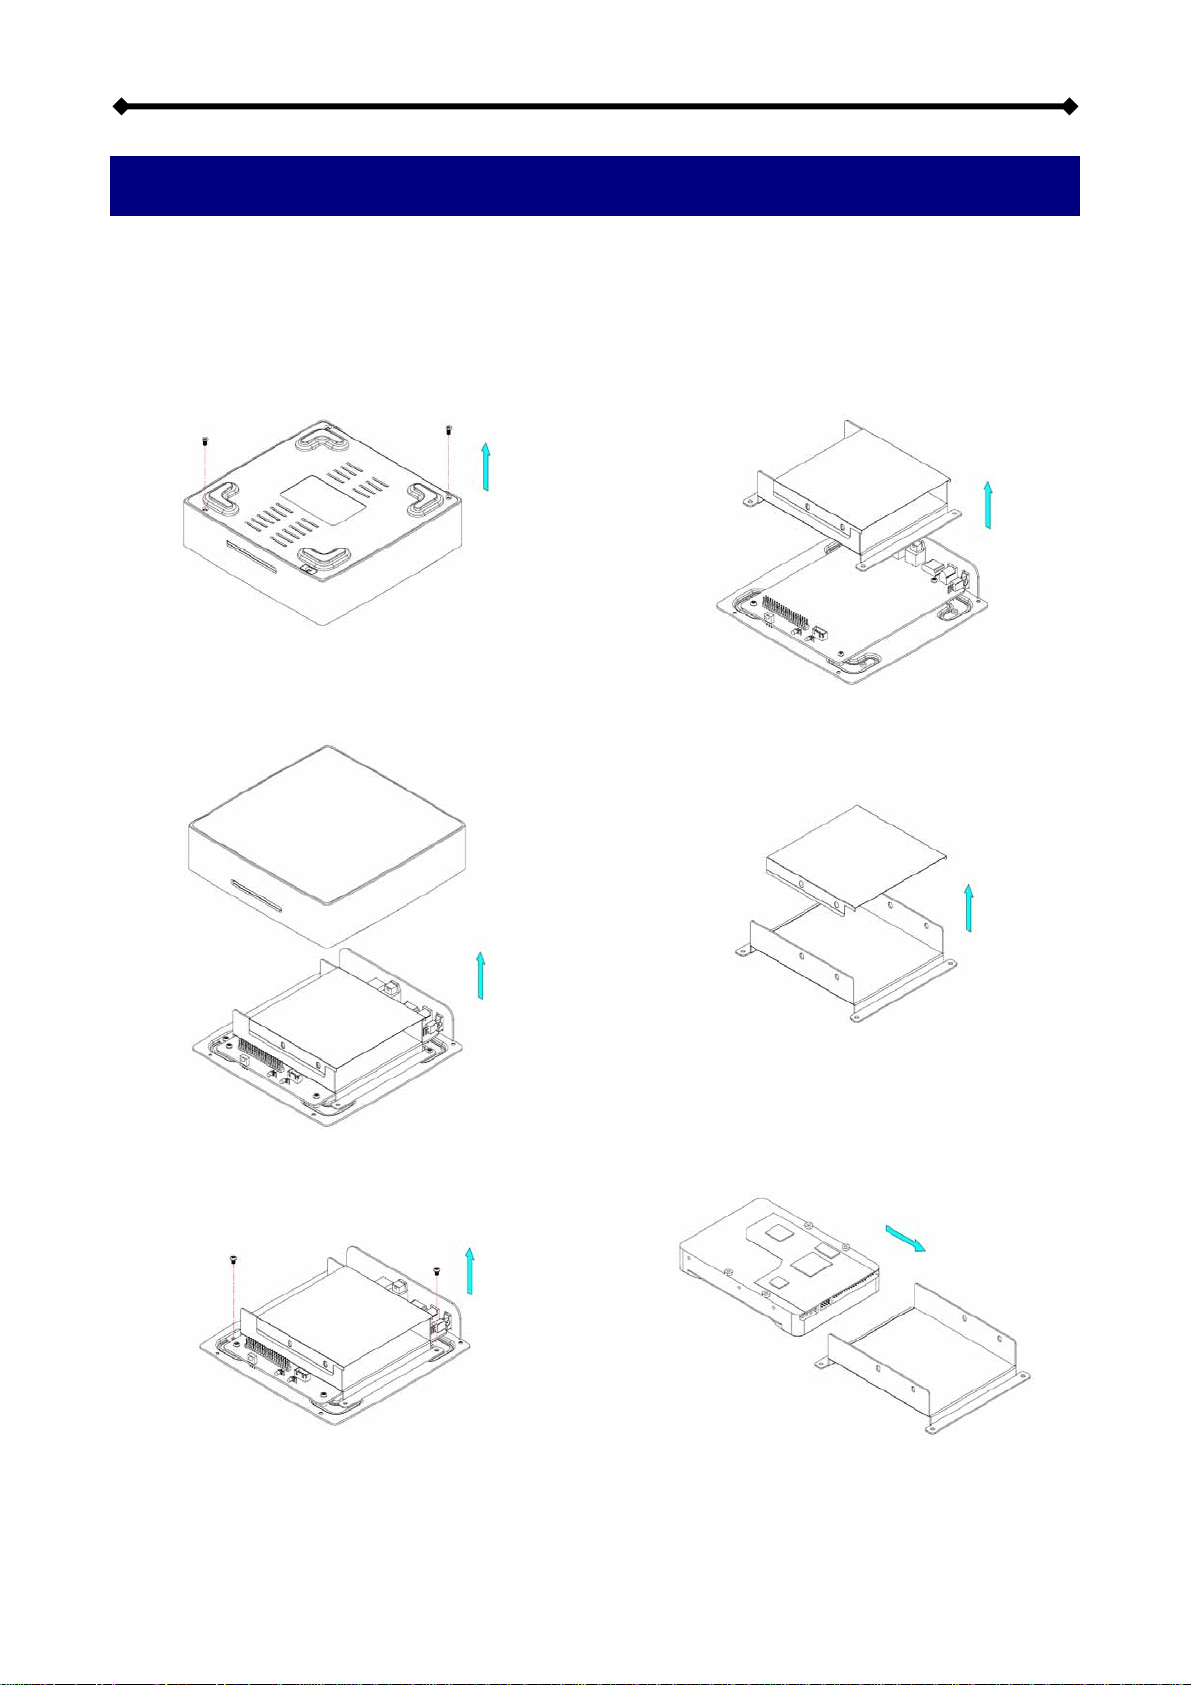
2.1 HDD INSTALLATION ...............................6
2.2 HDD SETUP..........................................8
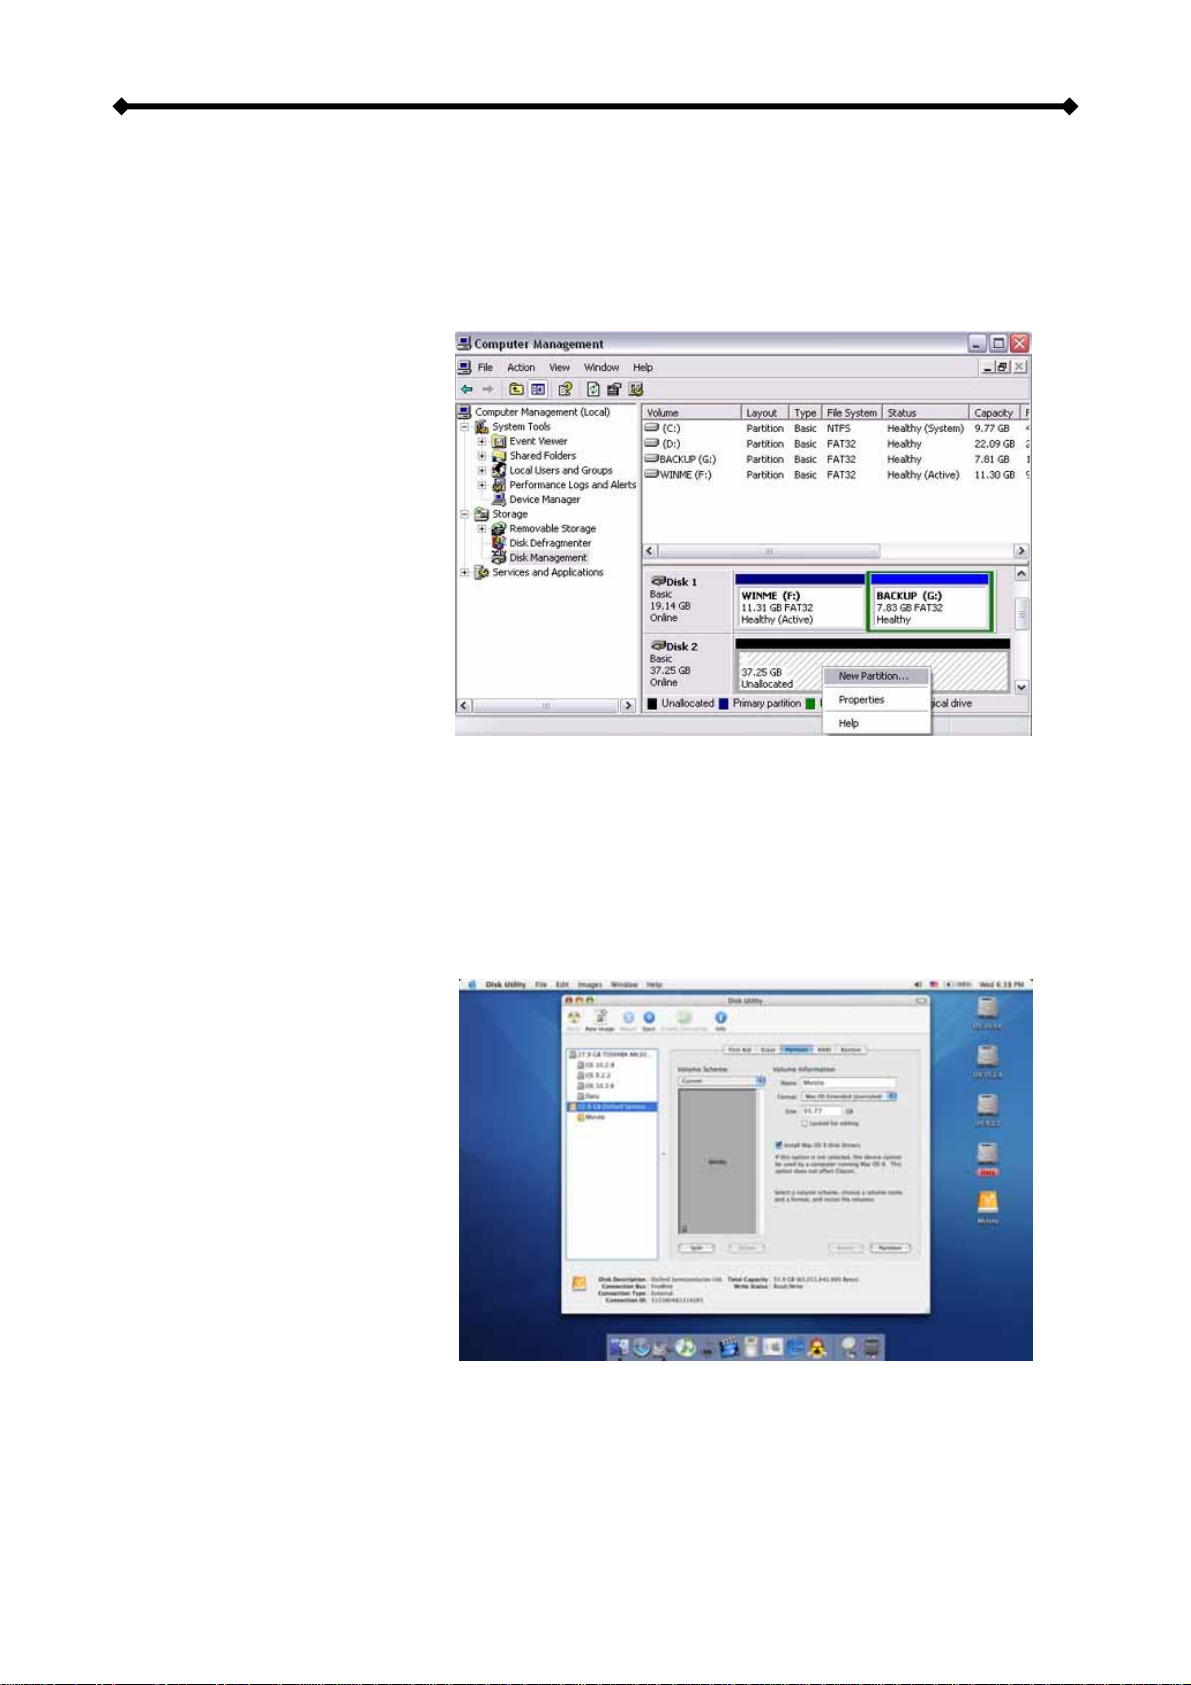
2.2.1 Formatting on a PC.........................8
2.2.2 Formatting on a Mac.......................8
2.3 CREATING THE DIRECTORIES .................9
2.3.1 Font Support...................................9
2.4 TV CONNECTION .................................10
2.4.1 Analogue Audio Setup..................11
2.4.2 Digital Audio Setup .......................11
2.5 USB CONNECTION ............................. 12
2.5.1 Safe Removal............................... 13
2.6 UPLOADING FILES............................... 14
3TV PLAYBACK......................................... 15
3.1 THE REMOTE CONTROL ...................... 15
3.2 UNIQUE CONTROL KEYS ..................... 18
3.3 MENU FUNCTIONS .............................. 19
3.3.1 Main Menu ................................... 19
3.3.2 Movies.......................................... 19
3.3.3 Music............................................ 20
3.3.4 Pictures ........................................ 21
3.3.5 Settings ........................................ 22
3.3.6 Background Images..................... 24
4TECHNICAL SPECIFICATIONS.............. 25
4.1 FILE FORMATS.................................... 25
4.1.1 .ISO.............................................. 25
4.1.2 XviD.............................................. 26
4.2 SPECIFICATIONS ................................. 27
4.3 PACKAGE CONTENTS .......................... 28
4.4 SAFETY INFORMATION......................... 29
4.4.1 Power on/off precautions ............. 29
4.4.2 Location and placing precautions 29
4.4.3 Electricity and power plug............ 29
4.4.4 Cables.......................................... 29
5APPENDIX................................................ 30
5.1 FAQ .................................................. 30
5.2 TECHNICAL QUESTIONS ...................... 31
5.3 ABOUT THIS MANUAL .......................... 31

Home Station User Guide
1 Introduction
The Home Station from Arkitio is a digital multimedia player as well as data storage
solution that you can connect to any PC or Mac. Transfer your favourite content such as
movies, music and pictures via USB 2.0 High Speed connection to the media player. Once
the files have been stored on the Home Station multimedia center, convenient playback of
the digital media on any standard TV is guaranteed! Enjoy your favourite films on the big
screen!
Product Dimensions: 16.9cm x 16.9cm x 5cm
6.7in x 6.7in x 2in
1.1 Package Contents
•Home Station multimedia center (no HDD included)
•Power Adapter;
Input 100-240V, Output +12V/2A
•Infrared remote control
•USB 2.0 cable
•Standard AV cable (Composite RCA/S-Video)
•Manual
Note: Package contents may vary depending on vendor & product version.
1.2 System Requirements
•Computer with USB connection for setup and file transfer
•One 3.5” IDE (Home Station 1 and 2) or SATA (Home Station 3) hard drive to be
installed into the Home Station media player
1.2.1 Supported Operating Systems:
•PC running Win2000, WinXP or Windows Vista
•Mac running Mac OS 10.2 or above
1.2.2 Supported File Systems:
•FAT32 for both Mac and Windows
•NTFS for Windows only
•HFS+ for Mac only
1.2.3 Supported Languages:
•English, French, German, Italian, Spanish, Dutch, Swedish, Hungarian, Czech, Polish,
Greek, Turkish
•Requires external font: Traditional Chinese, Simplified Chinese, Japanese, Thai,
Korean
Note: For external text subtitles it supports any language as long as the required font is
installed on the hard drive.
Page 1 / Chapter 1 - Introduction

Home Station User Guide
1.3 Supported File Formats
1.3.1 Video File Formats:
•MPEG-1 (AVI, MPG)
•MPEG-2 (AVI, VOB, ISO)
•MPEG-4 (AVI, XviD)
Note: Does not support high definition media files (HD) such as WMV9 and does not
support GMC or Qpel.
1.3.2 Video Outputs:
•Composite Video (NTSC/PAL, Composite RCA, S-Video Mini-Din)
•Home Station 2 & 3 only: Component Video (Analogue YPbPr, progressive or interlaced,
scalable up to 1280x720p or 1920x1080i)
•Home Station 2 & 3 only: VGA (1024x768)
1.3.3 Audio File Formats:
•WAV, MP3, MPEG-4 (AAC), WMA, AC3, OGG
Note: Does not support AAC files from Apple’s media player iTunes.
1.3.4 Audio Outputs:
•Dual stereo analogue audio
•Optical SPDIF digital audio (supports compressed Dolby Digital 5.1 and DTS pass
through)
1.3.5 Picture Formats:
•JPG baseline and progressive up to 8 mega pixel
1.4 Available Models
•Home Station 1: Designed for 3.5” IDE hard drives with standard video output,
including Composite and S-Video
•Home Station 2: Designed for 3.5” IDE hard drives with high definition video output,
including Composite, S-Video, Component and VGA
•Home Station 3: Designed for 3.5” SATA hard drives with high definition video output,
including Composite, S-Video, Component and VGA
The media player is not designed or intended to, and may not be used to violate any
copyrights or other IP (Intellectual Property) rights. Each user of the media player
may only use it in connection with materials legally owned by or licensed to the
user and only extend such ownership or license rights that will permit such use.
MS-DOS, Microsoft, Windows 98/ME/2000/XP/Vista are trademarks of Microsoft Corporation. Apple
Macintosh and Mac are trademarks of Apple Computer. Dolby® and Dolby® Digital are registered
trademarks of Dolby Laboratories, Inc. All other third party brands and names are the property of their
respective owners.
Page 2 / Chapter 1 - Introduction

Home Station User Guide
1.5 Detailed View
For a detailed description on how each of these ports and buttons work, please refer to the
following chapters.
1.5.1 Front View
XYZ
1. IR receiver
Infrared receiver for remote control signal
2. System LED (green)
ON = Standby (media player), Flashing = IR command received
3. Power LED (blue)
ON = Power ON, Flashing = Data access
1.5.2 Rear View
]
XYZ[\
1. ON/OFF switch 4. Digital audio output
2. Power receptacle 5. USB 2.0 High Speed connection
3. Analogue audio/video output 6. Slot for security lock
Page 3 / Chapter 1 - Introduction

Home Station User Guide
1.6 Home Station Features
1.6.1 Media Player
Connected to the TV or any other display with the corresponding video inputs, it can
playback media files such as videos, music and photos directly from its hard drive.
1.6.2 ISO Playback
Only with the Home Station media player can you create your own virtual
DVD library by storing your private collection of DVDs (using the .ISO format)
and watch them as if they were running from the original DVDs. Yes, that
includes the menu, chapter selection, audio channels, subtitles and extra
features just like on your standard DVD player.
1.6.3 USB Drive
With its USB 2.0 High Speed connection, the Home Station can be used as standard mass
storage class device. Transfer files between different computers and platforms, expand
your storage capacity or use it to backup your data in case of data loss.
Page 4 / Chapter 1 - Introduction

Home Station User Guide
Page 5 / Chapter 1 - Introduction
1.7 Quick Installation Guide
Following is a quick installation guide to get you up and running. In a few steps, we will
show you how to set up the hard drive, fill it with some media files and hook it up to your
TV system for immediate playback.
1. Open the enclosure, install and connect your hard drive but be careful not to
damage any pins or components! Jumper settings of your hard drive should be set
to Master. Mount the hard drive with the supplied screws and finish the assembly.
2. Connect the USB cable to your computer, connect the power supply to the wall
socket and turn on the power.
3. Create a single primary partition and format the drive using the FAT32, NTFS or
HFS+ file system, depending on your Operating System and personal preferences.
4. Create four (4) empty folders in the root directory, named exactly as follows:
Firmware, Movies, Music and Pictures.
5. Copy your media files to the hard drive. Store videos inside the Movies folder,
music clips inside the Music folder and images inside the Pictures folder.
6. Remove the device from your computer and disconnect the USB cable.
7. Connect the AV cable to your TV and turn on the power.
8. Use the remote control to access your files and start playback.
Note: If you do not see anything on your TV screen, make sure you have selected the
correct TV channel but if you still only see a black screen, press the “Video Output” button
on your Home Station remote control to toggle between the different TV formats until you
see the main screen. Once you have found the right video output, go to Settings, select
the proper output and press the HOME key on your remote control to save the new
settings.

Home Station User Guide
2 System Setup
2.1 HDD Installation
If your device already comes with a hard drive installed, there is no need to open the case.
Please skip this step.
1. Remove the screws.
2. Lift the top cover off the base.
3. Loosen the screws for the base.
4. Lift the hard drive frame out of the base.
5. Remove the shielding from the hard
drive frame.
6. Install the hard drive upside down in
the frame, so that the mounting holes line
up properly.
Page 6 / Chapter 3 - Web Configuration

Home Station User Guide
7. Place the shielding on top of the drive.
8. Fasten the screws from the side to
mount the hard drive to the frame.
9. Place the assembled drive back into
the base and connect the cables.
10. Fasten the screws to mount the frame
to the base.
11. Align the top cover with the base and
push lightly into place.
12. Fasten the screws to finish the
assembly.
Note: For the Home Station 1&2, set the jumper of the IDE hard drive to master or factory
default.
Page 7 / Chapter 2 - System Setup

Home Station User Guide
2.2 HDD Setup
For brand new hard drives, a partition has to be created first and it has to be formatted. Be
aware that formatting the drive will erase all existing data on it! Connect the USB drive to
your computer and turn it on.
2.2.1 Formatting on a PC
(Win2000/XP/Vista)
Use Disk Management:
•Right click on “My
Computer” and choose
“Manage”
•Select “Disk Management”
•Choose the drive you want
to format and right click on
the disk or drive field for
further commands
•Create a primary NTFS
partition (basic disk) and
format it by following the
instructions
Note: For Win2000, WinXP and Vista, we recommend formatting the drive using the NTFS
file system.
If you are using the FAT32 file system to format the drive on Win2000, WinXP or Vista, the
biggest single partition you can create will be 32GB. To create larger partitions, you need
to use a 3rd party application. The file size for a single file on FAT32 is limited to 4GB!
2.2.2 Formatting on a Mac
(Mac OS 10.2 or above)
Use the Disk Utility:
•Select “Disk Utility” in the
utilities folder
•Choose your external drive
and format it according to
your requirement
•We recommend creating
one single partition and
formatting it using “Mac OS
Extended”
Note: For Mac OS X, we recommend formatting the drive using its native file system HFS+
(Mac OS Extended).
If you are using the FAT32 file system (MS-DOS), it will also be compatible with the PC but
the file size for a single file on FAT32 is limited to 4GB!
Page 8 / Chapter 2 - System Setup

Home Station User Guide
2.3 Creating the Directories
For the Home Station media player to be able and access the files on the hard drive, four
(4) folders with the exact name as shown below must be created first! NONE of the
prerequisite folders should ever be deleted or renamed, because your Home Station
uses these exact names as a reference to locate the respective files. Inside these
folders you can have any sub-directories that are convenient to you.
Firmware - This folder is for
the Home Station firmware
files during an upgrade.
Depending on your setup, you
can create two additional
subfolders inside it.
Font - For an additional font if
your language is not
supported (not required for
English and most European
languages).
Settings - Create a text file
called “Settings.txt” and store
it inside that folder to change
the text for the screen saver
message, otherwise leave this folder emtpy. This file has to be a Unicode text file with two
strings. The first line is the default TV mode (PAL or NTSC) in which the Home Station
should start before the user applies his/her own settings. The second line is the string used
for the screen saver. This string is user editable but should not contain more than 16 letters.
Movies - This folder will contain your video files.
Music - This folder will contain your music files.
Pictures - This folder will contain your image files.
AutoBoot - Optional folder for video files (AVI & MPG) to be played automatically at boot
up. Only create this folder when you are actually using this function.
Note: If you need a directory to transfer your files from one computer to another, you may
create more directories and name them whatever you like. These folders won’t affect the
Home Station media player but they will NOT show up on your TV screen!
2.3.1 Font Support
For additional font support other than English or the already supported European
languages, we recommend copying the ‘Arial Unicode MS’ font to the “Font” folder located
in the “Firmware” directory. On a PC, you can find this font by going to the Control Panel
and then selecting Fonts. After copying the font to the hard drive, rename the file “font.ttf”.
Example: If the original file name is “arialuni.ttf,” rename it “font.ttf”. You may use any other
Unicode true type font (TTF) you have or whatever is available on the internet, but
remember to rename the file “font.ttf’ after copying it to the Home Station media player.
Page 9 / Chapter 2 - System Setup

Home Station User Guide
2.4 TV Connection
The Home Station provides high quality video and audio output when connected to your
TV set and audio system. The TV connection is straightforward:
1. Connect the Home Station media center to your TV set (NTSC or PAL) using the
included AV cable.
2. Plug in the power supply.
3. Turn on the power.
4. Use the remote control to access the files on your TV screen.
When using the default AV cable provided with the Home Station media center, you have a
choice between composite video and S-Video. For the audio, the standard is stereo
(left/right) analogue audio. If your TV does not have this connection or you prefer a
different type, please purchase some of the additional cables.
Optional cables:
•AV cable with analogue YPbPr video (progressive or interlaced) scalable up to
1280x720p or 1920x1080i.
•VGA AV cable for VGA interfaces with a resolution of 1024x768.
Note: Both YPbPr and VGA video cables provide analogue L/R audio.
From best to worst in regards of the video quality and connection, the order is as followed:
•Component YPbPr 1080i
•Component YPbPr 720p
•Component YPbPr 480p
•S-Video
•Composite
Page 10 / Chapter 2 - System Setup

Home Station User Guide
The Home Station media center offers the option for two kinds of audio connection,
analogue and digital. Use the analogue connection when connected directly to the TV, or if
you don’t own a stereo amplifier and use the digital connection when you want to listen to
digital surround sound on your home entertainment system.
2.4.1 Analogue Audio Setup
The simplest configuration is when the analogue audio
system on your TV set is used. In this case, no matter
what type of AV cable you use, the analogue audio is
provided to the stereo input of your TV by the left/right
RCA jacks.
This configuration uses only one AV cable connected to
the multi-connector port (A/V) on the Home Station.
Note: With this simple setup, you can get the highest
video quality, but the audio quality remains the same as
the stereo analogue quality provided by the TV set’s built
in speakers.
2.4.2 Digital Audio Setup
This configuration provides the
best mix of video and audio
quality.
In this setup, you can connect
any of the available AV cables
except the stereo L/R RCA
jacks to the TV set speakers.
Instead, use the digital audio
port (OPTICAL) of the Home
Station. Connect this port using
the SPDIF optical audio cable to
the digital input of your Dolby
Digital or DTS Home Theatre
Receiver/Processor.
Note: With this more advanced setup and the use of a 5.1 surround speaker system, you
can experience optimum sound as well as video quality.
Page 11 / Chapter 2 - System Setup

Home Station User Guide
2.5 USB Connection
When connected to a computer via USB, the drive operates as a standard USB 2.0 mass
storage device. Use the included cable to connect your device to the computer system.
Always connect the USB cable to your computer first, before you turn on the device. Your
system will automatically recognise the Home Station as external hard disk in which you
then can copy any file(s) you want (music, movies, pictures, and/or data).
It is strongly recommended to empty the “Recycle Bin” after your file(s) deletions to
free the HDD space.
The Home Station supports the following file formats: FAT32 (Windows & Mac) NTFS
(Windows), HFS+ (Mac). If your computer system does not have a USB 2.0 interface, but
only USB 1.1, you will receive a warning. You can still use the device with USB 1.1, but
with a slower performance level.
Note: You will always need the external power adapter when connected to the computer.
NONE of the prerequisite folders should ever be deleted or renamed, because your
Home Station uses these exact names as a reference to locate the respective files.
Inside these folders you can have any sub-directories that are convenient for you.
Firmware - This is the folder in which you can copy the latest firmware files when there is
a new upgrade for the media player firmware available.
Movies - Store all your video clips and movies inside this folder.
Music - Store all your music files inside this folder.
Pictures - Store all your images and photos inside this folder.
Note: Media files stored in different locations will not be recognised by the media player
when it is connected to the TV.
To backup your files or to transfer data between different computers and platforms, you
may create as many new folders in the root directory as you like. These will not affect the
Home Station media player and also won’t be seen on the TV screen.
Page 12 / Chapter 2 - System Setup

Home Station User Guide
2.5.1 Safe Removal
In order to safely remove the Home Station from
your system, please follow the same procedures
as for any external Plug & Play device.
PC
Double click on the taskbar icon to “Unplug or
Eject hardware”. The adjacent dialogue box will
appear, displaying the external Plug & Play
devices. In the current example, you can see
the Home Station as a USB Mass Storage
Device.
In order to remove it, select the device in the list
and then press Stop.
Click OK on the next dialogue box. The
operating system will automatically stop the
device and inform you for its safe removal. If
you are using the Home Station (e.g. you are
working on a Word document or a picture
located in its disk), the operating system will
notify you that it is unable to remove the device.
If that’s the case, close all the applications
affecting or accessing the Home Station and try
again.
Mac
Drag the drive icon into the trash bin
to eject and remove the drive.
Note: Always follow the safe removal process when disconnecting the device or it might
not be recognised on the TV.
Page 13 / Chapter 2 - System Setup

Home Station User Guide
Page 14 / Chapter 2 - System Setup
2.6 Uploading Files
To upload new files, connect the Home Station media player to you computer using the
USB connection and add the new files. If you wish to access and display the files on your
TV screen, make sure to always store the media files in the correct pre-requisite folders.
Note: You can only use one interface at the time! To upload new files, set the switch to PC
and use either the USB or the Ethernet connection but not both at the same time.
1. Connect the USB cable to your computer and the Home Station.
2. Turn on the power.
3. Erase old files and upload new ones to the media player.
4. Eject the drive, remove the USB cable and turn it off.
5. Connect it to your TV and turn it back on.
6. Done!
Note: We recommend always turning off the power and waiting for the hard drive to spin
down before you re-locate the device!

Home Station User Guide
3 TV Playback
3.1 The Remote Control
The Home Station remote has all the functional capabilities to fully control your device and
enjoy your multimedia files. The next figure describes each button’s function.
POWER On/Off
THUMBNAILS On/Off
ROTATE picture
DVD MENU
NAVIGATION BUTTONS
REPEAT chapter or title
External Text SUBTITLE position
ZOOM to image
NUMERICAL PAD
VOL +, increase volume
SHUFFLE, play all files randomly
DVD TITLE
VOL -, decrease volume
PLAY ENTER
SLOW forward function
SEARCH for Time or Title/Chapter
PREVIOUS TRACK
REPEAT between points A-B
AUDIO, toggle audio language
FAST FORWARD
PLAY ALL Files
NEXT TRACK
ANGLE, view DVD with different angle
HOME, displays the main menu
INFO, displays file information
VIDEO OUTPUT, toggle video out format
REVERSE PLAY
MUTE
SUBTITLE, toggle language subtitles
PAUSE/STEP
RETURN, to the previous menu
STOP PLAYBACK
Page 15 / Chapter 3 - TV Playback

Home Station User Guide
Button Functionality
Movies Music
HOME Displays the main menu Displays the main menu
POWER POWER On/Off POWER On/Off
SHUFFLE Play all files randomly Play all files randomly
PLAY/ENTER SELECT/PLAY movie SELECT/PLAY song
PLAY ALL PLAY ALL Files PLAY ALL Files
REVERSE PLAY REVERSE PLAY REVERSE 10 seconds of the song
PAUSE/STEP PAUSE/STEP PAUSE
FAST FORWARD FAST FORWARD FORWARD 10 seconds of the song
PREVIOUS TRACK PREVIOUS TRACK (.ISO), PREVIOUS 5 MIN
(XviD), PREVIOUS page in file list
Select PREVIOUS song and display PREVIOUS
page in file list
STOP PLAYBACK STOP PLAYBACK STOP PLAYBACK
NEXT TRACK NEXT TRACK (.ISO), NEXT 5 MIN (XviD), NEXT
page in file list
Select NEXT song and display NEXT page in file
list
ROTATE N/A N/A
ZOOM Use arrow keys to stretch image, then press Enter
and use arrow keys to scroll N/A
RETURN Return to the previous menu Return to the previous menu
TITLE DVD TITLE (.ISO files only) N/A
MENU DVD MENU (.ISO files only) N/A
MUTE Mute Mute
VOL + Increase volume Increase volume
VOL - Decrease volume Decrease volume
AUDIO Toggle audio language N/A
SUBTITLE Toggle subtitle language N/A
EXT. SUBTITLE ef Text SUBTITLE size for XviD files N/A
EXT. SUBTITLE cd Text SUBTITLE position for XviD files N/A
NUMERICAL PAD Use for Time Search Used for Time Search
INFO Displays file information (e.g. size, format, etc) Displays file information (e.g. size, format, etc)
SEARCH SEARCH for Time or Title/Chapter
applicable ONLY for .ISO files Search for Time
SLOW SLOW forward function (.ISO files only) N/A
ANGLE View DVD with different angle (.ISO files only) N/A
THUMBNAILS N/A N/A
VIDEO OUTPUT
VIDEO OUTPUT, toggle video out format. You can
switch between the individual video outputs
pressing this button. The video output selected at
any time will be shown on the screen. If you
cannot see the correct image on the TV or VGA
screen, press this button until the image appears.
VIDEO OUTPUT, toggle video out format. You can
switch between the individual video outputs
pressing this button. The video output selected at
any time will be shown on the screen. If you
cannot see the correct image on the TV or VGA
screen, press this button until the image appears.
REPEAT REPEAT chapter or title,
applicable ONLY for .ISO files N/A
REPEAT A-B REPEAT between points A-B,
applicable ONLY for .ISO files N/A
INFO 0 1 2 RETURN By pressing the buttons consecutively: INFO 0 1 2
RETURN, the unit is set to factory default
By pressing the buttons consecutively: INFO 0 1 2
RETURN, the unit is set to factory default
Page 16 / Chapter 3 - TV Playback

Home Station User Guide
Button Functionality
Pictures Settings
HOME Displays the main menu Displays the main menu and saves new settings
POWER POWER On/Off POWER On/Off (not during Firmware update)
SHUFFLE Play all files randomly N/A
PLAY/ENTER SELECT/DISPLAY image SELECT
PLAY ALL PLAY ALL Files N/A
REVERSE PLAY N/A N/A
PAUSE/STEP N/A N/A
FAST FORWARD N/A N/A
PREVIOUS TRACK Select PREVIOUS image and display PREVIOUS
page in file list N/A
STOP PLAYBACK STOP DISPLAY N/A
NEXT TRACK Select NEXT image and display NEXT page in file
list N/A
ROTATE Rotate picture N/A
ZOOM ZOOM IN (using ⇒key), ZOOM OUT (using ⇐
key), press Enter and use arrow keys to scroll N/A
RETURN Return to the previous menu Return to the previous menu and cancel
command
TITLE N/A N/A
MENU N/A N/A
MUTE N/A N/A
VOL + N/A N/A
VOL - N/A N/A
AUDIO N/A N/A
SUBTITLE N/A N/A
EXT. SUBTITLE ef N/A N/A
EXT. SUBTITLE cd N/A N/A
NUMERICAL PAD N/A N/A
INFO Displays file information (e.g. size, format, etc) N/A
SEARCH N/A N/A
SLOW N/A N/A
ANGLE N/A N/A
THUMBNAILS Image preview ON/OFF N/A
VIDEO OUTPUT
VIDEO OUTPUT, toggle video out format. You can
switch between the individual video outputs
pressing this button. The video output selected at
any time will be shown on the screen. If you
cannot see the correct image on the TV or VGA
screen, press this button until the image appears.
VIDEO OUTPUT, toggle video out format. You can
switch between the individual video outputs
pressing this button. The video output selected at
any time will be shown on the screen. If you
cannot see the correct image on the TV or VGA
screen, press this button until the image appears.
REPEAT N/A N/A
REPEAT A-B N/A N/A
INFO 0 1 2 RETURN By pressing the buttons consecutively: INFO 0 1 2
RETURN, the unit is set to factory default
By pressing the buttons consecutively: INFO 0 1 2
RETURN, the unit is set to factory default
(not when you select Firmware update)
Page 17 / Chapter 3 - TV Playback

Home Station User Guide
3.2 Unique Control Keys
The Home Station remote control has a full set of buttons in order to provide the user with
complete control of the device. The following paragraphs describe the functions of some
more unique buttons; while in the previous table, there is a list of all the keys and their
functions.
VIDEO OUTPUT
This key toggles the video output format. You can switch between the individual video
outputs pressing this button. If you cannot see the Home Station main screen on the TV or
VGA display, press this button until an image appears. The video indication banner
appears for a few seconds each time you press the VIDEO OUTPUT button and also each
time you switch on the Home Station.
Toggling the video output does not save the video settings. To do so, go to “Video
Settings” in the Settings menu, select the video output and press HOME to save it.
SUBTITLE cd
This key allows you to position the external subtitles of XviD movies. When it is pressed, a
dual set of white template lines will appear for you to position using the cdkeys. Press
the button again when done positioning.
Use the same button to also adjust the font size for the external subtitles. After pressing
this button, use the efkeys to increase or decrease the size. Press the button again
when done resizing.
THUMBNAILS
Pressing this key turns the image preview of your photos ON or OFF. Loading the preview
might take a while, depending on the size of the image, so we recommend leaving this
function turned off.
SHUFFLE
Pressing this key will shuffle all the content in the present folder randomly and start playing
back all files inside the folder continuously.
INFO, 0, 1, 2, RETURN
To return to factory default settings, press the above keys successively.
0 INFO 0 and 1 INFO 1
Press the HOME button to go to the main screen and then press 0 INFO 0 to temporarily
turn off the on-screen display (OSD). To turn it back on, press the HOME button and then
press 1 INFO 1. This setting will reset itself to “enabled” after the unit has been restarted.
As an example, before a slideshow presentation, this function can be used to turn off all
on-screen messages.
Page 18 / Chapter 3 - TV Playback
This manual suits for next models
2
Table of contents