AROFLY ELITE User manual
Quick Start Guide
Intelligent Dynamic Pressure Technology

PACKAGE CONTENTS
Package Box
Elite GPS Bike
Computer
Wrench toolPresta Valve Adaptor
AROFLY Power
Meter
Cadence
Sensor
Computer Mount
Micro USB CableRubber Tie
Hex Wrench
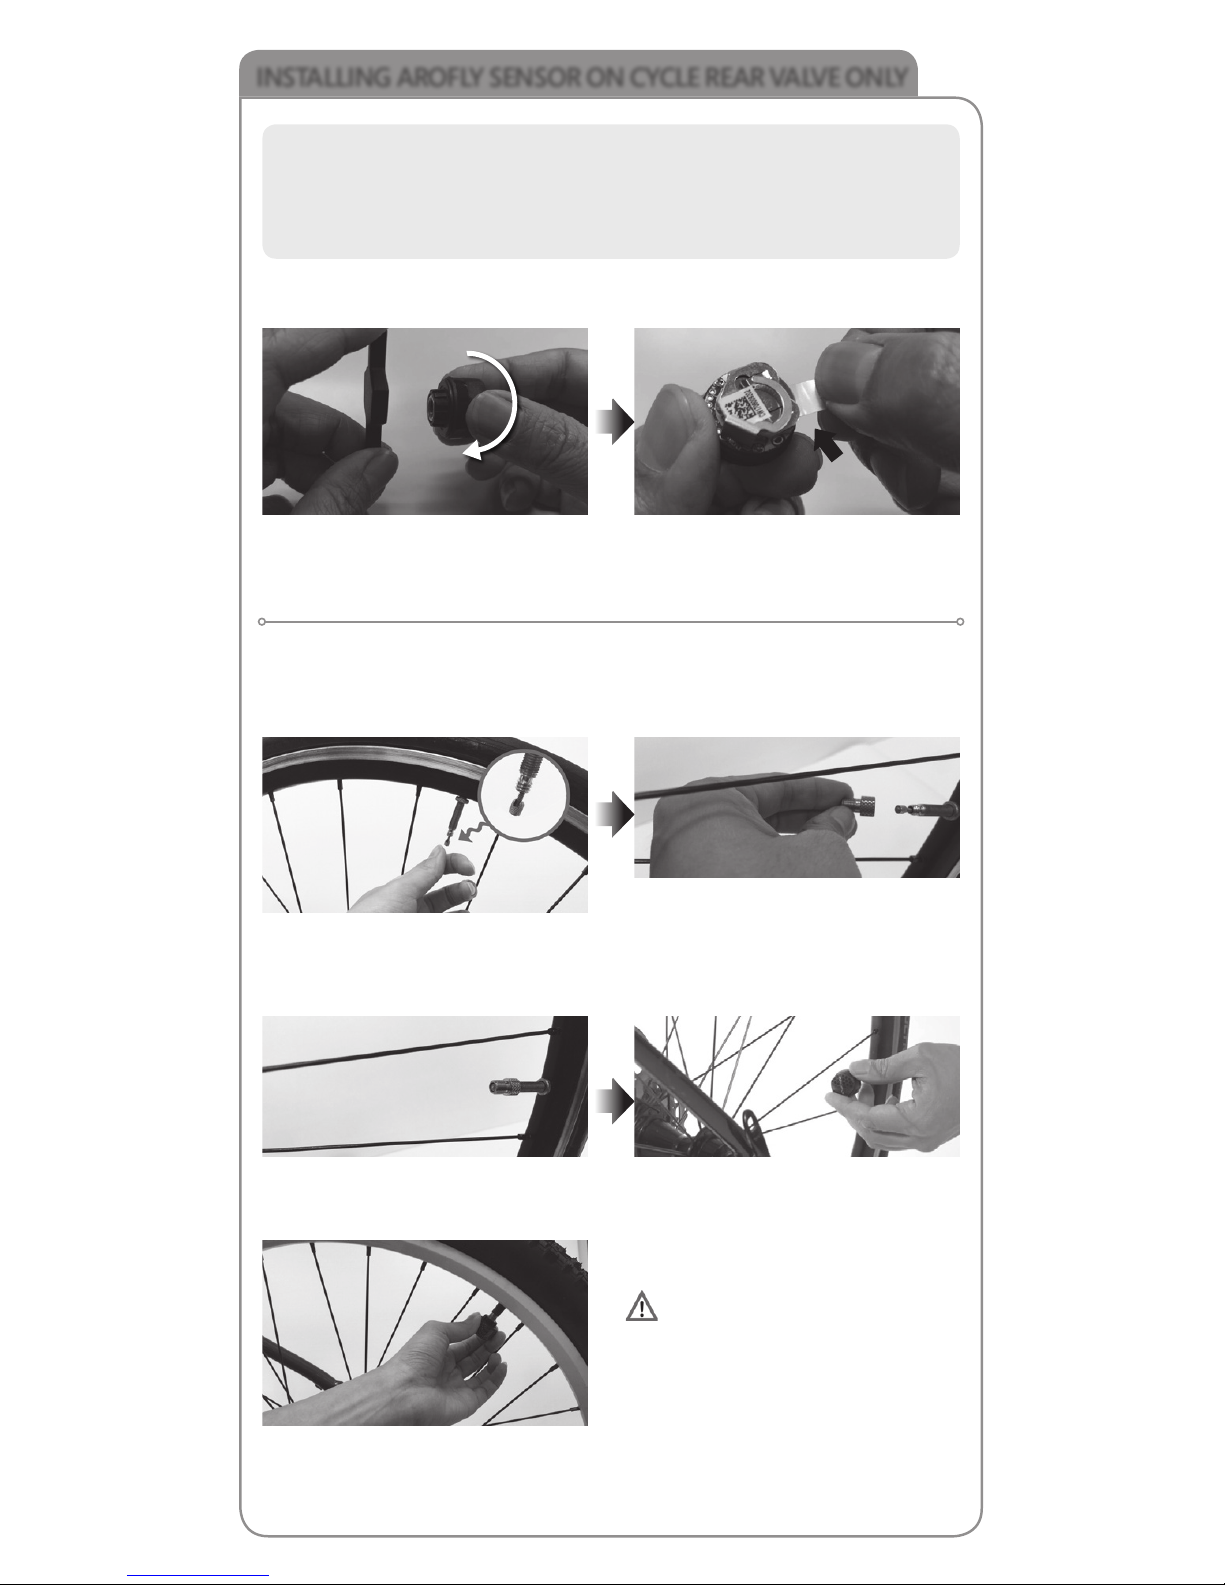
INSTALLING AROFLY SENSOR ON CYCLE REAR VALVE ONLY
Before using AROFLY sensor, twist open the cap, then remove the INSULATION
TAB, from between the battery contact.
Tips:
Before installing AROFLY sensor to the rear tire valve, please inflate the bike
tires to appropriate tire pressure as marked on the tire. Suggest the road
bike to be 90~120psi (6~8bar); Mountain bike to be 35~65psi (2.4~4.5bar)
Place Wrench onto the AROFLY Base.
Twist counter-clockwise to open
AROFLY Cap.
Pull and remove Insulation Tab from
AROFLY to connect battery. Replace
the cap to AROFLY.
Insulation Tab
Installing AROFLY to the cycle rear valve: If it is a Schrader valve, please install
directly; If it is a Presta valve, please use the Presta valve adaptor first, included
in the kit, before installing the AROFLY sensor.
If it is a Presta valve, please loosen
"the valve pin" to the top-end of the
Presta valve shaft.
Install "Valve Adaptor" on Presta
valve.
Ensure the correct side of the
Adaptor to the Valve.
Twist Adaptor firmly on the Presta
valve.
If it is a Schrader valve, AROFLY can
be installed directly onto the rear
valve (no need for any adaptor).
Install AROFLY on the Adaptor.
Be sure to twist tightly to avoid
air leakage, and to ensure good
contact with valve pin.
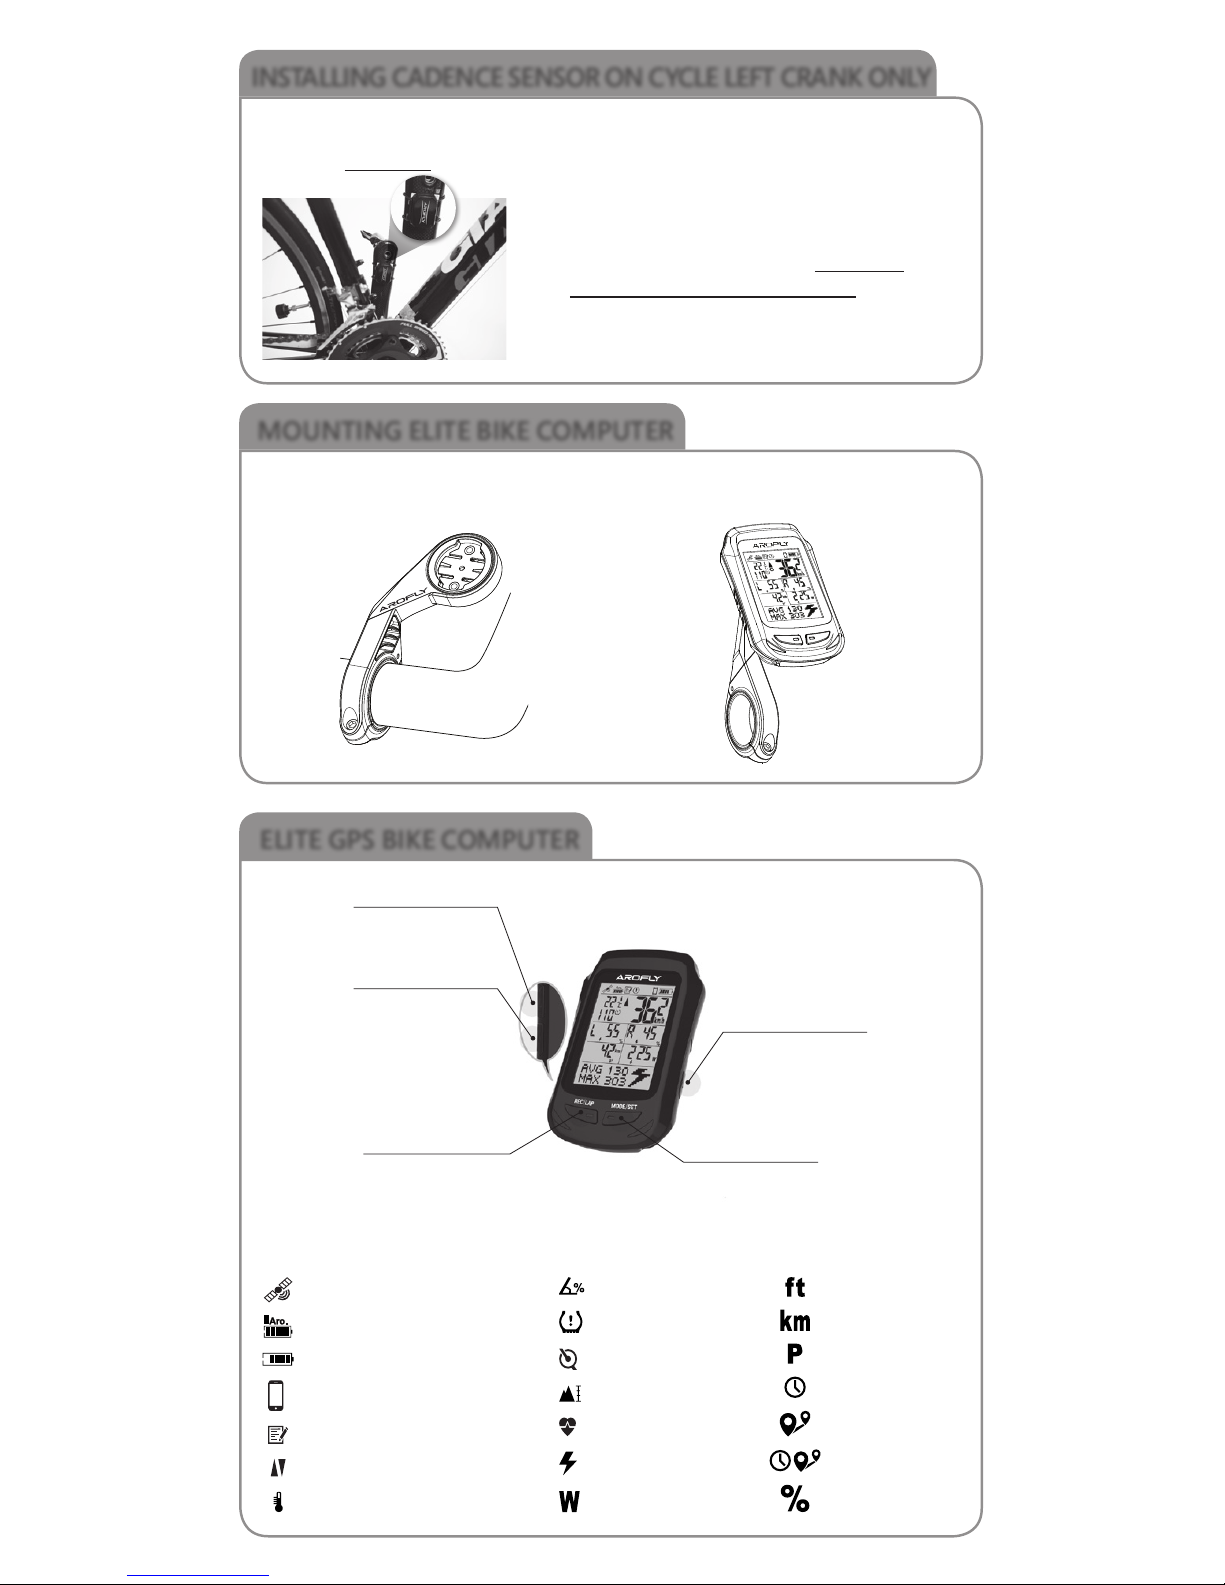
INSTALLING CADENCE SENSOR ON CYCLE LEFT CRANK ONLY
Using the rubber ties included, secure the cadence sensor to the inner side of
the cycle left crank.
Attach the cadence sensor to the inner side of the
cycle left crank for best performance
Tighten the computer mount on the handlebar with the hex wrench, included.
MOUNTING ELITE BIKE COMPUTER
KEYS
ELITE GPS BIKE COMPUTER
DISPLAY ICONS
•Press once to go back.
•Press and Hold for 3 seconds to
turn on/off linking Smart Phone.
• Press once to go forward.
•Press and Hold for 3 seconds
to clear trip time, trip distance.
•Press to start recording.
•Press and Hold for 3 seconds to STOP RECORDING.
•In recording, press for LAP 1,2,3, etc.
• Power on/off : Press and Hold for 3 seconds.
• Backlight on/off : Press once.
•Press and Hold for 3 seconds to enter/exit SETTING MODE.
• In Setting Mode, press it to confirm.
•In Biking Mode, press for next mode.
GPS reception
AROFLY Sensor Battery Indicator
ELITE Meter Battery Indicator
Comparison of the current speed with
the average speed
Temperature
Smart Phone connection
Recording
Gradient Percentage
Rear Tire Pressure
Current Cadence
Current Altitude
Current Heart Rate
Current Watt
Unit of Watt
Unit of feet
Unit of Kilometer
Time of PM
Time
Trip Distance
Trip Time
Percentage
Previous Key
Next Key
REC/LAP (Left Key) MODE/SET (Right Key)
ON/OFF/BACKLIGHT
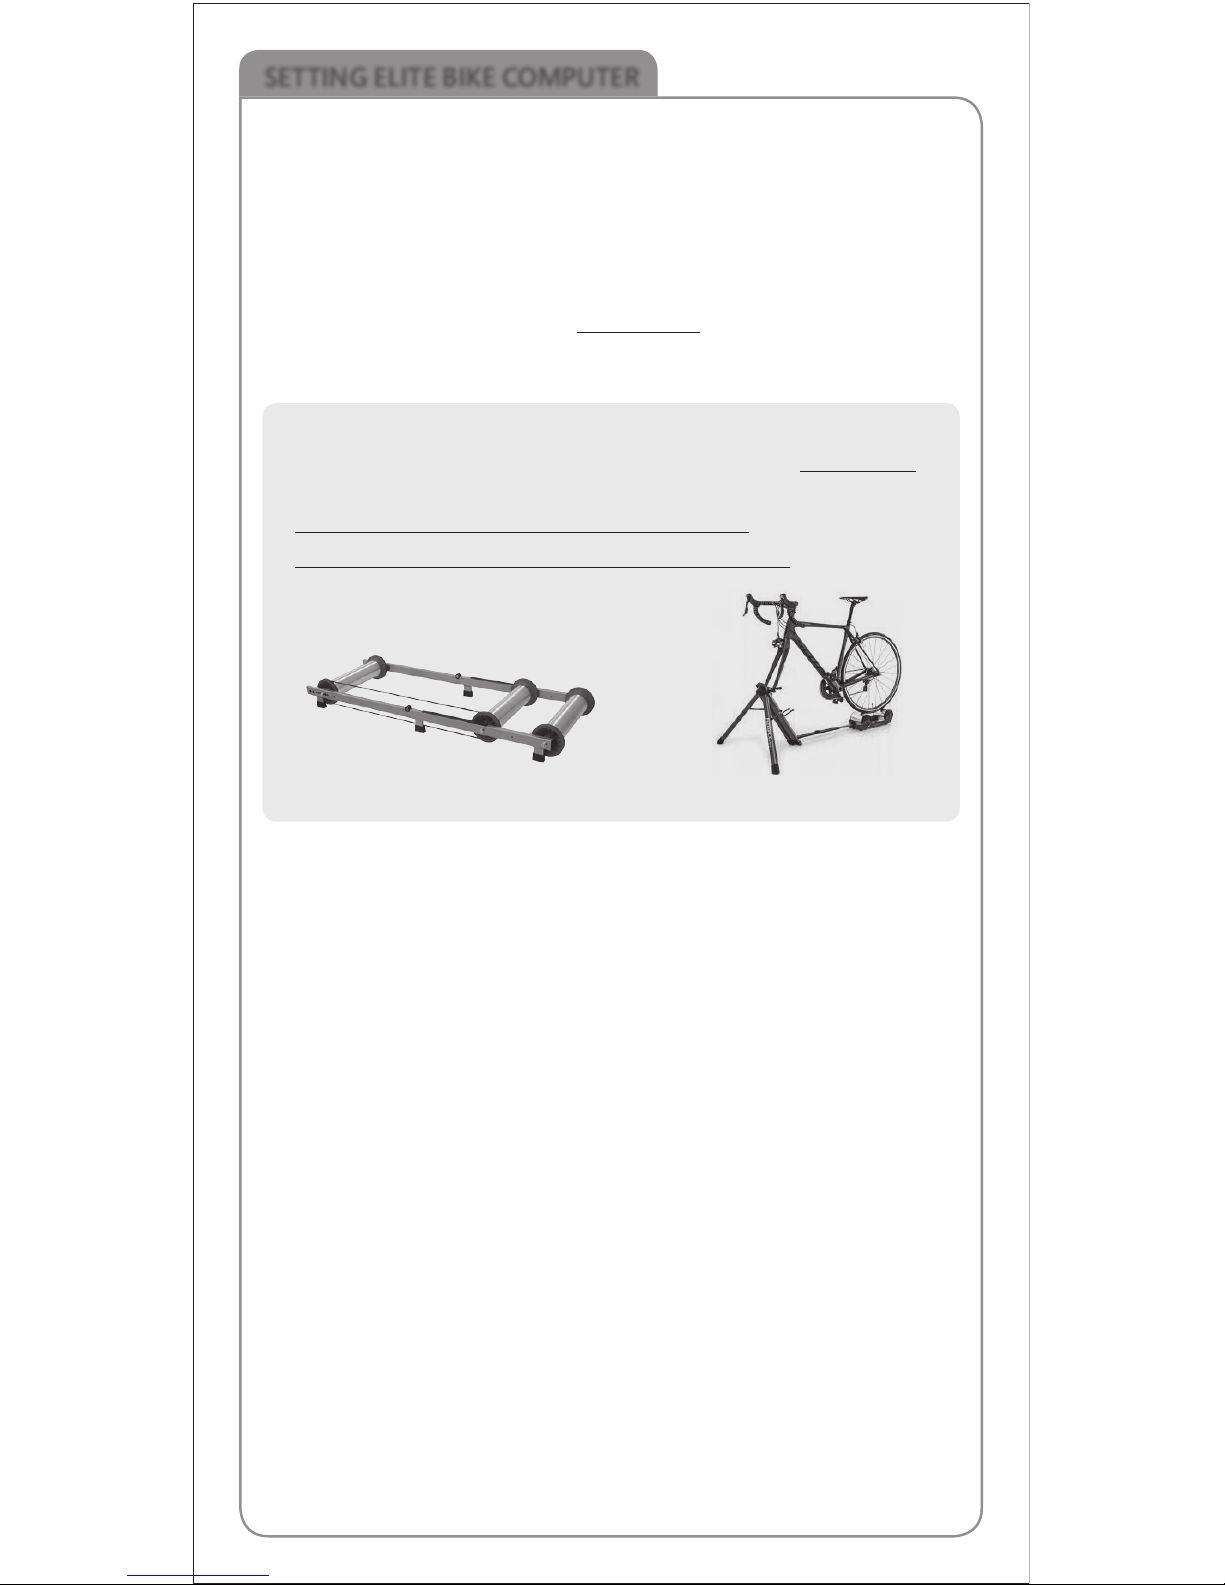
SETTING ELITE BIKE COMPUTER
Press MODE/SET key for 3 seconds to enter SET MODE
The following data must be set in the ELITE BIKE COMPUTER
1. SELECT OUTDOOR OR INDOOR
In set mode, press right key and go to INDOOR →Press left key to enter
→Press previous or next key to select →when selected, press right key to
confirm and out
• If riding outdoor, please select INDOOR OFF
• If riding indoor, press previous or next key to ON and select your bike
trainer
Tips:
• IMPORTANT: When riding outdoor, please esure you set “INDOOR OFF”
• AROFLY measures power by tire pressure variation. When riding indoor,
it only works on bike trainer with rollers for rear tire.
• AROFLY, performs better on rollers without any resistance.
Roller Trainer
2. PAIRING SENSORS
The AROFLY sensor and Cadence sensor were already paired with the
ELITE bike computer before leaving factory. If they are not connected,
please pair again by following the steps below
At set mode, press right key and go to SET SENSOR →Press left key to enter
→Press previous or next key to AROFLY →Press left key to SEARCH (at the
same time, shake or tap AROFLY sensor to wake up) →When paired, press
right key to confirm and out
(Pairing Cadence sensor or Heart Rate sensor please follow the same steps
as above)
3. SELECT BIKE AND INPUT WHEEL SIZE
At set mode, press right key and go to BIKE →Press left key to
enter →Press previous or next key to BIKE 1 or 2 →Set Bike 1, press left
key to enter →Press previous or next key to select your bike type, (Road
Bike, Mount Bike, Small Wheel) →Press left key to select wheel size (from
MANUAL or TIRE LIST) →Select or Input, press right key to confirm and out
4. SET USER (INPUT USER WEIGHT)
At set mode, press right key and go to SET USER →Press left key to set
Male or Female (Press previous or next key to select) →Press left key to set
birthday (Press previous or next key to select) →Press left key to set user
weight (Press previous or next key to select) →When selected, press right
key to confirm and out
SETTING ELITE BIKE COMPUTER
5. USER PAGE (SELECT FAVORITE BIKE DATA TO DISPLAY)
There are 3 user pages available for selecting favorite data
Steps to input your favorite data page
At set mode, press right key and go to USER PAGE →Press left key to
enter →Press previous or next key to Page 1, 2, 3 →Select Page 1, press
left key to SET ON or OFF →Press left key to data page selecting →Press
previous or next key to select, press left key to next data column →Select all
data columns, press right key to confirm and out.
(Set PAGE 2 and 3 is the same steps as above)
The other settings of “SET CLOCK, SET UNIT, LANGUAGE, AUTO WAKE UP,
SET KEYTONE, SET ODO, SET ALTI”, please press left key to enter, and press
previous or next key to select, and then press right key to confirm and out.
Follow the default in the meter to select
Tips:
The middle 4 data columns of icons refers
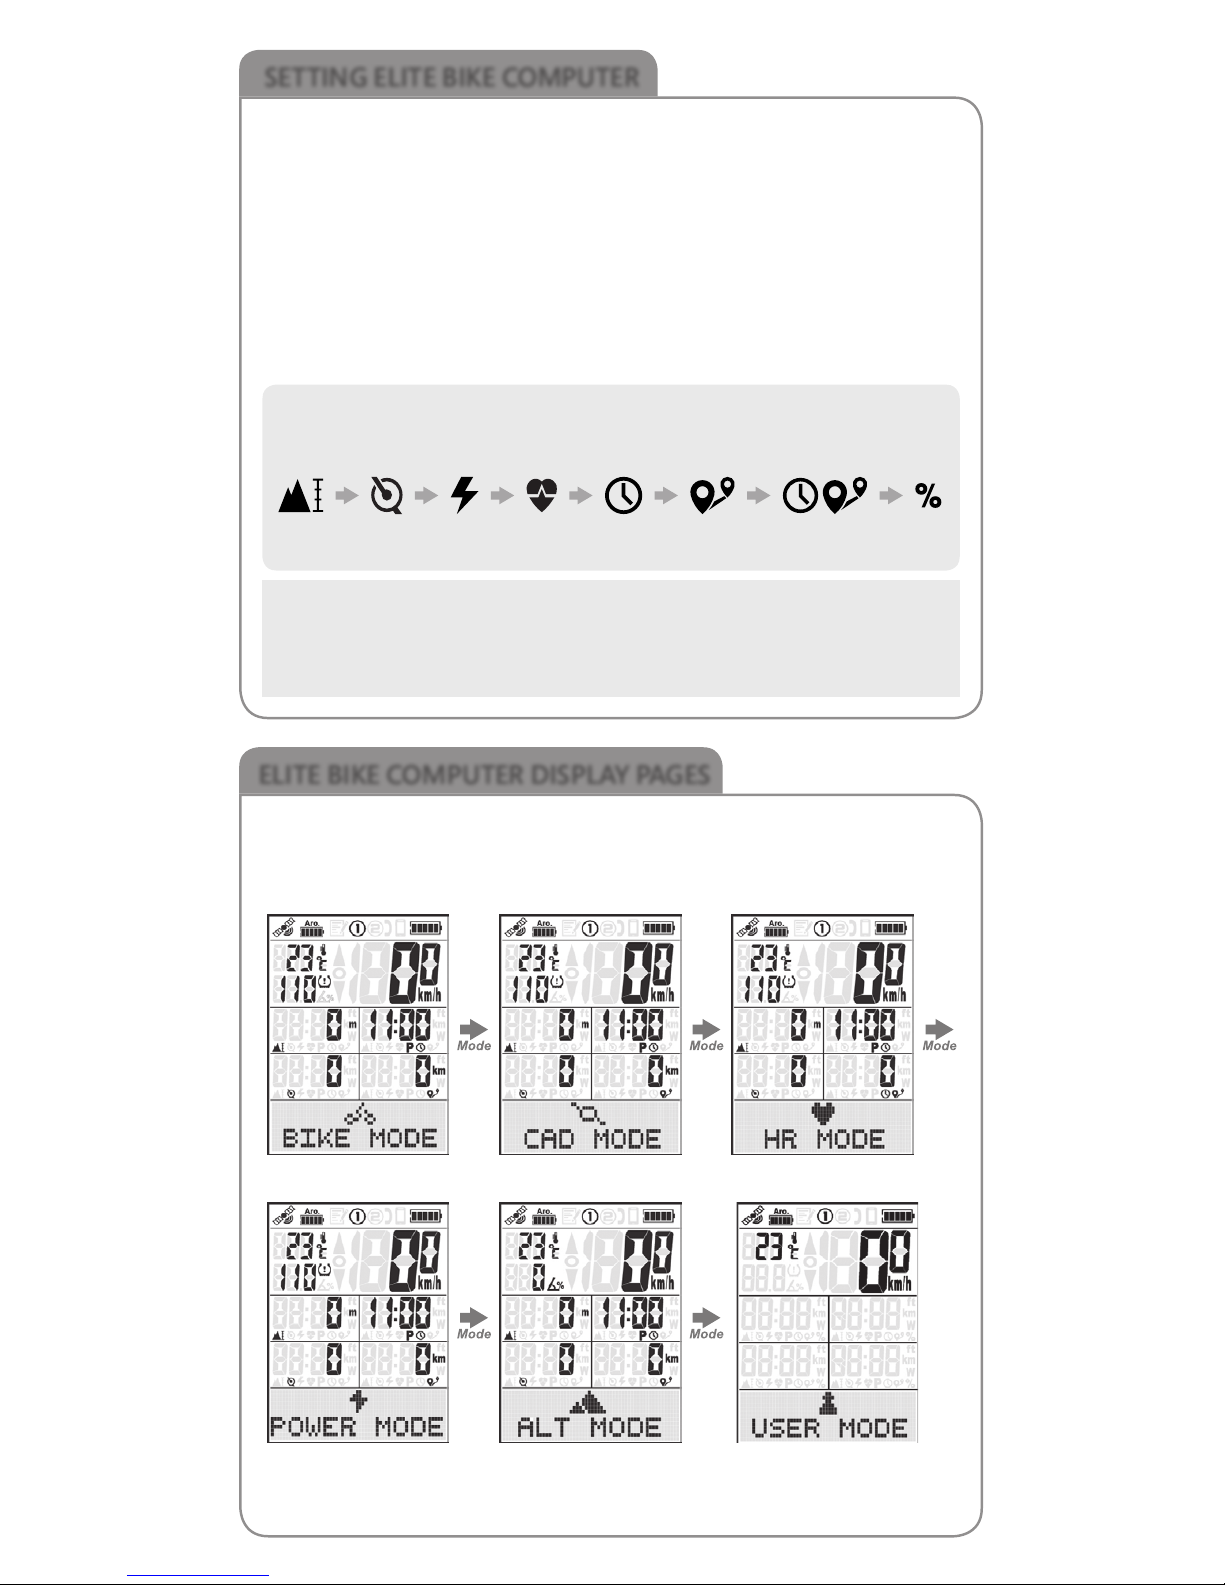
ELITE BIKE COMPUTER DISPLAY PAGES
When in display page, press right key (MODE/SET) to switch.
The USER MODE is displayed when you SET USER PAGE.
Press previous or next key, to see the sub-pages of each mode
BIKE MODE →CAD MODE →HR MODE →
POWER MODE →ALT MODE →
The display pages are as below
USER MODE
Altitude →Cadence →Power →Heart Rate →Time →Riding Distance →Riding Time →L/R%
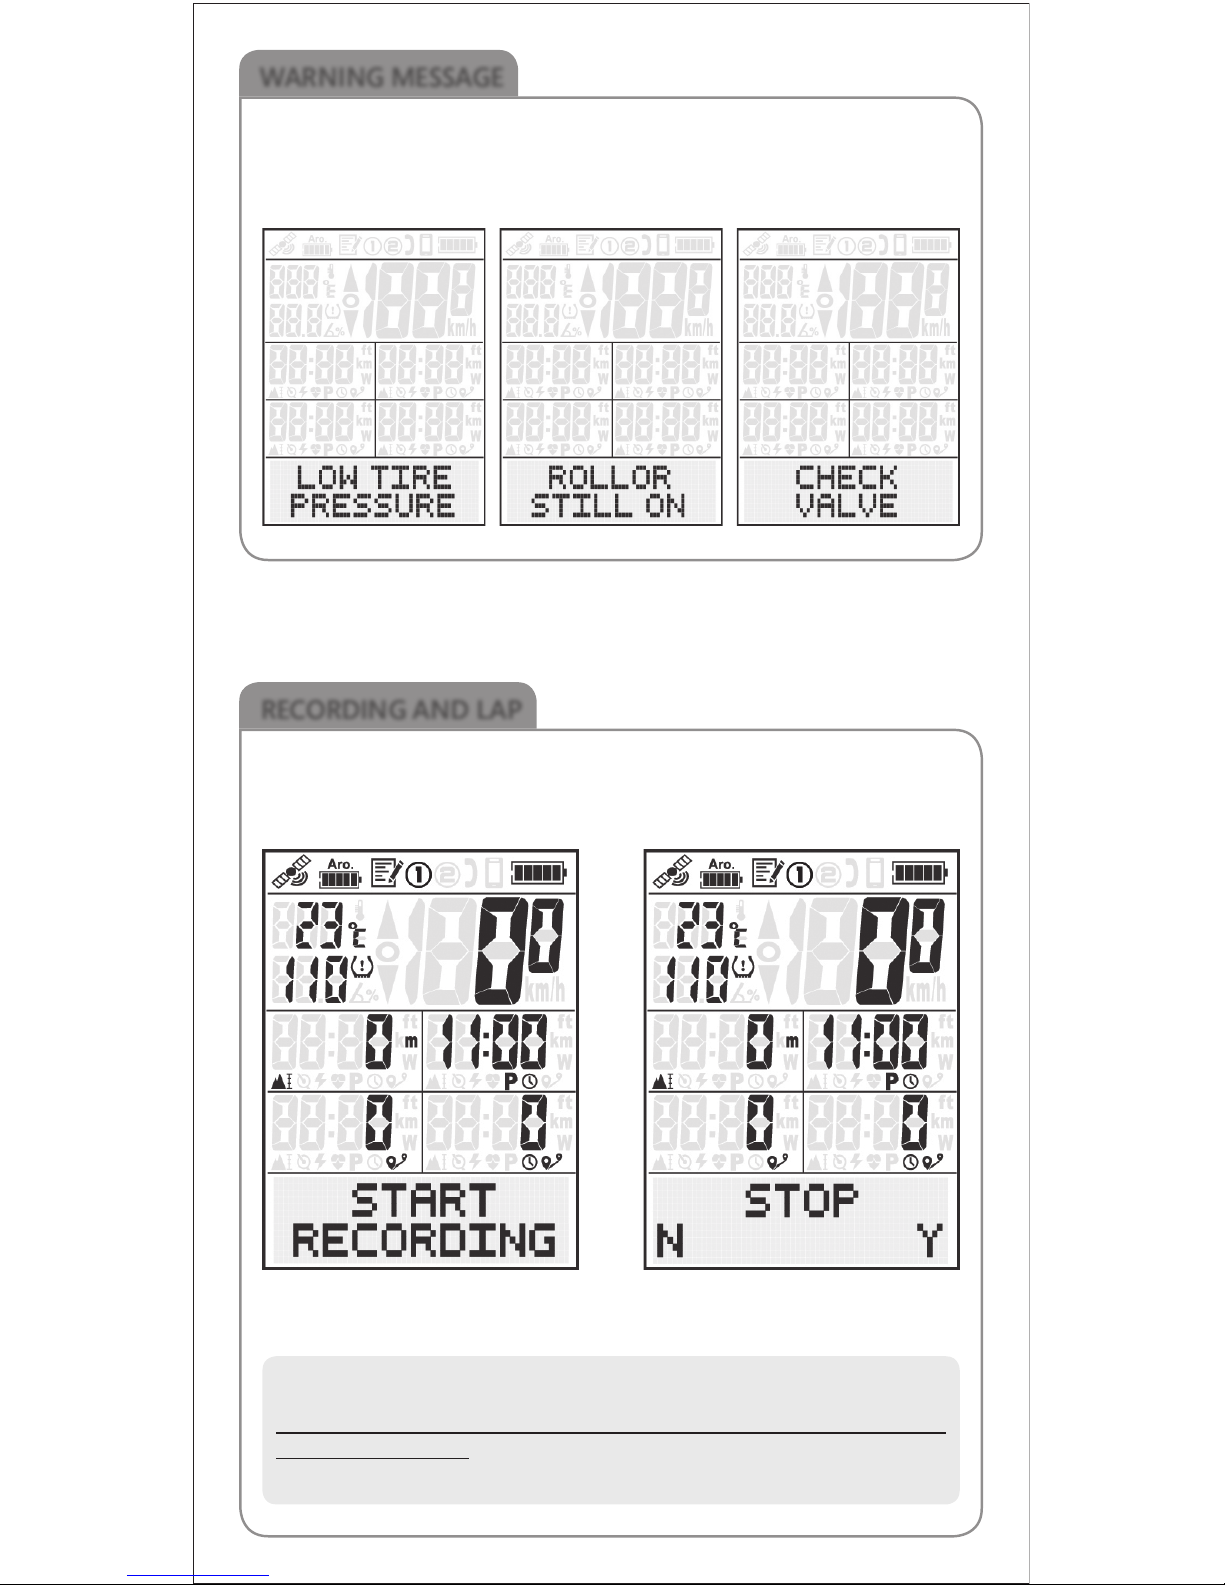
WARNING MESSAGE
LOW TIRE PRESSURE: inflate your tire pressure
INDOOR STILL ON: go to set mode and turn it off
CHECK VALVE: Correctly install AROFLY sensor again
RECORDING AND LAP
Press left key (REC/LAP) to START
RECORDING Screen shows
recording icon on top
Press left key (REC/LAP) again
and Hold 3 seconds to STOP
RECORDING
While in recording, press left key (REC/LAP) to start LAP 1, LAP 2….
Tips:
When you finish biking , please Press left key (REC/LAP) and hold 3 seconds
to STOP RECORDING.
Save file and upload to AROFLY CLOUD to review your riding data.

1. USB cable connect ELITE Meter and PC (personal computer)
Select the recorded files from the ELITE meter to upload to AROFLY CLOUD
2. Use Smart Phone AROFLY APP to wireless upload to AROFLY CLOUD
AROFLY Sensor
Product Name AROFLY Power Meter
Size Diameter 20mm/ Height 20 mm
Weight 7.2g (Battery excluded)
Battery CR 1632
Working Hours 1500 Kilometers
Water Proof IPX6
Transmission By Bluetooth
ELITE GPS Bike Computer
Product Name ELITE GPS Bike Computer
Size 93.3 mm x 61.3 mm x 16.7 mm
Weight 70g
Battery Rechargeable Battery
Working Hours 20 hours without backlight
Water Proof IPX6
Transmission By Bluetooth
UPLOAD TO AROFLY CLOUD AND REVIEW
SPECIFICATION
Cadence Sensor
Product Name Cadence Sensor
Size 37.6 mm x 33.3 mm x 10.3 mm
Weight 10.3g
Battery CR 2032
Working Hours 350 hours
Water Proof IPX6
Transmission By Bluetooth / ANT+
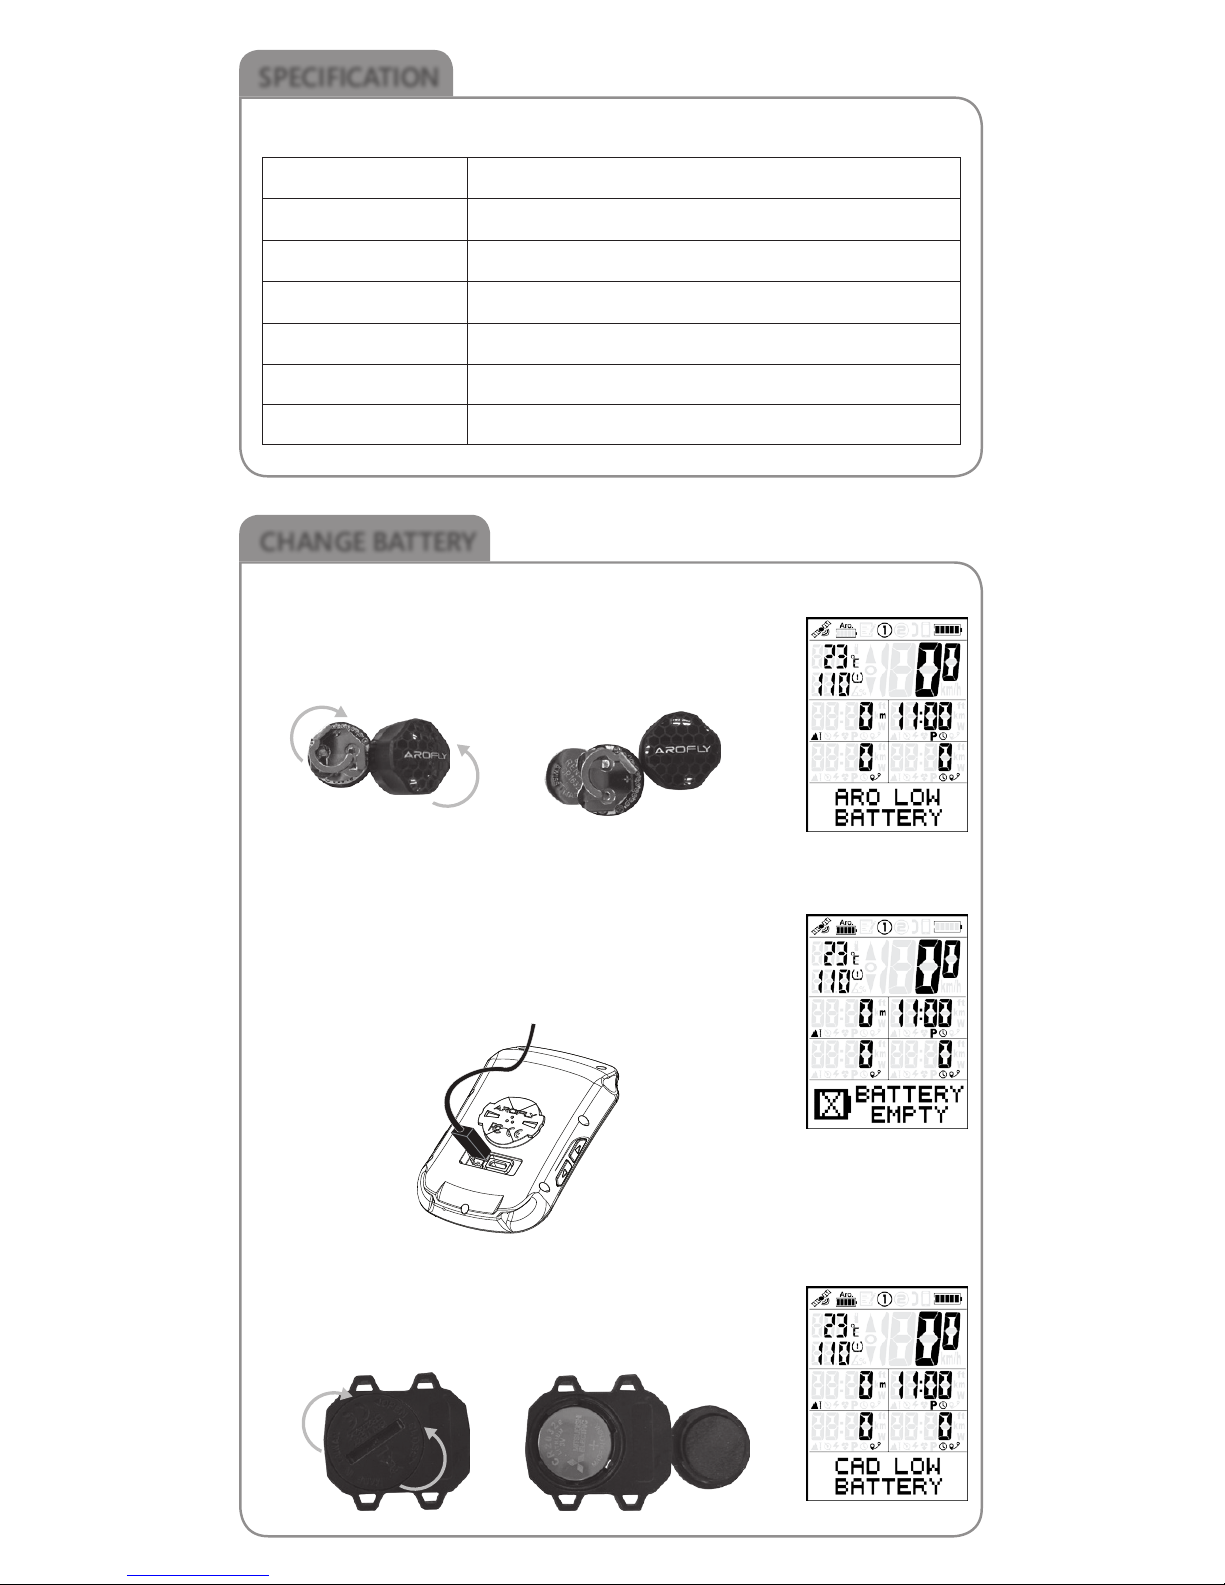
CHANGE BATTERY
Take out batteryOpen Arofly Cap
ELITE GPS Bike Computer
When Bike Computer battery level shows low on the
meter indicator, Please use the USB cable in the package
to charge the bike computer.
Cadence Sensor
When Cadence Sensor battery level shows low on the
meter indicator, replace with New battery:
AROFLY Sensor
When AROFLY Sensor battery level shows low on the
meter indicator, replace with New battery:
SPECIFICATION
C
l
o
s
e
O
p
e
n
C
l
o
s
e
O
p
e
n

ATTENTION
1. Please follow the bicycle manufacturer's instructions to regularly check your
cycle tire-pressure, that it is at optimum level before installing AROFLY on
the tire valve.
2. AROFLY is compatible with most Presta & Schrader cycle valves, but may not
fit on other types of cycle valves.
3. AROFLY APP is compatible with most iOS and Android systems for smart
phones, but does not guarantee to work with other operating systems due
to the diversity.
4. ELITE Bike Computer follows the "Standard Bluetooth profile" and may work
with certain heart-rate monitors (devices) in the Bluetooth version. But, does
not guarantee compatibility with certain heart-rate monitors because of the
system diversity.
5. For safety reasons, we do not suggest using AROFLY indoors with bike
speed over 50 km/hr. And for AROFLY to work best, the rear tire must touch
the road or roller with the pedal moving forward, without any other extra
support or any resistance.
6. AROFLY power meter is NOT suitable on tubeless tires, because the sealant
inside the tube, will damage the AROFLY sensor.
7. Please be sure to update the software to the latest version.
WARRANTY
1. AROFLY comes with a 12 month warranty against manufacturer's defects,
or failure to work within the 12 months, from date of original purchase.
Warranty cannot be transferred.
2. Warranty does not cover failure from, neglect, accidental damage, due to
dropping, crushing, misuse, and failure to follow the instruction manual.
3. If the AROFLY is opened without the manufacturer's assistance or any
tampering with the electronic components, it will COMPLETELY VOID the
WARRANTY.
Design & Manufacture by
TBS Group Corporation
www.arofly.com / Made in Taiwan
Table of contents
Other AROFLY Bicycle Accessories manuals


Popular Bicycle Accessories manuals by other brands


Specialized
Specialized Elite CylcoComputer user manual

Sigma
Sigma BC 16.16 manual

Playcore
Playcore Dero Setbacks installation instructions

VDO Cyclecomputing
VDO Cyclecomputing x3dw instruction manual

Cateye
Cateye RAPID X2 manual

buratti meccanica
buratti meccanica Clorofilla Trail Use and maintenance manual


