manuals.online logo
Brands
  1. Home
  2. •
  3. Brands
  4. •
  5. Aroma
  6. •
  7. Skillet
  8. •
  9. Aroma AFP-1600S User manual

Aroma AFP-1600S User manual

Other manuals for AFP-1600S

1

Other Aroma Skillet manuals

Aroma SuperPot ASP-137 Technical specifications

Aroma

Aroma SuperPot ASP-137 Technical specifications

Popular Skillet manuals by other brands

Breville Thermal Pro BEF460 Instruction book

Breville

Breville Thermal Pro BEF460 Instruction book

Sunbeam SK6400 Instruction/recipe booklet

Sunbeam

Sunbeam SK6400 Instruction/recipe booklet

Crux 14620 instruction manual

Crux

Crux 14620 instruction manual

Vremi Sizzlesaurus Sauté manual

Vremi

Vremi Sizzlesaurus Sauté manual

IKEA KAVALKAD manual

IKEA

IKEA KAVALKAD manual

Fagor SARTENES manual

Fagor

Fagor SARTENES manual

IKEA TROVARDIG manual

IKEA

IKEA TROVARDIG manual

Presto 6851 instructions

Presto

Presto 6851 instructions

Stalgast 974000 user manual

Stalgast

Stalgast 974000 user manual

Presto Slimline 06858 instructions

Presto

Presto Slimline 06858 instructions

Blodgett BLG-30G Installation operation & maintenance

Blodgett

Blodgett BLG-30G Installation operation & maintenance

Proctor-Silex 38526 instruction manual

Proctor-Silex

Proctor-Silex 38526 instruction manual

NuWave NuWave Medley XL user manual

NuWave

NuWave NuWave Medley XL user manual

Presto Electric Skillet instructions

Presto

Presto Electric Skillet instructions

Coleman 9988-A41 Instructions for use

Coleman

Coleman 9988-A41 Instructions for use

Jata electro PE539 Instructions for use

Jata electro

Jata electro PE539 Instructions for use

Mellerware ALONZO manual

Mellerware

Mellerware ALONZO manual

Premier ED-0271 instruction manual

Premier

Premier ED-0271 instruction manual

manuals.online logo
manuals.online logoBrands
  • About & Mission
  • Contact us
  • Privacy Policy
  • Terms and Conditions

Copyright 2025 Manuals.Online. All Rights Reserved.

www.AromaCo.com
Sartén eléctrico
de acero inoxidable
Manual de instrucciones
AFP-1600S
Stainless Steel
Electric Skillet
Instruction Manual
AFP-1600S
www.AromaCo.com
Congratulations on your purchase of the Stainless Steel Electric
Skillet!
Your new electric skillet is perfect for a wide variety of meals—from hearty
breakfast classics to delicious dinner favorites. The sturdy 18/10 stainless steel
construction is designed to stand the test of time.
The Stainless Steel Electric Skillet’s elegant design makes it an ideal serving dish for
entertaining as well. Cook a meal to be served in the skillet and cut down on
dishes by serving in the same pan! Just remove the temperature control and the
skillet is ready to be brought to the table.
This manual contains instructions for the use of your new electric skillet. For a
wealth of recipes for your electric skillet, replacement parts and more kitchen
solution ideas, please visit us online at www.AromaCo.com.
Please read all the instructions before first use.
Published By:
Aroma Housewares Co.
6469 Flanders Drive
San Diego, CA 92121
U.S.A.
1-800-276-6286
www.AromaCo.com
© 2010 Aroma Housewares Company All rights reserved.
¡Felicidades en la compra de su sartén eléctrico de acero
inoxidable!
Su nuevo sartén eléctrico es perfecto para una gran variedad de comidas,
desde unos clásicos y vigorosos desayunos, hasta una suculenta cena clásica. Su
robusta construcción de acero inoxidable 18/10 está diseñada para resistir el
paso del tiempo.
El elegante diseño del sartén eléctrico aroma de acero inoxidable lo hace ideal
para servir platillos, al tiempo que entretiene a sus invitados. ¡Cocine una comida
para ser servida en el sartén y evite así el uso de vajillas! Solo quítele el control
de temperatura y el sartén está listo para ser llevado a la mesa.
Este manual contiene instrucciones para el uso de su nuevo sartén eléctrico.
Para un caudal de recetas para su sartén eléctrico, refacciones de repuesto y
mas ideas con soluciones de cocina, por favor visítenos en línea al:
www.AromaCo.com.
Por favor lea todas las instrucciones antes de su primer uso.
Publicado Por:
Aroma Housewares Co.
6469 Flanders Drive
San Diego, CA 92121
U.S.A.
1-800-276-6286
www.AromaCo.com
© 2010 Aroma Housewares Company Todos los derechos reservados.
1
1
IMPORTANT SAFEGUARDS
MEDIDAS IMPORTANTES DE SEGURIDAD
1. Importante: Lea todas las
instrucciones con cuidado antes de
usarlo por vez primera.
2. No toque superficies calientes,
siempre use las manijas o guantes
de cocina.
3. Asegúrese de que todas las
agarraderas estén armadas y
apropiadamente aseguradas.
4. Úsese solo sobre una superficie
nivelada, seca y con una superficie
resistente al calor.
5. Como protección contra una
descarga eléctrica, no sumerja la
base del sartén, los cables, enchufes
o el control de temperatura, en
agua o en cualquier otro líquido.
6. Una supervisión estrecha es
necesaria cuando se use un
aparato electrodoméstico cerca de
niños. Este aparato no debe ser
usado por niños.
7. Desenchúfelo de la conexión de
salida cuando no esté en uso y
antes de limpiarlo. Permita que el
sartén y sus accesorios se enfríen
completamente antes de quitarle o
adherirle partes.
8. No opere ningún aparato con un
cable o enchufe dañado, o bien
después de que el aparato haya
funcionado mal, se haya caído,
dañado de alguna manera, o no
esté funcionando apropiadamente.
Contacte al servicio a clientes de
Aroma®para que sea examinado,
reparado, o ajustado.
9. El uso de accesorios o refacciones
no recomendados por Aroma®
puede causar fuego, descargas
eléctricas o alguna lesión.
10. No se use a la intemperie.
11. No permita que el cable cuelgue de
la mesa o del mostrador.
12. Extrema precaución debe usarse
cuando se mueva este aparato, o
cualquier otro, que contengan
aceite u otros líquidos calientes.
13. Siempre adhiera el medidor de
temperatura al aparato primero y
después enchufe el cable eléctrico.
Para desconectarlo, ponga el
control de la temperatura en “OFF”
y después desconecte el cable de
la pared.
14. No permita que el cable haga
contacto con superficies calientes.
15. Cuando, en cualquier contenedor,
se calienta aceite a altas
temperaturas, se pueden provocar
gases inflamables. No exponga una
flama con estos gases ya que
puede ser peligroso. Nunca cubra el
sartén mientras esté calentando
aceite.
16. No lo ponga cerca de un
calentador o de un horno caliente.
17. No toque, cubra o obstruya el
conducto de ventilación arriba de
la tapa del sartén durante, o
después de usarse, ya que está
extremadamente caliente y puede
causar quemaduras y lesiones.
18. No limpie con cojinetes metálicos ya
que pueden desprenderse
pequeñas partículas y hacer
contacto con partes eléctricas,
creando el riesgo de una descarga.
Estos cojinetes metálicos también
pueden dañar el acabado del
sartén.
19. Cuando use el sartén evite cambios
súbitos de temperatura.
20. Úsese solo con corriente alterna de
120V AC.
21. Solo utilice la sonda del Control de
Temperatura que incluimos para
operar este sistema.
22. No se use este aparato para otros
usos que el previsto.
Cua do se use aparatos electricos, siempre deberá observarse las
precaucio es básicas de seguridad, i cluye do las siguie tes:
GUARDE ESTAS INSTRUCCIONES
Basic safety precautio s should always be followed whe usi g electrical
applia ces, i cludi g the followi g:
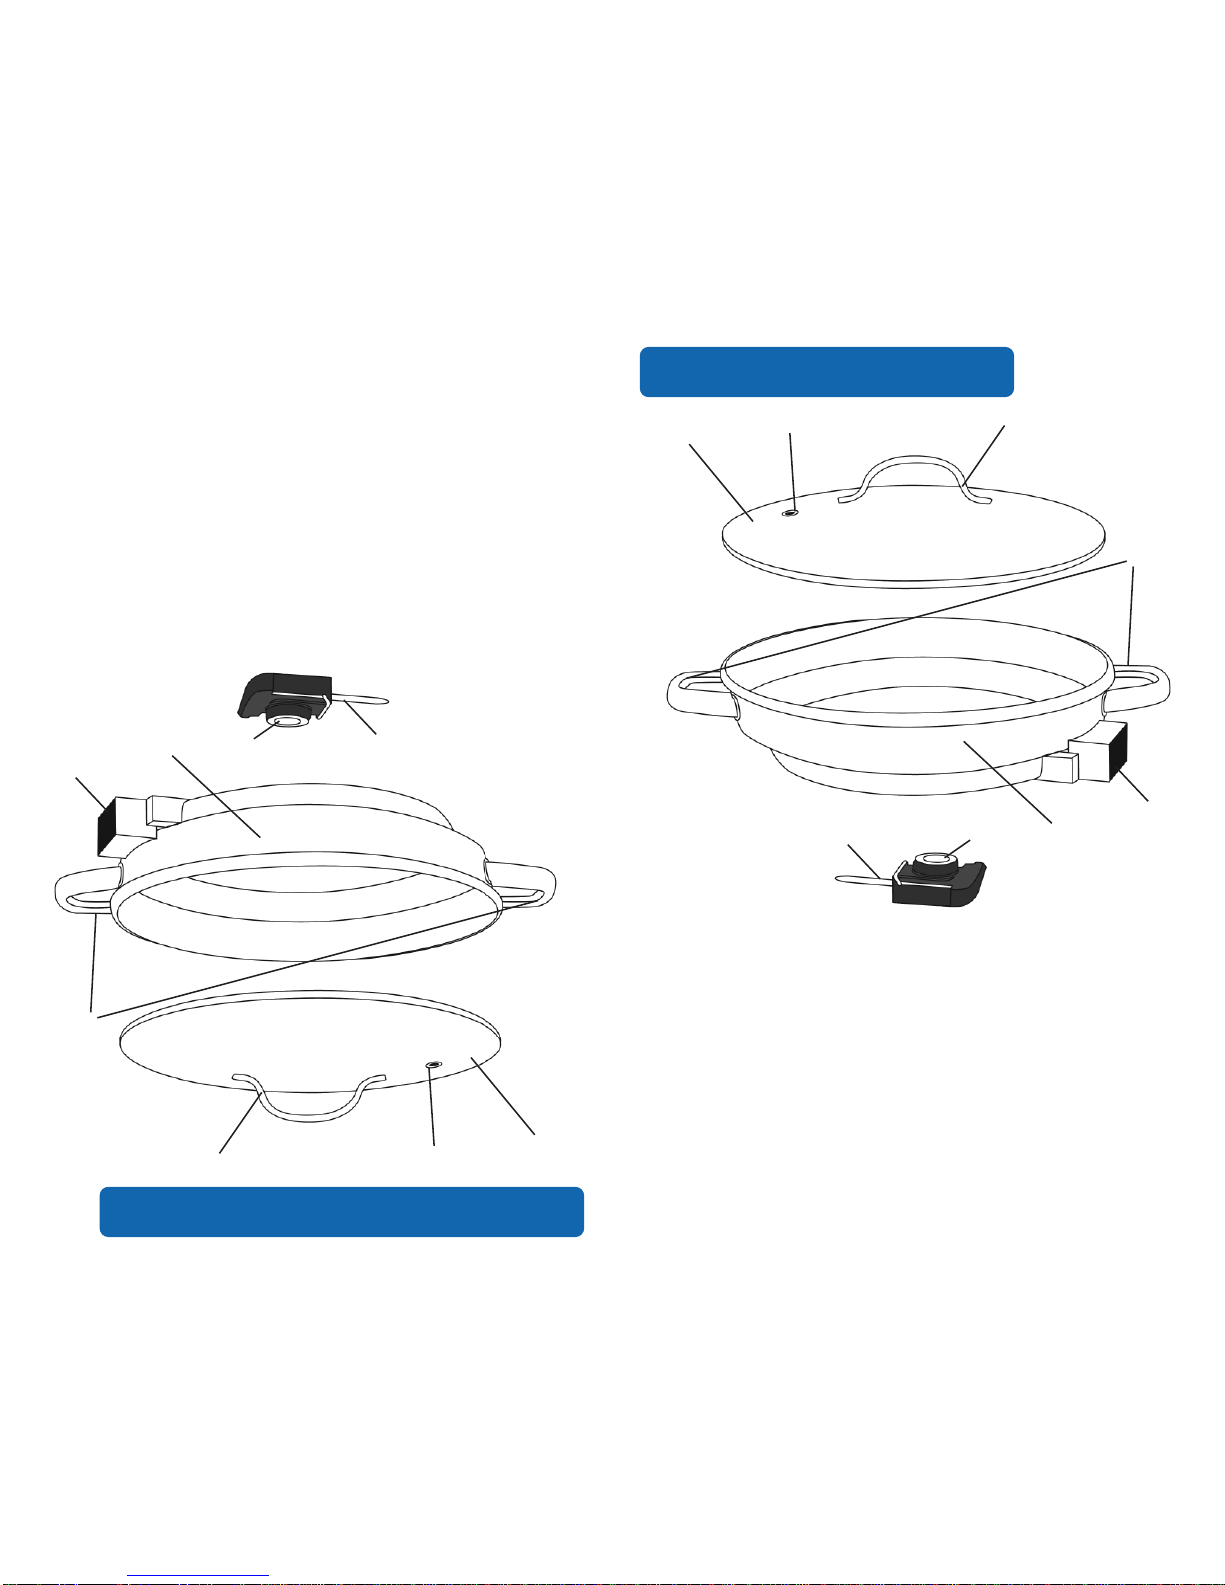
1. Important: Read all instructions
carefully before first use.
2. Do not touch hot surfaces. Always
use handles or knobs.
3. Ensure that all handles are
assembled and securely fastened.
4. Use only on a level, dry and
heat-resistant surface.
5. To protect against the risk of
electrical shock, do not immerse the
skillet base, cord, plugs or
temperature control in water or any
other liquid.
6. Close supervision is necessary when
using any appliance near children.
This appliance is not intended for
use by children.
7. Unplug from outlet when not in use
and before cleaning. Allow the
skillet and all parts to cool
completely before removing or
placing parts and before cleaning.
8. Do not operate any appliance with
a damaged cord or plug or after
the appliance has malfunctioned,
has been dropped or damaged in
any way or is not operating properly.
Contact Aroma®customer service
for examination, repair or
adjustment.
9. The use of accessory attachments
not recommended by Aroma®may
result in fire, electrical shock or injury.
10. Do not use outdoors.
11. Do not allow the cord hang over
the edge of the table or counter.
12. Extreme caution must be used when
moving this, or any, appliance
containing hot oil or other hot
liquids.
13. Always attach the temperature
probe to the appliance first, and
then plug the cord in the wall outlet.
To disconnect, turn the temperature
control to “OFF,” then remove the
plug from the wall outlet.
14. Do not allow the cord to contact
hot surfaces.
15. When oil is heated to high
temperatures in any vessel,
flammable gases are given off. Do
not expose a flame to these gases
as this may be dangerous. Never
cover the skillet while heating oil.
16. Do not place on or near a hot
burner or in a heated oven.
17. Do not touch, cover or obstruct the
steam vent on top of the skillet lid
during or immediately after use as it
is extremely hot and may cause
scalding.
18. Do not clean with metal scouring
pads. Small particles may break off
of the pads and contact electrical
parts, creating a risk of electric
shock. Metal scouring pads also may
damage the finish.
19. Avoid sudden temperature changes
when using the skillet.
20. Use only with a 120V AC power
outlet.
21. Use only the included Aroma®
Temperature Control Probe when
operating this appliance.
22. Do not use this appliance for other
than its intended use.
SAVE THESE INSTRUCTIONS
INSTRUCCIONES DE CABLE CORTO
1. A short power-supply cord is provided to reduce the risks resulting from
becoming entangled in or tripping over a longer cord.
2
This appliance has a polarized plug (one blade is wider than the other); follow
the instructions below:
To reduce the risk of electric shock, this plug is intended to fit into a polarized
outlet only one way. If the plug does not fit fully into the outlet, reverse the plug.
If it still does not fit, contact a qualified electrician. Do not attempt to modify
the plug in any way.
If the supply cord is damaged, it must be replaced by the manufacturer or its
service agent or a similarly qualified person in order to avoid a hazard.
This appliance is for household use only.
SHORT CORD INSTRUCTIONS
POLARIZED PLUG
PLOYA POLARIZADA
2
1. Se proporciona un cable eléctrico corto con el propósito de reducir el
riesgo de tropezarse o enredarse con un cable más largo.
Si este aparato tiene ploya polarizada:
Para reducir el riesgo de descarga eléctrica, este ploya intencionalmente solo
debe de enchufar un lado en enchufes de luz de ploya polarisada. Si la clavija
no entra completamente, da vuelta a la clavija. Si aun la clavija no puede
entrar, llame a un electricista calificada. No intente de modificar la clavija, es
muy peligroso.
Si esté estropeado el cordón eléctrico, hay que ser reemplazado por el
fabricante o su agencia de servicio u otra persona calificada para hacer que se
evita cualquier peligro.
¡NO DEJE QUE EL CABLE CUELGUE!
¡MANTÉNGALO
LEJOS DE LOS
NIÑOS!
ESTE APARATO ES PARA USO DOMÉSTICO.
DO NOT DRAPE CORD!
KEEP FROM
CHILDREN!
3
PARTS IDENTIFICATION
1. Tempered Glass id
2. Steam Vent
3. id Handle
4. Skillet Handles
5. Temperature Control Port
6. Stainless Steel Skillet Base
7. Temperature Control Dial
8. Temperature Control Probe
3
IDENTIFICACION DE LAS PARTES
123
4
5
6
7
8
1. Tapa de vidrio templado
2. Ventilación del vapor
3. Agarradera de la tapa
4. Mango del sartén
5. Puerto de control de
temperatura
6. Base de acero inoxidable del
sartén
7. Indicador del control de
temperatura
8. Sonda del control de
temperatura
123
4
5
6
7
8
3. Plug the power cord into an available electrical outlet.
4. Turn the temperature control dial to the desired setting. The indicator
light will illuminate to indicate that the skillet is preheating.
1. Read all instructions and important safeguards.
2. Remove all packaging materials and make sure items are received in
good condition.
3. Tear up all plastic bags as they can pose a risk to children.
4. Wash the tempered glass lid and stainless steel skillet in warm, soapy
water. Rinse and dry thoroughly. Do not wash the temperature control
probe.
USING YOUR ELECTIC SKILLET
Before First Use:
To Cook:
NOTE:
•Do not use abrasive cleaners or scouring pads.
•Do not immerse the temperature control probe in water at any
time.
1. Place the skillet on a clean, level, dry and heat-resistant surface.
Illustration A
1. ea todas las instrucciones y las medidas de seguridad de importancia.
2. Deshágase de los materiales de empaque y cerciórese que los artículos
vengan en buena condición.
3. Rasgue todas las bolsas de plástico ya que pueden presentar un peligro para
los niños.
4. ave la tapa de vidrio templado y el sartén de acero inoxidable con agua
tibia y jabonosa. Enjuague y seque a conciencia. No lave la sonda del
control de temperatura.
COMO USAR EL APARATO
Antes de usarlo por primera vez:
Para cocinar:
NOTA:
• No use mallas metálicas o limpiadores raspantes.
• No meta al agua la sonda del control de temperatura.
1. Coloque el sartén sobre una superficie limpia, seca, nivelada y resistente al
calor.
Ilustración A
3. Enchufe el cable en un toma corriente.
4. Gire el control de temperatura a la posición deseada. a luz del indicador se
iluminará para señalar que el sartén se está precalentando.
HELPFUL HINTS:
•To ease cleanup and reduce sticking, add a light coat of nonstick
cooking spray or oil to the skillet prior to cooking.
2. Check that the temperature control dial is set to “OFF.” Insert the
temperature control probe into the temperature control port. See
Illustratio A for details.
2. Verifique que el indicador del control de temperatura esté en “OFF.” Inserte la
sonda del control de temperatura en el control del mismo. Para detalles vea
la ilustració A.
CONSEJO ÚTIL:
•Para facilitar la limpieza y reducir la adhesividad, antes de cocinar
agréguele al sartén una ligera capa de vaporizador anti-adherente o de
aceite.
4
NOTE:
•Once the skillet has finished preheating, do not leave the skillet on
without any food inside. This may lead to damage over time.
CONTINUED ON NEXT PAGE
4
NOTA:
•Una vez que el precalentamiento ha terminado no deje el sartén sin
algún alimento sobre este, ya que esto puede causar daños con el
tiempo.
USING YOUR ELECTRIC SKILLET
To Cook:
5. The skillet will preheat for approximately 3-5 minutes, depending upon
the chosen temperature setting.
6. Once the skillet has reached the chosen temperature setting the
indicator light will shut off. The indicator light will blink on and off during
cooking as the skillet maintains temperature.
7. Using caution, place food to be cooked into the skillet.
8. Cook food as directed or until desired results are acheived. See the
“Cooki g Guide” on page 7 for suggested temperatures and cooking
times for many favorite skillet foods.
5
HELPFUL HINTS:
•There are several recipes included in this instruction manual,
beginning on page 9. Visit www.AromaCo.com for more great
recipe ideas, or even to submit your own.
9. After food has cooked, set the temperature control dial to the “Off”
position. Unplug the electric skillet and allow it to cool completely
before cleaning. Refer to “How to Clea ” on page 8 for cleaning
instructions.
COMO USAR EL APARATO
Para cocinar:
5. El sartén se precalentará por unos 3-5 minutos, dependiendo de la temperatura
seleccionada.
6. Una vez que el sartén ha alcanzado la temperatura seleccionada, la luz del
indicador se apagará. a luz del indicador parpadeará intermitentemente en
‘on’ y ‘off’ durante el cocimiento mientras el sartén mantenga la temperatura.
7. Con precaución coloque en el sartén los alimentos que van a ser cocinados.
8. Cocine la comida como se indica o hasta obtener los resultados buscados. En
la página 7 del Guía para Coci ar (Cooki g Guide) encontrará temperaturas
sugeridas y tiempos de cocimiento para muchos de los platillos favoritos.
5
CONSEJO ÚTIL:
•Hay varias recetas culinarias en este manual instructivo, empezando en la
página 9. Visite www.AromaCo.com para mas sugerencias culinarias, o
bien para someter las suyas propias.
9. Una vez se ha cocinado la comida, programe el control de temperatura en la
posición de “Off.” Desenchufe el sartén eléctrico y permita que se enfríe
totalmente antes de lavarlo. Para instrucciones de cómo limpiarlo, vaya a la
página 8.
To Brown/Braise Food:
1. Follow steps 1-3 of “To Cook” on page 4.
2. Turn the temperature control dial to the appropriate temperature to
brown/braise. Recommended temperatures for browning are 325ºF to
400ºF. The recommended range for braising is 200ºF to 225ºF. The
indicator light will illuminate to indicate that the skillet is preheating.
3. Once the skillet has reached the chosen temperature setting the
indicator light will shut off. The indicator light will blink on and off during
cooking as the skillet maintains temperature.
4. Using caution, place food to be browned/braised into the skillet.
5. Brown/braise until desired results are reached.
6. After food has cooked, set the temperature control dial to the “Off”
position. Unplug the electric skillet and allow it to cool completely
before cleaning. Refer to “How to Clea ” on page 8 for cleaning
instructions.
Para dorar a fuego lento:
1. Siga los pasos del 1 al 3 de “Para Coci ar”enla página 4.
2. Gire el control a la temperatura apropiada para dorar. as temperaturas
recomendadas son de 325°F a 400°F. El rango recomendado para cocer a
fuego lento es de 200°F a 225°F. a luz iluminadora se encenderá para
indicarnos que el sartén se está precalentando.
3. Una vez que el sartén ha alcanzado la temperatura elegida, la luz indicadora
se apagará y parpadeará mientras el sartén se calienta.
4. Con precaución coloque los alimentos que van a ser dorados a fuego lento
en el sartén.
5. Cocine a fuego lento hasta obtener los resultados deseados.
6. Después de haber cocinado los alimentos, gire el control de temperaturas a la
posición de “Off.” Desconecte el sartén eléctrico y deje que se enfríe
completamente antes de limpiarlo. Busque en la página 8 las instrucciones
para limpiar el sartén correctamente.
NOTE:
• The lid handle and skillet handles will become hot during
operation. Use oven mitts or another form of heat protection
whenever touching the lid handle or skillet handles while cooking.
• Use caution when opening the tempered glass lid. Open the lid so
that it is angled away from you, as escaping steam will be
extremely hot.
NOTA:
• as manijas y mangos de la tapa y del sartén se verán calentadas
durante la operación, por lo que le sugerimos use guantes para horno
cuando haya que tocarlas.
• Cuando abra la tapa de vidrio templado hágalo con precaución y
hágalo retirado de su cara porque el vapor que sale puede ser
extremadamente caliente.
To Use as a Buffet Server:
The beautiful stai less steel fi ish of this electric skillet makes it a ideal
piece for e tertai i g as well. Your electric skillet easily doubles as a
buffet server.
1. Set the electric skillet, filled with cooked food to be served, out in the
proper serving area. The serving surface should be level, dry and
heat-resistant.
2. Turn the temperature control dial to 200ºF setting.
3. Once the skillet has reached 200ºF the indicator light will shut off. The
indicator light will blink on and off during cooking as the skillet maintains
temperature.
NOTE:
• Monitor the amount of food in the electric skillet while serving. The
electric skillet should never be kept at the Warm setting without any
food in the skillet.
6
USING YOUR ELECTRIC SKILLET
To Simmer Soups, Sauces and More:
1. Follow steps 1-3 of “To Cook” on page 4.
2. Add liquid and food to be simmered to the skillet.
3. Turn the temperature control dial to 300ºF. The indicator light will illuminate
to indicate that the skillet is heating up to the chosen temperaure.
4. Once the skillet has reached the chosen temperature setting the indicator
light will shut off. The indicator light will blink on and off during cooking as
the skillet maintains temperature.
5. Monitor the liquid being simmered. Once it begins to boil, reduce the
temperature to 200ºF.
6. Simmer until done. Refer to the recipe being used for suggested simmering
time.
7. After food has cooked, set the temperature control dial to the “Off”
position. Unplug the electric skillet and allow it to cool completely before
cleaning. Refer to “How to Clea ” on page 8 for cleaning instructions.
COMO USAR EL APARATO
6
NOTE:
• If serving meat, here are the recommended safe serving
temperatures:
4. After serving is complete, set the temperature control dial to the “Off”
position. Unplug the electric skillet and allow it to cool completely before
cleaning. Refer to “How to Clea ” on page 8 for cleaning instructions.
Para usarse como un servidor para buffet:
El hermoso y elega te termi ado de acero i oxidable de este sarté eléctrico lo
hace u a tema ideal para e trete er a sus i vitados.
1. Saque su sartén eléctrico a la zona donde planea agasajar a sus invitados,
llénelo con sus platillos favoritos. a superficie donde lo va a colocar debe ser
plana, seca y resistente al calor.
2. Programe el control de temperatura a 200ºF.
3. Una vez el sartén ha alcanzado esta temperatura, el indicador se apagará,
para empezar a parpadear, indicando que el sartén continúa manteniendo la
temperatura seleccionada.
NOTA:
• No deje el sartén en la posición de “Warm” sin alimentos sobre éste.
Para cocer a fuego lento sopas, salsas y mas:
1. Siga los pasos del 1 al 3 de “Para Coci ar”enla página 4.
2. Agréguele la comida y los líquidos que va a dorar al sartén.
3. Gire el marcador del control de temperatura a 300°F. a luz del indicador se
prenderá para indicar que el sartén se está calentando a la temperatura
deseada.
4. Una vez que el sartén ha alcanzado la temperatura deseada, la luz del
indicador se prenderá y apagará durante el cocimiento mientas el sartén
mantiene su temperatura.
5. Monitoreé el liquido que se está dorando para una vez que hierva se reduzca
la temperatura a 200°F.
6. Cocine hasta que termine. Consulte con la receta que está usando para
saber cuánto tiempo se debe de cocinar.
7. Después de que se ha cocinado la comida, gire el indicador de temperatura
a la posición de “Off.” Desconecte y permita que se enfríe antes de lavarse.
Consulte la página 8 para instrucciones de lavado.
NOTA:
• Si sirve la carne, aquí sea las temperaturas seguras recomendadas de la
porción:
4. Cuando haya terminado de servir los alimentos, programe el control de
temperatura a “Off.” Desconecte el sartén eléctrico y permita que se enfríe
antes de iniciar su limpieza. Para instrucciones busque en la página 8, en la
sección de “Cómo limpiar.”
Meat Safe Temperature
Fish 140ºF
Beef/Pork 160ºF
Chicken 165ºF
Carne Temperatura sana
Pescado 140ºF
Carne de vaca o carne de cerdo 160ºF
Pollo 165ºF
COOKING GUIDE
Food Selection Temperature Settings Approximate Time
Bacon 375OF 4-7 min
Casseroles 225OF 30-60 min
Chicken 375OF 10-15 min
Eggs 300OF 2-5 min
Fish 350OF 6-9 min
French Toast 350OF 4-5 min
Grilled Sandwiches 300OF 5-10 min
Hamburgers 375OF 5-12 min
Ham Steak Slices 350OF 10-15 min
Hash Browns 400OF 8-10 min
Pancakes 375OF 1-3 min
Pizza 375OF 10-15 min
Pork Chops 375OF 10-15 min
Potatoes 325OF 10-12 min
Sausage 350OF 10-12 min
Stir Fry 375OF 4-7 min
Vegetables 300OF 4-7 min
NOTE:
•Cooking times and temperatures given here are only a guide.
They may vary due to differences in meat and temperature of
refrigerated food. Adjust your cooking time and temperature to
your preference.
GUÍA PARA COCINAR
NOTA:
•Los tiempos y temperaturas para cocinar que se indican en esta tabla
son una guía únicamente. Podrán variar debido a las diferencias en las
carnes y en la temperatura de los alimentos refrigerados. Ajuste su
tiempo y temperatura para cocinar de acuerdo a su preferencia.
7
7
Tiempo Aproximado Ajustes de
Temperatura Selección de
Alimentos
Tocino 375OF 4-7 min
Cacerolas de platillos 225OF 30-60 min
Pollo 375OF 10-15 min
Huevos 300OF 2-5 min
Pescado 350OF 6-9 min
Tostada francesa 350OF 4-5 min
Sándwiches a la
plancha 300OF 5-10 min
Hamburguesas 375OF 5-12 min
Rebanadas de bistec
de jamón 350OF 10-15 min
Papa rallada dorada 400OF 8-10 min
Panqueques 375OF 1-3 min
Pizzas 375OF 10-15 min
Chuletas de puerco 375OF 10-15 min
Papas 325OF 10-12 min
Chorizo 350OF 10-12 min
Platillos orientales 375OF 4-7 min
Verduras 300OF 4-7 min
The Stai less Steel Electric Skillet is a excelle t way to prepare a variety
of family favorites. The guide below is a quick overview of suggested
times a d temperatures for ma y classic skillet foods. There are also
several recipes i cluded i this ma ual, begi i g o page 9.
For eve more meal ideas, or to submit your ow recipes, visit
www.A omaCo.com.
El sarté eléctrico de acero i oxidable es u a mag ifica opció para preparar
u a variedad de los platillos favoritos de su familia. El guía de abajo es u a
ma era práctica y rápida para co ocer los tiempos y temperaturas ideales.
Tambié hay varias recetas i cluidas e este ma ual, empeza do e la
página 9.
Para recibir mas recetas, o bie para someter las suyas, por favor visíte os e
www.A omaCo.com.
HO TO CLEAN
Always unplug unit and allow to cool completely befo e cleaning.
1. Unplug and remove the temperature control probe from the
temperature control port.
2. Wash the tempered glass lid with a dishcloth in warm, soapy water.
3. Wash the cooking surface of the skillet base with a soapy sponge,
taking care not to immerse the temperature control port of the skillet
base in water.
4. Dry the skillet base and tempered glass lid thoroughly.
8
COMO LIMPIAR
8
NOTE:
•Do not immerse the skillet base, temperature-control probe, cord,
or plug in water or any other liquid.
• Do not attempt to cool the unit by pouring cold water into it. This
sudden temperature change may cause the product to warp.
• Ensure that the temperature control port, located on the side of
the skillet, is thoroughly dried after washing and before using.
Siemp e desconecte la unidad y pe mita que se enf íe antes de inicia
su limpieza.
1. Desconecte y retire la sonda de la salida del control de temperatura.
2. ave la tapa de vidrio templado con un paño con agua tibia y jabonosa.
3. ave la superficie del sartén con una esponja, cuidando de no meter al
agua el dispositivo del control de temperatura.
4. Seque con cuidado la base del sartén así como la tapa de vidrio
templado.
NOTA:
• Nunca sumerja en el agua, o cualquier otro liquido, la base del sartén, la
sonda del control de temperatura, el cordón o el enchufe.
• No intente enfriar la unidad vaciándole adentro agua fría. Este cambio
brusco de temperatura puede ocasionar que el producto se tuerza.
• Asegúrese que el conector del probador, localizado en el costado del
sartén, esté completamente seco después de lavarlo y antes de usarlo.