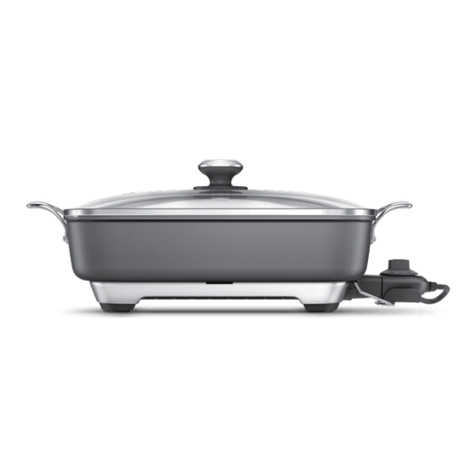
Breville Thermal Pro BEF460 User manual

the Thermal Pro™
Instruction Book - BEF460

2
BREVILLE
RECOMMENDS
SAFETY FIRST
At Breville we are very safety
conscious. We design and
manufacture consumer
products with the safety of you,
our valued customer, foremost
in mind. In addition we ask
that you exercise a degree of
care when using any electrical
appliance and adhere to the
following precautions.
IMPORTANT
SAFEGUARDS
When using electrical
appliances, basic safety
precautions should always be
followed, including the
following:
READ ALL INSTRUCTIONS
BEFORE USE AND SAVE
FOR FUTURE REFERENCE
• Do not place skillet near the
edge of a bench or table during
operation. Ensure the surface is
level, clean and free of water.
• Remove any promotional
stickers before using the skillet
for the first time.
• Do not place the skillet on
or near a hot gas or electric
burner, or where it could touch
a heated oven. Place skillet at
least 8" away from walls
and curtains.
• Do not use on metal surfaces,
for example, a sink drain board.
2 Breville Recommends
Safety First
6 Components
7 Functions
8 Care & Cleaning
10 Tips
14 French
Contents

3
• Always insert Temperature
Control Probe into probe
socket and ensure it is fully
inserted, before inserting power
plug into power outlet and
switching on appliance.
Ensure the probe socket is
completely dry before inserting
the Temperature Control
Probe.
• Ensure the cord is not touching
the hot pan.
• To protect against electric
shock, do not immerse cord or
Temperature Control Probe in
water or any other liquid.
• Ensure the Temperature
Control Probe has cooled
before removing from the
appliance.
• Always remove Temperature
Control Probe before cleaning
the appliance.
• Only the Temperature Control
Probe included with the skillet
must be used.
• If using plastic utensils, do not
leave in skillet when hot.
• Never immerse cord and/or
heat probe in water or any other
liquid.
• Do not place hot glass lid
under cold water.
• Extreme caution must be
used when moving the skillet
containing hot oil, or other
hot liquid. Do not move the
appliance during cooking.
Allow the skillet to cool before
removing oil or other liquid.
• Do not touch hot surfaces.
Use handles or knobs.
• Do not leave the appliance
unattended when in use.
• Always turn the Temperature
Control Probe to the
MINIMUM line marking, allow
probe to cool, then remove
probe and unplug, if appliance
is to be left unattended, if not in
use and before cleaning.
• Keep the appliance clean.
Follow the cleaning instructions
provided in this book.
• Always use the appliance on
a dry, level surface.

4
IMPORTANT
SAFEGUARDS
FOR ALL
ELECTRICAL
APPLIANCES
• Unwind the cord before use.
• Do not let the cord hang over
the edge of a table or counter,
touch hot surfaces, or become
knotted.
• This appliance is not intended
for use by young children
or infirm persons without
supervision.
• Young children should be
supervised to ensure that they
do not play with the appliance.
• The appliance is not intended
to be operated by means of an
external timer or a separate
remote-control system.
• It is recommended to regularly
inspect the appliance.
Do not use the appliance if
the power cord, power plug, or
appliance becomes damaged
in anyway. Immediately cease
use and call Breville Consumer
Support for examination, repair
or adjustment.
• For any maintenance other
than cleaning, visit
www.Breville.com or call
Breville Consumer Support.
• This appliance is for household
use only. Do not use this
appliance for anything other
than its intended use.
• Do not use in moving vehicles
or boats. Do not use outdoors.
• The installation of a residual
current device (safety switch)
is recommended to provide
additional safety protection
when using electrical
appliances. It is advisable that
a safety switch with a rated
residual operating current not
exceeding 30mA be installed
in the electrical circuit
supplying the appliance.
See your electrician for
professional advice.
• Do not place this appliance
on or near a hot gas or electric
burner, or where it could touch
a heated oven.
• Always switch appliance off,
then unplug the appliance
when not in use, before
attempting to move appliance
and before cleaning.
• The use of accessory
attachments not recommended
by Breville may cause injuries.
• This appliance is not intended
for deep frying foods.

5
WARNING
To prevent burns or personal
injury, always use protective
hot pads or oven mitts when
touching or handling the skillet.
Appliance surfaces are hot
during and after use.
BREVILLE ASSIST‰PLUG
Your Breville appliance comes
with a unique Assist‰Plug,
conveniently designed with a
finger hole to ease removal from
the power outlet.
CALIFORNIA
PROPOSITION 65:
(Applicable to California
residents only).
This product contains chemicals
known to the State of California
to cause cancer, birth defects or
other reproductive harm.
SHORT CORD
INSTRUCTIONS
Your Breville appliance is fitted
with a short power supply cord
to reduce personal injury or
property damage resulting from
pulling, tripping or becoming
entangled with a longer cord.
Longer detachable power-supply
cords or extension cords are
available and may be used if care
is exercised in their use.
If an extension cord is used, (1)
the marked electrical rating of
the cord set or extension cord
should be at least as great as the
electrical rating of the appliance,
(2) the cord should be arranged
so that it will not drape over the
countertop or table-top where
it can be pulled on by children
or tripped over unintentionally
and (3) the extension cord must
include a 3-prong grounding plug.
HOUSEHOLD USE ONLY
SAVE THESE INSTRUCTIONS

6
Components
B
FE
K
I
HG
A C D
J
A. Large 15" x 12" banquet shaped skillet
Dishwasher safe.
B. Steam vent hole
Suitable size for insertion of meat probe.
C. Toughened glass high domed lid
Dishwasher safe.
D. Cast stainless steel handles
E. Cast-in butterfly element
1800 watts of power provides even
distribution of heat over the entire
cooking surface.
F. PFOA-free non-stick cooking surface
For easy cleaning.
G. Non-slip feet
H. Pan tilt lever
I. Precise variable temperature control
With 6 heat settings including SEAR.
J. Stainless steel rack
For steaming and roasting.
K. Pouring spout

7
Functions
BEFORE FIRST USE
Remove any promotional and packaging
materials before use.
Wash your skillet and lid in hot soapy water.
Rinse and dry thoroughly.
Do not immerse the cord, plug and/or
Temperature Control Probe in water or
any other liquid.
1. Insert the Temperature Control Probe into
the probe socket on the appliance. Plug into
a 110/120V power outlet. Always insert the
probe into the appliance first, then insert
plug into power outlet.
NOTE
Before inserting the Temperature Control
Probe into the probe socket, ensure the
interior of the socket is completely dry.
To do this, shake out excess water then wipe
the interior of the socket with a dry cloth.
2. Turn the dial on the Temperature
Control Probe clockwise to the
desired setting. The red heating light
on the probe will illuminate.
3. The red heating light will remain
illuminated until the skillet reaches
the desired temperature setting.
Once the temperature has been
reached, the red light will cycle ‘On’
and ‘Off’ during cooking to maintain
the desired temperature.
4. When cooking is complete, turn the dial
counterclockwise until the MINIMUM line
marking is aligned with the red heating
light. Unplug the power cord from the
power outlet.
Cooking
Off
5. Leave the Temperature Control Probe
connected to the appliance until cool.
NOTE
This skillet must be used with the
Temperature Control Probe provided.
Do not use any other probe or connector.

8
RECOMMENDED PROBE SETTINGS
Dial Setting Uses
WARM • Keeping food warm
• Basting
SIMMER • Slow cooking e.g.
stews, chili and soups
• Cooking roasts
SAUTE • Toasting nuts
• Shallow frying
• Pancakes and crepes
• Rice and pasta
PAN FRY • Browning meats,
poultry and seafood
• Frying eggs
SEAR • High Sear
• Stir frying vegetables
Care & Cleaning
Do not leave plastic cooking utensils
in contact with the hot skillet surface
while cooking.
Before cleaning, switch the skillet to the
off position and unplug from the power
outlet. Remove the Temperature Control
Probe when cooled from the probe socket
of the appliance.
TEMPERATURE CONTROL PROBE
If cleaning is necessary, wipe the
Temperature Control Probe over with a
slightly damp cloth. Ensure it is completely
dry before use. Never immerse the
Temperature Control Probe, plug or cord
in water or any other liquid.
PFOA-FREE NON-STICK
COOKING SURFACE
Cooking on a non-stick surface minimizes
the need for oil as food does not stick and
cleaning is easier.
Any discoloration that may occur on the
non-stick surface may detract from the
appearance of the skillet but will not affect
the cooking performance.
Do not use metal (or other abrasive)
scourers when cleaning the non-stick
coating. Wash with hot soapy water.
Remove stubborn spots with a soft plastic
washing pad or nylon washing brush.
Rinse and dry thoroughly.

9
REMOVING DISCOLORATION
FROM THE NON-STICK SURFACE
1. Combine 2 tablespoons baking soda,
¼ cup household bleach, 1 cup water.
2. Pour into the skillet, place lid on
with the vent closed, and simmer
for 5–10 minutes.
3. Clean in a well-ventilated area and avoid
breathing in the vapors. Wash as directed
before re-use. In some instances this may
not remove all the staining.
GLASS HIGH DOMED LID
Wash the lid in warm soapy water using a
soft sponge, rinse and dry thoroughly.
NOTE
Take care when the glass lid is hot.
Do not place hot lid under cold water or on
cold surfaces. This may cause the lid to break.
DISHWASHER SAFE
The lid and cooking pan are dishwasher
safe for easy cleaning. The recessed heating
element is completely sealed so it is safe to
immerse in water.
The skillet may also be washed in hot,
soapy water. Dry thoroughly.
NOTE
Before inserting the temperature control
probe into the skillet socket, ensure the
interior of the skillet socket is fully dry.
To do this, shake out excess water then wipe
the interior of the socket with a dry cloth.
STORAGE
Store the temperature probe carefully.
Do not knock or drop it as this can damage
the probe. If damage is suspected, call
Breville Consumer Support.
TIP
For convenient storage of the temperature
probe, line the skillet with paper towels and
place the probe on the paper towels.
This will ensure the probe and plug don’t
scratch the surface.

10
Tips
STIR FRYING
Recommended temperature probe setting:
SEAR for vegetables, PAN FRY for
sealing meat.
• Preheat your skillet before adding any
ingredients, allowing the temperature light
to cycle “ON” and “OFF” several times.
This will allow the skillet to reach an even
higher temperature.
• Stir frying is a dry heat cooking method
and is best suited to tender cuts of meat.
Timing is a key factor as over cooking will
give a tough, dry result. Cooking times will
depend on the size and thickness of the
cut, ie. the bigger the cut, the more time is
needed.
RECOMMENDED CUTS FOR STIR FRYING
Beef
Lean beef strips prepared from topside,
rump, sirloin, rib eye, fillet.
Chicken
Lean chicken strips prepared from
breast fillets, tenderloins, thigh fillets.
Lamb
Lean lamb strips prepared from fillet, lamb
leg steaks, round or topside mini roasts,
eye of loin.
Pork
Lean pork strips prepared from fillet
or medallion steaks.
Seafood
Whole peeled prawns, cleaned squid strips,
mussels and cracked crab.
STIR FRY TIPS
• Stir fry strips in small batches (approx 1lb)
to prevent overloading pan and allowing
the meat to “stew” in its juice, resulting in
tougher meat.
• When adding meat strips to the skillet,
the meat should sizzle.
• Stir fry strips for 1–2 minutes per batch.
Any longer will toughen the meat.
• Remove each batch once cooked and allow
the skillet to reheat before stir frying the
next. By cooking in small batches, the heat
of the skillet remains constant, ensuring the
meat doesn’t stew and toughen.
• Drain off the marinades from meat
strips before stir frying to prevent stewing
and splatter.
• Stir fry vegetables with a little oil or
sprinkling of water until vivid in color.
Cooking time Ingredients
3 minutes Quartered onion, broccoli
florets, sliced carrot,
green beans
2 minutes Snow peas, bell pepper,
sliced zucchini, sliced water
chestnuts, bamboo shoots
1 minute Chopped garlic, minced
chilli and ginger, sliced
green onions, bean sprouts
These brief cooking times will keep
vegetables crisp.
• Peanut oil is traditionally used for Asian
stir fry dishes. However, other oils such as
canola, rice bran oil and even light olive oils
may be used.
• Do not over fill the skillet. Always cook in
small batches and reheat at the end of stir
frying by returning the meat to the pan with
simmering sauce and vegetables.
• If using this method, remember to under
cook meat slightly so that reheating will not
spoil and toughen the finished dish.
• Serve stir fried foods immediately
to retain their crisp texture.

11
SHALLOW FRYING
Recommended temperature probe
setting: SAUTE-PAN FRY.
Used to crispen and cook foods in small
amounts of oil. The foods may have
already been cooked.
• Use approximately 2 cups of oil, or
sufficient oil so that half the food is
submerged.
• Preheat the oil before adding food.
When using oil, never cover with the lid
during heating or cooking as this will cause
condensation to drip into the oil and result
in splattering.
• Do not move the skillet during heating
or cooking.
• Wipe excess moisture from foods to
avoid splattering.
• Cook food in batches to ensure crispness.
• Drain cooked foods on paper towels
to absorb excess oil.
• Never leave your skillet unattended while
shallow frying.
• Allow oil to cool completely before
removing from the skillet. Vegetable, canola
or rice bran oil is recommended for shallow
frying.
PAN FRYING
Recommended temperature probe setting:
Searing meat: PAN FRY-SEAR
Medium heat: SAUTE-PAN FRY
Used for cooking meats, fish, seafood, eggs,
chicken or sausages.
• Preheat the skillet on SAUTE-PAN FRY
setting.
• Allow time for meat to sear on both sides or
eggs to begin to set. Then reduce to
the SIMMER setting..
SAUTÉING
Recommended temperature setting:
SAUTE-PAN FRY
Used for sautéing onions, garlic, spices,
pastes, herbs, vegetables, meat and seafood.
NOTE
If using oil to sauté, use PAN FRY setting.
If using butter, use SAUTE setting.

12
ROASTING
Recommended temperature probe setting:
Browning Roasts: PAN FRY-SEAR
Cooking Roasts: SIMMER
MEAT AND POULTRY
The skillet is ideal for roasting meat
and poultry, as the meat retains the
flavor and juices.
The skillet’s dome lid allows for larger
joints of meat and poultry to be cooked
(approximately 3lbs).
• Preheat the skillet on PAN FRY-SEAR
setting. Fattier joints of meat such as lamb
require a small amount of oil.
• Brown and seal the meat on all sides.
• Cover with lid.
• After browning, turn the dial down to the
SIMMER setting and cook to desired
doneness.
• Turn the meat over during the
cooking time.
• Once the meat is cooked, set aside and
cover loosely with foil, whilst the gravy is
prepared from the pan juices.
• To make gravy: Drain excess oil from pan,
stir 1–2 tablespoons of plain flour into
pan residue, cook for 1–2 minutes.
Reduce heat to the SIMMER setting and
gradually add 1–2 cups stock.
Increase heat setting to SAUTE and stir
gravy continuously until it comes to the
boil. Reduce heat and simmer 3–4 minutes
until gravy thickens. Serve immediately
with sliced roast meat.
VEGETABLES
• Cut into even sized pieces.
• Add to the skillet 40–65 minutes
before serving.
• For crispier vegetables, remove the
meat and increase the heat for the
last few minutes before cooking.
ROASTING TIMES
The following times are for dishes that
are well done. Reduce time by 5 minutes
for medium and 10 minutes for rare.
Ingredients Cooking time
Pork 30–40 minutes/1lb after
browning
Lamb/Beef 30–40 minutes/1lb after
browning
Chicken 30–35 minutes/1lb after
browning
BASTING
Recommended temperature probe
setting: WARM-SIMMER
The Pan Tilt Lever makes basting easy by
allowing the juices to drain to one side of
the pan.
• Position the Pan Tilt Lever and allow
the juices to drain to the lower end of
the skillet.
• Spoon juices over the food as desired.

13
BAKING
Recommended temperature probe setting:
SEAR
The skillet can be used for baking cakes.
• Preheat the skillet on SEAR setting
for 15 minutes with the lid on.
Place wire rack into the base of the pan
to elevate the cake away from the base
of the skillet.
• Place the cake onto the wire rack
and cook with the lid on.
SIMMERING
Recommended temperature probe setting:
SIMMER
• Used for cooking stews, chili and soups
and reducing and thickening sauces.
• Simmering food is to cook food in
liquid between a temperature range
of 185°F–205°F (85°C–96°C).
• Bubbles should be small and just breaking
through the surface.
• For best simmering results, the skillet
should have a minimum of 3 quarts
of combined food and liquid.
• Simmering can be achieved with
and without the lid on.
• Food should be stirred occasionally
to allow food to be cooked evenly.
STEAMING
Recommended temperature probe setting:
SIMMER-SAUTE
• Steaming is the healthiest of cooking
techniques. It retains the food’s texture,
flavor, vitamins and minerals which may
otherwise be lost in the cooking water.
• Steaming consists of cooking food by
setting it above a hot boiling liquid, and
letting the steam from the liquid literally
cook the food.
• When steaming, always make sure the
water never comes in contact with the food.
• Always line a plate or tray with baking
paper or cabbage leaves. This keeps the
food from sticking to the plate and coming
in contact with the water.
• Always fill the skillet with a minimum
of 1–2 quarts of water.
• Do not allow the skillet to boil dry.
• Check water levels during cooking
and refill with boiling water to prevent
skillet from boiling dry.
• To steam; fill the skillet with cold water.
Set temperature probe to SEAR setting and
place wire rack into the base.
• Line a plate with baking paper or cabbage
leaves and place food on top. Position plate
or tray onto wire rack and cover with lid.
• Bring water to the boil and reduce
probe to SIMMER-SAUTE setting.
• Be careful when dealing with steam.
When lifting the lid, steam can scald
and burn.

the Thermal Pro™
Manuel d'instructions - BEF460

15
15 Breville vous recommande
la sécurité avant tout
20 Composants
21 Fonctions
22 Entretien & nettoyage
24 Trucs
BREVILLE
VOUS
RECOMMANDE
LA SÉCURITÉ
AVANT TOUT
Chez Breville, la sécurité
occupe une place de choix.
Nous concevons et fabriquons
de consommation sans jamais
perdre de vue la sécurité de
notre précieuse clientèle. De
plus, nous vous demandons
d’être très vigilant lorsque vous
utilisez un appareil électrique
et de respecter les précautions
suivantes.
Tables des
matières
IMPORTANTES
MESURES DE
SÉCURITÉ
Lorsque vous utilisez
un appareil électrique,
des mesures de sécurité
élémentaires doivent toujours
être respectées, incluant
ce qui suit:
LISEZ TOUTES LES
INSTRUCTIONS AVANT
L'USAGE ET CONSERVEZ-
LES POUR RÉFÉRENCE
FUTURE.
• Ne placez pas la poêle sur le
bord d’un comptoir ou d’une
table durant l’usage. Assurez-
vous que la surface de travail
est de niveau, propre et sèche.
• Retirez toutes étiquettes
promotionnelles avant
d’utiliser la poêle pour la
première fois.
• Ne placez pas la poêle sur ou
près d’un élément au gaz ou
électrique, ou à un endroit où
elle pourrait toucher un four
chaud. Gardez une distance
d’au moins 20 cm (8") entre
la poêle et les murs ou les
rideaux.

16
• N’utilisez pas la poêle sur une
surface métallique, comme le
plateau d’égouttement d’un
lavabo.
• Insérez toujours la sonde de
température dans la prise de la
sonde et assurez-vous qu’elle
est parfaitement insérée avant
de brancher la fiche dans la
prise murale et de mettre
l’appareil en marche. Veillez
à ce que la prise de la sonde
soit parfaitement asséchée
avant d’y insérer la sonde de
température.
• Assurez-vous que le cordon ne
touche pas la poêle chaude.
• Pour vous protéger contre les
chocs électriques, n’immergez
pas le cordon ou la sonde de
température dans l’eau ou tout
autre liquide.
• Assurez-vous que la sonde
de température a refroidi
suffisamment avant de la
retirer de l’appareil.
• Retirez toujours la sonde de
température avant de nettoyer
l’appareil.
• Utilisez uniquement la sonde
de température fournie avec la
poêle à frire.
• Si vous utilisez des ustensiles
en plastique, ne les laissez pas
dans la poêle à frire quand elle
est chaude.
• N’immergez jamais le cordon
et/ou la sonde de température
dans l’eau ou tout autre liquide.
• Ne mettez pas le couvercle en
verre sous l’eau froide quand il
est chaud.
• Soyez extrêmement prudent
lorsque l’appareil contient de
l’huile chaude ou tout autre
liquide chaud. Ne déplacez pas
l’appareil durant la cuisson.
Laissez la poêle refroidir avant
d’en retirer l’huile ou tout autre
liquide.
• Ne touchez pas les surfaces
chaudes de l’appareil.
Servez-vous des poignées ou
boutons.
• Ne laissez pas l’appareil sans
surveillance lorsqu’il est en
usage.
• Tournez toujours la sonde
de température à la marque
MINIMUM, laissez-la refroidir,
puis retirez-la et débranchez
l'appareil s'il est laissé sans
surveillance, n'est pas en usage
ou avant de le nettoyer.

17
• Gardez l’appareil propre.
Suivez les instructions de
nettoyage décrites dans le
présent livret.
• Utilisez toujours l’appareil sur
une surface sèche et de niveau.
IMPORTANTES
PRÉCAUTIONS
POUR TOUT
APPAREIL
ÉLECTRIQUE
• Déroulez complètement le
cordon avant l’usage.
• Ne laissez pas le cordon pendre
d’une table ou d’un comptoir,
toucher des surfaces chaudes
ou se nouer.
• Cet appareil n’est pas
conçu pour être utilisé sans
surveillance par de jeunes
enfants ou des personnes
handicapées.
• Surveillez les jeunes enfants
pour qu’ils ne jouent pas avec
l’appareil.
• L’appareil n’est pas conçu
pour fonctionner à partir d’une
minuterie externe ou d’un
contrôle à distance.
• Il est recommandé de vérifier
régulièrement l’appareil.
Ne l’utilisez pas si le cordon
d’alimentation, la fiche, la
sonde ou l’appareil sont
endommagés de quelque
façon. Cessez immédiatement
l'usage de l'appareil et appelez
le Soutien aux consommateurs
de Breville pour le faire
examiner, réparer ou ajuster.
• Pour tout entretien autre que le
nettoyage, visitez www.breville.
com ou appeler le Soutien aux
consommateurs de Breville.
• Cet appareil est conçu pour un
usage domestique seulement.
Ne l’utilisez pas à d’autres fins
que celles pour lesquelles il est
conçu.
• N’utilisez pas l’appareil dans
un véhicule ou un bateau en
mouvement ni à l’extérieur.

18
• L’installation d’un dispositif de
courant résiduel (interrupteur
de sécurité) est recommandée
pour assurer une sécurité
supplémentaire lors de
l’utilisation d’un appareil
électrique. Il est conseillé
d’installer un interrupteur
de sécurité avec courant
résiduel de fonctionnement
nominal d’au plus 30 mA
sur le circuit électrique qui
alimente l’appareil. Consultez
un électricien pour des conseils
professionnels.
• Ne placez pas cet appareil sur
ou près d’un élément au gaz ou
électrique, ou à un endroit où il
pourrait toucher un four chaud.
• Éteignez toujours l'appareil,
puis débranchez-le lorsqu’il
n’est pas en usage, avant de
tenter de le déplacer ou avant
le nettoyage.
• L’utilisation d’accessoires non
recommandés par Breville peut
causer des blessures.
• Cet appareil n’est pas conçu
pour la grande friture.
ATTENTION
Afin de prévenir les brûlures ou
blessures personnelles, utilisez
toujours des maniques ou gants
de cuisine lorsque vous touchez
ou manipulez la poêle. Les
surfaces de l’appareil sont très
chaudes durant et après l’usage.
FICHE ASSIST®DE
BREVILLE
Votre appareil Breville est muni
d’une fiche exclusive Assist®
pourvue d’un anneau conçu
pour laisser passer un doigt afin
de permettre le retrait facile et
sécuritaire de la prise électrique.
PROPOSITION 65 DE LA
CALIFORNIE:
(Applicable aux résidents de la
Californie seulement).
Cet appareil contient des
produits chimiques connus de
l’État de la Californie comme
pouvant causer le cancer, des
malformations congénitales
ou autres problèmes de
reproduction.

19
COURT CORDON
D’ALIMENTATION
Votre appareil Breville est muni
d’un court cordon d’alimentation
très sécuritaire qui réduit les
risques de blessures corporelles
ou dommages pouvant être
causés par le fait de tirer,
trébucher ou s’enchevêtrer
dans un cordon plus long.
Les cordons d'alimentation
amovibles plus longs ou les
rallonges sont disponibles et
peuvent être utilisés avec
précaution. Si vous utilisez
une rallonge: (1) la puissance
nominale indiquée sur la corde
doit être au moins équivalente à
celle de l’appareil; (2) la corde ne
doit pas pendre d’un comptoir
ou d’une table où des enfants
pourraient involontairement s’y
suspendre ou trébucher; (3) la
rallonge doit être munie d’une
fiche à trois branches reliée à la
terre.
USAGE DOMESTIQUE SEULEMENT
CONSERVEZ CES INSTRUCTIONS

20
Composants
J
A. Grande poêle rectangulaire
de 39 cm x 31 cm
Va au lave-vaisselle.
B. Orifice de l’évent à vapeur
Permet d’insérer la sonde de température.
C. Couvercle bombé en verre trempé
Va au lave-vaisselle.
D. Poignées en acier inoxydable moulé
E. Élément papillon moulé
Puissance de 1800 watts, pour une
distribution uniforme de la chaleur
sur toute la surface de cuisson.
F. Surface de cuisson antiadhésive
sans APFO
Facilite le nettoyage.
G. Pieds antidérapants
H. Levier à bascule
I. Contrôle précis de température variable
6 réglages de chaleur, incluant SEAR (saisir).
J. Grille en acier inoxydable
Pour cuire à la vapeur et rôtir.
K. Bec verseur
B
FE
K
I
HG
A C D
Table of contents
Languages:
Other Breville Skillet manuals

Breville
Breville Avance BEF200 Quick guide

Breville
Breville Avance BEF200 User manual

Breville
Breville Thermal Pro Stainless BEF500 User manual

Breville
Breville the Skillet TF20 User manual

Breville
Breville TF10 User manual

Breville
Breville BEF200 - REV A10 User manual

Breville
Breville The Thermal Pro User manual

Breville
Breville BEF460 User manual

Breville
Breville The Banquet Pan BEF250 User manual