manuals.online logo
Brands
  1. Home
  2. •
  3. Brands
  4. •
  5. Aroma
  6. •
  7. Toaster
  8. •
  9. Aroma ATS-274MB User manual

Aroma ATS-274MB User manual

Instruction Manual
Model ATS-274MB
4-Slice Toaster
Manual de Instrucciones
Modelo: ATS-274MB
Tostadora de
quatro rebanadas
¡Felicitaciones!
Su tostadora de quatro rebanadas es un producto muy atractivo
para el hogar que ofrece calidad superior, tanto para su familia como para
sus amistades.
Antes de utilizar la tostadora por primera vez, lea con atención las
siguientes instrucciones.
Publicado por:
Aroma Housewares Co.
6469 Flanders Drive
San Diego, CA 92121
EE.UU.A.
www.aromaco.com
© 2005Aroma Housewares Company
Published By:
Aroma Housewares Co.
6469 Flanders Drive
San Diego, CA 92121
U.S.A.
1-800-276-6286
www.aromaco.com
© 2005Aroma Housewares CompanyAll rights reserved.
Congratulations! Your 4-slice toaster will be an attractive addition
to your home, while delivering superior quality to your family and friends.
Please read the following instructions carefully before your first use.
IMPORTANTES INSTRUCCIONES DE SEGURIDAD
Siempre se deben seguir las precauciones de seguridad básicas al usar
electrodomésticos, incluidas las siguientes:
1. Antes de usar esta unidad, lea todas las instrucciones.
2. No toque las superficies calientes. Utilice las asas o manijas. as superficies
metálicas se calientan mucho.
3. Para evitar riesgos de descargas eléctricas, no sumerja el cable, el enchufe o la
tostadora en agua o en otros líquidos. Consulte las instrucciones de limpieza.
4. Cuando un aparato electrodoméstico es utilizado por niños, o cerca de ellos, es
necesaria una atenta supervisión.
5. Siempre desenchufe la unidad cuando no esté en uso y antes de limpiarla.
Permita que la unidad se enfríe antes de limpiarla o manipularla.
6. No opere ningún aparato electrodoméstico cuyo cable o enchufe estén dañados,
que haya dejado de funcionar correctamente, que se haya caído o que se
encuentre dañado de cualquier manera. leve el aparato a un centro de servicio
autorizado para su revisión, reparación o ajuste eléctrico o mecánico.
7. No se recomienda el uso de accesorios no aprobados por el fabricante del aparato
electrodoméstico, ya que podrían ocurrir lesiones.
8. No lo utilice en exteriores.
9. No permita que el cable cuelgue del borde de la mesa o mostrador, ni que toque
superficies calientes.
10. No coloque la tostadora sobre o cerca de una hornalla de gas o eléctrica caliente,
ni dentro de un horno caliente.
11. Para desenchufar la tostadora, tome el enchufe y retírelo del tomacorriente. Nunca
jale del cable para desenchufar la unidad.
12. No utilice la tostadora para ningún otro fin que el indicado.
13. No coloque porciones demasiado grandes de alimentos, envolturas de papel de
aluminio o utensilios en la tostadora, ya que podrían incendiarse o provocar un
choque eléctrico.
14. a tostadora puede causar un incendio si se utiliza cuando está tapada o en
contacto con materiales inflamables, como cortinas, telas y paredes.
15. No intente retirar alimentos atascados cuando la tostadora está conectada a un
tomacorriente.
16. Para prevenir la posibilidad de un incendio, no deje la tostadora sin supervisión
durante su funcionamiento.
17. impie regularmente las migas acumuladas para prevenir riesgos de incendio o el
mal funcionamiento de la tostadora. No coloque alimentos cuyo relleno o cobertura
se pueda derretir y gotear al calentarse. Dichas acumulaciones dentro de la
tostadora crean condiciones insalubres y la posibilidad de incendio o de mal
funcionamiento de la unidad. Desenchufe la unidad cuando no esté en uso y antes
de limpiarla.
1
IMPORTANT SAFEGUARDS
1. Read all instructions before using the appliance.
2. Do not touch hot surfaces. Use handles or knobs. Metal surfaces become
extremely hot.
3. To prevent against electrical hazards, do not immerse cord, plug or toaster in water
or other liquid. See instructions for cleaning.
4. Close supervision is necessary when any appliance is used by or near children.
5. Always unplug appliance from outlet when not in use and before cleaning.Allow to
cool before cleaning and handling.
6. Do not operate any appliance with a damaged cord or plug, Do not use after
appliance malfunctions, is dropped or damaged in any manner. Return the
appliance to an authorized service facility for examination, repair or
electrical/ mechanical adjustment.
7. The use of accessory attachments not approved by the appliance manufacturer is
not recommended and may cause injuries.
8. Do not use outdoors.
9. Do not let cord hang over edge of table or counter or touch hot surfaces.
10. Do not place toaster on or near a hot gas or electric burner or a heated oven.
11. To disconnect, grasp plug and remove from outlet. Never unplug by pulling the cord.
12 Do not use toaster for other than intended use.
13. Oversized foods, foil packages or utensils must not be inserted in the toaster as
they present a risk of fire or electric shock.
14. Afire may occur if toasters are covered or touching flammable material including
curtains, draperies and walls during operation.
15. Do not attempt to dislodge food when the toaster is plugged into electrical outlet.
16. To avoid possibility of fire, do not leave toaster unattended during use.
17. Clean out accumulated crumbs frequently to avoid risk of fire or toaster
malfunction. Do not use foods that will drip coatings or fillings when heated. Such
accumulations inside the toaster create unsanitary conditions and the possibility of
fire or toaster malfunction. Unplug when not in use and before cleaning.
SAVE THESE INSTRUCTIONS
Basic safety precautions should always be followed when using electrical appliances,
including the following:
1
GUARDE ESTAS INSTRUCCIONES
INSTRUCCIONES PARA USAR EL CABLE CORTO
1. Se proporciona un cable eléctrico corto con el propósito de reducir el riesgo
de tropezarse o enredarse con un cable más largo.
2. Hay cables de extensión más largos disponibles y deben ser usados co
sumo cuidado.
3. Si se usa un cable de extensión más largo:
a. a clasificación eléctrica marcada en el cable de extensión debe ser
por lo menos igual que la clasificación eléctrica del aparato.
b. El cable más largo debe ser colocado de manera que no cuelgu
por el borde del mostrador o mesa en donde pudiera ser jalado por
un niño o alguien pudiera tropezarse con el cable sin querer.
CLAVIJA POLARIZADA
Este aparato cuenta con una lavija polarizada (una espiga es más ancha que la
otra); siga las siguientes instrucciones:
Para reducir el riesgo de choque eléctrico, esta clavija debe ser conectada a una salida
o enchufe eléctrico polarizado solamente de una manera. Si la clavija no entra
completamente en el enchufe, voltee la clavija.
Si aún no queda bien en el enchufe, póngase en contacto con un electricista
especializado. No trate de modificar la clavija.
Este apa ato fue diseñado
Solamente pa a Uso Doméstico.
2
SHORT CORD INSTRUCTIONS
1. Ashort power-supply cord is provided to reduce risk resulting from becoming
entangled in or tripping over a longer cord.
2. onger extension cords are available and may be used if care is exercised.
3. If a longer extension cord is used:
a. The marked electrical rating of the extension cord should be at least as great as
the electrical rating of the appliance.
b. The longer cord should be arranged so that it will not drape over the counter top
or tabletop where it can be pulled by children or tripped over unintentionally.
POLARIZED PLUG
This appliance has a polarized plug (one blade is wider than the other); follow the
instructions below:
To reduce the risk of electric shock, this plug is intended to fit into a polarized outlet
only one way. If plug does not fit fully into the outlet, reverse the plug. If it still does
not fit, contact a qualified electrician. Do not attempt to modify the plug in any way.
2
This applian e is for household use only.
¡NO DEJE QUE EL CABLE CUELGUE!
¡MANTÉNGASE
LEJOS DE LOS
NIÑOS!
9
IDENTIFICACIÓN DE LAS PARTES
PARTS IDENTIFICATION
3
3
1. Self Centering Bread Slots 6. Browning Control Knob
2. Control Panel 7. Bagel Function and Indicator ight
3. Removable Crumb Tray 8. Defrost Function and Indicator ight
4. Cancel Function and Indicator ight 9. Power Cord
5. 2 or 4 Slice Selector and Indicator ight 10. Bread Carriage ever
1. Ranuras con autocentrado para pan 2. Panel de control
3. Bandeja desmontable para migajas 4. Función para cancelar y luz indicadora
5. Seleccionar 2 ó 4 rebanadas 6. Perilla de control de tostado
7. Función para bagels y luz indicadora 8. Funciónparadescongelaryluzindicadora
9. Cable de alimentación eléctrica 10. Palanca del portador de pan
1
8
2
10
5
7
4
3
6
9
1
8
2
10
5
7
4
3
6
4
HOW TO USE
4
1. Before first use, check inside toaster slots for packaging and remove anything found.
2. For first time use, run toaster empty through a full cycle to allow the new elements to
preheat and burn off any dust that may have accumulated during assembly.
3. Make sure the crumb tray is in place and the bread carriage lever is in the UP
position.
4. Place toaster on flat, stable surface away from the edge and at least 3 inches away
from wall or back of counter.
5. Unwind power cord and plug into nearby outlet.
6. Make sure the bread carriage is in the up position and insert slices of bread.
7. Turn the browning control knob to desired position. The higher the number (1-6), the
darker the toast.
8. Press the bread carriage lever down until it locks into position.
9. When the toasting cycle is completed, the toast is automatically raised. To terminate
the toasting cycle before it is completed, simply press the Cancel button.
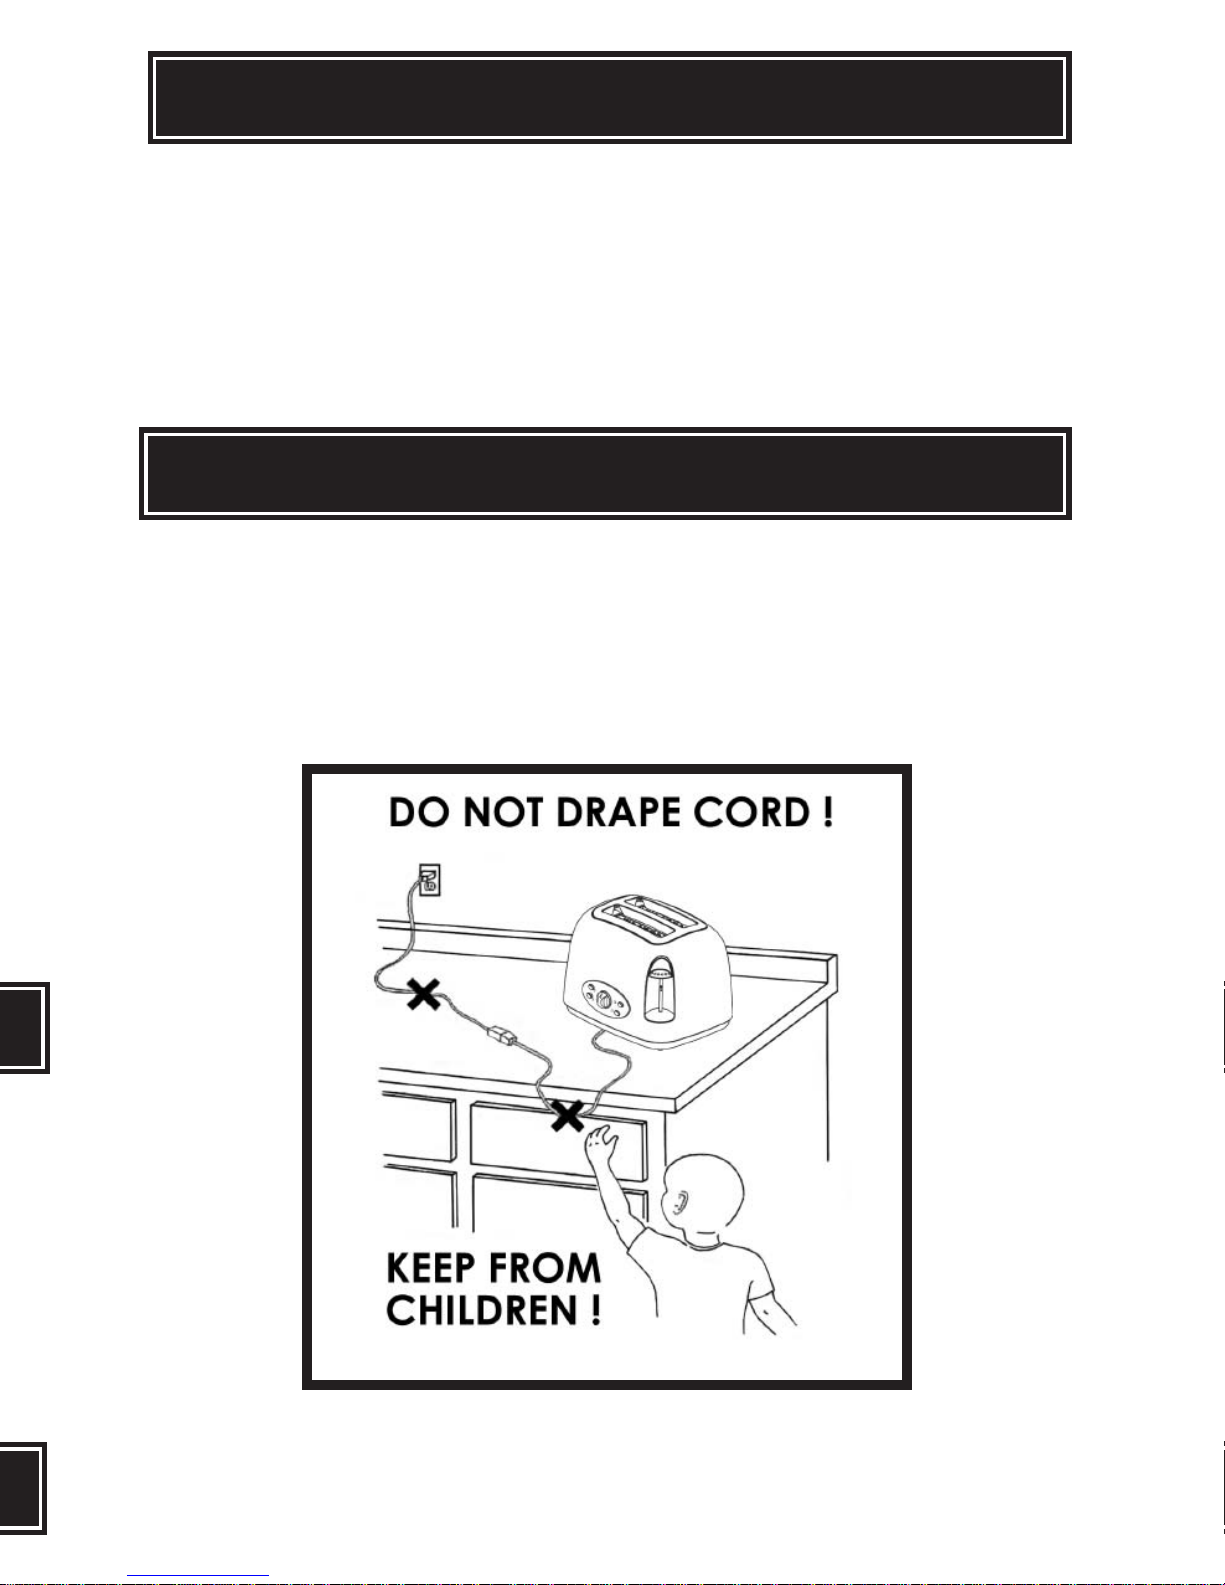
10.After use, unplug the toaster from the electrical outlet.
11. Never wrap cord around outside of toaster. Cord should be stored on the storage
cleats under the toaster.
Toasting Suggestions
-Toasting is a combination of drying and cooking the bread. Moisture levels differ
from one type of bread to the other, which can result in varying toasting times.
1. For slightly dry bread, use a lower setting (1-3) on the browning control knob.
2. For fresh bread or whole wheat, use a higher setting (4-6) on the browning control
knob.
3. Breads with very uneven surfaces, such as English muffins, will require a higher
setting (4-6) on the browning control knob.
4. Thickly cut pieces of bread, such as bagels, will take longer to toast since more
moisture must be evaporated from the bread before toasting can occur.
5. Very thick pieces may require two cycles.
6. When toasting breads containing fruit, remove all loose pieces before placing in the
toaster. This will prevent loose items from falling into the toaster or sticking to the
guard wire.
7. Before toasting bagels, slice into two equal halves, place them in the toaster with the
cut sides facing each other and select the Bagel function. The bagel function only
uses the heating wires in the middle of the unit.
8. For toasting a single slice, use a lower setting (1-3) on the browning control knob.
9. For frozen items, such as pancakes, bagels and waffles, use the Defrost function.
10.Use caution when toasting pastries as filling can become very hot before the surface
of the pastry becomes brown.
1. Antesdeutilizarlaunidadpor primeravez,verifiquedentrodelasranurasdelatostadora
yretirecualquierelementoqueencuentreallí.
2. Parautilizarlaunidadporprimeravez,hagafuncionarlatostadoravacíaduranteunciclo
completoparaprecalentarlos nuevoselementos yquemarelpolvilloque puedahaberse
acumuladoduranteelarmadodelaunidad.
3. Asegúrese dequelabandejapara migajasestécolocaday quelapalancadeportador
depanestéhaciaARRIBA(UP).
4. Coloquelatostadorasobreuna superficieplana yestable,alejadadelbordedelamesa y
anomenosde3 pulgadasdelaparedoparteposteriordelmostradordelacocina.
5. Desenrolleelcable dealimentacióneléctricay enchúfeloenuntomacorriente cercano.
6. Asegúrese dequeelportadordepan estéhaciaarriba ycoloquedos rebanadasdepan.
7. Girelaperilladecontroldetostadohastaelniveldeseado.Cuantomásaltoseael
número(1a 6), mássetostaráelpan.
8. Empujehaciaabajo lapalancadel portador depanhastaquesetrabeensusitio.
9. Cuandosecomplete elciclodetostado, lastostadas subiránautomáticamente.Para
interrumpirelciclo detostadoantesdeque finalice, simplementeoprima elbotónCancel
(Cancelar).
10.Despuésdeluso, desenchufelatostadora.
11. Nunca envuelvaelcablealrededor delatostadora.Elcable debeguardarseenrollándolo
enlaslengüetasdesujeciónsituadasdebajodelaunidad.
Sugeren ias de tostado
- Eltostadoesunacombinacióndesecadoy coccióndelpan. os nivelesdehumedad
difierensegúneltipo depan,locualpuederequerir tiemposdetostadodistintos.
1. Sielpanseencuentralevementeseco, utiliceunajustemenor(1a3)delaperillade
controldetostado.
2. Parapanfrescoo detrigointegral,utilicenivelesmásaltos(4a 6).
3. ospanescon superficiesnouniformes,comolosEnglishmuffins,requierenajustarla
perilladecontrola nivelesmásaltos(4a6).
4. aspiezasmás gruesas,comolosbagels,necesitanmás tiempodetostado debidoa
quedebenevaporarmás humedadantesdequeelpancomiencea tostarse.
5. aspiezasmuy gruesaspuedenrequerirdos ciclosdetostado.
6. Altostarpanesquecontenganfrutas, retiretodaslaspartessueltasantes decolocarlos
enlatostadora.Estoevitaráquelaspequeñasporcionescaigandentro delatostadorao
sepeguenalalambreprotector.
7. Antesdetostarbagels,córtelosendos mitadesiguales,colóquelasenlatostadoracon
lassuperficiesdemigafrente afrentey seleccione lafunciónBagel.Estafunciónsólo
utilizalosalambrescalefactoresenelcentrodelaunidad.
8. Paratostarunasola rebanada,utiliceunajustemenor(1a3)enlaperilladecontrolde
tostado.
9. Parapiezascongeladas,comopanqueques,bagelsy waffles,utilicelafunciónDefrost
(Descongelar).
10.Presteatenciónaltostarproductosderepostería,puestoque elrellenopuedecalentarse
muchoantes dequelasuperficie delalimento sedore.
INSTRUCCIONES DE USO
Fun ión para des ongelar
1. Coloque las rebanadas de pan en las ranuras.
2. Gire la perilla de control de tostado hasta el nivel deseado:
• Niveles 1 y 2: para panes refrigerados y porciones congeladas más delgadas, como
panqueques congelados.
• Niveles 3 y 4: para productos de repostería, waffles congelados, tostadas francesas
delgadas y bagels refrigerados.
• Niveles 5 y 6: para piezas congeladas más gruesas, tales como bagels, pan cortado
a mano y tostadas francesas gruesas.
3. Empuje hacia abajo la palanca del portador de pan hasta que se trabe en su sitio.
4. Oprima el botón Defrost (Descongelar).
5. Cuando se complete el ciclo de tostado, el portador de pan levantará las tostadas
automáticamente. Para interrumpir el ciclo antes de que finalice, simplemente
oprima el botón Cancel (Cancelar).
Fun ión para sele ionar 2 ó 4 rebanadas
1. Coloque las rebanadas de pan en las ranuras. Si sólo desea tostar 2 rebanadas,
colóquelas en las dos primeras ranuras más cercanas al panel de control.
2. Seleccione la cantidad adecuada de rebanadas que desee tostar.
3. Empuje hacia abajo la palanca del portador de pan hasta que se trabe en posición.
4. Cuando se complete el ciclo de tostado, el portador de pan levantará las tostadas
automáticamente.
5. Si desea detener el ciclo de tostado, oprima el botón Cancel (cancelar).
Fun ión para bagels
Nota: Esta función sólo utiliza los alambres calefactores en el centro de la unidad.
1. Corte el bagel en dos mitades iguales.
2. Coloque las mitades del bagel en las ranuras de modo que las superficies de miga
queden frente a frente.
3. Empuje hacia abajo la palanca del portador de pan hasta que se trabe en su sitio.
4. Oprima el botón Bagel.
5. Cuando se complete el ciclo de tostado, el portador de pan levantará las tostadas
automáticamente.
6. Si desea detener el ciclo de tostado, oprima el botón Cancel (Cancelar).
HOW TO USE
Defrost Fun tion
1. Insert slices of bread into the bread slots.
2. Turn the browning control knob onto the desired position:
• Setting 1-2: for refrigerated breads and thinner frozen items such as frozen
pancakes.
• Setting 3-4: for pastries, frozen waffles, thin French toast and refrigerated bagels.
• Setting 5-6: for thicker frozen items such as bagels, hand cut bread and thick
French toast.
3. Press the bread carriage lever down until it locks into position.
4. Press the Defrost button.
5. When the toasting cycle is completed, the bread carriage will raise the toast up. To
terminate the cycle before it is completed, simply press the Cancel button.
Reheat Fun tion
1. Insert slices of bread into the bread slots.
2. Press the bread carriage lever down until it locks into position.
3. Press the Reheat button.
4. When the toasting cycle is completed the bread carriage will raise the toast up.
5. If you wish to stop the toasting function, press the Cancel button.
Bagel Fun tion
Note: The bagel function only uses the heating wires in the middle of the unit.
1. Cut the bagel into two equal halves.
2. Insert the bagel halves into the slots with the cut sides facing each other.
3. Press the bread carriage level down until it locks into position.
4. Press the Bagel button.
5. When the toasting cycle is completed the bread carriage will raise the toast up.
6. If you wish to stop the toasting function, press the Cancel button.
INSTRUCCIONES DE USO
5
5
HOW TO CLEAN
1. Always unplug unit and allow to cool before cleaning.
2. Do not use abrasive cleansers. Simply wipe the exterior with a clean damp cloth and
dry thoroughly. If a cleaning solution is used, apply to a clean cloth and not directly
onto the toaster.
3. To remove crumbs, slide out the crumb tray and discard crumbs. Wipe clean and
replace. Never operate the toaster without the crumb tray in place.
4. To remove bread caught in the toaster, unplug from outlet, turn upside down and
shake gently. Never insert any hard or sharp object into toaster.
6
6
1. Siempre desenchufe la unidad y deje que se enfríe antes de limpiarla, .
2. No utilice limpiadores abrasivos. Simplemente frote la superficie externa con un
paño húmedo y limpio y séquela completamente. Si utiliza una solución de limpieza,
aplíquela a un paño limpio y no directamente en la tostadora.
3. Para retirar las migajas, deslice hacia fuera la bandeja de migajas y deseche las
migajas. Frótela para limpiarla y vuelva a colocarla. Nunca haga funcionar la
tostadora sin la bandeja de migas.
4. Para retirar piezas de pan atascadas en la tostadora, desenchufe la unidad, voltéela
al revés y sacúdala suavemente. Nunca inserte objetos duros o afilados en la
tostadora.
CÓMO LIMPIAR EL APARATO
GARANTÍA LIMITADA
Aroma Housewares Company garantiza que este producto esté libre de
defectos de fabricación y en los materiales durante un período de un año de la
fecha comprobable de compra dendro de os Estados Unidos.
Dentro de este período de garantía,Aroma Housewares Company, a su
opción, reparará o reemplazará gratuitamente cualquier parte que resulte
defectuosa, siempre y cuando el producto sea devuelto aAroma Housewares
Company, con porte pagado y comprobante de compra y U.S. $8.00 para
gastos de envío y manejo. Sírvase llamar al número telefóni o gratuito
que se men iona abajo para obtener un número de autoriza ión de
devolu ión. Espere entre 2-4 semanas para re ibir el aparato
nuevamente.
Esta garantía no cubre la instalación incorrecta, uso indebido, maltrato o
negligencia por parte del usuario. a garantía también es inválida en caso de
que el aparato sea desarmado o se le dé mantenimiento por un centro de
servicio no autorizado.
Esta garantía le ofrece derechos legales específicos, los cuales podrán variar
de un estado a otro y no cubre fuera de os Estados Unidos.
AROMAHOUSEWARES COMPANY
6469 Flanders Drive
San Diego, California 92121
1-800-276-6286
-V, 8:30AM - 5:00 PM, Tiempo del Pacífico
Sitio Web: www.aromaco.com
7
LIMITED WARRANTY
Aroma Housewares Company warrants this product free from defects in material
and workmanship for one year from provable date of purchase in the continental
United States.
Within this warranty period,Aroma Housewares Company will repair or replace, at
its option, defective parts at no charge, provided the product is returned, freight
prepaid with proof of purchase and U.S. $8.00 for shipping and handling charges
payable toAroma Housewares Company. Before returning an item, please call the
toll free number below for return authorization number. Allow 2-4 weeks for return
shipping.
This warranty does not cover improper installation, misuse, abuse or neglect on the
part of the owner. Warranty is also invalid in any case that the product is taken
apart or serviced by an unauthorized service station.
This warranty gives you specific legal rights which may vary from state to state and
does not cover areas outside the United States.
AROMAHOUSEWARES COMPANY
6469 Flanders Drive
San Diego, California 92121
1-800-276-6286
M-F, 8:30AM - 5:00 PM, Pacific Time
Website: www.aromaco.com
7

Other Aroma Toaster manuals

Aroma gourmet ATS-402 User manual

Aroma

Aroma gourmet ATS-402 User manual

Aroma ATS-102 User manual

Aroma

Aroma ATS-102 User manual

Aroma ATS-272W User manual

Aroma

Aroma ATS-272W User manual

Aroma PTS-304 User manual

Aroma

Aroma PTS-304 User manual

Aroma ATS-272R User manual

Aroma

Aroma ATS-272R User manual

Aroma ATS-102 User manual

Aroma

Aroma ATS-102 User manual

Aroma PTS-202 User manual

Aroma

Aroma PTS-202 User manual

Aroma PTS-304 User manual

Aroma

Aroma PTS-304 User manual

Aroma ATS-274W User manual

Aroma

Aroma ATS-274W User manual

Aroma PTS-204 User manual

Aroma

Aroma PTS-204 User manual

Popular Toaster manuals by other brands

SEVERIN AT 2577 Dimensions

SEVERIN

SEVERIN AT 2577 Dimensions

Cuisinart CPT780 Series manual

Cuisinart

Cuisinart CPT780 Series manual

Mellerware 2 4 1 0 2 instructions

Mellerware

Mellerware 2 4 1 0 2 instructions

Russell Hobbs 20370-56 instructions

Russell Hobbs

Russell Hobbs 20370-56 instructions

decakila KUTS003W quick start guide

decakila

decakila KUTS003W quick start guide

Breville Bit More BTA720XL user manual

Breville

Breville Bit More BTA720XL user manual

ARTHUR MARTIN AMP179 instruction manual

ARTHUR MARTIN

ARTHUR MARTIN AMP179 instruction manual

dyras T-311B instruction manual

dyras

dyras T-311B instruction manual

Blizzard BCT2 owner's manual

Blizzard

Blizzard BCT2 owner's manual

Commercial CHEF CCT2201B user manual

Commercial CHEF

Commercial CHEF CCT2201B user manual

Hamilton Beach SmartToast 22408 owner's manual

Hamilton Beach

Hamilton Beach SmartToast 22408 owner's manual

DeLonghi CTO Series Instructions for use

DeLonghi

DeLonghi CTO Series Instructions for use

SEVERIN AT 2519 Instructions for use

SEVERIN

SEVERIN AT 2519 Instructions for use

Drew & Cole TA1408-GS user manual

Drew & Cole

Drew & Cole TA1408-GS user manual

Philips Cucina HD2524 user guide

Philips

Philips Cucina HD2524 user guide

DeLonghi CTIN2003.W manual

DeLonghi

DeLonghi CTIN2003.W manual

Philips HD2630 Specifications

Philips

Philips HD2630 Specifications

Philips HD2628 manual

Philips

Philips HD2628 manual

manuals.online logo
manuals.online logoBrands
  • About & Mission
  • Contact us
  • Privacy Policy
  • Terms and Conditions

Copyright 2025 Manuals.Online. All Rights Reserved.