manuals.online logo
Brands
  1. Home
  2. •
  3. Brands
  4. •
  5. Aroma360
  6. •
  7. Accessories
  8. •
  9. Aroma360 HOTEL SCENTS MUSEUM360 User manual

Aroma360 HOTEL SCENTS MUSEUM360 User manual

At a Glance
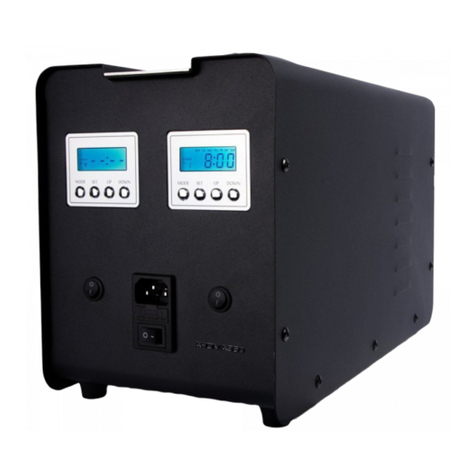
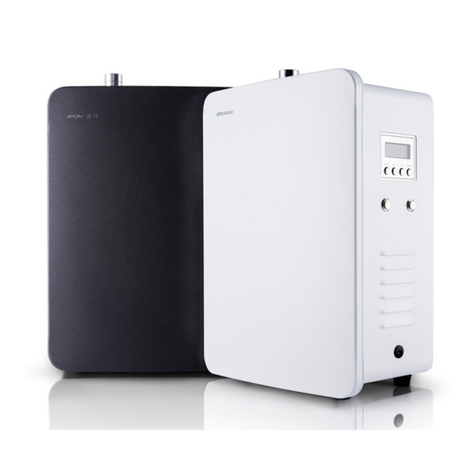
Understanding Your Museum360
MODE SET UP DOWN
: 00
LCD Screens — The Museum360 has two LCD screens to oer
dual-scenting power.
POWER — The unit has three power buttons. The center switch underneath
the LCD screens turn on the unit. The individual switches underneath the
LCD screens power the corresponding sides of the Museum360.
LOCK SETTINGS — If you want to lock the settings to prevent tampering,
hold down the SET button for 20 seconds. This will prevent anyone from
adjusting the settings on the unit. You will hear a beep that confirms the
settings have been locked. Repeat to unlock the settings. You will need to
unlock the unit to adjust the settings.
FACTORY RESET — If you want to reset the unit to the factory settings,
hold down the MODE button for 20 seconds and the unit will return to the
original settings.
HVAC CONNECTION — Your Museum360 is meant to be used in
conjunction with the central air conditioning system.
The Museum360’s LCD display provides valuable information about your
settings. Here is a quick guide on what each item means.
WORK/PAUSE — When the unit is in WORK mode, it is emitting aroma.
When the unit is in PAUSE mode, it is not emitting aroma.
TIME — The number displayed on the unit should represent the current time,
using the 24-hour clock.
DAY OF THE WEEK — The Museum360 allows you to have dierent settings
for multiple days. The day that’s shown on the display should be the current
day.
SCENT/WORK/PAUSE — This screen appears when adjusting the scenting
strength.
Setting Up Your Museum360
Now that the diuser is powered on, you may begin adjusting the settings to
your liking. By default, the LCD screen will depict the current time. Note the
unit uses a 24-hour clock so 5:30pm will be shown as 17:30
How to Adjust the Scent Intensity
Press MODE and the display will show SCENT WORK PAUSE. This is
where you will adjust the scent intensity for EVENT 1. You can set it
between 5% and 95% (with 5% being the lowest setting and 95% being
the highest setting). Press SET to confirm the intensity.
Once you have the desired scent intensity, press MODE and EVENT 2 ON
will appear. This will allow you to set the On Time for the second and
remaining EVENTS. If you only have one EVENT, then press MODE until
you reach the end of the event settings.
1
2
Unbox your diuser to reveal your new Museum360. Familiarize yourself with
the parts and accessories.
Connect the 10A-125V power cord to the diuser and plug it into a regular
110v outlet. Press the center button to power the unit on. Press the switch
underneath the LCD screen to power on the individual sides. Turn both sides
on if you are using the Museum360 as a Double.
1
2
Setting the Operating Hours
Now it’s time to set your scenting events. The Museum360 allows up to five
individual events to scent at dierent times throughout the days of the week.
To set the start time of an operating period: Press MODE. EVENT 1 ON will
appear. This represents the On Time for the first working period. Set time as
instructed above.
To set the operating days: Press UP or DOWN. The days of the week will
begin to flash. Select the days you wish to apply the working hours to. Once
the desired days have been selected, press SET to confirm.
To set the end time of the operating period: Press MODE. EVENT 1 OFF will
appear. This represents the O Time for the first operating period. Press UP
or DOWN to adjust the hour, press SET to confirm. Repeat to set the
minutes.
Repeat these steps to set Events 2-5, if need be.
Ensure there are no conflicting settings.
The unit cannot be set to run past midnight. You must split the setting
between two dierent working periods. For example:
i. EVENT 1 ON — 22:00 EVENT 1 OFF — 23:59
ii. EVENT 2 ON — 00:01 EVENT 2 OFF — 04:00
1
2
3
4
Installing your Museum360
Ensure that your diuser is powered o and unplugged. Aix the provided
wall plate and atomizer as close to the ductwork as possible. Unscrew the
bottle from the wall plate and atomizer. Pour in your Aroma360 fragrance oil
and tightly screw the bottle back into place.
Insert one end of the thin white tube into the hole on the back of the diuser
on the side you have set and are prepared to use. Insert the other end into
the top of the atomizer. Cut away any excess tubing.
Just after your HVAC filter, use a screwdriver or a drill to make a small hole
(or two if you are installing a Double Museum360) in the ductwork. These
scent points should be the same diameter as the thick transparent tube.
Insert one end of the thick tube about 6” into the scent hole and the other
end into the larger hole at the top of the atomizer. Cut away any excess
tubing and seal the scent point (see below) with HVAC tape. Ensure your
tubing is vertical and not horizontal.
Plug in and turn on your diuser to begin enjoying your consistent scenting
experience.
1
2
3
4
5
•
•
Setting the Current Time
To set the current time, press SET and the hour will flash. Press UP or DOWN
to adjust to the current hour and press SET to confirm your choice. (If your
screen is unresponsive, press and hold the SET button for 20 seconds).
The minutes will now be flashing. Press UP or DOWN to adjust to the current
minute and press SET to confirm your choice.
The day of the week will now be flashing. Press UP or DOWN to adjust to the
current day of the week and press SET to confirm.
1
2
3
•
•
•
•
•
•
•
•
The Museum360 Diuser Unit
1 or 2 Empty Aluminum Bottles
1 or 2 Atomizers with Attached
Wall-Mountable Plate
Power Cord
Thick Transparent Tubing
Thin White Tubing
Wall Mounting Brackets
Spare Nozzle
What’s included:
MODE SET UP DOWN
-- : --
MUSEUM
The
Tips for Using Your Museum360
Diusing rubbing alcohol every three months helps maintain the diuser and
prevent oil from clogging your system.
Please ensure the Museum360 and atomizers are always kept in the upright
position, away from any kind of moisture and extreme temperatures, and also
out of reach of children.
Always make sure the unit is either powered o or unplugged before adding
or removing the oil canister.
Always remove oil when transporting the unit.
To remove the thick or thin tubing from the atomizer or diuser, simply press
down on the black outer portion of the tube connector and the tubing will
release as the black outer ring is a “release” button.
PROBLEM REASON
No LCD Indication Power is not getting to the unit or the unit is turned
o.
Make sure the unit is plugged in.
Check the LCD display. If it says “OFF”, the unit is not
set to be working at that time. If the unit says “PAUSE”
it’s on the pause portion of the interval.
Oil could be out.
No Mist/Scent
Low Mist/Scent The nozzle may be clogged.
Oil Leakage Ensure the Museum360 is a full upright position.
Buttons are not
working
The unit’s settings may be locked.
Plug in the unit and press the silver button that is
on the lower side part of the Museum360.
SOLUTION
SOLUTION
SOLUTION
Ensure the power is connected and adjust the
event times and days so that the unit is set to
“ON”. Also check the oil canister to make sure
there is oil in the bottle.
Run with rubbing alcohol for 3 minutes or change
the nozzle.
SOLUTION Remove the fragrance bottle and reattach
making sure it is screwed in straightly and is
very tight.
SOLUTION Hold down the “SET” button for 10 seconds until
you hear a beep. The sound will indicate “lock
mode” has been disabled.
•
•
•
•
•
Adding Your Hotel Scents Oil Troubleshooting
Be certain the diuser is unplugged or powered o before proceeding.
Unscrew the aluminum oil bottle from the atomizer.
You will see an oil pipette aixed to a nozzle. Pour your Aroma360 oil into the
provided aluminum bottle. Then, screw in the aluminum bottle until it is
tightly secured.
• Do not overfill the bottle.
• Only Hotel Scents oils should be used in the Museum360; using any other
oils may damage the unit and will void the warranty.
Screw in the fragrance bottle to the atomizer. Ensure it is inserted tightly and
straight otherwise, the oil will leak. Once the fragrance bottle is secured, you
may turn on or plug in the diuser
When changing scenting oils, remove any oils in the bottle inside first. (You
may dispose of it or pour it back into the original bottle). Pour some rubbing
alcohol into the aluminum bottle, about ¼ full. Diuse the rubbing alcohol for
about 15-30 minutes.
Remove any additional rubbing alcohol, rinse and dry the bottle as best as
possible before pouring in the new fragrance oil.
1
2
3
4
5
Unit Dimension
Voltage
Power
Noise Level
Unit Weight
Coverage
Color
dispersion
14 ¾ x 7 x 9 ½ (inches) | 37.46 x 17.78 x 24.13 (cm)
110v
50 watts or 2.2 amps
< 56dba
19.6 lbs. (8.89 kgs)
6,000 sq. ft. 557m2)
Black
HVAC Only
Technical Specifications
Welcome to the world of Hotel Scents scenting!
With your Hotel Scents scent diuser, you'll be able to create a beautifully
scented ambiance in a few simple steps.
Through the advanced technology of Cold-Air Diusion, your discreet
and sleek Hotel Scents diuser is a convenient and practical solution to
enhance any space you desire.
CONTACT INFORMATION:
WWW.HOTELSCENTS.COM
CustomerSer[email protected]
(305) 549-5413

Other Aroma360 Accessories manuals

Aroma360 VanGogh360 User manual

Aroma360

Aroma360 VanGogh360 User manual

Aroma360 Davinci360 User manual

Aroma360

Aroma360 Davinci360 User manual

Aroma360 DaVinci360 User manual

Aroma360

Aroma360 DaVinci360 User manual

Aroma360 Mini360 2.0 User manual

Aroma360

Aroma360 Mini360 2.0 User manual

Aroma360 Mini360 User manual

Aroma360

Aroma360 Mini360 User manual

Aroma360 360 Mini User manual

Aroma360

Aroma360 360 Mini User manual

Aroma360 Mini360 User manual

Aroma360

Aroma360 Mini360 User manual

Aroma360 MUSEUM360 User manual

Aroma360

Aroma360 MUSEUM360 User manual

Aroma360 Vangogh360 User manual

Aroma360

Aroma360 Vangogh360 User manual

Aroma360 360 Mini User manual

Aroma360

Aroma360 360 Mini User manual

Aroma360 Museum360 User manual

Aroma360

Aroma360 Museum360 User manual

Aroma360 VANGOGH360 User manual

Aroma360

Aroma360 VANGOGH360 User manual

Aroma360 VanGogh360 User manual

Aroma360

Aroma360 VanGogh360 User manual

Popular Accessories manuals by other brands

Fife Maxcess DSE-45 Series user manual

Fife

Fife Maxcess DSE-45 Series user manual

AFRISO WaterSensor con operating instructions

AFRISO

AFRISO WaterSensor con operating instructions

Dometic 9100 Operation instructions

Dometic

Dometic 9100 Operation instructions

Axis AXDL-100 Manual guide

Axis

Axis AXDL-100 Manual guide

TOPPOINT LT95081 quick start guide

TOPPOINT

TOPPOINT LT95081 quick start guide

PCB Piezotronics TORKDISC 5308D-140-02A Installation and operating manual

PCB Piezotronics

PCB Piezotronics TORKDISC 5308D-140-02A Installation and operating manual

LEGRAND Valena Galea Life Creo 7 741 29 quick start guide

LEGRAND

LEGRAND Valena Galea Life Creo 7 741 29 quick start guide

ekwb EK-PRO GPU WB RTX A100 user guide

ekwb

ekwb EK-PRO GPU WB RTX A100 user guide

Livescribe Smartpen user guide

Livescribe

Livescribe Smartpen user guide

DIGITAL YACHT GPS105 Installation & quick start guide

DIGITAL YACHT

DIGITAL YACHT GPS105 Installation & quick start guide

Kasco marine 8400EJ owner's manual

Kasco marine

Kasco marine 8400EJ owner's manual

Rane Scratch Live SL 1 Operator's manual

Rane

Rane Scratch Live SL 1 Operator's manual

Millipore TANKASMIN user manual

Millipore

Millipore TANKASMIN user manual

IFM Electronic efector 300 SU8000 operating instructions

IFM Electronic

IFM Electronic efector 300 SU8000 operating instructions

M-Audio M-Track Solo user guide

M-Audio

M-Audio M-Track Solo user guide

Panamax MIW-5RCA installation instructions

Panamax

Panamax MIW-5RCA installation instructions

Sunbeam Sleep warm. Sleep well. user manual

Sunbeam

Sunbeam Sleep warm. Sleep well. user manual

PCB Piezotronics 109C12 Installation and operating manual

PCB Piezotronics

PCB Piezotronics 109C12 Installation and operating manual

manuals.online logo
manuals.online logoBrands
  • About & Mission
  • Contact us
  • Privacy Policy
  • Terms and Conditions

Copyright 2025 Manuals.Online. All Rights Reserved.