ArrowVision Shepherd 210 User manual

Shepherd 210
Fingerprint Door Lock
OperationsManual
V3.2

DL210 Operation Manual V3.2
1
Table of Contents
1. Introductory Notes …………………………………………………………2
2. Definitions and Explanations………………………………… …………....4
3. Setting Security Threshold Level…………………………………………..7
4. Registering Fingerprints …………………………………………………...9
5. Unlocking the door with your fingerprint…………………………………11
6. Display…………………………………………………………………….12
7. Registering additional fingerprints………………………………………...12
8. Deleting Fingerprints………………………………………………………15
9. Door Operation…………………………………………………………….16
10. LED Display……………………………………………………………...20
11. Troubleshooting…………………………………………………………..20
12. Specifications………………………………………………………….....23
13. User ID List………………………………………………………………24

DL210 Operation Manual V3.2
2
Congratulations! You are the owner of a state-of-the-art door lock
featuring:
•Fingerprint identification for keyless access
•Storage of fingerprints for up to 50 users
•Attractive, self-contained unit; no external wiring
•Programmable at the door with no computer or external devices
•Manual mode for no-lock access when desired
•Key override to conform to regulations
•Powered by AA batteries (typically lasting two years)
•Interchangeable with Schlage/Kwikset cylindrical plus deadbolt lock
sets
1. Introductory Notes
1.1. As with many advanced technologies, the use of biometrics for
identification involves a learning process. The Shepherd 210 uses
exciting technology and design that allows the opening of a locked
door simply by pressing a finger on the lock, but users must learn the
best positioning and pressure to use.
1.2. Generally, the center of the vortex of the fingerprint pattern is the key
data point; ideally, it is placed in the center of the small glass window
in a consistent way. Your finger should be flat, motionless and held
with firm pressure in the same way each time. See Appendix for
some guiding drawings.
1.3. A very firm pressure when placing the finger gives the best image,
but the finger must not move during scanning.

DL210 Operation Manual V3.2
3
1.4. Moist fingers give better images than dry ones. If on cold, dry days
you have difficulty, for example, try moistening your finger with your
breath or a little moisture.
1.5. Very dirty fingers are obviously not recommended, not only for
obscuring the fingerprint but also for the risk of scratching the
window.
1.6. The Shepherd 210 allows setting of security thresholds to determine
how precisely you must place your finger to open the lock, thus
giving customers a range in the tradeoff between security and
convenience.
1.7. The attractive dust cover is just that. It has no effect on the
electronic system and can be removed if the lock is installed on an
inside door where dust protection is not necessary. However, it does
hide the override key hole.
Put the finger center on the
center of the scanner window.
Place finger flat o
n the
window.
Don’t put finger on the
edge, and then move to
the center.
Raise the finger then leave
scanning window after
fingerprint scanning. Don’t
drag the finger on the
surface of the scanning
window.

DL210 Operation Manual V3.2
4
2. Definitions and Explanations
2.1. Outside and Inside –the two sides of the lock corresponding
respectively to the fingerprint window side and the internal side with
the programming buttons. See Figure 1. When you slide the dust
cover up on the Outside you will uncover thePower On button.
Both Inside and Outside parts of the lock have Lock buttons that
extend the deadbolt, although the Outside one (oval shape) is
unmarked. The Inside part also has an Unlockbutton to retract the
deadbolt. There are also three programming buttons (STORE,
DELETE, and SELECT) on Inside of lock.
Figure 1
2.2. Registering or Programming of Fingerprints –This is the process
of acquiring the image of fingerprints of authorized persons and
storing them into the lock’s memory. (Also called Enrolling in
biometrics language.) Two images of each finger are scanned in the
process, with the same finger being placed two separate times on the
window. (Section 4)
Store
Delete
Select
Unlock
Lock
Lock
Deadbolt
Power On
Pull

DL210 Operation Manual V3.2
5
2.3. Power Off/Time Out –The lock maximizes both security and
battery life by automatically powering off if no action is taken for 5
to 10 seconds (depending on function), which the user will hear as a
motor noise inside the lock. During the fingerprint registration and
other programming functions, the time out function requires you to
move right along in the programming sequence. Dilly-dallying too
long will mean you must start over in the sequence.
2.4. Manual / Unlocked Operation –The Shepherd 210 can be set to an
unlocked state so users can open the door without engaging the
fingerprint identification system. (Section 9.4)
2.5. Security Levels –Five thresholds are available to optimize between
convenience in operating lock versus stringency of security in
matching fingerprint images. (Section 3)
2.6. Management Levels –The Shepherd 210 has three permission levels:
Administrator, Supervisor and User. They are designated and
identified by ID numbers that correspond to their stored fingerprints
as follows:
2.6.1. Administrators: ID numbers 1 through 5
2.6.2. Supervisors: ID numbers 6 through 10
2.6.3. Users: ID numbers 11 through 50
2.6.4. In general, the first two levels can add/delete fingerprints on
levels below theirs. The Administrators can, in addition,
add/delete their own level plus mass-erase all stored fingerprints.
2.6.5. The first two people Registered will be automatically assigned
Administrator IDs. Thereafter, either of the first two
Administrators can designate the level for each new registrant.
If no designations are made, the new registrants will be assigned

DL210 Operation Manual V3.2
6
ID numbers as Users, i.e. IDs 11 through 50. (This is because for
most applications, only two management levels are needed:
Administrator and User.)
Administrator
IDs: 1–5Supervisor
IDs: 6 -10 User
IDs: 11 -50
Mass erase X
Add same level X
Delete same level X
Add below level XX
Delete below level XX
Open door XXX
Check current ID XXX

DL210 Operation Manual V3.2
7
3. Setting Security Threshold Level
3.1. Five triggering thresholds are available: S0 through S4. Lowest
level is S0, with increasingly more stringent thresholds up to S4.
At S0, which is the TRAINING mode, the algorithm matches a
minimal number of fingerprint characteristics and therefore is more
forgiving in terms of exact placement of finger, dirt on the finger, and
image quality, etc. It also means there is the risk that a random
fingerprint could be matched with a registered image, so we
recommend increasing threshold after you are getting familiar to
using the lock.
At S4, the fingerprint image must match perfectly with a registered
fingerprint, which means there is no risk of a false acceptance, but the
users must learn to place their fingers consistently and present an
excellent image in order to be admitted. S1, S2 and S3 are
intermediate levels.
3.2. Setting Security/Threshold Levels
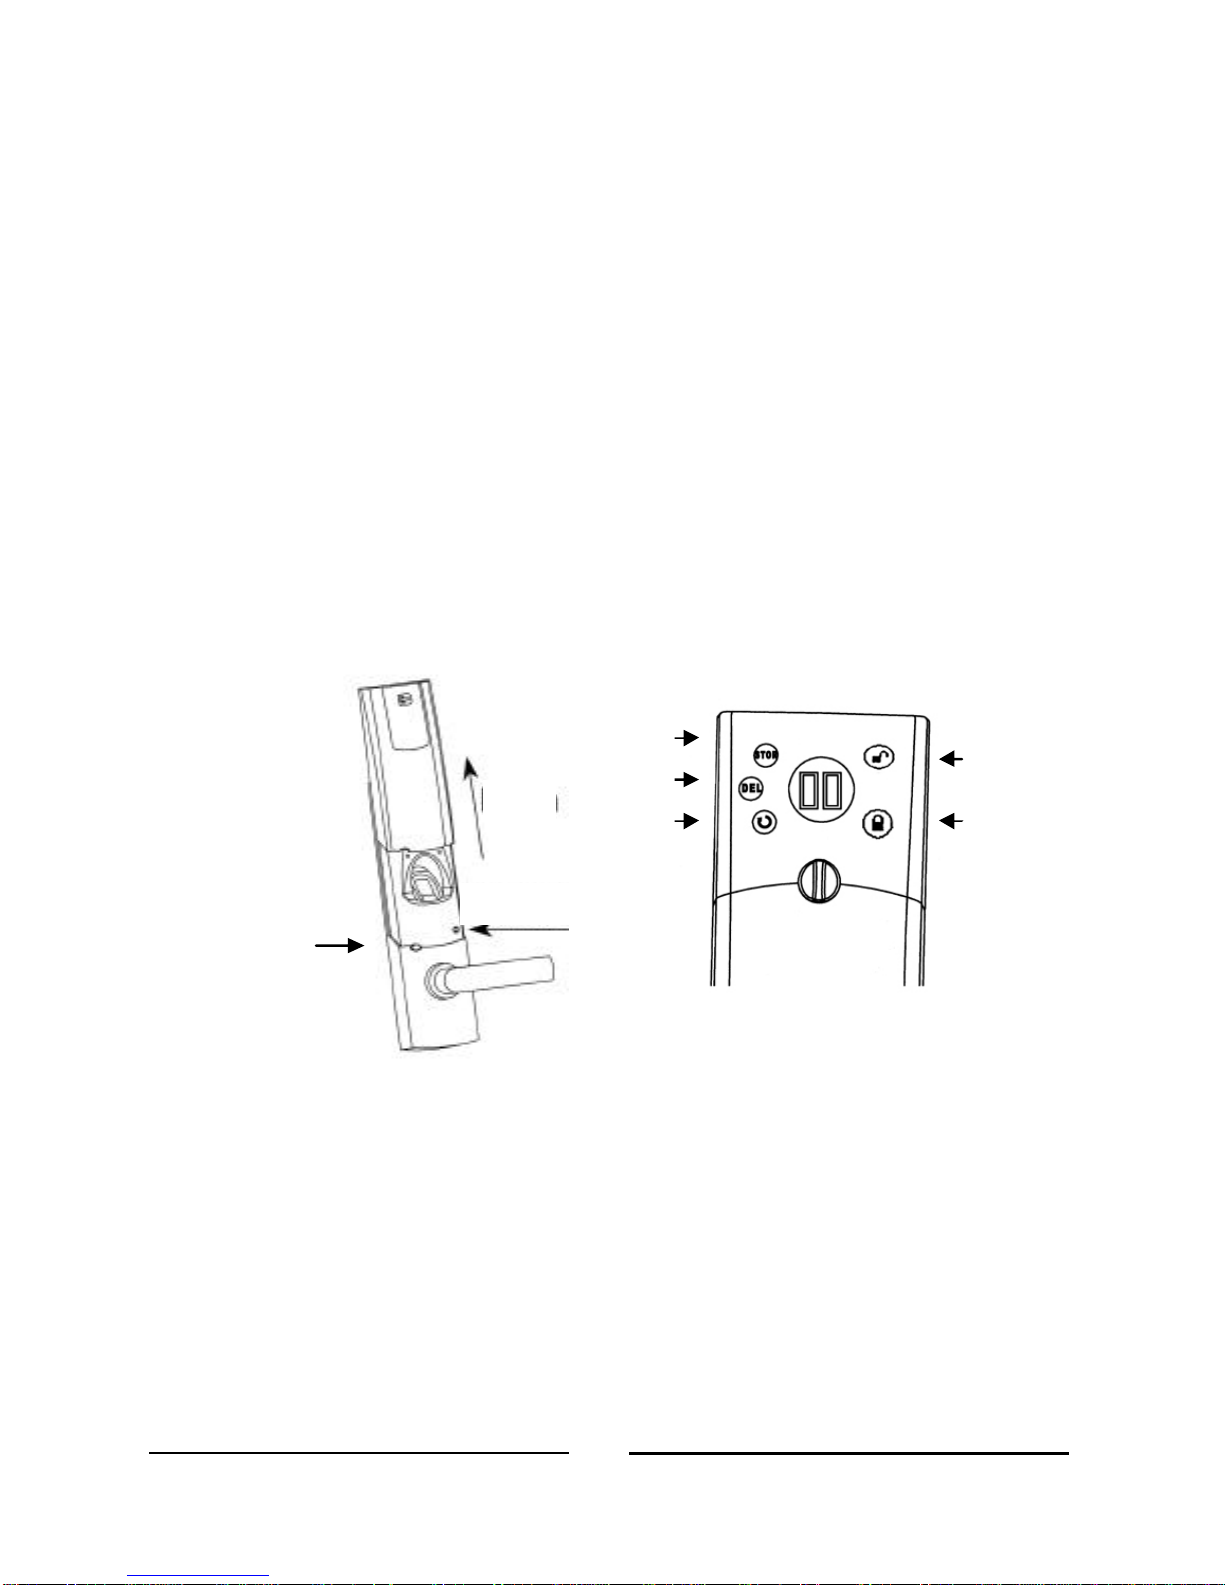
3.2.1. If no fingerprints have been registered, press Power button on
Outside (hear 2 beeps)
3.2.2. Press STOR, DEL and Z(Select) buttons on Inside
simultaneously until the display shows 00 or Sx (x=0,1,2,3 or 4)
3.2.3. Release the three buttons, then press the ZSelect button to
cycle through S0–S1–S2–S3–S4, etc. Set at S0 to start,
which will ease the learning process. (After you can activate
the lock almost every time, you can upgrade the security to a
higher level for your purposes.)

DL210 Operation Manual V3.2
8
3.2.4. Press STOR again to set the chosen security level.
3.2.5. If fingerprints are already registered and stored, it is necessary
for an Administrator to first access the lock with his/her
fingerprint, then proceed with the three buttons per Step 3.2.2
above.
3.2.6. Only one security level is set for the lock at a time. Different
security levels cannot be set for different individuals.

DL210 Operation Manual V3.2
9
4. Registering Fingerprints
4.1. Hint: In order to register fingerprints, the operator will be operating
buttons and the scanning window on both sides of the lock. By
becoming familiar with the location of buttons as shown in Figure 1,
as well as the sequence of operations, the operator will more easily
accomplish the registration without being “timed out” as mentioned
above.
4.2. On the Outside, you will slide up the dust cover and use the Power
On button and the fingerprint scanning window.
4.3. On the Inside, you will be using the STOR, DEL and Z(Select)
buttons.
4.4. On the first two registrations, there is no need to assign management
levels as they will be Administrators automatically, but on subsequent
registrations, have in mind what level you wish to assign and the
range of ID numbers defining the levels. (Review Para. 2.6 above.)
4.5. Hint: Before starting the procedure for registration, decide on what
finger you wish to use and practice placing the finger onto window in
the same way you intend to open the door later. Practicing will give
you a feel for the window and how to put the center of your vortex
onto the center of the window.
4.6. Procedure for registering first Administrators:
4.6.1. Slide open dust cover
4.6.2. Press Power-On button (Outside) (hear onelong beep)
4.6.3. Press and hold STOR (Inside) for about 3 seconds until a long
beep

DL210 Operation Manual V3.2
10
4.6.4. Press chosen finger very firmly onto window, stay motionless,
and press and hold STOR button again with your other hand
until a long beep sounds again and scanner starts scanning your
finger
4.6.5. When scanner goes off and a short beep sounds, pick up and
replace the same finger firmly for a second scan, which starts
automatically
4.6.6. When TWO short beeps sound, congratulations! Your
fingerprint was successfully registered.
4.6.7. If you hear THREE beeps, the fingerprint was NOT registered,
due to a poor image, movement or other reasons. Start at Step
4.6.2 and try again if you heard a motor noise and the power has
timed out. If power is still on, start over at Step 4.6.3.
4.7. After registration, test to see that you can activate the lock per the
next section before you shut the door and maybe lock yourself out!
4.8. Hint: You can register yourself or any other person, such as a young
girl, several times as if she were different people, using the same
finger. This way she will have a higher probability of activating the
lock even if she varies her finger position at entry.

DL210 Operation Manual V3.2
11
5. Unlocking the door with your fingerprint
(Included here for convenience; also in Door Operation Section 9.)
5.1. Press Power On button (Outside)
5.2. Immediate place your chosen finger firmly on the window exactly as
you did during registration
5.3. If successful, the green light flashes, there is a beep and the deadbolt
will retract automatically. You will have 5 seconds to push down on
the door handle. (If the deadbolt was not extended, you can see the
green light flash and hear a noise indicating the door mechanism is
being activated after accepting a proper fingerprint.)
5.4. If there are three beeps, the fingerprint was rejected. This means
the finger was positioned and/or pressed in a way that did not match
the registration. Simply press the Power On button again and place
your finger again. With a little practice, you will unlock the door
every time. (Note: Section 3describes how to set the threshold
level, and how to trade-off ease of acceptance with tight security.)
5.5. Hint: If you have difficulty activating the lock and your rejection
rate is more than half the time, consider registering a different finger,
different pressure/position, etc. A simple mass delete can be done per
Section 8.

DL210 Operation Manual V3.2
12
6. Display
6.1. The LED displays different information depending on if you are in a
pure display mode or if you have just finished a programming
function such as registering fingerprints.
6.2. When in the Programming Mode, immediately after registering
fingerprints, you can press the Select button and see the NEXT
AVAILABLE IDs of the three categories of people: Administrator,
Supervisor or User. For example, if you have two Administrators and
three Users already registered and you just finished adding a fourth
User, pressing the Select button will show: 15 –3 –5
6.3. In the pure Display mode, you can verify the ID of the person who
just unlocked the lock. Immediately after a fingerprint verification,
press the Select button. The Display will then show the entering ID,
alternating with the remaining number of available spaces in the lock
memory. For example, if there are two Administrators and the last of
four Users just entered, the display would show: 04 –44
7. Registering additional fingerprints
7.1. After the first two fingerprints are registered as Administrators,
additional fingerprints can be registered by any Administrator (or
Supervisor.)
7.2. The Administrator should advise the new registrant on the proper
method of placing the finger in the scanning window and the
sequence of steps per Section 4.5 and 4.6 above
7.3. The Administrator should know what level he/she wants to assign to
the new registrant. (Review Section 2.6)

DL210 Operation Manual V3.2
13
7.4. The Administrator first gains access to the system per Section 5
above.
7.5. Immediately after successfully unlocking the door (before time out of
the power), press and hold the STOR button for 3 seconds (long beep
will sound)
7.6. Press the ZSelect button repeatedly to select the desired ID for the
new person. The display will show the next available IDs in each of
the three groups. Remember that IDs 1 thru 5 are Administrators,
IDs 6 thru 10 are Supervisors and IDs 11 thru 50 are Users. (Ref.
Section 2.6 above)
For example, if only two Administrators have been registered, they
will have used up 01 and 02. Upon registering a third person,
pressing repeatedly on the Select button will display: 11 –06 –03.
These are the next available IDs in the three categories. If you wish
this person to be at the Supervisor level, for example, you would
cycle the three available choices to 06, the next available ID number
in the Supervisor category.
Note: The ID number must be selected at this time. A fingerprint
image cannot have its management level changed after registering.
7.7. Make a record of ID numbers for each individual. This is needed a
user ID later if you wish to delete an individual—it will be by ID
number. A user ID list from is provided at the end of this manual for
your convenience.
7.8. Press STOR for about 3 seconds again, and have new registrant place
finger firmly and properly in scanning window. You will hear a
long beep and see the scanning of the finger. At the short beep,
remove and replace finger onto window for a second scan.

DL210 Operation Manual V3.2
14
7.9. When 2 beeps sound, that person’s fingerprint was successfully
registered.
The display should show 03 –11 –07. (The next available
Supervisor ID is now 07 since you just used up 06)
7.10. If 3 beeps sound, the registration was not successful. You can
immediately press STOR until a long beep (about 3 seconds) and try
again from Step 7.8 above. However, if the power has Timed Out,
and you hear the motor sound, then you must start over from Step 7.4
above.
7.11. After a successful registration, you can immediately register another
person starting with Step 7.5 above, or if Timed Out, start at Step 7.4.
7.12. After registrations, wait about 10 seconds for the lock to Time Out
before trying to test the fingerprint access system.

DL210 Operation Manual V3.2
15
8. Deleting Fingerprints
8.1. Mass Delete with only two Administrators registered
8.1.1. While holding the DEL button, press the Power button and
hold
8.1.2. Listen for long beep followed by two beeps. Display will
show UU.
8.2. Mass Delete with more than two fingerprints registered
8.2.1. One of the Administrators must first perform an unlocking
procedure per Section 5.
8.2.2. Immediately after the Administrator is successfully verified,
press the ZSelect button once and release, then press both DEL
and STOR buttons simultaneously for about 3 seconds.
Display will show UU.
8.3. Deleting individual fingerprints
8.3.1. Administrators can delete anyone. Supervisors can delete
IDs on the User level. Users cannot delete.
8.3.2. The Administrator or Supervisor must know the ID number of
the person being deleted.
8.3.3. The Administrator or Supervisor first verifies his/her
fingerprint and unlocks the lock per Section 5.
8.3.4. Quickly (before time out) press DEL button for about 3
seconds until you hear a long beep.
8.3.5. Press the ZSelect button repeatedly until the ID of the person
being deleted is displayed.

DL210 Operation Manual V3.2
16
8.3.6. Press the DEL button again for about 3 seconds until the long
beep.
8.3.7. That individual has been deleted.
9. Door Operation
9.1. Batteries
9.1.1. Six alkaline AA batteries will operate the door for
approximately two years under typical use.
9.1.2. A Low Battery Alert is indicated by four extra beeps after the
Lock or Unlockbuttons are pushed, and after unlocking by
fingerprint ID. After the low battery alert, there will be
approximately 50 more door openings or equivalent operations
left.
9.1.3. To change batteries, unscrew retaining screw at top of battery
compartment on the Inside. Remove battery pack by pulling
straight out.

DL210 Operation Manual V3.2
17
9.2. Normal Operation From Inside
9.2.1. There are Lockand Unlockbuttons clearly marked on the
inside of the lock, which apply only to the deadbolt. Pressing the
Lockbutton will extend the deadbolt. Pressing the Unlock
button will retract it.
9.2.2. The cylindrical (lower) lock is automatically locked for
people on the outside until it is unlocked by fingerprint as
described below. It is not locked for people on the inside.
9.3. Normal Operation From Outside –Using fingerprint to gain
access
9.3.1. Press Power On button (Outside)
9.3.2. Immediate place your chosen finger on the window exactly as
you did during registration. The scanner will scan your finger.
9.3.3. If successful, there is a beep and the deadbolt will retract
automatically. You will have 5 seconds to push down on the
door handle.
9.3.4. If there are three beeps, the fingerprint was rejected. This
means the finger was positioned and/or pressed in a way that did
not match the registration. Simply press the Power On button
again and place your finger again. With a little practice, you
will unlock the door every time. (Note: Section 3describes
how to set the threshold level to optimize the trade-off between
ease of acceptance and tightness of security.)
9.3.5. Hint: If you have difficulty activating the lock and your
rejection rate is more than half the time, consider re-registering
of your fingerprint with a different finger, more pressure,
different position, etc. If you had successfully registered your

DL210 Operation Manual V3.2
18
fingerprint, but cannot open the lock, you may want to reregister
your fingerprint with a better image. To start over with an
empty lock, you can perform a mass delete per Section 8.
9.4. To Keep Door Always Unlocked
9.4.1. After the lock is unlocked and while power is still on, press
the Unlockbutton. A long “beep” will sound and the lock will
remain unlocked.
9.4.2. To return to normal operation, press Lockbutton (inside or
outside).
Note: This function is available with firmware Version 3.1 that
shipped approximately February 18. (Version 3.1 is marked on inside
of lock.)
9.5. Emergency Unlocking From the Outside –Using Emergency Key
9.5.1. Possible reasons for use of emergency procedures:
9.5.1.1. Registered fingerprint is injured and door cannot be
opened
9.5.1.2. Low battery indicator was ignored and batteries are
dead. (Note: Batteries are replaced from the Inside.)
9.5.1.3. Fingerprint ID system is not working
9.5.2. The same spare key is used for the deadbolt and the
cylindrical lock. Both keyholes are normally hidden from view,
and are accessed from the Outside.
9.5.3. For the dead bolt, slide up dust cover, then remove it
completely to expose the keyway. (Cover pops off by pulling
out on sides.)

DL210 Operation Manual V3.2
19
9.5.4. For the latch, use a pocket knife or tiny screw driver to pry off
the round metal cap on door handle to expose the keyway.
9.6. Emergency Retracting of Deadbolt From the Inside
9.6.1. Only the deadbolt requires an emergency procedure, as the
cylindrical lock is not locked from the Inside.
9.6.2. Unscrew the battery pack retaining screw and remove the
battery pack by pulling straight out.
9.6.3. Use a small screwdriver to turn the small black screw at the
upper left to manually retract the deadbolt.
Other manuals for Shepherd 210
1
Table of contents
Other ArrowVision Lock manuals
Popular Lock manuals by other brands

Kaba
Kaba Quantum Series installation guide

Stanley
Stanley 9K Series manual

AV SAVIO
AV SAVIO 6010.890 manual

Kaba
Kaba Saflok QuantumII MT RFID installation instructions

Relcross Door Controls
Relcross Door Controls Keylex K900 Installation & operation

Siegenia
Siegenia KFV BS 230 Series Assembly instructions

BUILDONE
BUILDONE BO-DP8100VSK user manual

Assa Abloy
Assa Abloy HES KS100 Aperio Assembly, installation and operating instructions

iLoq
iLoq G50S.2x1 Installation, Operating and Care Instructions

Technomax
Technomax EUROLINE User instruction

Assa Abloy
Assa Abloy Corbin Russwin SE LP10 ML20600 installation instructions

VALBERG
VALBERG PS 300 Operational instructions