BEFORE YOU BEGIN:
• Read all instructions before installing.
• Keep these instructions for future use.
• Remove all contents from packaging and discard box, and/or poly bags.
• Lay out and identify all parts.
• Do not return this product to the place of purchase. If any parts are
(800) 544-1108, or fax at (800) 207-8182. You can also visit our web site
at www.safety1st.com. Have the model number ready (48517) and date
code (manufacture date) located on product.
ANTES DE COMENZAR:
• Read all instructions before installing.
• Guarde estas instrucciones para su uso futuro.
• Retire todo el contenido del embalaje y deseche la caja y/o las bolsas de
polietileno.
• Despliegue e identifique todas las piezas.
• No devuelva este producto al lugar donde lo compró. Si falta alguna pieza, envíe un
con el Consumidor al (800) 544-1108, o envíe un fax al (800) 207-8182. También
puede visitar nuestro sitio web en www.safety1st.com. Tenga a mano el número de
modelo (48517) y el código de fecha (fecha de fabricación), indicados en el producto.
1
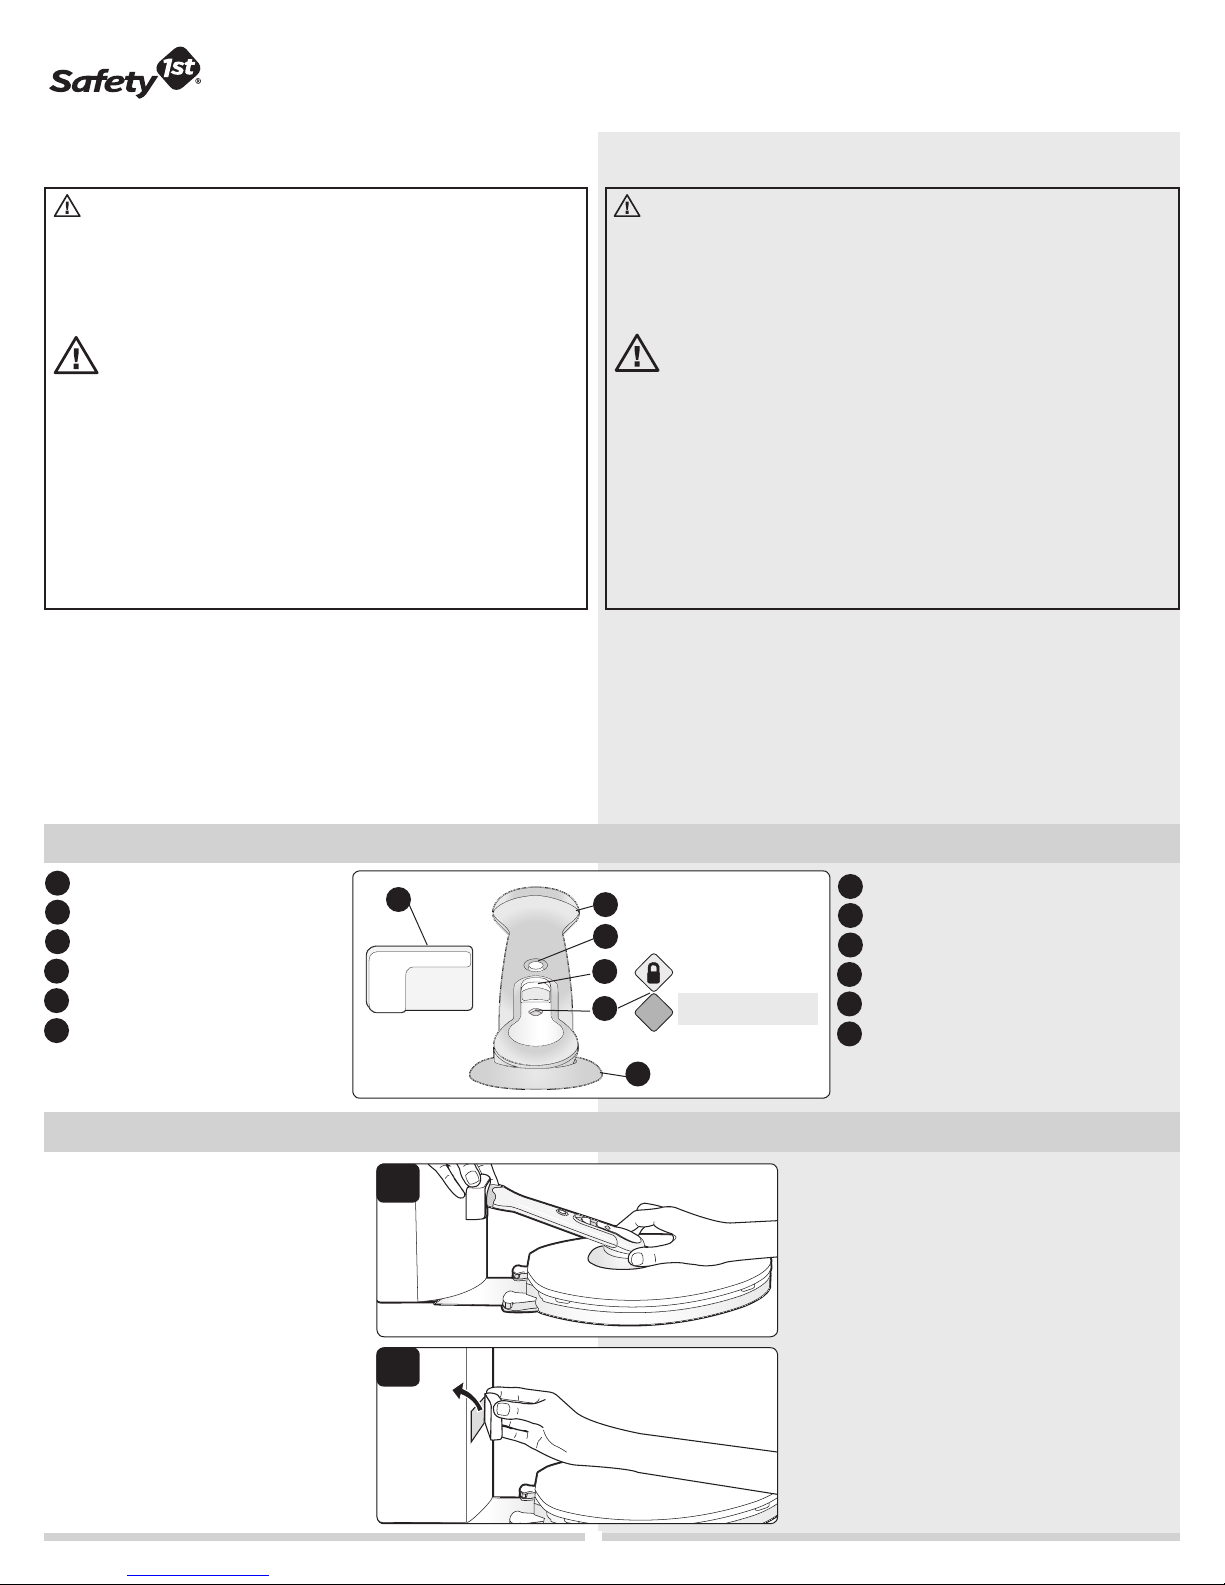
A
B
CC
A
Tank stop
Swing arm
Unlock button
Sliding lock button
SecureTechTM indicator
Base
D
CAUTION:
• Thisproductisnotatoy.Donotallowchildrentoplaywithit.
Whennotinuse,keepoutofreachofchildren.
• Thisproductisonlyadeterrent.Itisnotasubstituteforproper
adultsupervision.Discontinueusewhenchildbecomesold
enoughtodefeatit.
©2009 Dorel Juvenile Group. All Rights Reserved. Todos derechos reservados.
www.djgusa.com (800) 544-1108 www.safety1st.com Made in CHINA. Hecho en CHINA.
Styles and colors may vary. Los estilos y los colores pueden variar.
Distributed by (distribuido por) Dorel Juvenile Group, Inc., 2525 State St., Columbus, IN 47201-7494
Dorel Distribution Canada, 873 Hodge, St. Laurent, QC H4N 2B1
07/12/09 4358-4882
PRECAUCIÓN:
• Esteproductonoesunjuguete.Nopermitaquelosniñosjueguencon
él.Cuandonoloutilice,manténgalofueradelalcancedelosniños.
• Esteproductoessólounelementodisuasivo.Elmismonoreemplaza
lasupervisiónadecuadaporpartedeunadulto.Dejedeusarlatraba
cuandoelniñoseasuficientementegrandecomoparadestrabarla.
Swing Shut Toilet Lock
48517
User Guide
Traba articulada para inodoro
48517
Guía del Usuario
Parts & Features Lista de piezas y características
F
WARNING:
• ADULTASSEMBLYREQUIRED.KEEPSMALLPARTS
AWAYFROMCHILDRENDURINGASSEMBLY.
• NEVERLEAVECHILDUNATTENDEDINBATHROOM.
• Thisproductisforuseon“hard”toiletlidandseat
assembliesonly.Itisnotintendedforuseonsoftor
paddedlidsorseats.
• Whenproperlyinstalled,thetoiletlidshouldliftno
morethan1.5”(3.8cm).
AVISO:
• REQUIEREENSAMBLADOPORPARTEDEUNADULTO.
MANTENGALASPIEZASPEQUEÑASFUERADEL
ALCANCEDELOSNIÑOSDURANTEELENSAMBLADO.
• NUNCADEJEALNIÑOSINATENCIÓNENELBAÑO.
• Esteproductoesparautilizarúnicamenteconconjuntos
deasientoytapa“duros”.Nodebeusarsecontapasy
asientosblandosoacolchados.
• Unavezinstaladacorrectamente,latapadelasientono
debelevantarsemásde1.5pulg.(3.8cm).
To Install Para instalar
B
E
D
F
Green = Locked
Red = Unlocked
Verde = Trabada
Rojo = Destrabada
E
NOTE: Be sure toilet lid and tank are
dry before installing.
1
Test out the location where you will
install the toilet lock: With paper still
on adhesive, place the tank stop and
swing arm on the toilet to see where
it will be positioned (Figure 1). Raise
the tank stop a little, a few mm’s at
most, so that there will be clearance
for the swing arm to rotate out of the
way to the unlocked position.
2
Keep a finger at the bottom and top
right corners to help prevent the tank
stop from slipping. With the right
edge of the tank stop held in place,
lift up the left side and peal paper off
adhesive (Figure 2).
1
2
A
B
C
Tope del tanque
Brazo articulado
Botón de destraba
Botón de traba deslizante
Indicador SecureTech™
Base
D
E
F
NOTA: Asegúrese de que la tapa del
asiento y el tanque estén secos antes de
instalar el producto.
1
Pruebe la ubicación donde instalará la
traba para inodoro: Sin quitar los papeles
que cubren el adhesivo, coloque el tope
del tanque y el brazo articulado sobre la
tapa del inodoro para comprobar dónde
lo colocará (Figura 1). Levante el tope
del tanque levemente, (no más de unos
pocos milímetros), a fin de tener espacio
suficiente para girar el brazo articulado y
llevarlo hasta la posición de destraba.
2
Levante el tope del tanque levemente
—no más de unos pocos milímetros—, a
fin de tener espacio suficiente para girar
el brazo articulado y llevarlo hasta la
posición de destraba. (Figura 2).


