Artesian Spas platinum series User manual

Platinum Class

TABLE OF CONTENTS
Congratulations........................................................
Safety Warnings........................................................
Line Drawing Key......................................................
Spa Configuration and Water Capacities...............
Electrical Requirements and Installation...............
Electrical Wiring...............................................
Spa Start Up..............................................................
Selecting a Location........................................
Inspection........................................................
Filling the Spa with Water................................
Turning the Power On.....................................
Verifying Water Circulation..............................
Testing the GFCI Breaker................................
Priming the Pump............................................
Water Preparation...........................................
Key Pad Intro.............................................................
Basic Programming..................................................
Options.............................................................
Setting the Purge Cycles.................................
Setting Economy Mode...................................
Maintenance Reminder Prompts.....................
Changing Keypad Options...............................
Changing Display Options...............................
Changing Sound Options.................................
Changing Regional Options.............................
Changing Security Options..............................
Setting the Time..............................................
Spa Functions...........................................................
Changing the Water Temp Set Point................
Turning Light On/Off........................................
Turning the Pumps On/Off...............................
Economy Mode................................................
On/Off Key.......................................................
Displaying the Time.........................................
Viewing Active Progress Bars..........................
1
3
5
6
16
16
18
18
19
19
21
21
21
22
22
24
25
25
26
27
28
30
30
32
33
34
36
37
37
37
38
39
40
40
40

1
Before you do anything else, make sure you
visit our website at www.artesianspas.com
and register your new Artesian spa.
Congratulations...
Congratulations on the purchase of your new Platinum spa by
Artesian. We know you will enjoy your spa. Although spas are
relaxing and fun, we believe they can be an indispensable part
of a healthy lifestyle. The spa lifestyle is one that encourages
health and well-being.
Owning a spa brings some responsibility. With proper care, your
spa will provide years of enjoyment and therapy for your family
and friends. Please take time to read and understand all of the
instructions provided before you install your Artesian spa. This
owner’s manual is meant to be a supplement to the training you
should receive from your dealer when you purchase and start up
your spa for the first time.
Please remember your spa is a powerful piece of electrical
equipment. It is extremely important that you have it properly
installed to ensure safe use. This manual explains safety
precautions, installation instructions, and operating and
maintenance procedures. If you have any questions regarding
this manual, please call your competent Artesian spa dealer, who
will be happy to further assist you.
TABLE OF CONTENTS cont...
Using the Audio..............................................................
Turning Power On/Off............................................
Volume Up/Down...................................................
Seek/Track Up/Down.............................................
Selecting the Source..............................................
Pausing the Playing of a Disk................................
Muting the Audio Output.........................................
Selecting a Radio Band.........................................
Tone.......................................................................
Fader......................................................................
Equalization............................................................
Intro Scan Mode.....................................................
Repeat Mode.........................................................
Random Mode.......................................................
Auto Scan Mode....................................................
Selecting Weather Band Mode..............................
Disc Up/Down........................................................
Maintaining Your Spa.....................................................
Draining Your Spa..................................................
Pillow Care.............................................................
Jet Care.................................................................
Removing, Installing, and Cleaning Filters............
Winterizing Your Spa..............................................
Replacing the Light Bulb........................................
Spa Cabinet Care..................................................
Cleaning Your Spa Interior.....................................
Cover Care.............................................................
Chemical Treatment of Water.................................
Water Chemistry..............................................................
Water Treatment Glossary......................................
Spa Chemicals Glossary........................................
Maintaining the Proper pH.....................................
Troubleshooting.............................................................
Warranty Information.....................................................
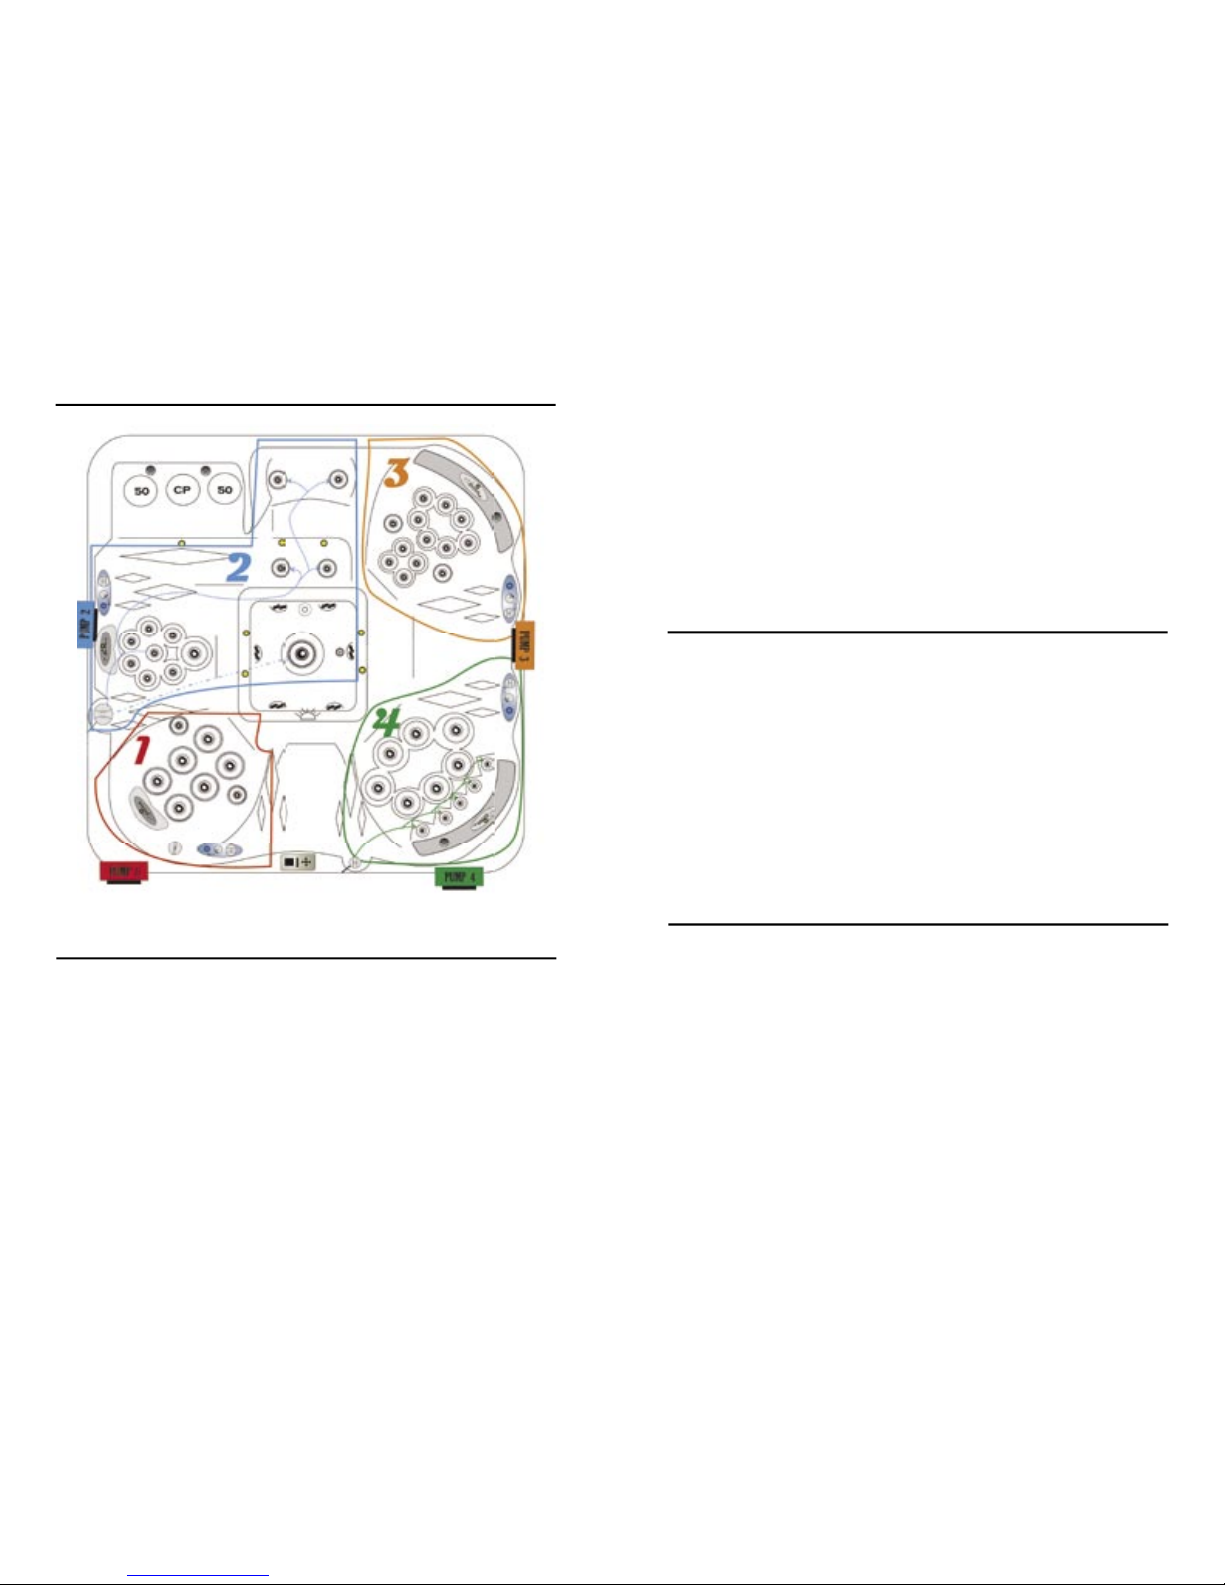
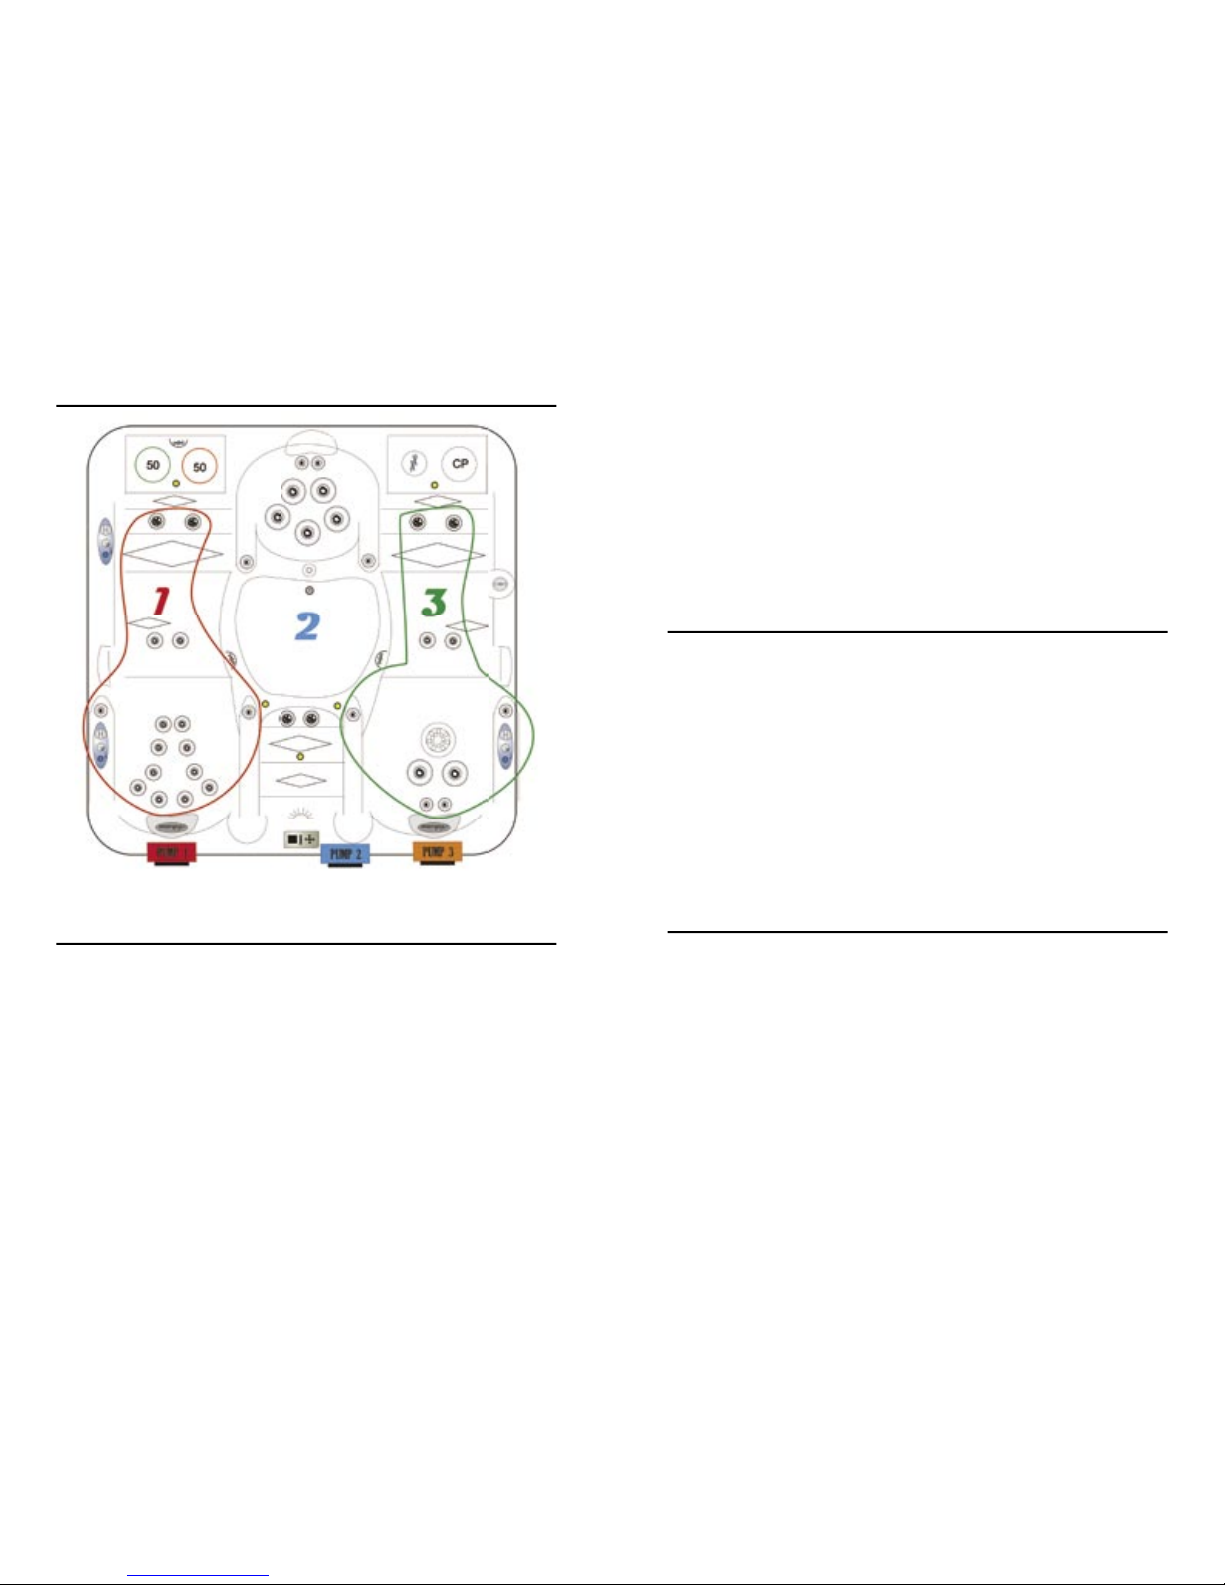
Interior Spa Diagram.......................................................
41
41
41
42
42
43
43
43
44
44
45
45
46
46
46
47
47
48
48
48
49
50
51
51
52
52
53
54
55
55
60
62
63
70
76

For your future reference and convenience, please record the
Serial and Model number along with the installation date in the
spaces provided below. STORE THIS MANUAL WHERE YOU
CAN EASILY FIND IT WHEN NEEDED. The serial and model
numbers are mounted on the base of the equipment enclosure
area, as shown below.
Spa Serial Number_____________________________________
Spa Model Number_____________________________________
Spa Installation Date____________________________________
Dealer Name, Address, and Telephone Number
____________________________________________________
____________________________________________________
____________________________________________________
Diagram of Where to Find Serial Number
SAFETY WARNINGS
PLEASE TAKE THE TIME TO READ ALL OF THESE
WARNINGS AND CAUTIONS PRIOR TO USING YOUR SPA.
PLEASE, be a responsible spa owner. When installing and using this
spa, always adhere to basic safety precautions. Be sure to list
emergency telephone numbers at the telephone nearest the spa,
including physician, hospital, ambulance, police, and the fi re
department. Be certain to explain safety precautions to all new or
occasional users of your spa. Remember, they may not be aware
of the possible risks associated with the spa water temperature.
Have at least one family member learn CPR (cardiopulmonary
resuscitation). IT COULD SAVE A LIFE!
1. READ AND FOLLOW ALL INSTRUCTIONS!
2. WARNING - To reduce the risk of injury, do not permit children to
use this product unless they are closely supervised at all times.
3. A wire connector is provided on this unit to connect a minimum
8 AWG (8.4 mm ) solid copper conductor between this unit and
any metal equipment, metal enclosures of electrical equipment,
metal water pipe, or conduit within 5 feet (1.5 m) of the unit.
4. DANGER - Risk of Accidental Drowning - Extreme caution must
be exercised to prevent unauthorized access by children. To avoid
accidents, ensure that children cannot use this spa unless they are
supervised at all times.
5. DANGER - Risk of Injury - The suction fi ttings in this area are sized
to match the specifi c water fl ow created by the pump. Should the
need arise to replace the suction fi ttings or the pump, be sure the
fl ow rates are compatible.
Never operate spa if the suction fi ttings are broken or missing.
Never replace a suction fi tting with one rated less than the fl ow rate
marked on the original suction fi tting.
6. DANGER - Risk of Electrical Shock - Install at least 5 feet (1.5 m)
from all metal surfaces. As an alternative, a spa may be within 5
feet of metal surfaces if each metal surface is permanently
connected by a minimum 8 AWG (8.4 mm ) solid copper
conductor to the wire connector on the terminal box that is provided
for this purpose.
7. DANGER - Risk of Electric Shock - Do not permit any electrical
appliance such as a light, telephone, radio, or television, within 5
feet (1.5 m) of a spa.
32
2

6. Do not service this product yourself as opening or removing covers
may expose you to dangerous voltage or other risk of injury. Refer
all servicing to qualifi ed service personnal.
KEEP THESE SAFETY INSTRUCTIONS IN A CONVENIENT AND
READILY ACCESSIBLE LOCATION!!
SAFETY WARNINGS cont...
8. WARNING - To reduce the risk of injury:
a) The water in a spa should never exceed 40 C (104 F). Water
temperatures between 38 C (100 F) and 40 C are considered
safe for a healthy adult. Lower water temperatures are
recommended for young children and when spa use exceeds 10
minutes.
b) Since excessive water temperatures have a high potential for
causing fetal damage during the early months of pregnancy,
pregnant or possibly pregnant women should limit spa water
temperatures to 38 C (100 F).
c) Before entering a spa, the user should measure the water
temperature with an accurate thermometer since the tolerance of
water temperature regulating devices varies.
d) The use of alcohol, drugs, or medication before or during spa use
may lead to unconsciousness with the possibility of drowning.
e) Obese persons and persons with a history of heart disease, low
or high blood pressure, circulatory system problems, or diabetes
should consult a physician before using a spa.
f) Persons using medication should consult a physician before using
a spa since some medication may induce drowsiness while other
medication may affect heart rate, blood pressure, and circulation.
AUDIO COMPONENT WARNINGS
Spas equipped with the Audio system should follow these guide-
lines for safety:
1. CAUTION - Risk of Electrical Shock - Do not leave compartment
door open.
2. CAUTION - Risk of Electrical Shock - Replace components only
with identical components.
3. Do not operate the audio controls while inside the spa.
4. WARNING - Prevent Electrocution - Do not connect any auxillary
components (for example cable, additional speakers, headphones,
additional audio/video components, etc.) to the system.
5. These units are not provided with an outdoor antennae; when
provided, it should be installed in accordance with Article 810 of the
National Electrical Code, ANSI/NFPA 70.
54
LINE DRAWING KEY
Name of Component Symbol for Component
Storm Roto Ribbed w/ Escutcheons
Storm Twirl w/ Escutcheons
Mini Storm Roto Ribbed w/ Escutcheons
Mini Storm Pulsator “A” w/ Escutcheons
Storm Pulsator “A” w/ Escutcheons
Euro-Adjustable w/ Escutcheons
Jumbo Storm Massage w/ Escutcheons
Non-Adjustable Whirlpool w/ Escutcheons
Storm Direct Ribbed w/ Escutcheons
Ozone / Drain Jet
Return Jet
LED
Air Control
Diverter Controls
Filter Well and Filters
Speakers
Line Drawings may not be exact models of your particular spa.
Certain options may be shown that are not included on your spa.

SPA CONFIGURATION AND WATER CAPACITY
Volume 505 Gallons
Weight dry / 968 lbs fi lled / 5175 lbs
Dimensions 92”x92”x37”
Control IN.XM 3-5P
Pump (5) 3.0 HP 1SPD 230V Power WOW
Heater IN.THERM 4 kw
Circulation System HI-FLO
Ozone IN.ZONE, CD
Filter One 50 Sq Ft Pleated & One Disposable
Direct Flow Control 5
6” Waterfall Maximum of 1
PIPER GLEN Volume d’ eau 1514 liters
Poids à vide 439 kg
Poids plein 1891 kg
Dimensions 2.34m x 2.34m x .94m
Control IN.XM 3-5P
Pompe (5) 3.0 HP 1SPD 230V Power WOW
Réchauffeur IN.THERM 3.6 kw
Circulation System HI-FLO
Ozone IN.ZONE, CD
Filtre 2
Direct Flow Control 5
6” Cascade le maximum de 1
Wassermenge 1514 liters
Leergewicht 439 kg
Gesamtgewicht 1891 kg
Dimensions 2.34m x 2.34m x .94m
Control IN.XM 3-5P
Pumpe (5) 3.0 HP 1SPD 230V PowerWOW
Heizelement IN.THERM 3.6 kw
Zirkulationssystem HI-FLO
Ozon IN.ZONE, CD
Filter 2
Direct Flow Control 5
6” Wasserfall Höchstbetrag von 1
Volumen 1514 liters
Peso seco/439 kg llenado/1891 kg
Dimensiones 2.34m x 2.34m x .94m
Control IN.XM 3-5P
Bomba (5) 3.0 HP 1SPD 230V Power WOW
Calentador IN.THERM 3.6 kw
Sistema de la circulación HI-FLO
Ozono IN.ZONE, CD
Filtrar 2
Direct Flow Control 5
6” Cascada máximo de 1
76

Volume 345 Gallons
Weight dry / 579 lbs fi lled / 3450 lbs
Dimensions 92”x77”x34”
Control IN.XM 3-5P
Pump (4) 3.0 HP 1SPD 230V
Heater IN.THERM 4 kw
Circulation System HI-FLO
Ozone IN.ZONE, CD
Filter One 50 Sq Ft Pleated & One Disposable
Direct Flow Control 4
6” Waterfall Maximum of 1
SPA CONFIGURATION AND WATER CAPACITY
QUAIL RIDGE
Wassermenge 1174 liters
Leergewicht 263 kg
Gesamtgewicht 1388 kg
Dimensions 2.34m x 1.96m x .86m
Control IN.XM 3-5P
Pumpe (4) 3.0 HP 1SPD 230V PowerWOW
Heizelement IN.THERM 3.6 kw
Zirkulationssystem HI-FLO
Ozon IN.ZONE, CD
Filter 2
Direct Flow Control 4
6” Wasserfall Höchstbetrag von 1
Volume d’ eau 1174 liters
Poids à vide 263 kg
Poids plein 1388 kg
Dimensions 2.34m x 1.96m x .86m
Control IN.XM 3-5P
Pompe (4) 3.0 HP 1SPD 230V Power WOW
Réchauffeur IN.THERM 3.6 kw
Circulation System HI-FLO
Ozone IN.ZONE, CD
Filtre 2
Direct Flow Control 4
6” Cascade le maximum de 1
Volumen 1174 liters
Peso seco/263 kg llenado/1388 kg
Dimensiones 2.34m x 1.96m x .86m
Control IN.XM 3-5P
Bomba (4) 3.0 HP 1SPD 230V Power WOW
Calentador IN.THERM 3.6 kw
Sistema de la circulación HI-FLO
Ozono IN.ZONE, CD
Filtrar 2
Direct Flow Control 4
6” Cascada máximo de 1
98

SPA CONFIGURATION AND WATER CAPACITY
DOVE CANYON
Volume 475 Gallons
Weight dry/901 lbs fi lled/4860 lbs
Dimensions 92”x92”x36”
Control IN.XM 3-5P
Pump (5) 3.0 HP 1SPD 230V Power WOW
Heater IN.THERM 4 kw
Circulation System HI-FLO
Ozone IN.ZONE, CD
Filter One 50 Sq Ft Pleated & One Disposable
Direct Flow Control 5
6” Waterfall Maximum of 1
Volume d’ eau 1514 liters
Poids à vide 409 kg
Poids plein 1861 kg
Dimensions 2.34m x 2.34m x .94m
Control IN.XM 3-5P
Pompe (5) 3.0 HP 1SPD 230V Power WOW
Réchauffeur IN.THERM 3.6 kw
Circulation System HI-FLO
Ozone IN.ZONE, CD
Filtre 2
Direct Flow Control 5
6” Cascade le maximum de 1
Wassermenge 1514 liters
Leergewicht 409 kg
Gesamtgewicht 1861 kg
Dimensions 2.34m x 2.34m x .94m
Control IN.XM 3-5P
Pumpe (5) 3.0 HP 1SPD 230V PowerWOW
Heizelement IN.THERM 3.6 kw
Zirkulationssystem HI-FLO
Ozon IN.ZONE, CD
Filter 2
Direct Flow Control 5
6” Wasserfall Höchstbetrag von 1
Volumen 1514 liters
Peso seco/409 kg llenado/1861 kg
Dimensiones 2.34m x 2.34m x .94m
Control IN.XM 3-5P
Bomba (5) 3.0 HP 1SPD 230V Power WOW
Calentador IN.THERM 3.6 kw
Sistema de la circulación HI-FLO
Ozono 110v. (UV) 20-301-ROZM25
Filtrar 2
Direct Flow Control 5
6” Cascada máximo de 1
1110

SPA CONFIGURATION AND WATER CAPACITY
HERON BAY
Volume 360 Gallons
Weight dry/645 lbs fi lled/3650 lbs
Dimensions 82”x82”x37”
Control IN.XM 3-5P
Pump (4) 3.0 HP 1SPD 230V Power WOW
Heater IN.THERM 4 kw
Circulation System HI-FLO
Ozone IN.ZONE, CD
Filter One 50 Sq Ft Pleated & One Disposable
Direct Flow Control 4
6” Waterfall Maximum of 1
Volume d’ eau 1174 liters
Poids à vide 293 kg
Poids plein 1418 kg
Dimensions 2.08m x 2.08m x .94m
Control IN.XM 3-5P
Pompe (4) 3.0 HP 1SPD 230V Power WOW
Réchauffeur IN.THERM 3.6 kw
Circulation System HI-FLO
Ozone IN.ZONE, CD
Filtre 2
Direct Flow Control 4
6” Cascade le maximum de 1
Wassermenge 1174 liters
Leergewicht 293 kg
Gesamtgewicht 1418 kg
Dimensions 2.08m x 2.08m x .94m
Control IN.XM 3-5P
Pumpe (4) 3.0 HP 1SPD 230V PowerWOW
Heizelement IN.THERM 3.6 kw
Zirkulationssystem HI-FLO
Ozon IN.ZONE, CD
Filter 2
Direct Flow Control 4
6” Wasserfall Höchstbetrag von 1
Volumen 1174 liters
Peso seco/293 kg llenado/1418 kg
Dimensiones 2.08m x 2.08m x .94m
Control IN.XM 3-5P
Bomba (4) 3.0 HP 1SPD 230V Power WOW
Calentador IN.THERM 3.6 kw
Sistema de la circulación HI-FLO
Ozono IN.ZONE, CD
Filtro 2
Direct Flow Control 4
6” Cascada máximo de 1
1312

SPA CONFIGURATION AND WATER CAPACITY
FALCON COVE
Volume 360 Gallons
Weight dry/645 lbs fi lled/3150 lbs
Dimensions 84”x84”x37”
Control IN.XM 3-5P
Pump (3) 3.0 HP 1SPD 230V Power WOW
Heater IN.THERM 4 kw
Circulation System HI-FLO
Ozone IN.ZONE, CD
Filter One 50 Sq Ft Pleated & One Disposable
Direct Flow Control 3
6” Waterfall Maximum of 1
Wassermenge 1174 liters
Leergewicht 293 kg
Gesamtgewicht 1417 kg
Dimensions 2.13m x 2.13m x.94m
Control IN.XM 3-5P
Pumpe (3) 3.0 HP 1SPD 230V PowerWOW
Heizelement IN.THERM 3.6 kw
Zirkulationssystem HI-FLO
Ozon IN.ZONE, CD
Filter 2
Direct Flow Control 3
6” Wasserfall Höchstbetrag von 1
Volume d’ eau 1174 liters
Poids à vide 293 kg
Poids plein 1417 kg
Dimensions 2.13m x 2.13m x.94m
Control IN.XM 3-5P
Pompe (3) 3.0 HP 1SPD 230V Power WOW
Réchauffeur IN.THERM 3.6 kw
Circulation System HI-FLO
Ozone IN.ZONE, CD
Filtre 2
Direct Flow Control 3
6” chute d’eau Maximum de 1
Volumen 1174 liters
Peso seco/293 kg llenado/1417 kg
Dimensiones 2.13m x 2.13m x.94m
Control IN.XM 3-5P
Bomba (3) 3.0 HP 1SPD 230V Power WOW
Calentador IN.THERM 3.6 kw
Sistema de la circulación HI-FLO
Ozono IN.ZONE, CD
Filtro 2
Direct Flow Control 3
6” Cascada Máximo de 1
1514

ELECTRICAL REQUIREMENTS
AND INSTALLATION
The following information is provided for hooking up electrical supply to
your new spa. A qualifi ed, licensed, electrician must perform this work.
Failure to follow these instructions will terminate all warranty coverage
and can cause serious injury or death.
Your Artesian spa is preset at the factory to run on 240V with a 48
amps input. This feature gives you the most performance out of your
spa. This will require a 240V, 60-amp GFCI. If a 60-amp service is not
available, your spa can be made to run with 32 or 40 amps input
rating. Press the SELECT key on the spa control pack to change the
input rating.
ELECTRICAL WIRING
WARNING: Your spa must be wired by a certifi ed electrician and
according to these instructions. Failure to do so will terminate all
warranties and all listings from the independant listing facility.
1) The Platinum Class Spa requires a 240 VAC dedicated
system. The spa must be hardwired to the power supply, with no
plug-in connections, extension cords, or sharing of service.
2) The spa requires that you run 6 or 8 AWG copper wire, depending
on the GFCI size. Do Not Use Aluminum Wire.
3) The power supply must have a suitable Ground Fault Circuit
Interrupter (GFCI), according to Section 422-20 of the National
Electrical Code, ANSI/NFPA 70-7987. This could be used as the
shut-off switch, which must be installed in plain view of the spa. This
electrical service must be readily accessible to the spa occupants,
but must not be within 5 feet of the spa.
4) Use only non-metallic conduit and fi ttings when installing power to
the spa.
5) After your spa has been positioned, route lines through the knockout
on the left or right front corner of the spa.
6) Connect the power to the spa.
16 17
From Electrical Box To Spa From Electrical Box To Spa
MUST BE DONE BY A CERTIFIED ELECTRICIAN
• The black and red wires from the electrical box must be connected to the input of
the GFCI.
• The white wire from the electrical box must be connected to the neutral bus.
• The green or copper wire must be connected to the ground log of the GFCI.
• The black, red and white wires going to the spa must be connected directly to the
output of the GFCI.
• The neutral of the GFCI must be connected to the neutral bus.
• The green or copper wire going to the spa must be connected to the ground log.
Pack Terminal Block from GFCI
MUST BE DONE BY A CERTIFIED ELECTRICIAN
Important
Connections
Neutral of GFCI
must be connected
to neutral bus.
Neutral from spa
must be connected
to breaker.

SPA START-UP
Please read each step of the Start-up section prior to doing the
step.
SELECTING A LOCATION
In preparation for installing your new Artesian spa, you should
ensure that your chosen location meets some minimum guidelines:
1) Place your spa on a surface that is large enough for the entire spa to
fit. Consider the space needed to easily access equipment
compartments and circuit breakers. Remember, all electronics
must be kept dry.
2) The spa must be on a solid, level foundation. Recommended: 4-
inch cement slab that has cured for at least 72 hours. Your warranty
will be voided if the spa is not properly installed. Structural damage
due to an improper foundation is not covered under warranty.
3) To avoid potential water damage to the skirt and frame, your spa
should be placed on a site where it will not be in the way of water
sprinklers.
4) OUTDOOR SPAS: Consider building codes, electrical and
plumbing codes, desired proximity to house, wind and sun exposure,
location of trees (falling leaves, shade), dressing area, landscaping
and lighting when selecting a location.
5) INDOOR SPAS: Floor surface must have traction to prevent slipping
when wet. A floor drain is optimum. As room humidity will increase
because of the spa, provide ample ventilation to prevent dry rot,
mildew and mold. Use materials that will withstand humidity. There
may be a need for cross-ventilation fans and/or dehumidifiers. The
spa chemicals may corrode some household metals. Provide ample
room if servicing should be needed. Strong foundational support is
vital, particularly if a second-story site is selected.
6) Ensure the equipment compartment is in a location where it will not
be damaged by water drainage. Cover the equipment compartment
with a heavy screen if rodents are a problem. Damage due to
rodents is not covered under warranty.
18
7) Have the spa deck installed by a knowledgeable contractor to
ensure proper support.
8). If the spa is placed on the ground, even for a short period of time,
it must be supported by stones that are at least 2 inches thick and
12 inches square. A solid foundation is recommended as soon as
possible.
INSPECTION
You will want to inspect your spa, prior to filling it up with water. Look
for and remove any debris in the spa tub and in the filter. Verify that
pump plugs are installed on the pumps and the pump unions are tight.
FILLING THE SPA WITH WATER
NOTE: DO NOT fill your spa with hot water straight out of your
water heater or tap. This water may be as hot as 180 degrees F
and will cause damage to the surface and plumbing of the spa.
This will void your warranty. Level the spa before filling.
1) Prepare to fill the tub by removing all debris.
2) Remove the filters from your spa (see Removing, Installing and
Cleaning Filters, page 33)
3) Place your garden hose in the circulation pump line.
19

SPA START-UP cont...
FILLING THE SPA WITH WATER cont...
4) Fill the tub from the circulation pump line until water level is above
the foot-well.
Note: This will purge all the air out of the circulation pump.
An air lock can cause damage to the circulation pump
and is not covered under warranty.
5) Once the water level is filled over the foot-well, you can pull the
hose out of the circulation line and continue filling the spa from the
filter well.
6) Fill the spa to the bottom of the pillows. Note: DO NOT OVER-FILL
YOUR TUB!
7) With the front panel off, verify there are no leaks at the pump
union. Note: Pump unions can become loose during shipping.
Verify that there are no leaks during filling of the spa.
8) Reinstall the circulation pump screen and all filters.
20
TURNING THE POWER ON
Turn the power to the spa on at the main circuit breaker. Verify that
your spa has no error codes. (See page 47) Verify that there is good
water circulation in the spa. The pumps will come on in cycles, for 1
minute each cycle.
VERIFYING WATER CIRCULATION
1) Open all the jets.
2) Press the Pump 1 key to turn the pumps on or off.
3) Make sure each seat has water flow. Note: On certain spas there is
a diverter valve. Verify where the diverter valve is located.
TESTING THE GFCI BREAKER
NOTE: The electrical service panel for your spa should be
equipped with a GFCI breaker. To avoid the risk of electrical
shock, perform the following safety test before each use of
your spa.
1) Make sure the power is turned on at the electrical service panel.
2) Turn on the GFCI breaker. If the breaker stays on, it is functioning
properly.
DANGER: RISK OF ELECTRICAL SHOCK
If the GFCI breaker fails to operate as described, there is a possibility
of an electric shock if the spa is used. Shut off the power at the main
electrical service panel until the source of the problem has been
identified and corrected by a licensed electrician or qualified spa
technician.
21

SPA START-UP cont...
TESTING THE GFCI BREAKER cont...
NOTE: When power is turned on, your spa is automatically
programmed to start circulating water through the circulation
pump. Each pump and/or blower will come on consecutively for
approximately 1 minute to automatically purge the system. Adjust
your temperature by pressing the up button on your touchpad
until the desired temperature is displayed. This setting will allow
your spa to heat to the set temperature.
CAUTION: If water is not noticeably coming from your spa jets
during the automatic purge, turn on the high speed pump. If water
is still not coming from the jets, the pump needs to be manually
primed, following the steps below.
PRIMING THE PUMP
1) Turn off power at electrical service panel.
2) Locate and loosen one of the pump plugs on each pump by turning
it counterclockwise one half of one turn.
3) Allow air to escape from fittings. When a steady stream of water
flows from the pump plug, close it by turning it clockwise until tight.
4) Turn on power at electrical service panel.
5) Check once more to make sure that water is flowing from the jets
during auto purge. If so, continue. If no water is coming from your
spa jets, please call your Artesian dealer for further assistance.
WATER PREPARATION
NOTE: Before putting your new spa into operation, understand
that preparing your new water is an important part of
maintenance. Failure to properly prepare your water can result
in substantially decreasing the life of the components and may
void your warranty in severe cases. Your Artesian dealer should
have a start-up and maintenance kit available for you when you
receive your spa.
22 23

Keypad Introduction
OPTIONS
BASIC PROGRAMMING
You can personalize the operation of your spa by changing preset
factory settings in the Options menu.
To access the Options menu, you must first press the “Mode” key and
select “Options” from the Mode Menu.
2524
Key 1
Key 4
Key 3
Key 2 Mode Key
Next Page Key
Left Key
Minus Key
Right Key
Plus Key
OK Key
Key
Left
Right
Ok
Mode
Next
Plus
Minus
(4) Number Keys
Function
Selects adjacent on-screen parameter
Goes back to previous parameter setting or
increases parameter in some menus
Goes to next parameter setting or decreases
parameter in some menus
Saves selected parameter and exits; or in SPA
Menu, changes display from Temperature to Time
or to Error Code when Service Icon is on.
Selects mode of operation : Spa, Audio, Options
Goes to next menu page of the current mode of
operation
Increases parameter
Decreases Parameter
Options Key
Mode Key
This menu allows the user to
change Filtration, Economy, and
Maintenance reminder prompt
settings and view active
maintenance and warning
messages.
Spa Options Key
Information
Display Area
Status Icon
Display Area
Message Prompt
Display Area
Mode of operation
Display Area
Menu Title
Display Area
Number Key
Function
Display Area

SETTING ECONOMY MODE
This menu allows the user to program Economy mode start time and
stop time.
Setting Economy Mode
Start Time
- Use “Plus” or “Minus” keys
to change purge start time.
- Use “Next” key to confi rm
and go to Economy Mode
stop time.
- Use “Ok” key to confi rm and
return to Spa Options Menu.
- Use “Exit” key to exit and
return to Spa Options Menu.
Setting Economy Mode
Stop Time
- Use “Plus” or “Minus” keys
to change Economy Mode
stop time.
- Use “Confi rm” or “Ok” key to
confi rm and return to Spa
Options Menu.
- Use “Exit” key to exit and
return to Spa Options Menu.
Start Time
to change purge start time.
and go to Economy Mode
stop time.
return to Spa Options Menu.
BASIC PROGRAMMING cont...
SETTING PURGE CYCLES
This menu allows the spa user to set the purge start time and stop
time.
Setting Purge Start Time
- Use “Plus” or “Minus” keys
to change purge start time.
- Use “Next” key to confi rm
and go to purge frequency.
- Use “Ok” key to confi rm and
return to Spa Options Menu.
- Use “Exit” key to exit and
return to Spa Options Menu.
Setting Purge Frequency
- Use “Plus” or “Minus” keys
to change purge frequency.
- Use “Confi rm” or “Ok” key to
confi rm and return to Spa
Options Menu.
- Use “Exit” key to exit and
return to Spa Options Menu.
2726
Filter Options
Key
to change purge start time.
and go to purge frequency.
return to Spa Options Menu.
Setting Purge Frequency
to change purge frequency.
confi rm and return to Spa
Options Menu.
return to Spa Options Menu.
Economy
Options Key
Stop Time
to change Economy Mode
stop time.
confi rm and return to Spa
Options Menu.
return to Spa Options Menu.
Confi rm Key
Next Key
Exit Key
Exit Key

BASIC PROGRAMMING cont...
MAINTENANCE REMINDER PROMPTS
This menu allows the user to turn on/off maintenance reminder
prompts and to view active maintenance messages.
Turning On/Off
Maintenance Reminder
Prompts
- Use “Plus” or “Minus” keys
to turn on/off maintenance
reminder pumps.
- Use “Next” key to confi rm
and go to active
maintenance
messages window.
- Use “Ok” key to confi rm and
return to Spa Options Menu.
- Use “Exit” key to exit and
return to Spa Options Menu.
Viewing Active
Maintenance Messages
- Use “Left” or “Right” keys to
view all maintenance
message (if more than one).
- Use “Ok” or “Exit” key to exit
and return to Spa Options
Menu.
MAINTENANCE REMINDER PROMPTS cont...
This menu allows the user to view active warning messages.
Viewing Active
Warning Messages
- Use “Left” or “Right” keys to
view all warning message
(if more than one).
- Use “Ok” or “Exit” key to exit
and return to Spa Options
Menu.
return to Spa Options Menu.
Maintenance Messages
-
view all maintenance
message (if more than one).
and return to Spa Options
Menu.
2928
Reminder
Options Key
Viewing Active
Warning Messages
-
view all warning message
(if more than one).
and return to Spa Options
Menu.
Maintenance Reminder
Prompts
to turn on/off maintenance
reminder pumps.
and go to active
maintenance
messages window.
return to Spa Options Menu.
Warning Key
Confi rm Key
Next Key
Exit Key
Exit Key
Exit Key

BASIC PROGRAMMING cont...
CHANGING KEYPAD OPTIONS
This menu allows the user to change display, sound, regional, and
security settings.
CHANGING DISPLAY OPTIONS
This menu is used to change display settings: Contrast, Backlight, and
Mode.
Setting Contrast Level
- Use “Plus” or “Minus” keys to
change contrast level.
- Use “Next” key to confi rm and
go to Backlight settings.
- Use “Ok” key to confi rm and
return to Keypad Options Menu.
- Use “Exit” key to exit and return
to Keypad Options Menu.
Keypad
Options Key
Display
Options Key
Setting Contrast Level
-
change contrast level.
go to Backlight settings.
- Use “Ok” key to confi rm and
return to Keypad Options Menu.
- Use “Exit” key to exit and return
to Keypad Options Menu.
CHANGING DISPLAY OPTIONS cont...
Setting Backlight Level
- Use “Plus” or “Minus” keys to
change backlight level.
- Use “Next” key to confi rm and
go to Backlight settings.
- Use “Ok” key to confi rm and
return to Keypad Options Menu.
- Use “Exit” key to exit and return
to Keypad Options Menu.
Setting Video Mode
- Use “Plus” or “Minus” keys to
change Video mode from
“Normal” to “Reverse” mode.
- Use “Next” key to confi rm and
go to Backlight settings.
- Use “Ok” key to confi rm and
return to Keypad Options Menu.
- Use “Exit” key to exit and return
to Keypad Options Menu.
Setting Display Inversion
- Use “Plus” or “Minus” keys to
change display from Normal
to Inverted.
- Use “Confi rm” or “Ok” key to
confi rm and return to Keypad
Options Menu.
- Use “Exit” key to exit and
return to Keypad Options Menu.
Setting Backlight Level
-
change backlight level.
go to Backlight settings.
- Use “Ok” key to confi rm and
return to Keypad Options Menu.
- Use “Exit” key to exit and return
to Keypad Options Menu.
Setting Display Inversion
-
change display from Normal
to Inverted.
confi rm and return to Keypad
Options Menu.
- Use “Exit” key to exit and
return to Keypad Options Menu.
Setting Video Mode
-
change Video mode from
“Normal” to “Reverse” mode.
go to Backlight settings.
- Use “Ok” key to confi rm and
return to Keypad Options Menu.
- Use “Exit” key to exit and return
to Keypad Options Menu.
3130

BASIC PROGRAMMING cont...
CHANGING SOUND OPTIONS
This menu allows the user to change sound settings: Keypad and
Alarm sound and Audio Type.
Setting Keypad Sound
- Use “Plus” or “Minus” keys to
turn keypad sound on or off.
- Use “Next” key to confi rm and
go to alarm sound settings.
- Use “Ok” key to confi rm and
return to Keypad Options Menu.
- Use “Exit” key to exit and return
to Keypad Options Menu.
Setting Alarm Sound
- Use “Plus” or “Minus” keys to
turn alarm sound on or off.
- Use “Next” key to confi rm and
go to alarm sound settings.
- Use “Ok” key to confi rm and
return to Keypad Options Menu.
- Use “Exit” key to exit and return
to Keypad Options Menu.
Sound
Options Key
-
turn keypad sound on or off.
go to alarm sound settings.
- Use “Ok” key to confi rm and
return to Keypad Options Menu.
- Use “Exit” key to exit and return
to Keypad Options Menu.
-
turn alarm sound on or off.
go to alarm sound settings.
- Use “Ok” key to confi rm and
return to Keypad Options Menu.
- Use “Exit” key to exit and return
to Keypad Options Menu.
CHANGING SOUND OPTIONS cont...
Setting Audio Type
- Use “Plus” or “Minus” keys to
set audio type to “in.tune” or
“in.pix”.
- Use “Confi rm” or “Ok” key to
confi rm and return to Keypad
Options Menu.
- Use “Exit” key to exit and return
to Keypad Options Menu.
CHANGING REGIONAL OPTIONS
This menu is used to change regional settings: Language and
Temperature Units, and Time Format.
Setting Languages
- Use “Plus” or “Minus” keys to
change language to French or
English
- Use “Next” key to confi rm and
go to Temperature Unit settings
- Use “Ok” key to confi rm and
return to Keypad Options Menu.
- Use “Exit” key to exit and return
to Keypad Options Menu
Setting Audio Type
-
set audio type to “in.tune” or
“in.pix”.
- Use “Confi rm” or “Ok” key to
confi rm and return to Keypad
Options Menu.
- Use “Exit” key to exit and return
to Keypad Options Menu.
Regional
Options Key
-
change language to French or
English
go to Temperature Unit settings
- Use “Ok” key to confi rm and
return to Keypad Options Menu.
- Use “Exit” key to exit and return
3332

CHANGING SECURITY OPTIONS cont...
Setting Audio Type
- Use “Plus” or “Minus” keys to
lock (partial or full) or unlock
keypad.
- Use “Confi rm” or “Ok” key to
confi rm and return to Keypad
Options Menu.
- Use “Exit” key to exit and return
to Keypad Options Menu.
Notes:
- To exit Partial Lock, press
Options key for 5 seconds.
- To exit Full Lock, press Key 1
for 5 seconds.
BASIC PROGRAMMING cont...
CHANGING REGIONAL OPTIONS cont...
Setting Temperature Units
- Use “Plus” or “Minus” keys to
change temperature units to
“F” or “C”.
- Use “Next”, “Right”, or “Ok” key to
confi rm and go to Time Format
setting.
- Use “Ok” key to confi rm and
return to Keypad Options Menu.
- Use “Exit” key to exit and return
to Keypad Options Menu.
Setting Time Format
- Use “Plus” or “Minus” keys to
change Time Format to 12
hours or 24 hours.
- Use “Confi rm” or “Ok” key to
confi rm and return to Keypad
Options Menu.
- Use “Exit” key to exit and return
to Keypad Options Menu.
CHANGING SECURITY OPTIONS
This menu is used to change security settings: keypad unlock, partial
lock, or full lock
-
change temperature units to
“F” or “C”.
confi rm and go to Time Format
setting.
- Use “Ok” key to confi rm and
return to Keypad Options Menu.
- Use “Exit” key to exit and return
-
change Time Format to 12
hours or 24 hours.
- Use “Confi rm” or “Ok” key to
confi rm and return to Keypad
Options Menu.
- Use “Exit” key to exit and return
to Keypad Options Menu.
Security
Options Key
3534
Setting Audio Type
-
lock (partial or full) or unlock
keypad.
- Use “Confi rm” or “Ok” key to
confi rm and return to Keypad
Options Menu.
- Use “Exit” key to exit and return
to Keypad Options Menu.
Options key for 5 seconds.
Partial Lock Icon
Full Lock Icon
Unlock Icon
Unlock Icon
Table of contents
Other Artesian Spas Hot Tub manuals

Artesian Spas
Artesian Spas ISLAND SPAS ELITE Series User manual

Artesian Spas
Artesian Spas PLATINUM ELITE User manual

Artesian Spas
Artesian Spas Garden Series Owner's manual

Artesian Spas
Artesian Spas Tropic Seas Spa series User manual

Artesian Spas
Artesian Spas Antigua User manual

Artesian Spas
Artesian Spas Garden Spas User manual

Artesian Spas
Artesian Spas Grand Bahama User manual

Artesian Spas
Artesian Spas PLATINUM ELITE User manual

Artesian Spas
Artesian Spas Island Spas Series User manual

Artesian Spas
Artesian Spas Grand Bahama User manual