ARVA EVO5 User manual

USER MANUAL
MODE D’EMPLOI
INBETRIEBNAHME
GUIDA INTRODUTTIVA
GUÍA DE UTILIZACIÓN
KÄYTTÖOHJE
BRUKERMANUAL
ANVÄNDARMANUAL
取扱説明書


2
Congratulations on purchasing a new ARVA
transceiver. This user manual will provide all of
the key information you need on how to operate
your new device. This manual is also available
on our website on the “downloads” page.
Register your ARVA transceiver on our website
www.arva-equipment.com to receive an addi-
tional 3-year warranty.
OPERATING INSTRUCTIONS
1/
2/
3/
4/
5/
6/
7/
GETTING STARTED
TRANSMIT MODE
SEARCH MODE
PROBING - SHOVELING
INTERFERENCE
WARRANTY - MAINTENANCE - LIFECYCLE
DECLARATIONS OF CONFORMITY (at the end
of the manual)
1.1/ TECHNICAL FEATURES
• Digital 3-antenna device
• Frequency: 457 kHz
• Search strip width: 50m
• Active interference management
• Automatic revert to transmit by timer (8 min)
• Power supply: 1 AA/LR06 alkaline battery
• Battery life (alkaline battery): minimum 200 hours
in transmit mode followed by 1 hour in search
mode.
• Weight: 165g (battery included).
• Storage temperature range: -20 °C to +70 °C
• Operating temperature range: -20 °C to +45 °C
• Maximum altitude to function properly: 10 000 m
• Avalanche beacon / Frequency band :
456.9 - 457.1 kHz
• Avalanche beacon / Maximum power used : H-Field
< 2.23 µA/m @ 10 m
1/ GETTING STARTED

EN
3
LOCK BUTTON IN TRANS-
MIT MODE (SEND)
MARKING BUTTON
OFF/SEND/SEARCH
SELECTOR SWITCH
WAIST BELT
ELASTIC ATTACHMENT
LANYARD

4
The information contained in this user manual is for ref-
erence purposes only and may be modified at any time.
The technical and product specifications may change
without prior notice for future versions of this and other
devices.
1.2/ PRACTICE - RESPONSIBILITY
Practice makes perfect, and knowing how to properly use
your device is essential in an avalanche search. Off-piste
skiing, ski touring, and ski mountaineering are activities
with inherent risks, and wearing a transceiver should not in-
fluence your decision making in risky locations. Know when
to turn around.
1.3/ STORAGE - BATTERY
Store your transceiver in a cool and dry place, away from
direct sunlight. Remove the battery when storing the device
for long periods of time (in summer). Your transceiver is no
longer under warranty if the battery leaks. Check your de-
vice on a regular to make sure that the OFF/SEND/SEARCH
selector switch and screen function properly, and that there
are no traces of corrosion in the battery compartment.
The EVO5 operates exclusively with one AA/LR06 alkaline
battery. Do not use a lithium or rechargeable battery. The
label in the battery compartment is important for customer
service, do not remove it. After changing the battery, make
sure that the cover is closed properly.
Important for Switzerland: appendix 4.10 for standard
SR814.013 applies to batteries.
CAUTION: There is a risk of explosion if the battery
is thrown into a fire or replaced by the wrong type
of battery. Follow the instructions on how to prop-
erly dispose of used batteries.
2/ TRANSMIT MODE
2.1/ TURNING ON THE DEVICE
The device is off when the OFF/
SEND/SEARCH selector switch
is in the top position and the
selector’s white arrow points
to “OFF”.

EN
5
To turn on the device, push the
OFF/SEND/SEARCH selector (lo-
cated on the upper right-hand
side of the device) down until
the lock button mechanically
locks it into place (the white ar-
row should point to “SEND”).
When the device turns on, it automatically checks that all
main functions are working properly. Verify that the au-
to-test runs correctly and pay close attention to any error
messages that display when turning on your device.
The device then displays the software version installed and
remaining battery life. We recommend that you replace the
battery as soon as it drops below 50%. Holding down the
marking button in transmit mode will allow you to check bat-
tery life left at any time.
The selector is properly locked when, in transmit mode, the
lock button pops out and you hear it click into place and you
cannot push it down any further.

6
Once the start-up phase is complete,
the device automatically switches to
transmit mode. A blinking arrow in the
upper middle of the screen confirms
that your transceiver is in transmit
mode.
2.2/ WEARING THE DEVICE
POCKET OPTION
Once the EVO5 is in transmit mode, make sure that it is
connected to the elastic attachment lanyard (the device is
delivered attached to the lanyard), and then verify that the
carabiner on the elastic attachment lanyard is connected to
the waist belt.
Position the EVO5 in a zippered pant pocket for the entire
duration of your outing. The zipper slider should be fully
closed, leaving only enough room for the elastic cord to exit.
Adjust the belt around your waist and then buckle it.

EN
7
Make sure that you do not place any other contents in the
pocket carrying your EVO5 avalanche transceiver. Do not
place a cell phone in the same pocket and follow the dis-
tance guidelines detailed in paragraph 5, “INTERFERENCE”.
2.3/ WEARING THE DEVICE
HOLSTER OPTION
If you have an EVO5 HOLSTER (sold separately as an acces-
sory), make sure that the carabiner on the elastic attach-
ment lanyard is connected to the holster’s waist belt (2 po-
sitions, left or right), position the device in the holster with
the screen facing out, and then buckle the holster closed.
The EVO5 should always be worn over a base layer and as
close to your body as possible.

8
2.4/ TURNING OFF THE DEVICE
To turn off the device when it is in transmit mode, press the
lock button to unlock the OFF/SEND/SEARCH selector switch
and then push the selector into the upper position, with the
white arrow pointing to “OFF”. You will then be asked to con-
firm that you want to turn off the device by pressing on the
marking button.
3/ SEARCH MODE
In the event of an avalanche, to switch from search to trans-
mit mode, take the device out of your pocket or holster and
press the lock button down to unlock and push the selector
switch down to the “SEARCH” position.
1.PRESS
2.PUSH
UP
PRESS
TO SWITCH
OFF
1.PRESS
2.PULL
DOWN

EN
9
3.1/ GROUP AND FREQUENCY CHECK
Before starting your outing, check to make sure that every-
one’s device is in transmit mode and working properly. The
group leader should switch their device into GROUP CHECK
mode to check the devices of the other members in the
group.
When turning on the EVO5 in transmit mode, it will prompt
you to switch to GROUP CHECK mode. To enter GROUP CHECK
mode, push on the marking button when the GROUP CHECK
icon is blinking in the upper part of the screen.
PRESS
1M
You will then be able to test your partners’ devices one by
one by positioning your device 1m away from each device
you check.
In GROUP CHECK mode, the EVO5 starts by analyzing the
transmit frequency. If the frequency does not comply with
current standards, a “no” message will appear indicating
that the device being checked is defective and should be
sent to customer service. If the frequency meets the stand-
ard, a distance reading will display on your screen and you
may then proceed to checking transmit power :

10
• If the distance displayed alternates
between 0.5m and 1.5m, and you are posi-
tioned 1m from the device being checked,
your device will emit a standard search
beep indicating that the transmit power
meets standard requirements.
• If the distance displayed seems strange,
this means that the transmit power might
be faulty and that the device should be
sent to customer service for further in-
spection and maintenance.
Make sure that the group leader’s device is also checked
once the group check is finished. Push on the marking but-
ton to switch to transmit mode.
3.2/ RESCUE
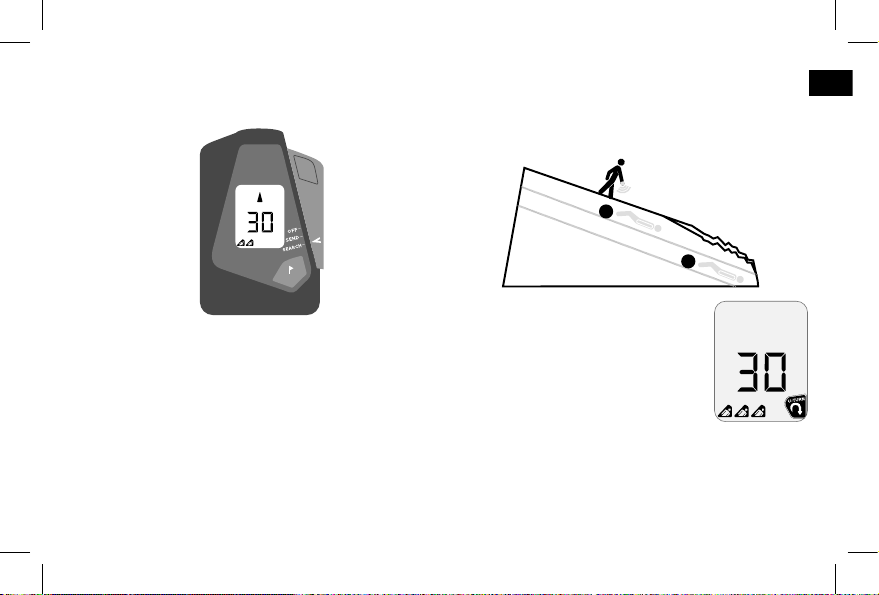
3.2.1/ STEP 1: SIGNAL SEARCH
To search for a signal, move through the avalanche debris
using one of the two techniques illustrated in the diagrams
below.
It is important to point your transceiver in the direction of
the avalanche, parallel to the slope. Listen carefully for the
first signs of a signal while also paying attention to any
visual clues (poles, skis, and clothing). As soon as you re-
ceive a signal, a victim icon appears on the screen.
25m 25m
50m50m 50m
EN
11
3.2.2/ STEP 2: COARSE SEARCH
As soon as you receive a signal, place the device in the palm
of your hand, parallel to the slope, and pointing in the di-
rection indicated on the screen. Pay close attention to the
distance and the direction indicated on screen. For the initial
signal received (the strongest signal), the first avalanche
victim icon appears on screen, and once locked in, the icon
will start to blink. The victims are ranked by signal strength,
from strongest to weakest. So the victim corresponding to
The victim icons are located on the bottom left of your
screen. The “+” icon indicates that there are more than three
burials.
the strongest signal will blink on your screen. If you come
close to another burial during your search, the icon corre-
sponding to this victim will also start to blink.
If you are not heading in the right direc-
tion, an alarm will sound and “u-turn” icon
will appear on screen indicating that you
should turnaround to head in the correct
direction towards the victim(s) burial zone.
In a complex situation where there are
multiple burials or in an environment where there is a lot
of interference, the device might reach analysis overload.
In this case, distance yourself from that specific area and
then return by following another direction.
A
B
12
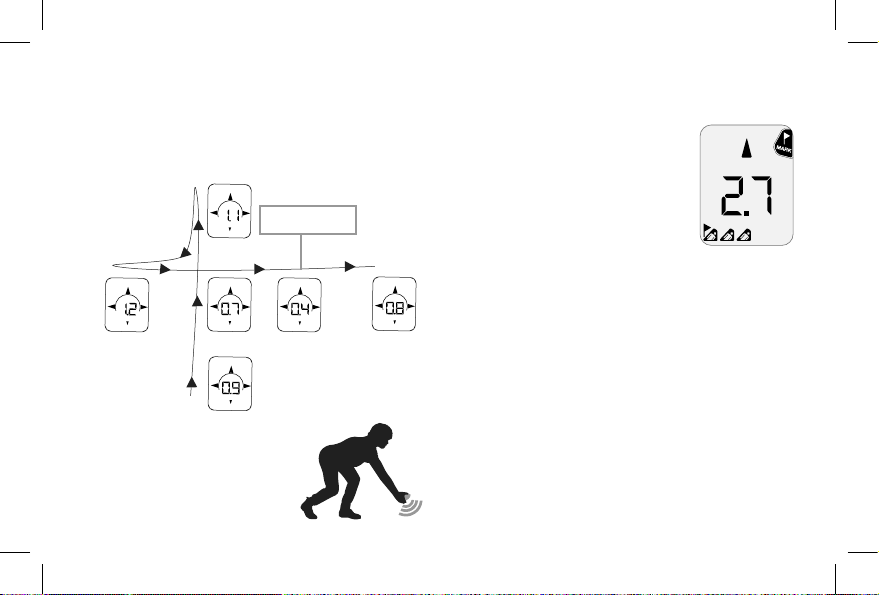
3.2.3/ STEP 3: FINE SEARCH
When the screen indicates that you are “3 meters” from a
burial, your device will no longer indicate a direction. At this
point you need two conduct a fine search using a “cross
pattern”.
Example of fine
search technique 1st probing
point
2. Move your device in a cross pattern to locate the point
where the distance reading is the lowest.
Marking function: When you are less than
3 meters from the burial(s), a marking
icon blinks in the upper right-hand corner
of the screen. Press the marking button
to mark the victim. The device will start
searching for the next victim without any
already marked burial(s) interfering.
In a multi-burial situation, as soon as
you mark a victim, step 1 meter away to prompt the device
to more quickly start searching for the next buried victim.
When you mark a victim, a flag appears next to that victim’s
icon.
3.3/ AUTOMATIC REVERT-TO-TRANSMIT MODE
In the event of a secondary avalanche, the automatic re-
vert-to-transmit mode allows the device to automatically
switch back to transmitting a signal. In search mode, the
device will beep every 8 minutes and the “AUTO-REVERT”
icon will appear on screen asking the user to confirm they
would like to continue in search mode. Press on the marking
1. Position your device near snow level.

EN
13
button to signal to your device that you are
not buried. If no action on your part is de-
tected, the device automatically reverts to
transmit mode.
Warning: if a search is still in progress to find other buried
victims, is important for your device to stay in search mode.
If it reverts to transmit mode, it will interfere with the search
for other victims. Make sure that you push your device’s
marking button to stay in search mode if you are not caught
or buried in a secondary avalanche.
4/ PROBING - SHOVELING
Before you start probing, make sure that you place your
device in the dedicated pocket you chosen to carry it, with
the zipper closed, to keep it out of the cold and well-pro-
tected from impacts. As soon as you have defined the zone
where the victim is likely buried, it is quicker to start probing.
Search for the victim by probing in concentric spirals pro-
gressively away from the minimum distance point detected
by your ARVA. Probe perpendicular to the slope.
Statistically, shoveling takes at least as much
time as the transceiver search. It is important
to take a methodic approach to shoveling.
The V-shaped conveyor technique allows
you to optimize shoveling. As soon you
uncover the person, it is important to
turn off their transceiver as quickly as
possible.

14
5/ INTERFERENCE
Certain electronic devices as well as electrical and electro-
magnetic installations can significantly interfere with trans-
ceiver signals.
These sources are:
• Carried: smart phones, radios, cameras, heart rate mon-
itors, GPS, etc.
• Permanent: relay towers, power lines / electricity generat-
ing equipment, ski lifts.
In order to reduce the risk of signal deterioration, we recom-
mend that you keep your transceiver as far as possible from
sources of electrical and electromagnetic activity.
5.1/ RECOMMENDATIONS IN SEARCH MODE
Move all metallic and electronic devices at least 50cm away
from your transceiver.
When conducting a search, we recommend turning off all
electronic devices except analog radios, headlamps with-
out an automatic regulator, watches that do not have a
radio feature, and backup transceivers in the event of a sec-
ondary avalanche. Turn off all telephones and digital radios
during an active search. All telephone calls should be made
at least 25m from the people conducting the active search.
5.2/ RECOMMENDATIONS IN TRANSMIT MODE
Move all metallic and electronic devices at least 20cm away
from your transceiver.
5.3/ ACTIVE INTERFERENCE MANAGEMENT
With the huge increase in the use of wearable electronic
devices, the potential has increased for electromagnetic
interference of the search signal. These incidences have
primarily been observed near ski areas. Active interference
management is a default setting on the EVO5, allowing your
device to detect interference zones and, if necessary, re-
duce the search strip width. The user can then adapt their
search strategy accordingly.

EN
15
With no interference, the theoretical search strip width is
50m. If there is any interference, the device will reduce the
search strip width to 20m and display an “INTERFERENCE
20m” message. If there is indeed inter-
ference, it is important to adapt your
search technique by narrowing your
search strips to 20m.
6/ WARRANTY – MAINTENANCE -
LIFECYCLE
Your device (without batteries) has a 2-year warranty starting
from the purchase date. All ARVA transceivers have a unique
identification number.
Registering your device on www.arva-equipment.com allows
us to link your contact information to your device to for optimal
tracking and to add another 3 years to your warranty.
Any damage caused by improper use is not covered by the war-
ranty. The warranty is void if the device was opened by the user
or an unqualified third party. We recommend sending us your
device once every 3 years for maintenance (and once every 2
years for professionals).
Disposal of electronic instruments by users from private house-
holds: this symbol indicates that the product is not allowed to be
disposed of with household waste. It is your responsibility to bring
your waste to a designated recycling center to properly recycle
or dispose of your electric and electronics devices. Separate dis-
posal and recycling of your waste will contribute to preserving our
natural resources and ensure an environmentally-friendly dispos-
al that is safer for public health. For more information regarding
the closest recycling center to your residence, contact your local
city hall, waste management company, or the store where you
purchased the product.

16
Félicitations pour l’achat de votre nouvel appar-
eil ARVA, vous trouverez dans ce manuel toutes
les informations indispensables à la bonne
utilisation de votre appareil. Ce manuel est dis-
ponible sur notre site à la rubrique “télécharge-
ments”.
Enregistrez votre appareil ARVA sur notre site
www.arva-equipment.com et bénéficiez de 3
ans de garantie supplémentaire.
MODE D’EMPLOI
1/
2/
3/
4/
5/
6/
7/
PRISE EN MAIN
MODE ÉMISSION
MODE RECHERCHE
SONDAGE - PELLETAGE
PERTURBATIONS
GARANTIE - RÉVISION
DÉCLARATION DE CONFORMITÉ (en fin de
manuel)
1.1/ CARACTÉRISTIQUES TECHNIQUES
• Appareil numérique à 3 antennes
• Fréquence d’émission : 457 kHz
• Largeur de bande de recherche : 50 m
• Gestion dynamique des interférences
• Retour automatique en émission par timer (8 min)
• Alimentation électrique : 1 pile alcaline AA / LR06
• Autonomie avec pile alcaline : minimum 200h en
mode émission suivies d’1h en mode recherche
• Poids : 165 g (pile incluse)
• Plage de températures de stockage : -20 °C à +70 °C
• Plage de températures d’utilisation : -20 °C à +45 °C
• Altitude maximum d’utilisation : 10 000 m
• Détecteur de victimes d’avalanche / Bande de
fréquences : 456.9 - 457.1 kHz
• Détecteur de victimes d’avalanche / Puissance
maximum : H-Field < 2.23 µA/m @ 10 m
1/ PRISE EN MAIN

FR
17
BOUTON DE VERROUIL-
LAGE EN MODE
ÉMISSION (SEND)
BOUTON MARQUAGE
SÉLECTEUR OFF/SEND/
SEARCH
CEINTURE DE
PORTAGE
CORDON D’ATTA-
CHE ÉLASTIQUE

18
Toutes les informations présentes dans ce manuel sont
données à titre indicatif et sous réserve de modification
à tout moment. Les caractéristiques techniques et les
spécifications du produit peuvent être modifiées sans
préavis dans les prochaines versions d’appareils.
1.2/ ENTRAÎNEMENT - RESPONSABILITÉ
S’entraîner et bien connaître son appareil est indispensable
pour réussir une recherche en avalanche. Le ski hors-piste
et le ski de randonnée sont des activités à risque, le port
d’un DVA ne doit en aucun cas affecter votre prise de déci-
sion dans les zones à risque, sachez renoncer.
1.3/ STOCKAGE - PILE
Stockez votre appareil dans un endroit tempéré, sec et à
l’abri des rayons directs du soleil. Enlevez la pile en cas de
stockage de longue durée, aucune garantie n’est accordée
si la pile a coulé dans la trappe. Vérifiez régulièrement votre
appareil, notamment le bon fonctionnement mécanique du
sélecteur OFF/SEND/SEARCH, l’état de l’écran et l’absence
de traces de corrosion dans la trappe pile.
L’EVO5 fonctionne exclusivement avec une pile alcaline
AA / LR06, ne pas utiliser de pile rechargeable ou lithium.
L’étiquette au fond de la trappe pile est importante pour les
procédures SAV, ne pas la retirer. Après un changement de
pile, veillez à ce que le couvercle de la trappe soit correcte-
ment fermé.
Important Suisse : l’annexe 4.10 de la norme SR814.013 est
applicable aux batteries.
ATTENTION : Il y a risque d’explosion si la batterie
est lancée dans le feu ou si elle est remplacée par
une batterie de type incorrect, mettre au rebus
les batteries usagées conformément aux instruc-
tions.
2/ MODE ÉMISSION
2.1/ MISE EN SERVICE
L’appareil est éteint lorsque le
sélecteur OFF/SEND/SEARCH
est en position haute, la flèche
blanche du sélecteur pointe
dans ce cas sur le repère “OFF”.
Pour allumer l’appareil, pouss-

FR
19
er vers le bas le sélecteur OFF/
SEND/SEARCH situé sur le côté
supérieur droit de l’appareil en
appuyant avec votre doigt sur le
sommet du sélecteur jusqu’à ce
que celui-ci se verrouille mécan-
iquement via le bouton de ver-
rouillage (flèche blanche point-
ant alors sur le repère “SEND”).
Pendant la phase de démarrage, l’appareil effectue un
autotest de ses fonctionnalités principales, veillez à bien
contrôler que l’autotest se déroule correctement et soyez
vigilant à l’apparition d’éventuels messages d’erreurs au
démarrage.
L’appareil indique ensuite la version du logiciel installé et
le niveau d’autonomie restante dans la pile. Nous vous
conseillons de remplacer la pile dès que le niveau indiqué
descend en dessous de 50%. Un appui long sur le bouton
marquage en mode émission vous permettra de consulter le
niveau d’autonomie de la pile à tout moment.
Le sélecteur est correctement verrouillé lorsque le bouton de
verrouillage en mode émission est en position sortie et que
vous avez entendu un clic de verrouillage marquant la fin de
descente du sélecteur.
Other manuals for EVO5
2
Table of contents
Languages:
Other ARVA Transceiver manuals


