ARVA EVOLUTION+ User manual
secure your freedom
Mode d’emploi
Instruction for use
Gebrauchsanweisung
Istruzioni d’uso
Modo de empleo
Evolution+

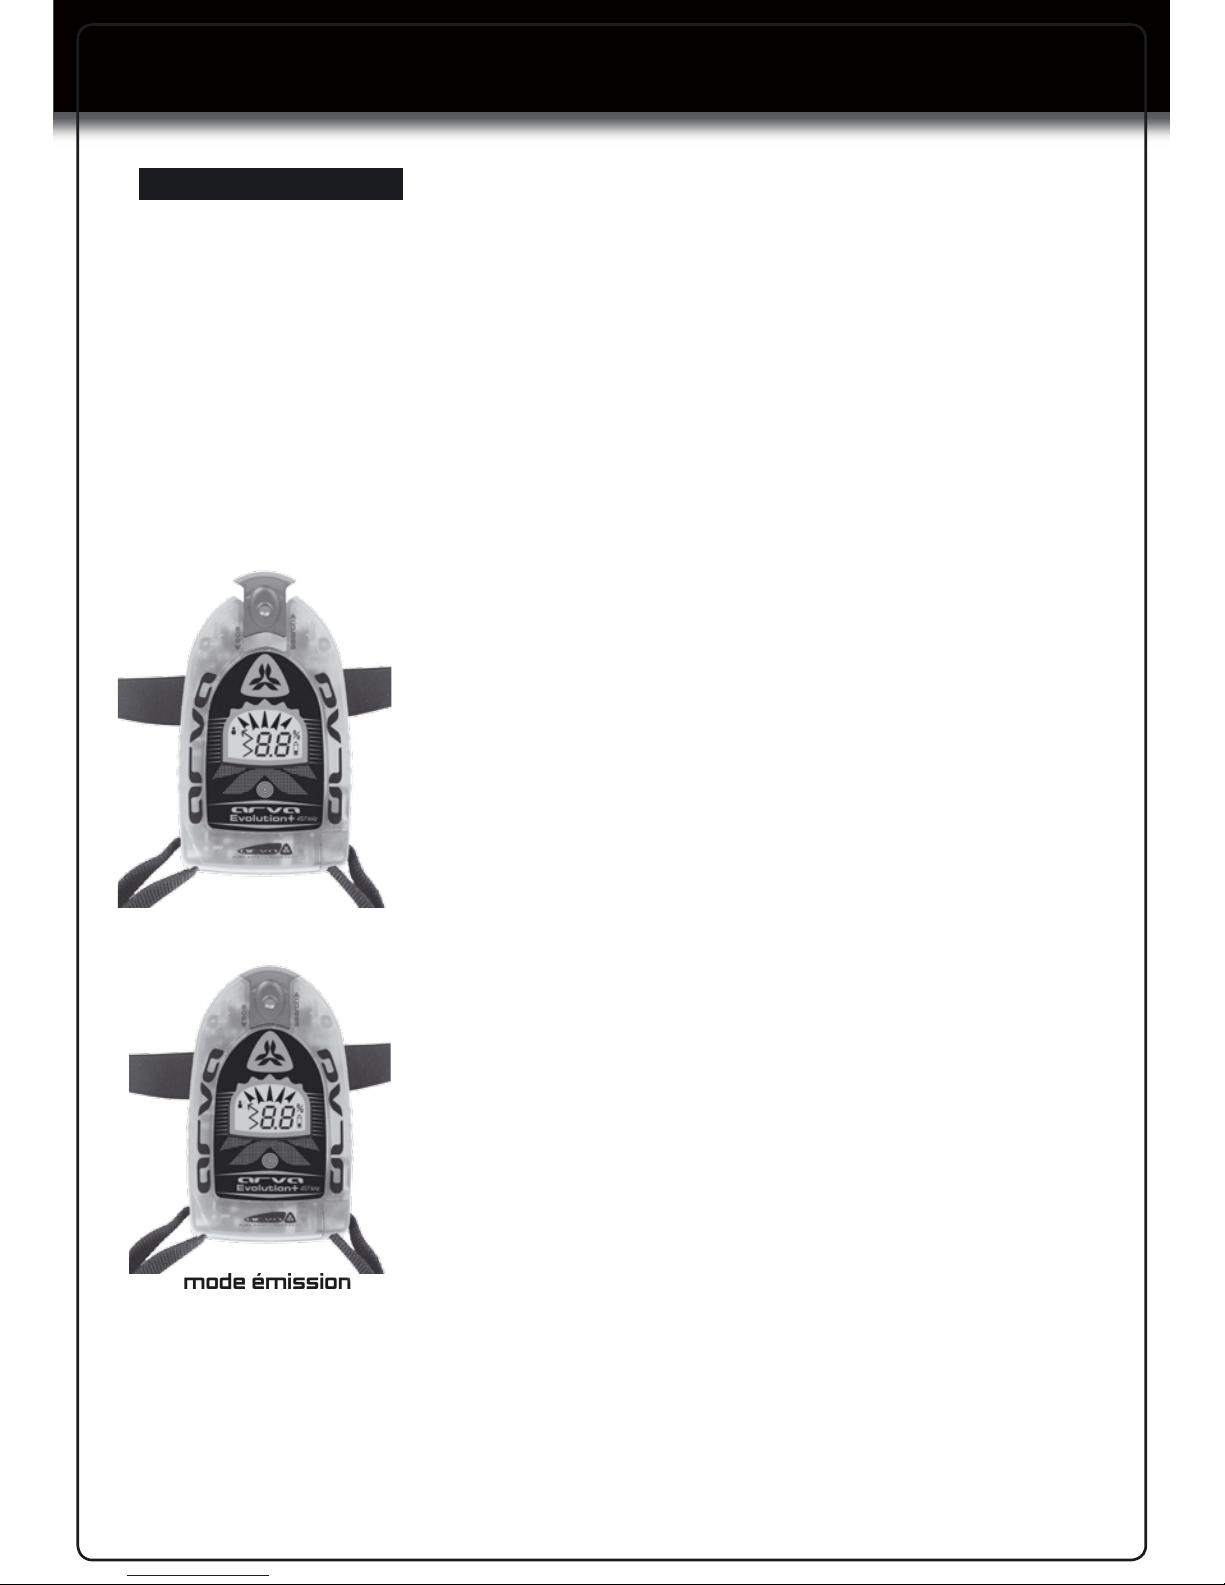
Description de l’appareil
nFace Dessus :
1
Boucle sangle Marche/Arrêt
2
Sélecteur Emission/Réception (SOS / Search)+
Commutateur SCAN
3
Flèches indicatrices de la direction à suivre
4
Haut parleur
nEcran LCD
5
Indicateur d’une détection simultanée de
plusieurs victimes
6
Indicateur de progression en recherche primaire
7
Indicateur de progression / de l’état des piles
8
Indicateur de l’état des piles
nFace dessous :
9
Trappe d’accès aux piles
10
Rappel : - Mise sous tension – Passage en
mode réception - Simulation recherche primaire
un ou x sauveteurs 1- Recherche secondaire
2- Recherche finale (croix finale) 3
A
recherche primaire
5
6
7
8
10
9
Un sauveteur Plusieurs sauveteurs
M M MM
M
M
M M MM
M
M
BC
1
4
2
Evolution+
3
Sangles Hypalon®
new

mise en place des piles
L’ARVA EVOLUTION+ fonctionne exclusivement avec 4 piles Alcaline LR03 standard. Ouvrez la trappe d’accès
aux piles 9avec un tournevis ou une pièce de monnaie. Les 4 piles doivent toujours être de même marque
et remplacées en même temps. Introduisez les piles soigneusement dans le sens indiqué à l’intérieur du loge-
ment.
N.B. : Ne pas stocker l’appareil à une température inférieure à 0° C pour ne pas dégrader les piles.
EVITER ABSOLUMENT les piles rechargeables. Enlever les piles en cas de non utilisation prolongée.
mise en route
nBouclez la sangle Marche/Arrêt 1
nAuto contrôle de l’appareil : les flèches numériques 3vont s’allumer de gauche à droite ainsi que tout
l’affichage de l’écran LCD. 3 Bips pour le contrôle du haut parleur vont se faire entendre quand il est en bon
état.
nContrôlez vos piles grâce à l’échelle de valeur en pourcentage de qualité des piles 7 8 . 11 niveaux (99,
90, 80, 70, 60, 50, 40, 30, 20, 10, 0).
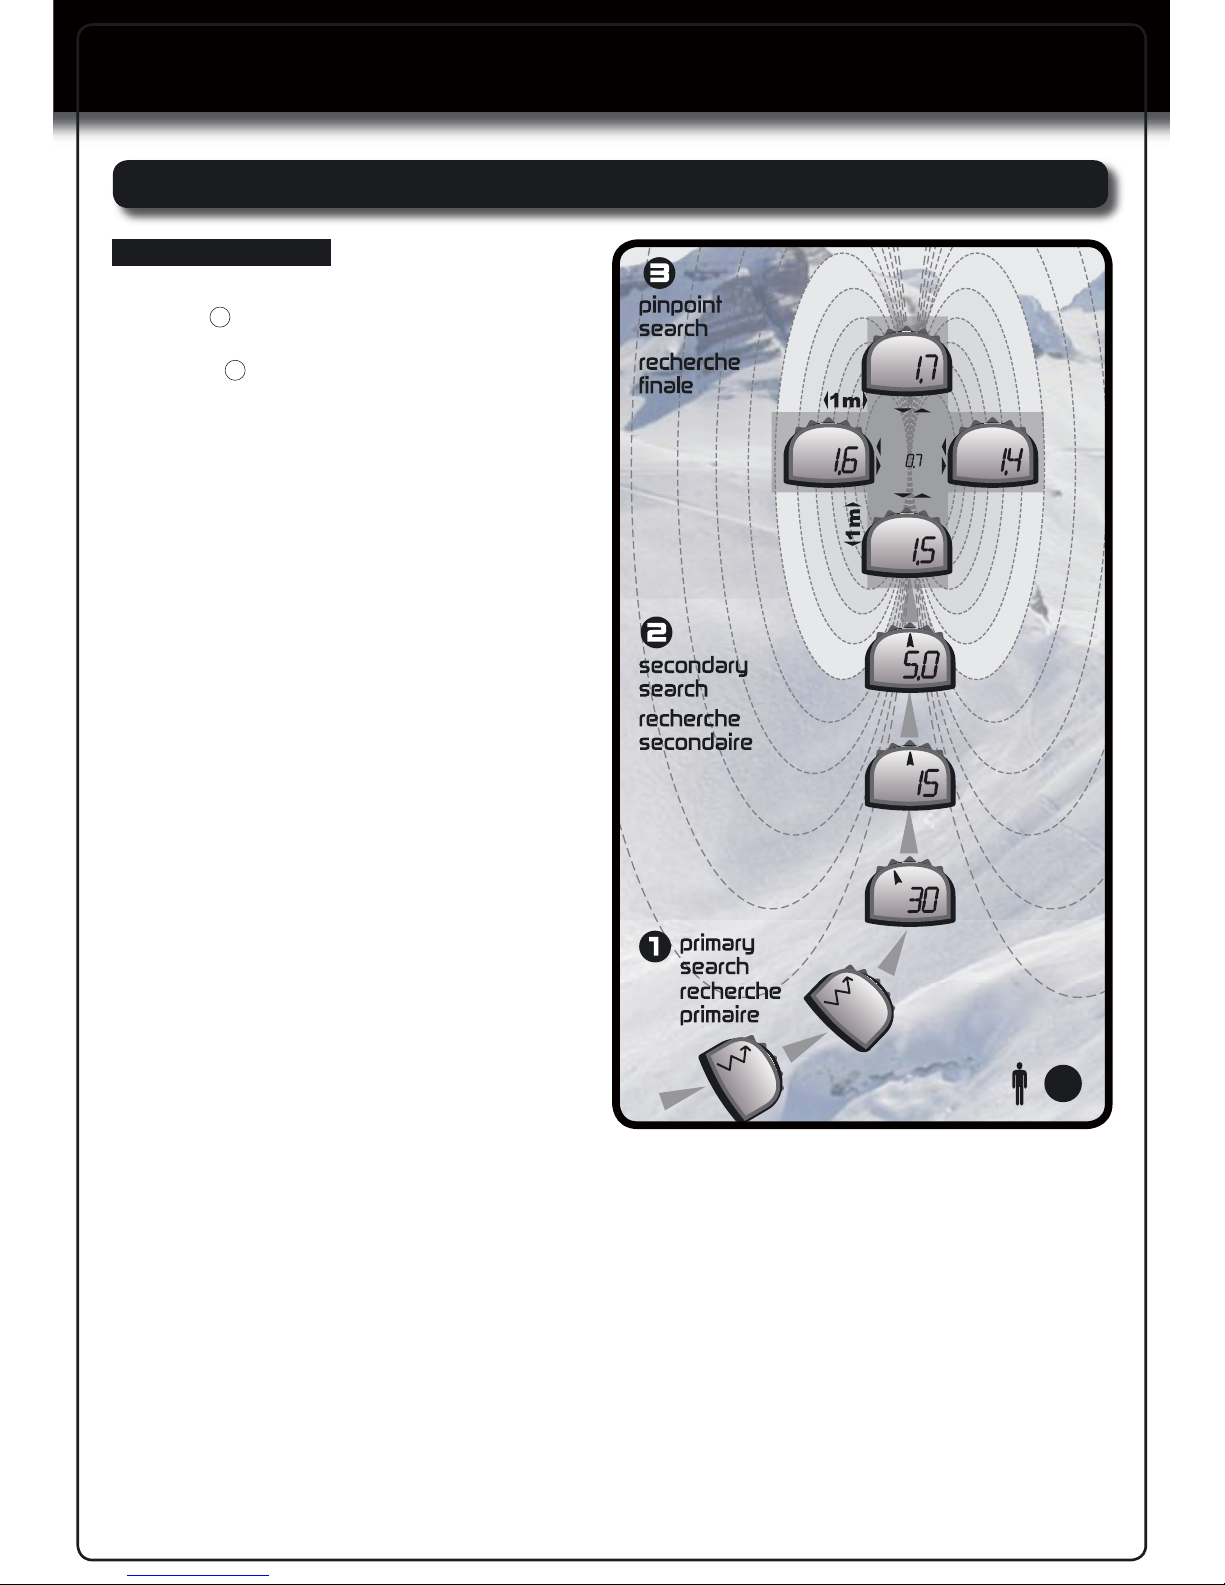
nEnsuite l’appareil éteint l’écran LCD et la flèche numérique centrale clignote 3pour indiquer que l’ap-
pareil est en position émission.
nContrôle Réception/Emission à effectuer au départ de chaque sortie. Le contrôleur met son ARVA en émis-
sion et chaque membre du groupe vérifie que son ARVA en réception le détecte bien. Opération à renouveler
dans l’autre sens pour que TOUS les ARVA du groupe soient contrôlés en émission et réception.
Anomalies possibles...
L’ARVA EVOLUTION+ procède à un auto-test toutes les cinq minutes vérifiant l’état des piles, le calage de la
fréquence, la puissance d’émission, etc.
Si l’appareil détecte une anomalie, un long bip de 5 secondes se fait entendre, 3 fois séparées par 5
minutes. Deux cas possibles :
• Etat des piles descendu à 20% (l’appareil peut encore émettre 48h ou rechercher pendant 1⁄2 heure). Après
les longs bips de 5 secondes, 20% restera allumé sur l’écran LCD pour vous rappeler de changer les piles au
plus vite.
• Problèmes techniques d’émission ou de programme, après les longs bips de 5 secondes, l’écran LCD affiche
Er (= Error). Ne partez pas avec cet appareil dans ce dernier cas.
français
Les EXCLUSIVITES de l'ARVA Evolution+ :
• Un émetteur 457 kHz ±20 Hz très puissant dont le niveau d’émission ne dépend pas de l’état
des piles.
•
La largeur de bande de recherche est de 40 m.
• Un indicateur de présence d’un multi-ensevelissements et une synchronisation automatique
sur la victime la plus proche
•
Fonction SCAN
•
Un auto-contrôle du calage sur la fréquence et de la puissance d’émission toutes les 5 minutes
• Processeur 16 bits avec vitesse d’analyse extrêmement rapide

quelques conseils pour l’utilisation :
Evoluer sur le terrain LENTEMENT pour ne pas prendre de fausses directions dans la hâte. La
totalité de la surface du dépôt de l’avalanche doit être prospectée. Lors d’une recherche ou d’un
contrôle, veillez à : rester éloigné de tout appareil électrique (ligne à haute tension, radio, télé-
phone portable) ou faire un silence radio. Cette liste est non exhaustive.
Ceci s’applique pour tout appareil émetteur-récepteur de type A.R.V.A. L’indicateur de progres-
sion donne un indice de progression sur une ligne de champ et non une distance en mètres.
Lors d'une recherche à plusieurs sauveteurs, vérifiez que tous les sauveteurs soient en position
réception.
utilisations
L’ARVA EVOLUTION+ est un arva NUMÉRIQUE avec utilisation des flèches de direction droite et
gauche. L’appareil se calera automatiquement sur la victime la plus proche.
L’utilisateur suit les indications chiffrées et la direction indiquée par la flèche numérique qui
s’allume.
Si le pictogramme 5apparaît, l’appareil détecte un cas de multi-ensevelissements.
informations pour votre sécurité
Quand vous sortez des pistes de ski sécurisées, vous entrez dans un monde à risque, où une
avalanche, en particulier, peut se produire. Vous circulez alors en montagne sous votre propre
responsabilité :
• Avant de partir, informez-vous (répondeur téléphonique au au 0 892 68 10 20, www.meteo.
fr et professionnels de la montagne) et équipez-vous. En particulier, portez sur vous un ARVA
(appareil de recherche de victimes d’avalanche), une pelle et une sonde. Cet équipement n’est
pas un détecteur d’avalanche, ni une protection absolue, Mais attention, pour être efficace, il faut
être entraîné : exercez-vous donc à utiliser votre ARVA !
• Ne partez jamais seul, ne suivez pas n’importe quelles traces : elles ne sont pas une
garantie absolue de sécurité. En cas de doute sur la stabilité d’une pente que vous devez abso-
lument emprunter, augmentez les distances entre vous, ou mieux, ne passez qu’un par un. Et
surveillez-vous mutuellement.
• Enfin, sachez renoncer... Soyez vigilants : la neige change, le risque d’avalanche aussi! Ap-
prenez donc à mieux connaître les avalanches (catalogue gratuit et documentation à l’ANENA,
association nationale pour l’étude de la neige et des avalanches, au 04 76 51 39 39 et sur www.
anena.org)
Evolution+
français
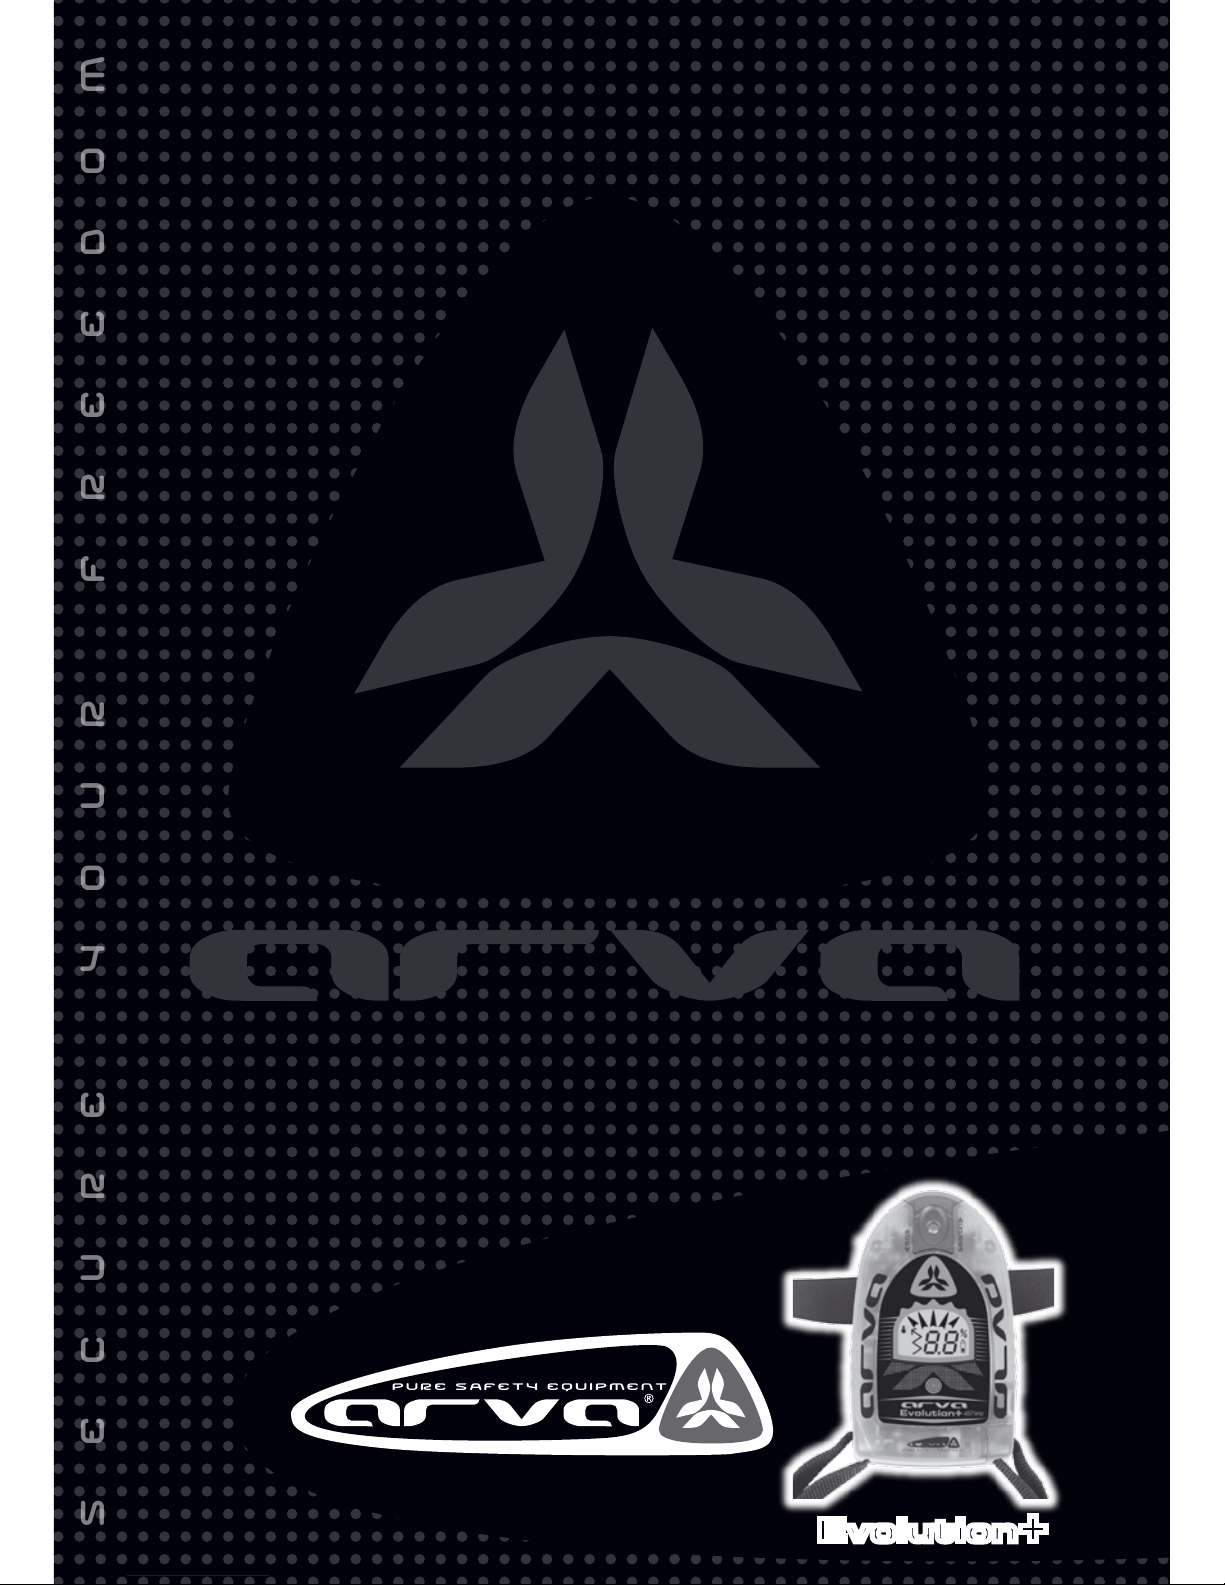
mode numérique
nRecherche Primaire (Phase d’approche) (cf D1)
• Tirez sur 2SEARCH.- L’appareil est automatiquement
en mode numérique complètement automatique, l’écran
LCD affiche 6en continu tant que vous n’avez pas dé-
tecté de signal émis par la victime
• Evoluez en quadrillant l’avalanche selon le schéma B si
vous êtes seul ou C si vous êtes plusieurs sauveteurs.
• Tenez l’ARVA horizontalement, en le pointant vers le
bas en balayant lentement de gauche à droite et de droi-
te à gauche (vous pouvez faire un angle de 180°)
• Continuez jusqu’à avoir un premier signal net et clair
(flèches de direction s’allumant ET indicateur de progres-
sion).
N.B : Il peut arriver que vous soyez directement en re-
cherche secondaire, l’ARVA captant un signal dès sa
commutation en réception.
nRecherche secondaire (phase de localisation) (cf
D2). Cette phase commence à partir du moment où
vous recevez le signal de la victime.
• L’ARVA vous donne une indication de progression sur
l’écran LCD (chiffres) ET l’une des flèches de direction
s’allume.
• Dès qu’une flèche de direction s’allume, orientez votre
ARVA de telle sorte que la flèche numérique centrale
soit allumée et partez dans la direction ainsi indiquée.
Si les chiffres diminuent, vous vous rapprochez de
la victime, continuez dans cette bonne direction.
Sinon, partez en sens inverse.
• Chercher toujours à allumer la flèche de direction
centrale pour progresser, opérez alors un balayage
léger dans le sens où les flèches s’allument. Ceci va vous permettre de parcourir le moins de distance possible
jusqu’à la victime. Continuez à avancer jusqu’à ce que l’écran de progression affiche 3.0.
nRecherche finale (phase de détection) (cf D3).
Arrivé à cet indice, flèche allumée, descendez l’ARVA horizontalement et dans la même position au ras de la neige.
Les bips s’accélèrent, l’indice de progression diminue encore. Continuez la progression jusqu’au plus petit chif-
fre. Lorsqu’il augmente, revenir au plus petit et localisez alors la victime par la technique de la croix en gardant
constamment l’ARVA dans la même position.
nTechnique de la croix : L’ARVA doit impérativement être déplacé au ras de la neige, parallèlement à lui-même
sur une ligne droite. Sur cette droite, il faut déterminer l’endroit où l’indication de progression est la plus faible
(bips très rapprochés, voire continus). De là, partir à la perpendiculaire et renouveler l’opération. Le point de son
maximum alors déterminé est à la verticale de l’émetteur. S’il le faut, renouveler l’opération une ou deux fois de
plus pour affiner la localisation. Mais, il n’est pas nécessaire d’arriver à une localisation extrêmement précise à
l’aide de l’ARVA. Il est en effet souvent plus rapide de commencer immédiatement à sonder dès que l’on a défini
la zone probable de localisation avec une précision de 50 centimètres environ.
Cas d’une seule victime ensevelie Ä
D

mode scan
N.B : Cette méthode est une des méthodes possibles
pour résoudre le cas.
Commencer par votre recherche primaire si besoin
est...
• Dans la phase de recherche secondaire, si l’appareil
détecte un scénario multi victime, le voyant 5va
s’allumer, ceci veut dire que votre appareil détecte
d’autres émissions autour de vous.
• Continuez alors votre recherche en suivant la mé-
thode standard d’une seule victime ensevelie.
• L’appareil va automatiquement se caler sur l’ap-
pareil qui émet le plus fort donc théoriquement, la
victime la plus proche de vous.
Vous avez trouvé la première victime (v1), localisez la
avec votre sonde et signalisez l’emplacement.
Reculez alors d’un à deux pas de votre sens d’arri-
vée. Passez alors en MODE SCAN :
Pour passer en mode SCAN, actionnez rapidement le
bouton 2(position émission puis réception).
Dès que vous êtes en mode SCAN, le son se coupe et
apparaît sur l’écran LCD et clignote pendant 6
secondes.
NE BOUGEZ PAS VOTRE APPAREIL, il scanne le ter-
rain dans un rayon de 15 m autour de vous.
Après son SCAN (cf schéma E), plusieurs indices
numériques et directions apparaissent successi-
vement sur l’écran LCD. Concentrez vous sur les
chiffres et directions données, (l’appareil n’émet
aucun son)
Chaque victime détectée est caractérisée par un
indice de progression et une direction.
(Le plus petit chiffre correspond à la victime que vous
venez de trouver v1 et l’autre chiffre correspond à
l’éloignement de la victime v2)
L’indice (et la direction) le plus élevé correspond au nombre de pas que vous devrez faire pour trouver la victime V2
• Dirigez vous en fonction de l’indice le plus élevé, balayez LENTEMENT. Si vous captez un nouveau signal, suivez
la procédure de la recherche standard simple victime à partir de la recherche secondaire.
N.B : Après son SCAN, l’appareil va répéter successivement 5 fois les directions et indices de progression des
appareils détectés. Après ces répétitions, il repassera automatiquement en mode Numérique.
Si lors de la recherche de V2, l’appareil vous ramène à V1, refaites un scan pour retrouver la direction de V2 en
recommençant la procédure ci-dessus.
ATTENTION : Même en ayant utilisé la fonction SCAN, un emetteur peut en cacher un autre en étant parfaitement
synchronisé en terme d’émission. SCANNEZ à nouveau et contrôlez toute l’avalanche.
N.B : Pensez à marquer votre premier signal par un bâton ou une sonde et explorez toute l’avalanche... L’ap-
pareil peut ne pas afficher le picto 5(présence multi victime) car il ne le détecte pas ou vous n’êtes pas dans
le périmètre de détection donc n’hésitez pas à refaire un SCAN si un doute persiste et contrôlez l’avalanche sur
TOUTE sa surface.
Entraînez vous !
Cas de plusieurs victimes ensevelies ÄÄ...
v1
15 m
2
1
v2
6
1, 4
1,
5
1,
7
0,
7
1,
6
1, 4
1,
5
1,
7
0,
7
1,
v1 v2
5
52
1
5
5
6’’
E
Evolution+
français
Distribution
mode recherche
mode émission
Caractéristiques techniques :
• Emetteur / Récepteur : 457 kHz,
fréquence internationale.
• Numérique.
• Bi antenne.
• Fonction scan.
• Largeur de bande de recherche 40 m.
• Mise en route par simple bouclage des sangles.
• Test pile sonore et visuel.
• Auto contrôle en émission.
• Recherche automatique par flèches directionnel-
les et afficheur de progression.
• Poids : 220 g - Autonomie + 250 heures.
• Alimentation 4 piles alcalines AAA/LR03.
• Réalisé suivant norme européenne ETS 300718.
certificat de garantie
ASTEEL garantit conformément à la loi tout défaut de fabrication ou vice caché dûment constaté. La date
de fin de garantie est indiquée sur l’étiquette à l’intérieur de la trappe pile. L’absence ou toute falsification
de cette étiquette ainsi que toute intervention sur les vis de fermeture du boîtier annule la garantie.
Pendant la période de garantie, toutes les réparations nécessaires à cet appareil conformément aux
conditions de garantie seront effectuées gratuitement (hors transport) ou si nous le préférons l’appareil
sera remplacé sans frais. Cet appareil ne sera soumis à aucune autre garantie expresse ou implicite. Nous
déclinons toute responsabilité relative en cas de perte ou d’une utilisation inadaptée de l’appareil.
En cas de mauvais fonctionnement, l’appareil devra être retourné au magasin accompagné de la descrip-
tion des défauts constatés.
La présente garantie n’est donnée que si l’appareil a été utilisé conformément au mode d’emploi et n’a
subi aucune intervention étrangère.
Distribution internationale / International Distribution /
Internationaler Vertrieb / Distribuzione internazionale /
Distributiòn internacional
NIC-IMPEX - BP 10120 - 74941 ANNECY LE VIEUX CEDEX - FRANCE
Tél. 33 (0) 450 571 351 - Fax. 33 (0) 450 677 795
www.arva-equipment.com - info@nic-impex.com

A
5
6
7
8
10
9
1
4
2
3
primary search
One rescuer Several rescuers
M M MM
M
M
M M MM
M
M
BC
Evolution+
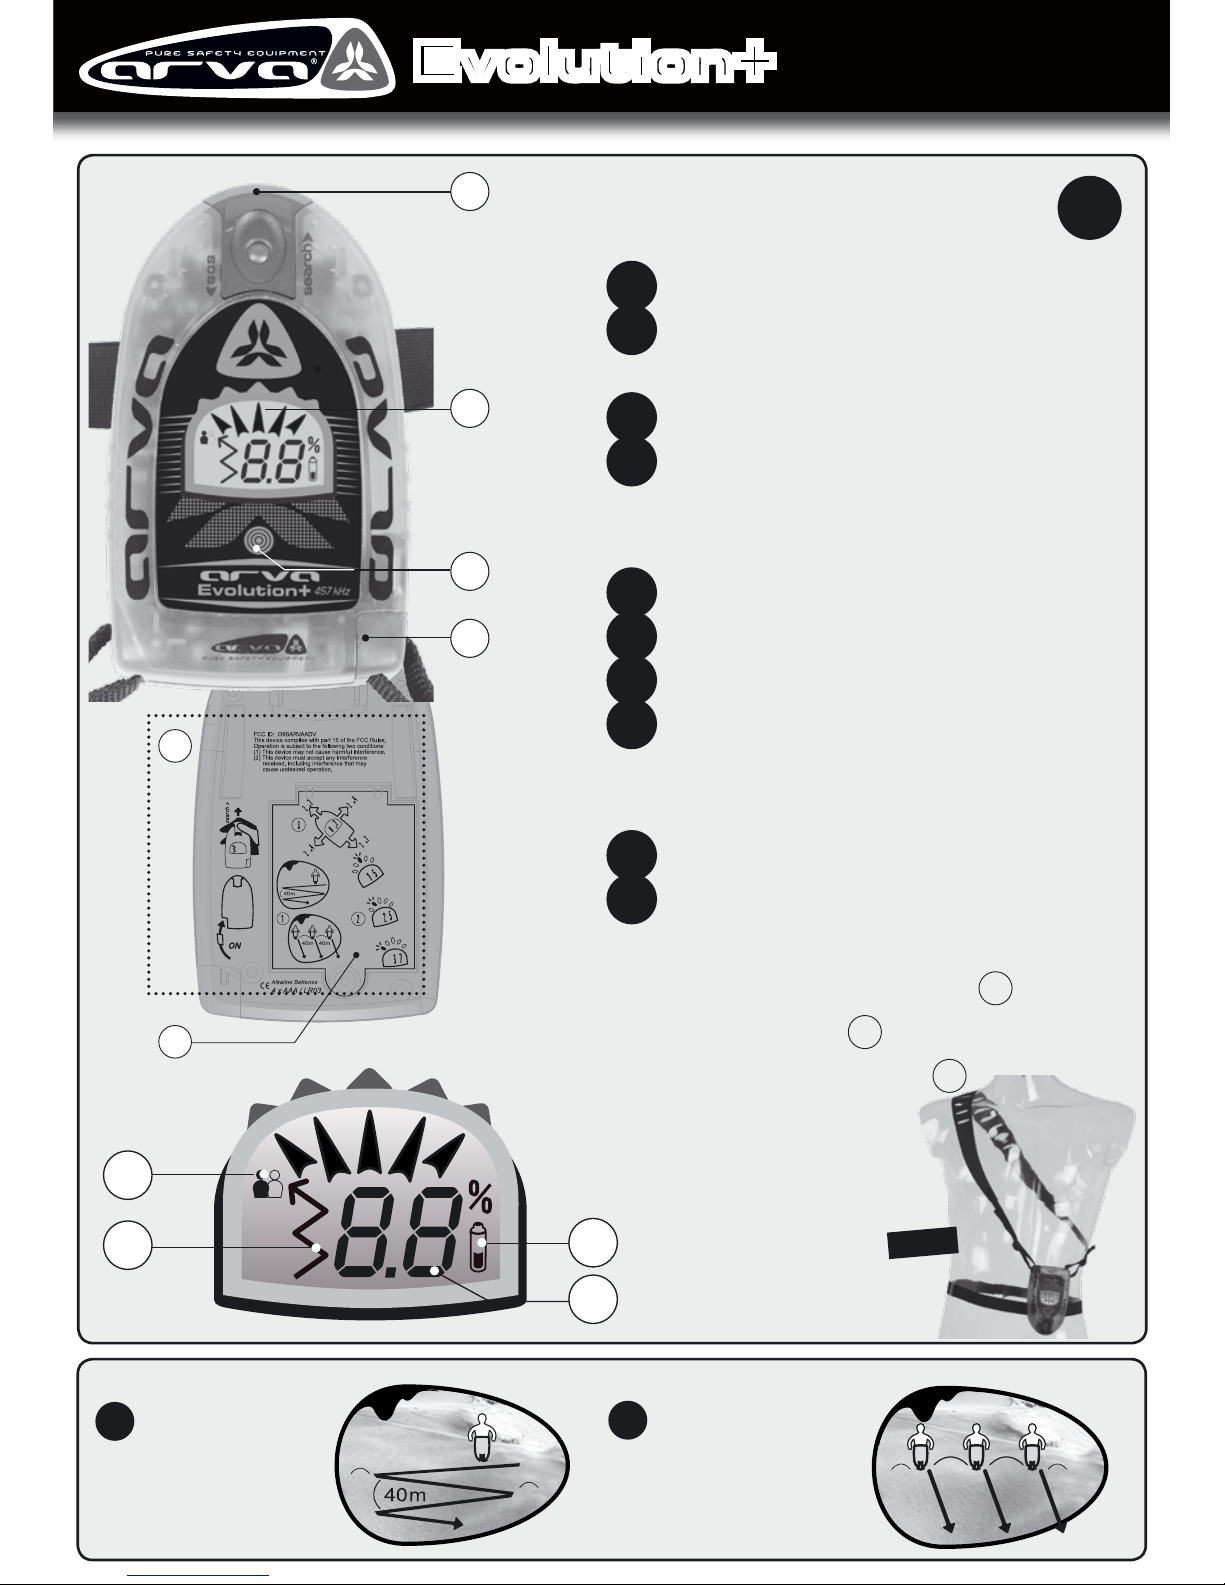
Description of the unit
nFront:
1
On/Off harness buckle switch
2
Transmission / reception (SOS/Search) selector
+ SCAN switch
3
Arrows indicating the direction to follow
4
Speaker
nLCD screen
5
Indicator showing simultaneous detection of
multiple victims
6
Primary search indicator
7
Distance indicator / battery status
8
Battery status indicator
nBack:
9
Battery compartment cover
10
Reminder: Startup – Switching to reception mode
- Simulation primary search, one or x rescuers
1- Secondary search 2- Final search
(last cross) 3
Sangles Hypalon®
new

english
inserting the batteries
The ARVA EVOLUTION+ functions exclusively with 4 standard LR03 alkaline batteries. Open the battery compart-
ment cover 9with a screwdriver or coin. The 4 batteries must always be the same brand and replaced at the
same time. Fit the batteries in carefully in the direction indicated inside the compartment.
Note: Do not store the device at a temperature below 0° C to avoid battery damage.
DO NOT USE rechargeable batteries.
Remove batteries when not using the device for an extended period of time.
switching the unit on
nBuckle the On/Off harness switch 1
nDevice self-test: The numerical arrows 3and the entire display on the LCD screen will be illuminated from
left to right. 3 beeps for the test of the speaker will be heard when it is in good condition.
nCheck your batteries with the battery capacity scale indicated in percentages 7 8 . 11 levels (99, 90, 80,
70, 60, 50, 40, 30, 20, 10, 0).
nThe device then switches off the LCD screen and the central numerical arrow flashes 3to indicate that
the device is in the transmission mode.
nReception/transmission test to be conducted before each excursion. The tester sets his avalanche
transceiver for transmission and each member of the group verifies that his transceiver in reception mode
detects him correctly. The operation to be conducted in reverse so that ALL transceivers in the group are
checked in both transmission and reception modes.
Possible anomalies...
The ARVA EVOLUTION+ conducts a self-test every five minutes to check the status of the batteries, the locking
onto the frequency, transmission power, etc.
If the device detects an anomaly, a long 5-second beep will be heard, 3 times separated by 5 minutes.
Two cases are possible:
• The capacity of the batteries has dropped to 20% (the device can still transmit for 48 hours or search for 1⁄2
hour). After the long 5-second beeps, 20% will remain lit on the LCD display to remind you to change the
batteries as quickly as possible.
• Technical transmission or program problems, after the long 5-second beeps, the LCD screen displays
Er (= Error). Do not leave with the device in this last case.
Exclusive features of the ARVA Evolution+:
• A powerful 457 kHz ±20 Hz transmitter transmission level does not depend on battery
status.
• The search band width is 40 m.
•
A multi-victim indicator and an automatic locking on the closest victim.
• SCAN function
• A self-test of the locking onto the transmission frequency and power every 5 minutes.
• 16-bit processor with extremely rapid analysis speed

Evolution+
recommendations for use
Advance over the terrain SLOWLY to not head in a wrong direction in your haste. The entire
surface of the avalanche site must be covered. During a search or a test, be sure to: stay away
from any electrical device (high-voltage power line, radio, portable cellular phone) or establish a
radio silence. This list is not exhaustive.
This applies to any avalanche transceiver-type transmission-reception device. The distance
and direction display gives an indication of progress on a flux line and not of direct distance in
meters.
using the arvaA
The ARVA EVOLUTION+ is a DIGITAL avalanche transceiver with right and left directional arrow
utilization. The device will automatically lock onto the closest victim. The user follows the
numbered instructions and the direction indicated by the numerical arrow which is illuminated.
If the icon 5appears, the device detects a case of multiple victims.
information for your own safety
When you go off ski trails with their assurance of safety, you head for a world of risks where an
avalanche, in particular, can happen. You therefore are enjoying your recreation in the moun-
tains under your own responsibility:
• Before leaving, get informed through representative organizations and mountain professio-
nals and get equipped. In particular, have an avalanche transceiver (an avalanche victim research
device), a shovel and an avalanche probe. This equipment is not an avalanche detector, nor a
total protection. Be careful – to be efficient, you have to be trained: train youself therefore to
use your ARVA!
• Never go out alone, do not follow just any ski trails: they are not an absolute guarantee of
safety. In doubt as to the stability of a slope that you must absolutely take, increase the distance
between you, or better, only go one at a time. And look out for each other.
• Last, know when to stop... Be vigilant: snow changes, the risk of an avalanche as well! Learn
therefore to know more about avalanches (get informed through the pertaining organizations).

english
digital mode
nPrimary search (Approach phase) (see D1)
• Pull on 2SEARCH. The device is in digital mode enti-
rely automatically; the LCD screen displays 6continual-
ly as long as you have not detected a signal transmitted
by the victim
• Advance by crisscrossing the avalanche according to
diagram B if you are alone or C if you are several res-
cuers.
• Hold the transceiver horizontally, pointing it downward
and sweeping slowly from left to right and right to left
(you can make a 180° angle)
• Continue until the first clear and distinct signal (direc-
tional arrows lighting up AND the distance display).
Note: It may happen that you are directly in secondary
search, the transceiver picking up a signal right from its
being switched over to reception.
nSecondary search (localization phase) (see D2).
This phase begins from the moment you receive a signal
from the victim.
• The transceiver gives you distance information on the
LCD screen (numbers) AND one of the directional arrows
lights up.
• As soon as a directional arrow lights up, position your
transceiver so that the central numerical arrow is lit and
proceed in the indicated direction. If the numbers de-
crease, you are getting closer to the victim, continue
in this correct direction. Otherwise, head in the op-
posite direction.
• Always try to have the central directional arrow lit
in order to progress, carrying out a slight sweeping mo-
vement in the direction the lit arrows are indicating.
This will make it possible for you to cover the shortest distance possible for you to reach the victim. Continue to move
forward until the distance display shows 3.0.
nFinal search (pinpointing phase) (see D3). Having reached this indication, the arrow lit, bring the transceiver down
horizontally and in the same position to the level of the snow. The beeps will speed up, the distance indication will
decrease further. Continue until you reach the smallest number. When it increases, come back to the smallest and
locate the victim by the “pinpoint over a cross” technique while continually keeping the transceiver in the
same position.
n“Pinpoint over a cross” technique: the transceiver must absolutely be moved at the level of the snow, parallel to
it and in a straight line. On this straight line, the place must be determined where the distance information is lowest
(beeps very close to each other, or even continuous beeps). From there, move out at a perpendicular and do the same
procedure again. The point where the sound reaches its maximum, determined in this way, is on a vertical with the
transceiver. If necessary, do the procedure one or two more times to further pinpoint the location. It is not neces-
sary however to reach an extremely precise localization with the help of the transceiver. It is indeed often faster to
immediately begin to probe as soon as the probable area of localization is defined with a precision within an area of
about 50 centimeters.
In the event of a single buried victim Ä
D

Evolution+
In the event of several buried victims ÄÄ...
scan mode
Note: This is one of the methods possible for fa-
cing this situation.
Begin by your primary search if necessary...
• In the secondary search phase, if the device detects
a multi-victim situation, the indicator 5will light up;
this means that your device detects several transmis-
sions around you.
• Then continue your search following the standard
method for a single buried victim.
• The device will automatically lock on the device
transmitting the strongest signal, which is theoreti-
cally the victim closest to you. When you have found
the first victim (v1), locate them with your probe and
indicate the position.
Take then one or two steps backwards in the di-
rection you came in. Then switch over to SCAN
MODE:
To switch over to SCAN mode, press several times on
the button 2(transmission then reception position).
As soon as you are in SCAN mode, the sound cuts
and appears on the LCD screen and flashes for
6 seconds.
DO NOT MOVE YOUR DEVICE, it is scanning the
terrain by a radius of 15 meters around you. Af-
ter its SCAN (cf diagram E), several numerical and
directional indications appear successively on the
LCD screen. Concentrate on the given numbers
and directions (the device will transmit no sound).
Each detected victim is indicated by a distance
and direction.
(The smallest number corresponds to the victim you
have just found v1 and the other number corresponds
to the distance from the victim v2)
The highest indication (and the direction) correspond to
the number of steps you have to take to find victim V2
• Moving in terms of the highest indication, sweep SLOWLY. If you pick up a new signal, follow the standard
search procedure for a single victim from the secondary search phase.
Note: After its SCAN, the device is going to successively repeat 5 times the directions and distance indications
for the detected devices.
After these repeats, it will switch automatically to digital mode.
If while searching for V2, the device brings you back to V1, redo a scan to find the direction of V2 to begin the
above procedure again.
WARNING: Even after having used the SCAN function, a signal can hide another, both having perfectly synchroni-
zed transmissions. SCAN again and check the entire avalanche site.
Note: Think to mark your first signal with a stick or a probe and explore the entire avalanche site... The device
may not display the icon 5(multiple victims) because it does not detect them or you are not in the detection area;
therefore, do not hesitate to redo a SCAN if any doubt remains and check the ENTIRE area of the avalanche site.
Train yourself!
v1
15 m
2
1
v2
6
1, 4
1,
5
1,
7
0,
7
1,
6
1, 4
1,
5
1,
7
0,
7
1,
v1 v2
5
52
1
5
5
6’’
E

english
Distribution
search mode
transmit position
Technical characteristics:
• Transceiver 457 kHz, international Frequency.
• Digital.
• Dual antenna.
• Fonction scan.
• 40 m search band width.
• Switch on by inserting end of strap
into transceiver.
• Visual and auditory battery test.
• Autotests when switched on.
• Transmission level self-test.
• Automatic search using the directional arrows
and progression display device.
• Weight : 220 g - Battery life 250 Hrs.
• Require 4 alkaline batteries AAA/LR03.
• Manufactured in accordance with
European standard ETS 300718.
guarantee certificate
ASTEEL guarantees against all manufacturing defects.
Guarantee-by date is noted on the sticker inside the battery compartment. The absence of –or tampering
to this sticker, as well as opening the beacon shell nullifies the guarantee.
For the period of this guarantee, all necessary repairs or replacement of beacon will be made free of
charge (excludind freight).
This product is not subject to any other expressed or implicid guarantee. Distributor accepts no responsi-
bility for loss, theft, or adapted use of this beacon.
In case of defect, beacon must be returned to place of purchase with description of problems.
Guarantee applies only to beacons used according to proper directions.
Distribution internationale / International Distribution /
Internationaler Vertrieb / Distribuzione internazionale /
Distributiòn internacional
NIC-IMPEX - BP 10120 - 74941 ANNECY LE VIEUX CEDEX - FRANCE
Tél. 33 (0) 450 571 351 - Fax. 33 (0) 450 677 795
http://www.arva-equipment.com - info@nic-impex.com
A
5
6
7
8
10
9
1
4
2
3
grobsuche
Ein suchender (Retter) Mehrere suchende (Retter)
M M MM
M
M
M M MM
M
M
BC
Evolution+
Beschreibung des Gerätes
nOberseite des Gerätes :
1
Schiebestecker Ein/Aus
2
Schiebeschalter für Umschaltung auf Empfang
und Scan
3
Richtungsweisung
4
Lautsprecher
nLCD Display :
5
Anzeige für Mehrfachverschüttung
6
Anzeige bei Grobsuche (noch kein Empfangs-
signal)
7
Distanzanzeige bzw. bei Inbetriebnahme Angabe
zum Batteriezustand in %
8
Batteriezustand
nUnterseite des Gerätes :
9
Batteriefach
10
Bitte beachten: - Skizze für Inbetriebnahme /
Umschalten auf Empfang sowie Grobsuche 1
– Feinsuche 2– Punktortung 3
Schnallen aus Hypalon®
new

deutsch
einlegen der batterien
ARVA EVOLUTION+ funktioniert ausschließlich mit 4 Standard Alkali Batterien LR03. Öffnen Sie das Batteriefach
9mit einem Schraubendreher oder einer Münze. Die 4 Batterien müssen immer von der gleichen Marke sein
und sind bei Entleerung gleichzeitig zu wechseln. Setzen Sie die Batterien ordnungsgemäß nach der Richtung-
sangabe im Gehäuseinneren ein.
Anmerkung: Das Gerät nicht bei Temperaturen unter 0 °C lagern, dies schädigt die Batterien. KEINE WIEDER
AUFLADBAREN BATTERIEN verwenden. Bei längerer Zeit ohne Geräteverwendung, Batterien herausnehmen.
inbetriebnahme
nSchließen Sie den On/Off 1Gurt
nFunktion Auto-Control des Gerätes: Die Richtungspfeile zur Richtungsweisung 3leuchten von links nach
rechts auf, die gesamte Anzeige des LCD-Displays leuchtet ebenso auf. 3 Pieptöne zur Kontrolle über Lauts-
precher, dann ist das Gerät betriebsbereit.
nKontrollieren Sie die Batterien, Batterieanzeige mit % zum Batteriestand 7 8 . 11 Stufen (99, 90, 80, 70,
60, 50, 40, 30, 20, 10, 0).
nDanach schaltet sich das LCD-Display aus und die Zentraldiode 3gibt an, dass sich das Gerät in Sende-
betrieb befindet.
nKontrolle: Empfangs/Sendefunktion vor jedem Einsatz. Die Kontrollfunktion setzt ARVA auf Sendebetrieb
und jedes Mitglied der Rettungsmannschaft überprüft den ordnungsgemäßen Empfang auf seinem ARVA
Gerät. Umgekehrte Überprüfung für ALLE ARVA Rettungsmannschaftsmitglieder auf Sende- und Empfangs-
betrieb.
Mögliche Betriebsstörungen...
ARVA EVOLUTION+ führt alle fünf Minuten einen automatischen Test auf Batteriestand, Frequenz, Sendes-
tärke etc. aus Falls das Gerät eine Anomalie aufzeigt, erfolgt ein 5 Sekunden langer Piepton, 3 x mit
5 Minuten Unterbrechung.
2 mögliche Ursachen:
• Batteriestand unter 20% (das Gerät hat dann noch eine Sendekapazität von 48 Std. oder 1⁄2 Stunde Suchfu-
nktion). Nach den 5 Sekunden langen Pieptönen ist die Anzeige “20%” weiterhin auf dem Display zu sehen,
um Sie daran zu erinnern die Batterien so schnell wie möglich zu wechseln.
• Technische Probleme beim Senden oder Programmstörungen:
nach den 5 Sekunden langen Pieptönen zeigt das Display folgende Message an: Er (= Error). In diesem Fall ist
das Gerät nichts betriebsfähig. Nehmen Sie dieses Gerät nicht mit auf Lawinensuche.
Besonderheiten des ARVA Evolution+:
• Besonders starke Sendeleistung auf 457 kHz ± 20 Hz. Die Sendeleistung ist nicht vom
Batteriezustand abhängig.
• Suchfeldbreite 40 m.
• Anzeige für Mehrfachverschüttung auf engem Raum, automatische Synchronisation
auf den nächstgelegenen Verschütteten.
• Scan Funktion
• Automatische Kontrolle der Sendefuntkion alle 5 Minuten.
• Extrem schneller 16 bit Prozessor.

Evolution+
einige ratschläge zur geräteverwendung
Gehen sie bei der Suche bedacht und mit höchster Aufmerksamkeit vor.
Hochspannungsleitungen oder Handys können die Geräteleistung beeinflussen. Dies gilt für alle
LVS Geräte.
Die Distanzangabe ist keine Angabe in Metern, sie beschreibt nur die fortschreitende
Annäherung an den Sender.
verwendung des gerätes
ARVA EVOLUTION+ ist ein digitales Arva mit Richtungspfeilen zur Richtungsweisung rechts und
links. Das Gerät richtet seinen Empfang automatisch auf den nächstgelegenen Verschütteten
aus.
Die Mitglieder der Rettungsmannschaft orientieren sich durch die Distanzangabe und an dem
erleuchteten Richtungspfeil.
Das Gerät hat eine Scan Funktion. Das Pictogramm 5gibt eine Mehrfachverschüttung an.
informationen für ihre sicherheit
Sobald Sie die ausgeschilderten Skipisten verlassen, begeben Sie sich in Risikogebiete, wo
sich jederzeit Lawinen auslösen können. In der Bergwelt sind Sie auf eigene Verantwortung
unterwegs:
• Vor Aufbruch informieren Sie sich (bei den zuständigen amtlichen Informationsposten, über
Internet www.meteo.fr und Auskünfte bei den professionellen Bergführern) und achten Sie
auch geeignetes Material. Nehmen Sie ein ARVA Gerät (Lawinenverschütteten-Suchgerät), eine
Schaufel und eine Sonde mit. Dieses Gerät ist kein Lawinenanzeiger und auch kein
absoluter Lawinenschutz. Aber Sie sollten sich zu optimalem Einsatz vorher mit dem Gerät
vertraut machen: üben Sie den Umgang mit Ihrem ARVA-Gerät! • Gehen Sie nie alleine los,
folgen Sie nicht beliebigen Spuren: das ist keine absolute Sicherheitsgarantie. Bei Zweifel zur
Stabilität der Schneelage eines Abhanges sind auf jeden Fall die Abstände zwischen den
Personen zu vergrößern, oder noch besser, Sie passieren einer nach dem anderen. und
beobachten Sie sich gegenseitig. • und letztendlich: lernen Sie auch Nein zu sagen und
umzukehren... Seien Sie vorsichtig: die Schneeverhältnisse ändern sich schnell und hiermit das
Lawinenrisiko! Lernen Sie überLawinen (Informationen bei den zuständigen Organisationen).

deutsch
digital-modus
nGrobsuche (Annäherungsphase) (siehe D1)
• Ziehen Sie an 2SEARCH.- Das Gerät steht automa-
tisch in Digitalbetrieb das LCD-Display zeigt dann 6in
Daueranzeige an, solange wie Sie noch kein Signal eines
Lawinenverschütteten empfangen haben.
• Gehen Sie das Lawinensuchfeld nach Schema B ab,
falls Sie alleine suchen, oder Schema C, wenn mehrere
Personen mitsuchen.
• Halten Sie das ARVA-Gerät zuerst waagrecht und nei-
gen Sie es dann in Bodenrichtung, schwenken Sie das
Gerät langsam von links nach rechts und rechts nach
links (180° Winkel möglich)
• Fahren Sie bis zum ersten klar erkennbaren Signal fort
(Aufleuchten der Richtungspfeile UND des Suchstandan-
zeigers).
Anmerkung: Es kann vorkommen, dass Sie sofort in
Feinsuche starten, dann empfängt Ihr ARVA-Gerät sofort
beim Umschalten auf Empfang ein Signal.
nFeinsuche (Lokalisierungsphase)
(siehe D2) Diese Phase beginnt sobald Sie ein Signal ei-
nes Lawinenverschütteten erhalten haben.
• Das ARVA-Gerät zeigt Ihnen den Stand der Suche auf
dem LCD-Display (Zahlen) an UND einer der Richtungs-
pfeile leuchtet auf.
• Sobald ein Richtungspfeil aufleuchtet, richten Sie das
Arva so aus, dass die zentrale Digitaldiode in Betrieb ist
und gehen dann in diese Richtung los. Wenn die Zahlen
auf der Anzeige kleiner werden, nähern Sie sich ei-
nem Lawinenverschütteten, gehen Sie dann in dieser
Richtung weiter. Ansonsten in entgegen gesetzter
Richtung weitergehen.
• Richten Sie das Gerät immer so aus, dass die zen-
trale Digitaldiode aufleuchtet. Zum Weitersuchen wird
das Gerät leicht in Richtung der aufleuchtenden Richtungspfeile schwenken.
So legen Sie minimale Wegstrecke zwischen Ihnen und dem Verschütteten zurück. Gehen Sie weiter bis der Suchs-
tandsanzeiger 3.0 angibt.
nPunktortung ( Findephase) (siehe D3). Bei diesem Zeichen leuchtet ein Pfeil auf, richten Sie dann ihr ARVA-Gerät
waagrecht und in diese Richtung ganz knapp über der Schneeoberfläche aus. Die Pieptöne werden schneller und
die Angabe zum Suchstand geht noch weiter zurück. Fahren Sie so bis zur kleinsten Zahlenanzeige fort. Falls die
Zahlen wieder ansteigen, gehen Sie zur kleinsten Angabe zurück und lokalisieren Sie dann den Verschütteten mit der
Kreuztechnik, wobei der ARVA hierbei immer in gleicher Position gehalten wird.
nKreuztechnik: Das ARVA-Gerät muss hierbei ganz knapp über der Schneeoberfläche bewegt werden, parallel zum
Gerät selbst, auf einer geraden Linie. Auf dieser Linie muss man dann den Punkt ausmachen, an dem die Angabe
zum Suchstand die niedrigste Zahl anzeigt (sehr nahe Pieptöne, fast ganz durchgehender Piepton). Von hier aus dann
parallel vorgehen und den Vorgang wiederholen. Der vernommene höchste Ton entspricht hier der Senkrechte zum
Sender des Verschütteten. Falls erforderlich diesen Vorgang ein oder zwei Mal wiederholen, um die Lokalisierung
zu verfeinern. Eine extrem präzise Lokalisierung mit dem ARVA-Gerät ist jedoch nicht nötig. Man ist oft wesentlich
schneller, wenn man sofort die Sonde zur Hand nimmt, sobald man die mögliche Lokalisierungszone auf mehr oder
minder 50 cm genau festgelegt hat.
Einfachverschüttung Ä
D

Evolution+
Mehrfachverschüttung ÄÄ...
suche bei mehrfachverschüttung
mit scan-modus
Anmerkung: Diese Methode ist eine der möglichen
Suchmethoden.
Beginnen Sie die Grobsuche falls erforderlich.
Falls das Gerät in der Sekundärphase Mehrfachvers-
chüttung erkennt, leuchtet die Diode 5auf, d.h. Ihr
Gerät empfängt weitere Sendesignale rund um Sie.
• Führen Sie Ihre Suche im Standardmodus (Einzelvers-
chüttung) fort.
• Das Gerät richtet sich automatisch auf das stärkste
Sendesignal aus, d.h. theoretisch der Ihnen am nächs-
ten gelegene Lawinenverschüttete. Sie haben den ers-
ten Verschütteten (v1) gefunden, lokalisieren Sie ihn mit
Ihrer Sonde und geben Sie sofort die Stellung bekannt.
Gehen Sie dann ein bis zwei Schritte in die Richtung
zurück, aus der Sie kamen. Gehen Sie dann in SCAN-
MODUS über:
Zum Übergang in Scan-Modus, Schalter 2schnell
betätigen (Stellung “Senden” dann “Empfang”). So-
bald das Gerät in Scan-Modus ist, erlischt der Ton und
erscheint auf dem Display, der dann 6 Sekunden
blinkt.
HALTEN SIE IHR GERÄT RUHIG, es scannt den Bo-
den in einem Umkreis von 15 m um Sie herum ein.
Nach dem SCANNEN (siehe Zeichnung E) erfolgt na-
cheinander Anzeige mehrerer Zahlen und Richtung-
sanweisungen auf dem LCD-Display. Konzentrieren
Sie sich auf die Zahlen– und Richtungsangaben
(keinerlei Ton am Gerät). Jeder Verschüttete erhält
ein Zeichen für Suchzustand und Richtung.
(die kleinste Zahl entspricht dem Verschütteten, den Sie
eben gefunden haben und die andere Zahl steht für die
Entfernung bis zum Lawinenverschütteten v2).
Das höchste Zeichen (und Richtungsangabe) entspre-
chen der Schrittzahl bis zum Verschütteten V2.
• Gehen Sie nach der höchsten Angabe und schwenken Sie das Gerät LANGSAM. Wenn Sie ein neues Signal emp-
fangen, folgen Sie dem Verfahren zu „Einzelverschüttung“ ab Feinsuche.
Anmerkung: Das Gerät wird nach dem Scannen 5 x die Richtungen und Suchstände der empfangenen Lawinensu-
chgeräte wiederholen.
Nach dieser Wiederholung geht das Gerät automatisch in Digital-Modus über.
Falls das Gerät Sie während der Suche nach Verschüttetem V2 wieder zu V1 zurückführt, müssen Sie das Scannen
nach vorstehender Beschreibung wiederholen, um erneut die Richtung zu V2 wieder zu finden.
VORSICHT: Auch bei Verwendung der SCAN-Funktion kann es sich um verschiedene Verschüttete mit vollkommen
zeitgleichen Sendesignalen handeln. SCANNEN Sie dann erneut ein und überprüfen Sie das ganze Lawinenfeld.
Anmerkung: Denken Sie daran Ihr erstes Signal mit einer Latte, oder einer Sonde zu markieren und gehen Sie dann
über das ganze Lawinenfeld.... Das Gerät kann das Piktogramm 5(Mehrfachverschüttung) nicht anzeigen, oder Sie
befinden sich außerhalb des Suchfeldes: wiederholen Sie die Scan-Funktion und dies auch bei jedem Zweifel. Gehen
Sie das gesamte Lawinenfeld ab.
Üben Sie mit dem Gerät !
v1
15 m
2
1
v2
6
1, 4
1,
5
1,
7
0,
7
1,
6
1, 4
1,
5
1,
7
0,
7
1,
v1 v2
5
52
1
5
5
6’’
E

deutsch
Vertrieb
suchvorgang
richtige position im
sendezustand
Technische Daten :
• Senden und Suchen : internationale
Frequenz 457 kHz.
• Digital.
• Zwei Antennen.
• Scan Funktion.
• Suchstreifenbreite 40 m.
• Zwangseinschaltung mit Schiebestecker.
• Akustische und visuelle Prüfung des
Batteriezustandes.
• Automatische Kontrolle der Sendeimpulse.
• Automatische Suche durch Richtungspfeile und
Distanzangabe.
• Gewicht : 220 gr - Betriebsdauer + 250 Stunden.
• Batterien : 4 Standard-Alkalibatterien vom Typ
LR03/AAA.
• Gemäß europäischer Norm ETS 300718.
garantie
Die Fa ASTEEL (Hersteller) übernimmt die Garantie hinsichtlich aller Herstellungsfehler.
Das Ablaufdatum der Garantie ist im Inneren des Batteriegehäuses zu ersehen. Das Fehlen oder
Veränderungen am Garantieaufkleber, ebenso jeder Eingriff am Schraubverschluss setzt die Garantie
ausser Kraft.
Innerhalb der Garantie erfolgen notwendige Reparaturen gemäss unseren Garantiebedingungen kostenlos
(ausgenommen sind Frachtkosten). Bei Verlust oder unsachgemässer Anwendung des Gerätes besteht
kein Anspruch auf Garantieleistungen.
Reklamationen sind schriftlich unter Angabe aller Einzelheiten beim Hersteller einzureichen.
Bei unsachgemässer Benutzung oder Fremdreparaturen erlischt die Garantie.
Distribution internationale / International Distribution /
Internationaler Vertrieb / Distribuzione internazionale /
Distributiòn internacional
NIC-IMPEX - BP 10120 - 74941 ANNECY LE VIEUX CEDEX - FRANCE
Tél. 33 (0) 450 571 351 - Fax. 33 (0) 450 677 795
http://www.arva-equipment.com - info@nic-impex.com
A
5
6
7
8
10
9
1
4
2
3
ricerca primaria
Un soccorritore Più soccorritori
M M MM
M
M
M M MM
M
M
BC
Evolution+
Escrizione dell’apparecchio
nLato superiore:
1
Fibbia cinghia Marcia/Arresto
2
Selettore trasmissione/ricezione (SOS/Search) +
Commutatore SCAN
3
Frecce direzionali
4
Diffusore acustico
nDisplay LCD
5
Indicatore plurivittime
6
Indicatore di progressione in ricerca primaria
7
Indicatore di progressione/stato delle pile
8
Indicatore stato delle pile
nLato inferiore:
9
Vano pile
10
Promemoria: messa in funzione; commutazione
in modalità Ricezione; simulazione ricerca
primaria a uno o più soccorritori 1;
ricerca secondaria 2;
ricerca finale (croce finale) 3.
Sangles Hypalon®
new
Table of contents
Languages:
Other ARVA Transceiver manuals


Popular Transceiver manuals by other brands


Realistic
Realistic TRC-410 Service manual

National Instruments
National Instruments PXIe-5842 Getting started

Vertex Standard
Vertex Standard VX-2100 Series Service manual

NiceRF
NiceRF LoRa-CC68 Product specification

Kenwood
Kenwood TK-780 series Service manual supplement

Sun Microsystems
Sun Microsystems SUN-IE100 Series user manual


