ASA Electronics XMH100 User manual

XMH100
Installation and Operation Manual
AM/FM/WX/USB/BT/AUX IN Radio
AM/FM/WX/USB/BT/AUX EN LA radio
Radio d'entrée AM/FM/WX/USB/BT/AUX
Manual del usuario/
Manuel de l’utilisateur

XMH100
CONTENTS
Introduction.....................................................................................................................................................1
Features...................................................................................................................................................1
Box Content..............................................................................................................................................1
Compliance...............................................................................................................................................1
Safety Information.....................................................................................................................................2
Installation......................................................................................................................................................3
Mounting the Radio....................................................................................................................................3
Auxiliary Input...........................................................................................................................................3
Line Output...............................................................................................................................................3
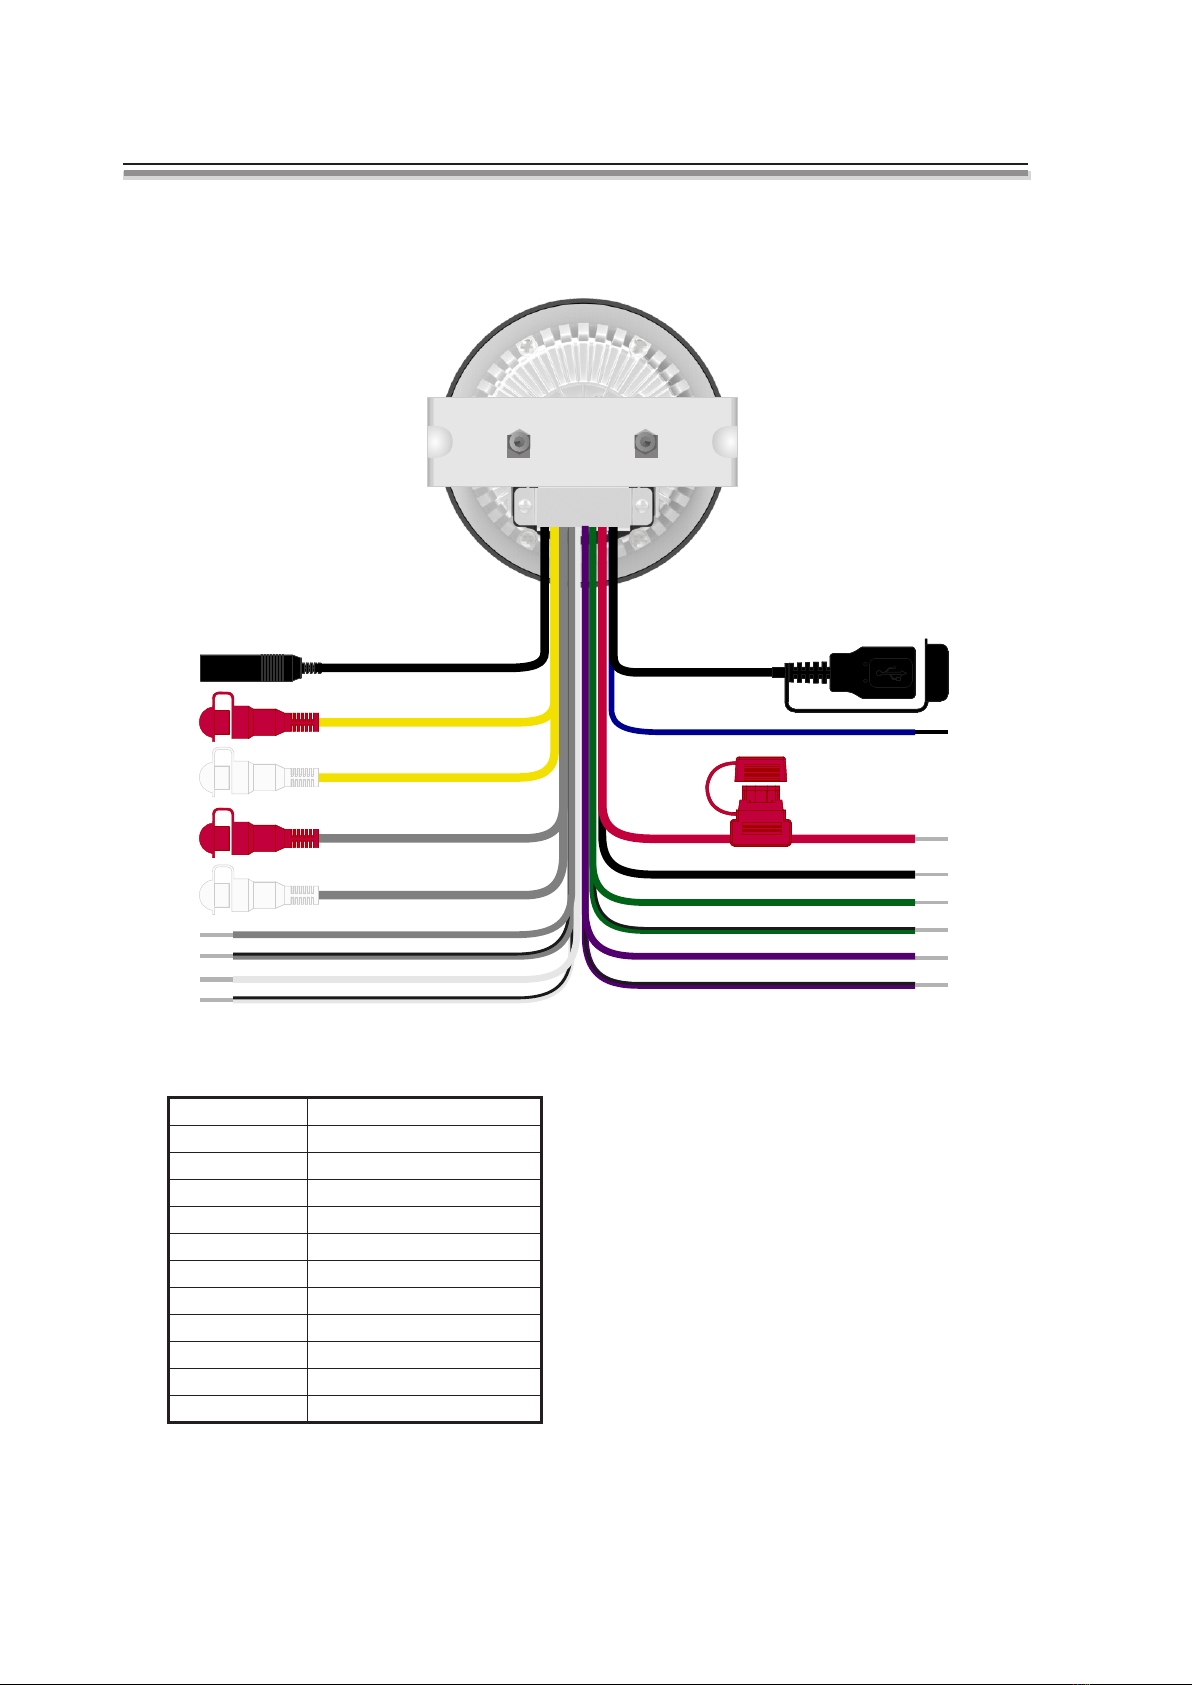
Wiring Diagram.........................................................................................................................................4
Operation........................................................................................................................................................5
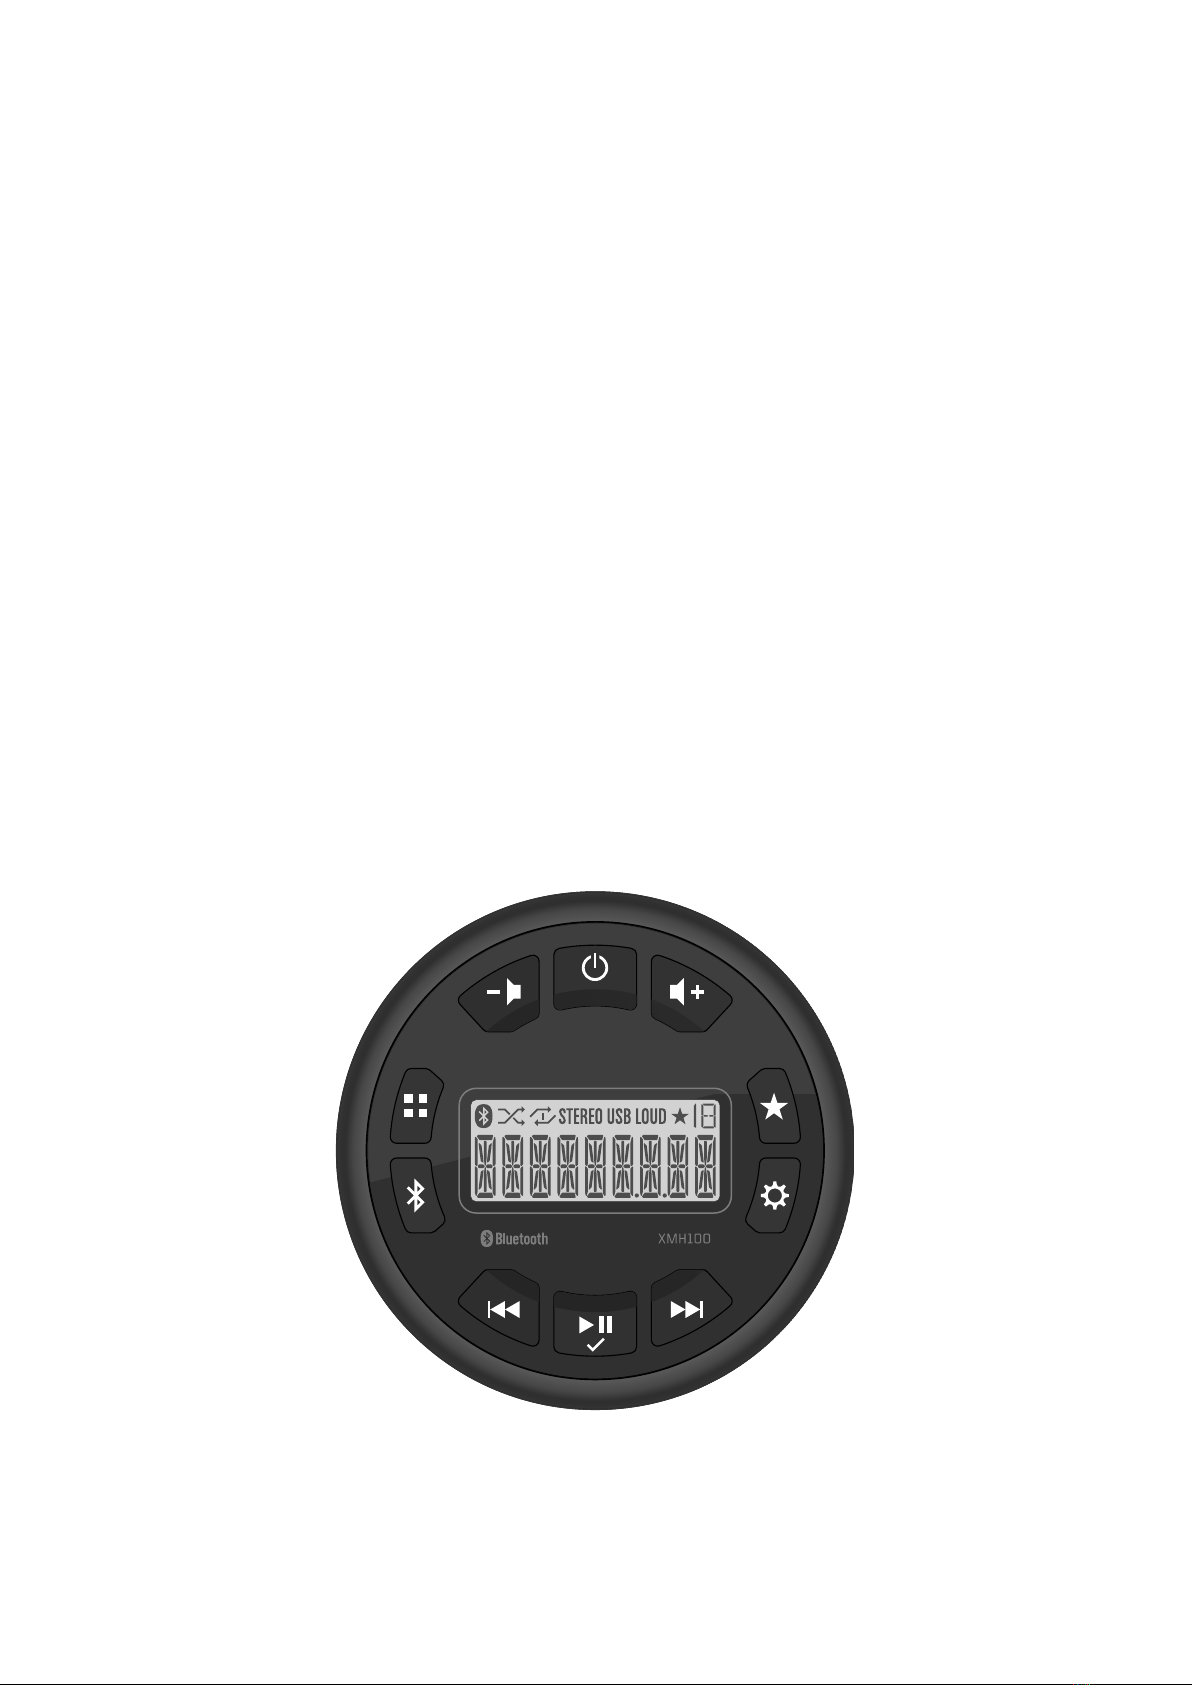
Basic Functions.........................................................................................................................................5
Audio Menu...............................................................................................................................................5
System Menu............................................................................................................................................5
Radio Mode...............................................................................................................................................6
USB Mode.................................................................................................................................................6
Playback Menu (Repeat/Random)...............................................................................................................7
Auxiliary Input Mode..................................................................................................................................7
Bluetooth Operation...................................................................................................................................8
Canada Statement.........................................................................................................................................10
Troubleshooting.............................................................................................................................................11
Specifications................................................................................................................................................11
CONTENIDO
Introducción ................................................................................................................................................................................12
Características..................................................................................................................................................................... 12
Contenido de la Caja ........................................................................................................................................................... 12
Conformidad con las Normas FCC ...................................................................................................................................... 12
Información de Seguridad ....................................................................................................................................................13
Instalación ..................................................................................................................................................................................14
Montaje de la Radio .............................................................................................................................................................14
Entrada Auxiliar ...................................................................................................................................................................14
Salida de Línea ....................................................................................................................................................................14
Diagrama de Cableado ........................................................................................................................................................15
Funcionamiento ..........................................................................................................................................................................16
Funciones Básicas ..............................................................................................................................................................16
Menú de Audio.....................................................................................................................................................................16
Menú del Sistema ................................................................................................................................................................16
Modo de Radio ................................................................................................................................................................... 17
Modo USB ...........................................................................................................................................................................17
Menú de Reproducción (Repetir/Aleatorio) ..........................................................................................................................18
Modo de Entrada Auxiliar .....................................................................................................................................................18
Funcionamiento Bluetooth ...................................................................................................................................................19
Resolución de Problemas .......................................................................................................................................................... 21
Especificaciones ........................................................................................................................................................................ 22

TABLE DES MATIÈ RES
Introduction ............................................................................................................................................................................... 23
Caractéristiques ................................................................................................................................................................. 23
Contenu de la boîte ........................................................................................................................................................... 23
Réglementations FCC ....................................................................................................................................................... 23
Informations sur la sécurité ................................................................................................................................................ 23
Installation ................................................................................................................................................................................ 25
Montage de la radio ........................................................................................................................................................... 25
Entrée auxiliaire ................................................................................................................................................................. 25
Ligne de sortie ................................................................................................................................................................... 25
Schéma de câblage ........................................................................................................................................................... 26
Fonctionnement ........................................................................................................................................................................ 27
Fonctions de base ............................................................................................................................................................. 27
Menu audio ........................................................................................................................................................................ 27
Menu système ................................................................................................................................................................... 27
Mode radio ........................................................................................................................................................................ 28
Mode USB ......................................................................................................................................................................... 28
Menu lecture (Répétition/Aléatoire) .................................................................................................................................... 29
Mode d’entrée auxiliaire ..................................................................................................................................................... 29
Fonctionnement du Bluetooth ............................................................................................................................................ 30
Dépannage ............................................................................................................................................................................... 32
Spécifications ........................................................................................................................................................................... 33
XMH100

XMH100
INTRODUCTION
Thank for choosing a product. We hope you will find the instructions in this owner's manual clear and easy to follow. If you take
a few minutes to look through it, you'll learn how to use all the features of your new receiver for maximum enjoyment.
Features
● Waterproof iPx6
● UV and Corrosion Resistant
● Dimmable Backlit LCD Control
● AM/FM Tuner (US/EURO)
● 24 Programmable Presets (12 AM, 12 FM)
● Weather Band Tuner
● Electronic Bass, Treble, Balance and Fader Controls
● USB MP3 Player
● Rear Auxiliary Audio Input (RCA)
● Rear Auxiliary Audio Output (RCA)
● 4-Channel Amplified Audio Output
● Bluetooth (Supports A2DP and AVRCP)
Box Content
● XMH100 Radio
● Radio Mounting Bracket
● Screw Posts (x2)
● Locking Hex Nuts (x2)
● Washers (x2)
Compliance with FCC Rules
Compliance with FCC Rules (U.S.A Only)
This device complies with Part 15 of the FCC rules. Operation is subjected to the following two conditions: (1) This device may
not cause harmful interference, and (2) this device must accept any interference received, including interference that may cause
undesired operation.
NOTICE
This equipment has been tested and found to comply with the limits for a Class B digital device, pursuant to Part 15 of the FCC
Rules. These limits are designed to provide reasonable protection against Harmful interference in a residential installation. This
equipment generates uses and can radiate radio frequency energy and, if not installed and used in accordance with the
instructions, may cause harmful Interference to radio communications.
FCC WARNING
● Changes or modifications to this unit not expressly approved by the party responsible for compliance could void the user's
authority to operate the equipment.
● Proper connections must be used for connection to a host computer and/or peripherals in order to meet FCC emission
limits.
1

2
XMH100
Safety Information
● To ensure full satisfaction with the product, please read the entire instruction manual.
● Keep instructions for future reference.
● Follow all operation guidelines and adhere to all safety warnings and cautions to ensure safe use.
● Do not install near any heat sources such as radiators, heat registers, stoves, or other apparatus (including amplifiers) that
produce heat.
● Only use attachments/accessories specified by the manufacturer.
● Never use harsh cleaning agents. Clean only with a dry cloth.
When Driving
Keep the volume level low enough to be aware of the road and traffic conditions.
Protect from Water
Do not submerge, as this can cause electrical shorts, fire or other damage.
Protect from High Temperatures
Exposure to direct sunlight for an extended period of time can produce very high temperatures inside your vehicle. Give the
interior a chance to cool down before starting playback. Do not mount the radio within close proximity of the engine
compartment.
Use the Proper Power Supply
This product is designed to operate with a 12 volt DC negative ground battery system.
WARNING:
● DO NOT OPEN, DISASSEMBLE OR ALTER THE UNIT IN ANY WAY. Doing so may result in fire, electric shock or product
damage.
● USE THE CORRECT AMPERE RATING WHEN REPLACING FUSE. Failure to do so may result in fire, electric shock or
product damage.
● DO NOT INSTALL IN LOCATIONS THAT MIGHT HINDER VEHICLE OPERATION. Doing so may obstruct vision or
hamper movement which can result in a serious accident.
● INSTALL THE WIRING SO THAT IT IS NOT CRIMPED OR PINCHED BY SCREWS ORSHARP METAL EDGES. Route
the cables away from moving parts or sharp pointed edges. This will prevent crimping and damage to the wiring. If the
wiring must pass through a metal hole, be sure to use a rubber grommet to prevent the wire's insulation from being cut by
the metal edge of the hole. It is also recommended to apply sealing caulk to any opening that may potentially allow water
to enter.
● Be sure to choose a location that is flat and has clearance above the unit to prevent any damage, as well as allow for
ventilation.
● Before drilling any holes, carefully inspect the area underneath and behind the mounting surface where the device will be
mounted to make sure it will not interfere with existing wires, fuel lines, the fuel tank or any other objects that could be
damaged.
● Always disconnect the vehicle negative battery terminal during installation to prevent accidental shorting.

INSTALLATION
Mounting the Radio
1. Choose a mounting location on the dash board or instrument panel that will allow room behind to run radio cables to the
power source. Consider how you will use the AUX IN, LINEOUT and USB connectors and route the appropriate extension
cables to an accessible area.
2. Cut a hole in the dash board using the template provided in the back of this manual. At least 3 ¾”depth is needed to mount
the radio.
IMPORTANT! Do not mount this unit where it can be submerged in water.
3. Slide the included spring washers (B) over the screw posts (A) and attach the screw posts to the back of the radio.
4. Place the radio in front of the dashboard opening so the wiring can be brought through the opening.
5. After completing the wiring connections, turn the radio on to confirm operation (vehicle accessory switch must be on). If the
radio does not operate, recheck all wiring until the problem is corrected. Once proper operation is achieved, turn the
accessory switch off and proceed with final mounting of the radio. Refer to the “Wiring Diagram” on page 4.
NOTE: Before final installation, test the wiring connections to make sure the unit is connected properly and the
system works.
6. Insert the radio into the mounting hole.
7. Place the “U” bracket (C) over the screw posts and secure the radio to the dash using the included hex nuts (D). If
necessary, cut the score marks (E) on either side of the mounting bracket to custom fit the bracket length for your
application. See Figure A.
3
XMH100
Auxiliary Input
Connect a portable audio device to the Audio Input (AUX IN RIGHT/LEFT) on the back of the unit using RCA cables.
Line Output
The Line Out connectors (LINE OUT RIGHT/LEFT) on the back of the unit output a line-level analog signal. Use this output to
connect to an external amplifier.
Figure A - Installation
A
B
C
D
E

4
XMH100
Note: Do not connect the red wire to a
constant power connection. The red wire
should be connected to a vehicle connection
with switched power such as IGN or ACC.
WIRE COLOR
PURPLE
PURPLE/BLACK
GRAY
GRAY/BLACK
WHITE
WHITE/BLACK
GREEN
GREEN/BLACK
RED
BLACK
BLUE
DESCRIPTION
RIGHT REAR SPEAKER(+)
RIGHT REAR SPEAKER(-)
RIGHT FRONT SPEAKER(+)
RIGHT FRONT SPEAKER(-)
LEFT FRONT SPEAKER(+)
LEFT FRONT SPEAKER(-)
LEFT REAR SPEAKER(+)
LEFT REAR SPEAKER(-)
ACC +12V
GROUND
POWER AMP REMOTE
LINE-OUT-RIGHT
LINE-OUT-LEFT
AUX IN-RIGHT
AUX IN-LEFT
USB
ACC +12V
GROUND
FRONT LEFT SPEAKER(-)
FRONT LEFT SPEAKER(+)
REAR LEFT SPEAKER(+)
REAR LEFT SPEAKER(-)
REAR RIGHT SPEAKER(-)
REAR RIGHT SPEAKER(+)
FRONT RIGHT SPEAKER(-)
FRONT RIGHT SPEAKER(+)
POWER AMP REMOTE
GRAY
GRAY/BLACK
BLACK
YELLOW
YELLOW
BLACK
RED
WHITE/BLACK
GREEN
PURPLE
BLUE
GRAY
BLACK
ANTENNA
WHITE
GRAY
GREEN/BLACK
PURPLE/BLACK
FUSE 15A
Wiring Diagram

Basic Functions
Power
Press the power button (1) to turn the unit on.
Press and hold the power button (1) to enter standby mode.
Volume
Press the button (10) to increase the volume.
Press the button (2) to decrease the volume.
Press and hold either button to change the volume level continuously.
Pause/Mute
Press the button (6) to silence the audio output in tuner, AUX or USB mode. Press again to restore the previous volume
level.
Mode
Press the button (3) to select a mode of operation: AM, FM, WX, Bluetooth, AUX IN and USB.
Dimming Control
Press the button (1) to turn the dimmer on (Selected brightness level) and press again to turn the dimmer off (maximum
brightness level)
Audio Menu
Press button (8) to access the audio menu. Press the button repeatedly to adjust the following audio menu settings:
BASS, TREBLE, BALANCE, FADER and LOUD. Use the or buttons (5, 7) to choose a value for each setting.
System Menu
Press and hold button (8) to access the system menu. Press the button (8) once again to adjust the following system
menu settings: BT DEVICE, BT PAIR, DIMMER ON/OFF, DIMMER LEVEL (0 - 8), REGION (USA/EURO), PRESET VOLUME
and RESET. Use the or buttons (5, 7) to choose a value for each setting.
Reset
Press the button (6) to confirm factory default restore. This function will time out after 5 seconds of inactivity and the unit will
resume normal operation. After reset, the unit will default to FM mode.
5
XMH100
1
2
3
4
5
6
9
8
10
7
OPERATION

Radio Mode
USA/Europe (EURO) Tuning Mode Selection
To change from USA to European tuning mode, perform the following steps:
1. Press and hold the button (8) for 3 seconds to access the system menu.
2. Press the button (8) repeatedly to cycle through the menu options (DIM > DIM LEVEL > REGION > PRE VOL >
RESET). The Region setting will display REG USA (if set to USA frequency tuning mode) or REG EUR (if set to European
frequency mode).
3. With the display showing the current tuning mode, Press the or buttons (5, 7) to change between (REG USA /
REG EUR).
Frequency Tuning
Press the or buttons (5, 7) to fine tune the radio frequency.
Channel Seek
Press and hold the or buttons (5, 7) to seek strong radio frequencies.
Preset Channel Store
To manually store a favourite channel to one of the twelve preset channels, perform the following steps:
1. Press the or buttons (5, 7) to tune to the radio frequency you want to store.
2. Press and hole the favourite button (9) to access 12 presets channel list; the favourite icon & channel will be
flashing on display.
3. Press the button (9) repeatedly to select desired favourite preset channel number (1-12).
4. Press the button (6) to save the station to the chosen preset channel and exit preset channel list, the favourite icon will
stop flashing.
Auto Store
Press and hold the button (3) to access the tuner menu list (AUTO STORE & PRESET SCAN). Press button (3)
repeatedly until “AUTO STR” appears on the display. Press the button (6) to begin the Auto Store function and store the
strongest stations to the preset tuning channels.
NOTE: Only stations detected with sufficient signal strength will be stored in the preset channel automatically.
Preset Scan
Press and hold the button (3) to access the tuner menu list (AUTO STORE & PRESET SCAN). Press button (3)
repeatedly until “PRE SCAN” appears on the display. Press the button (6) to begin the Preset Scan function and listen the
strongest stations to the preset tuning channels.
Favourite Preset Channel select
Press the button (9) to select available preset channels.
USB Mode
Insert/Remove USB Device
You can connect a USB device directly to the USB interface at the rear of the radio for playback of compatible files. Playback
begins automatically.
Press the button (3) to switch to USB mode from another source.
Play/Pause (USB)
During USB playback, press the button (6) to play or pause the selected track.
Next/Previous File
Press the or button (5, 7) to select the previous or next track.
Track Select
1. Press and hold the buttons (9) to access the MP3 track navigate mode.
2. Press the volume or button (10, 2) to select the desire track.
3. Press button (6) to confirm to playback the track selected.
Fast Forward/Fast Reverse
Press and hold the or button (5, 7) to fast forward or fast reverse.
6
XMH100

Playback Menu (Repeat/Random)
Press the button (9) to select Repeat All, Repeat One and Random playback.
Repeat Play
Repeat One: to continuous repeat the selected track.
Repeat All: to repeat all tracks.
Random Play
Random Shuffle: To play all tracks in random, shuffle order.
Auxiliary Input Mode
Press the button (3) repeatedly until auxiliary input mode (AUX IN) is selected from any other modes, when a portable
device is connected to the unit.
7
XMH100

Bluetooth Operation
The XMH100 includes built-in Bluetooth technology that allows you to connect this unit to Bluetooth devices for streaming audio
playback.
About Bluetooth Technology
Bluetooth is a short-range wireless radio connectivity technology developed as a cable replacement for various electronic
devices. Bluetooth operates in 2.4 GHz frequency range and transmits voice and data at speeds up to 1 megabit per second.
Bluetooth was launched by a special interest group (SIG) comprised of Ericsson Inc., Intel Corp., Nokia Corp., Toshiba and IBM
in 1998, and it is currently developed by nearly 2,000 companies worldwide. The Bluetooth word mark and logos are owned by
the Bluetooth SIG, Inc. and any use of such marks is under license. Other trademarks and trade names are those of their
respective owners.
Bluetooth Menu Options
NOTE: Please note that some Bluetooth menu options are only available while the unit is in Bluetooth Audio mode.
Press and hold the button (8) to enter the menu adjustment mode. The following additional menu options are available
when the unit is in Bluetooth mode:
● BT PAIR: ON the BT PAIR screen press the button (6) to make pairing available for 120 seconds then connect using
your Bluetooth enabled device.
● BT DEVICE: Press the button (6) to view a list of previously paired mobile phone devices. Press the or
buttons (5, 7) to view devices in the list. When viewing a specific device press button (6) again to enable the
following LOCK/UNLOCK, CONNECT/DISCONNECT, or DELETE functions and press or buttons (5, 7) to cycle
through them.
● CONNECT/DISCONNECT: To disconnect a paired device, press the button (6) to temporarily remove the
Bluetooth connection. The connection can be re-established through your phone menu by selecting the XMH100
for connection or select the phone device name on pairing list through the radio unit and press button (6) and
select CONNECT for connection.
LOCK/UNLOCK: The XMH100 can store up to 5 devices for Bluetooth connection. The devices are stored in a ●
FIFO (First in First Out) order. To prevent a device from being bumped from the list when more than 5 devices are
used, you can lock the device. To Lock/Unlock a device, press button (6) to change between Lock/Unlock.
DELETE: Deleting a device removes it from the pairing list. To delete a device from the list, press the button (6). ●
To reconnect with a deleted device it must be paired again.
8
…
…
…
XMH100
Use /
to Navigate
the List Press / Press /
Press /
Press /
BT Device
Device 1
Device 1
Device 2
Device 3
Device 4
Device 5
Device 5
Lock/Unlock
Connect/Disconnect
Delete
Lock/Unlock
Connect/Disconnect
Delete
/

Pairing a Bluetooth Device
Before you begin, consult the owner's manual for the Bluetooth device you want to pair with the XMH100.
1. Make sure the device you intend to pair with is on and ready to receive a signal from the XMH100.
2. Press the button (4) to enter Bluetooth mode.
3. Press and hold the button (8) and press repeatedly until the unit display PAIR, then press button (6). The unit
will display PAIR and count down from 120 to o. While the unit counts down, use your mobile device Bluetooth function to
search for a Bluetooth function to search for a Bluetooth device.
4. When your mobile device has completed its search, the mobile device will display the Bluetooth device name (XMH100).
5. Select XMH100. Once connected the Bluetooth Audio icon will appear on the display.
6. Enter the pairing password (0000), if requested.
After connecting successfully, you will be able to listen to audio stored on your Bluetooth enabled device through the radio.
Answering a Call
When answering a call using the connected phone, Bluetooth audio playback will pause. After hanging up from the call, Bluetooth
audio will continue on some phones. It may be necessary to press the button (6) to resume Bluetooth audio playback.
Bluetooth Audio (A2DP)
Selecting Tracks
During playback, press or button (5, 7) to play the previous or next track.
Pausing Playback
During playback, press button (6) to pause the Bluetooth audio playback. “PAUSE” will appear on the LCD. Press button
(6) again to resume playback. If you change to another mode, playback will automatically pause. Press the button (3) to
return to Bluetooth mode and resume audio playback from your Bluetooth enabled device.
NOTE: If a Bluetooth device is disconnected due to the power being turned off or if the device goes out of range, the
unit will automatically search for the matching Bluetooth mobile device when the power is restored.
9
XMH100

10
XMH100
CANADA STATEMENT

XMH100
TROUBLESHOOTING
Table 1: Troubleshooting
Problem Solution
No power
No AM/FM Reception
No sound
If the power supply is connected to the vehicle accessory circuits but the engine is not on , switch
the ignition key to “ACC”.
Fuse may be blown. Replace with 15 AMP ATO fuse.
Antenna cable not connected; insert antenna cable firmly.
Check volume level; increase volume if necessary.
Check power; make sure device is on.
Check device; press the play/pause button to ensure unit is not in Pause mode.
SPECIFICATIONS
General
Frequency band(s) ( for Bluetooth)..................................................................................................................2.4~2.4835GHz
Maximum radio frequency power transmitted (for Bluetooth)........................................................................................10 dBm
Power Supply Requirements.....................................................................................................DC 12 Volts, Negative Ground
Operating Voltage...................................................................................................................................................10-16V DC
Unit Dimensions..........................................................................................................................3.602" Diameter, 3.465"Deep
Mounting Dimensions.......................................................................................................................3.866" Wide, 4.465" Deep
Weight.............................................................................................................................................................................1.3lb.
FM Tuner
Tuning Range..............................................................................................................................................87.5 to 107.9 MHz
Sensitivity.........................................................................................................................................................................<5 Vμ
Stereo Separation @ 1 kHz............................................................................................................................................>30dB
AM Tuner
Tuning Range....................................................................................................................................................530-1710 KHz
Sensitivity.......................................................................................................................................................................<63 Vμ
Amplifier
Max Output Power.........................................................................................................180 Watts Total (45 Watts, 4 Channel)
Output Impedance........................................................................Compatible with 4-8 Ohm Speakers, 4 Ohm Load Minimum
RMS power spec....................................................................................................................4x26WRMS, @ 10%THD, 14.4V
Specifications subject to change without notice.
11

12
INTRODUCCIÓ N
Gracias por elegir los productos. Esperamos que encuentre las instrucciones de este manual claras y fáciles de seguir.
Si se toma unos minutos para leerlo, aprenderá cómo utilizar todas las funciones de su nueva radio para su máximo
disfrute.
Características
• Impermeable iPx6
• Resistente a UV y Corrosión
• Control de LCD Retroiluminado Atenuable
• Sintonizador AM/FM (EEUU/EUROPA)
• 24 Preselecciones Programables (12 AM, 12 FM)
• Sintonizador de Banda Meteorológica
• Controles Electrónicos de Graves, Agudos, Balance y Atenuador
• Reproductor USB MP3
• Entrada de Audio Auxiliar Trasera (RCA)
• Salida de Audio Auxiliar Trasera (RCA)
• Salida de Audio Amplificada de 4 Canales
• Bluetooth (Compatible con A2DP y AVRCP)
Contenido de la Caja
• Radio XMH100
• Soporte de Instalación de la Radio
• Tornillos Espárrago (x2)
• Tuercas Hexagonales de Bloqueo (x2)
• Arandelas (x2)
Conformidad con las Normas FCC
Conformidad con las Normas FCC (sólo EE.UU.)
Este dispositivo cumple los requisitos estipulados en la Sección 15 de las Normas FCC. Su uso está sujeto a las dos
condiciones siguientes: (1) Este dispositivo no puede causar interferencias perjudiciales, y (2) este dispositivo debe aceptar
cualquier interferencia recibida, incluyendo interferencias que puedan provocar un funcionamiento no deseado.
NOTA
Este equipo ha sido probado y declarado conforme con los límites establecidos para dispositivos digitales de Clase B, en
cumplimiento de la Sección 15 de las Normas FCC. Estos límites están diseñados para proporcionar una protección razonable
contra las interferencias perjudiciales en las instalaciones residenciales. Este equipo genera, utiliza y puede emitir energía de
radiofrecuencia y, si no se instala y utiliza según las instrucciones, puede provocar interferencias perjudiciales para las
comunicaciones de radio.
ADVERTENCIA FCC
• Los cambios o modificaciones de esta unidad no aprobados expresamente por la parte responsable del cumplimiento
podrían anular el derecho del usuario a hacer uso del equipo.
• Deben utilizarse conexiones adecuadas para la conexión a un ordenador y/o periféricos con el fin de cumplir los límites de
emisiones de la FCC.
XMH100

13
Información de Seguridad
Al Conducir una Embarcación
Recuerde mantener el nivel de volumen lo suficientemente bajo como para estar al tanto de lo que le rodea.
Proteja el Dispositivo del Agua
No sumerja este dispositivo, ya que esto puede causar cortocircuitos, incendios u otros daños.
Proteja el Dispositivo de la Intemperie
Utilice la cubierta incluida para proteger el controlador cableado de la luz del sol, el polvo y el agua mientras no está en uso.
Proteja el Dispositivo de las Altas Temperaturas
No monte la radio en las proximidades del compartimento del motor.
Use la Alimentación Adecuada
Este producto está diseñado para funcionar con un sistema de batería de 12 voltios DC negativo a tierra.
PRECAUCIÓN:
NO ABRA LAS CUBIERTAS NI INTENTE REPARAR LA UNIDAD POR SU CUENTA. REFIERA LAS TAREAS DE
MANTENIMIENTO A UN TÉCNICO CUALIFICADO.
ADVERTENCIA:
PARA REDUCIR EL RIESGO DE INCENDIO O DESCARGA ELÉCTRICA E INTERFERENCIAS, UTILICE ÚNICAMENTE LOS
ACCESORIOS RECOMENDADOS.
XMH100

14
INSTALACIÓ N
Montaje de la Radio
1. Elija un lugar de instalación en el tablero o panel de instrumentos que deje suficiente espacio detrás para tender los
cables de radio hacia la fuente de alimentación. Tenga en cuenta cómo va a utilizar los conectores AUX IN (entrada
auxiliar), LINE OUT (salida de línea) y USB, y dirija los cables de extensión apropiados hacia una zona accesible.
2. Recorte un agujero en el tablero de instrumentos con ayuda de la plantilla que figura en el reverso de este manual. Se
necesita una profundidad de al menos 3 ¾” para instalar la radio.
IMPORTANTE! No instale esta unidad donde pueda quedar sumergida en el agua.
3. Deslice las arandelas de resorte (B) incluidas sobre los tornillos espárrago (A) y sujete los tornillos a la parte posterior de
la radio.
4. Coloque la radio enfrente de la apertura del tablero de manera que el cableado pueda ser dirigido a través de la abertura.
5. Después de realizar las conexiones del cableado, encienda la radio para comprobar el funcionamiento (el interruptor
accesorio de la embarcación debe estar encendido). Si la radio no funciona, vuelva a revisar todo el cableado hasta que
se corrija el problema. Una vez que haya logrado una operación correcta, apague el interruptor accesorio y proceda con el
montaje final de la radio. Consulte la sección "Diagrama de Cableado" en la página 4.
NOTA: Antes de la instalación final, pruebe las conexiones de los cables para asegurarse de que la unidad está
conectada correctamente y de que el sistema funciona.
6. Inserte la radio en el orificio de montaje.
7. Coloque el soporte en "U" (C) en los tornillos espárrago y fije la radio en el tablero con las tuercas hexagonales (D)
incluidas. De ser necesario, corte las marcas de incisión (E) que hay a cada lado del soporte de montaje para adaptar la
longitud del soporte a su aplicación. Consulte la figura A.
Entrada Auxiliar
Conecte un dispositivo de audio portátil a la entrada de audio auxiliar (AUX IN DCHA./IZDA.) de la parte posterior de la unidad
utilizando cables RCA.
Salida de Línea
Los conectores de salida de línea (LINE OUT DERECHA / IZQUIERDA) situados en la parte posterior de la unidad emiten una
señal analógica de nivel de línea. Utilice esta salida para conectar un amplificador externo.
Figura A - Instalación
XMH100
A
B
C
D
E

15
Diagrama de Cableado
COLOR DEL
CABLE
DESCRIPCIÓN
MORADO
ALTAVOZ TRASERO DERECHO (+)
MORADO/NEGRO
ALTAVOZ TRASERO DERECHO (–)
GRIS
ALTAVOZ FRONTAL DERECHO (+)
GRIS/NEGRO
ALTAVOZ FRONTAL DERECHO (–)
BLANCO
ALTAVOZ FRONTAL IZQUIERDO (+)
BLANCO/NEGRO
ALTAVOZ FRONTAL IZQUIERDO (–)
VERDE
ALTAVOZ TRASERO IZQUIERDO (+)
VERDE/NEGRO
ALTAVOZ TRASERO IZQUIERDO (–)
ROJO
ACC +12V
NEGRO
TIERRA
AZUL
AMP POTENCIA REMOTO
Nota: No conecte el cable rojo a una conexión de
alimentación constante. El cable rojo debe
conectarse a una conexión de embarcación con
alimentación interrumpible, como IGN o ACC.
XMH100

16
FUNCIONAMIENTO
Funciones Básicas
Encendido
Pulse el botón de encendido (1) para encender la unidad.
Pulse y mantenga pulsado el botón de encendido (1) para pasar a modo de espera.
Volumen
Pulse el botón (10) para aumentar el volumen.
Pulse el botón (2) para disminuir el volumen.
Pulse y mantenga pulsado cada uno de los botones para cambiar el nivel de volumen de forma continua.
Pausa/Silenciado
Pulse el botón (6) para silenciar la salida de audio en el sintonizador, AUX o USB. Pulse de nuevo para restaurar el nivel de
volumen anterior.
Modo
Pulse el botón (3) para seleccionar un modo de funcionamiento: AM, FM, WX, Bluetooth, AUX IN o USB.
Control de Atenuado
Pulse el botón (1) para encender el atenuador (nivel de brillo seleccionado) y vuelva a pulsarlo para apagar el atenuador
(nivel de brillo máximo).
Menú de Audio
Pulse el botón (8) para acceder al menú de audio. Pulse el botón repetidamente para configurar los ajustes siguientes
del menú de audio: GRAVES (BASS), AGUDOS (TREBLE), BALANCE (BALANCE), ATENUADOR (FADER) e INTENSIDAD
(LOUD). Use los botones o (5, 7) para elegir un valor para cada ajuste.
Menú del Sistema
Pulse y mantenga pulsado el botón (8) para acceder al menú del sistema. Pulse el botón (8) otra vez para configurar los
siguientes ajustes del menú del sistema: DISPOSITIVO BT (BT DEVICE), CONEXIÓN BT (BT PAIR), ATENUADOR ON/OFF
(DIMMER ON/OFF), NIVEL DE ATENUADO (0 – 8), REGIÓN (USA/EURO), VOLUMEN PRESTABLECIDO (PRESET VOLUME)
y RESTABLECER (RESET). Use los botones o (5, 7) para elegir un valor para cada ajuste.
Restablecer
Pulse el botón para confirmar la restauración a los valores predeterminados de fábrica. Esta función caducará después de 5
segundos de inactividad, tras lo que la unidad continuará con su funcionamiento normal. Después del reinicio, la unidad pasará
a modo FM de manera predeterminada.
XMH100
1
2
3
4
5
6
9
8
10
7

17
Modo de Radio
Selección del Modo de Sintonización EE.UU./Europa (EURO)
Para cambiar del modo estadounidense al modo europeo de sintonización, lleve a cabo los siguientes pasos:
1. Pulse y mantenga pulsado el botón (8) durante 3 segundos para acceder al menú del sistema.
2. Pulse el botón (8) repetidamente para desplazarse por las opciones del menú (DIM > DIM LEVEL > REGION > PRE
VOL > RESET). El ajuste de Región mostrará REG USA (si está en el modo de sintonización de frecuencias de EE.UU.)
o REG EUR (si está en el modo de sintonización de frecuencias de Europa).
3. Cuando la pantalla muestre el modo de sintonía actual, pulse el botón o (5, 7) para cambiar entre REG
USA/REG EUR.
Sintonización de Frecuencia
Pulse el botón o (5, 7) para sintonizar la frecuencia de radio.
Búsqueda de Canal
Pulse y mantenga pulsado el botón o (5, 7) para buscar frecuencias de radio con buena recepción.
Almacenamiento en Canal Preseleccionado
Para almacenar manualmente un canal favorito en uno de los doce canales preestablecidos, siga estos pasos:
1. Pulse el botón o (5, 7) para sintonizar la frecuencia que desea almacenar.
2. Pulse y mantenga pulsado el botón (9) para acceder a la lista de los 12 canales preseleccionados; el icono de favorito
y el canal parpadearán en la pantalla.
3. Pulse el botón (9) repetidamente para seleccionar el número de canal preseleccionado favorito (1-12).
4. Pulse el botón (6) para guardar la estación en el canal preseleccionado elegido y salir de la lista actual de canales,
con lo que dejará de parpadear el icono de favorito.
Almacenamiento Automático
Pulse y mantenga pulsado el botón (3) para acceder a la lista del menú de sintonización (AUTO STORE y PRESET SCAN).
Pulse el botón (3) repetidamente hasta que aparezca “AUTO STR” en pantalla. Pulse el botón (6) para iniciar la función
de almacenamiento automático y almacenar las emisoras con mejor recepción en los canales de sintonización de
preselecciones.
NOTA: Sólo las estaciones con buena recepción se almacenarán automáticamente en los canales preseleccionados.
Búsqueda de Preselecciones
Pulse y mantenga pulsado el botón (3) para acceder a la lista del menú de sintonización (AUTO STORE y PRESET SCAN).
Pulse el botón (3) repetidamente hasta que aparezca “PRE SCAN” en pantalla. Pulse el botón (6) para iniciar la función
de búsqueda de preselecciones y escuchar las estaciones con mejor recepción en los canales de sintonización
preseleccionados.
Selección de Canales Preseleccionados Favoritos
Pulse el botón (9) para seleccionar los canales preseleccionados disponibles.
Modo USB
Insertar/Extraer un Dispositivo USB
Puede conectar un dispositivo USB directamente al puerto USB de la parte trasera de la radio para la reproducción de archivos
compatibles. La reproducción se iniciará automáticamente.
Pulse el botón (3) para cambiar al modo USB de otra fuente.
Reproducir/Pausar (USB)
Durante la reproducción USB, pulse el botón (9) para reproducir o pausar la pista seleccionada.
Archivo Siguiente/Anterior
Pulse el botón o (5, 7) para seleccionar la pista anterior o la siguiente.
Selección de Pista
1. Pulse y mantenga pulsado el botón (9) para acceder al modo de navegación de pistas MP3.
2. Pulse el botón de volumen o (10, 2) para seleccionar la pista deseada.
3. Pulse el botón (6) para confirmar y reproducir la pista seleccionada.
Avance/Retroceso Rápido
Pulse y mantenga pulsado el botón o (5, 7) para avanzar o retroceder rápidamente.
XMH100
This manual suits for next models
1
Table of contents
Languages:
Other ASA Electronics Radio manuals

ASA Electronics
ASA Electronics MSR3007VIK User manual

ASA Electronics
ASA Electronics OEC3007 User manual

ASA Electronics
ASA Electronics Radio OEC1550 User manual

ASA Electronics
ASA Electronics OEC3006 User manual

ASA Electronics
ASA Electronics Jensen JMS2212 User manual

ASA Electronics
ASA Electronics MSR2107BRP User manual

ASA Electronics
ASA Electronics C480013 User manual