ASAIR ADP2100 User manual

ADP2100
www.aosong.com 2022.71 / 8
ADP2100 Manual
Digital Differential Pressure Sensor
⚫Excellent repeatability , no drift
⚫Built-in temperature compensation
⚫High reliability and long-term stability
⚫high signal to noise ratio
⚫Built-in MCU with high processing capability
⚫Short response time and fast measurement speed
⚫Small size and light weight
Application range
The ADP2100 is designed for high-accuracy measurement of differential pressure with a fast
response time of 1 0 ms and can respond quickly to air, nitrogen, and oxygen. It can adapt to HVAC
applications with harsh environment and low cost requirements, such as: VAV controller, burner, heat
recovery system and filter monitoring); it can also be customized and used in specific scenarios
according to customer needs, such as: fire protection in smart fire protection Residual pressure
monitoring system; pipe blockage monitoring and variable air volume control in electrical equipment
such as heating air conditioners and fresh air systems, building automation, precise control and
monitoring of gas flow in the medical field, etc.
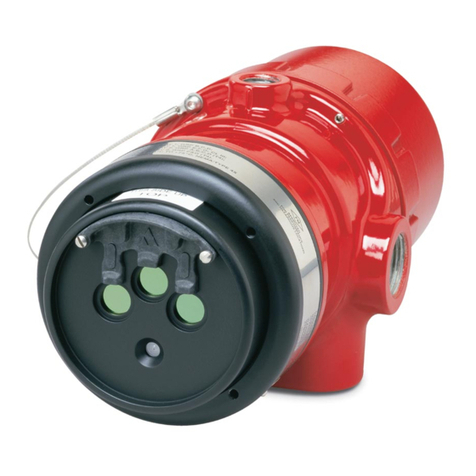
Figure 1. ADP2100 Differential Pressure Sensor
Product summary
The ADP2100 sensor is a digital differential pressure sensor, and its internal thermal sensor element
measures the pressure difference of the gas. The sensor can measure the pressure difference of air,
nitrogen, and oxygen without drift and with high precision. It also has excellent accuracy at low
pressure difference. It has good performance in sensitivity, shock resistance and temperature
change.
The ADP2100 sensor has standard I2C interface, simple communication mode, and can be easily
connected to the microprocessor.
ADP2100
www.aosong.com 2022.72 / 8
1. Sensor parameters and materials
1.1 Sensor parameters
Table 1. Sensor parameters
Parameter
Describe
Measuring range
-500 ~500Pa
Zero point accuracy
0.3Pa
Precision
Reading ×3%
Zero-point repeatability
0.1Pa
Repeatability
Reading ×0.5%
Year offset
< 0.05Pa
Response time
10ms
Calibration gas
Air
Fluid compatibility
Air, nitrogen, oxygen (non-condensing state)
Temperature Compensation
Range
0 ~ 50°C
Shell material
LCP
Note: Unless otherwise stated, all sensor differential pressure parameters are measured at 25°C , VDD = 3.3 V,
and absolute pressure = 966 mbar .
1.2 Temperature parameters
Table 2. Temperature Parameters
Parameter
Value
Measuring range
-40
~
85°C
accuracy
From -10
to
60°C at 2°C
at -40
~
85°C at 3°C
repeatability
0.3°C
Note: The temperature indicated in the table is the temperature inside the sensor . This temperature value depends
not only on the gas temperature, but also on the ambient temperature around the sensor.

ADP2100
www.aosong.com 2022.73 / 8
1.3 Electrical parameters
Table 3. Electrical Parameters
Parameter
Symbol
State
Min
Typ
Max
unit
voltage
V
DD
-
3.2
3.3
3.4
V
supply current
I DD
Measurement
-
3.8
5.5
mA
idle state
-
-
1.1
mA
1.4 Timing parameters
Table 4. Timing Parameters
Parameter
Describe
Power-up time (time for sensor to be ready)
≤ 25ms _
I 2 C SCL Frequency
≤ 100kHz _
Update rate of differential pressure value (in continuous
mode)
100Hz _
1.5 Mechanical parameters
Table 5. Mechanical Parameters
Parameter
Value
Overpressure allowed
1 bar
Rated Burst Pressure
5 bars
weight
0.4g _
1.6 Absolute Minimum and Maximum Ratings
Table 6. Absolute Minimum and Maximum Ratings
Parameter
Scope
Voltage
-0.3 ~ 3.4V
The maximum voltage on pins ( SDA , SCL )
-0.3 ~V DD +0.3 V
Input current on any pin
±70mA
Working and storage temperature range
-40 ~85°C
storage temperature range
-40 ~85°C
ESD HBM (Human Body Model)
2kV _
Note: This parameter is for air and nitrogen. Prolonged exposure to oxygen at elevated temperatures (> 50 °C )
will shorten product life . V
DD
in the table refers to the power supply voltage V
DD
in Table 3.

ADP2100
www.aosong.com 2022.74 / 8
2. Pin assignment
Figure 2. ADP2100 Digital Pinouts
Table 8. ADP2100 Digital Pin Assignments
Pin
Name
Describe
1
VDD
VDD power supply
2
SDA
Serial data ( I 2 C interface)
3
GND
grounding
4
SCL
Serial Clock ( I 2 C Interface)
5~8
N/ C
empty pin
3. I 2 C and CRC check
I 2 C address of ADP2100 is 0x 25 , namely 0 100101 , a total of 7 bits. The address is followed
by a read or write bit, the I 2 C address followed by a write bit command is 0x 4 a , followed by a read
bit command is 0x 4 b . CRC (Cyclic Redundancy Check) is an algorithm that performs polynomial
operations on data and appends theresult to the end of the frame. The receiving device also executes
a similar algorithm when receiving data, which is mainly used to detect or verify possible errors after
data transmission or storage to ensure the correctness and integrity of data transmission.
3.1 I 2 Ctiming
2 and Figure 3 show the timing of I 2 C host (computer) writing data and receiving instructions
and data and the instructions in the figure are all 16bit. The sensor data is output with 16bit, and each
word is followed by an 8bit checksum to ensure the reliability of communication.
Figure 2. I
2
C master executes the timing diagram of writing 16 -bit data instruction

ADP2100
www.aosong.com 2022.75 / 8
S: start bit (Start); W/R: write/read bit; ACK: acknowledge bit; NACK: non-acknowledge bit; P: stop bit (Stop); Data x: data command; CRC x:
verification command; white bottom data bit: master signal; gray bottom data bit: slave signal
Figure 3. I
2
C master executes the read command and receives multiple 16- bit data commands and CRC check
code timing diagram
3.2 I 2 C read command
The sensor can measure differential pressure and temperature at the same time, and the above two
measurement results can be read through the hexadecimal I 2 C read command, continuous
measurement command (0x 361 E) and single measurement command (0x 372 D) , During
continuous measurement, the update time of the measurement result is 10ms .
Sending the continuous measurement command, the chip will continue to measure and update the
measurement results. New results can be continuously read using only the continuous measurement
command. In addition, product identification and communication testing can also be performed
through the product type read command (0xE 201). See Table 9 for continuous measurement and
product type read instruction information.
Table 9. I 2 C Read Commands and Their Descriptions
Instruction
Byte description
Remark
Continuous
measurement
(0x 361 E)
Byte 1: high 8 bits of differential
pressure raw data
Byte 2: low 8 bits of differential
pressure raw data
Byte 3: CRC
Byte 4: high 8 bits of
temperature data
Byte 5: low 8 bits of
temperature data
Byte 6: CRC
After starting continuous measurement,
the measurement result can be read
out; the temperature and scale factor
do not need to be read out every time;
Read operations can be terminated by
NACK and STOP conditions.
Product type
read (0xE 201 )
Byte 1: data high 8 bits ( 41 )
Byte 2: data low 8 bits (5 3 )
Byte 3: CRC (D 1 )
The product type is a unique identifier,
and the product type reading
instructions read by the same type of
sensor are consistent. The product type
code for the ADP2100 is 0x 4153 .

ADP2100
www.aosong.com 2022.76 / 8
3.3 Checksum calculation
CRC generally has three standards: CRC 8 , CRC 16 , and CRC 32 , and CRC 8 is used in
ADP2100 . Taking the polynomial x 8 + x 5 + x 4 +1 (0x 31 ) as an example, the CRC 8 checksum byte
is generated by the CRC algorithm with the properties shown in Table 1.0 .
Table 1 0. Values corresponding to each attribute
Attributes
Value
length
8bit
polynomial
x 8 + x 5 + x 4 +1
initial value
0xFF
Whether the input
needs to be
reversed
False
Whether the output
needs to be inverted
False
Final XOR value
0x00
Calculating the CRC code is as follows:
//**********************************************************
// Function name: Calc_CRC8
// Function: CRC8 calculation, initial value: 0xFF, polynomial: 0x31(x8 + x5 + x4 +1)
// Parameter: u8 *data: the first number of CRC validation; u8 Num: indicates the length of CRC
verification data
// Returns: crc: The calculated value of crc8
//**********************************************************
u8 Calc_CRC8(u8 *data, u8 Num)
{
u8 bit,byte,crc=0xFF;
for(byte=0; byte<Num; byte++)
{
crc^=(data[byte]);
for(bit=8;bit>0;--bit)
{
if(crc&0x80) crc=(crc<<1)^0x31;
else crc=(crc<<1);
}
}
return crc;
}

ADP2100
www.aosong.com 2022.77 / 8
4. Signal conversion to physical value
Differential pressure and temperature signals to physical values is done through scaling factors.
4.1 Scale factor
Table 1 1. Scale factor
Parameter
Describe
Differential pressure scaling
factor
60Pa -1
Differential pressure scaling
factor
14 ' 945 ( inch H 2 O ) -1
Temperature scaling factor
200°C -1
4.2 Differential pressure
Calibrated differential pressure signal read from the sensor is a signed integer (two's complement).
An integer value can be converted to a physical value by dividing it by a scaling factor.
Pressure difference = sensor output integer value ÷pressure difference scaling factor
The number read from ADP 2100 is 0x 1770, and 0x 1770 is converted into a decimal integerto 6000,
and the pressure difference = 6000 ÷6 0 = 100 Pa.
4.3 Temperature
Signal readfrom the sensor is a signed integer (two's complement). An integer valuecan be converted
to a physical value by dividing it by a scaling factor.
Temperature ( °C ) = sensor output integer value ÷temperature scaling factor
For example, the number read from the sensor is 0x 0 FA 0 , 0x0FA0 converted into a decimal integer
is 4 000 , temperature = 4000 ÷2 00 = 20 ℃.
5. Dimensions
Figure 4. ADP2100 (unit: mm, tolerance: ±0.1 mm )

ADP2100
www.aosong.com 2022.78 / 8
WARNINGS AND PERSONAL INJURY
Do not use this product in safety protection devices or emergency stop equipment, and in any
other application where failure of the product may cause personal injury, unless there is a specific
purpose or authorization for use. Refer to the product data sheet and instruction manual before
installing, handling, using or maintaining this product. Failure to follow recommendations could
result in death or serious personal injury. The company will not be responsible for all
compensation for personal injury and death arising therefrom, and exempt any claims that may
arise from the company's managers and employees, affiliated agents, distributors, etc., including:
various costs, claims fees, attorney fees, etc.
Quality Assurance
Guangzhou Aosong Electronics Co., Ltd. provides the direct purchasers of its products with the quality
assurance in the following table (calculated from the date of delivery), and indicates the technical
specifications in the Aosong Electronics product manual. If the product is proven to be defective within
the warranty period, the company will provide free repair or replacement services.
Warranty Description
Product Category
Warranty period
ADP2100 Differential Pressure Sensor
12 months
The company is only responsible for the products that are defective due to the application in the
occasions that meet the technical conditions of the product. The company does not make any
guarantees for product applications in special scenarios that are not recommended. The company
also does not make any commitment to the reliability of the product applied to other non-company
supporting products or circuits.
This manual is subject to change without notice.
The final interpretation right of this product belongs to Guangzhou Aosong Electronics Co., Ltd.
Copyright © 2022, ASAIR ®
Table of contents