ASI Audio 3DME BT G2 User manual

3DME 3DME 3DME
3DME
Three dimensional music enhancement
3DME
Three dimensional music enhancement
outlined
outlined
Novocento Wide Light and Avenir Next Demi no outlines
Novocento Wide Light no outlines
91 63 47 33
5477CP
72 34 26 1
7697CP
0 79 100 0
1665CP
QQuuiicckk SSttaarrtt GGuuiiddee
© 2022 ASI Audio. All rights reserved. Model 3DME x Sensaphonics is protected by US Patent 8,160,261
3DME BT G2
3D-40020-B

W
ELCOME
T
O
3DME
T
HREE
D
IMENSIONAL
M
USIC
E
NHANCEMENT
3DME is a unique in-ear listening
system that combines patented
Active Ambient™ audio
technology from Sensaphonics®
with a powerful smartphone app
to enhance listening and promote
long-term hearing health.
The system includes:
3DME Active Ambient™
Earphones – Universal-fit, dual
driver in-ear monitors (IEMs) with
embedded binaural microphones
capture the ambient sound around
you with full 3D directionality and
three sizes of eartips to isolate your
ears and deliver superb sound.
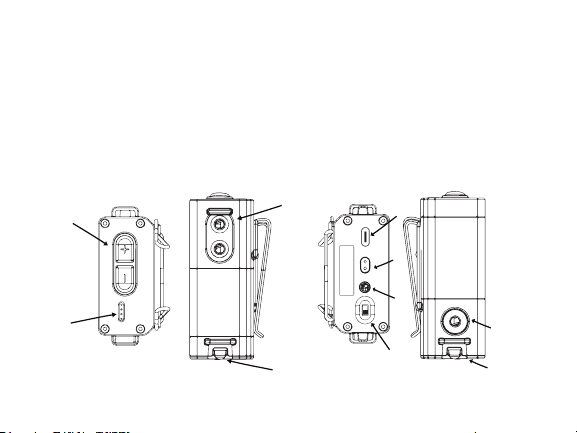
3DME Bodypack Mixer
Connects and combines your
sound source with the ambient mic
feed to add 3D stage mic level to
your monitor mix. The bodypack
also houses powerful limiter and EQ
functions. (When used without a
direct monitor mix, you can still hear
and control your customized
ambient feed with full 3D
directionality.) Note: The Power
switch is on the bottom.
ASI Audio Smartphone App
Program the bodypack and tailor
your sound mix, levels, mic level,
EQ and sound limiting, save
custom presets, and performs an
Audio Seal Test for proper IEM fit.
2
For more complete instructions and important information, please refer to the
owners manual on the ASI Audio website at https://asiaudio.com/pages/support

•Universal fit in-ear monitors
•IEM Drivers: Dual-driver
balanced armature, crossover-
free
•Embedded binaural ambient
microphone system
•Rechargeable bodypack with
Bluetooth control
•3DME In-Ear Monitors
•3DME bodypack with lithium
ion battery
•Stereo jumper cable
•USB-C bodypack charging
cable
•Earpiece cleaning tool
•Shirt clip
•Carrying Case
•3-pairs ear tips, S,M,L
HARDWARE AND FEATURES
3
IN THE BOX

Top and right of bodypack Bottom and left of bodypack
1
3
44
5
7
8
3DME Bodypack Mixer
1 - Ambient volume control switches
(+/-)(top panel)
2 - Battery status LEDs (4 LEDs) (top
panel)
3 - Dual earphone jacks (right side)
4 - Cable management/strain relief
(right and left sides)
5 - Monitor input mini-jack (left panel);
tip-left, ring-right
6 - USB-C charging port (bottom)
7 - USB power/charging status LEDs
(bottom)
8 - Power switch (bottom)
9 - Monitor output mini-jack (bottom);
tip-left, ring-right. The output signal
directly reflects the total signal
reaching your ears, including both the
microphone and monitor input
signals modified by the Mic Level, EQ
and Limiter. This output signal is
useful for monitoring your listening
level and for binaural recording.
9
6
4
2

relief (right and left sides)
5 - Monitor input mini-jack (left
panel)
6- Micro-USB charging/data port
(bottom)
7- USB power/charging status
LEDs (bottom)
8- Power switch (bottom)
5
GETTING STARTED:
CONNECTING YOUR 3DME AND ATTACHING
EARTIPS
Your 3DME universal-fit IEMs
have embedded Active Ambient
microphones to capture the
ambient sound around you and
deliver accurate 3D directionality.
5

For rich, full sound, the earpieces
must be fully inserted to achieve
a full, tight seal. Three sizes of
ear tips are included. NOTE: The
earpiece cables are designed to
run up, over and behind the ears,
meeting behind the head.
2. Place the sound port (nozzle)
into the core of the tip at a slight
angle. As they join, straighten out
the tip and push the tip as far back
as it will go.
Inserting In-Ears
1. Before inserting into the ear
canal, observe left/right marking
on the earpiece.
Memory foam ear tips, 3 sizes
Ear buds without tips
Installing Ear Tips
1. Select an ear tip, holding
it rmly between thumb and
forenger.
6

2. Place the sound port (nozzle)
into the core of the tip at a sligh
angle. As they join, straighte
the tip and push the tip as far b
as it will go.
Inserting In-Ears
1. Before inserting into the ear
canal, observe left/right marki
on the earpiece.
Step 1 Step 2
Proper t
2. Roll the tip between your ngers
to compress the foam into a thin
cylinder.
3. Insert the tip as deep as
possible without irritating the ear,
positioning the cable to run up,
over and behind the ear.
4. Hold the earpiece in place for
15-30 seconds, allowing the tip to
expand and conform to your ear
canal. This will create a custom
t and perfect seal - providing an
optimal audio experience.
7

IMPORTANT:
If the earpieces are not fully sealed, a brief feedback squeal may
occur. If you have any doubts about your fit, use the Audio Seal Test.
Very rarely, an ear tip can come off and remain in the ear canal when
removing your 3DME IEM. Should this occur and the ear tip cannot be
removed easily, please consult or immediately visit an audiologist or
medical provider.
These professionals are equipped with medical grade tweezers
designed specifically for ear canal disruptions. It is also very important
to have your ears checked for excessive ear wax build up or other
hearing challenge issues that can cause you to use loud sound
volumes not recommended for extended periods of time. Properly
sealed earphones allow for safe hearing at lower volume levels.
Warning: Listening at a high volume for a long time may damage your
hearing.
8
If the eartips are not fully sealed, a brief feedback squeal may occur. A
safety limiter is engaged when the 3DME bodypack is turned on to limit
the level of any feedback. If you have any doubts about your fit, use the
Audio Seal Test. For additional details on the Audio Seal Test and Safety
Limiter, please refer to the 3DME owners manual on the ASI Audio
website at www.asiaudio.com/pages/support
Note::Turn the bodypack on prior to connecting your earphone cable
to the bodypack.
Warning::Listening at a high volume for a long time may damage your
hearing.
8

Pairing the 3DME with ASI Audio App
1. Download the ASI Audio 3DME BT G2 App
from Google Play Store or Apple App Store.
2. On your Android or iOS device, go to
Settings > Bluetooth and turn on Bluetooth.
3. Turn on the 3DME bodypack.
4. Go to the ASI Audio App and touch the
Bluetooth icon on the upper left corner
5. Touch the Bluetooth device on the list you
want to connect to.
6. Connection status will display "Connected".
7. Touch "<ASI Audio" on the upper left corner.
8. The Bluetooth icon on the upper left corner
will have 2 dots on it indicating the devices are
paired
9
For additional details on the ASI Audio app,
please refer to the 3DME owners manual at
https://asiaudio.com/pages/support.
Apple App Store
Google Play Store
Amazon Appstore

Congratulations, your system is now ready for you to use to enhance your
listening experience.
•Explore the app on your device to change the volume, equalization,
limiter and other features including saving your presets.
•The 3DME bodypack is powered by a rechargeable Li-Ion (lithium ion)
battery. The system is shipped with a partial charge, but you should
fully charge the battery before your first gig. Use the supplied cable to
connect the bodypack's USB-C connector (located on the bottom of
the pack) to a stable power source.
•For more complete instructions and important information, please
refer to the 3DME owners manual at https://asiaudio.com/pages/
support.
Register your 3DME through the ASI Audio app Help menu or visit
https://asiaudio.com/pages/support.
10
Congratulations, your system is now ready for you to use to enhance
your listening experience.
•Explore the app on your device to change the volume, equalization and
other features.
•The 3DME bodypack is powered by a rechargeable Li-Ion (lithium ion)
battery. The system is shipped with a partial charge, but you should fully
charge the battery before your first gig. Use the supplied cable to connect
the bodypack's micro-USB connector (located on the bottom of the pack)
to a stable power source.
•For more complete instructions and important information, please refer to
the 3DME owners manual asiaudio.com/pages/support.
Register your 3DME through the ASI Audio app Help menu or visit
asiaudio.com/pages/support
10
Other ASI Audio Headphones manuals