ASICS AH01 User manual

AH01: WJ30/WJ31
ASICS
HRM WATCH
&
CHEST STRAP
INSTRUCTION MANUAL
World-Wide Limited Warranty
・ Warranty term: Two years from the date of purchase
・ Your watch will be repaired or replaced (with the same or similar model) free of charge at our
option during the warranty term (see above) if it should malfunction during normal use as
described in the Instruction Manual.
・ This warranty covers the watch itself (movement and case). Other parts than the above are not
covered by the warranty.
・ To have repairs and adjustments covered under this warranty performed, bring the watch, the
warranty, and the original receipt identifying the ASICS watch purchased and the date of
purchase to an ASICS watch retailer or a nearby authorized ASICS service facility.
・ Note that repairs will be charged in the following cases, even during the warranty term:
a. Failure or damage caused by improper use or carelessness;
b. Failure or damage caused by unjustiable repair or modication;
c. Failure or damage caused by re or water, or a natural disaster such as an earthquake;
d. Esthetic changes that occur during use (minor scratches, etc. on the case and glass);
e. In case the retail store and the purchase date are not indicated on the warranty, or if this
information has been rewritten; and
f. If the warranty is not submitted along with the watch.
・ Battery replacement will be charged even during the warranty term.
・ Since the battery in your watch is a monitor battery inserted at the factory to check the functions
and performance of the watch, it may run down in less than the specied period after the date of
purchase.
・ The case, glass, watchband or other parts of the watch may be replaced with substitutes if the
originals are not available.
・ All postage, insurance and shipping costs incurred in presenting or sending the watch to the
service facility are your responsibility.
・ Some countries, states and regions do not allow the exclusion or limitation of consequential
damages or limitations on how long an implied warranty lasts so the above exclusion or
limitation may not apply to you. This warranty gives you specic legal rights, and you may also
have other rights which vary from country to country, state to state, and region to region.
・ This warranty warrants that you can receive free repair in accordance with the terms set forth
herein and within the specied term, and shall not restrict any lawful right of the Customer.
i
EU contact information:
Please visit the Website below,
and contact a nearby distributor.
http://asics-watch.com/eg/shoplist.html
For the US Consumers:
Additional Notation to Obtain Warranty Service
Warranty Disclaimers
We make no express warranties other than as expressly set forth in this warranty.
WE HEREBY DISCLAIM ANY AND ALL LIABILITY FOR INDIRECT, SPECIAL OR CONSEQUENTIAL
DAMAGES FOR BREACH OF ANY EXPRESS OR IMPLIED WARRANTY, INCLUDING, WITHOUT
LIMITATION, ANY IMPLIED WARRANTY OF MERCHANTABILITY AND ANY IMPLIED WARRANTY
OF FITNESS FOR A PARTICULAR PURPOSE. Some states do not allow the exclusion or limitation
of incidental or consequential damages, so the above limitation or exclusion may not apply to you.
Warranty Limitations
All implied warranties, including, without limitation, implied warranties of merchantability and
tness for a particular purpose, which may exist, are limited to the duration of this warranty. Some
states do not allow limitations on how long an implied warranty lasts, so the above limitation may
not apply to you.
We make no warranties except as expressly set forth in this warranty.
For the locations of the authorized ASICS
service facilities, please visit our website at
http://www.asics-watch.com.
Manufacturer: Seiko Instruments Inc.
8, Nakase 1-chome,Mihama-ku, Chiba-shi,
Chiba-ken, Japan
AH01-WJ30WJ31英語版.ai12013/03/0417:22:17

ii
TO PRESERVE THE QUALITY OF YOUR WATCH
ὲ
CAUTION
ὲ
WARNING
ὲ
DANGER
This symbol indicates any condition or practice which
will imminently result in serious personal injury or
death if the instruction with this symbol is not strictly
observed.
This symbol indicates any condition or practice which
could result in serious personal injury or possible
death if the instruction with this symbol is not strictly
observed.
This symbol indicates any condition or practice which
could result in minor personal injury or property loss if
the instruction with this symbol is not strictly
observed.
●PRECAUTIONS ON WEARING YOUR WATCH
zIf you are wearing any medical device such as a pace maker, never use this
product.
zDo not use this product near a person using any medical device such as a pace
maker, or do not bring it close to such person.
zIf you feel sick while taking exercise using this product, stop using it
immediately, and consult a doctor.
zDo not use this product inside an airplane.
zWhen you are wearing the watch, take care not to tumble, fall or bump into
others. This may injure yourself and others.
zTake care not to hold a young child in your arms with the watch worn on your
wrist. This may injure the child or cause him/her to develop a rash or allergy.
zWhen you are wearing the watch, do not swing your arms forcefully to bump
the watch against hard objects. This may cause property loss, or a malfunction
of the watch.
zNever attempt to operate any of the buttons in water. Water may get inside the
watch to cause damage to it.
zThose who have not taken physical exercise for a long time and those who are
ill should consult a doctor before starting running with the watch. If you feel
sick while running, stop running immediately.
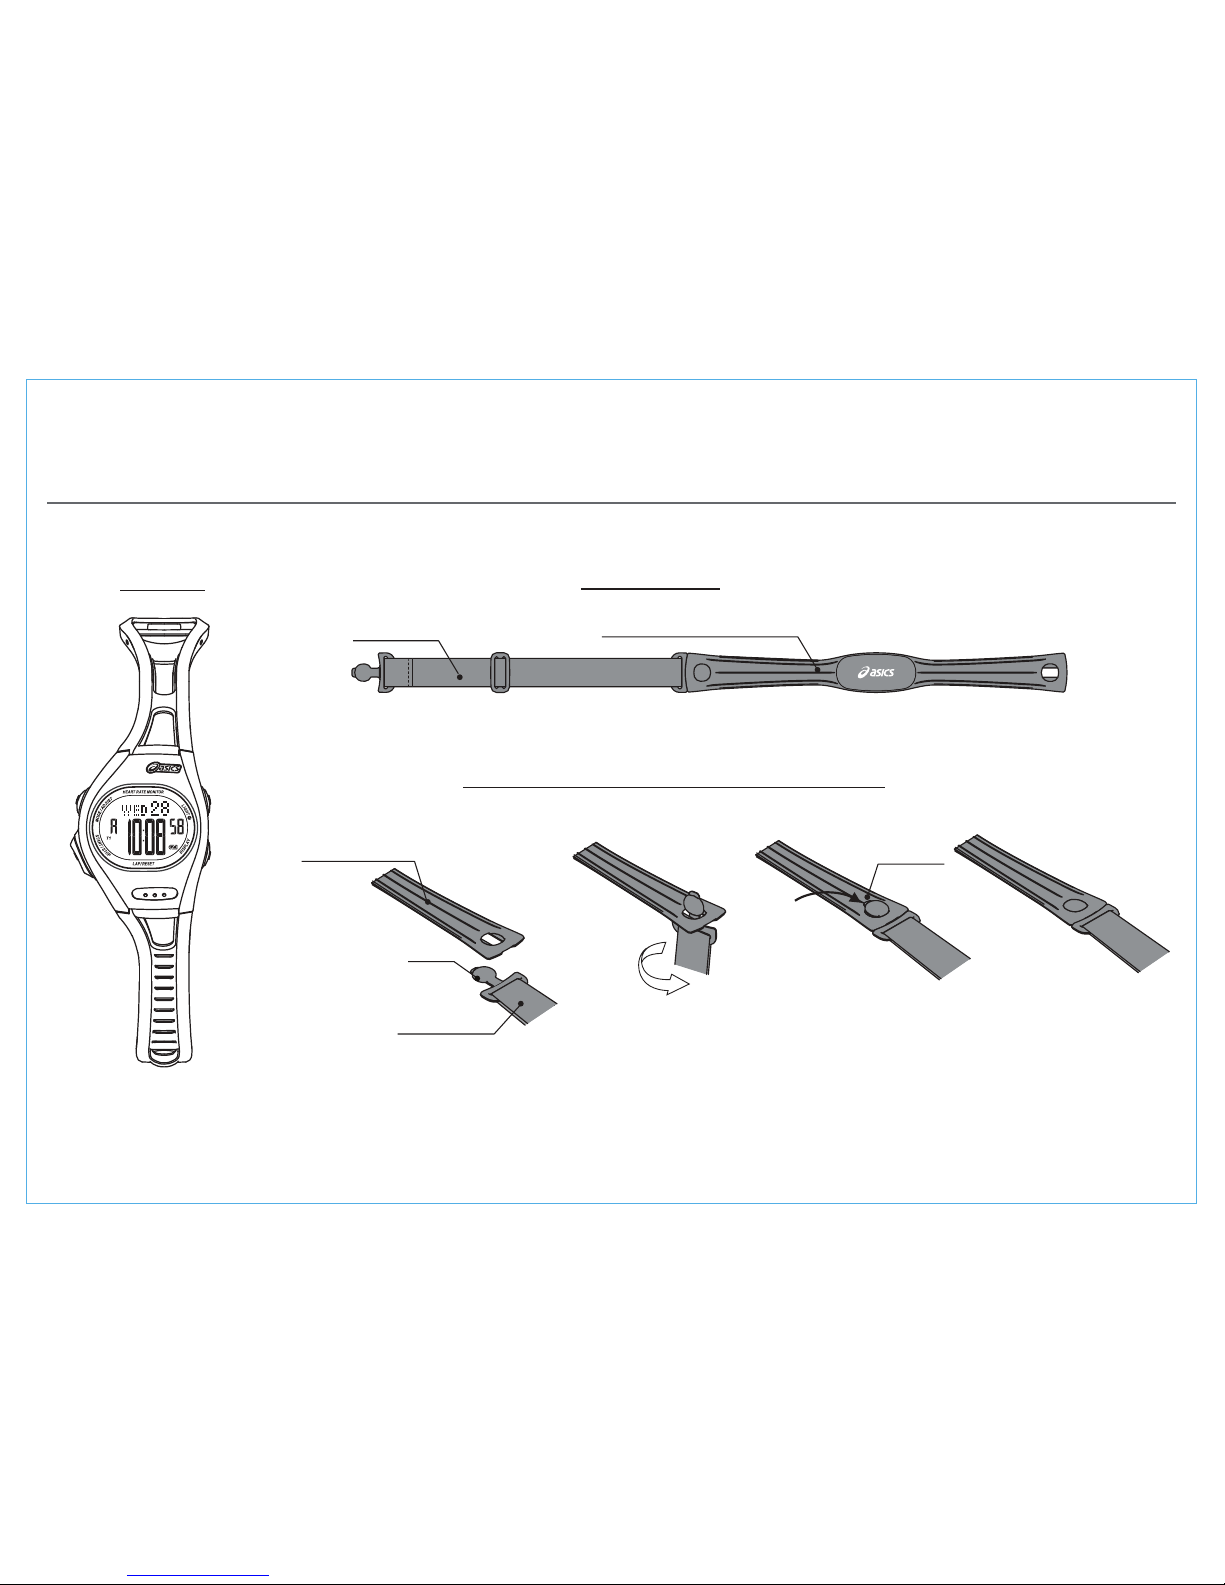
zDo not place the chest strap within the reach of children.
zDo not use this product near a microwave oven, a television set or a mobile
phone, or inside an automobile or a train. If it is used near a transmitting
station, accurate measurement may not be obtained due to interference.
●DAILY CARE
zThe case and band contact directly with the skin like an underwear. If they are left
soiled, the rust that forms on them may stain the edge of the sleeve, or cause a
rash or allergy on your wrist. Keep the case and bracelet clean to avoid this.
zAfter the watch is removed from your wrist, wipe off perspiration or moisture
from the watch using a soft dry cloth. Doing this will serve to prolong the
service life the case, band, gasket and other parts.
zDo not use chemicals such as benzine, thinner, alcohol and a solution of
neutral detergent to clean the watch. This may cause a chemical change to
deteriorate the watch.
zIf the chest strap becomes soiled, wipe it with a dry soft cloth or a cloth soaked
in a diluted solution of neutral detergent and squeezed tightly.
<Soft plastic band>
If the watch is left under uorescent light or direct sunlight for a long time, or
the band is left soiled until the soil adheres to it, the band may be discolored,
hardened or broken. If your watch has a semitransparent urethane band, which
is easily discolored, special care should be taken to keep it clean. It may be
discolored in several months depending on the conditions of use. Also, do not
keep the watch in a place where it is exposed to high humidity, or do not leave
the band wet with perspiration or water. Otherwise, the band may be discolored
in a very short time. When the band is soiled, rinse it in soapy water. Do no use
solvents for cleaning as some solvents may deteriorate the band.
●RASH AND ALLERGY
zAdjust the watchband so that there will be a little clearance between the band
and your wrist to avoid accumulation of perspiration.
zIf you are susceptible to rash, the band may cause a rash or itching on your skin
depending on your physical condition.
zIf wearing the chest strap causes a rash or other problems on your skin, stop
using it immediately.
zThe possible causes of the rash are as follows:
1. Allergy to metals; or
2. Rust, soil or perspiration on the watch or band.
zIf any abnormal condition occurs on your skin, remove the watch from your
wrist immediately, and consult a doctor.
ὲ
DANGER
ὲ
CAUTION
ὲ
WARNING
ὲ
CAUTION
AH01-WJ30WJ31英語版.ai12013/02/2421:26:55

iii
●REMARKS ON THE BATTERY
□MONITOR BATTERY
The battery in your watch may run down in less than the specied period after
the date of purchase, as it is a monitor battery inserted at the factory to check
the functions and performance of the watch.
We cannot guarantee that the stored data will remain intact after the battery is
replaced with a new one, or the watch is repaired at the service facility. To
prevent the data from being lost, it is recommended that the important
measurement and setting data be noted down on paper beforehand.
□BATTERY REPLACEMENT
zWhen the battery expires, be sure to replace it with a new one as soon as
possible to prevent any malfunction. For battery replacement, contact the
retailer from whom you watch was purchased.
zIf the exhausted battery is left in the watch for a long time, a malfunction may
result due to battery leakage, etc. Have it replaced with a new one as soon as
possible.
zBattery replacement is charged even if it runs down within the warranty period.
zThe battery is not rechargeable. Never attempt to recharge it, as this may cause
the battery to explode, leak uid or be damaged.
zDo not open the case back of the watch forcibly to remove the battery.
zIf it is necessary to take out the battery from the watch, keep it out of the reach
of children.
zIf the battery for the sensor unit of the chest strap is taken out from it, keep the
battery out of the reach of children.
zIf a child swallows it, consult a doctor immediately as it will adversely affect the
health of the child.
zDo not expose the watch to temperatures outside the normal temperature
range (5°C ~ 35°C) for a long time. This may shorten the battery life, or cause a
malfunction due to battery leakage.
●WATER RESISTANCE
Check the dial or case back of your watch for the water resistance indication,
and use it properly according to the instructions in the table below:
○×× ×
○○× ×
○○○ ×
zNEVER WEAR 10-bar water-resistant watch during saturation diving and air
diving.
zNEVER WEAR 5-bar water-resistant watch during any type of diving including
skin diving.
zNEVER PUT 3-bar water-resistant watch into water.
zAfter the 5-bar or 10-bar water-resistant watch is used in the seawater, rinse
the watch to remove salt as soon as possible. Otherwise, the watch may
become rusty. To do so, do not rinse the watch under running water.
Excessive water pressure may be applied to the watch, deteriorating its water
resistant quality. Be sure to rinse the watch in a pot or bowl lled with water.
Indication
on the
case back
WATER
RESIST
WATER
RESIST 5BAR
or 10BAR
Condition
of use
Accidental
contact
with
water
such as
rain and
splashes
Swimming,
kitchen
work and
other
water-
related
activities
Skin diving
without
breathing
apparatus
Scuba diving
using
breathing
apparatus and
saturation
diving using
helium gas
ὲ
WARNING
ὲ
CAUTION
ὲ
WARNING
ὲ
CAUTION
TO PRESERVE THE QUALITY OF YOUR WATCH
Degree of
water resistance
Water resistance
for daily life use
Enhanced
water
resistance
5 bar
10 bar
AH01-WJ30WJ31英語版.ai12013/02/2421:27:17

●PLACES TO KEEP YOUR WATCH
When not in use, the watch may be damaged, deteriorated or broken in the
following cases:
zIf the watch is exposed to temperatures outside the range between -5°C and
+50°C, its performance may be deteriorated or it may stop operating.
zIf the watch is left under direct sunlight or extremely high or low temperatures
for a long time, this may cause it to gain or lose time.
zIf the watch is left at a place where it is exposed to magnetic leakage from a TV
set, speaker, mobile phone, magnetic necklace, etc., it may gain or lose time.
zIf the watch is left at a place where it is exposed to strong vibration, it may be
damaged or gain or lose time.
zIf the watch is left at a place where it is exposed to chemical steam or
chemicals, it may be deteriorated or damaged.
Examples of such chemicals: Benzine, thinner, manicure, cosmetic sprays,
cleaners, toilet detergents, adhesives, mercury, iodized disinfectants,
insecticides, etc.
zIf the watch is left near a hot spring or kept together with insecticides, it may be
deteriorated.
zIf you decide not to use the watch for a long time, it is recommended that the
watch be stored in a box and placed at a well-ventilated place.
●PERIODIC CHECK
zTo enjoy longer use of the watch, it is recommended that you have it
overhauled and undergo thorough checking every 2 or 3 years. Depending on
the conditions of use, the gasket and other parts may be deteriorated to affect
the water resistant quality of the watch due to perspiration or water that may
get inside it. For overhaul and checking, contact the retailer from whom the
watch was purchased.
zWhen replacing the parts such as battery, please specify “GENUINE PARTS”.
zWhen the periodic check is performed, it is recommended that the gasket and
the push-pin be also replaced with new ones.
iv
TO PRESERVE THE QUALITY OF YOUR WATCH
AH01-WJ30WJ31英語版.ai12013/02/2421:27:36

v
TABLE OF CONTENTS
WORLD-WIDE LIMITED WARRANTY ............................................................ i
TO PRESERVE THE QUALITY OF YOUR WATCH........................................ ii
TABLE OF CONTENTS................................................................................... v
FEATURES...................................................................................................... 1
Use Your HRM Watch in the Manner Best Suited to Your Needs.
....................... 3
PARTS OF YOUR HRM WATCH AND CHEST STRAP ................................. 4
MODE CHANGE AND FUNCTIONS AVAILABLE IN EACH MODE.............. 5
TIME MODE
SETTING OF TIME/CALENDAR AND OTHER FUNCTIONS............................... 6
DETAILS OF FUNCTIONS SET IN TIME SETTING DISPLAY............................. 7
OTHER FUNCTIONS THAT CAN BE SET IN TIME MODE ................................. 8
HR-CHR MODE
CHRONOGRAPH MEASUREMENT PROCEDURE.............................................. 9
STORAGE OF DATA AFTER MEASUREMENT................................................. 10
TO MEASURE HEART RATE - 1 : HEALTH CHECK BEFORE RUNNING......... 11
TO MEASURE HEART RATE - 2 : WARM-UP BEFORE RUNNING.................. 12
TO MEASURE HEART RATE - 3 : WEARING CHEST STRAP .......................... 13
TO MEASURE HEART RATE - 4 : HEART RATE INDICATION AND
MEASUREMENT CONDITION CHECKING FUNCTION ............................. 14
TO MEASURE HEART RATE - 5 : TARGET ZONE FUNCTION ....................... 15
ANOTHER FUNCTION OF HR-CHR MODE : INTERVAL TIMER FUNCTION
............... 16
SETTING OF FUNCTIONS USED IN HR-CHR MODE....................................... 17
HR-GRAPH MODE
GRAPHIC DISPLAY OF HEART RATE DATA ............................................... 18
HR-LOG MODE
TO CHECK LOG DATA ....................................................................................... 19
SETTING FOR AT-HEART RATE (AT-HR)CALCULATION / AT-HR DISPLAY
.............. 20
TO DELETE LOG DATA...................................................................................... 21
GOAL TIME MODE
TO ESTIMATE YOUR MARATHON FINISH TIME ............................................ 22
TIMER MODE
TO SET AND USE “DOUBLE REPEAT TIMER”................................................ 23
ALARM MODE
TO SET AND USE “3-CHANNEL” ALARM....................................................... 24
SPECIFICATIONS .......................................................................................... 25
TROUBLESHOOTING GUIDE....................................................................... 26
DEFINITION OF TERMS/INDICATION OF MARKS...................................... 27
AH01-WJ30WJ31英語版.ai12013/02/2421:27:58

FEATURES - 1
1
AT-Heart Rate (AT-HR) Calculation Function (P. 20)
Target Zone Function (PP.15 & 17)
Estimate of Marathon Finish Time (P. 22)
ASICS HRM (Heart Rate Monitor) Watch measures heart rate, and calculates
“AT-Heart Rate” and “AT-Pace” from running data using the proprietary
algorithm developed by ASICS, providing runners with useful information to
perform their training efciently and effectively.
■AT (Anaerobic Threshold) refers to the point at which your body transitions
from aerobic to anaerobic exercise as the exercise intensity increases.
When the exercise intensity (running pace) exceeds the AT, the exercise
gradually becomes anaerobic, making it difcult to continue running for
long.
The AT has a strong relation with marathon pace. It not only provides a
measure to control the intensity of training efciently, but also serves as a
guideline for your race pace.
■ASICS HRM Watch automatically calculates AT-Heart Rate and AT-Pace using
the algorithm developed by ASICS Institute of Sports Science based on its
accumulated database.
By setting the target heart rate zone around AT-Heart Rate, and performing
various types of training programs day by day utilizing the target zone,
higher effect can be expected from less amount of training.
For the runners seeking to complete a marathon,
or those aiming to improve their performance,
planning training programs based on the AT-Heart
Rate will enhance the efciency of training and,
achieve their purposes more effectively.
For the runners worrying about their running
pace, the AT-Pace will serve as a guideline for their
race pace.
The watch calculates your AT-Heart Rate and
AT-Pace by inputting your gender, personal best
time for 5 or 10 km (preferably, the time measured
within last 2 years), and running data obtained by
running a usual distance at a usual pace.
For the details of the method of training based on
the heart rate zones, please refer to the “Training
Book.”
The watch indicates, while you are running,
whether your heart rate is above, below or within
the target zone around your AT-Heart Rate. This
function helps you perform training based on
heart rate zones in a well-balanced manner.
It is possible to customize this function by nely
adjusting the target heart rate (”TARGET”) and the
zone width above/below it (”ZONE”).
For the details of the method of training based on
the heart rate zones, please refer to the “Training
Book.”
Using the algorithm developed by ASICS, the
watch estimates your nish times for a full
marathon and a half marathon by inputting your
gender and running time for 5 or 10 km.
“HI” Zone
TARGET
ZONE
ZONE
“IN” Zone
Heart rate
Target heart
rate zone
“LO” Zone
AH01-WJ30WJ31英語版.ai12013/02/2421:28:20

300 Lap Memory (P. 10)
Interval Timer Function (PP. 16 & 17) Double Repeat Timer (P. 23)
Dual Time Display (P. 8)
3-Channel Daily Alarm (P. 24)
Auto-HRM Function (PP. 14 & 17)
Measurement Condition Checking Function (P. 14)
Graphic Display of Heart Rate (P. 18)
2
It starts counting down the set time
simultaneously with the start of the
chronograph, and is reset and restarted
repeatedly each time a lap time is measured.
This timer is suitable for such training
programs as interval training and build-up
training.
By wearing the chest strap, the heart rate data
it measures is transmitted to the watch, and
displayed automatically. The watch can be
used alone without wearing the chest strap as
a sports watch.
When the heart rate is not measured properly,
the color and shape of the heart shape change
to indicate the poor measurement condition.
The transition of heart rate during the latest
run is displayed graphically. As detailed data,
heart rate at each time point of the graph can
be checked numerically.
Two timers repeat counting down the
respective set times alternately as many times
as necessary. They can be set to count down
from 10 seconds up to 99 hours 59 minutes
and 59 seconds, and the countdown can be
repeated up to 99 times.
Up to 300 measurement data can be stored in
memory.
The time of two different time zones can be set
and displayed as necessary.
The alarm can be set to ring at three different
times of a day. It can be engaged or
disengaged channel by channel, and the time
zone of the designated alarm time can be
selected.
FEATURES - 2
AH01-WJ30WJ31英語版.ai12013/02/2421:28:40

3
●The watch can be set to display, during measurement, the measured data in different ways according to your needs.
UseYour HRM Watch in the Manner Best Suited toYour Needs.
Customize Target Zone function.
(See pp. 15 and 17.)
HR-LOG Mode
BEST
TIME
USUAL
PACE
To know your heart
rate while running
besides running data:
Function setting display of
HR-CHR Mode
Skip AT-Heart Rate setting
procedure to disable calculation
based on ASICS’s algorithm.
(See p. 20.)
Auto-HRM function
works as soon as
the watch receives
heart rate signal,
and heart rate is
displayed
automatically.
Heart rate is displayed
together with running
data including lap time
and split time.
To use AT-Heart Rate
as a guideline of
intensity of training
and race pace:
To customize Target
Zone function to utilize
it for various training
programs:
Input target heart rate (TARGET)
and width above/below target (ZONE).
“HI” Zone
TARGET
ZONE
ZONE
“IN” Zone
Heart rate
Target heart
rate zone
Input “usual pace” running data
and “best time.”
The watch indicates, in real
time, whether your heart
rate is above, below or
within the target zone
which includes AT-Heart
Rate at its center.
By customizing target heart rate zone
nely according to the purpose of
training program, Target Zone function
provides a measure to control exercise
intensity of training, enhancing its
quality and efciency.
Press for
more than
1 second
Press for
more than
2 seconds
Set your AT-Heart Rate on the watch.
(See p. 20.)
“LO” Zone
AH01-WJ30WJ31英語版.ai12013/02/2421:28:59

4
How to Connect the Sensor Unit with the Rubber Strap
Joint
Protrusion
PARTS OFYOUR HRM WATCH AND CHEST STRAP
WATCH CHEST STRAP
Sensor unit (outer surface side)
Rubber strap
Outer surface side of
sensor unit
Rubber strap
Push in
1. 2. 3.
1. Insert the joint of the rubber strap into the hole of the sensor unit from its inner
surface side.
2. Turn the joint, and push in the protrusion at its tip until it clicks in position.
3. Check that the protrusion of the joint is invisible from the outer surface side of
the sensor unit.
* When wearing the chest strap around your chest, follow the same procedure to
connect the sensor unit and the rubber strap.
AH01-WJ30WJ31英語版.ai12013/02/2421:29:15

MODE CHANGE AND FUNCTIONS AVAILABLE IN EACH MODE
5
・Setting Auto-HRM function
・Setting Target Zone function
・Setting Interval Timer function
・Displaying AT-HR
・Setting AT-HR calculation function
●With each press of Button “B”, the mode changes in the following order:
Mode name
TIME
HR-CHR
HR-GRAPH
HR-LOG
GOAL TIME
TIMER
ALARM
Time and calendar are displayed.
Setting of time, calendar and other functions can be
made.
Heart rate and chronograph measurement can be
made.
Setting of the following functions can be made:
z
Auto-HRM function
When the watch receives the heart rate data from
the chest strap, it is displayed automatically.
z
Target Zone function
The watch indicates, in real time, whether your
heart rate is above, below or within the target zone.
z
Interval Timer function
It is a timer function suitable for “interval” and other
types of training.
Transition of heart rate in the latest run is displayed in
graphical form.
Log data measured in HR-CHR Mode can be displayed.
z
AT-Heart Rate (HR) is displayed.
z
Setting for AT-HR calculation can be made.
Finish time of a full/half marathon is estimated.
Two timers repeat counting down the respective set
times alternately for the set number of times.
Alarm can be set to ring at three different times of a
day.
Refer
to
PP.
6 ~ 8
PP.
9 ~ 17
P. 14
P. 15
P. 16
P. 18
PP.
19 ~ 21
P. 20
P. 22
P. 23
P. 24
Functions available in each mode
Press for more than
2 seconds.
Keeping Button “C”
pressed for more than 2
seconds in any mode
returns the display to
TIME Mode.
Button “B”:
[With each press]
Mode change
Button “B”:
[Press for more
than 2 seconds in
HR-CHR Mode]
Activation of Function
Setting Display
Button “A”
[TIME Mode]
Button “D”
Button “E”:
[Press for more
than 1 second in
HR-LOG Mode]
Display and setting of AT-HR
Press for more than
2 seconds.
Press for more than
1 second.
TIME Mode
ALARM Mode
TIMER Mode
GOAL TIME Mode
HR-CHR Mode
HR-LOG Mode
HR-GRAPH Mode
In any mode
Button “C”
AH01-WJ30WJ31英語版.ai12013/02/2421:29:30

SETTING OF TIME/CALENDAR AND OTHER FUNCTIONS
TIME MODE
●Set the current time/calendar, and the auto-backlight, contrast and “ECO” functions in theTime Setting Display.
TIME Mode
■How to Set Time/Calendar and Other Functions
6
Time Setting Display
/////
[1] Keep Button “B” pressed for more than 2 seconds in theTIME Mode. TheTime
Setting Display appears, and the Seconds digits start ashing.
[2] Press Button “A” or “D” to set the ashing digits.
[3] Press Button “E” to select the digits to be adjusted.
[
4] Repeat Steps [2] and [3] to set the digits in the order shown in the illustration below.
* If Button “A” or “D” is kept pressed for more than 2 seconds, the digits attached with “A/D”
in the illustration below move quickly.
[5] After all the adjustments are completed, press button “B” to return to theTIME
Mode. All the settings are registered in memory.
* If the watch is left untouched in the Time Setting Display with the digits ashing, the display will
automatically return to the TIME Mode in 2 to 3 minutes.
* If Button “A” or “D” is pressed while the Second digits are ashing, they are reset to “00”.
When the Seconds read any number from “30” to “59”and either of the buttons is pressed,
one minute is added.
* Once the Year, Month and Date are set, the Day of the week is set automatically.
Button “B”:
Returning to
TIME Mode
Button “B”:
[Press for more
than 2 seconds]
Activation of Time
Setting Display
* When the TIME Mode appears, “TIME” is shown in the upper row of the display for 1
second , and then, “day of the week and date” or “month and date” appear instead.
Button “A”:
Increasing digits
to be adjusted
Button “C”:
Turning on backlight
Button “D”:
Decreasing digits
to be adjusted
Button “E”:
Selection of digits
to be adjusted
Press for
more than
2 seconds. Second Minute Hour Date Month Year
12/24-hour
time system
Day of the week-date/
month-date format
“ECO” function
(See p. 7.)
Contrast
(See p. 7.)
Auto-backlight
(See p. 7.)
AH01-WJ30WJ31英語版.ai12013/02/2421:29:47

7
DETAILS OF FUNCTIONS SET IN TIME SETTING DISPLAY
TIME MODE
■Contrast Adjustment
3 2 1 0 −1 −2 −3
The contrast of the display can be adjusted in 7 levels for easy viewing.
Select the time period before “ECO” function
starts working in the following order:
■Setting of “ECO”Function
OFF 1H 3H 6H 12H
If the watch is left untouched without any button operation for a certain period of
time (1, 3, 6 or 12 hours), the display goes blank automatically to save the battery
energy.
■Changeover of display format
[ Day of the week - Date ] [ Month - Date ]
■Turning ON/OFF of Auto-Backlight
The display format of the upper row of the display can be changed over between
“Day of the week-Date” and “Month-Date”.
or
Day of the week
Date
Month
Date
* When the time period before “ECO” function works is
selected, “ECO” is shown in the lower right corner of the
display.
* When the display is blank, having been turned off by the “ECO”
function, pressing any button will turn on the display again.
* The “ECO” function is activated only when both the
chronograph and the timer are stopped and reset.
Higher Lower
When the Auto-Backlight function is turned on, the backlight automatically turns on
approximately for 2 seconds with each press of any of the buttons.
or
* When the Auto-Backlight function is turned on, the Auto-Backlight mark “ ” is
displayed on the upper left corner of the display.
* Even if the function is turned on, the button operations for data input such as those for
alarm and timer setting will not light up the backlight.
AH01-WJ30WJ31英語版.ai12013/02/2421:30:09

OTHER FUNCTIONS THAT CAN BE SET IN TIME MODE
TIME MODE
■Selection of Time Zone
■Turning ON/OFF of Button Operation Conrmation Sound Battery Life Indicator Function
8
Button Operation Conrmation Sound mark
Time Zone mark
・This function enables you to know when the battery needs to be
replaced.
・The remaining life of the battery is shown graphically in three
levels.
* The battery mark “ ” indicates that the battery is nearing
its end. When it is shown, replace the battery with a new one
immediately.
Battery mark
Button “B”:
Mode change
Button “B”:
[Press for more
than 2 seconds]
Activation of Time
Setting Display
Button “A”:
Turning ON/OFF of
Button Operation
Conrmation Sound
Button “C”:
Turning on backlight
Button “D”
Button “E”:
[Press for more
than 2 seconds]
Selection of Time Zone
(T1/T2)
With each press of Button “A”, the Button
Operation Conrmation Sound turns ON and OFF
alternately. When it is turned ON, the Button
Operation Conrmation Sound mark “ ” is
shown.
* When the display is returned to the TIME Mode, and when the data of the
latest run is displayed, and the total time display is shown in the HR-LOG
Mode, by pressing a button, the Button Operation Conrmation Sound
rings differently from usual.
With each continuous press of Button “E” for
more than 2 seconds, the time zone changes
over between T1 and T2. The dual time function
is convenient during trip abroad. The Time
Zone mark (T1 or T2) indicates the time zone
selected.
AH01-WJ30WJ31英語版.ai12013/02/2421:30:26

CHRONOGRAPH MEASUREMENT PROCEDURE
HR-CHR MODE
●During running, the watch indicates heart rate automatically besides measuring lap and split times with button operation.
■Chronograph Measurement
SPLIT2
SPLIT1
LAP1
ⒶⒶ
ⒺⒺ
LAP2 LAP10
Ⓔ
LAP3〜LAP9
Ⓔ
SPLIT10=Totaltime
SPLIT9
SPLIT3〜SPLIT8
* During measurement, stop and restart can be repeated as many times as necessary by
pressing Button “A”.
* When the chronograph is reset by pressing Button “E”, the measured data is stored in
memory as log data.
Display can be changed during measurement
■Selection of Measurement Display
●Measurement with watch alone:
●Measurement when chest strap is worn:
・Each time Button “E” is pressed to measure a lap time, the lap time measured
remains displayed for 6 seconds.
9
* While the lap time remains displayed, the lap
No. and the heart rate are shown alternately.
* Once “FULL” is displayed, no more lap data
is stored in memory (see p. 10).
*
When the lap time in progress exceeds 1
hour, the lap time indication “LP” disappears.
SPLIT2
LAP2
ⒶⒶ
* When the HR-CHR Mode appears, “HR-CHR” is shown in the upper row of the
display for 1 second, and then, the Chronograph Display appears.
Button “B”:
Mode change
Button “C”:
[Press for more
than 2 seconds]
Returning display to
TIME Mode
Button “A”:
Start/Stop
Button “C”:
Turning on backlight
Button “E”:
Lap/Reset
Button “D”:
Selection of
measurement display
Heart rate Heart rateHeart rate
Lap time
Display can be changed during measurement
Split time
* Split time is shown for 6 seconds when the
chronograph is started, stopped and reset.
Current
time*
Lap time
Split time
Lap time Split time
Lap time
Split time
Current time
Current time
■Display Immediately After Lap Time Measurement
Start Finish
Start Lap Lap Lap Stop Reset
Run
Stop Restart
Running interrupted
1*: Measurement is halted.
1*
Lap time: Time required to run any given section of the entire distance.
(Ex.: Time required to run a circuit in a track race)
Split time: Time required to run from the start to any given point of the entire distance.
(Ex.: Time required to reach 10 or 20 km point of a marathon)
Total time: Entire time to run from start to nish (excluding the time while the
measurement is halted).
Run: A running attempt measured by the chronograph from when it is
started until it is nally stopped and reset.
Lap time
Lap No.
Chronograph mark
AH01-WJ30WJ31英語版.ai12013/02/2421:30:52

・If Button “E” is pressed to measure a lap time after
the number of data in memory has reached ”300”,
“FULL” is shown instead of the lap No.
・Even when “FULL” is displayed, lap and split times
can be measured, but will not be stored in memory.
・To store new data in memory, delete unnecessary
data in the HR-LOG Mode after resetting the
chronograph.
10
STORAGE OF DATA AFTER MEASUREMENT
HR-CHR MODE
●After measurement, the measured data is stored in memory as log data.
Example of chronograph measurement
Nil 3
14
n
・By pressing Button “E” to reset the chronograph after measurement, the measured
data is stored in memory as log data.
・The measured data is stored in memory on a run-by-run basis. “Run” refers to a
running attempt measured by the chronograph from when it is started until it is
stopped and reset.
■Storage of Measured Data
・While the chronograph has been reset, pressing Button “E” in the HR-CHR Mode
will show the “LAP m.” (the number of measurement data stored in memory) while
the button is kept pressed.
■“LAP m.” (LAP Memory: Number of measurement data in memory)
■When “LAP Memory” Number has reached “300”
(For deletion of data, see p. 21.)
The number of measurement
data stored in memory is “18”.
The number of data
stored in memory has
reached “300”.
■Checking of Log Data (See p.19.)
・To check the log data stored in memory, use the HR-LOG Mode. The log data is
displayed in order of measurement or reverse order of measurement on a run-by-
run basis.
・The “LAP Memory” number accumulates each time the measurement of a run is
made.
・Up to 300 measurement data can be stored in memory. When the number of data
in memory reaches 300, the data measured thereafter cannot be stored in memory.
The table below shows the number of data stored in memory after the
measurement of one run for your reference.
While the button
is kept pressed
Start →Stop →Reset
Start →LAP-1 →Stop →Reset
Start →LAP-1 …… →LAP-n →Stop→Reset
Number of data stored
Number of
lap times
measured
3 + n
AH01-WJ30WJ31英語版.ai12013/02/2421:31:09

■To Take Exercise Safely
To minimize the risk of exercise-related disease, check your health condition
before starting exercise.
Even if you have not noticed any sign of disease in your daily life, make sure
that you have no health problem.
If you answer yes to any one of the following questions of the checklist, it is
recommended that you should consult a doctor before starting doing
exercise on a regular basis.
Checklist:
① Do you currently have a symptom of a disease, or are you undergoing
treatment of a disease?
② Do you have a medical history of a respiratory or circulatory disease, and
are you concerned about your health?
③ Do you sometimes feel pain or discomfort in your chest during daily
activities?
④ Do you sometimes feel palpitation, breathlessness, dizziness or extreme
fatigue during daily activities?
⑤ Did you recently experience a sudden weight change (either gain or loss)
in a short period of time?
⑥ Are you using a pacemaker or any other implantable electronic medical device?
⑦ Are you pregnant?
zThe heart rate measured during exercise is affected not only by the
intensity of the exercise but also by the extent of strain felt by the
exerciser, temperature, medicine taken before exercise (hypotensive,
antasthmatic, psychotropic, or other drugs), or intake of alcohol, nicotine,
or some types of energy drinks.
zThe AT-Heart Rate calculated by this product and the heart rate zone
indications given by the Target Zone function serve as a measure of
intensity of training and a guideline for race pace. However, the exercise
intensity and the running pace provided by this product are for guideline
purposes only, and should not be followed indiscriminately by the user.
If the intensity of the exercise or running is felt hard, it is recommended
that it should be stopped, or the intensity or the pace should be reduced.
zIf you feel unexpected chest pain or breathlessness during exercise, stop
it immediately. If the symptom persists after a short rest, it is
recommended that you should consult your doctor.
zIf you have not exercised regularly for more than 5 years, you are
recommended to start exercise with walking (especially if you are over 40
years of age). When you have become able to walk for more than 30
minutes on end, increase the time and distance of running gradually, for
example, by walking for 5 minutes and running for 5 minutes at rst, and
walking for 5 minutes and running for 10 minutes next time.
zBefore starting exercise, perform sufcient warm-up and stretching
exercises. If you have a rather sedentary lifestyle, they should be
performed particularly painstakingly.
zNever use this product if you are using a pacemaker or any other
implantable electronic medical device.
zIf you are allergic to something that comes into contact with your skin, or
if you have experienced an allergic reaction when using a similar type of
product, you are recommended to refer to P. 25 of this manual to check
the materials used for this product, and consult your doctor for advice.
zIf the chest strap rubs strongly against moist clothing, it may stain the
clothing due to color transfer. Special care should be taken when
wearing light-colored clothing.
■Safety Precautions
11
THIS PRODUCT IS NOT A MEDICAL DEVICE
zThis product is designed to monitor the heart rate during running for the
purpose of enhancing training effect, and is not intended for use in
treatment of any disease.
zIt should be noted that the heart rate values indicated by the watch serve
as a general guideline only, as they vary widely from person to person
depending on personal physical constitution, and even in one person
depending on the day-to-day physical condition.
zNever use the chest strap in water, such as in a pool.
TO MEASURE HEART RATE - 1 : HEALTH CHECK BEFORE RUNNING
HR-CHR MODE
●If you do not usually play sports or have a rather sedentary lifestyle, the types of exercise and running recommended to be performed with the Heart Rate
Monitor Watch may be hazardous to your health.
ὲ
CAUTION
AH01-WJ30WJ31英語版.ai12013/02/2421:31:32

12
●To prevent injuries and make your training more effective, perform sufcient warm-up and stretch exercises before starting running. They are particularly
important for those who have sedentary lifestyle, and should be performed painstakingly.
■Before Starting Exercise
Stretching is one of the most important warm-up exercises. It can alleviate
the strain of muscles, and increase the range of motion of joints.
The following are the stretching exercises typically performed before
starting running or walking.
1. Stretch whole body.
Stand with the feet shoulder-width apart, and put the hands on the back
of the head with the ngers interlocked. Then, slowly stretch straight
upwards.
2. Stretch the waist.
Stand with the feet shoulder-width apart, and put the hands on the back
of the head with the ngers interlocked. Then, lean the upper body
slowly sideways.
3. Rotate the shoulders (to a larger extent).
Make circles with the arms by moving them from the back of the body
to the front, and then, in the opposite direction, so that you feel the
shoulder blades move to a large extent.
4. Rotate the shoulders (to a smaller extent).
Place the hands on the shoulders. Make circles with the elbows by
moving them from the back of the body to the front, and then, in the
opposite direction, so that you feel the shoulder blades move.
5. Stretch the groin.
Place one foot in front of you away from the other.
While keeping the
back leg straight
, slowly lower the hips so that you feel a stretch in the
groin of the back leg, taking care lest the knee of the front leg should go
beyond the toes.
6. Stretch the back of the thigh.
Place one foot in front of you away from the other.
While keeping the
front leg straight
, slowly bend the upper body by thrusting out the hips,
so that you feel a stretch in the back of the thigh and calf of the front leg.
TO MEASURE HEART RATE - 2 : WARM-UP BEFORE RUNNING
HR-CHR MODE
7. Stretch the Achilles tendon.
Place one foot in front of you
away from the other.
While keeping the
back leg straight, slowly move the hips forward until you feel a stretch
in the calf and the Achilles tendon of the back leg. Keep the heel of the
back foot at on the ground.
8. Stretch the front of the thigh.
Standing straight on one leg, hold the top of the other foot with the
hand of the same side. Slowly pull the heel toward the buttock.
1. Stretch whole body. 2. Stretch the waist.
5. Stretch the groin.
6. Stretch the back of
the thigh.
7. Stretch the Achilles
tendon.
8. Stretch the front of
the thigh.
3.Rotate the shoulders
(to a larger extent).
4.Rotate the shoulders
(to a smaller extent).
AH01-WJ30WJ31英語版.ai12013/02/2421:31:50

13
TO MEASURE HEART RATE - 3 : WEARING CHEST STRAP
HR-CHR MODE
●To measure your heart rate, it is necessary to wear the chest strap. Wear it securely before starting running.
■Procedure of Wearing Chest Strap
Chest circumference
below breast
〜75 cm/〜29 inches 40 cm/16 inches
75〜80 cm/29〜31 inches 44 cm/17 inches
80〜85 cm/31〜33 inches 48 cm/19 inches
85〜90 cm/33〜35 inches 52 cm/21 inches
90〜95 cm/35〜37 inches 56 cm/22 inches
95〜100 cm/37〜39 inches 60 cm/24 inches
100〜105 cm/39〜41 inches 64 cm/25 inches
105〜110 cm/41〜43 inches 68 cm/27 inches
110〜115 cm/43〜45 inches 72 cm/28 inches
115〜120 cm/45〜47 inches 76 cm/30 inches
Length of rubber strap
■Adjustment of Rubber Strap Length
1. Moisten the electrode portions on both sides
of the inner surface of the sensor unit
sufciently with water.
2. Adjust the length of the rubber strap.
3. Wear the chest strap just below the breast,
and adjust the length lest it is fastened too
tightly around your chest. Also, check that
the electrode portions are kept in secure
contact with your skin.
M size strap (with black stitching)
●Take care not to shorten the rubber strap too much to wear the chest
strap too tightly around your chest, as this may cause you to feel sick,
putting pressure on your heart. If you nd the chest strap too tight,
loosen the rubber strap immediately.
●The rubber strap is consumable. Its elasticity reduces with use, and the
chest strap will not t well around your chest even if its length remains
the same. If you nd the chest strap loose around your chest, shorten
the rubber strap length for secure t.
●If you feel the chest strap still loose around your chest after shortening
the rubber strap length, the rubber strap has reached the end of its
serviceable life. It is recommended that a new rubber strap be
purchased at the retailer from whom your HRM Watch was purchased.
ὲ
CAUTION
ὲ
WARNING
Adjust the length of the rubber strap so that it ts comfortably and securely around
your chest.
Rubber strap length
* Separately-sold S size rubber
strap is also available
(product No.: CQAZ0102).
It ts a chest circumference
of 63 ~ 95 cm / 25 ~ 37 inches.
AH01-WJ30WJ31英語版.ai12013/02/2421:32:11

14
HR-CHR MODE
●When the chest strap measures heart rate while the watch is in the HR-CHR Mode, the heart rate data is transmitted to the watch and displayed automatically.
The measurement condition of the heart rate is indicated by a “heart shape.”
■Auto-HRM (Heart Rate Monitor) Function ■Heart Rate Indication and “Heart Shape”
■HR-CHR Mode Displays When Watch is Used Alone and
with Chest Strap
●When the watch is used with the chest strap:
●When the watch is used alone: Open heart shape
■Measurement Condition Checking Function
●When any noise is detected:
●When heart rate is not measured properly:
By wearing the chest strap while the watch is in the HR-CHR Mode, the heart rate data
is measured and transmitted to the watch, and displayed automatically.
* For the method of disabling the Auto-HRM function to use the watch alone at all times,
see p. 17.
TO MEASURE HEART RATE - 4 : HEART RATE INDICATION AND MEASUREMENT CONDITION CHECKING FUNCTION
Measurement
with watch
alone
Wearing
chest strap
Heart rate data
Heart rate is not displayed.
An open heart shape is
shown in the upper right
corner of the display.
Communication mark Heart rate
* When the chest strap is worn on your chest, the “communication mark” appears,
and the heart rate is shown in 2 seconds.
* When the chest strap is removed from your chest, the watch will automatically
show the display for single use in approximately 2 minutes.
* Even while the chest strap is worn on your chest, the watch will automatically
show the display for single use if it is left untouched for more than 12 hours without
pressing any button.
Heart shape Heart rate
The heart shape indicates the measurement condition of the
heart rate as follows:
A solid heart shape is shown when the heart rate is
measured properly.
An open heart shape is shown when the heart rate is not
measured properly (when the chest strap is not worn
appropriately, for example).
When any noise is detected, or when the heart rate is not measured properly, the
heart shape indicates the measurement condition as follows:
[Heart rate is measured properly]
Noise is detected
These indications
are shown in
order repeatedly
until the noise
disappears.
[Good measurement
condition]
[Poor measurement
condition]
[Heart rate in abnormal
range is detected]
* Possible cause of the noise:
・Another heart rate monitor product is used
within 1 m radius around you.
・An electronic device emitting radio wave is
placed near you.
* When a noise is detected, accurate
measurement of heart rate may not be made
constantly.
* The open heart shape indicates that the heart
rate shown on the display is not accurate.
* The heart rate within the range between 30 and
220 bpm is considered normal. If any heart rate
outside this range is measured, “- - -” is
displayed.
AH01-WJ30WJ31英語版.ai12013/02/2421:32:27

TARGET
ZONE
ZONE
15
■Customization of Target Zone Function
■Indication of Current Heart Rate Level
■Target Zone Function
TO MEASURE HEART RATE - 5 : TARGET ZONE FUNCTION
HR-CHR MODE
●The watch indicates whether your heart rate is above, within or below the target heart rate zone during measurement.
The watch indicates, in real time, whether your heart rate while running is above,
within or below the target heart rate zone which includes the AT-Heart Rate at its
center.
For the details of the training method based on the target heart rate zone, please
refer to the “Training Book.”
Target heart rate (”TARGET”) : The center value of the target heart rate zone
(Initial setting: AT-Heart Rate)
Zone width (”ZONE”) : The width above or below the target heart
rate within the target heart rate zone
(Initial setting: “7”)
Heart rate
“HI” Zone
Target heart rate zone
“IN” Zone
“LO” Zone
Once the data input is performed to calculate your AT-Heart Rate in the HR-LOG
Mode (see p. 20), the target heart rate (”TARGET”) and the zone width (”ZONE”) of
the Target Zone function is automatically set to your AT-Heart Rate and “7”,
respectively.
To customize the Target Zone function to meet your needs, input desired the target
heart rate (”TARGET”) and the zone width (”ZONE”) in the Function Setting Display
of the HR-CHR Mode (see p. 17).
●The level of your heart rate is indicated by the heart shape and alphabets.
Ex.): When the target heart rate (”TARGET”) and the width above or below the
target heart rate (”ZONE”) are set to “149” and “7”, respectively:
Heart rate is above the target zone.
Heart Rate Zone Level of Current Heart Rate Zone Indication
“HI” Zone
“IN” Zone
“LO” Zone
Heart rate is within the target zone.
Heart rate is below the target zone.
* The upper and lower limits of the “IN” Zone is “156” and “142”, respectively.
When the current heart rate measures “180”, it is above the upper limit of the
“IN” Zone, and “HI” is displayed, whereas “LO” is displayed when your heart rate
is “120” as it is below the lower limit of the “IN” Zone.
* When neither the AT-Heart Rate nor the target heart rate (”TARGET”) has been
set, the Target Zone function will not work, and the zone indication will not be
displayed.
AH01-WJ30WJ31英語版.ai12013/02/2421:32:45
Table of contents
Other ASICS Watch manuals