Asko SVK67CS HCI643G User manual

Operating instructions
SVK67CS HC1643G

EN
Manual EN 3 - EN 27
Pictograms used
Important information
Tip

EN 3
CONTENTS
Your ceramic hob
Introduction 4
Control panel 5
Description 6
Safety instructions
What you should pay attention to 7
Connection and repair 7
During use 7
Cooking time limiter 9
Use
Using the touch controls 10
Pans 10
Operation
Switching on 12
Setting the power 12
Switching off 12
Residual heat indicator 13
Zone function 13
(Child) lock 14
Kitchen / Egg timer 15
Automatic heat-up function 17
Cooking
Healthy cooking 19
Cooking settings 20
Maintenance
Cleaning 21
Faults
General 22
Troubleshooting table 22
Installation
What you need to consider 24
Electrical connection 28
Building in 29
Technical details 30
Environmental aspects
Disposal of packaging and appliance 31
original instruction

EN 4
Introduction
This hob has been designed for the real lover of cooking. The
hob is equipped with ‘Cooklight’ elements. These are very rapid-
heating, radiant elements with a high efficiency, which is very
favourable for heating-up times. What’s more, these elements also
have very good heat distribution. The ample space between the
cooking zones makes cooking comfortable.
Cooking on a ceramic hob is different from cooking on a traditional
appliance. Ceramic cooking makes use of heat radiation through
the glass top.
For optimum safety the ceramic hob is equipped with a child lock,
a cooking time limiter and a residual heat indicator, which shows
which cooking zones are still hot.
This manual describes how you can make the best possible use of
the ceramic hob. In addition to information about operation, you
will also find background information that can assist you in using
this product. You will also find cooking tables and maintenance
tips.
Read the manual thorougly before using the appliance, and
store these instructions in a safe place for future reference.
The manual also serves as reference material for service
technicians. Please, therefore, stick the appliance identification
card in the space provided, at the back of the manual. The
appliance identification card contains all the information that the
service technician will need in order to respond appropriately to
your needs and questions.
Enjoy your cooking!
YOUR CERAMIC HOB

EN 5
Control panel
YOUR CERAMIC HOB
J D
C1 B1
F
F1
I H C B AG
LK
E
Control sensor keys:
A Cooking hob on/off sensor
B Child lock sensor
B1 Child lock signal light
C Stop & Go sensor (temporary cooking progress suspension
sensor key)
C1 Stop & Go signal light
D Alarm or timer setting sensor
E Cooking zone expansion indicator light
F Power level / residual heat displays
F1 Active function decimal point
G Increase value / setting sensor
H Cooking zone selection sensor
I Decrease value / setting sensor
J Cooking zone expansion on/off sensor
K Switch-off timer indication light
L Time display

EN 6
YOUR CERAMIC HOB
Description
1
2
3
5
4
1. Cooking zone rear left 1200 W / ø 145
2. Cooking zone front left 2200 W / ø 210, ø 120
3. Cooking hob control unit
4. Cooking zone front right 1200 W / ø 145
5. Cooking zone rear right 1700 W / ø 180, ø 120

EN 7
What you should pay attention to
• Ceramic cooking is extremely safe. Various devices have been
incorporated in the hob such as a residual heat indicator and
a cooking time limiter. There are nevertheless a number of
precautions you should take.
Connection and repair
• This appliance may only be connected by a qualified installer.
• Never open the casing. The casing may only be opened by an
authorized service technician.
• Disconnect the electricity from the appliance before starting
any repair work. Preferably unplug the appliance, switch
the (automatic) fuse(s) off or, in the event of a permanent
connection, set the switch in the power supply lead to zero.
• When the cable is damaged it may only be replaced by the
manufacturer, its service organization or equally qualified
persons, to avoid dangerous situations.
During use
• WARNING: The appliance and its accessible parts become hot
during use. Care should be taken to avoid touching heating
elements. Children less than 8 years of age shall be kept away
unless continuously supervised.
• This appliance can be used by children aged from 8 years and
above and persons with reduced physical, sensory or mental
capabilities or lack of experience and knowledge if they have
been given supervision or instruction concerning use of the
appliance in a safe way and understand the hazards involved.
Children shall not play with the appliance. Cleaning and user
maintenance shall not be made by children without supervision.
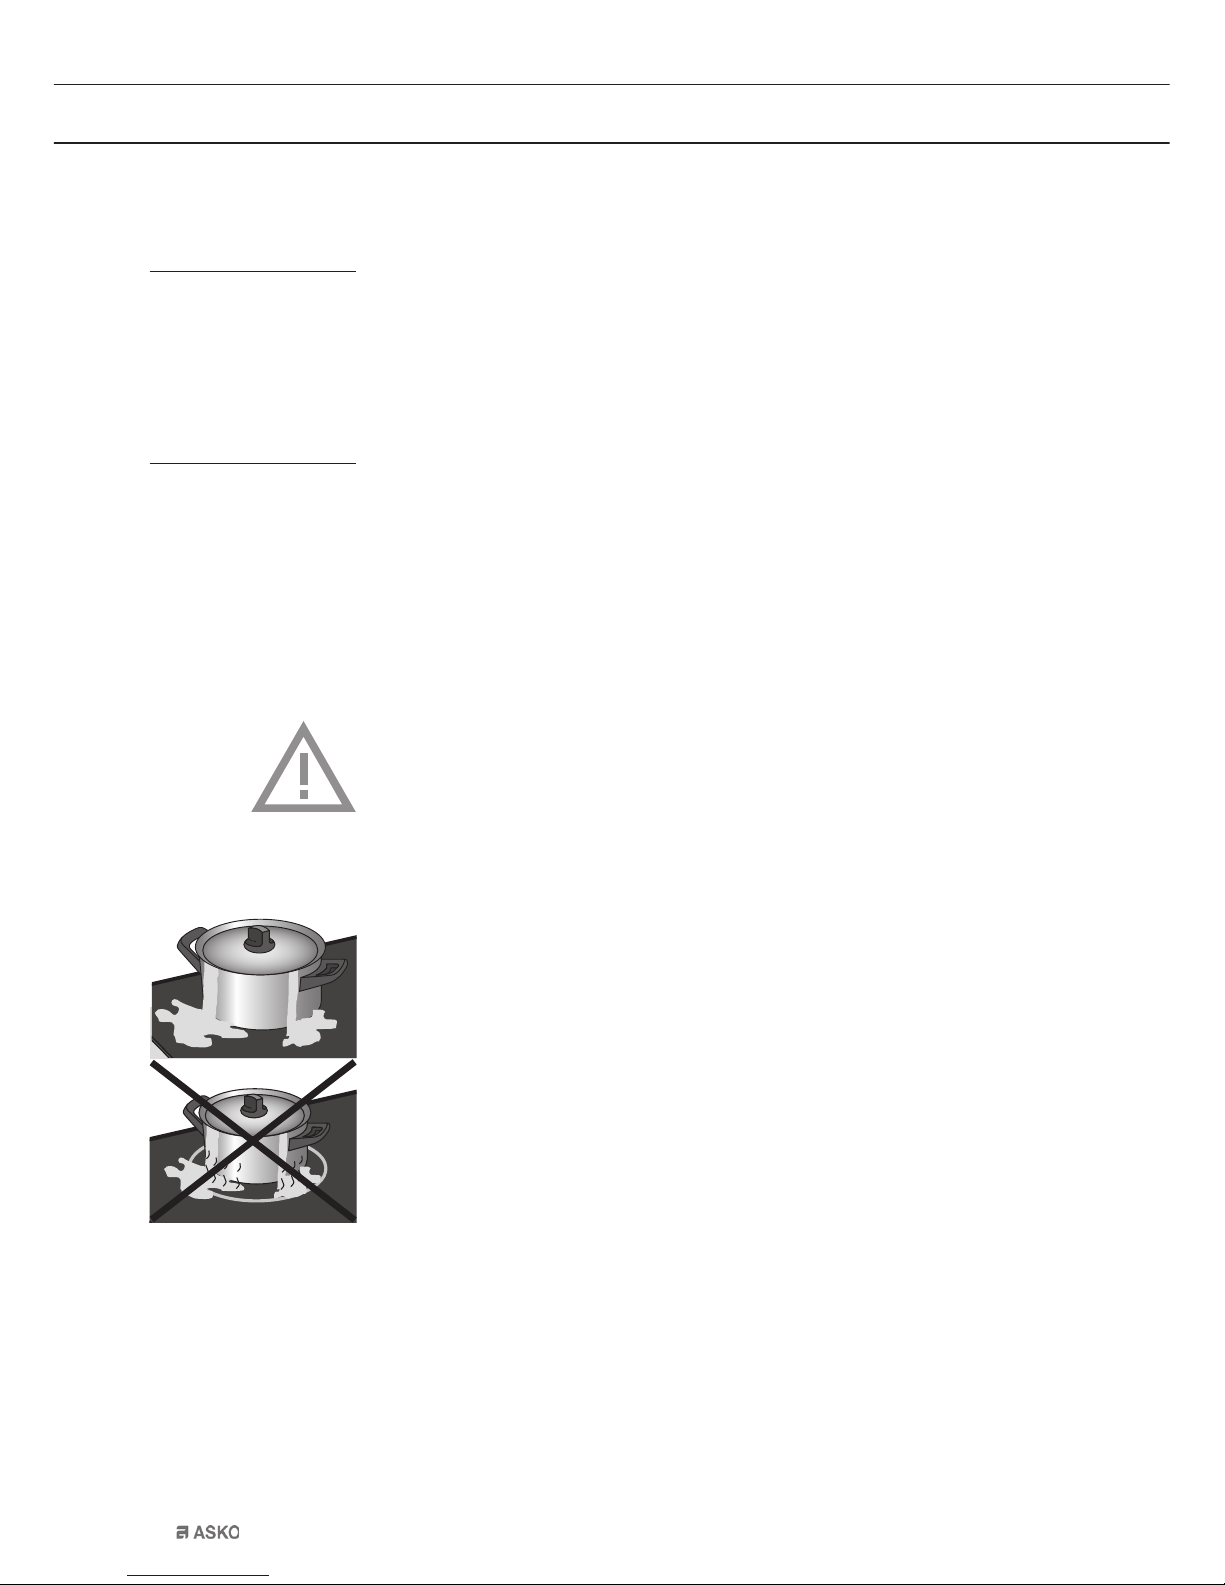
• WARNING: Unattended cooking on a hob with fat or oil can be
dangerous and may result in fire. NEVER try to extinguish a fire
with water, but switch off the appliance and then cover flame
e.g. with a lid or a fire blanket.
• WARNING: Danger of fire: do not store items on the cooking
surfaces.
• WARNING: If the surface is cracked, switch off the appliance to
avoid the possibility of electric shock.
SAFETY

EN 8
• This cooking appliance is designed for household use. It is to
be used for food preparation only.
• When you use the hob for the first time you will notice a “new
smell”. This is normal. If the kitchen is well ventilated the smell
will soon disappear.
• Do not leave the hob unattended if you are using a zone on a
high setting.
• Ensure there is adequate ventilation while the hob is in use.
Keep all natural ventilation openings open.
• Do not allow pans to boil dry. The hob itself is protected
against overheating but the pan will get very hot indeed and
could be damaged. The guarantee does not cover any damage
caused by a pan boiling dry.
• Make sure that flexes of electrical appliances, such as a mixer,
cannot touch the hot cooking zone.
• Never flambé food under the cooker hood. The high flames
could cause a fire, even if the cooker hood is switched off.
• The ceramic top is extremely strong, but not unbreakable. A
spice jar or pointed utensil falling on it, for example, could
cause it to break.
• Never use a pressure cleaner or steam cleaner to clean the
hob.
• The appliance is not intended to be operated by means of an
external timer or separate remote-control system.
SAFETY

EN 9
Cooking time limiter
• The cooking time limiter is a safety function of your cooking
appliance. It will operate if you forget to switch off your hob.
• Depending on the setting you have chosen, the cooking time
will be limited as follows:
Setting The cooking zone switches off
automatically after:
U6 hours
16 hours
26 hours
3 5 hours
4 5 hours
5 4 hours
6 1,5 hours
7 1,5 hours
8 1,5 hours
9 1,5 hours
The cooking time limiter switches off the cooking zones when the
time in the table has elapsed.
SAFETY

EN 10
USE
Using the touch controls
The touch controls may take some getting used to if you are used
to other (rotary) controls. Place the tip of your finger flat on the
control to achieve the best results. You do not have to apply any
pressure.
Pans
Pans for ceramic cooking
Ceramic cooking requires a particular quality of pan.
Attention
• Only use pans that are suitable for electric cooking with:
▷a thick base (minimum 2.25 mm);
▷a flat base.
Attention
Be careful with enamelled sheet-steel pans:
• the enamel may chip (the enamel comes loose from the steel),
if you switch the hob on at a high setting when the pan is (too)
dry;
• the base of the pan may warp - due to, for example,
overheating or the use of too high a power level.
Attention
• Do not use pans that are smaller than the cooking zone. This
will prevent food remains ending up on the red-hot cooking
zone. Burnt-on food remains are difficult to remove. In addition,
the handles may become too hot and a lot of energy is lost.
• Do not use aluminium foil, such as the trays from ready-made
meals, for cooking food in. If aluminium foil melts on the
cooking surface, it cannot be removed. Aluminium foil is also a
very poor conductor of heat.

EN 11
USE
Attention
• Grains of sand may cause scratches which cannot be removed.
Only put pans with a clean base on the cooking surface and
always pick pans up to move them.
•
Always keep the lid on the pan when cooking, in order to avoid
energy loss.
Tip
• Slide the bottom of the pan over a slightly damp cloth, before
placing the pan on the cooking zone. This prevents dirt getting
on to the cooking surface.
• The cooking zone can be switched off 5 to 10 minutes before
the end of the cooking time. The dish will then finish cooking on
the residual heat, provided you keep the lid on the pan.

EN 12
General
• The cooking hob is fitted with electronic sensor keys which
are activated, respectively, when the indicated surface of
a particular sensor is touched with a finger for at least one
second.
• Activation of a sensor key is confirmed by a beep.
• Do not place any objects on the sensor key surface (this may
• trigger error reports).
• Make sure the sensor key surface is always clean.
Turning on the cooking hob
• Touch the on/off sensor key (A) and hold it for at least one
second. The cooking hob is activated; a “0” is displayed next to
all power level displays (F), and a decimal point (F1) is flashing.
Any subsequent setting must be carried out within the following 10
seconds; otherwise, the cooking hob will be automatically switched
off again.
Turning on the cooking zones
• If the cooking hob was turned on with the on/off sensor key (A),
the desired cooking zone may be activated in the following 10
seconds. To do this, touch the (H) sensor key. A decimal point
(F1) will light up next to the power level display of the currently
selected cooking zone.
• Touch the “+” sensor key (G) to set the power level 1-9. If the
key “–” (I) is touched first, the setting 9 is selected immediately.
When the “+” (G) or “–” (I) sensor key are pressed and held, the
levels will automatically start decreasing or increasing. Power level
can also be changed by touching these two sensor keys several
times; in this case, the power level is changed stepwise.
Settings can only be made for one selected cooking zone at a time
– the one indicated by the decimal point (F1).
• If all power levels are set to “0”, the cooking hob will be turned
off automatically after 10 seconds.
OPERATION
C1 B1
C B A
J DF
F1
I H G
LK
E

EN 13
Changing the cooking zone power level
• Select the cooking zone by pressing / touching the (H) sensor
key. A decimal point (F1) will light up on the display of the
selected cooking zone (F).
• Press the “+” (G) or “–” (I) sensor key to change the power
level.
Keep warm function
• By operating the - (I) sensor, another heat setting – the
Warming Plate Function -“u” can be chosen.
• Select from heat setting “1” the ‘Keep warm function’ by
pressing the - sensor. On the display appears a small “u”.
• The purpose of the keep warm function is to keep warm the
food that is already cooked.
Turning off the cooking zones
• Select the cooking zone by pressing the relevant sensor key
(H). The decimal point (F1) next to the display for the selected
cooking zone will light up.
• Press the “–” (I) sensor key to set the power level to “0”.
• Quick power off: the power level can be instantly set to “0”
by pressing the “+” (G) sensor key and “–” (I) sensor key
simultaneously.
Turning off the cooking hob
• The cooking hob may be turned off at any time by pressing the
on/off sensor key (A).
• All indicators go off, except for the remaining, or residual, heat
indicators “H” which are lit on the displays for those cooking
zones that are still hot.
• If the cooking zone is turned off before the end of the cooking
process, the residual heat is used, which saves some power.
Activating the child lock
By activating the child lock, the operation and use of the cooking
zones is prevented. This way, children will not be able to activate
the cooking hob.
OPERATION
J DF
F1
I H G
LK
E
J DF
F1
I H G
LK
E

EN 14
OPERATION
Activating the child lock
• Activate the child lock by holding the (B) sensor key for
approximately three seconds; the (B1) signal light will light up.
• Child lock can be activated when the cooking zone is operating.
• Child lock prevents activation of any sensor key, except for the
main switch (A) and the child lock sensor key (B).
Deactivating the child lock
• Child lock can be deactivated, or disengaged, by holding the
(B) sensor key for three seconds. A beep will sound when the
lock is disengaged and the signal light above the sensor key
will go off.
Residual heat indicators
As soon as a hot coking zone is switched off, or when the entire
cooking hob is turned off, the following is displayed on the display
of each hot cooking zone:
• “H” if the cooking zone is still hot;
• “h” if the cooking zone is cooling down and is warm to touch.
The duration of this display is calculated given the power level and
depends on how long the cooking zone has been activated. When
the “H” or “h” sign goes off, the cooking zone may in some cases
(power failure, a hot pan left on the cooking zone) still be hot. Be
careful, as there is a risk of burning.
If a power failure has occurred when the cooking zones were
hot, the indicator “H” or “h” will flash. This is to warn you
that the cooking zone may still be hot, but not necessarily,
depending on how long the power supply was out of order. The
hob can be used normally. ‘H’ will disappear after 35 minutes.
Automatic cook function
When this function is activated, the cooking zone will operate at the
highest possible level for a certain period of time, depending on the
selected power level; after this, the cooking zone will automatically
switch to the initially selected level and continue operating.
The autocook function may be activated for each cooking zone,
for any power level, except for power level “9”, as in this case the
cooking zone is constantly operating at full power.
C1 B1
C B A

EN 15
Activating the autocook function
• Set the power level to 9.
• Press the “+” (G) sensor key. Indications “A” and “9” are shown
on the display alternately.
• Reduce the power level to the desired level at which the
cooking is to continue.
The symbol “A” and the selected power level will be indicated
alternately on the display. When the autocook function has expired,
the cooking zone will switch automatically to the selected level
which is then indicated permanently on the display.
If the power level is changed during the autocook function on a
particular cooking zone, the autocook function is immediately
deactivated.
Dish/cooking
mode
quantity power
level
cooking
duration (min)
Soup/
reheating
0,5 – 1 lit A7 - 8 4 - 7
milk/reheating 0,2 – 0,4 lit A1 - 2 4 - 7
rice/simmering 125 – 250 g
approx. 300ml -
600ml water
A2 - 3 20 - 25
cooked jacket
potatoes
750g – 1,5 kg
approx. 600ml –
900ml water
A5 - 6 25 - 38
fresh
vegetables/
boiling
0,5 – 1 kg
approx. 400ml –
600ml water
A4 - 5 18 - 25
• The table lists the examples of some dishes for which the auto
cook function is appropriate.
• The values indicated are approximate and depend on other
parameters (e.g. type and quality of cookware, quantity of
additional water, etc.).
• Minor quantities are indicated for smaller cooking zones and major
quantities apply to larger cooking zones.
• Cook in pots covered with lids on the two smaller cooking zones
back left, front right, or on the double cooking zone front left.
OPERATION
J DF
F1
I H G
LK
E

EN 16
Cooking zone expansion
Activating the cooking zone expansion
• For a selected cooking one (a decimal point is lit next to the
display for the currently selected zone), an additional heating
coil can be activated by pressing the (J) sensor key. The signal
light (E) next to the display will light up.
• Select the cooking zone for both heating coils.
• If a cooking zone also features a third heating coil, this can also
be engaged by pressing the (J) sensor key once again.
Deactivating the additional heating coil
• Select the cooking zone (a decimal point is lit next to the
display for the currently selected zone).
• Additional heating coil may be deactivated by pressing the (J)
sensor key for the selected cooking zone several times.
Operation time limit
For improved safety, your cooking hob is fitted with a device that
limits the duration of the cooking hob operation for each cooking
zone respectively. The duration of operation is measured from
the last change made to the power level settings for a particular
cooking zone. If the power level is not changed for a while, the
cooking zone will automatically be switched off after a certain
period of time which depends on the power level (the higher the
power level, the shorter the duration – see table page 9).
Temporary cooking progress suspension- STOP & GO
The STOP & GO function enables you to temporarily suspend, or
pause the cooking progress (urgent other tasks), while keeping all
the settings.
Engaging the STOP & GO function
• Cooking is temporarily suspended by touching the STOP & GO
(C) sensor key.
• A signal light (C1) will light up above the sensor key.
• All settings are frozen, and the cooking zones do not operate.
The letters S, t, O, and P are indicated alternately on the
display.
OPERATION
J DF
F1
I H G
LK
E

EN 17
Resuming the cooking progress
• The cooking hob will continue to operate when the STOP & GO
(C) sensor key is pressed again.
• Signal light (C1) goes off.
If the STOP & GO function is not deactivated in 10 minutes, the
entire cooking hob will be switched off automatically.
Program timer
The cooking hob features two types of timer functions:
Aegg-timer-function – countdown without the switch-off option
Bswitch-off function – countdown with the switch-off option
for respective cooking zones.
A Egg-timer-function:- countdown without switching off the
cooking zone
The timer warns you that the time set has elapsed, but does not
turn off the cooking zone. The alarm timer can be set when the
cooking hob is on.
• Press the timer sensor key (D) to activate the timer. “00” is
displayed on the timer display (L) and the decimal point (F1) is
lit.
• Press the “+” (G) and “–” (I) sensor keys to set the time in the
range from 1 to 99 minutes.
• After the set time has elapsed, an alarm will sound, but the
cooking zone will not be turned off.
• Acknowledge and turn off the alarm by pressing any sensor
key; if this is not done, the alarm will stop after a certain period
of time.
• Egg timer function will remain active also after the hob is
switched off with button (A).
OPERATION

EN 18
OPERATION
B Switch-off function timer
The switch-off timer facilitates the cooking process by allowing you
to set the cooking time for a particular cooking zone. In order to set
the switch-off timer, the power level must already have been set
(see section “Turning on the cooking zones”).
• Press the timer sensor key (D) to activate the timer. “00” is
displayed on the timer display (L) and the decimal point (F1)
is lit. When the (D) sensor key is pressed again, the (K) point
indicating the selected cooking zone, starts flashing.
• As long as the decimal point is lit, sensor keys “+” (G) and
“–” (I) can be used to set the time in the range from 1 to 99
minutes. IF the sensor key is pressed and held, the rate at
which the timer setting is changing will be increased after a
while.
• When the value was set, the countdown starts. The
corresponding point (K) is still flashing, indicating the selected
cooking field.
Cooking time can be set for each cooking zone independently.
If several timers have been programmed, the time that is closest to
zero will always be displayed. This is indicated by a flashing signal
light (L) which indicates the cooking field.
Changing the timer setting
• Timer setting can be changed any time during operation.
• Press the timer sensor key (D) to display the remaining time for
the selected cooking field. The corresponding signal light (K)
will flash.
• Press the “+” (G) or “–” (I) sensor key to set the new cooking
time.
Checking the remaining cooking time
• If several timers are set, the remaining cooking time can be
displayed by touching the (D) sensor key.
J DF
F1
I H G
LK
E

EN 19
COOKING
Switching off the timer
After the set time has elapsed, an alarm will sound and the cooking
zone will be turned off. The value “00” flashes on the timer display.
Switch off the alarm by pressing any sensor key; if this is not done,
the alarm will go off after a certain period of time.
To deactivate the timer before the set time has elapsed:
• Select the desired timer display (see section Changing the timer
setting) – the set time and the corresponding dot that indicates
the cooking field will flash.
• Press the “–” (I) sensor key to set the value to “00”, or press the
“+” (G) and “–” (I) sensor key simultaneously, to reset the value
to zero immediately.
J DF
F1
I H G
LK
E

EN 20
Cleaning
Tip
Set the (child) lock before you start cleaning the hob.
Daily cleaning
• Best for daily cleaning is a damp cloth with a mild cleaning
agent.
• Dry with kitchen paper or a dry teacloth.
• Special cleaning agents for ceramic hobs have the advantage
that a thin layer remains on the glass surface so that over-
cooked food and lime scale are less likely to get burnt into the
hob, making it easier to clean the next time.
• It is best to let the hob cool down before cleaning it.
• Over-cooked food containing a lot of sugar and acids, such
as apple sauce, rhubarb or red cabbage are best removed
immediately with a damp dish cloth to prevent them getting
burnt into the hob. Be careful with the hot cooking zone!
Stubborn stains
• Stubborn stains can also be removed with a mild cleaning
agent such as washing-up liquid.
• Remove water marks and lime scale with vinegar.
• Metal marks (caused by sliding pans) can be difficult to remove.
Special agents are available.
• Use a glass scraper to remove food spills. Melted plastic and
sugar is also best removed with a glass scraper.
Never use
• Never use abrasives. They leave scratches in which dirt and
lime scale can accumulate.
• Never use anything sharp such as steel wool or scourers.
MAINTENANCE
Table of contents
Other Asko Kitchen Appliance manuals

Asko
Asko Hg1984a User manual

Asko
Asko RWFN2826S User manual

Asko
Asko RWFN2684SL User manual

Asko
Asko ODV8128G User manual

Asko
Asko WCN311942G User manual

Asko
Asko ODV8127 Series User manual

Asko
Asko 2002 Vrs 2.0 User manual

Asko
Asko O870S User manual

Asko
Asko WCN25842G User manual

Asko
Asko WCN15842G User manual
Popular Kitchen Appliance manuals by other brands

Hamilton Beach
Hamilton Beach 59998 user manual

CENTRAL RESTAURANT PRODUCTS
CENTRAL RESTAURANT PRODUCTS 69K-143 Service, installation and care manual

Capitani
Capitani Vapor 3000A Plus Instructions for use

CombiSteel
CombiSteel 7455.1095 user manual

Berkel
Berkel RED LINE 220 user manual

Sinbo
Sinbo SK 7381 instruction manual