Asko RWFN2684SL User manual

Instructions for use
Wine cooler with a freezer compartment
RWFN2684SL
RWFN2684BL

2
577323
We thank you for the
confidence you have shown by
purchasing our appliance.
We wish you find a lot of pleasure in it
use.
The appliance is intended solely for
household use.
The wine cooler with a freezer
compartment /ZeroZone compartment
(hereinafter referred to as the appliance)
consists of two parts. The upper part is
the wine cooler, and the lower part is the
freezer/ZeroZone compartment.
The wine cooler is intended for wine
storage.
The freezer compartment is intended
for freezing fresh food and for long-term
storage of frozen food (up to one year,
depending on the type of food).
The entire freezer compartment can be
turned into a ZeroZone compartment
with a temperature around 0 °C.

3
TABLE OF CONTENTS
577323
INTRODUCTION
APPLIANCE
DESCRIPTION
DEFROSTING
AND CLEANING
THE APPLIANCE
OTHER
STORING AND
FREEZING FOOD
4 IMPORTANT NOTES AND WARNINGS
8 ADVICE FOR SAVING POWER WITH REFRIGERATION
APPLIANCES
9 APPLIANCE DESCRIPTION
10 INSTALLATION AND CONNECTION
12 CHANGING THE DIRECTION OF DOOR OPENING
14 OPERATING THE APPLIANCE
19 APPLIANCE INTERIOR EQUIPMENT
22 STORING FOOD IN THE ZEROZONE COMPARTMENT
24 FREEZING AND STORING FROZEN FOOD
24 Freezing process
25 Important warnings on freezing fresh food
25 Storage of industrially frozen food
26 Frozen food storage time
26 Defrosting frozen food
27 DEFROSTING THE APPLIANCE
28 CLEANING THE APPLIANCE
29 TROUBLESHOOTING
31 INFORMATION ABOUT APPLIANCE NOISE

4
IMPORTANT NOTES AND
WARNINGS
577323
This appliance can be used by children aged from 8
years and above and persons with reduced physical,
sensory or metal capabilities or lack of experience
and knowledge if they have been given supervision or
instruction concerning use of the appliance in a safe
way and understand the hazards involved.
Children shall not play with the appliance.
Cleaning and user maintenance shall not be made by
children without supervision.
Before connecting the appliance to the power mains,
please read carefully the instructions for use which
describe the appliance and its correct and safe use. The
instructions apply for several appliance types/models;
thus, settings or equipment may be described herein
which is not available in your appliance. The instruction
manual includes the NO FROST version/model of
the freezer which is fitted with a fan and in which the
defrosting process is automatic.
Remove the packaging intended for protecting the
appliance or particular parts during transport.
Spacers are fitted on the
corners of the doors.
Remove them and insert
the supplied plugs into
their slots (only in some
models).

5
577323
Before connecting the appliance to the power
mains, let the appliance rest in a vertical position for
approximately 2 hours. This will reduce the possibility
of operation faults due to the effect of transport on the
cooling system.
The appliance must be connected to the power
mains and grounded in compliance with the effective
standards and regulations.
The appliance may not be used outdoors and it may
not be exposed to rain.
Do not store explosive substances such as aerosol cans
with a flammable propellant in this appliance.
Before cleaning the appliance, unplug the appliance
from the power mains (unplug the power cord from the
wall outlet).
If the power cord is damaged, it must be replaced by a
service technician or other adequately trained person.
If the appliance will be out of use for a prolonged
period of time, switch it off using the relevant button,
and unplug the appliance from the power mains. Empty
the appliance, defrost it, clean it, and leave the door
ajar.
If LED lighting does not work, call a service technician.
Do not attempt a repair of the LED lighting yourself, as
there is danger of contact with high voltage!

6
577323
To protect the environment, take the obsolete
appliance to an authorized home appliance collection
center.
Packaging is made of environmentally friendly materials
that can be recycled, disposed of, or destroyed without
any hazard to the environment.
Rating plate can be found in the appliance interior. If
the language on the rating plate is not the language of
your choice or the language of your country, replace it
with the one supplied.
WARNING! Keep ventilation openings, in the
appliance enclosure or in the built-in structure, clear of
obstruction.
WARNING! Do not use mechanical devices or other
means to accelerate the defrosting process, other than
those recommended by the manufacturer.
WARNING! Do not damage the refrigerant circuit.
WARNING! Do not use electrical appliances inside
the food storage compartments of the appliance,
unless they are of the type recommended by the
manufacturer.
WARNING! Shelves and portable bottle case are made of
natural non-treated wood. Therefore, some stains (oil, red
wine etc.) may be difficult or impossible to remove.
Do not touch the case and shelves if your hands are dirty!
The colour of wood can change in time.

7
577323
The symbol on the product or its packaging indicates that the product should
not be treated as normal household waste. The product should be taken to an
authorized collection center for waste electric and electronic equipment
processing. Correct disposal of the product will help prevent any negative effects
on the environment and health of people which could occur in case of incorrect
product removal. For detailed information on removal and processing of the product,
please contact the relevant municipal body in charge of waste management, your
waste disposal service, or the store where you bought the product.

8
ADVICE FOR SAVING POWER
WITH REFRIGERATION
APPLIANCES
577323
• Install the appliance as specified in the instruction manual.
• Do not open the door more often than necessary.
• Occasionally make sure air circulation underneath the appliance is unobstructed.
• Condenser unit on the rear wall should be kept clean (see chapter Cleaning the
appliance).
• If the gasket is damaged or does not provide a perfect seal for other reasons, have it
replaced as soon as possible.
• Store the food in tightly sealed containers or appropriate packaging.
• Before placing the food in the appliance, cool it to room temperature.
• Defrost frozen food in the refrigerator compartment.
• Remove some of the drawers from the freezer compartment as described in the
instruction manual, in order to make use of the entire interior.
• Defrost your conventional freezer when an approximately 3-5 milimeter layer of of
frost or ice has built up on the refrigerated surfaces.
• Make sure the layout of shelves in the compartment is uniform and that the food
is placed so that the air can freely circulate in the appliance interior (observe the
recommended placement of food as described in the instructions).
• In appliances with a fan, do not block the fan slots.
• If you do not need the fan or the ionizer, switch them o to reduce power
consumption.

9
APPLIANCE DESCRIPTION
577323
• The shelves are protected against pulling out. To remove a shelf, lift it at the back and
then pull it out.
• The drawers are protected against pulling out. To remove a drawer from the appliance,
pull it out as far as it will go, then lift at the front and pull out completely.
** Freezer/ZeroZone is an adjustable area that can be used either as a freezing
compartment or a ZeroZone. When the appliance is switched on for the first time, this
compartment will function as a freezer.
2
3
1
2
4
A
B
5
A Wine cooler
1Control unit
2Led lighting of refrigerator
interior
3Bottle shelves
4Portable bottle case
B Freezer/ZeroZone
compartment**
5Freezer drawers/ZeroZone
compartment

10
INSTALLATION AND CONNECTION
577323
SELECTING THE ROOM
• Install the appliance in a dry and well ventilated room. The appliance will operate correctly
if the environment temperature is in the interval specified in the table. The appliance class is
indicated on the rating plate / label with the basic information on the appliance.
Class Temperature
SN (subnormal) from +10°C to +32°C
N (normal) from +16°C to +32°C
ST (subtropical) from +16°C to +38°C
T (tropical) from +16°C to +43°C
Warning: Make sure the room where the appliance is installed is large enough. There
should be at least 1 m3of space per 8 grams of refrigerant. Amount of refrigerant is stated
on the rating plate in the appliance interior.
INSTALLING THE APPLIANCE
Appliance installation should be carried
out by at least two persons to avoid any
physical injury or damage to the appliance.
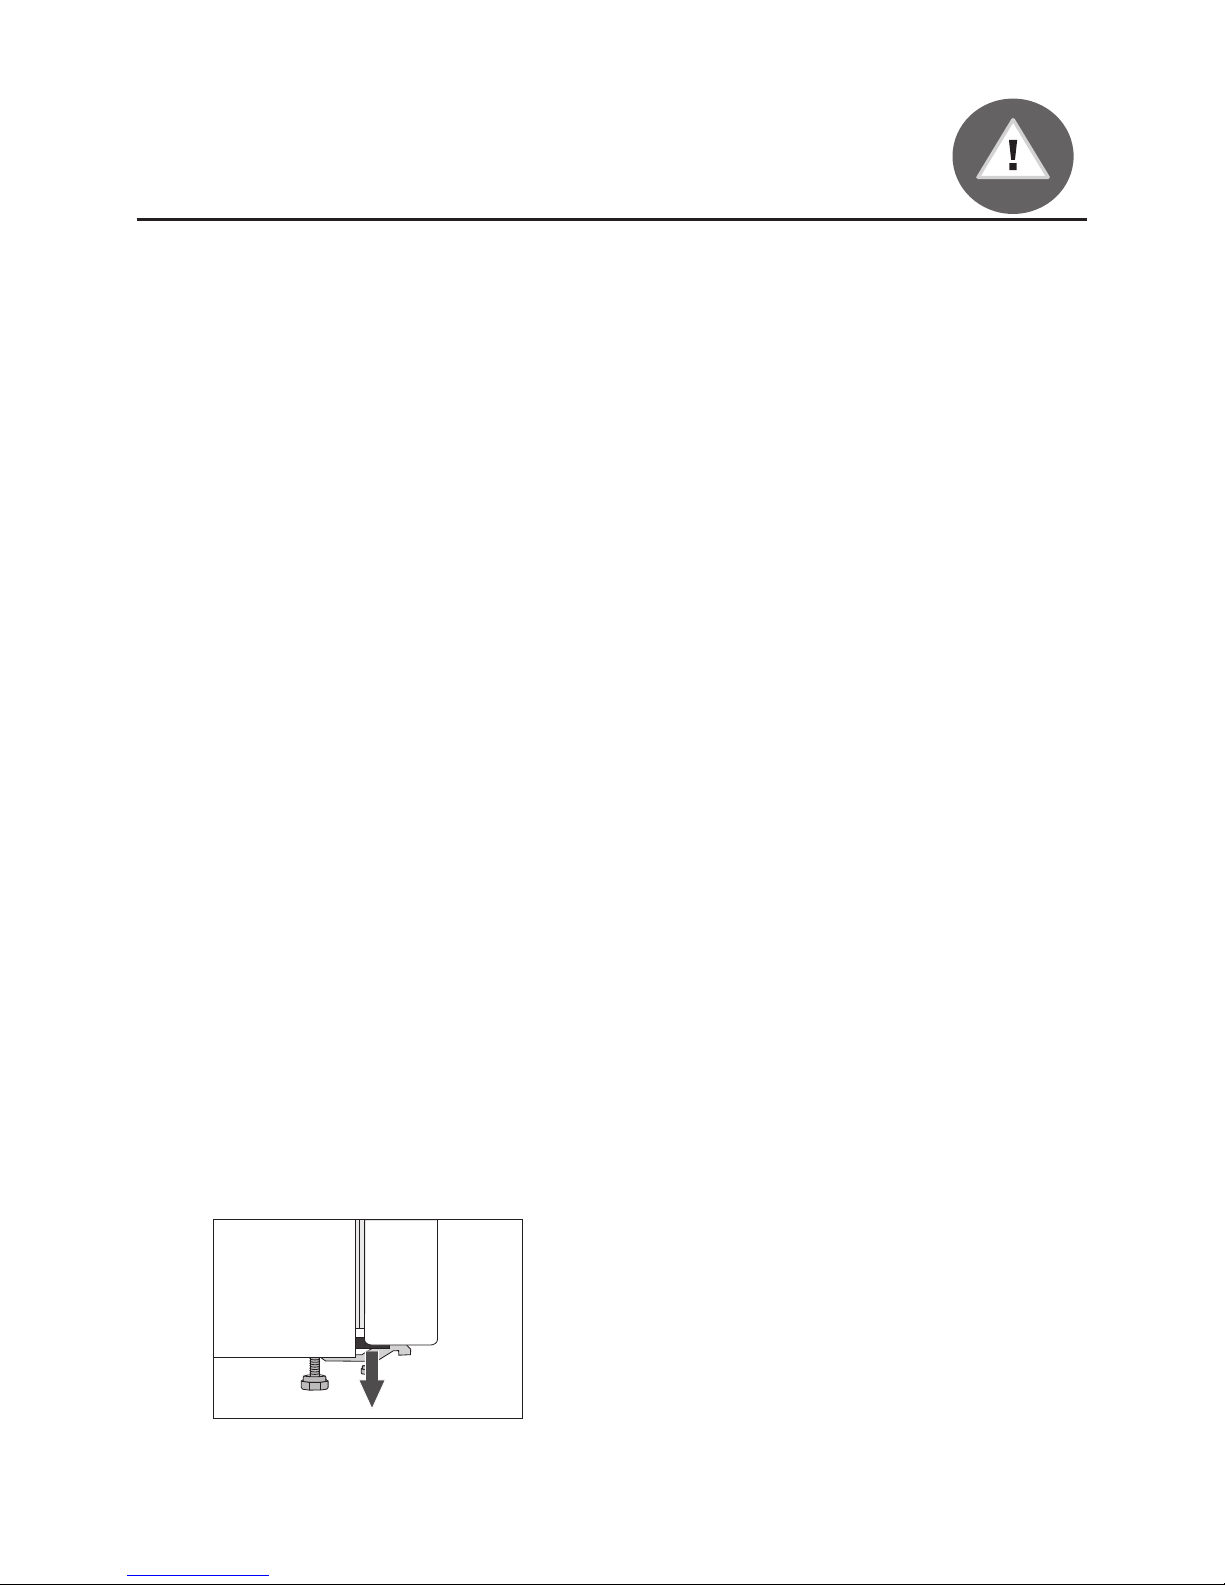
• The appliance must stand level or tilted
slightly to the back, stable on a solid
base. At the front, the appliance is fitted
with two adjustable legs that can be used
to level the appliance. At the rear side,
casters allow for easier installation of the
appliance (only with some models).
• There should be a clearance of at least 5 cm
between the appliance and any cupboard
installed above it, in order to allow adequate
cooling of the condenser unit.
• The appliance is supplied with two
spacers which should be installed on
the lower part of the housing to prevent
from pushing the appliance too close to
the wall. Appliance may also be installed
without the spacers; however, this may
increase power consumption.
• Do not expose the appliance to direct
sunlight and do not place it near any
source of heat. If this cannot be avoided,
install an insulation panel.
max
30 mm
> 90°

11
577323
CONNECTING THE APPLIANCE
• Connect the appliance to the power mains using a connection cable. The wall outlet
should be fitted with a ground contact (safety socket). Nominal voltage and frequency
are indicated on the rating plate/label with basic information on the appliance.
• The appliance must be connected to the power mains and grounded in compliance
with the eective standards and regulations. The appliance will withstand short-term
deviations from the nominal voltage, but not more than +/- 6%.
• The appliance may stand alone or it may be placed ext to a cupboard or a wall. Consider
the clearance required to fully open the door in order to allow pulling out the drawers
and shelves (see installation diagram).
Side-by-side installation: We recommend leaving the side-by-side installation of
two appliances to a service technician. If you decide to do this yourself, observe the
instructions supplied with the side-by-side installation kit.
627 675
min 1210
max 115° max 115°
1194 1242

12
CHANGING THE DIRECTION OF
DOOR OPENING
577323
Tools required: socket wrench No. 8, Phillips screwdriver, torx 25, hex key No. 4, flat
screwdriver.
The procedure to change the direction of door opening should be carried out by at least
two persons.
1. Remove the upper hinge cover (A).
2. Unscrew the upper hinge (B) and remove the upper door (C).
3. Then remove the covering plugs (D), unscrew the mid hinge (E) and remove the lower
door (F) from the lower hinge (G).
4. Tilt the appliance backwards (make sure you do not press against the condenser unit
on the rear wall of the appliance as this may damage the cooling system), unscrew the
lower hinge (G) and the foot (H) and move them to the opposite side. Make sure the
washer is installed like it was before disassembly.
5. Move the door hinges (I) to the opposite side. Remove the door stopper S1 and attach
the door stopper S2 supplied in a bag with the instruction manual.
6. Place the middle hinge (E) on the lower door (F) and place the lower door on the lower
hinge (G). Fasten the mid hinge (the door should be open while you do this). Do not
forget to place the washers (J) and covering plugs (M) as they were placed before the
disassembly.
7. Place the upper door (C) over the middle hinge (E), remove the covering cap (K) and
fasten the upper hinge (B).
8. Install the upper hinge cover (A) and the covering cap (K).
9. Replace the handle (L): undo the side screws (M) and the (N) screw in the handle
holder. Take care not to damage the door. Pull the handle in the direction of the arrow
Disassemble the handle (L): undo the screw (O), turn the handle holder (P) by 180° and
reattach it using the screw. On the opposite side of the door, remove the cover plugs
(R) and replace the handle (L) in the direction of the arrow 2. Reattach the handle using
the screws (M) and (N). Place the covering plugs/caps (R) on the opposite side of the
door.

13
577323
12
E
F
3
G
H
H
4
5
E
F
J
M
6
8
7
9
C
K
B
A
K
B
C
D
I
I
D
L
L
M
NP
R

14
OPERATING THE APPLIANCE
577323
A Appliance on key and wine cooler o key
B Acoustic alarm o key
C Lighting on/o key
D Wine cooler temperature setting keys
E Wine cooler set temperature display
F Freezer compartment on key and appliance o key
G Freezer/ZeroZone switch key
H Freezer boost on/o key (when the freezer compartment operates in the ZeroZone
mode, the Hkey has no function)
I Freezer/ZeroZone compartment temperature setting keys
J Freezer/ZeroZone compartment set temperature display
SWITCHING THE APPLIANCE ON/OFF
Switching the appliance on: Switch on the
appliance by briefly pressing the A key.
With this model, it is possible to only switch
on the freezer compartment while the wine
cooler compartment is switched off. This
setting can be made in two ways:
- Briefly press the Fkey to switch on the
freezer compartment only. Or
- First briefly press the Akey to switch
on the entire appliance. Then, press and
hold (for three seconds) the Akey to
switch off the wine cooler.
When the Akey is pressed again, the wine
cooler compartment will be switched back
on.
A B C E
DJ
IH G F

15
577323
ADJUSTING THE TEMPERATURE IN THE APPLIANCE
Switching off the appliance: To switch off
the appliance, press and hold (for three
seconds) the Fkey (caution: appliance
will remain powered, i.e. there will still be
electric current in the appliance).
• To set the temperature in the freezer
compartment, use the Dkeys.
lower temperature;
higher temperature
• Temperature in the wine cooler can be
set in the range from +1 °C to +19 °C (or
from +4 °C to +19 °C if the ZeroZone
compartment is activated with the Gkey).
• Temperature in the wine cooler cannot be higher than the temperature of the room in
which the appliance is installed!
• Press the left Dkey to decrease the temperature setting by 1 °C. Press the right Dkey to
increase the temperature setting by 1 °C. A short beep will be heard every time a key is
pressed.
• After one of the D keys is pressed, the most recent temperature setting will flash on the
display unit E. Use the Dkeys to set the desired temperature. Three seconds after the
last key was pressed, the most recent temperature setting is stored for the wine cooler
compartment.
• Recommended temperature setting for storing red wine is: light red wines and roses at
12 °C; medium and full-bodied red wines at 17 to 19 °C.
• Recommended temperature setting for storing white wine is: Sparkling and dessert
wines at 6 to 8 °C; light white wines at 10 °C.
• Set the temperature in the freezer
compartment using the Ikeys.
lower temperature;
higher temperature
• Temperature in the freezer compartment
can be set in the range from -24 °C
to -16°C (or from -2 °C to +3 °C if the
ZeroZone compartment is activated with
the Gkey).
• Press the left Ikey to decrease the
temperature setting by 1 °C. Press the
right Ikey to increase the temperature
setting by 1 °C. A short beep will be heard
every time a key is pressed.

16
577323
INTENSIVE FREEZING (FREEZER COMPARTMENT)
• Use this setting after switching on
the appliance for the first time, before
cleaning, or 24 hours before inserting a
large amount of food.
Switching on the freezer boost (super
freeze) function: Press the Hkey. FF will
appear on the display. The Hkey will remain
lit as long as the freezer boost function is
activated.
EXTREME FREEZING (UPPER DRAWER OF THE FREEZER
COMPARTMENT)
• In order to quickly freeze fresh food,
use the XtremeFreeze function
that is only active in the upper
drawer of the freezer compartment.
It involves intensive blowing of cool air in
that part of the appliance. Faster freezing
will retain more vitamins, minerals, and
nutrients in the food for a longer period
of time.
Switching on the freezer boost
(XtremeFreeze) function: Press the Hkey
and hold it for at least 3 seconds. EF will
appear on the display J.
If any other setting is made while the freezer boost function is activated, the function will
be immediately deactivated.
If the freezer boost is not deactivated manually, it will be automatically switched off after
approximately 2 days. Then the temperature of the freezer compartment will return to the
most recently set value.
• After one of the Ikeys is pressed, the most recent temperature setting will flash on the
display J. Use the Ikeys to set the desired temperature. Three seconds after the last key
was pressed, the most recent temperature setting is stored for the freezer compartment.
• Recommended temperature setting is -18 °C.

17
577323
• With this setting, the compressor will operate continuously and the temperature in the
freezer compartment will drop considerably.
• If the setting is not deactivated manually (by pressing the H key), it will be deactivated
automatically after approximately one day. Freezer compartment temperature will return
to the most recent setting.
• Use this setting for freezing smaller amounts of food (up to 2 kilograms) in the upper
drawer. When freezing a large amount of food, the setting should be activated 12 hours
before inserting the food in the freezer.
CONTROLLING THE ZEROZONE COMPARTMENT
• The entire freezer compartment can be
turned into a ZeroZone compartment.
The temperature in this compartment is
around 0 °C. Therefore, do not store food
that is sensitive to low temperature in this
compartment as such food may freeze.
Before switching to ZeroZone function,
empty the freezer compartment to
prevent the frozen food from defrosting
and perishing.
• Switching the ZeroZone on/o: Press the Gkey and hold it for 5 seconds. When
activated, the Gkey will be lit up.
• Setting the temperature in the ZeroZone: press the Ikeys to set the temperature
between -2 °C and +3 °C.
• ZeroZone may operate even when the refrigerator compartment is switched o.
After switching from freezer to ZeroZone function, it may be necessary to wait a few
hours for the temperature to increase to the set value. The display Jwill flash during this
time.
• The temperatures are approximate and they depend on the temperature settings in the
refrigerator compartment, environment temperature, frequency of door opening, and
amount of food inserted. Higher temperatures in the ZeroZone compartment lead to
higher temperatures in the refrigerator compartment, and vice versa. Adjust the setting
to the operating conditions.
• If the bottom compartment functions as a ZeroZone, the temperatures in the
refrigerator compartment can only be set in the range from +4 °C to +19 °C. We
recommend such use only when environment temperature is between +16 °C and
+32 °C. At higher or lower temperatures, it is not possible to guarantee adequately low
temperatures in the appliance.

18
577323
SAFETY BLOCK (CHILD SAFETY LOCK)
Use this function to prevent any inadvertent
changes to appliance settings.
To activate, press and hold the Bkey (for
three seconds); LL will appear on the
display E.
This will lock every key except B. To
deactivate the child safety lock, press the B
key again and hold it for three seconds.
• Lighting in the entire wine cooler compartment is switched on every time you open
the door, and it is switched off every time you close the door, except in the special
operating mode described below.
• Press the Ckey to activate the continuous LED lighting for the entire wine cooler
compartment. In this mode, LED lighting will not be switched o when you close the
door, but will rather remain active until switched o manually, i.e. until you press the C
key again.
If continuous LED lighting is not switched o manually, then it will be switched o
automatically after five hours.
APPLIANCE LIGHTING
HIGH TEMPERATURE ALARM
If the temperature inside the appliance is
too high, acoustic alarm will be activated
(intermittent tone) and the Bkey will
flash. Moreover, flashing Jor Edisplay will
indicated the compartment for which the
high temperature alarm was activated.
• The acoustic alarm will be sounded for the
first five minutes of every hour until the
appliance reaches a suitable temperature.
• The acoustic alarm will be activated every 24 hours if the temperature in the appliance
is not low enough and there is danger of food spoilage. The alarm will be switched o
automatically as soon as the temperature in the freezer drops to a level that no longer
presents spoilage hazard.
• When the appliance is switched on for the first time, there is a 24-hour delay in
temperature alarm operation since the appliance will not have reached the adequate
temperature. Thus, unnecessary activation of alarm is prevented.
Open door alarm: if the wine cooler or freezer compartment door is open for more than 2
minutes, acoustic alarm will be activated and the Bkey will flash. When the door is closed,
the alarm will be deactivated. It can also be switched off by pressing the Bkey.

19
APPLIANCE INTERIOR EQUIPMENT
577323
BOTTLE SHELVES
• The shelves are intended for storing
bottles.
• Maximum load on each shelf is 13 kg.
Shelf removal: The shelves are secured in
place with a rail. When removing the shelf,
unscrew the two screws on the rail, which is
installed on the right side in the back of the
appliance, behind the shelves.
When the two screws are removed, lightly
lift the back of the shelf and pull it out.
Note: Loaded shelves should always be
fixated with rail to prevent removal.
(* Equipment depends on the model)

20
577323
BOTTLE CASE
• There is a bottle case at the bottom
of the wine cooler compartment. It
is intended for storing bottles and to
transport them from the appliance or into
the appliance.
• Use the handles on either side to
transport the case.
• Avoid overloading the case as this may
cause injury in case of falling or any other
accident.
Note: The shelf is not intended to be
partially pulled out. Therefore, do not pull
out a full shelf from the appliance.
Note: Do not stack bottles on the shelf in
several layers.
This manual suits for next models
1
Table of contents
Other Asko Kitchen Appliance manuals

Asko
Asko SVK67CS HCI643G User manual

Asko
Asko O870S User manual

Asko
Asko RWFN2826S User manual

Asko
Asko 2002 Vrs 2.0 User manual

Asko
Asko ODV8127 Series User manual

Asko
Asko WCN311942G User manual

Asko
Asko VD1692D User manual

Asko
Asko WCN15842G User manual

Asko
Asko ODV8128G User manual

Asko
Asko Hg1984a User manual