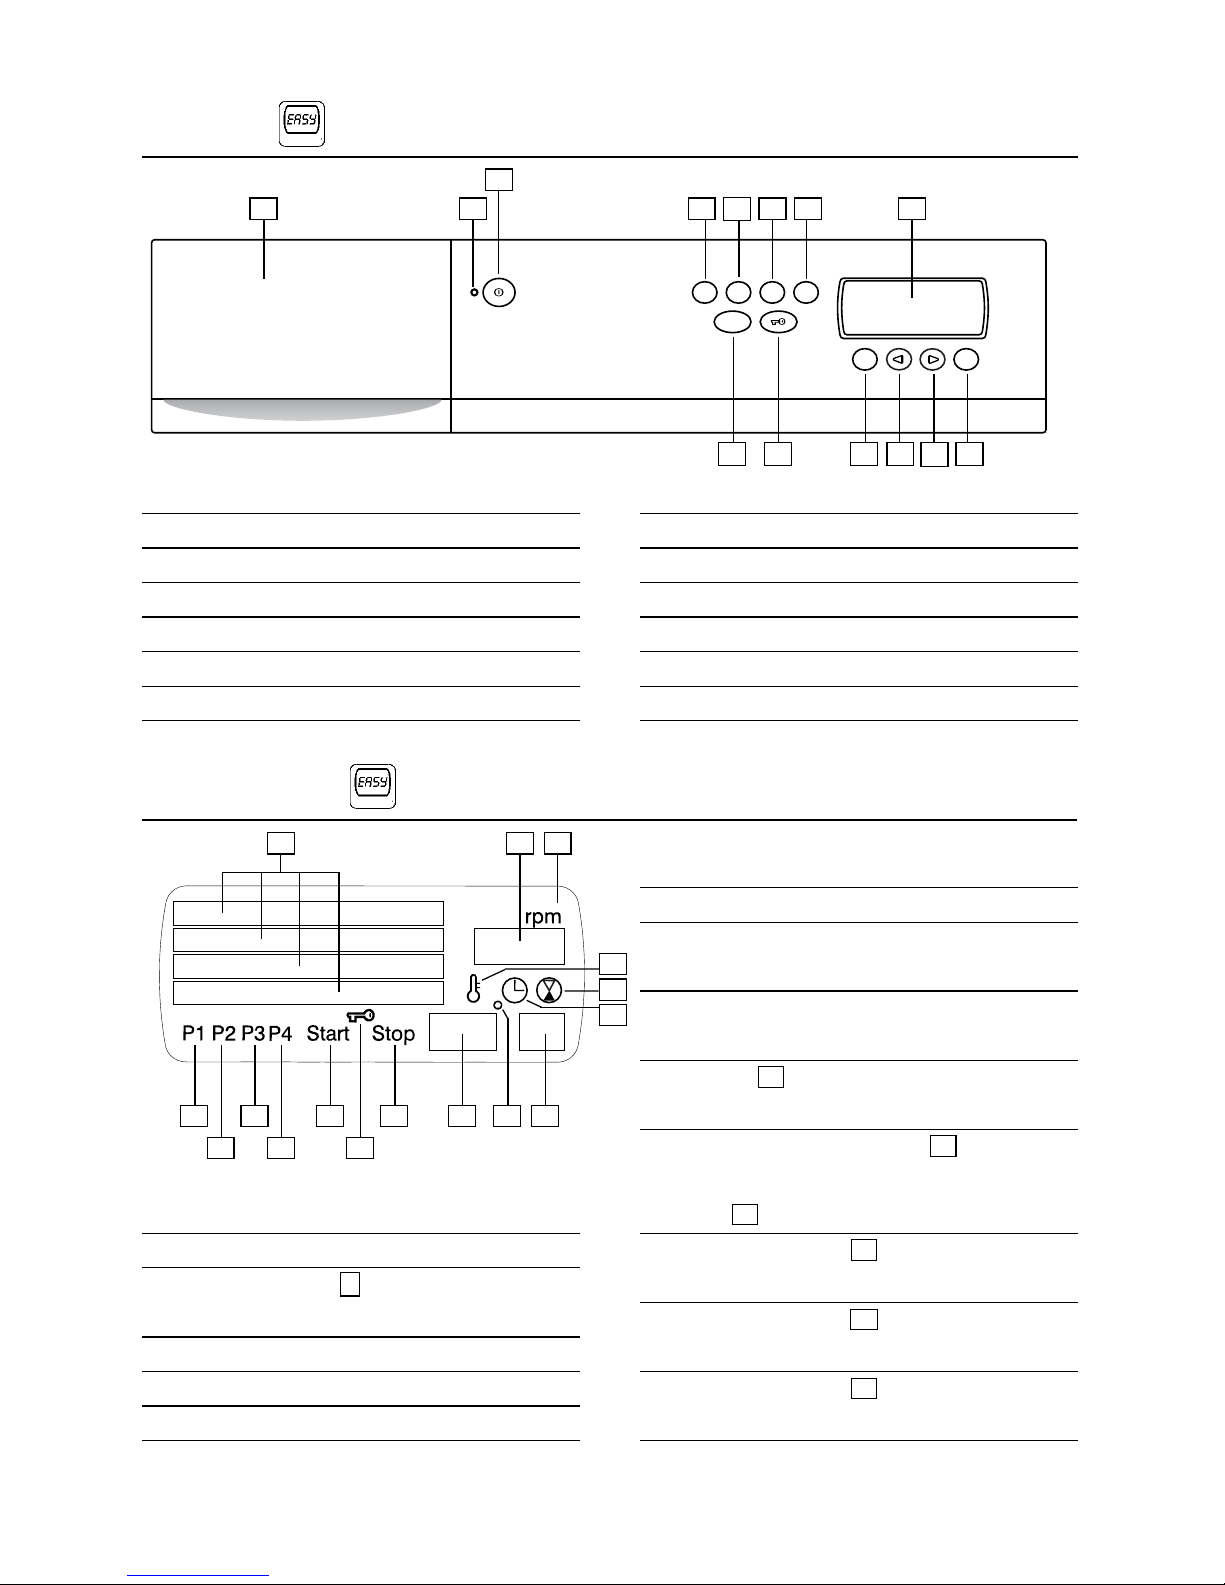
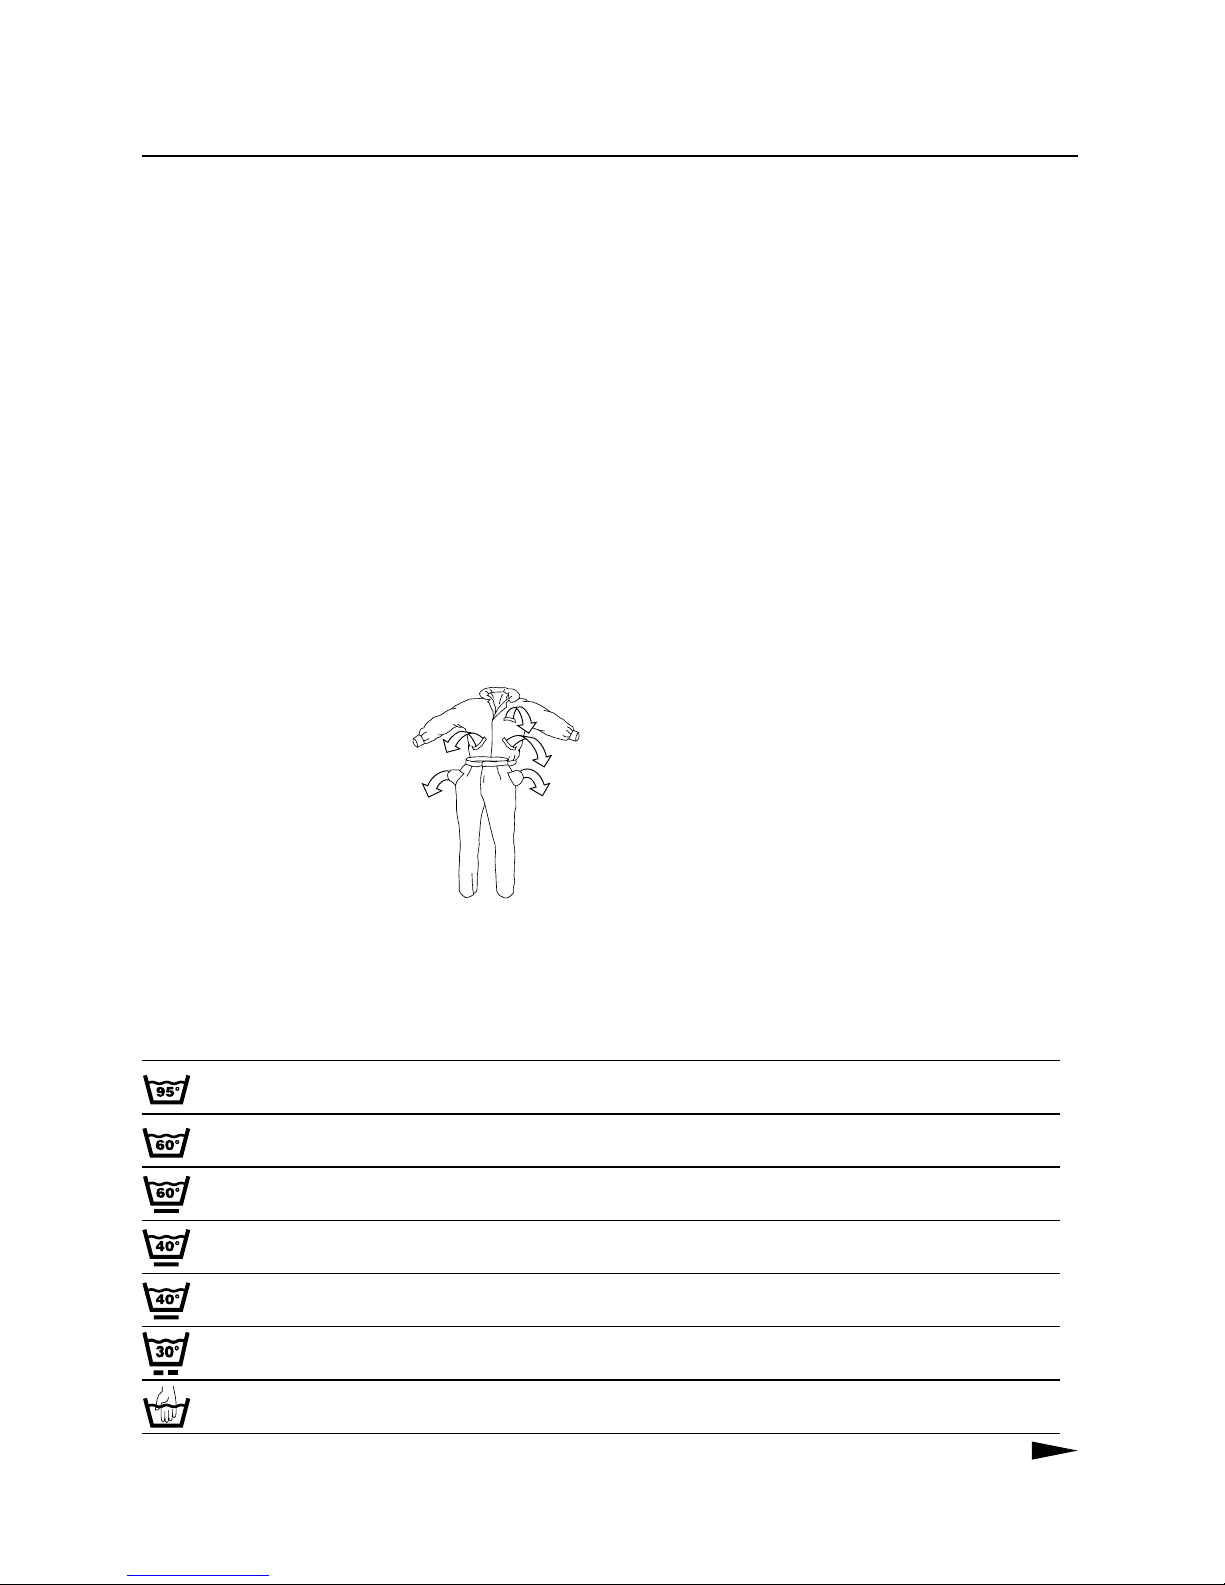
Asko W640 User manual

Washing Machine W640
DEAR ASKO CUSTOMER
Welcome to the family of ASKO customers. We hope that you will get many years of good use of your new
washing machine. The washing machine is very sophisticated. In order to get best possible use of your
machine and all its functions we recommend you to read this Use and Care Guide before you use the
washing machine.

2
CONTENTS
READ FIRST
1 Before washing the first time 3
2 Safety instructions 4-5
General. Installation. Washer door. Over-
fill protection. Interrupting a program.
Packing material. Transport/Winter sto-
rage. Disposal.
3 Children's safety 6
Child-safe washing. Protect children.
Child safety catch on detergent compart-
ment. Child lock on Start/Stop and
Menu buttons.
4 Parts of the washer 7
5 Detergent compartment 7
6 Panel 8
7 LC Display 8
INSTALLATION
See instructions for installation.
WASHING
8 Before washing 9-11
Sorting the washing. Garments.
Recommended washing marking.
Coloured cotton. Delicate washing. Su-
per rinse. Economy and efficiency.
Detergents. Textile dyeing. Washing
time.
9 Washing 12-15
Main power switch. Open the door.
Putting in the washing. Select program.
Temporary alterations. Starting the
washing program. Putting in more wash-
ing. Changing settings after starting.
Changing the program. Washing pro-
gram completed. When washing is finis-
hed.
10 Consumption values - Pre-set washing
programs 16
11 Making own washing programs 17-23
Selecting initial program. Programs.
Temperature. Spin speed. Delayed start.
Options. Short cuts. Restoring pre-set
program.
CARE
12 Care and Cleaning 24-25
Cleaning the needle trap and drain pump.
Cleaning the detergent compartment.
Cleaning the outside of the machine.
Clean-out recess under the ridges. If you
have hard water.
PROBLEMS?
13 Trouble shooting 26-27
Door will not open. Machine will not
start. No water entering the machine
when it starts. Water in the machine af-
ter the final spin or pump out. Fault in-
dications. Wrong language on the dis-
play. Temperature - Celsius or Farenheit.
MISCELLANEOUS
14 Technical information 28
Technical data. Standard tests.
15 Service and guarantee 29
16 Quick guide 30
17 Index 31

3
1 BEFORE WASHING THE FIRST TIME
CAUTION WITH CERTAIN MATERIALS
Always check and adhere to recommended
washing marking on the items concerned. If no
recommendations are given, refer to those in
chapter 8, Before washing.
TRANSPORT SUPPORTS
Are the transport supports (three screws at the
back of the machine) removed? If not, see the
Installation instructions.
WASHER DOOR
The door of the washer opens electrically. Con-
sequently, the door cannot be opened normally
until the machine is connected to an electric
power supply. However, emergency opening is
available, see chapter 13, Trouble shooting.
CHECK HARDNESS OF THE WATER
Call your local water company to find out what
degree of water hardness applies. This has signi-
ficance in relation to the amount of detergent
that should be dispensed.

4
OVERFILL PROTECTION
If the level of water in the machine rises above
normal, the overfill protection will start to pump
out water and shut off the water supply. The
program will be interrupted if the level does
not fall within 60 seconds.
INTERRUPTING A PROGRAM
To interrupt a washing program, hold the
button pressed for three seconds, or press the
main power switch . The machine will "re-
member" where in the program it was when stop-
ped. If you wish to continue the washing pro-
cess, just close the door and press the
Start /Stop
button and the machine will start where it was
interrupted.
You can also interrupt a program by pressing
Start /Stop
for three seconds. However, if you stop
the machine in this way it will forget where it
was in the program and you will have to select a
program to restart.
PACKING MATERIAL
Sort the packing material for recycling accor-
ding to recommendations by the local authori-
ties.
GENERAL
• Study and save this Use and Care Guide for
future reference.
• Electrical and water installation, if required,
must be carried out by authorized persons.
• The machine may only be used for washing in
accordance with these operating instructions -
not for dry cleaning.
• Use only detergents intended for machine
washing.
• Remove the transport supports before using
the machine, see installation instructions.
INSTALLATION
See the accompanying installation instructions.
WASHER DOOR
The door of the washer opens electrically. Con-
sequently, the door cannot be opened normally
until the machine is connected to an electric
power supply.
To open the door manually, see the heading,
Door will not open, in chapter 13, Trouble shoo-
ting.
The machine cannot be started with the door
open.
To open the door during an ongoing pro-
gram, see below, Interrupting a program.
2 SAFETY INSTRUCTIONS

5
TRANSPORT/WINTER STORAGE
If the machine is to be transported or stored
during the winter, on unheated premises, emp-
ty the needle trap and the drain pump, see chap-
ter 12, Care and Cleaning.
If you have any questions, please phone your
retailer.
DISPOSAL
When the machine is no longer useful and is to
be scrapped it should be made unusable.
Get in touch with the refuse collection servi-
ce or your local authorities for advice on how to
scrap the machine in a proper manner.
The machine is made and marked to facilitate
recycling.

6
CHILD-SAFE WASHING
Always close the washer door and start the pro-
gram immediately after filling the detergent.
Do not allow children to play with the wash-
ing machine.
PROTECT CHILDREN
Keep detergents and conditioner out of the reach
of children.
CHILD SAFETY CATCH ON DETERGENT COMPART -
MENT
On the right in the handle of the detergent
compartment there is a disengageable safety
catch to prevent children from opening the
compartment.
Engaging the child safety catch
To engage the child safety catch, pull the deter-
gent compartment out a little so that you can
reach the catch. Pull the catch towards you and
then release it.
Child safety catch engaged
To be able to open the compartment when the
child safety catch is engaged you must push the
catch to the left while pulling out the compart-
ment.
Disengaging the child safety catch
To disengage the child safety catch, push the
catch to the left and then in.
3 CHILDREN'S SAFETY
CHILD LOCK ON
Start /Stop
AND
Menu
BUTTONS
By locking the
Start /Stop
and
Menu
buttons, you can
prevent that for example a child starts the mach-
ine or changes the settings by mistake.
Child lock On/Off
Turn the main power switch, , off and then
turn it on again.
Press the
Enter
button five times, then press
the
P3
button five times. These ten times must
be completed within fifteen seconds.
Within three seconds after the last press on
the
P3
button, use the buttons to
choose Child lock ON (the figure 3 will appear
at the bottom right in the display) or OFF (the
figure 0 will appear at the bottom right in the
display).
To start a program with locked
Start /Stop
button.
Press the
Start /Stop
button for three seconds and
the machine will start.
To change program settings with Child locked
Menu
button.
Press the
Menu
button for three seconds, after
that the
Menu
button works normally again. If
you do not press any button within two minu-
tes, the
Menu
button will be locked again.
NOTE
If you want to change the settings after you
have started a program, you always have to press
the
Menu
button for three seconds.

7
Start/Stop
P3
P1 P2 P4
MenuEnter
4 PARTS OF THE WASHER
1. DETERGENT COMPARTMENT - PRE-WASH
2. DETERGENT COMPARTMENT - MAIN WASH
3. FABRIC CONDITIONER COMPARTMENT
4. PARTITION PIECE (FOR USE OF LIQUID
DETERGENT)
5. CHILD SAFETY CATCH
5 DETERGENT COMPARTMENT
1. DETERGENT COMPARTMENT
2. MAIN POWER SWITCH
3. PROGRAM PANEL
4. DATA PLATE
5. COVER - DRAIN PUMP
6. DRAIN PUMP (BEHIND THE COVER)
7. WASHER DOOR
5
4
23
1
67
1
23
5
4

8
Start /Sto p
P3P1 P2 P4
Menu Enter
6 PANEL
1. DETERGENT COMPARTMENT
2. INDICATING LAMP ON/OFF
3. MAIN POWER SWITCH
4. PROGRAM SELECTION BUTTON 1
5. PROGRAM SELECTION BUTTON 2
6. PROGRAM SELECTION BUTTON 3
7. PROGRAM SELECTION BUTTON 4
8. LC DISPLAY
9. START/STOP BUTTON
10. DOOR OPENING BUTTON
11. MENU BUTTON
12. STEP BACKWARD/CHANGE TEMPERATURE
13. STEP FORWARD/CHANGE SPIN SPEED
14. ENTER BUTTON
7 LC DISPLAY
2 3
95 7
1. TEXT FIELD, SHOWING PROGRAMS,
OPTIONS, ERROR MESSAGES, ETC.
2. SHOWING SELECTED SPIN SPEED
3. INDICATES THAT 2 SHOWS SELECTED SPIN
SPEED
4. INDICATES THAT SELECTED PROGRAM IS P1
5. INDICATES THAT SELECTED PROGRAM IS P2
6. INDICATES THAT SELECTED PROGRAM IS P3
4 6 8 10 11 12
15
13
16
7. INDICATES THAT SELECTED PROGRAM IS P4
8. INDICATES THAT A PROGRAM HAS STARTED
9. INDICATES THAT WASHER DOOR IS OPEN OR
WILL OPEN
10. INDICATES THAT A PROGRAM IS COMPLETED
OR STOPPED
11. AND 12 SHOWS SELECTED WASHING
TEMPERATURE
13. SHOWS TOGETHER WITH 14 THE NUMBER
OF HOURS FOR DELAYED START AND TOGETHER
WITH 15 THE REMAINING PROGRAM TIME
14. INDICATES THAT 13 SHOWS DELAYED
STARTING
15. INDICATES THAT 13 SHOWS REMAINING
PROGRAM TIME
16. INDICATES THAT 11 SHOWS THE TEMPERA-
TURE
1
3
4567 8
910 11 12 13 14
14
1
2

9
RECOMMENDED WASHING MARKING
Check the recommended washing marking on
garments. The table below gives useful informa-
tion on suitable washing programs for different
materials and amounts of washing.
COLOURED COTTON
Coloured cotton garments marked with a re-
commendation for 60ºC should the first time
be washed at 60ºC to get rid of any surplus dye.
If this advice is ignored there is a risk that co-
lours will run. Use a detergent without bleach
to safeguard the colours.
DELICATE WASHING
Unbleached linen
Unbleached linen should be washed at 60ºC
using a detergent without bleach or optical
whitening agent. Severely soiled linen can oc-
casionally be washed at a higher temperature,
but not too often because heat can destroy the
lustre and strength of linen.
8 BEFORE WASHING
Before you start washing, here is some advice
that can be useful.
SORTING THE WASHING
Sort garments in relation to:
• How soiled they are
• Colour
• Material
GARMENTS
• Close zip-fasteners so that they do not chafe
against other items.
• New coloured garments can have surplus dye
and should therefore be washed separately the
first time.
• Turn garments inside out.
This reduces the risk of bur-
ling, dye creases, etc.
• Empty pockets and suitably
let them wash turned inside out.
WASHING
LABEL MATERIAL PROGRAM LOAD
Cotton, linen, white and light coloured garments. Normal wash 60° to 95° 1/1
Cotton, linen. Darker coloured garments. Normal wash 60° 1/1
Polyester, cotton/polyester, nylon. White garments. Synthetic wash 60° 1/2
Rayon, acetates, acrylics. Garments with more sensitive colours. Synthetic wash 40° 1/2
Polyester, cotton/polyester, nylon. Coloured garments. Synthetic wash 40° 1/2
Silk and very delicate garments. Synthetic wash 30° 1/3
Garments marked IWS or Superwash Wool/hand wash 40° 1/3
Symbols in washing instructions

10
Wool and silk
Sometimes marked machine wash and someti-
mes hand wash. The Wool/hand wash program
of the machine is at least as gentle as washing by
hand.
Wool in particular is sensitive to mechanical
processing. If you wish to avoid spin drying,
press out the water thoroughly using terry to-
wels. Most garments however can tolerate a
short spin dry.
Synthetic fibre
Garments made of synthetic fibre require suffi-
cient space to avoid creasing. Fill the machine
at half load when washing such items. Select
short spin.
NOTE
Viscose and acetate are brittle when wet.
SUPER RINSE
This washing machine is provided with the Su-
per rinse function. Super rinse adds extra rinses
to your washing program. To the programs
Heavy wash, Normal wash and Light wash four
extra rinses are added. To the others, two rinses
are added. Choose Super rinse ON if at any
time you want especially thorough rinsing.
Use this function also when dyeing any ma-
terial. See chapter 11, Making own washing
programs, to select Super rinse ON.
ECONOMY AND EFFICIENCY
You can save a lot of energy by not using a more
powerful program than is necessary.
• Choose Super Quick wash, program 3, if you
only need to freshen up garments, eg, shirts and
tracksuits. You will save both water and energy.
• Without increasing the temperature, washing
results can be improved by selecting E2: Eco/
Efficiency ON. You then save energy without
jeopardizing the washing results. See chapter
11, Making own washng programs, to select
E2: Eco/Efficiency ON.
• Select high spin speed to reduce energy con-
sumption when using a tumble dryer or drying
cupboard. See Temporary alterations in chap-
ter 9, Washing.
DETERGENTS
Overdosing detergent will not give better re-
sults, it only increases the burden on the envi-
ronment.
Try using less detergent, and increase the dose
only if you are displeased with the washing re-
sults.
TEXTILE DYEING
If you want to dye textiles in the machine, se-
lect the Normal wash program and the Super
rinse option ON. Choose a temperature accor-
ding to recommendations from the dye maker.
NOTE!
Bleaches or stain removers that contain the che-
mical Na2S2O4, known as sodium dithionite or
sodium hyposulphite, must not be used in this
washing machine. If these substances are used
they could cause corrosion and discoloration.
If the items being dyed are mixed material
cotton/polyester a short spin dry at 800 revs
per minute should also be selected. See chapter

11
11, Making own washing programs (Super rin-
se) and chapter 9, Washing - Temporary altera-
tions (Spin speed), to see how these selections
are made.
NOTE
Put the dye directly in the drum - not in the
detergent compartment. After dyeing, the emp-
ty machine should be run using the same pro-
gramme. Use a normal amount of detergent.
WASHING TIME
The -symbol indicates that the remaining
washing time is shown at the bottom right in
the display within ten minutes after the wash-
ing program starts.
When a program is choosen the washing time
is calculated. The calculated washing time can
vary from time to time due to the temperature
of incoming water.
Before the last rinse the remaining time is
recalculated and can then be decreased or in-
creased.

12
PRESS THE BUTTON
The display will then show the four pre-set pro-
grams. If no button is pressed within three minu-
tes the display will go out. The display will light
again when one of the buttons is pressed. If the
language on the display becomes altered for any
reason, see chapter 13, Trouble shooting.
OPEN THE DOOR
Press the button and put the washing in.
PUTTING IN THE WASHING AND DETERGENT
Follow the recommendations on the detergent
packet for how much detergent should be used.
The capacity of the machine is for 5.5 kg wash-
ing. If you put a smaller amount in the machi-
ne, you can reduce the amount of detergent
accordingly.
The partition piece provided should be used
for liquid detergent only, see below.
Powder detergent
Pour in the powder for main wash ( ) and any
pre-wash ( ), see figure.
Liquid detergent
Underneath the detergent
compartment you will find
a partition piece for liquid
detergent. Take it and in-
9 WASHING
sert it in the slot furthest in in the com- part-
ment as illustrated. Pour the detergent direct
into the main wash compartment ( ).
Detergent ball or dosing bag
If you are using a detergent ball or dosing bag,
load it directly with the washing and select a
programme without pre-wash.
Fabric conditioner
Pour conditioner in the compartment marked
. Follow the maker's instructions.
NOTE
Do not exceed the maximum dose level of the
container, the conditioner will otherwise flow
in too soon and deteriorate the washing effect.
SELECTING PROGRAM
Select one of the pre-set programs
P1
to
P4
.
Pre-set washing programs
P1
-Normal wash, , 1400 r/min, main
wash, three rinses, short spin dry after the main
wash and the first two rinses and a long spin dry
after the final rinse.
P2
-Normal wash, , 1400 r/min, main
wash, three rinses, short spin dry after the main
wash and the first two rinses and a long spin dry
after the final rinse.
P3
-Super Quick wash, , 800 r/min,
main wash, two rinses and short spin dry.
P4
-Wool/hand wash, , 800 r/min, main
wash, three rinses and short spin dry.
Conditioner
Pre-wash
Main wash

13
You can adjust Temperature and Spin speed in
the pre-set programs according to Temporary
alterations, below.
You can also alter the contents (program,
options, etc.) of the pre-set programs to suit
your particular requirements, see chapter 11,
Making own washing programs.
TEMPORARY ALTERATIONS
After selecting one of the pre-set programs
P1
to
P4
you can adjust the program to suit your
particular washing in the best way. These alte-
rations return to the initial settings at the end
of the washing program. To make permanent
alterations in the programs, see chapter 11, Ma-
king own washing programs.
Temperature
You can select a washing temperature C (cold),
or between 30°C and 95°C. If you choose C the
temperature will be the same as that of the in-
coming water.
For the Wool/hand wash program it is not
possible to choose a temperature higher than
40°C.
With the button, step to the desired
temperature.
When you step to the desired temperature it
will be shown at the lower edge of the display
together with the symbol. After stepping to
the maximum temperature the counter will start
again at the lowest temperature.
Spin speed
You can select spin speeds between 600 and
Settings of the four pre-set programs. *) Means that you can make temporary alterations to these settings. **) Means that the settings are maximum values in
the program and that if you make temporary alterations you can only choose lower values for these settings. To alter other settings, see, Making own washing
programs.
OFF
ON
NORMAL WASH
P1
40*
1400** 0
P2
P3 40*
30*
60*
1400**
800*
800**
0
0
0
OFF
OFF
OFF
OFF
OFF
OFF OFF
OFF OFF OFF ON
ONOFF OFF OFF
ONOFF
ON
ON ON
ON
ON
ON
OFF OFF
SUPER QUICK WASH
NORMAL WASH
WOOL/HAND WASHP4 OFF
PROGRAM
TEMPERATURE (°C)
DELAYED START (h)
SPIN SPEED (RPM)
OPTIONS
Pre-soak
Quick main
wash
Drain
E2: Eco/
Efficiency
Super rinse
Short spin
Spin
PROGRAM
BUTTON

14
1400 r/min.
For the programs Synthetic wash and Wool/
hand wash it is not possible to select higher
speed than 800 r/min.
With the button, step to the desired
spin speed.
When you step to the desired speed it will be
shown at the upper right corner of the display
together with the symbol. After stepping to
the highest speed the counter will start again at
the lowest speed.
STARTING THE WASHING PROGRAM
After completing your settings you can start the
washing program. Make certain the door is clo-
sed and then press the
Start /Stop
button.
The text at the lower edge of the dis-
play indicates that the program has started. The
text field of the display shows the current stage
of the program while it is in progress.
The remaining washing time is shown at the
bottom right in the display within ten minutes
after the washing program starts.
When a program is choosen the washing time
is calculated. The calculated washing time can
vary from time to time due to the temperature
of incoming water.
Before the last rinse the remaining time is
recalculated and can then be decreased or in-
creased.
PUTTING IN MORE WASHING
If you decide to put in more washing after star-
ting the machine, hold the button pres-
sed for three seconds. Any water in the machine
will be pumped out and the door will then open.
Put the extra washing in and close the door and
the washing program will start automatically
where it was interrupted.
CHANGING SETTINGS AFTER STARTING
It is possible to alter some settings after you
have started a washing program. However, to
make any alterations it is necessary that the
part of the program that you wish to alter has
not become activated. The settings that can be
altered are:
• E2: Eco/Efficiency - Can be altered before
cooling or pumping out of water from the main
wash begins.
• Super rinse - Can be altered before the final
rinse begins.
• Short spin - Can be altered before the final
spin begins.
• Spin - Can be altered before spinning begins.
• Temperature - Can be altered before the hea-
ting phase.
• Spin speed - Can be altered before the final
spin sequence begins.
As a precaution it is necessary that you hold
the
Menu
button pressed for three seconds to
enable settings to be altered. You can then alter
the desired settings according to Temporary al-
terations or in the manner described in chapter
11, Making own washing programs.
CHANGING THE PROGRAM
Press the
Start /Stop
button for three seconds. The
program will then be zero set and you can choose
a new program.

15
WASHING PROGRAM COMPLETED
Press the button and take out the wash-
ing.
WHEN WASHING IS FINISHED
Turn off the main switch, , and cloose the
washer door.

16
10 CONSUMPTION VALUES - PRE-SET PROGRAMS
The following conditions apply for the consump-
tion values indicated below:
Temperature of incoming water: 20ºC.
Element power: 2200 W, 240 V.
PROGRAM WASHING/ AMOUNT OF WATER CONSUMP- ENERGY CONSUMP- PROGRAM TIME
TEMPERATURE WASHING TION (ca litre) TION (ca kWh) (ca minutes)
P1 Cotton, 1/1 (5.5 kg) 56 0.90 115
Normal wash linen, 60 °C
P2 Cotton, 1/1 (5.5 kg) 56 0.35 95
Normal wash linen, 40 °C
P3 Super Polyester, cotton/poly- 1/2 (2.5 kg) 22 0.30 35
quick wash ester, 40 °C
P4 Wool/ Wool/hand wash, IWS, 1/3 (1.7 kg) 53 0.25 39
hand wash Superwash, 30 °C

17
11 MAKING OWN WASHING PROGRAMS
You can make your own washing programs that
perhaps suit your requirements better than the
four pre-set programs.
It is always possible to restore the initial pre-
set programs. See the heading at the end of this
chapter, Restoring pre-set programs.
There is a flow chart on the next page that
gives you a good overview of all the available
options. After that follows a step-by-step
instruction on how to design the programs that
satisfy your requirements.
Each step begins with a description of the
programs, options or settings that you can
choose. Followed by a numbered sequence
describing what to do to make the alterations
that you require.
The buttons that you will need to use when
compiling your own programs are
Menu
-, -
, - and
Enter
.
Step forward in the menu by pressing the
Menu
button to the menu heading where you
wish to make an alteration. The menu headings
are: Programs, Temperature, Spin speed, De-
layed start and Options. The options consist of
sub-headings Pre-soaking, Quick main wash,
E2: Eco/Efficiency, Super rinse, Short spin, Spin
and Drain.
Using the buttons, step forward or
backward in the respective headings to the set-
ting you wish to choose.
When you are at the desired setting, ack-
nowledge your choice by pressing the
Enter
but-
ton once.
In order to remember what you have included
in your washing programs, we recommend that
Settings of the four pre-set programs.
OFF
ON
NORMAL WASH
P1
40
1400 0
P2
P3 40
30
60
1400
800
800
0
0
0
OFF
OFF
OFF
OFF
OFF
OFF OFF
OFF OFF OFF ON
ONOFF OFF OFF
ONOFF
ON
ON ON
ON
ON
ON
OFF OFF
SUPER QUICK WASH
NORMAL WASH
WOOL/HAND WASHP4 OFF
PROGRAM
TEMPERATURE (°C)
DELAYED START (h)
SPIN SPEED (RPM)
OPTIONS
Pre-soak
Quick main
wash
Drain
E2: Eco/
Efficiency
Super rinse
Short spin
Spin
PROGRAM
BUTTON

18
Begin by
pressing
Enter
Menu
Menu
Enter
Menu
Enter
Menu
Enter
Menu
Enter
Menu
Enter
Menu
Enter
Menu
Enter
Menu
Enter
Menu
Enter
Menu
Enter
Menu
SELECT PROGRAM
Heavy wash
Normal wash
Light wash
Super quick wash
Synthetic wash
Wool/hand wash
Rinse program
Spin
Drain
SELECT
TEMPERATURE (˚C)
C
30
35
40
85
90
95
.
.
.
SELECT
SPIN SPEED (rpm)
600
700
800
1300
1400
.
.
.
SELECT
DELAYED START (h)
0
1
2
11
12
.
.
.
PRE-SOAK
SUPER RINSE
DRAIN
QUICK MAIN
WASH
E2
SHORT SPIN
SPIN
Menu
Enter
Use the -button to acknowledge and save your choice.
Use the -button to go to the next menu heading without
making any changes in the program.
On
Off
On
Off
On
Off
On
Off
On
Off
On
Off
On
Off
The new settings
are now shown in
the display.
USE THE
Menu
, , ,
Enter
BUTTONS TO MAKE YOUR OWN PROGRAMS.

19
you fill in the settings that you have chosen in
the table noted on the last page of this chapter.
1 - SELECT INITIAL PROGRAM
Begin by choosing one of the pre-set programs.
1. Press the button of the program you wish to
alter, ie
P1
,
P2
,
P3
or
P4
.
2. Proceed to step 2.
2 - PROGRAMS
The programs that you can choose from have
the following sequence:
Heavy wash: Pre-wash - main wash - 3 rinses -
short spin after the main wash and the first
two rinses - long spin after the final rinse.
Normal wash: Main wash - 3 rinses - short spin
after the main wash and the first two rinses
and a long spin after the final rinse.
Light wash: Short main wash - 3 rinses - short
spin after the main wash and the first two
rinses and a long spin after the final rinse.
Super Quick wash: Short main wash - 2 rinses
- short spin.
Synthetic wash: Main wash - 3 rinses - short
spin.
Wool/hand wash: Main wash (gentle action,
high level of water) - 3 rinses - short spin.
Rinse program: 1 rinse - long spin.
Spin: 1 long spin.
Drain: Pumping out only.
1. Press the
Menu
button once.
2. Using the buttons, choose between
Heavy wash, Normal wash, Light wash, Super
Quick wash, Synthetic wash, Wool/hand wash,
Rinse program, Spin or Drain.
3. Press the
Enter
button once to acknowledge
and save your choice.
3 - TEMPERATURE
You can select a washing temperature C (cold),
or between 30°C and 95°C. If you choose C the
temperature will be the same as that of the in-
coming water.
For the Wool/hand wash program it is not
possible to choose higher than 40°C.
1. Press the
Menu
button once.
2. With the buttons, step to the
desired temperature.
3. Press the
Enter
button once to acknowledge
and save your choice.
4 - SPIN SPEED
You can select spin speeds between 600 and
14•00 r/min.
For the programs Synthetic wash and Wool/
hand wash the maximum speed is 800 r/min.
1. Press the
Menu
button once.
2. With the buttons, choose the
desired spin speed.
3. Press the
Enter
button once to acknowledge
and save your choice.
5 - DELAYED START
You can delay start your washing program by up
to 12 hours.
If you select Delayed start at say five hours,
the machine will start five hours after you press
the start button.
When stepping to the desired time it will

20
beshown at the bottom right corner of the dis-
play together with the -symbol.
1. Press the
Menu
button once.
2. With the buttons, choose how long
you wish to delay starting of the washing pro-
gram.
3. Press the
Enter
button once to acknowledge
and save your choice.
6 - OPTIONS
This heading has seven sub-headings (option
headings) indicating the options that you can
add to your program.
The seven options are: Pre-soak, Quick main
wash, E2: Eco/Efficiency, Super rinse, Short
spin, Spin and Drain.
Pre-soak
This option is useful if you have severely soiled
washing that needs to soak before being was-
hed. The washing will soak for two hours before
the washing program starts.
1. Press the
Menu
button once.
2. Using the buttons, select Pre-soak
ON or OFF.
3. Press the
Enter
button once to acknowledge
and save your choice. You will now come
automatically to sub-heading:
Quick main wash
Using this option reduces the main wash by
about 27 minutes. Use this option if your wash-
ing is only slightly soiled.
Can only be selected for the programs Hea-
vy wash and Normal wash.
1. Using the buttons, select Quick
main wash ON or OFF.
2. Press the
Enter
button once to acknowledge
and save your choice. You will now come
automatically to sub-heading:
E2: Eco/Efficiency
If you choose this option the main wash will be
prolonged by about 22 minutes. You can choo-
se either an energy saving variant (I) without
jeopardizing good washing results, or the vari-
ant (II) that gives an excellently effective pro-
gram.
I. You can improve the washing effect by choo-
sing E2: Eco/Efficiency ON. This will give you
an energy saving program without jeopardizing
the washing results.
II. Choose E2: Eco/Efficiency ON and a hig-
her temperature. This will give you an even
more effective washing program.
Can only be selected for the programs Heavy
wash, Normal wash and Light wash.
1. Using the buttons, select E2: Eco/
Efficiency ON or OFF.
2. Press the
Enter
button once to acknowledge
and save your choice. You will now come
automatically to sub-heading:
Super rinse
Adds extra rinses to your washing program. To
the programs Heavy wash, Normal wash and
Light wash four extra rinses are added. To the
others, two rinses are added. Choose Super rin-
se ON if at any time you want especially tho-
rough rinsing. Use this function also when dye-
Other manuals for W640
2
Table of contents
Other Asko Washer manuals

Asko
Asko W6864W ECO User manual

Asko
Asko W4086C.W.AU User manual

Asko
Asko PROFESSIONAL WMC844VG User manual

Asko
Asko W640 User manual

Asko
Asko 20005 - User manual

Asko
Asko W2084.W User manual

Asko
Asko Allergy W6888 User manual

Asko
Asko WM75.C-P User manual

Asko
Asko WM70 User manual

Asko
Asko WM85 C-V Series User manual