安全與規範資訊/ Sicherheits- und Richtlinienhinweise / Informations de sécurité et
réglementaires / Informazioni sugli standard di sicurezza / Información sobre seguridad y
normativas / Информация по технике безопасности и нормативным вопросам /
Informações de Segurança e Regulamentares / 안전 및 규정 정보/
安全性および規制に関する情報保固條款/ Garantiebedingungen / Conditions de la garantie / Termini della garanzia /
Términos de la garantía / Срок действия гарантии / Termos da Garantia / 보증조건/
保証期間
Risk of explosion if the battery is replaced with an incorrect type. Batteries should be
recycled where possible. Disposal of used Batteries must be in accordance with local
environmental regulations.
若以不正確類型的電池進行更換,可能會有爆炸的危險。應儘可能回收電池。應依照當地環保法規棄置使用過的電池Es besteht Explosionsgefahr, wenn die Batterie durch einen falschen Typ ersetzt wird.
Batterien müssen recycelt werden, sofern möglich. Gebrauchte Batterien müssen
gemäß den örtlichen Umweltschutzvorschrien entsorgt werden.
Risque d’explosion si la batterie n’est pas du bon type. Les piles doivent être recyclées
quand cela est possible. Le rejet des batteries usagées doit être effectué en fonction des
réglementations locales.
C’è il rischio d'esplosioni se la batteria sostituita non è del tipo corretto. Le batterie
devono essere riciclate utilizzando gli appositi raccoglitori. Le batterie usate devono
essere smaltite in conformità alle leggi ambientali locali.
Hay riesgo de explosión si la batería se reemplaza por otra de tipo incorrecto. Las
baterías se deben reciclar donde sea posible. Deshágase de las baterías
usadas conforme a la normativa medioambiental local.
Характеристики батареи отличные от оригинальных могут привести к
разрушению корпуса элемента (микровзрыву). Использованные батареи
должны быть утилизированы в соответствии с рекомендациями местных
регулирующих органов.
Risco de explosão caso a bateria seja trocada por um tipo incorreto. As baterias devem
ser recicladas sempre que possível. O descarte das baterias usadas deve ser controladas
de acordo com os regulamentos ambientais locais.
배터리를잘못된타입으로교체하면폭발위험이있습니다.가능한한배터리를재활용하십시오. 수명이다한배터리는현지의환경규정에따라폐기해야합니다.
間違ったバッテリーへの交換は、破裂など事故の原因になります。可能であれ
ばバッテリーはなるべくリサイクルしてください。使用済みバッテリーは地域
の環境規制に従い処理してください。
English
- Warranty of host of NAS-9601 super m icrocomputer (casing excluded): 1 years
- Warranty of transformer (including the plug), remote control and wireless module: 1 year
- Our warranty does not cover the casing of the product, the CD drive, the metal frame and
fastenings and screws, or packaging accessories.
- Data stored in the product may be lost as a result of the repair work or re-formatting of the
hard drive disk. We does not provide data recovery services or data storage. Please back up
your data regularly to protect the data and avoid loss. For details of our warranty terms, please
refer to the individual warranty statement applicable to the district where your product was
bought.
繁體中文
- NAS-9601主機保固1年(但不含外殼)。- 變壓器(含Plug) 、遙控器、無線模組保固一年。- 產品的外殼、CD 、固定鐵架(含螺絲)、產品的包裝配件,恕不在保固範圍內- 產品內的資料可能因維修或重新格式化而遺失,華擎科技並無提供客戶資料 救援與保管之服務,強烈建議您應定時備份資料免於重要資料損壞。- 其他保固條款,請見產品購買地區之個別條款。Deutsch
- Garantie des Hosts des Super-Mikrocomputers der NAS-9601
(Gehäuse ausgenommen): 1 Jahre
- Garantie von Transformator (einschließlich Stecker), Fernbedienung und WLAN-Modul:
1 Jahr
- Unsere Garantie gilt nicht für das Gehäuse des Produktes, das CD-Laufwerk, den Metallrah
-men, die Befestigungen und Schrauben sowie das Verpackungszubehör.
- Auf dem Produkt gespeicherte Daten können in Folge der Reparatur oder Neuform atierung
der Festplatte verlorengehen. Wir bietet keine Datenwiederherstellungs dienste oder
Datenspeicherung. Bitte sichern Sie Ihre Daten zum Schutz der Daten und zur Vermeidung von
Datenverlust regelmäßig. Einzelheiten zu unseren Garantie
-bedingungen finden Sie in der für die Region, in der Ihr Produkt erworben wurde, geltenden
Garantieerklärung.
Français
- Garantie de l'hôte de la série NAS-9601 de micro-ordinateurs (boîtier exclu) : 1 ans
- Garantie du transformateur (prise comprise), de la télécommande et du module sans fil : 1 an
- Notre garantie ne couvre pas le boîtier du produit, le lecteur CD, le cadre métallique et les
fixations et vis, ainsi que les accessoires d'emballage.
- Les données stockées sur le produit peuvent être perdues suite à un travail de répar ation ou de
reformatage du disque dur. Nous ne fournit pas de services de récupé ration de données ou de
stockage de données. Veuillez sauvegarder vos données régulièrement pour protéger les données
et d'éviter leur perte.
- Pour les détails des conditions de notre garantie, reportez-vous à la déclaration de garantie
individuelle applicable au lieu d'achat de ce produit.
Italiano
- Garanzia degli host dei super microcomputer NAS-9601 (coperture escluse): 1 anni
- Garanzia del trasformatore (spina inclusa), telecomando e modulo wireless: 1 anno
- La nostra garanzia non copre le coperture del prodotto, l’unità CD, la struttura metallica,
i dispositivi di fissaggio e leviti, o gli accessori contenuti nella confezione.
- I dati archiviati nel prodotto potrebbero andare persi in seguito a lavori di riparazione
o ri-formattazione dell’unità HDD. Noi non fornisce servizi di recupero o archivia
-zione dei dati. Eseguire il backup dei dati regolarmente per proteggere i dati ed evitare perdite.
-Per i dettagli sui termini della garanzia, fare riferimento alle singole dichiarazioni di garanzia
applicabili alla zona in cui è stato acquistato il prodotto.
Español
- Garantía del host de supermicrocomputador de la serie NAS-9601
(sin incluir la carcasa): 1 años
- Garantía del transformador (incluido el enchufe), el mando a distancia y el módulo
inalámbrico: 1 año
- Nuestra garantía no cubre la carcasa del producto, la unidad de CD, el marco metálico y los
elementos de sujeción y tornillos o accesorios del paquete.
- Los datos almacenados en el producto pueden perderse como consecuencia de un trabajo de
reparación o de una nueva operación de formato en la unidad de disco duro. Nosotros no
proporciona servicios de recuperación de datos ni almacen
-amiento de datos. Haga una copia de seguridad de sus datos con cierta frecuencia para proteger
estos y evitar su pérdida.
- Para obtener detalles de nuestros términos de garantía, consulte la declaración de garantía
individual aplicable al distrito en el que adquirió el producto.
Русский
- Гарантия хоста супермикрокомпьютера серии NAS-9601 (без корпуса): 1 года
- Гарантия на трансформатор (вместе с вилкой), пульт ДУ и беспроводной модуль: 1 год
- Наша гарантия не распространяется на корпус изделия, дисковод для комп акт-дисков,
металлическую раму, а также крепления, винты и упаковочные принадлежности.
- В процессе проведения ремонтных работ или переформатирования жесткого диска
данные, хранящиеся в устройстве, могут быть утеряны. Mы не предоставляет услуг по
восстановлению или хранению данных. Регулярно выполняйте резервное копирование
данных, чтобы защитить их от утери. Подробные сведения об условиях гарантии
представлены в индивидуальном гарантийном талоне, действительном для местности,
в которой было приобр
-етено устройство.
Português
- Garantia de acolhimento de super microcomputador da série NAS-9601
(gabinete excluído): 1 anos
- Garantia de transformador (incluindo plugue), controle remoto e o módulo sem fio: 1 ano
- Nossa garantia não cobre o gabinete do produto, a unidade de CD, a estrutura de metal e os
fechos e parafusos, acessórios ou embalagem.
- Os dados armazenados no produto podem ser perdidos como resultado do trabalho de reparo
ação u re-formatação do disco rígido. A Nós não fornece serviços de recuperação de dados
ou armazenamento de dados. Favor faça backup de seus dados regularmente para proteger os
dados e evitar perdas. Para mais detalhes dos nossos termos de garantia, consulte a declaração
de garantia individual aplicável à zona onde o produto foi comprado. 한 국 어- NAS-9601 시리즈 수퍼 마이크로컴퓨터 호스트(케이스 제외)에 대한 보증: 1년- 변압기(플러그 포함), 리모컨 및 무선 모듈에 대한 보증: 1년 - 당사의 보증에는 제품의 케이스, CD 드라이브, 금속 프레임 및 고정 장치와 나사 또는 포장 액세서리가 포함되지 않습니다. - 제품에 저장된 데이터는 수리 작업을 하거나 하드 드라이브 디스크를 다시 포맷하면 손실될 수 있습니다. 우리는 데이터 복구 또는 데이터 저장 서비스를 제공하지 않습니다. 정기적으로 데이터를 백업하여 데이터를 보호하고 데이터 손실을 방지하십시오. - 보증 조건에 대한 자세한 내용은 제품을 구입한 지역에 적용되는 보증서를 참조하십시오.日本語- NAS-9601 シリーズスーパーマイクロコンピュータ(ケーシングは含まれません)のホストの保証: 1 年間- トランスフォーマー(プラグを含みます)、リモートコントロール、ワイヤレスモジュールの保証: 1 年間
- 製品のケーシング、CD ドライブ、金属製フレーム、および、固定具とねじ、または、パッケージング付属品は弊社の保証の対象外となります。
- ハードドライブディスクを修理したり、再フォーマットすると、製品內に保管されたデータが失われることがあります。我々はデーター回復サービスまたはデータ保管サービスは提供いたしません。データを保護して損失を防止するために、データを定期的にバックアップしてください。
- 弊社の保証条件の詳細については、製品を購入された地域に適用されるそれぞれの保証書を参照してください。
Failure to use the included Power Adapter may violate regulatory compliance and may
expose the user to safety hazards.
未能使用隨附的電源變壓器,可能違反法規並導致使用者受到安全危害。Wird das mitgelieferte Netzteil nicht verwendet, könnte die Richtlinienkonformität
verletzt werden; zudem setzt sich der Nutzer möglicherweise Sicherheitsrisiken aus.
Ne pas utiliser l'adaptateur secteur inclus peut enfreindre des lois de conformité
réglementaire et exposer l'utilisateur à des risques de sécurité.
Il mancato uso dell’adattatore di corrente fornito in dotazione, può violare la
conformità agli standard di sicurezza e può esporre l’utente a pericoli.
Un uso inadecuado del adaptador de alimentación incluido puede infringir el c
umplimiento de normativas y puede exponer al usuario a riesgos de seguridad.
Если не используется входящий в комплект поставки адаптер питания,
это нарушает нормативные требования и создает угрозу безопасности
пользователя.
A não utilização do adaptador de corrente incluído pode violar a conformidade
regulatória e pode expor o usuário a riscos de segurança.
함께 제공된 전원 어댑터를 사용하지 않으면 규정상 적합성을 위반하게 되고 이로써 사용자가 안전 위험에 노출될 수 있습니다.付属の電源アダプタを使用しないと、規制準拠に違反したり、ユーザー
が危険にさらされることがあります。
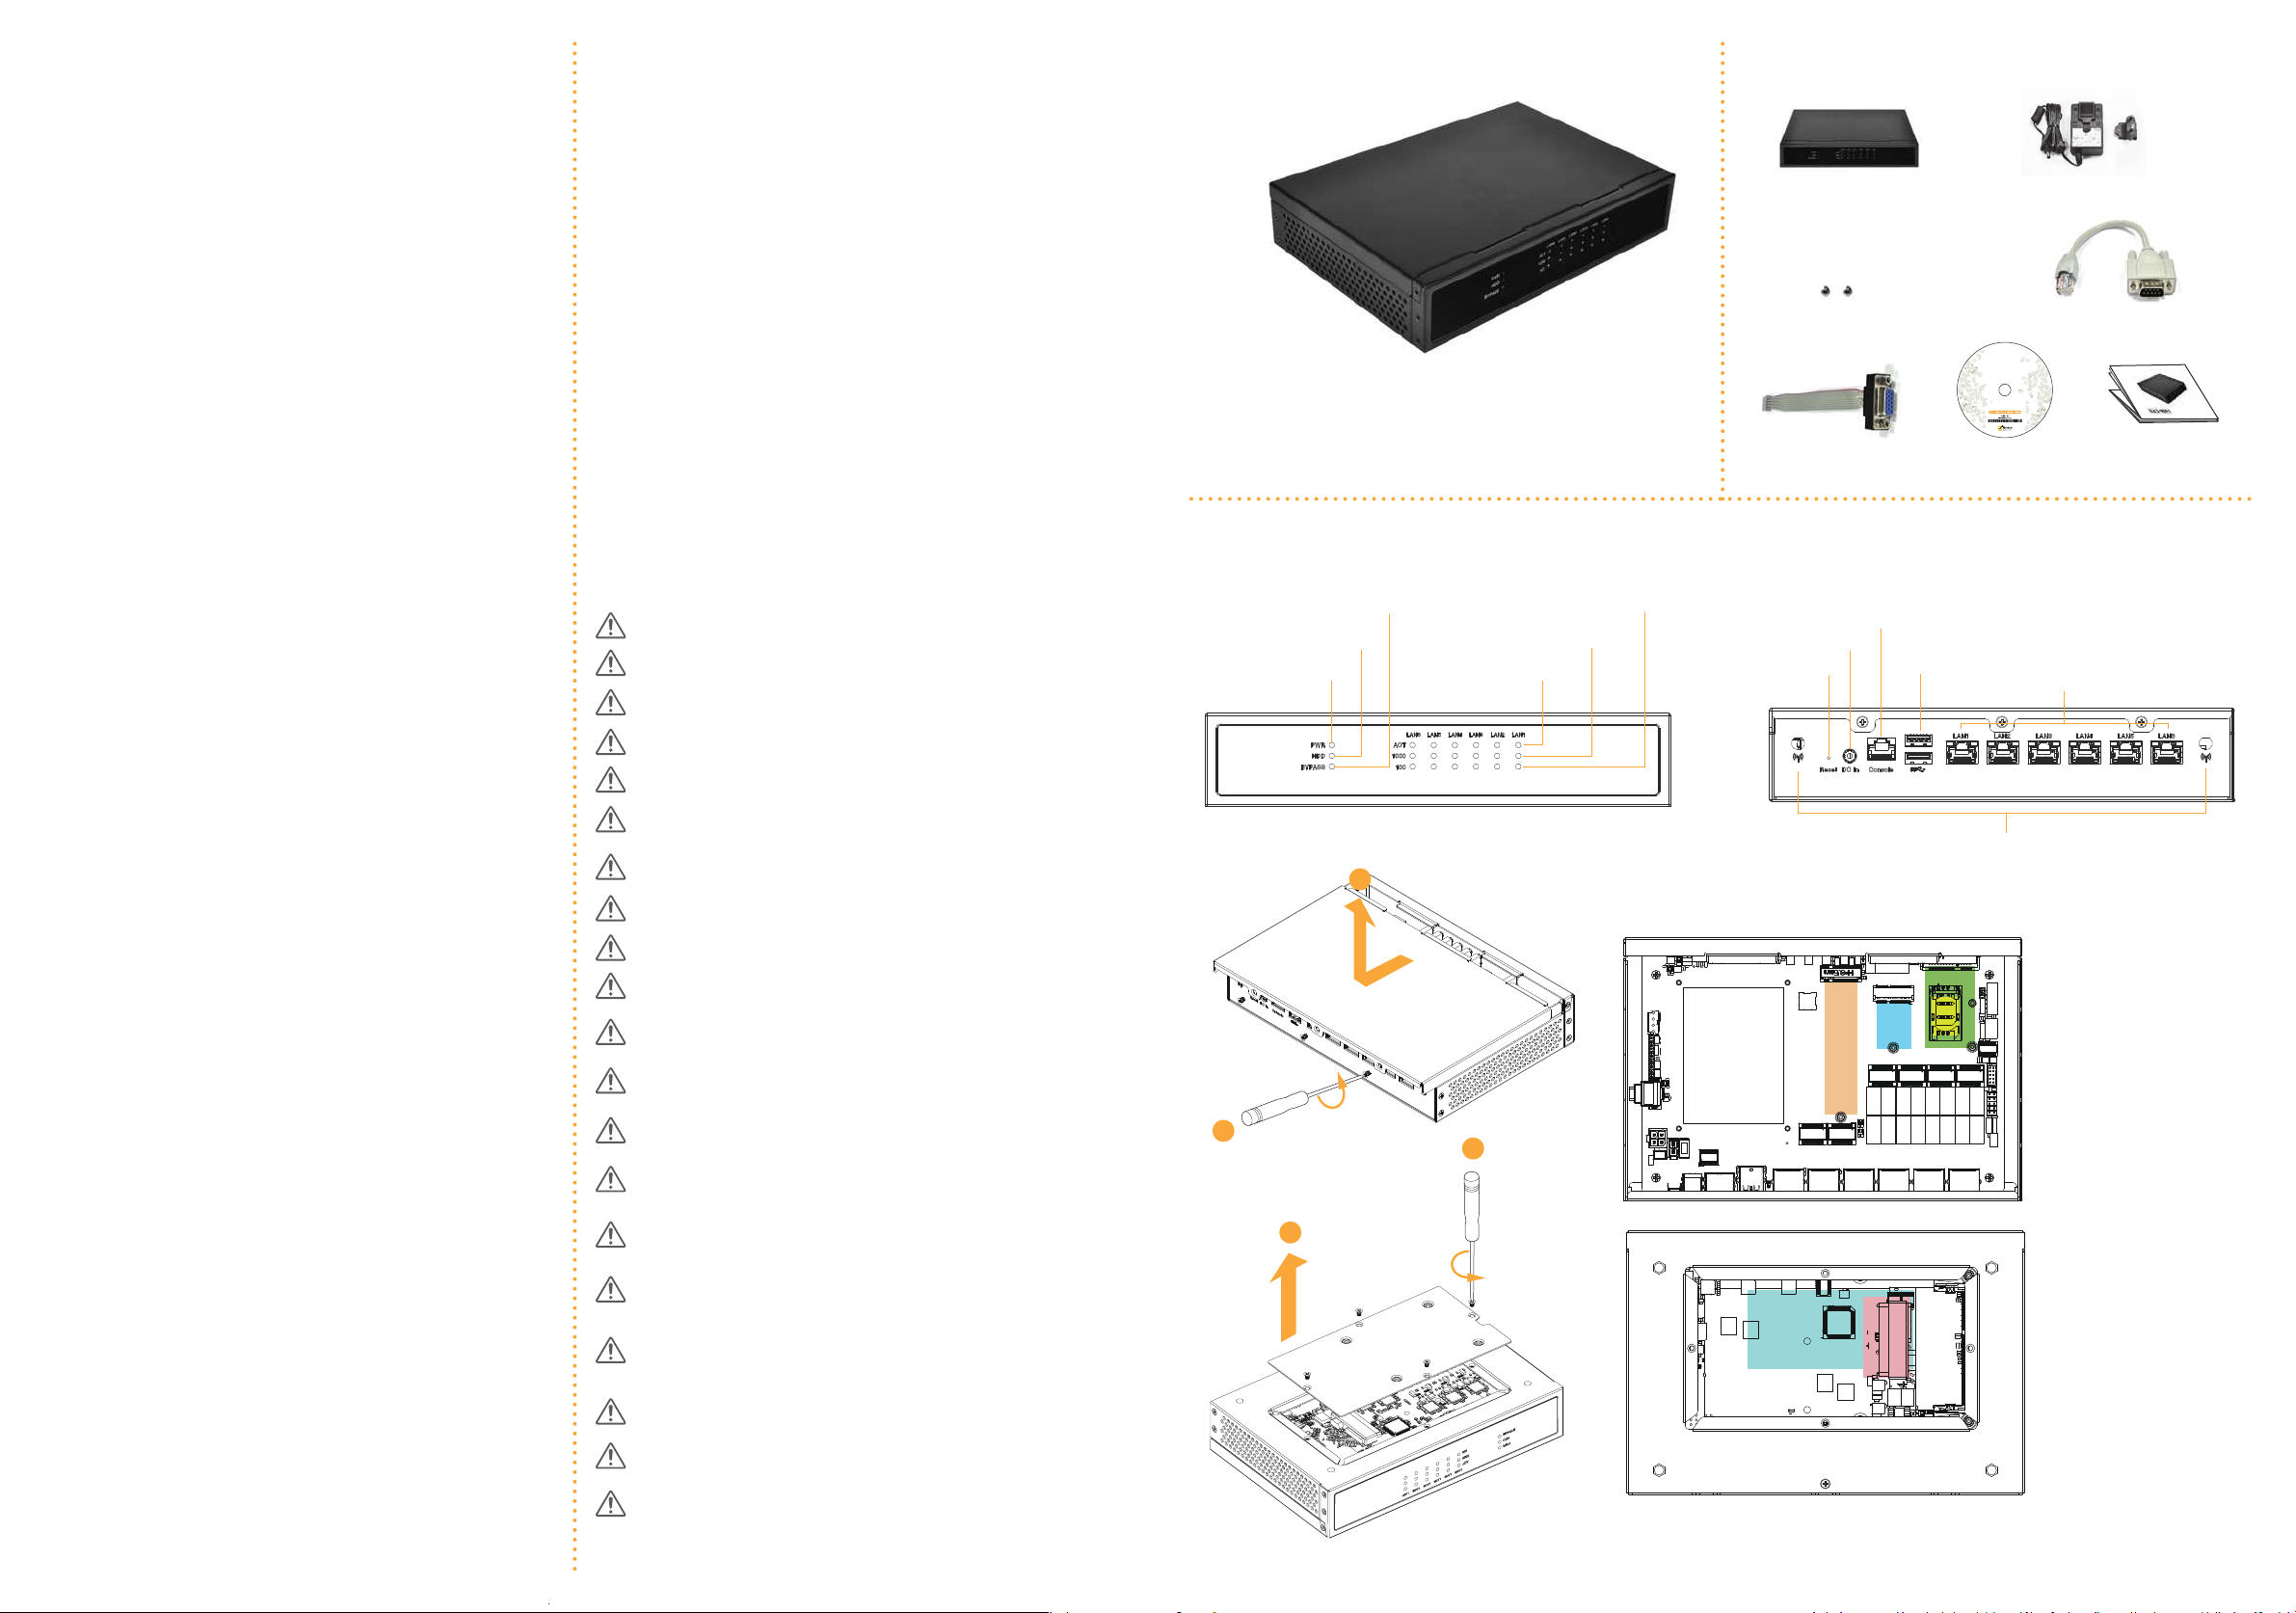
Product Overview
Package Contents
NAS-9601
NAS-9601
NAS-9601
*e barebone system does not include
memory, hard drive and mSATA SSD.
Power Adapter & Power Plug
RJ45 to COM Cable
Support CD
Safety & Regulatory Information
Warranty Term
Quick Installation Guide
VGA Cable
產品概述/ Produktübersicht / Aperçu du produit / Descrizione del prodotto / Información general del producto / Обзор изделия c Visão Geral do Produto/
제품 개요 / 製品概要2 x mSATA Screws
Power Status LED
HDD Status LED
Bypass Status LED
LAN Activity/Link LED
100M bps Connection Speed LED
1Gbps Connection Speed LED
2
1
C
A
B
E
F
2
1
Antennas (Optional)
Ethernet RJ-45
USB 3.0 (Type A)
Reset
DC-In
Console Output (RJ45 (No LED) COM port)
D
A
B
C
D
E
F
Mini PCIe Card
M.2 WiFi Module
M.2 SSD
SIM Card
SO-DIMM Slots
2.5-inch Hard Drive


