ASTROS AS-201 User manual

ASTROGATE INC.
1
1
ASTROS Station
AS-201
User manual

ASTROGATE INC.
2
2
Index
1Introduction..................................................................................................................................... 4
ASTROS Station 201 (AS-201) Key features highlight...................................................................... 4
2About ASTROS Station 201.............................................................................................................. 5
Package contents............................................................................................................................. 5
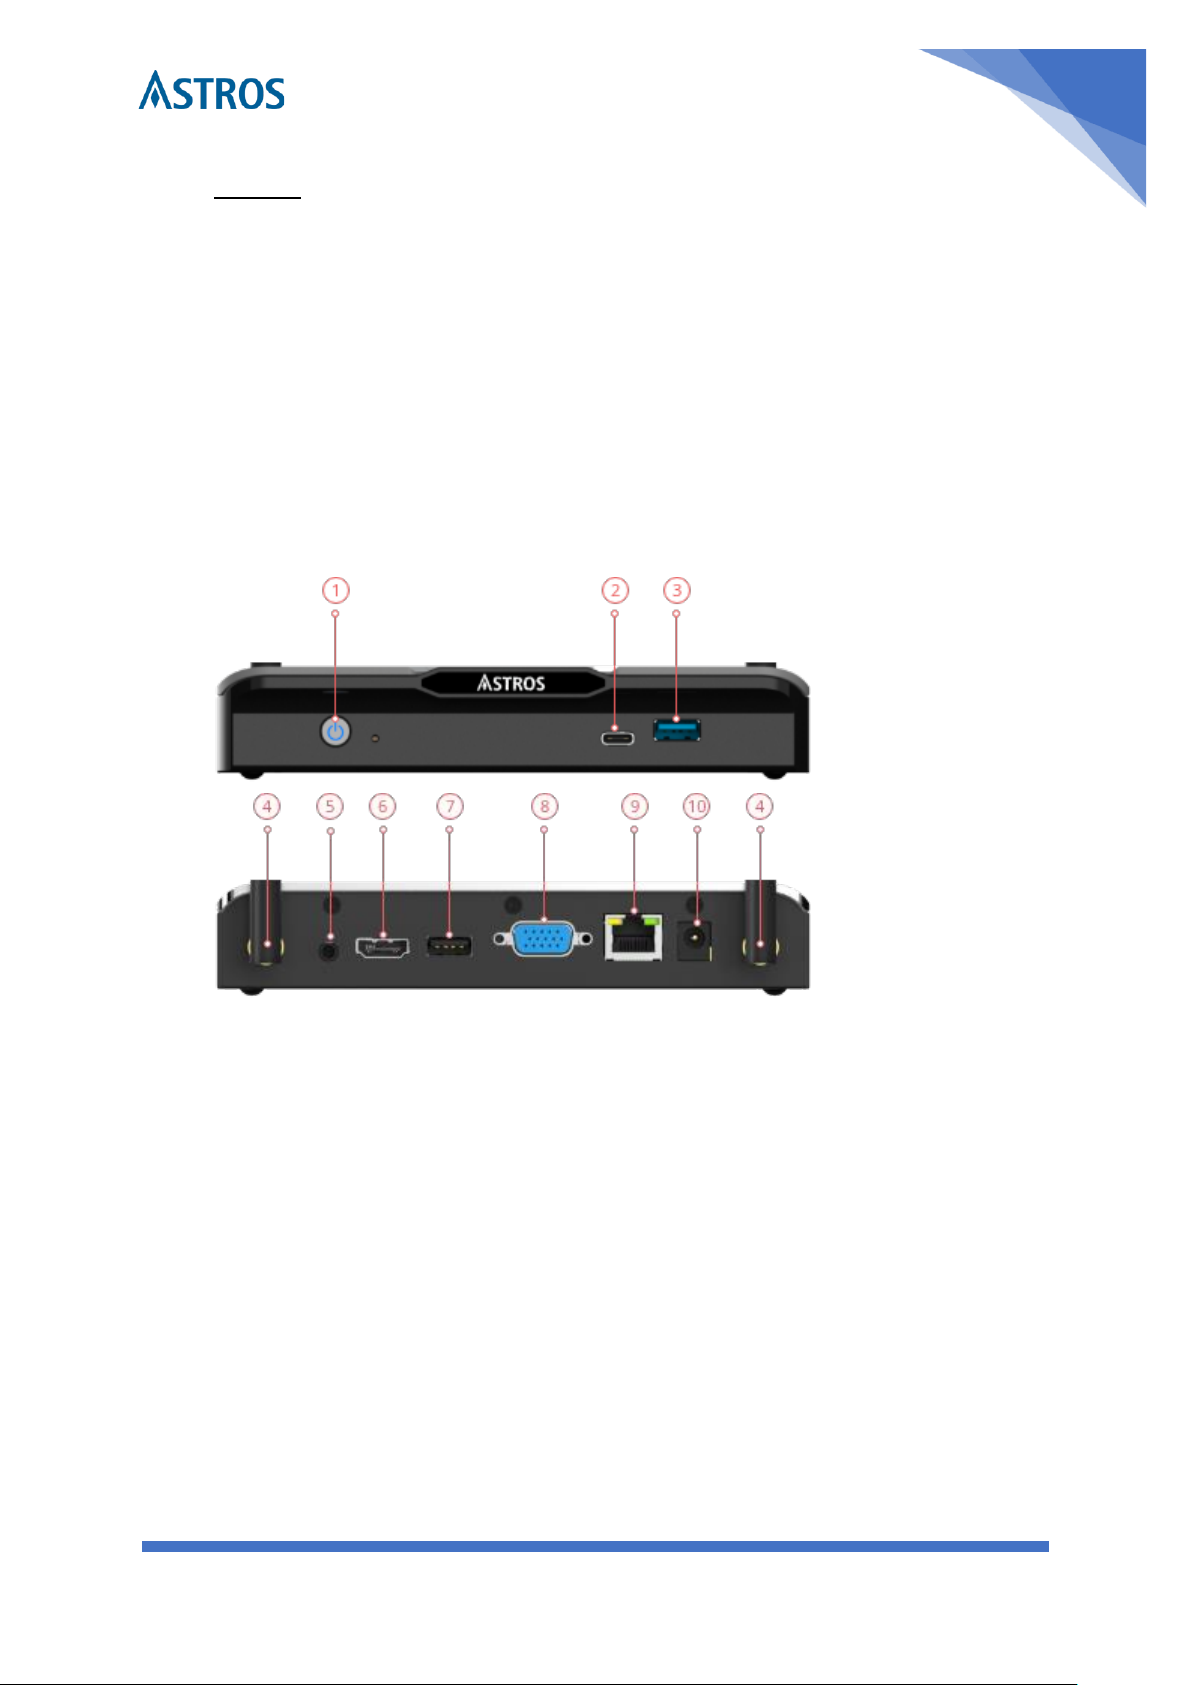
Interface .......................................................................................................................................... 5
Others.............................................................................................................................................. 6
3ASTROS Station Installation............................................................................................................. 7
3.1. Mounting................................................................................................................................ 7
Wall mounting................................................................................................................................. 7
3.2. ASTROS Station Configuration ............................................................................................... 7
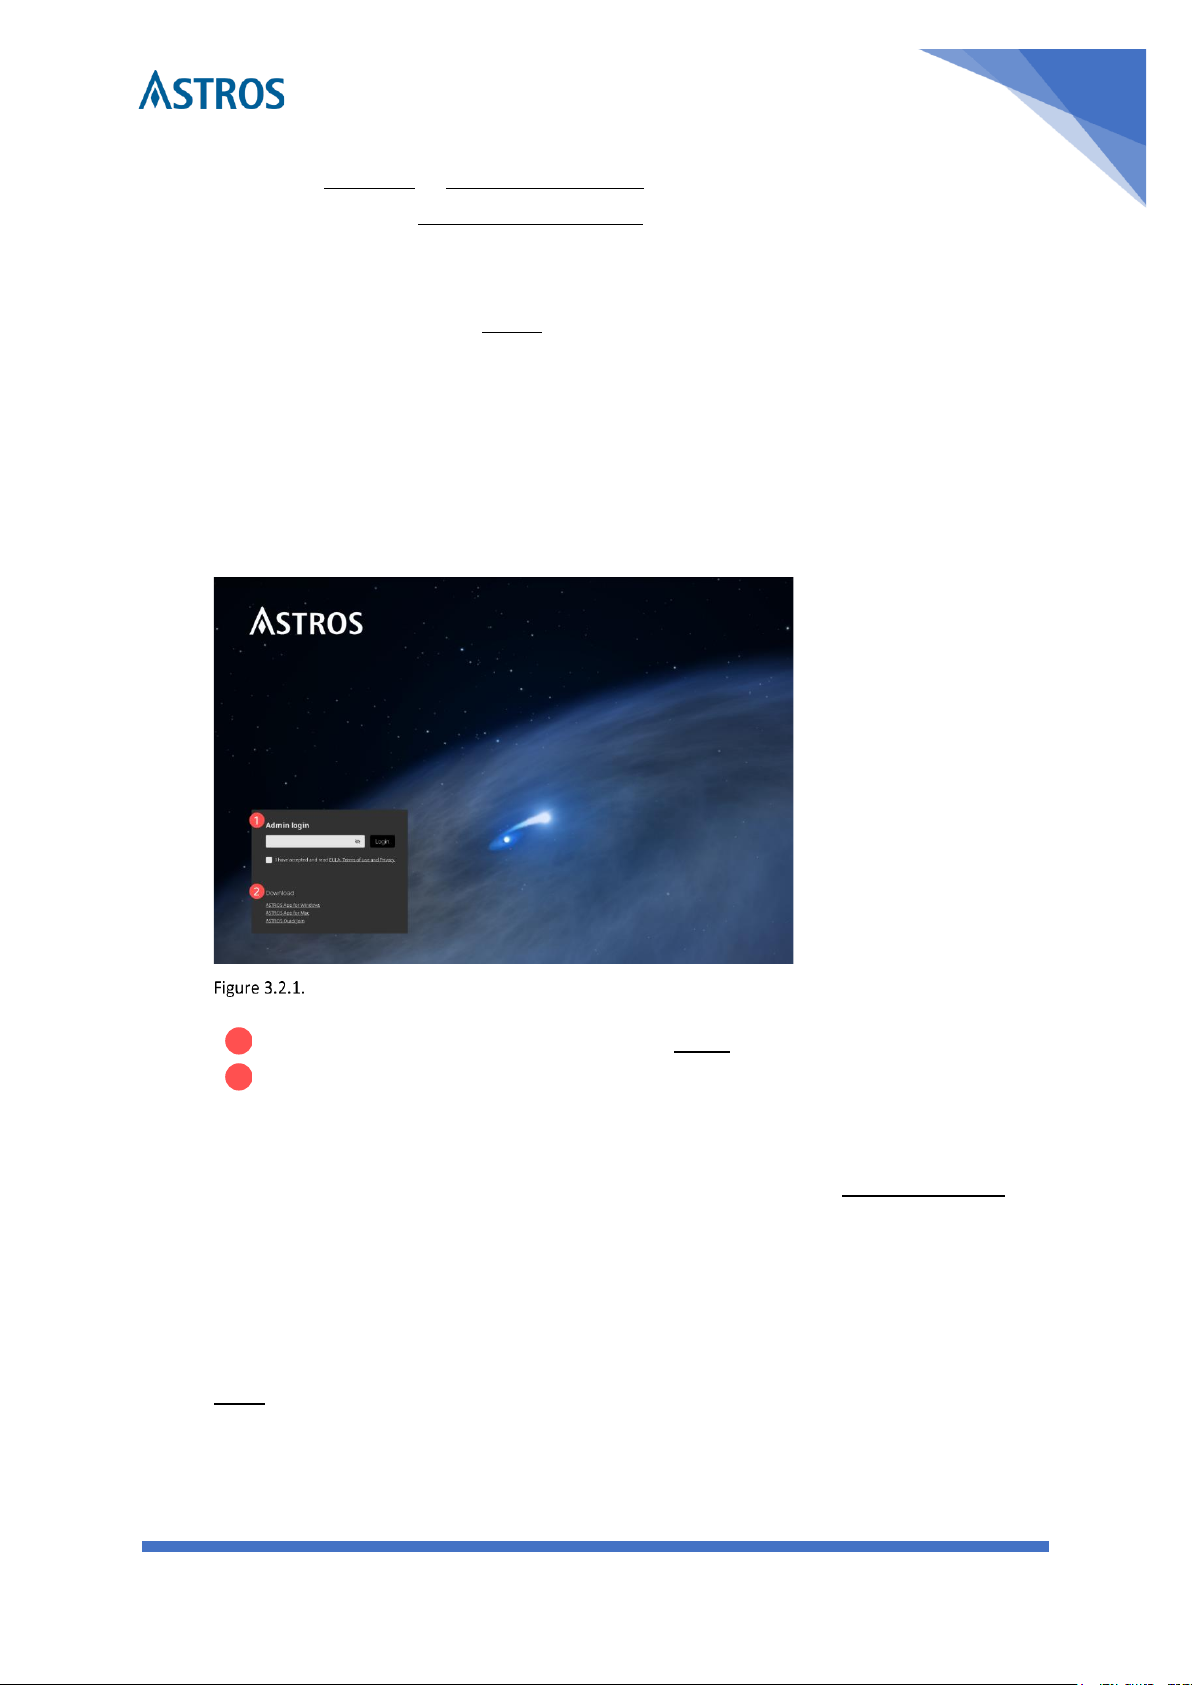
Access ASTROS configuration page................................................................................................. 7
The Landing Page............................................................................................................................. 8
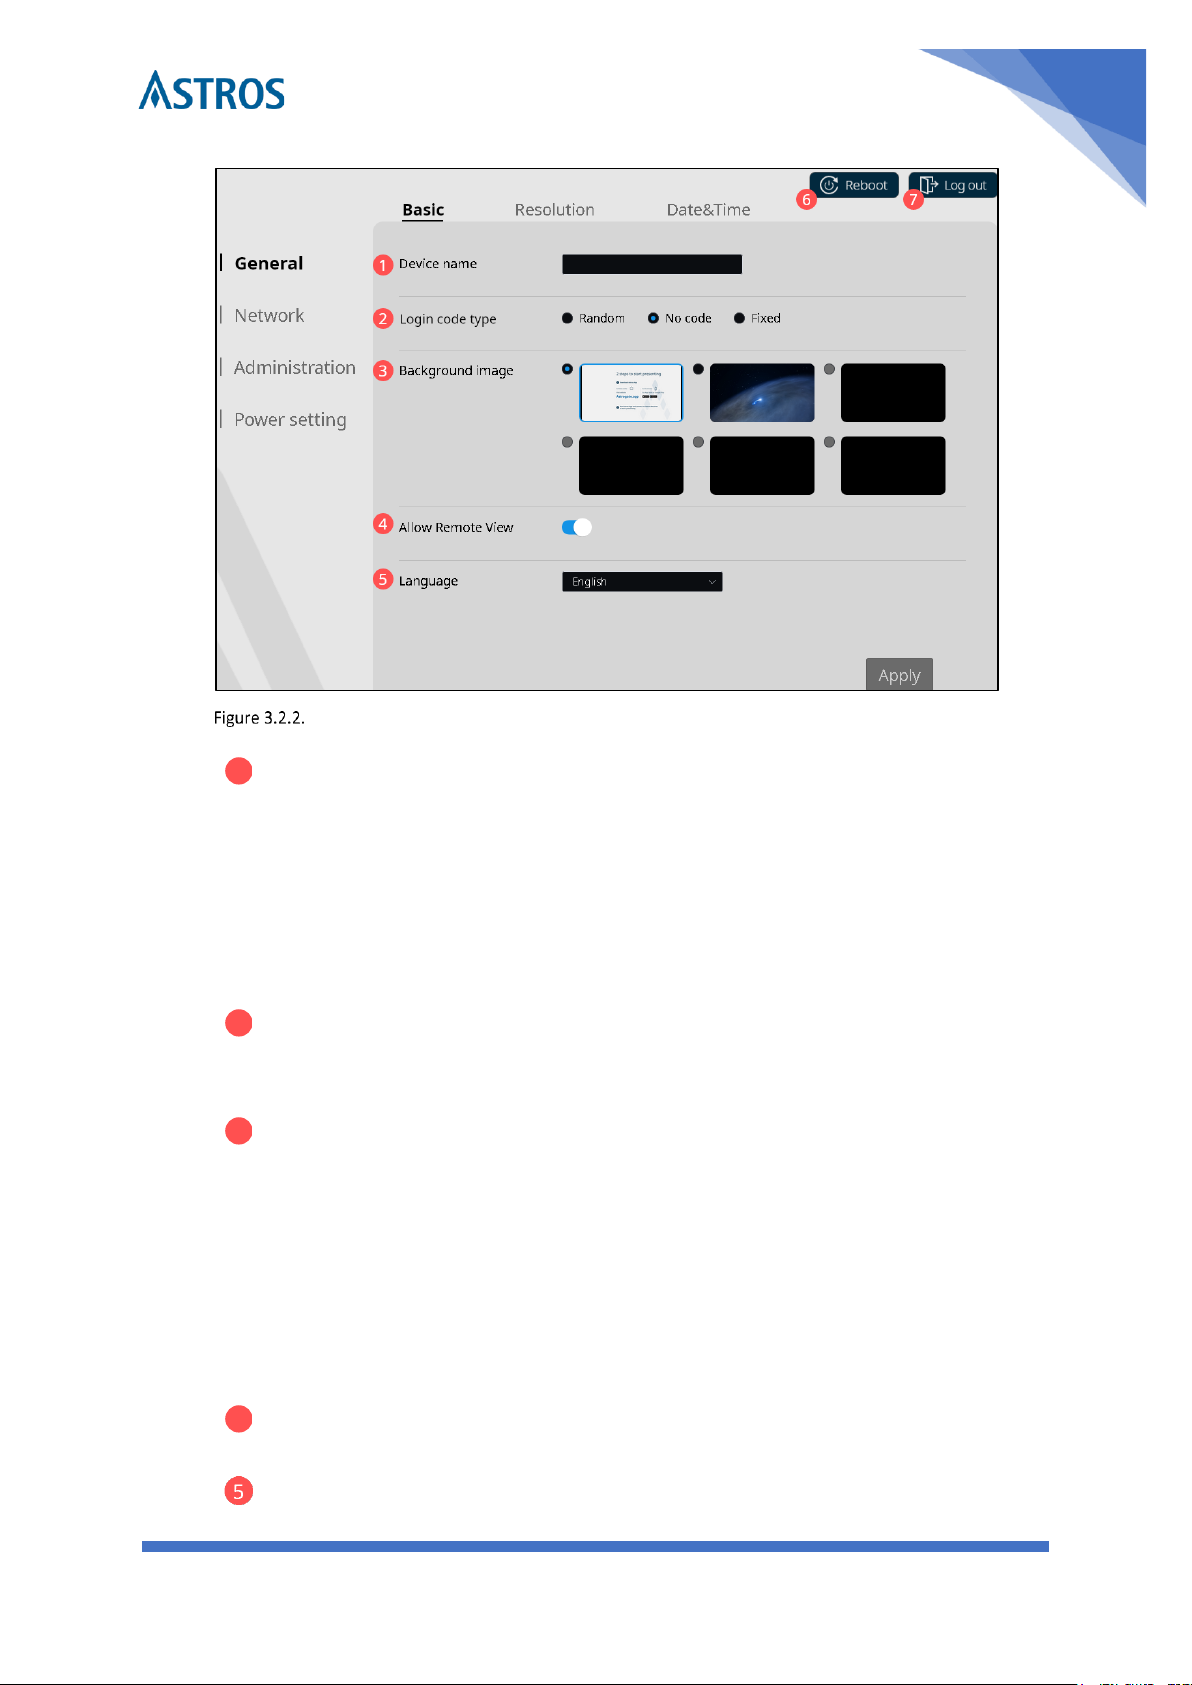
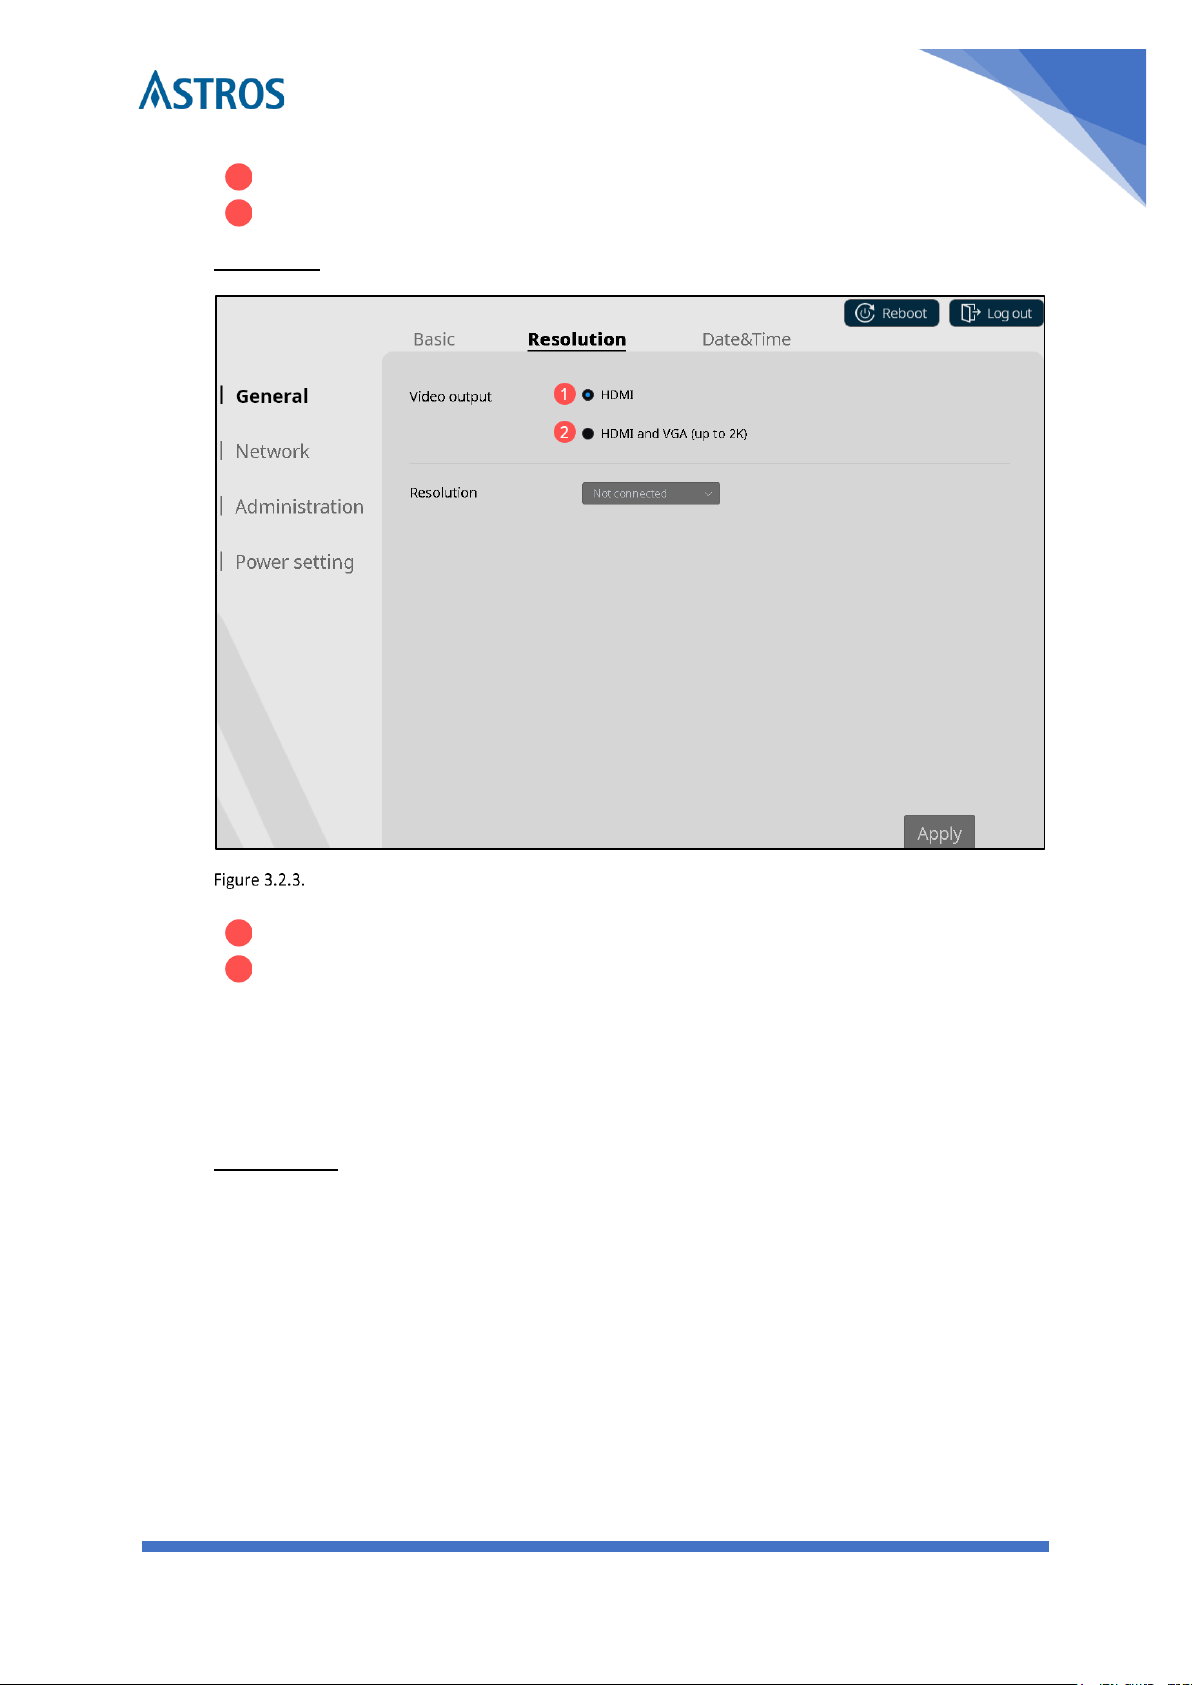
General............................................................................................................................................ 8
Network integration...................................................................................................................... 11
Administration............................................................................................................................... 15
Power setting ................................................................................................................................ 17
4Start Screen Sharing...................................................................................................................... 18
4.1. Download ASTROS App........................................................................................................ 18
4.2. Connect to an ASTROS Station using ASTROS App .............................................................. 18
Steps.............................................................................................................................................. 18
Station list (Nearby Stations)......................................................................................................... 19
Search bar...................................................................................................................................... 19
4.3. Operating ASTROS App for Windows/ macOS..................................................................... 19
Screen sharing ............................................................................................................................... 19
Other Features .............................................................................................................................. 21
Configure ASTROS App.................................................................................................................. 23
Enable sound for macOS projection.............................................................................................. 24

ASTROGATE INC.
3
3
Windows install-free version......................................................................................................... 24
4.4. Operating ASTROS App for Android or Chrome OS devices ................................................ 24
Screen sharing ............................................................................................................................... 24
4.5. Mirroring with native protocols........................................................................................... 25
Support AirPlay and Google Cast .................................................................................................. 25
5Operating the Standby Screen ...................................................................................................... 25
5.1. Overview.............................................................................................................................. 25
A Information panel ...................................................................................................................... 25
B Background image...................................................................................................................... 26
C Control Panel.............................................................................................................................. 26
C1 Touch Back ............................................................................................................................... 26
C2 User List.................................................................................................................................... 27
C3 Moderation Mode (on-screen)................................................................................................. 27
D Floating Menu and Collaboration Features ............................................................................... 27
D1 Whiteboard.............................................................................................................................. 27
D2 Annotation ............................................................................................................................... 28
D3 Screen Capture......................................................................................................................... 28
Access saved image....................................................................................................................... 28
5.2. Content arrangement .......................................................................................................... 29
Auto layout.................................................................................................................................... 29
Change position............................................................................................................................. 29

ASTROGATE INC.
4
4
1Introduction
ASTROS wireless presentation solution enables users to experience modern ways of
communication with Astrogate’s advanced network-based wireless AV distribution
technology. Cross-platform ASTROS Apps and our native mirroring protocol supported
allow users to present contents from various devices with existing network
infrastructure. ASTROS also offers collaboration features that work seamlessly with
touch displays to further increase the efficiency of communication and stimulate
creativity.
ASTROS Station 201 (AS-201) Key features highlight
High performance wireless presentation
-4K full screen or 2K split-screen wireless presentation
-4K video output
Screen sharing and advanced features by cross-platform ASTROS App
-Support Windows, macOS, Chrome OS, iOS and Android
-Window Sharing: choose to project entire screen or selected application window
on Windows and macOS
-Remote View: View and save the main screen with high quality in real time
-One-to-many: project different contents to maximum 4 ASTROS Stations
simultaneously
-Touch Back: remotely operate a touch-supported device from a touch display
-Native mirroring: AirPlay mirroring/streaming and Google Cast
Intuitive and collaborative main screen features
-contents shared on the main screen simultaneously- including AirPlay and Google
Cast
-Moderation Mode: control what is being presented to the audience
-Auto layout or manual layout: automatically arrange the presented contents, or
drag and drop to change the layout
-Whiteboard, annotation, and Screen Capture: quickly express idea during the
session
Manage ASTROS Station with ease
Browser-based ASTROS configuration page

ASTROGATE INC.
5
5
Network
Up to 20 users can connect to AS-201 simultaneously
Wireless access point supporting 802.11ac
Security: 4-digit Login code / data encryption
2About ASTROS Station 201
Package contents
ASTROS Station (AS-201) x1
Antennas x2
Quick Start Guide x1
Power adaptor (12V 2A) x1
Interface
1
Power button*
6
HDMI 1.4 out
2
USB Type-C
7
USB 2.0 Type-A
3
USB 3.0 Type-A
8
VGA out
4
Antenna
connectors
9
Ethernet port
5
Audio out
10
Power jack
*Power button and LED behavior
Enter/quit Sleep or Suspend mode: short press for 1 second
Factory reset: long press until "Restarting..." dialog appears on screen
Red: sleep mode; Blue: power on; Blinking red and blue: firmware updating
*USB devices support on AS-201
Mouse / Keyboard / USB flash drive

ASTROGATE INC.
6
6
Others
1. Product name and Model name: ASTROS Station AS-201
2. PSU power rating: 12V / 2A
3. POE power rating: 48V / 0.32A
4. Max. operating temperature: 0°- 40°
5. Max. storage temperature: -10°- 70°
6. Height of wall mounting: lower than 3 meters (suggested)
7. Warning:
-The RTC battery inside of the ASTROS Station is forbidden to charge,
decompose, heat or throw into fire.
-Do not ingest or swallow the RTC battery, or it can cause severe internal burns
in just 2 hours and can lead to death.
-Keep the RTC battery away from children.
-Please use in accordance with the product manual to avoid damage to the
product and affecting the warranty.
8. Warranty: 3 years
-Product problems caused by the following improper use will not be covered by
the warranty:
Disassemble or repair the product by yourself;
Disassemble or replace the RTC battery in the product;
Make the system short-circuit by spraying liquid improperly on the system;
Use equipment that is not in the product packing, such as power adapter or
antennas... etc.
-If you have any other questions, please contact our customer support or
distributor, and send the product for repair if necessary.

ASTROGATE INC.
7
7
3ASTROS Station Installation
3.1. Mounting
Wall mounting
1. Drill two holes in the wall with the distance shown on Figure 4.1.1. Use screw
anchors if needed
ASTROS Station bottom view
2. Drive in two screws.
The screw head diameter must be between 3.3 and 6 mm.
The screw rod diameter must be smaller than 3.3 mm.
Do not drive in the screws completely.
3. Hang the ASTROS Station to both screw heads and slide downwards until it’s fixed.
3.2. ASTROS Station Configuration
Access ASTROS configuration page
1. Prepare a device with web browser capability (a laptop is preferable)
2. Connect your device to the ASTROS Station
Make sure your device and the ASTROS Station are connected to the same network
For more information, see Network integration
3. On the Standby Screen, find ASTROS Station’s IP address on the left-hand side

ASTROGATE INC.
8
8
4. Type in https://IP or https://Device name in a web browser
For example, use https://192.168.120.11 on the default IP address when no
Ethernet cable is connected.
5. On the Landing Page, type in the administrator password.
The default password is admin.
! It is strongly suggested to change the administrator password the first time you
configure your AS-201.
! “https://” in IP address is necessary for the browser to direct to the ASTROS
configuration page correctly.
! You will be automatically logged out to the Landing Page if idle for 15 minutes.
The Landing Page
Admin login
Default login code is admin
Download apps
ASTROS App for Windows and macOS: redirect to Astrogate
website
ASTROS Quick Join: download a shortcut file with connection
information of this ASTROS Station; see ASTROS Quick Join for
more information.
! Download Windows installation-free app at
www.astrogate.com/support
General
Basic

ASTROGATE INC.
9
9
Station name input
The displayed name for this ASTROS Station. The name will
be displayed on the Standby Screen and ASTROS App’s
Station list. It will also be the SSID (WiFi name) for ASTROS
Station wireless access point.
Default name: AS201-xxxx
Format: A to Z, a to z, 0 to 9 and “-“ hyphen sign. Maximum
16 characters.
Select Login code type
Random: Login code enabled, generated randomly
No code: Login code disabled
Fixed: Login code enabled, customized 4 digits
Select background
image
There are two built-in images (unremovable) with the first
one selected as default. Hover your mouse to any empty
block and click on the “add” button to upload a custom
background image from your device. Hover your mouse on a
block with custom image, and click on the “delete” button to
delete the custom background image.
Image format: png or jpeg; width/height ratio between 1.5-
2.0; less then 4K resolution is recommended
Remote View switch
Enable this option will allow all users in the session to view
the main screen via ASTROS App.
Language selection
Select the language for this ASTROS Station.

ASTROGATE INC.
10
10
Reboot button
Click this button to reboot ASTROS Station.
Log out button
Log out to the landing page.
Resolution
HDMI only (default)
Maximum resolution is up to 4K resolution.
HDMI and VGA
duplicate
Enable dual-display output. In this mode, the maximum
resolution is up to 1080p.
! The available resolution depends on the connected monitor. When using dual-display
output, both will be set to the same resolution.
! When audio jack and HDMI are both connected, the audio will be duplicated.
Date & Time

ASTROGATE INC.
11
11
Time retrieval method
Automatic time retrieval by default.
Enabled: automatically retrieve time and date from specified
timer servers
Disabled: manually set time and date
! Time synchronization is necessary for screen projection.
Please ensure the date and time is set correctly.
Network integration
There are three types of setup to integrate the ASTROS Station to your organization
network (LAN). How an administrator or a user access the ASTROS Station depends on
which type of setup you choose.
! It is recommended to connect to the ASTROS Station via Ethernet when performing
Wi-Fi configuration.
! Switching Wi-Fi modes requires clicking Apply button to take effect.

ASTROGATE INC.
12
12
Wi-Fi setting page- 1
Wi-Fi setting page- 2

ASTROGATE INC.
13
13
Ethernet setting page
Type 1: ASTROS Station standalone network (recommended)
ASTROS Station standalone network
This is the default network state when you first time turn on an ASTROS Station,
without an Ethernet cable connected.
ASTROS Station will become a wireless access point with default SSID AS201-xxxx.
Under this circumstance, the default IP address is192.168.120.11.
With the following steps, you may set an ASTROS Station to Type1 mode:
1. On the ASTROS configuration page, navigate to Network > Wi-Fi

ASTROGATE INC.
14
14
2. Choose ASTROS Wi-Fi as AP (marked in Figure 4.2.5.)
3. Click on the Apply button
Advanced ASTROS wifi access point settings:
See Figure 4.2.5.
SSID
The broadcasted WiFi name of this ASTROS Station.
SSID by default is set to the same as the Station name. To
change this, go to General > Basic > Station name.
Security
Set WiFi protection mode to None or WPA2.
WPA2 password format: A to Z, a to z, 0 to 9; 8 to 16 characters.
Band selection
Select 5G (default; recommended) or 2.4G.
Type 2: ASTROS Station join another LAN via Ethernet cable (recommended)
ASTROS Station join another LAN via Ethernet
Same as Type 1, but Type 2 has a Ethernet cable connected to ASTROS Station.
ASTROS Station will be a wireless access point with default SSID AS201-xxxx and
default wireless IP address 192.168.120.11.
The Station will also obtain Ethernet IP address from the DHCP server, and display it
on the Standby Screen.
With the following steps, you may set an ASTROS Station to Type 2 mode:
1. On the ASTROS configuration page, navigate to Network > Wi-Fi
2. Choose ASTROS Wi-Fi as AP (see in Figure 4.2.5.)
3. Click on the Apply button
Advanced setting: you may choose to turn off ASTROS Station wireless access point
with the following steps:
1. On the ASTROS configuration page, navigate to Network > Wi-Fi
2. Choose ASTROS Wi-Fi off (see in Figure 4.2.6.)
3. Click on the Apply button

ASTROGATE INC.
15
15
Advanced setting: you may set static ethernet IP address instead of DHCP with the
following steps:
1. On the ASTROS configuration page, navigate to Network > Ethernet
2. Choose Static IP (see in Figure 4.2.7.)
3. Fill in valid IP information. All information should be in IPv4 format.
4. Click on the Apply button
Type 3: ASTROS Station join another LAN through Wi-Fi
ASTROS Station join another LAN through Wi-Fi
Type 3 setup allows you to integrate ASTROS Station to your organization LAN with
internal Wi-Fi. With this setup, users or administrators must connect their device to
the organization LAN to access ASTROS Station.
ASTROS Station will obtain IP address from the DHCP server, and display it on the
Standby Screen.
With the following steps, you may set an ASTROS Station to Type 3 mode:
1. On the ASTROS configuration page, navigate to Network > Wi-Fi
2. Choose ASTROS Wi-Fi connect to another AP (see in Figure 4.2.6.)
3. Find a wireless access point on the Wi-Fi list and connect (see in Figure 4.2.6.)
4. To connect to a wireless access point manually, click add button to start connection
process (see in Figure 4.2.6.)
5. Click on the Apply button
! Ethernet cable must be removed for Type 3 to take effect.
Administration
Update
There are two ethods to upgrade a ASTROS Station.
1. Update ASTROS Station Over-the-air (OTA)

ASTROGATE INC.
16
16
Click “Check for update” to check latest firmware version.
If new version is found, click “Upgrade”.
The firmware download begins. ASTROS Station will start firmware upgrade
process when download is complete. The configuration page will not be
accessible until the upgrade process is completed.
2. Update ASTROS Station by uploading firmware manually
Download the latest ASTROS Station firmware from
https://www.Astrogate.com/support
Click on the “Browse” button to upload the latest ASTROS Station firmware, then click
on the “Upgrade” button to start the upgrade process.
Password & configuration
This page allows you to change configuration page password and perform system
settings.

ASTROGATE INC.
17
17
Change configuration
page password
Format: A to Z, a to z, 0 to 9; up to 16 characters.
Import or export
Station configuration
file
Format: json
Perform system reset
Turn on/off system log
recording
This feature is used for system or error diagnosis. Only turn
on per Astrogate technical support’s request.
! It is strongly suggested to change administrator password the first time you configure
your AS-201.
Power setting
This page allows you to choose ASTROS Station power button behavior when you press
it.
Sleep mode
In Sleep mode, ASTROS Station turn off only the video and audio output. Users can still
discover this ASTROS Station and connect.

ASTROGATE INC.
18
18
To enter Sleep mode: short press the power button for 1 second.
To quit Sleep mode: short press the power button for 1 second or any connection
attempt.
Enter Sleep mode automatically
When you set power button behavior to Sleep mode, you may set ASTROS Station to
automatically enter Sleep mode if no operation is made for a certain period.
Suspend mode
In Suspend mode, ASTROS Station will shut down all functions to decrease power
consumption to minimum.
To enter Suspend mode: short press power button for 1 second.
To quit Suspend mode: short press power button for 1 second.
4Start Screen Sharing
4.1. Download ASTROS App
Windows and macOS:
Go to Astrogate.app website to download the ASTROS App for your device
Android and iOS: search for ASTROS App in Google Play or App Store
! Learn more about ASTROS App supported OS and version in the Specification sheet
4.2. Connect to an ASTROS Station using ASTROS App
Steps
(1) Launch the ASTROS App
(2) On the Station list, find the name same as the “Station name” shown on the
information panel of the Standby Screen.
(3) If the Station name does not appear on the Station list, open your device’s Wi-Fi
list and look for the Station name and connect. Then repeat step 1.
! Depending on the ASTROS Station network setup, you may be able to connect to
ASTROS via organization network, Wi-Fi direct connection or both. See Network
integration for more information.
(4) Click the Connect toggle.

ASTROGATE INC.
19
19
Station list (Nearby Stations)
ASTROS App will all the Stations accessible on the network
Search bar
You can use Search bar to:
(1) Type in key characters to quickly find the ASTROS Station you are looking for.
(2) Type in IP address to connect to a specific ASTROS Station on the same network as
your device
4.3. Operating ASTROS App for Windows/ macOS
Screen sharing
Play/ Pause and Stop button
When you first connect to an ASTROS Station, click the Play button to start projecting
your entire screen to the main screen.
While projecting, click the Pause button will freeze your projection on the last frame.

ASTROGATE INC.
20
20
When clicking the Stop button, the ASTROS App will instantly stop projecting your
screen.
Window Sharing button
You can choose to project only a specific application window or the entire screen. Click
Window Sharing button to make your selection then click on the Play button to
project.
Full screen button
Click on the “Full screen” button to force your projection to switch between full screen
and split screen.
Mute button
Click on the Mute button to turn on or off the audio of your projection.
Table of contents