manuals.online logo
Brands
  1. Home
  2. •
  3. Brands
  4. •
  5. Optoma
  6. •
  7. Projector Accessories
  8. •
  9. Optoma BX-AL133B User manual

Optoma BX-AL133B User manual

Other Optoma Projector Accessories manuals

Optoma PCT-101 User manual

Optoma

Optoma PCT-101 User manual

Optoma OWM1000 User manual

Optoma

Optoma OWM1000 User manual

Optoma A16 User manual

Optoma

Optoma A16 User manual

Optoma BX-AL133 User manual

Optoma

Optoma BX-AL133 User manual

Optoma A16 UST Series User manual

Optoma

Optoma A16 UST Series User manual

Optoma BM-3300ST User manual

Optoma

Optoma BM-3300ST User manual

Optoma ZF2100 Glasses User manual

Optoma

Optoma ZF2100 Glasses User manual

Optoma WS-9211G User manual

Optoma

Optoma WS-9211G User manual

Optoma OWM855 User manual

Optoma

Optoma OWM855 User manual

Optoma 3D-RF System User manual

Optoma

Optoma 3D-RF System User manual

Optoma OWM3000 User manual

Optoma

Optoma OWM3000 User manual

Optoma 3D-XL Technical manual

Optoma

Optoma 3D-XL Technical manual

Optoma ALR100 Installation guide

Optoma

Optoma ALR100 Installation guide

Optoma BM-9005U User manual

Optoma

Optoma BM-9005U User manual

Optoma CM-E75X User manual

Optoma

Optoma CM-E75X User manual

Optoma Projector User manual

Optoma

Optoma Projector User manual

Optoma 3D-XL User manual

Optoma

Optoma 3D-XL User manual

Optoma WPS User manual

Optoma

Optoma WPS User manual

Optoma TX778W User manual

Optoma

Optoma TX778W User manual

Optoma BX-AL133B User manual

Optoma

Optoma BX-AL133B User manual

Optoma UHDCast Pro Quick manual

Optoma

Optoma UHDCast Pro Quick manual

Optoma AKPro User manual

Optoma

Optoma AKPro User manual

Optoma 3D-RF System User manual

Optoma

Optoma 3D-RF System User manual

Optoma BM-5001U Guide

Optoma

Optoma BM-5001U Guide

Popular Projector Accessories manuals by other brands

PEERLESS PE 1120 Installation and assembly

PEERLESS

PEERLESS PE 1120 Installation and assembly

Osram SIRIUS HRI Series Directions for use

Osram

Osram SIRIUS HRI Series Directions for use

Presentation Switchers PS111 quick start

Presentation Switchers

Presentation Switchers PS111 quick start

Kramer VIA GO user manual

Kramer

Kramer VIA GO user manual

Yamaha PJL-112 Replacement guide

Yamaha

Yamaha PJL-112 Replacement guide

Mitsubishi Electric 236CB Features

Mitsubishi Electric

Mitsubishi Electric 236CB Features

Epson BrightLink 475Wi user guide

Epson

Epson BrightLink 475Wi user guide

Acer WP100 quick guide

Acer

Acer WP100 quick guide

Biamp Modena Hub Network administrator's guide

Biamp

Biamp Modena Hub Network administrator's guide

Panamorph DCR-S3 installation guide

Panamorph

Panamorph DCR-S3 installation guide

Exact solutions FRAME-EVO-P10 manual

Exact solutions

Exact solutions FRAME-EVO-P10 manual

i3 i3board user manual

i3

i3 i3board user manual

CHIEF VCM103S installation instructions

CHIEF

CHIEF VCM103S installation instructions

InFocus LP70+ Replacement instructions

InFocus

InFocus LP70+ Replacement instructions

Sharp AN-PH20EZ Operation manual

Sharp

Sharp AN-PH20EZ Operation manual

PDR UPM51 product manual

PDR

PDR UPM51 product manual

CHIEF HB-43E installation instructions

CHIEF

CHIEF HB-43E installation instructions

Sony LMP-F250 operating instructions

Sony

Sony LMP-F250 operating instructions

manuals.online logo
manuals.online logoBrands
  • About & Mission
  • Contact us
  • Privacy Policy
  • Terms and Conditions

Copyright 2025 Manuals.Online. All Rights Reserved.

© Copyright 2009 Optoma Technology, Inc. All specifications subject to change at any time. DLP®and the DLP logo are registered trademarks of Texas Instruments.
www.optoma.com
Datasheet – BX-AL133B
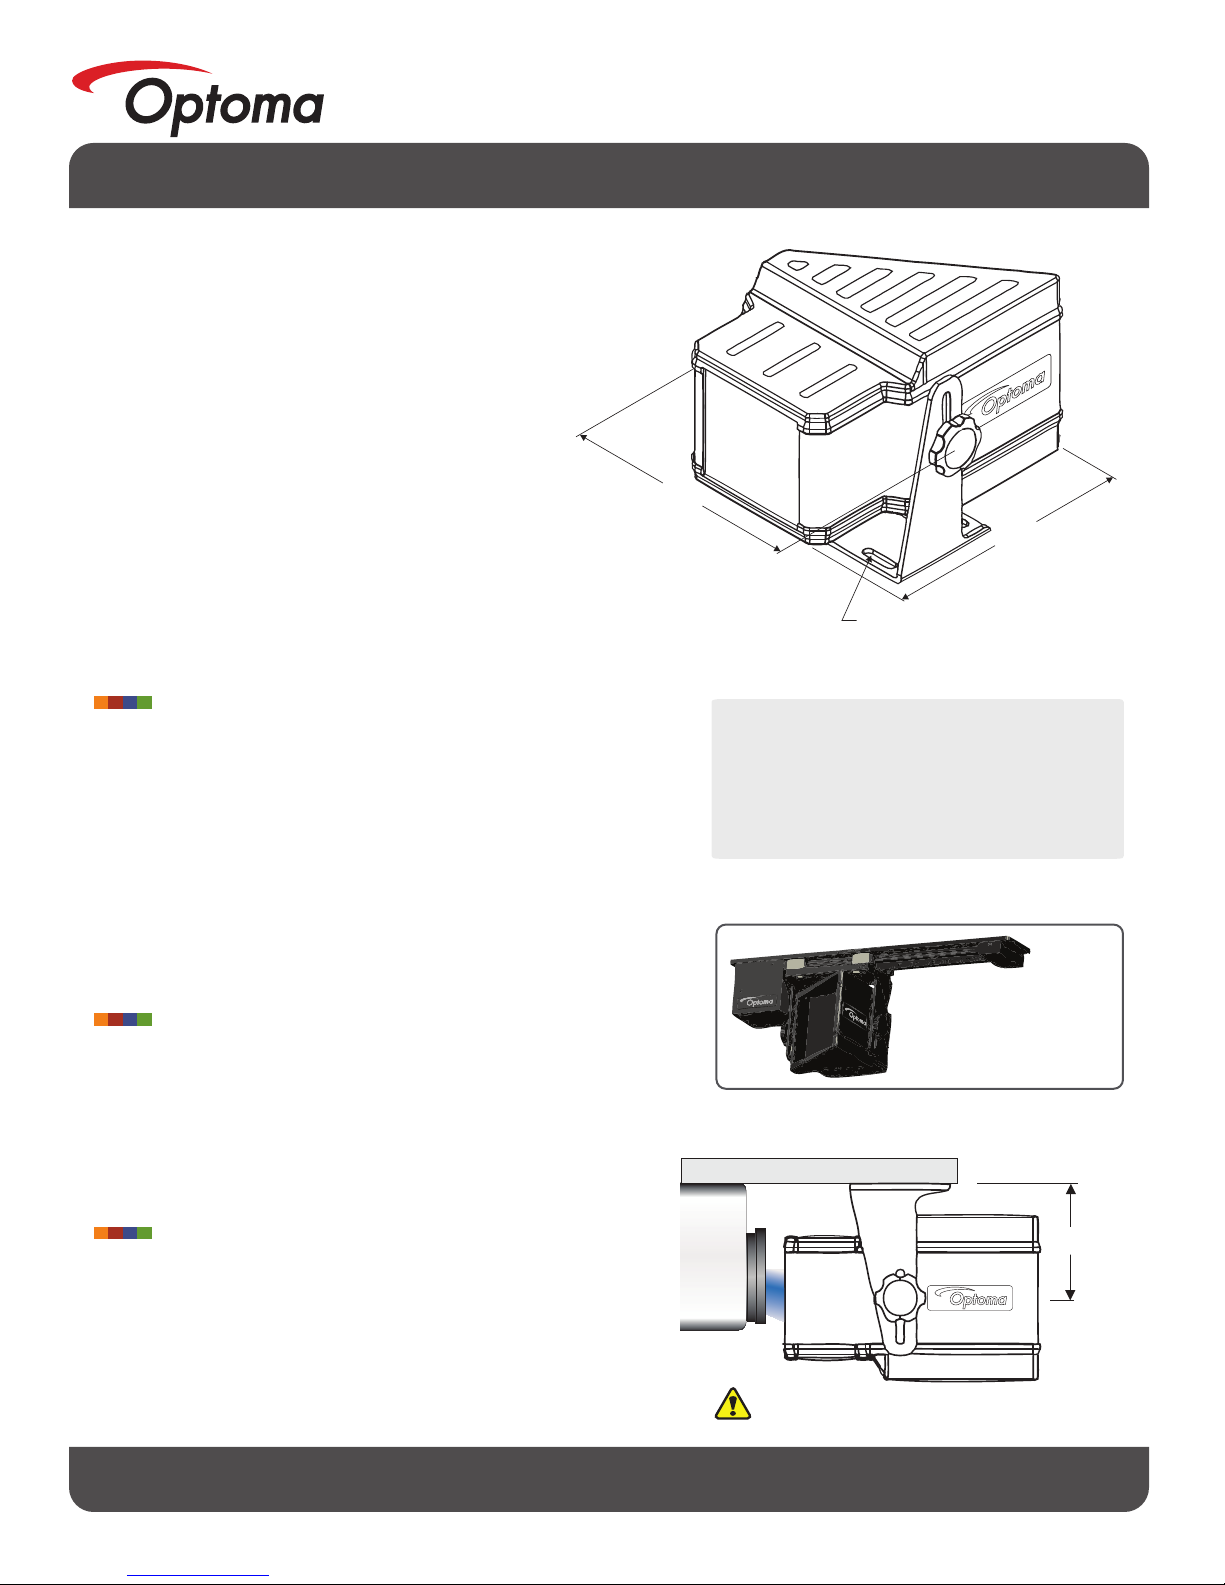
6.92”
(knob end to knob end)
7.70”
Four bracket mounting slots
accept 1/4” screws
Ceiling Structure or Projector Plate
2.75” to 4.5”
The BX-AL133B lens is a heavy product. Use
extreme caution if hanging from ceiling.
When using the BX-AL133B
mount please follow the
instructions for proper installation
Optics:
Transmission:
System Weight:
Patented, coated, five-element glass
achromatic, anastigmatic design
Minimum 20% net brightness increase
versus standard letterbox imaging.
8.5lbs. (3.9kg) with bracket
Assembled in the USA using components made in the USA and other countries.
BX-AL133B − Anamorphic Lens
With Optoma’s anamorphic lens, the option to create a true
cinematic setting is easier than ever. The Optoma
BX-AL133B Anamorphic Lens offers true 2.35:1 aspect
ratio in genuine movie theater style to match many of
today’s DVD and HD offerings.
Optoma’s BX-AL133B anamorphic lens is easy to
install and will work perfectly with a home
theater projector that is either sitting
table-top or mounted. The accompanying
mounting bracket can be attached directly to
the ceiling or a projector plate. A self-made riser
block may be needed if the bracket itself does not
allow for proper positioning.
To use: Mount the BX-AL133B as close to the projector lens as
possible, so that the projector beam enters the center of the rear
lens opening. Leave enough room to tilt the anamorphic lens within the
bracket so that the shape of the image is the same at the top and bottom.
BASIC REQUIREMENTS
The width of the projector beam should be less than three (3)
inches from where it enters the Optoma BX-AL133B
anamorphic lens
The recommended minimum throw distance from the
projector lens to the screen should be at least 12 feet
The throw distance divided by the image width (“throw ratio”)
should be at least 1.6, prior to adding the Optoma BX-AL133B
Before attaching the lens, the image must appear vertical
stretched; this can be done by selecting the “LBX” aspect
ratio from the projector’s display menu
NOTES
Any rotation of the lens around the vertical axis will
slightly shift the image in a horizontal direction
To clean: Lightly blow off any surface debris from the
lens. If needed, clean the lens using standard camera
cleaning supplies while the projector is on (be careful
not to look directly into the light beam of the projector)
LIMITED WARRANTY
Optoma Technology Inc., warrants this product to be free of defects in
original workmanship and material for a period of twenty-four (24)
months from the date of purchased. During this period, a defective unit
may be repaired or replaced, at the discretion of Optoma Technology
inc., by returning it in its original packaging with a copy of your receipt.
This warranty does not cover damage as a result from lack of proper
care, accident, misuse or any cosmetic damage not reported within
fifteen (15) days of purchase. Damages are limited to the cost of the
product. A service charge may be applied to any returned product
requiring cosmetic attention or to the repair of any damage not covered
under this warranty.