Asus Eee PC T101MT User manual

15G06Q212000
Eee PC
User Manual
Windows®7 Edition
Eee PC T101MT
E5119

ii
Table of Contents
Table of Contents
About This User’s Manual ......................................................................................................iv
Notes for This Manual .............................................................................................................iv
Safety Precautions.....................................................................................................................v
Chapter 1: Knowing the Parts
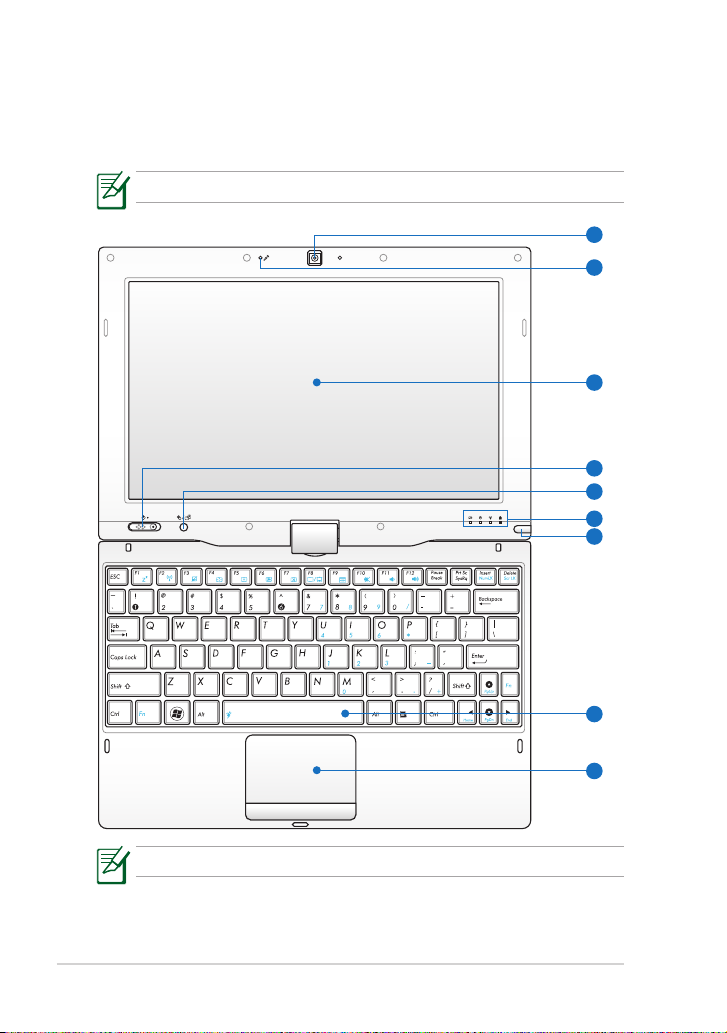
Top Side ....................................................................................................................................1-2
Bottom Side.............................................................................................................................1-5
Front Side .................................................................................................................................1-6
Right Side ................................................................................................................................. 1-7
Left Side ....................................................................................................................................1-7
Rear Side...................................................................................................................................1-8
Keyboard Usage...................................................................................................................1-10
Special Function Keys .........................................................................................1-10
Touchpad Usage..................................................................................................................1-12
Multi-finger gesture input.................................................................................1-12
Tablet PC Mode....................................................................................................................1-14
Chapter 2: Getting Started
Powering on your Eee PC ...................................................................................................2-2
First-time Startup ..................................................................................................................2-3
Desktop.....................................................................................................................................2-5
Network Connection............................................................................................................2-6
Configuring a wireless network connection.................................................2-6
Local Area Network................................................................................................2-7
Browsing web pages...........................................................................................2-10
Chapter 3: Using the Eee PC
ASUS Update...........................................................................................................................3-2
Updating the BIOS through the Internet.......................................................3-2
Updating the BIOS through a BIOS file...........................................................3-3
Bluetooth Connection (on selected models) ..............................................................3-4
Super Hybrid Engine............................................................................................................3-6
Super Hybrid Engine Modes...............................................................................3-6

ASUS Eee PC
iii
Eee Docking Touch Tool Bar ..............................................................................................3-7
Fun Touch ..................................................................................................................3-7
Eee Amuse ................................................................................................................3-8
Eee Sharing...............................................................................................................3-9
Eee Xperience..........................................................................................................3-9
Eee Tools ....................................................................................................................3-9
Boingo (on selected models) ..........................................................................................3-10
Touch Gate Mode .................................................................................................3-10
Touch Gate Mode................................................................................................................3-11
Using Touch Gate Mode ....................................................................................3-11
Changing Function Shortcuts..........................................................................3-12
Switching back to Windows Mode.................................................................3-13
Microsoft®Office Trial.........................................................................................................3-14
Chapter 4: Support DVD & System Recovery
Support DVD information..................................................................................................4-2
Running the support DVD...................................................................................4-2
Drivers menu............................................................................................................4-3
Utilities menu...........................................................................................................4-3
Contact.......................................................................................................................4-3
Other information ..................................................................................................4-3
System Recovery....................................................................................................................4-4
Using Recovery Partition (F9 Recovery) .........................................................4-4
Using the Support DVD........................................................................................4-4
Boot Booster............................................................................................................................4-6
Appendix
Declarations and Safety Statements ..............................................................................A-2
Copyright Information......................................................................................................A-12
Limitation of Liability ........................................................................................................ A-13
Service and Support..........................................................................................................A-13

iv
Table of Contents
About This User’s Manual
You are reading the Eee PC User’s Manual.This User’s Manual provides
information regarding the various components in the Eee PC and how to
use them.The following are major sections of this User’s Manual:
1. Knowing the Parts
Provides information on the Eee PC’s components.
2. Getting Started
Provides information on getting started with the Eee PC.
3. Using the Eee PC
Provides information on using the Eee PC’s utilities.
4. Support DVD and System Recovery
Gives you information on support DVD contents and system
recovery.
5. Appendix
Gives you safety statements.
The actual bundled applications differ by models and territories.
There may be differences between your Eee PC and the pictures
shown in this manual. Please accept your Eee PC as being correct.
Notes for This Manual
A few notes and warnings are used throughout this guide, allowing you
to complete certain tasks safely and effectively.These notes have different
degrees of importance as follows:
WARNING! Important information that must be followed for safe
operation.
IMPORTANT! Vital information that must be followed to prevent
damage to data, components, or persons.
TIP: Tips for completing tasks.
NOTE: Information for special situations.

ASUS Eee PC
v
Safety Precautions
The following safety precautions will increase the life of the Eee PC. Follow
all precautions and instructions. Except as described in this manual, refer
all servicing to qualified personnel. Do not use damaged power cords,
accessories, or other peripherals. Do not use strong solvents such as
thinners, benzene, or other chemicals on or near the surface.
DO NOT leave the Eee PC
on your lap or any part
of the body to prevent
discomfort or injury from
heat exposure.
DO NOT expose to dirty or
dusty environments.DO
NOT operate during a gas
leak.
DO NOT expose to strong
magnetic or electrical fields.
DO NOT expose to or
use near liquids, rain, or
moisture. DO NOT use the
modem during electrical
storms.
DO NOT place together
with small items that may
scratch or enter the Eee PC.
DO NOT place on uneven
or unstable work surfaces.
Seek servicing if the casing
has been damaged.
DO NOT place or drop
objects on top and do not
shove any foreign objects
into the Eee PC.
Disconnect the AC power before cleaning.Wipe the Eee PC using a
clean cellulose sponge or chamois cloth dampened with a solution
of nonabrasive detergent and a few drops of warm water and
remove any extra moisture with a dry cloth.
Battery safety warning: DO
NOT throw the battery in
fire. DO NOT short circuit
the contacts. DO NOT
disassemble the battery.

vi
Table of Contents
DO NOT throw the Eee PC in municipal waste. This product has
been designed to enable proper reuse of parts and recycling.The
symbol of the crossed out wheeled bin indicates that the product
(electrical, electronic equipment and mercury-containing button
cell battery) should not be placed in municipal waste.Check local
regulations for disposal of electronic products.
DO NOT throw the battery in municipal waste.The symbol of the
crossed out wheeled bin indicates that the battery should not be
placed in municipal waste.
SAFE TEMP: This Eee PC
should only be used
in environments with
ambient temperatures
between 5°C (41°F) and
35°C (95°F).
INPUT RATING: Refer to the
rating label on the bottom
of the Eee PC and be sure
that your power adapter
complies with the rating.
Transportation Precautions
To prepare your Eee PC for transport, you should turn it OFF and
disconnect all external peripherals to prevent damage to the
connectors.The hard disk drive’s head retracts when the power is turned
OFF to prevent scratching of the hard disk surface during transport.
Therefore, you should not transport your Eee PC while the power
is still ON. Close the display panel to protect the keyboard and display
panel.
The Eee PC’s surface is easily dulled if not properly cared for. Be careful
not to rub or scrape surfaces when transporting your Eee PC.You can put
your Eee PC in a carrying case for protection from dirt, water, shock, and
scratches.
Incorrect installation of
battery may cause explosion
and damage the Eee PC.
DO NOT carry or cover a
Eee PC that is powered
ON with any materials that
will reduce air circulation
such as a carrying bag.

ASUS Eee PC
vii
Charging Your Batteries
If you intend to use battery power, be sure to fully charge your battery
pack before going on long trips.Remember that the power adapter
charges the battery pack as long as it is plugged into the computer and an
AC power source.Be aware that it takes much longer to charge the battery
pack when the Eee PC is in use.
Remember to fully charge the battery (8 hours or more) before first use
and whenever it is depleted to prolong battery life.The battery reaches its
maximmum capacity after a few full charging and discharging cycles.
Airplane Precautions
Contact your airline if you want to use the Eee PC on the airplane. Most
airlines have restrictions for using electronic devices. Most airlines allow
electronic use only between and not during takeoffs and landings.
There are three main types of airport security devices: X-ray
machines (used on items placed on conveyor belts), magnetic
detectors (used on people walking through security checks), and
magnetic wands (hand-held devices used on people or individual
items).You can send your Eee PC and diskettes through airport X-ray
machines. However, it is recommended that you do not send your
Eee PC or diskettes through airport magnetic detectors or expose
them to magnetic wands.

viii
Table of Contents

Top Side
Bottom Side
Right Side
Left Side
Front Side
Rear Side
Keyboard Usage
Touchpad Usage
Tablet PC Mode
1
Knowing the Parts

Chapter 1: Knowing the Parts
1-2
Top Side
Refer to the diagram below to identify the components on this side of the
Eee PC.
The top side may vary in appearance depending on model.
The keyboard differs for each territory.
4
7
5
6
8
9
3
2
1

ASUS Eee PC
1-3
Built-in Camera
High Quality Microphone (Built-in)
The built-in high quality microphone is more clear and echo-free
compared with traditional single microphones.
Touch Screen Panel
The touch screen panel allows you to operate your Eee PC using
your finger or the touch screen pen.
Power Switch (Windows 7)
The power switch allows powering ON and OFF the Eee PC and
recovering from standby mode.Slide and release the switch to
turn ON, or slide and hold it to turn OFF the Eee PC.The power
switch only works when the display panel is opened.
Power Indicator
The power indicator lights when the Eee PC is turned ON
and blinks slowly when the Eee PC is in the
Suspend-to-RAM (Sleep) mode.This indicator is OFF when
the Eee PC is turned OFF.
Express Gate Button (on selected models)
When the Eee PC is turned off, pressing this button will launch
Express Gate. Express Gate is an ASUS exclusive OS that provides
you with quick access to the Internet and key applications
without entering the Windows® OS.
/ Home Key (Windows 7)
Shortly press this key to launch the Touch Gate touch screen
interface. Press and hold this key to preview desktop rotation, and
then release the key to finish desktop rotation.
1
2
3
4
5

Chapter 1: Knowing the Parts
1-4
Status Indicators
Battery Charge Indicator
The battery charge indicator (LED) shows the battery
charging status as follows:
Powered ON / Standby mode
With Adapter Without Adapter
High battery power
(95%–100%) Green ON Off
Medium battery
power (10%–94%) Orange ON Off
Low battery power
(0%–10%) Orange Blinking Orange Blinking
Powered OFF
With Adapter Without Adapter
High battery power
(95%–100%) Green ON Off
Medium battery
power (11%–94%) Orange ON Off
Low battery power
(0%–10%) Orange Blinking Off
Storage Device Indicator
The storage device indicator blinks when data is written to
or read from the storage device.
Wireless/Bluetooth Indicator
This is only applicable on models with built-in wireless
LAN/Bluetooth.When the built-in wireless LAN/Bluetooth is
enabled, this indicator lights.
Capital Lock Indicator
Indicates that capital lock [Caps Lock] is activated when
lighted.
Touch screen Pen Compartment
The touch screen pen compartment allows storage of the pen
used on the touch screen panel.
7
6

ASUS Eee PC
1-5
8
9
Keyboard
The keyboard provides keys with comfortable travel (depth at
which the keys can be depressed) and palm rest for both hands.
Touchpad and Buttons
The touchpad and its buttons comprises a pointing device that
provides the same functions as a desktop mouse. Multi-finger
gesture input is available to allow easy web and document
navigation.

Chapter 1: Knowing the Parts
1-6
Battery Lock - Manual
The manual battery lock is used to keep the battery pack secured.
Move the manual lock to the unlocked position to insert or
remove the battery pack. Move the manual lock to the locked
position after inserting the battery pack.
1
Bottom Side
Refer to the diagram below to identify the components on this side of the
Eee PC.
The bottom side may vary in appearance depending on model.
1
2
5
4
3
The bottom of the Eee PC can get very hot. Be careful when handling
the Eee PC while it is in operation or recently been in operation.High
temperatures are normal during charging or operation. DO NOT
use on soft surfaces such as beds or sofas, which may hinder heat
dissipation. DO NOT PUT THE Eee PC ON YOUR LAP OR OTHER
PARTS OF THE BODY TO AVOID INJURY FROM THE HEAT.

ASUS Eee PC
1-7
Battery Lock - Spring
The spring battery lock keeps the battery pack secure.When
the battery pack is inserted, it will automatically lock.When
removing the battery pack, this spring lock must be retained in
the unlocked position.
Memory Compartment
The memory module is secured in a dedicated compartment.
Battery Pack
The battery pack is automatically charged when connected
to an AC power source and maintains power to the Eee PC
when AC power is not connected.This allows use when moving
temporarily between locations.Battery time varies by usage and
by the specifications for this Eee PC.The battery pack cannot be
disassembled and must be purchased as a single unit.
Air Vents
The air vents allow cool air to enter and warm air to exit the Eee
PC.
Ensure that paper, books, clothing, cables, or other objects do not
block any of the air vents or else overheating may occur.
4
3
2
Front Side
Refer to the diagram below to identify the components on this side of the
Eee PC.
1
Audio Speaker System
The built-in stereo speaker system allows you to hear audio
without additional attachments.The multimedia sound system
features an integrated digital audio controller that produces rich,
vibrant sound (results improved with external stereo headphones
or speakers). Audio features are software controlled.
1
5

Chapter 1: Knowing the Parts
1-8
1
Right Side
Refer to the diagram below to identify the components on this side of the
Eee PC.
1
USB Port (2.0)
The USB (Universal Serial Bus) port is compatible with USB 2.0 or
USB 1.1 devices such as keyboards, pointing devices, cameras, and
storage devices, connected in a series up to 12Mbits/sec (USB 1.1)
and 480Mbits/sec (USB 2.0). Also, the USB supports hot-swapping
function.
21 3 4
Left Side
Refer to the diagram below to identify the components on this side of the
Eee PC.
Air Vents
The air vents allow cool air to enter and warm air to exit the Eee
PC.
Ensure that paper, books, clothing, cables, or other objects do not
block any of the air vents or else overheating may occur.
1

ASUS Eee PC
1-9
2
3
Microphone Jack
The microphone jack is designed to connect the microphone
used for Skype, voice narrations, or simple audio recordings.
Headphone Output Jack
The 1/8”stereo headphone jack (3.5mm) connects the Eee PC’s
audio out signal to amplified speakers or headphones. Using this
jack automatically disables the built-in speakers.
Memory Card Slot
The built-in memory card reader can read MMC/SD/SDHC cards.
4
Rear Side
Refer to the illustration below to identify the components on this side of
the Eee PC.
2 3 4 5
6 7
1
1
2
3
USB Port (2.0/1.1)
LAN Port
The eight-pin RJ-45 LAN port (10/100M bit) supports a standard
Ethernet cable for connection to a local network.The built-in
connector allows convenient use without additional adapters.
Display (Monitor) Output
The 15-pin D-sub monitor port supports a standard VGA-
compatible device such as a monitor or projector to allow
viewing on a larger external display.

Chapter 1: Knowing the Parts
1-10
4
Power (DC) Input
The supplied power adapter converts AC power to DC power
for use with this jack. Power supplied through this jack supplies
power to the Eee PC and charges the internal battery pack.To
prevent damage to the Eee PC and battery pack, always use the
supplied power adapter.
THE ADAPTER MAY BECOME WARM TO HOT WHEN IN USE.BE
SURE NOT TO COVER THE ADAPTER AND KEEP IT AWAY FROM
YOUR BODY.
Kensington® Lock Port
The Kensington® lock port allows the Eee PC to be secured
using Kensington® compatible security products.These security
products usually include a metal cable and lock that prevent the
Eee PC to be removed from a fixed object.
Battery Charge Indicator
The battery charge indicator (LED) shows the status of the
battery’s power. Refer to the LED status table on pages 1-3 to 1-4.
Power Indicator
The power indicator lights when the Eee PC is turned ON and
blinks slowly when the Eee PC is in the Suspend-to-RAM (Sleep)
mode.This indicator is OFF when the Eee PC is turned OFF.
5
6
7

ASUS Eee PC
1-11
Keyboard Usage
Special Function Keys
The following defines the colored hot keys on the Eee PC’s keyboard.The
colored commands can only be accessed by first pressing and holding the
function key while pressing a key with a colored command.Some function
icons appear in the Notification area after activation.
The Hot Key locations on the function keys may vary depending on
model but the functions should remain the same. Follow the icons
whenever your hot key locations do not match the manual.
Z
z
Icon (F1): Places the Eee PC in sleep mode
(Suspend-to-RAM).
Radio Tower (F2) (Wireless Models Only): Toggles
the internal wireless LAN or Bluetooth (on selected
models) ON or OFF with an on-screen-display.
When enabled, the corresponding wireless indicator
will light.
The default setting is WLAN ON / Bluetooth OFF.
Touchpad (F3):Toggles the touchpad ON/OFF.
Resolution Selection (F4): Press to adjust the display
resolution.
Sun Down Icon (F5): Decreases the display brightness.
Sun Up Icon (F6): Increases the display brightness.
Crossed Screen Icon (F7):Turns off the display backlight.
LCD/Monitor Icons (F8):Toggles between the Eee PC’s
LCD display and an external monitor.

Chapter 1: Knowing the Parts
1-12
Task Manager Icon (F9): Initiates the Task Manager to
view the application process or terminates applications.
Crossed Speaker Icon (F10): Mutes the speaker.
Volume Down Icon (F11): Decreases speaker volume.
Volume Up Icon (F12): Increases the speaker volume.
Super Hybrid Engine (Fn+Space Bar): Toggles among
various power saving modes.The selected mode is shown
on the display.
Num Lk (Insert):Toggles the numeric keypad
(number lock) ON and OFF. Allows use of a larger portion of
the keyboard for number entering.
Scr Lk (Delete): Toggles the“Scroll Lock” ON and OFF.
Allows you to use a larger portion of the keyboard for cell
navigation.
Pg Up (↑): Press to scroll up in documents or the web
browser.
Pg Dn (
↓
): Press to scroll down in documents or the web
browser.
Home (
←
): Press to move the pointer to the beginning of
the line.
End (
→
): Press to move the pointer to the end of the line.
Windows icon: Displays the start menu.
Menu with pointer icon : Activates the properties menu
and is equivalent to right-clicking the touchpad/mouse on
an object.
This manual suits for next models
5
Table of contents
Other Asus Laptop manuals

Asus
Asus T300L series User manual

Asus
Asus FX505DY Series User manual

Asus
Asus E7814 Guide

Asus
Asus L84L Manual

Asus
Asus N73SV User manual

Asus
Asus VivoBook 14 User manual

Asus
Asus F7400 User manual

Asus
Asus F5Z Instructions for use

Asus
Asus Eee Pad Transformer Prime TF201 Guide

Asus
Asus Chromebook Flip C213NA BW0034 Guide