AT&T TCL 30Z User manual

USER MANUAL

Table of Contents
1 Your device.................................................................... 2
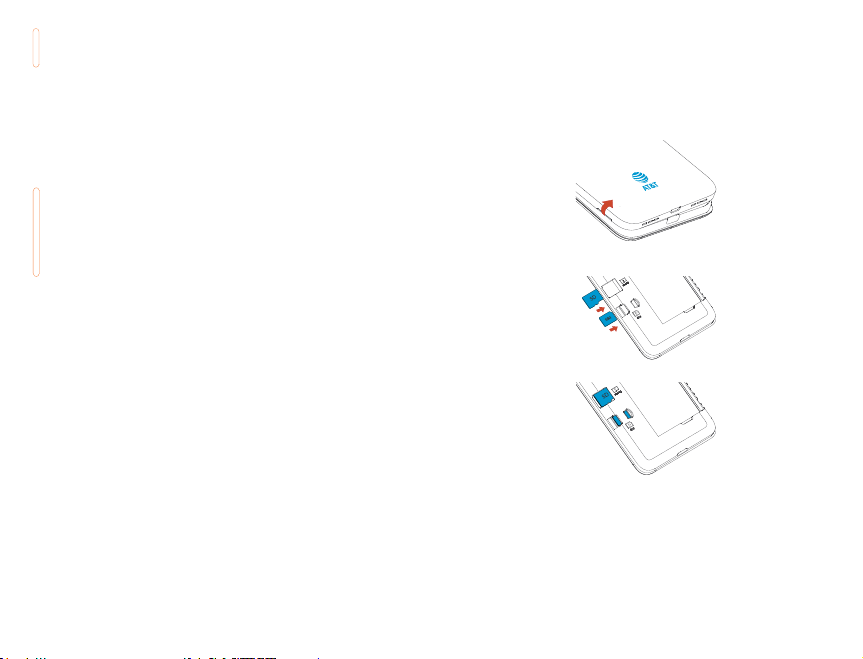
1.1 Keys and connectors.................................................................2
1.2 Getting started...............................................................................5
1.3 Home screen.....................................................................................7
1.4 Lock screen ......................................................................................15
2 Text input..................................................................... 17
2.1 Using onscreen keyboard....................................................17
2.2 Google keyboard.........................................................................17
2.3 Text editing...................................................................................... 18
3 AT&T Services.............................................................19
3.1 AT&T services..................................................................................19
4 Phone and Contacts................................................20
4.1 Phone....................................................................................................20
4.2 Contacts.............................................................................................26
5 Messaging ....................................................................30
5.1 Create a message .....................................................................30
5.2 Sending a text message.......................................................31
5.3 Sending a multimedia message....................................31
5.4 Manage messages....................................................................32
5.5 Adjust message settings..................................................... 33
6 Calendar, Clock & Calculator...............................34
6.1 Calendar.............................................................................................34
6.2 Clock......................................................................................................36
6.3 Calculator..........................................................................................39
7 Getting connected.................................................. 40
7.1 Connecting to the Internet.............................................. 40
7.2 Connecting with Bluetooth ..............................................41
7.3 Connecting to a computer ...............................................42
7.4 Sharing your cellular data connection....................43
7.5 Connecting to virtual private networks................43
8 Multimedia applications....................................... 45
8.1 Camera................................................................................................45
9 Others ............................................................................50
9.1 Other applications ...................................................................50
10 Google applications ............................................... 51
10.1 Play Store...........................................................................................51
10.2 Chrome................................................................................................51
10.3 Gmail .....................................................................................................52
10.4 Maps ......................................................................................................53
10.5 YouTube .............................................................................................53
10.6 Drive.......................................................................................................54
10.7 YT Music.............................................................................................54
10.8 Google Play Movies & TV....................................................54
10.9 Duo .........................................................................................................54
10.10 Photos..................................................................................................54
10.11 Assistant.............................................................................................54
10.12 Google Pay....................................................................................... 55
11 Settings.........................................................................56
11.1 Wi-Fi........................................................................................................56
11.2 Bluetooth ..........................................................................................56
11.3 Mobile network............................................................................56
11.4 Connections ...................................................................................56
11.5 Home screen & lock screen.............................................59
11.6 Display..................................................................................................59
11.7 NXTVISION.........................................................................................61
11.8 Sound & vibration.......................................................................61
11.9 Notifications ...................................................................................62

1
11.10 Button & gestures ....................................................................63
11.11 Advanced features....................................................................63
11.12 Smart Manager............................................................................63
11.13 Security & biometrics ........................................................... 64
11.14 Location............................................................................................. 64
11.15 Privacy..................................................................................................65
11.16 Safety & emergency...............................................................65
11.17 Apps.......................................................................................................65
11.18 Storage................................................................................................65
11.19 Users & accounts.......................................................................66
11.20 Digital Wellbeing & parental controls......................66
11.21 Google..................................................................................................66
11.22 Accessibility.....................................................................................66
11.23 System.................................................................................................67
12 Accessories................................................................. 69
13 Safety information ..................................................70
14 General information................................................82
15 1 YEAR LIMITED WARRANTY................................85
16 Troubleshooting....................................................... 88
17 Disclaimer ....................................................................92
SAR This device meets applicable national SAR
limits of 1.6 W/kg. When carrying the device
or using it while worn on your body, either
use an approved accessory such as a holster
or otherwise maintain a distance of 15 mm
from the body to ensure compliance with RF
exposure requirements. Note that the product
may be transmitting even if you are not using it.
To prevent possible hearing damage, do not
listen at high volume levels for long periods.
Exercise caution when holding your device near
your ear while the loudspeaker is in use.
The device contains magnets which may
interfere with other devices and items (such
as credit card, pacemakers, defibrillators, etc.).
Please maintain at least 150 mm of separation
between your phone and the devices/items
mentioned above.

23
Volume
Camera
Power/Lock
Flash
Charging port
Recent apps
• Tap to view applications you’ve recently accessed.
Home
• While on any application or screen, tap to return to
the home screen.
• Press and hold to open Google Assistant.
Back
• Tap to go back to the previous screen, or to close a
dialog box, options menu, the Notifications Panel, etc.
1 Your device.......................................
1.1 Keys and connectors.................................
Recent apps
Back
Home
Volume
keys
Power /
Lock key
Touch
screen
Camera
Headset port
Charging port
Speaker
Light & proximity sensors

45
Power/Lock
• Press: Lock the screen or light up the screen.
• Press and hold: Show the popup menu to select from
Power off/Restart/Airplane mode.
• Press and hold the Power/Lock key for at least 8
seconds to force restart.
• Press and hold the Power/Lock key and Volume down
key to capture a screenshot.
Volume up/down
• Adjust the earpiece or headset volume during a
phone call.
• Adjusts the media volume while listening to music or
a video, or streaming content.
• Adjust the ringtone volume.
• Mute the ringtone of an incoming call.
• While using the Camera app, press Volume up or
down key to take a photo or press and hold to take
several photos.
1.2 Getting started............................................
1.2.1 Setup
Install a SIM/microSDTM Card
1. With the phone face down, remove back cover by gently
pulling up on the indentation on the bottom left of the cover.
2. Insert the SIM card and microSDTM card* with gold contacts
facing down.
3. Ensure that SIM and microSDTM cards are properly secured.
A NANO SIM card is required to make phone calls and use
cellular networks. Insert your SIM card before setting up your
new phone. Inserting other SIM card types may damage your
phone.
NOTE: microSDTM card sold separately.

67
Charging the battery
You are advised to fully charge the battery. Charging status
is indicated by a percentage displayed on screen while the
phone is powered off. The percentage increases as the phone
is charged.
To reduce power consumption and energy waste,
disconnect your charger when the battery is fully
charged, and switch off Wi-Fi, GPS, Bluetooth or apps
running in the background when not needed.
1.2.2 Power on your phone
To turn your phone on, hold down the Power/Lock key. It will
take a few seconds before the screen lights up. If you’ve set a
screen lock in Settings, unlock your phone (Swipe, Pattern, PIN,
Password or Face) and display the Home screen.
1.2.3 Power off your phone
To turn your phone off, hold down the Power/Lock key until
the phone options appear, then select Power off.
1.3 Home screen.................................................
Bring all your favorite icons (applications, shortcuts, folders
and widgets) to your home screen for quick access. Tap the
Home key anytime to return to the Home screen.
Status bar
• Status/Notification indicators.
Favorite applications tray
• Tap to open the application.
• Press and hold to remove
applications.
The home screen extends on the right side of the screen to
allow more space for adding applications, shortcuts, folders
and widgets. Slide the home screen horizontally left to get a
complete view of the home screen. The white dot at the lower
part of the screen indicates which screen you are viewing.

89
1.3.1 Using the touch screen
Tap
To access an application, tap it with your finger.
Press and hold
Press and hold any item to view available actions or to move
the item. For example, select a contact in Contacts, press and
hold this contact, an option list will appear.
Drag
Place your finger on any item to drag it to another location.
Slide/Swipe
Slide the screen to scroll up and down on applications, images,
web pages, and more.
Pinch/Spread
Place your fingers of one hand on the screen surface and draw
them apart or together to scale an element on the screen.
Rotate
Change the screen orientation from portrait to landscape by
turning the device sideways.
NOTE: Auto-rotate is disabled by default. To turn on/turn off
auto-rotate, go to Settings > Display

10 11
1.3.2 Status bar
From the status bar, you can view both phone status (on the
right side) and notification information (on the left side).
Swipe down the status bar to view notifications and swipe
down again to enter the Quick settings panel. Swipe up to
close it.
Notification panel
Swipe down the Status bar to open the Notification panel to
read the detailed information.
Tap CLEAR ALL to remove
all event–based notifications
(other ongoing notifications will
remain)
Tap on the
notification to view it.
Quick settings panel
Swipe down the Status bar twice to access the Quick Settings
panel where you may enable or disable functions or change
modes by tapping the icons.
Tap to access the full Settings
menu, where you can manage
other items.

12 13
1.3.3 Search bar
The device provides a Search function which can be used to
locate information within applications, the device or the web.
Search by text
• Tap the Search bar from the home screen.
• Enter the text or phrase you want to find, then tap on the
keyboard to search.
Search by voice
• Tap from Search bar to display a dialog screen.
• Say the text or phrase you want to find. A list of search
results will display for you to select.
1.3.4 Personalize your Home screen
Add
To add an app to your home screen, swipe up on the home
screen to access all the applications on the phone. Press and
hold the desired app, and drag it to the home screen. To add
an item to the extended home screen, drag and hold the icon
on the left or right edge of the screen.
To add a widget to your home screen, press and hold an empty
place on the home screen, then tap Shortcuts.
Reposition
Tap and hold an item and drag it to the desired position and
then release. You can move items both on the Home screen
and the Favourite tray. Hold the icon on the left or right edge
of the screen to drag the item to another Home screen.
Remove
Tap and hold the item and drag it up to the top of the
remove icon, and release after it turns red.
Create folders
To improve the organisation of shortcuts or applications on
the Home screen and the Favourite tray, you can add them to
a folder by stacking one item on top of another. To rename a
folder, open it and tap the folder’s title bar to input the new
name.
Wallpaper customization
Press and hold the empty area in the home screen, then tap
Wallpapers to customize wallpaper.

14 15
1.3.5 Widgets and recently-used applications
View widgets
Press and hold the empty area in the home screen, then tap
to display all widgets.
Press and hold the selected widget and drag it to your
preferred screen.
View recently-used applications
To view recently-used applications, tap the Recent apps key.
Tap a thumbnail in the window to open the application.
To close the recently-used application, slide the thumbnail up.
1.3.6 Volume adjustment
Using volume key
Press the Volume key to adjust the Media volume.
Tap the to adjust Alarm, Ring and Notification volume.
Using Settings menu
Swipe up on the Home screen to access the app tray, then
tap Settings > Sound & vibration to set volume of media,
notification, and more.
1.4 Lock screen....................................................
1.4.1 Enable lock screen method
Enable an unlock method to keep your phone secure. Select
Swipe, Pattern, PIN, Password or Face Unlock. *
1. Swipe up on the home screen > Settings > Security &
biometrics > Screen lock.
2. Tap Swipe, Pattern, PIN, or Password.
• Tap None to disable screen lock.
• Tap Swipe to enable screen lock.
NOTE: you will not need a pattern, PIN, password to access
the phone
• Tap Pattern to create a pattern you must draw to unlock
the screen.
• Tap PIN or Password to set a numeric PIN or an alphanumeric
password that you must enter to unlock your screen.
• Face Unlock will unlock your phone by using the front
camera to register your face.
1. From the app list, tap Settings > Security & biometrics >
Face unlock. Before using the face key, you need to set a
pattern/PIN/password.
2. Hold your phone 20-50 cm from your face. Position your
face in the square shown on the screen. For best results,
we suggest that the face key is enrolled indoors and away
from direct sunlight.
3. Enable Face unlock when your screen turns on, otherwise
you will have to swipe up on the screen first of all.
*Face unlock may not be as secure as Pattern, PIN, or Password locks.
We may use Face unlock methods only for the purpose to unlock the
phone. The data collected from you through such methods will be
stored in your device and will not be disclosed to any third-party. You
may delete your data anytime.

16 17
1.4.2 Lock/unlock your screen.
Lock: Press the Power/Lock key once to lock the screen.
Unlock: Press the Power/Lock key once to light up the screen,
then swipe up. Enter your Screen unlock key (Pattern, PIN,
Password, Face unlock), if applicable.
1.4.3 Lock screen shortcuts *
• View notifications on your lock screen by double tapping the
notification. Your device will then open that application with
the notification.
• Access the applications Google Assistant, Messages, Camera,
Flashlight or Settings by double tapping on the icons.
NOTE: Before opening the notification or application, your
phone will prompt the unlock method, if enabled.
Double tap to enter the detailed
screen
SwipeletoenterCamera
*Modify how notifications appear on your lock screen: Settings >
Notifications > On the lock screen.
2 Text input..........................................
2.1 Using onscreen keyboard.......................
Onscreen Keyboard settings
From the home screen, swipe up to view app tray, and then tap
Settings > System > Languages & input > Virtual keyboard,
tap the keyboard you want to set up and a series of settings
will become available.
2.2 Google keyboard.........................................
Tap to enter
voice input.
Press and
hold to select
symbols.
Tap to switch
between abc and
ABC.
Tap to switch
between symbol and
numeric keyboard. Press and hold to
show input options.

18 19
2.3 Text editing ...................................................
• Press and hold or double-tap within the text you would like
to edit.
• Drag the tabs to change the selection.
• The following options will show: Cut, Copy, Paste, Share,
Select all.
• To exit from the selection and editing without making
changes, tap an empty place in entry bar or words that
haven’t been selected.
You can also insert new text
• Tap where you want to type, or press and hold a blank space
in the entry bar. The cursor will blink and the tab will show.
Drag the tab to move the cursor.
• If you have used Cut or Copy on any selected text, tap the
tab to show Paste.
3 AT&T Services .............................
3.1 AT&T services ...............................................
Visual Voicemail
Receive voicemail messages in an email-like
inbox. You can easily play and delete messages,
return calls, and manage voicemail features.
myAT&T
Keep track of your wireless and Internet data
usage, upgrade your phone or plan, and view/pay
your bill in the app.
AT&T Cloud
Securely backup, sync, access and share your
important content across operating systems &
devices anytime and anywhere.
AT&T Device Help
The Device Help app is a one-stop-shop to help
you get the most out of your device. Keep your
phone running smoothly with device health
status alerts, troubleshooting, quick fixes,
interactive tutorials, videos and more.

20 21
4 Phone and Contacts.....................
4.1 Phone......................................................
4.1.1 Making a call
Tap Phone on the home screen to access the Phone
application. Click icon to access Favorites, Recents and
Contacts. Tap to view keypad for number search or entry.
Favorites Recent Calls Contacts
Press and hold to
access voicemail.
• Open the keypad and dial the number to call, select a saved
number from Contacts, or select a contact or number from
Recent.
• Tap to delete any incorrect digits.
• Tap Create new contact to save the dialed number to
Contacts.
• Tap to place the call.
• Tap to end a call.
International call
To dial an international call, press and hold to enter + then
enter the international country prefix, followed by the full
phone number, and tap .
Emergency call
If your phone has network coverage, dial the emergency
number and tap to make an emergency call. This works
even without a SIM card and without unlocking the phone.

22 23
4.1.2 Answering or rejecting a call
When you receive a call
• Swipe up or tap ANSWER to answer.
• Swipe down or tap DECLINE to reject.
• Tap to reject the call and send a preset text message.
To mute the ringtone volume of an incoming call, press the
Volume up/down key.
4.1.3 Calling your voicemail
Your voicemail is provided by your network to avoid missing
calls. It works like an answering machine that you can consult
at any time.
To access your voicemail, press and hold 1.
If you receive a voicemail, a voicemail icon appears on
the Status bar. Open the Notification panel and tap New
voicemail.
4.1.4 Using options during a call
To adjust the volume during a call, press the Volume up/
down key.
• Tap to place a second call, separate from the first call,
which is put on hold. You can then merge the calls to
create a conference call.
• Tap to put the call on hold.
• Tap to turn the speaker on or off.
• Tap to open the dial pad.
• Tap to mute or unmute your microphone.
• Tap to end the current call.
To avoid accidental operation of the screen during a
call, the screen will be locked automatically when you
put the phone close to your ear; and it will be unlocked
when the phone is taken away from your ear.

24 25
4.1.5 Managing multiple calls
When call waiting and three-way calling features are available,
you can switch between two calls or set up a conference call.
Swap calls
When you accept two calls, tap the icon to switch between
the two lines. The current call will be put on hold and you are
able to join the other call.
Conference calls *
You can set up a conference call as follows.
• Place a call to the first participant of the conference call.
• Tap to add a call, then dial the number or choose from
Contacts or Recent.
• Tap to place the call.
• Tap to join the calls and start the conference.
• Tap to end the conference call and disconnect all callers.
4.1.6 Adjusting your phone settings
Tap from the Phone screen, then tap Settings. The following
options are available:
PHONE SETTINGS
Display options
• Sort by
Set the contacts display by First name or Last name.
• Name format
Set the name format by First name first or Last name first.
*Depending on your network carrier.
Sounds and vibrate: Adjust volume of Ring, media, notification,
and more.
Quick responses: Edit quick responses which will be used
when you reject a call with a text message.
Calls
• Call forwarding
Configure how unanswered calls are forwarded.
• Call barring
Select calls to be barred, cancel call barring, or change
barring password.
• Additional settings
Configure how your number displays for outgoing calls and
your call waiting settings.
Blocked numbers
Block calls from unidentified callers.
Voicemail
Access voicemail service and number settings.
Accessibility:
• RTT call button
RTT allows you to use text to communicate during a call. The
other person will see each letter typed in real time.
Tap RTT operation mode to set Always visible or Visible
during calls.
• Hearing aids
Enable hearing aid compatibility.
About
View Build version, Open sources licences, Privacy policy and
terms of service.

26 27
4.2 Contacts...................................................
Add contacts on your phone and synchronize them with
the contacts in your Google account or other accounts that
support contact syncing. Swipe up on the home screen >
Contacts
4.2.1 Consult your contacts
Tap to search in Contacts.
Tap to add a new contact.
Tap to open Quick Contact panel.
Delete a contact
To delete a contact, tap and hold the contact you want to
delete. Then tap and DELETE to delete the contact.
Contacts deleted will also be removed from other
applications on the phone or web the next time you
synchronize your phone.
4.2.2 Adding a contact
Tap in the contact list to create a new contact.
Enter the contact’s name and other contact information. By
scrolling up and down the screen, you can move from one field
to another easily.
Tap to save.
Tap to unfold the other
predefined labels of this
category.
Tap to select a picture for
the contact.
When finished, tap SAVE to save.
To exit without saving, tap Back and select DISCARD.
Add to/remove from Favorites
To add a contact to Favorites, tap a contact to view details
then tap (the star will turn ).
To remove a contact from favorites, tap on contact details
screen.
4.2.3 Editing your contacts
To edit contact information, tap on the contact to open
contact details. Tap on top of the screen. When finished
editing, tap SAVE to save the edits.

28 29
4.2.4 Communicating with your contacts
From the contacts list, you can communicate with your
contacts by making a call or exchanging messages.
To place a call to a contact, tap the contact to enter the detail
screen, then tap the number.
To send a message to a contact, tap the contact to enter the
detail screen, then tap the icon on the right side of the
number.
4.2.5 Share Contacts
Share a single contact or contacts with others by sending the
contact’s vCard via Bluetooth, Gmail, and more.
Select a contact you want to share, tap from Contact
details screen and select Share, then select the application to
perform this action.
4.2.6 Accounts
Contacts, data or other information can be synchronized from
multiple accounts, depending on the applications installed on
your device.
To add an account, swipe up on the home screen then
Settings > Users & accounts > Add account.
Select the kind of account you are adding, such as Google.
Enter the username and password, and follow the remaining
prompts to continue setup.
You can remove an account to delete it and all associated
information from the phone. Tap the account you want to
delete, then tap Remove Account to remove it.
4.2.7 Turn on/off auto-sync
In the Accounts screen, turn on/off the Automatically sync
data to activate/deactivate this function. When activated,
all changes to information on the phone or online will be
automatically synchronized with each other.

30 31
5 Messaging ...................................
Create, edit, send and receive text and mutimedia messages
with Messaging.
From the home screen, tap
5.1 Create a message.......................................
Tap to
create a new
message.
• Tap to view
the message
thread.
• Press and
hold to delete.
5.2 Sending a text message..........................
1. From the Messaging screen, tap to begin a new message.
2. Add recipients by one of the following ways:
- Tap the To field and type the recipient’s name, number, or
email address. If the recipient is saved in Contacts, their
contact information will appear.
- Tap to enter a number not saved in contacts, or without
searching Contacts .
- Tap Favorites or All Contacts to select a presaved contact.
Note: Messages sent to email addresses are multimedia
messages.
3. Tap Add text field and enter your text.
4. Tap to insert emojis and graphics.
5. Tap to send the message
An SMS message of more than 160 characters will be sent as
several SMS. A character counter is displayed on the right of
the text box.
Specific letters (accented) will increase the size of the
SMS, this may cause multiple SMS to be sent to your
recipient.
5.3 Sending a multimedia message ..........
MMS enables you to send video clips, images, photos,
animations, slides and sounds to other compatible devices
and e-mail addresses.
An SMS will be converted to MMS automatically when
media files (image, video, audio, slides) are attached or email
addresses are added.
To send a multimedia message, enter the recipient’s phone
number or email address in the To bar and tap the Add text
bar to enter text. Tap to attach a picture, video, audio
and more.

32 33
When finished, tap to send the multimedia message.
Share a
contact
Capture and
attached a
picture
Attach a picture
from Photos Record an
audio clip
5.4 Manage messages......................................
When you receive a new message, will appear in the Status
bar advising of the notification. Swipe down from the status
bar to open the Notification panel, tap the new message
to open and read it. You can also access the Messaging
application and tap the message to open it.
Messages are displayed as conversations in the order received.
Tap a message thread to open the conversation.
• Tap to call the number
• To reply to a message, enter text in the Add text bar. Tap
to attach a media file. Tap for more options.
• Press and hold a message to access the following actions:
• Copytext
• Forward
• Delete
• Moreoptions
5.5 Adjust message settings....................
You can adjust a range of message settings. From the
Messaging application screen, tap and tap Settings.
Default SMS APP
Change your default SMS app.
Notifications
Mark the checkbox to display message notifications in the
status bar.
Advanced
• Phone number
Select to see your phone number.
• Delete old messages
Select to delete old messages when the maximum number of
stored messages is reached. Messages older than 90 days will
be deleted automatically.
• Messages time limit
Set the maximum number of text messages to be saved per
conversation.
• Wirless Emergency Alerts
Set emergency alert and find emergency alert history.
• MMS Group messaging
Messages sent to multiple recipients in a conversation thread
will be converted to MMS messages.

34 35
6 Calendar, Clock & Calculator....
6.1 Calendar.................................................
Use Calendar to keep track of important meetings,
appointments, and more.
Multimode view
To change your Calendar view, tap next to the month title
to open the month view, or tap and select Schedule, Day, 3
days, Week or Month to open different views.
Day viewSchedule view 3 days view
Week view Month view
To create new events
• Tap .
• Fill in all required information for this new event. If it is a
whole-day event, you can select All-day.
• If applicable, enter the email addresses of the guests and
separate with commas. All guests will receive an invitation
from Calendar and Email.
• When finished, tap Save from the top of the screen.
To delete or edit an event
Tap an event to open details, then tap to change the event
or tap > Delete to remove the event.
Event reminder
If a reminder is set for an event, the upcoming event icon
will appear on Status bar as a notification when the reminder
time arrives.
Swipe down from the Status bar to open the notification
panel, tap event name to view detailed information.
Other manuals for TCL 30Z
1
Table of contents
Other AT&T Cell Phone manuals

AT&T
AT&T R225 User manual

AT&T
AT&T alcatel AXEL 50004R User manual

AT&T
AT&T Calypso Max User manual

AT&T
AT&T U102AA User manual

AT&T
AT&T Sonim XP5s User manual

AT&T
AT&T Z331 User manual

AT&T
AT&T Radiant User manual

AT&T
AT&T Link User manual

AT&T
AT&T Multimedia Cell Phone User manual

AT&T
AT&T Radiant Specification sheet