AT&T 962 User manual

1
Caller ID Telephone 962
1
Please also read
Part 1 — Important
Product Information
USER’S MANUAL
Part 2
AT&T and the globe symbol are registered trademarks ofAT&T Corp.licensed toAdvancedAmericanTelephones.

©2000AdvancedAmericanTelephones. All rights reserved.
Printed in Mexico. 850002924 Issue 1AT&T 6/00

Installation 2
BeforeYou Begin..................................2
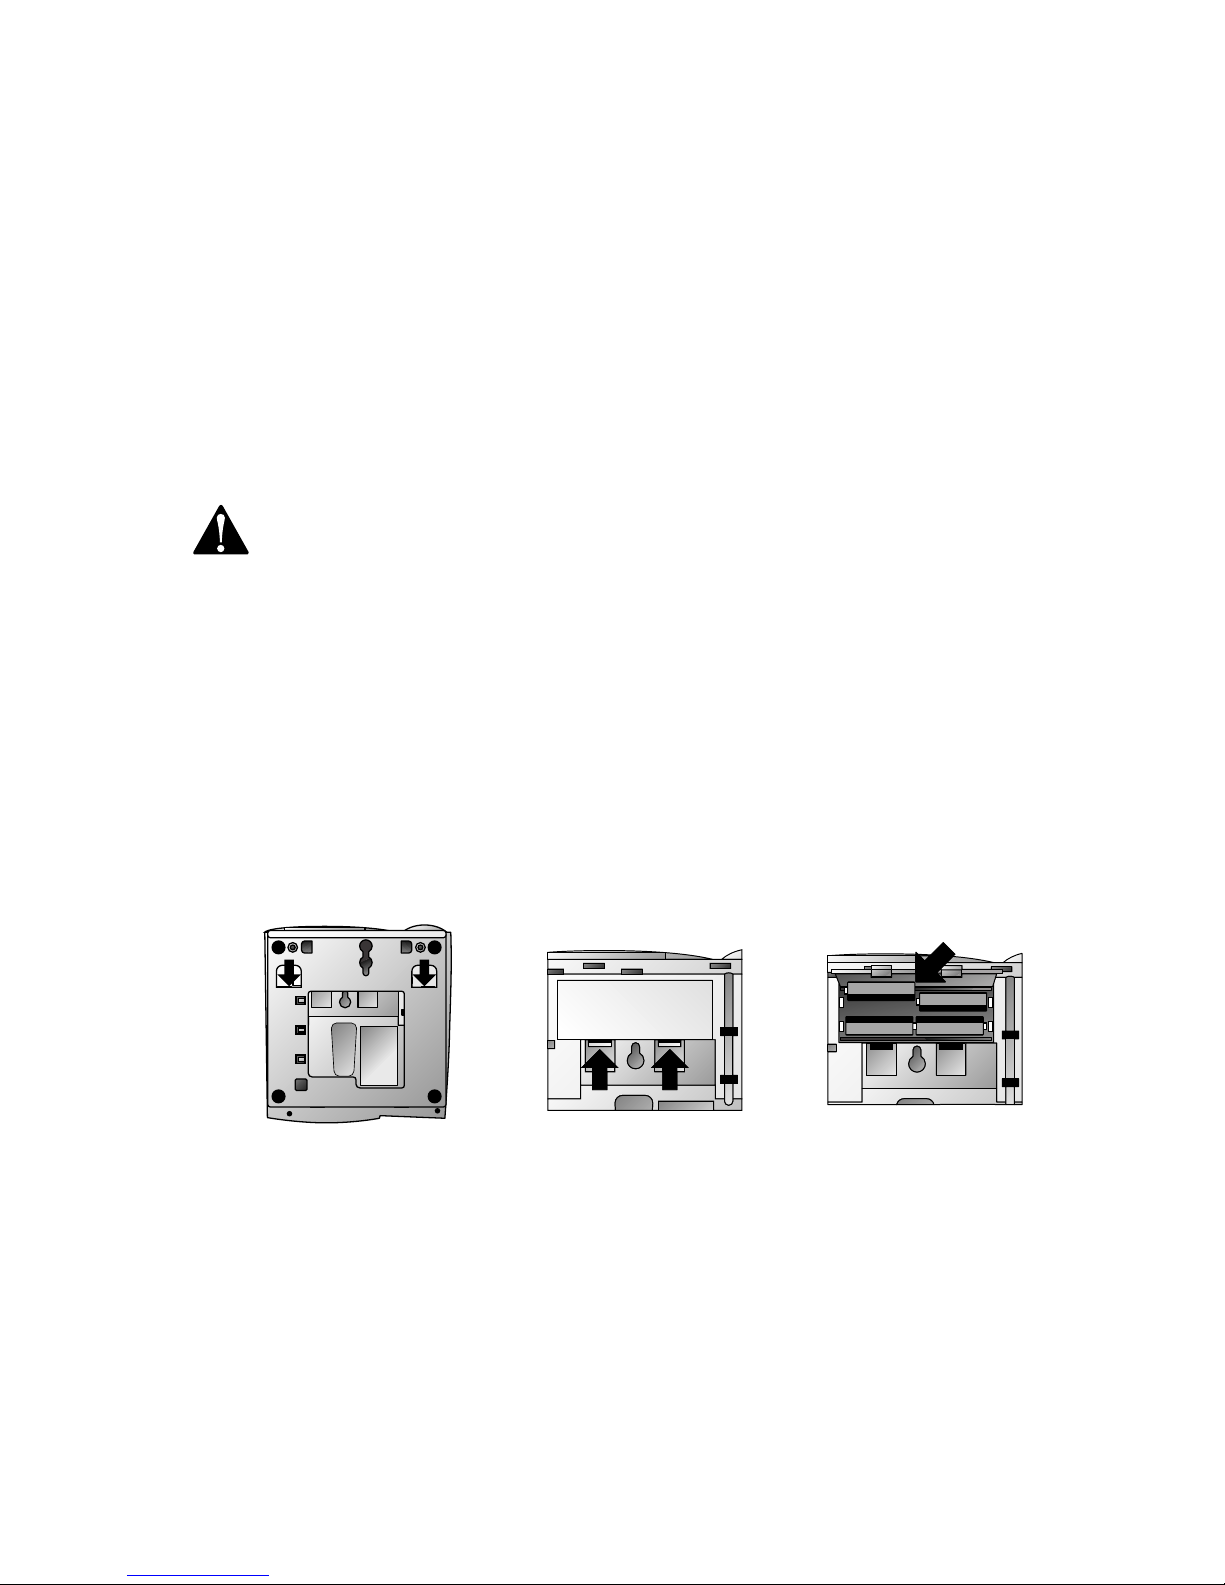
Battery Installation ...............................4
Wall Installation....................................5
Table/Desk Installation.........................6
Programming Options 11
Telephone Operation 13
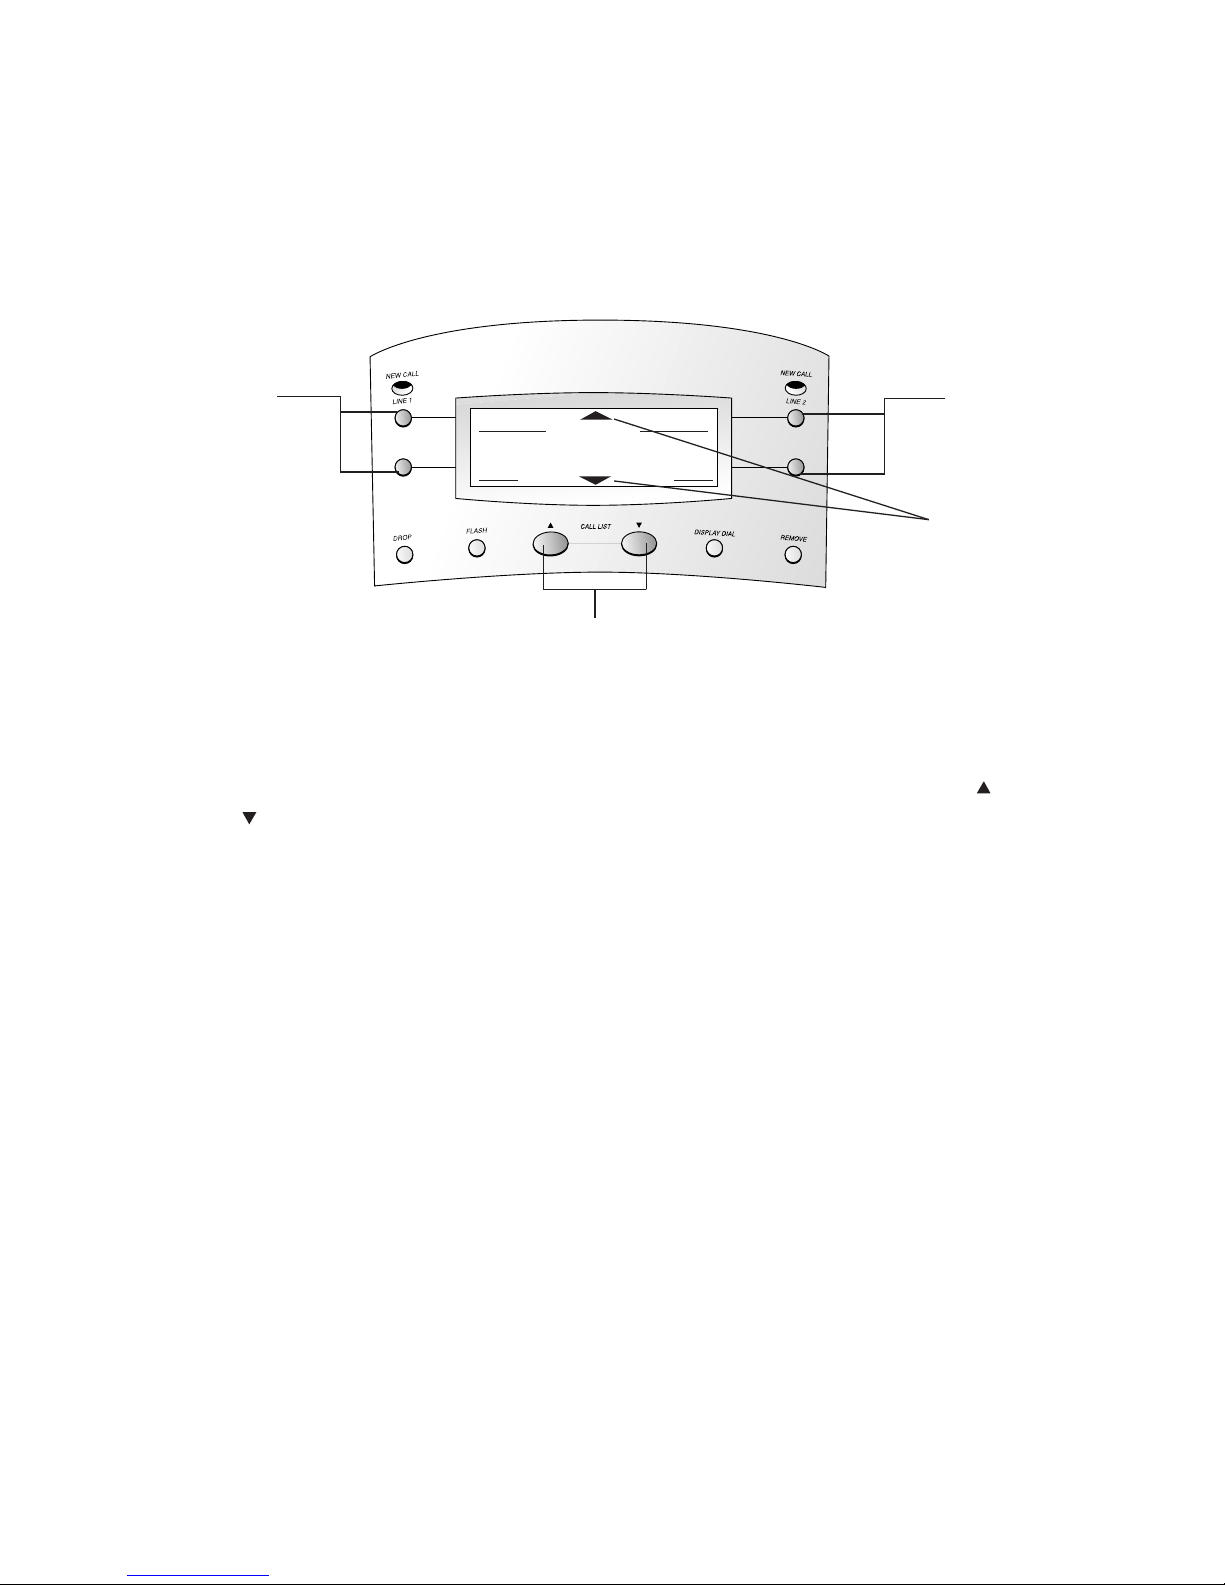
Making andAnswering a Call.............14
Automatic Line Selection....................15
Volume................................................15
Redial..................................................15
Hold....................................................15
Switching Between Lines
During a Call...................................16
Mute ...................................................16
Conference Calls ................................16
Conference Call Options....................17
Flash ...................................................17
TemporaryTone Dialing.....................17
RingerVolume ....................................17
Telephone Memory 18
Storing Numbers in Memory..............19
Storing Numbers from
Call History in Memory..................20
Storing a Pause orWait in a
Memory Number............................20
Dialing Numbers from
Telephone Memory ........................20
Erasing Numbers from
Telephone Memory ........................20
Caller ID Operation 21
About Caller Identification.................22
MessageWaiting and
NEW CALL Lights ...........................23
Call Screening.....................................24
Call History.........................................24
Reviewing Call History.......................24
Removing Call Records
from History ...................................24
Repeat Calls........................................25
Display Dial ........................................25
Display Dial Options ..........................26
CallWaiting.........................................26
CallWaiting Deluxe Features..............26
Using CallWaiting
Deluxe Options ..............................27
CallWaiting Deluxe Hold...................27
CallAnnounce ....................................27
Conference CallWaiting Call..............28
Dropping Calls During Conference....28
Combining Conference Features........28
Call Forward.......................................29
Drop Call............................................29
In Case of Difficulty 30
No DialTone.......................................30
Call Cannot be Dialed or is Dialed
Slowly .............................................30
Difficulty Storing Numbers
in Memory......................................30
Telephone Does Not Ring..................30
Problems with Line Status Lights.......31
NEW CALL Light Stays On..................31
Low Battery Indicator is Displayed....31
Speakerphone Does NotWork...........31
CONTENTS
1

About Softkeys
This telephone has been designed with your convenience in mind,offering
you many features which you can access using the four“softkeys.”
By pressing the softkey next to the operation indicated on the display
screen,you select that operation. Softkey prompts are always underlined
on the display.
When there are too many features to fit on the screen at one time,the
and characters are shown. Use the arrow keys below the screen to
scroll through to the additional commands.
BEFORE YOU BEGIN
2
LOCAL 1 LOCAL 2
Change which
area code?
HOME DONE
Softkeys
Scroll through commands
Softkeys
Indicates
additional
options

About Home Area Code and Local Area Codes
Always program your home area code,and,if you need them,up to four
local area codes (see“Program HomeArea Code”and“Program LocalArea
Code(s)”on pages 9 and 10). Programming these area codes will change
how numbers are displayed in the Call History,and will allow for correct
operation of the Display Dial feature.
If you don’t program your HomeArea Code,the system will continue to
display the Language Selection screen,and will be unable to display Caller
ID information.
About Call Waiting Deluxe
This product has a CallWaiting Deluxe feature that works with service
from some local phone service providers.
Contact your phone service provider to see if service is available in
your area, and to subscribe.
CallWaiting Deluxe lets you view Caller ID information for CallWaiting call
and then decide how you want to handle those calls.
This phone offers you on-screen options to forward calls to your voice mail
or to a pre-recorded announcement,or to place the calls on hold or drop
them. The options you can use will depend on your local telephone
company’s service.
This product also works with regular Caller ID and CallWaiting Services,
and you can use this product’s other features without subscribing to any of
these services.
There are fees for these services,and such services may not be available in
all areas.
BEFORE YOU BEGIN
3

Battery Installation
NOTE: Line 2 will not work without AC power. Make sure the power
cord is connected to the phone and plugged into an electrical outlet.
Before using the telephone,you should install 4AA batteries (not
included). In case of a power failure,you will only be able to make or
answer calls on Line 1. No other features will work,including Line 2.
When battery power is low,LOW BATT flashes on the display to alert you.
Replace batteries promptly.
CAUTION: Always disconnect all cords and remove base before
installing new batteries.
1Turn the telephone upside down.
2Remove the base (Figure 1).
Place your thumbs in the two openings at the large end of the
base. Push down with your thumbs,and lift the base up and away
from the phone.
3Open the battery compartment door (Figure 2).
Press on the tabs and swing the door open.
4Install 4 newAA batteries (Figure 3).
5Close the battery compartment door.
INSTALLATION
4
Figure 1 Figure 2 Figure 3

Wall Installation
1Remove the base.
Place your thumbs in the two openings at the large end of the
base. Push down with your thumbs,and lift the base up and away
from the phone.
2Connect the bundled line cord(s) to the telephone.
Leave the telephone line cord(s) bundled.
• If you have a two-line jack,use only the line cord with the
clear modular plugs on each end. Plug one end into the jack
labeled L1 OR L1/2 on the back of the telephone.
• If you have two separate jacks,use both line cords. Leave
the cord with the blue plugs bundled. Insert one end of this
cord into the jack labeled L1 OR L1/2 on the back of the
telephone. Unbundle the cord with the clear plugs.Insert
one end of this cord into the jack labeled L2 on the back of
the telephone.
3Attach the base.
Turn the base so that the larger end of the base is toward the
bottom of the telephone. Attach the base by inserting the tabs into
the slots. Push down on the large end of the base so the tabs are
in the slots,and the base locks in place.
4Reverse the handset tab.
This tab holds the handset
when you hang up. Hold down
the switchhook,and slide the
tab up and out of its slot. Turn
the tab so that the end with the
“hook”is up,then insert the tab
back into its slot.
5Connect the power cord to the phone.
Fit the power cord behind the strain relief tab. Then plug the
smaller end of the power cord into the jack labeled POWER at the
back of the system.
6Connect the line cord(s) to your modular jack(s) and mount
the phone onto the wall.
•If you have a two-line jack,plug the free end of the line cord
into a modular wall jack. Make sure the cord snaps firmly into
place. Place the phone on the wall jack mounting studs and
pull down until it is held securely.
INSTALLATION
5
Figure 1 Figure 2 Figure 3

•If you have two separate jacks,plug the free end of the cord
with the blue plugs into the modular wall jack for Line 1. Plug
the free end of the cord with the clear plugs into the modular
wall jack for Line 2. Make sure the cords snap firmly into
place. Place the phone on the wall jack mounting studs and
pull down until it is held firmly in place.
7Connect the handset to the telephone.
Plug the coiled cord into the handset jack on the side of the
phone.Plug the other end of the coiled cord into the handset,and
then hang up.
8Follow Steps 6 through 16 in “Table/Desk Installation.”
Table/Desk Installation
1 (Optional) You can adjust how much the phone tilts by pushing
outward with your thumbs on the recessed“feet.” Remove the
base by placing your thumbs in the two openings at the large end
of the base. Push down with your thumbs,and lift the base up and
away from the phone. Push the feet out from the other side,until
they snap into place.
INSTALLATION
6
Recessed
feet

2Attach the base.
Turn the base so the larger end is toward the top of the telephone.
Reattach the base by inserting the tabs into the slots. Push down
on the large end of the base to lock it into place.
3Connect the line cord(s) to the telephone.
•If you have a two-line jack,use only the line cord with the
clear modular plugs on each end. Plug one end into the jack
labeled L1 OR L1/2 on the back of the telephone.
• If you have two separate jacks,use both line cords. Insert
one end of the cord with the blue plugs into the jack labeled
L1 OR L1/2 on the back of the telephone. Insert one end of
the cord with the clear plugs into the jack labeled L2 on the
back of the telephone.
4Connect the line cord(s) to your modular jack(s).
•If you have a two-line jack,plug the free end of the line cord
into a modular wall jack. Make sure the cord snaps firmly
into place.
• If you have two separate jacks,plug the free end of the cord
with the blue plugs into the modular wall jack for Line 1.
Plug the free end of the cord with the clear plugs into the
modular wall jack for Line 2. Make sure the cords snap firmly
into place.
5Connect the handset to the telephone.
Plug the coiled cord into the handset jack on the side of the
phone. Plug the other end of the coiled cord into the handset,and
then hang up.
INSTALLATION
7

8
INSTALLATION
AC
Adapter
If you have a two-line jack…
Telephone
Power
Cord
Telephone Line
Cord with clear
modular plugs
Two-line
Modular
Jack
AC
Adapter
If you have two separate jacks…
Telephone
Power
Cord Telephone Line Cord with
blue modular plugs
Telephone
Line Cord
with clear
modular
plugs
Modular
Jack for
Line 2
Modular
Jack for
Line 1

6Connect the power cord.
CAUTION:Use only the power cord supplied with your
system.If you need a replacement cord,call 1 800 222-3111.
Fit the power cord behind the strain relief tab. Then plug the
smaller end of the power cord into the jack labeled POWER at the
back of the system. Plug the power cord into a standard electrical
outlet not controlled by a wall switch.
7System self-test.
As soon as you connect the power cord,the system runs a quick
self-test.
8Check for dial tone.
Press L,then lift the handset or press Sand listen for a
dial tone. Then press l. If you do not hear a dial tone,see
IN CASE OF DIFFICULTY.
9 Confirm Lines 1 and 2.
Press Land call one of your phone numbers. If you hear a
busy signal,you called Line 1. If you hear a ringing signal in the
receiver,then you called Line 2.
10 Remove the label covering the display screen.
11 Select Display Language.
The screen displays ENGLISH (flashing) and ESPANOL (the flashing
language is the selected language). Use +or -to select the other
language,then use the softkey to select OK.
12 Program Home Area Code.
You must program your area code so your phone can properly
recognize and dial calls.
If for calls You dial Enter
within your 7 digits Your area
own area code (phone number,no area code) code
10 digits 000
(area code + phone number)
— OR —
11 digits
(1+ area code + phone number)
NOTE: You must store a Home Area Code, or the screen will
continue to display the language selection screen, and will be
unable to display Caller ID Information.
INSTALLATION
9

Use the softkey to select HOME (the
screen displays Enter Area Code
and ---),then use the keypad to enter
your home area code. If you make a
mistake,select ERASE and re-enter the
correct digits. Use the softkey to
select DONE.
13 Program Local Area Codes(s).
You can program up to four LocalArea Codes
If for You dial Then enter
All calls outside 11 digits No LocalArea Codes
your home area code (1+ area code
+ phone number)
Some calls outside 10 digits Area codes that do
your home area code (area code not require a “1”
+ phone number)
If you dial 10 digits (area code plus phone number) for calls within your
own area code, include your area code as a Local Area Code.
Use the softkeys to select the area code you want to program
(LOCAL1–LOCAL4),then use the keypad to enter each code as for
the HomeArea Code in Step 12.Use the softkey to select DONE.
14 Set Dial Mode.
This product comes set for touch tone dialing. If you have dial
pulse (rotary) dialing service,you cannot dial numbers with the
phone set to touch tone. The current selection for Line 1 is
flashing. Use +or -to select TOUCH TONE or DIAL PULSE,then
use the softkey to select OK. The current selection for Line 2 will
then flash. Repeat this process to set the dial mode for Line 2.
15 Select Primary Line.
IfAutomatic Line Selection is off,the primary line (preset to Line 1)
is the line that will be selected when you lift the handset or press
Sif you do not manually choose a line. IfAutomatic Line
Selection is on,the primary line is the line that will be selected if
both lines are idle,both are ringing,or both are busy. To select
Line 2,use the softkey to select LINE 2,then select OK.
16 Set Automatic Line Selection.
You can choose whether the system will automatically select an
idle or ringing line when you make or answer a call. Use the
softkey to select ON to turn this feature on,or select OFF to turn
the feature off. Then select OK.
10
INSTALLATION
LOCAL1 LOCAL2
Change which
area code?
HOME DONE

11
PROGRAMMING OPTIONS
See the following list of options which are programmable for this product:
Phone Options
To change the Language, Area Code, Dial Mode, Primary Line,orAutomatic
Line Selection settings you made during installation,press O,then
select PHONE and continue to select OK or DONE to reach the setting you
want to change. For additional options,see CALLER ID OPERATION.
See INSTALLATION for more information on the following phone options:
OPTION DEFAULT DESCRIPTION
LANGUAGE ENGLISH Select English or Spanish.
AREA CODE - - - Enter area codes for both lines.
DIAL MODE TOUCH TONE SelectTouchTone or Rotary.
PRIMARY LINE LINE 1 You select line manually when
Automatic Line Selection is off;
automatically selected when
Automatic Line Selection is on.
AUTOMATIC LINE ON Select either on or off.
Voice Message Options (choose Line 1 or Line 2)
Options for VISUAL MESSAGE WAITING.
OPTION DESCRIPTION
OK Leaves message waiting light setting as is.
RESET Resets the message waiting light setting to ON.
OFF Turns the message waiting light setting to OFF.
PHONE VOICE MSG
Select options
area to change.
CALL ID CW DELUX
Select for
phone
options
Select for
Caller ID
options
Select for
voice
message
options
Select for
Call Waiting
Deluxe
options

Caller ID Options
You can customize how the Caller ID features of this phone work. Select
DONE or select OK until the screen displays the option you want to
customize. Options are described below in the order they appear in the
phone’s menu.
See CALLER ID OPERATION for more information on the following options:
OPTION DEFAULT DESCRIPTION
Call History ALL CALLS You select whether or not to
store all calls in call history.
Repeat Calls SEPARATE ENTRY You select whether or not to
store repeat calls as separate entries.
Caller ID with ON You select whether or not to
Call Waiting use Caller ID with CallWaiting.
NOTE: To program Call History and Repeat Calls, you must subscribe to
Caller ID, Caller ID with CallWaiting, or Call Waiting Deluxe service
from your local telephone company. To program Caller ID with Call
Waiting, you must subscribe to that service or to Caller ID Deluxe. If you
are not subscribed to the appropriate service, you should not program
the feature.
Call Waiting Deluxe Options (choose Line 1 or Line 2)
See CALLER ID OPERATION for more information on the following options:
Which options do you use?
OPTION DEFAULT DESCRIPTION
HOLD? OFF Turns hold on or off.
ANNOUNCE? OFF Turns announce on or off.
CONFERENCE? OFF Turns conference on or off.
FORWARD? OFF Turns forward on or off.
PROGRAMMING OPTIONS
12

TELEPHONE OPERATION
13
Display
Make a call
from Line 1
Make a call
from Line 2
Redial the last
call made
Conference
both lines
at once
Access
telephone
subscriber
services such as
Call Waiting
Access
two-touch
memory
locations
Indicates Line 1 in use (red steady)
and Line 1 on hold (red flashing) for
Line 1. Indicates Line 1 ringing
(green flashing).
Indicates Line 2 in use (red steady) and
Line 2 on hold (red flashing) for Line 2.
Indicates Line 2 ringing (green flashing).
Access
product
options
Directory
card
Put a call
on hold
Mute the
handset or
speakerphone
microphone
Turn speakerphone
on or off. Light
goes on when
speakerphone
is active
Adjust
Handset,
Speakerphone,
Ringer
Volume
RED RED
GREEN GREEN
Program
numbers
into memory
locations
Temporarily
switch to tone
service

TELEPHONE OPERATION
14
Making and Answering a Call
The green LINE light flashes for a line that is ringing. The green LINE light
is on steady for the line that will be selected when the handset is lifted or
Sis pressed.The red LINE light is on steady for a line that is in use
and flashes slowly for a line that is on hold.
Handset
To Make a Call
Lift the handset. You can dial your call manually,or use the memory
dialing feature. The red LINE light for selected line goes on. IfAutomatic
Line Selection is on,lifting the handset will connect to an idle line. To
select a specific line for the call,press Lor l.
To Receive a Call
IfAutomatic Line Selection is on,lift the handset. The ringing line is
automatically selected. To choose a specific line to answer or override any
automatic selection by the product,press a line button before or after
lifting the handset.
Speakerphone
To Make a Call
To make a call,press S. The SPEAKER light and the red LINE light
for the selected line go on. Wait for a dial tone,then dial the call manually
or by using memory dialing.
IfAutomatic Line Selection is on,pressing Swill connect to an idle
line. To select a specific line for the call,press the line button before or
after pressing S.
To Receive a Call
IfAutomatic Line Selection is on,press S. The ringing line is
automatically selected. To choose a specific line to answer or to override
any automatic line selection,press the LINE button beside a flashing light,
then press S. Press Sagain to end the call.
To switch from handset to speakerphone,press S,then replace
the handset. (The handset will not be active after Sis pressed.)
To switch from speakerphone to handset,lift the handset.

Automatic Line Selection
Automatic Line Selection is preset to be active. This means the system is
preset to select a line for you when you lift the handset or press S.
The system will automatically select a ringing line before an idle line,and
an idle line before the primary line. If both lines are idle or ringing,the
primary line is selected. If you have manually selected a line,the selection
is active for 10 seconds and overrides automatic selection.
WhenAutomatic Line Selection is off,the primary line will be selected
unless you pre-select a line as stated above under“Handset.”
Volume
TheVOLUME button adjusts the speaker or the handset during your call.
Adjusting one does not affect the other.
Lift the handset and press Vto increase volume,or press v
to decrease volume. You will hear beeps each time you press theVOLUME
button. You will hear a three-beep tone when the maximum volume level
is reached.
Redial
The last number dialed on this phone is stored in redial memory until you
dial another number. To dial the same number again,lift the handset or
press S,listen for the dial tone,then press R.
Hold
Press H. The red LINE light for the line on hold flashes. You can now
replace the handset in the cradle without disconnecting the call. The
speakerphone is automatically turned off. You cannot access any special
features.
To release Hold,press the appropriate LINE button and lift the handset or
press S
— OR —
Lift the handset of an extension phone on the same line.
TELEPHONE OPERATION
15

TELEPHONE OPERATION
16
Switching Between Lines During a Call
During a call on one line,you can make or answer a call on the other line
by pressing H. You can use the Hand Line buttons to switch back
and forth between calls as often as necessary.
For example: WithAutomatic Line Selection on,while you are using Line 1,
Line 2 rings.
1 Press Hto hold Line 1.
2 Press lto select the line for the incoming call,then lift the
handset or press Sto answer the call.
3 Press Lto hang up Line 2 and return to your first call
— OR—
Press Hto hold Line 2,and press Lto return to your
first call.
Mute
This feature lets you mute the line you’re on so that you can hear the other
party,but the other party can’t hear you.
To activate this feature,press and release M. The MUTE light goes on.
To return to normal conversation,press and release Magain.
NOTE: Switching from handset to speakerphone or from speakerphone to
handset also cancels Mute.
Conference Calls
You can use both lines at the same time to set up a three-way conference call.
1Answer or make a call on one line,then put the call on hold.
2 Press the other line button,and make or answer another call.
3 Press Cto connect all parties. The red LINE lights for both
lines are lit during a conference call.
If one party hangs up during a conference call,you might hear a dial tone.
Press the Line button of the remaining call to disconnect the other line and
eliminate the dial tone.
NOTE: Under certain circumstances, the far-end parties on a conference
call may not hear one another clearly.

17
TELEPHONE OPERATION
Conference Call Options
To place a conference call on Hold:
1 Press Hto hold both lines. Both red LINE lights will flash.
2 Press Cto release hold and continue your conference call.
To talk privately with one caller:
1 Press H.The red LINE light for the active line will be on steady
and the red LINE light for the line on hold will be flashing.
2 Press the Line button of the party with whom you want to speak
privately.
3 Press Cto continue your conference call.
To disconnect one party from a conference call and keep the other on the
line,press the Line button of the call you want to continue.
Flash
Use Finstead of the switchhook to activate telephone company
subscriber services such as CallWaiting or 3-Way Calling.
When taking a CallWaiting call,press Fto connect to the call. Press
Fagain to return to the first call without losing the second call.
Temporary Tone Dialing
If you have dial pulse (rotary) service,you can change from dial pulse
to touch tone dialing during a call by pressing *. This is useful if you
need to send touch tone signals for access to telephone banking or
long-distance services.
1Dial the number.
2Press Tor *.Buttons pressed after this send touch tone signals.
3After you hang up,the phone automatically returns to rotary service.
Ringer Volume
When you are not on a call,press the Line button for the ringer whose
volume you want to adjust. Then you can increase the ringer volume by
pressing the top part of V,and decrease it by pressing v.
Each time you pressVOLUME you will hear a short sample of ringer
volume. There are seven levels of volume control. Setting the ringer to the
lowest level turns the ringer off (you will hear a three-beep tone to
indicate when the ringer is at the highest level or when the ringer is off).

18
TELEPHONE MEMORY
Store
numbers in
telephone
memory
Memory
Location
button
Softkeys—
program
system features
Softkeys—
program
system features
White
Memory
Locations
Gray
Memory
Locations
Redial the
last number
dialed in
memory
Table of contents
Other AT&T Telephone manuals

AT&T
AT&T TRIMLINE 210 User manual

AT&T
AT&T CL84250 User manual

AT&T
AT&T 1815 User manual

AT&T
AT&T 17939 User manual

AT&T
AT&T MDW 9010 Quick start guide

AT&T
AT&T CL82101 User manual

AT&T
AT&T CL84109 User manual

AT&T
AT&T Definity Callmaster II Operating instructions

AT&T
AT&T TL96371 User manual

AT&T
AT&T SB67030 User manual