ATCOM AT810 series User manual

AT810
AT810
AT810
AT810 Quick
Quick
Quick
Quick Start
Start
Start
Start Guide
Guide
Guide
Guide
ATCOM TECHNOLOGY CO. , LIMITED
AT8
AT8
AT8
AT8 1
1
1
1 0
0
0
0 Quick
Quick
Quick
Quick Start
Start
Start
Start Guide
Guide
Guide
Guide
Version 1. 0
201 3 - 01 -1 7

AT810
AT810
AT810
AT810 Quick
Quick
Quick
Quick Start
Start
Start
Start Guide
Guide
Guide
Guide
ATCOM TECHNOLOGY CO. , LIMITED
1、Installation and access ....................................................................................................... 3
Installation ................................................................................................................................ 3
Feet installation instruction ....................................................................................................... 3
Check IP .................................................................................................................................... 5
Login to AT810's webpage ........................................................................................................ 6
2、Configure AT810 to make VoIP calls ............................................................................. 6
Network .................................................................................................................................... 6
Set password ............................................................................................................................. 7
SIP Settings ............................................................................................................................... 7

AT810
AT810
AT810
AT810 Quick
Quick
Quick
Quick Start
Start
Start
Start Guide
Guide
Guide
Guide
ATCOM TECHNOLOGY CO. , LIMITED
1
1
1
1
、
、
、
、
Installation
Installation
Installation
Installation and
and
and
and access
access
access
access
�
�
�
�
Installation
Installation
Installation
Installation
Set up AT8 1 0 as below:
�
�
�
�
Feet
Feet
Feet
Feet i
i
i
i nstallation
nstallation
nstallation
nstallation instruction
instruction
instruction
instruction
1、Desktop position:
A、Put the bottom side of the IP phone upside and press the plate with letter
“ PUSH ” into the slot, please refer the picture as below:
B、Press the other plate into the slot in accordance with the direction of the
arrow

AT810
AT810
AT810
AT810 Quick
Quick
Quick
Quick Start
Start
Start
Start Guide
Guide
Guide
Guide
ATCOM TECHNOLOGY CO. , LIMITED
C、Repeat A and B. It is the right picture of putting on desk after fixing the
two feet below:
D、Disassemble the feet:
Press the plate with word “ PUSH ” and pull the feet with the direction of
arrow. When the plate is pull out of the slot (there will be a sound of “ pa ” )
you can take off the feet
2、On wall position
A、Put the bottom side of the IP phone upside and push the plate with letter
“ PUSH ” into the slot, please refer the picture as below:
B、Push the other plate into the slot in accordance with the direction of the
arrow

AT810
AT810
AT810
AT810 Quick
Quick
Quick
Quick Start
Start
Start
Start Guide
Guide
Guide
Guide
ATCOM TECHNOLOGY CO. , LIMITED
C、Repeat A and B. It is the picture of wall mounting after fixing the two
feet below:
D、Disassemble the feet way:
Press the plate with word “ PUSH ” and pull the feet with the direction of
arrow. When the plate is pull out of the slot (there will be a sound of “ pa ” )
you can take off the feet
�
�
�
�
Check
Check
Check
Check IP
IP
IP
IP
If AT8 1 0 is connect to your network. AT8 1 0 WAN default to use DHCP, and after
connect WAN to Switch, it will obtain IP automatically. Press " Info " you will see
AT8 1 0's current
IP
, Current Gateway and UserID.
Attention: Please rotate the hook to the position as in
picture with a coin or other tools

AT810
AT810
AT810
AT810 Quick
Quick
Quick
Quick Start
Start
Start
Start Guide
Guide
Guide
Guide
ATCOM TECHNOLOGY CO. , LIMITED
�
�
�
�
Login
Login
Login
Login to
to
to
to AT8
AT8
AT8
AT8 1
1
1
1 0's
0's
0's
0's webpage
webpage
webpage
webpage
Modify your computer
’
s IP address to the same network as AT8 1 0. Enter AT8 1 0
IP addresses in the web browser to go to the login page, then you will access
AT8 1 0's user webpage.
Click "admin" which is on the right corner to enter administrator webpage.
2
2
2
2
、
、
、
、
Configure
Configure
Configure
Configure AT8
AT8
AT8
AT8 1
1
1
1 0
0
0
0 to
to
to
to make
make
make
make VoIP
VoIP
VoIP
VoIP calls
calls
calls
calls
�
�
�
�
Network
Network
Network
Network
Enter "Network" -> "Basic" page.
There are 3 ways to connect to the internet DHCP, Static and PPPoE, please
choose one according to your own situation.
Network mode: you can choose DHCP , Static and PPPoE
DHCP: AT8 1 0 default to use DHCP to obtain dynamic
IP.
Static: If you want to set your ip as static, you should fill ip, netmask,

AT810
AT810
AT810
AT810 Quick
Quick
Quick
Quick Start
Start
Start
Start Guide
Guide
Guide
Guide
ATCOM TECHNOLOGY CO. , LIMITED
gateway and DNS information.
PPPoE: If connect AT8 1 0 to modem, you should fill ADSL account and the
password which assigned by your network service provider.
�
�
�
�
Set
Set
Set
Set password
password
password
password
Enter "Network" -> "Advance" page.
There are 2 models to set the authority of web accessing and command line:
User model and Admin model. All the parameters can be visible and changed in
Admin mode while part of them can be visible in User mode.
Admin password: set admin webpage access password.(username: admin)
User password: set user webpage access password.(username: user)
�
�
�
�
SIP
SIP
SIP
SIP Settings
Settings
Settings
Settings
Enter "Account" -> "SIP" page.
Enable: whether enable this sip register.
Display Name: This name will display on your screen. It will show the User
ID instead if leave display name as blank.
User ID: Username of sip account.
Authenticate ID: normally is the same with User ID, can also leave it as
blank if there is no special requirement f ro m your sip server.
Password: Password of sip account.

AT810
AT810
AT810
AT810 Quick
Quick
Quick
Quick Start
Start
Start
Start Guide
Guide
Guide
Guide
ATCOM TECHNOLOGY CO. , LIMITED
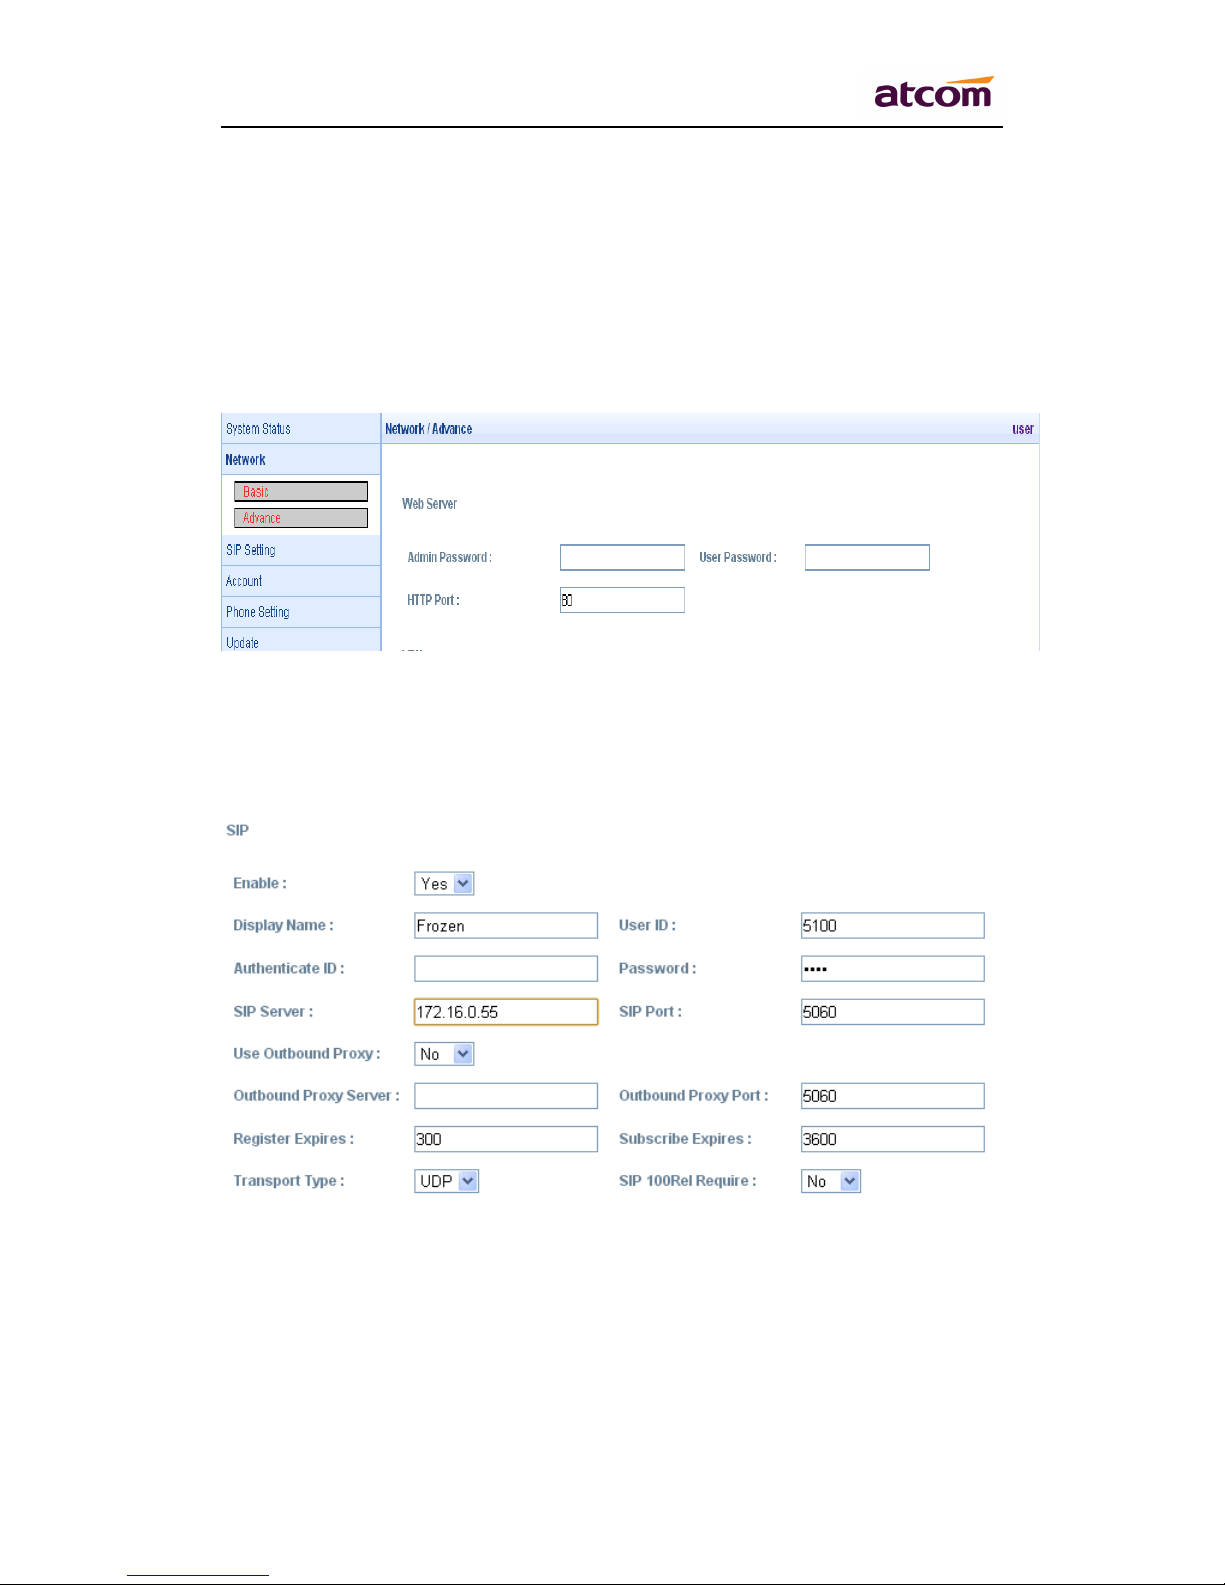
Server Server: SIP server address , support both IP address and domain
name.
Server Port: SIP server port , default is 5060.
Use Outbound Proxy: Whether to use outbound proxy.
Outbound Proxy Server :Normally the Proxy server is the same as SIP server.
If they are different then fill in the correct information that provided by ISP.
Outbound Proxy Port: Set your proxy server port.
Register Expires: register expire time, default is 60 seconds. AT8 1 0 will
auto configure this expire time to the server recommended setting if it is
different from the SIP server.
Subscribe Expires: The Expires value in SUBSCRIBE message, default is
3600 seconds.
SIP 100Rel Require : Require 100rel or not, default is no. If set to yes, the
INVITE message sent will contain the
require:100rel
header field.
Transport Type: UDP/TCP/TLS.
After configured and enabled register this account, please check the status of
this account in System Status page.
Other manuals for AT810 series
1
Table of contents
Other ATCOM Telephone manuals