12
!
!
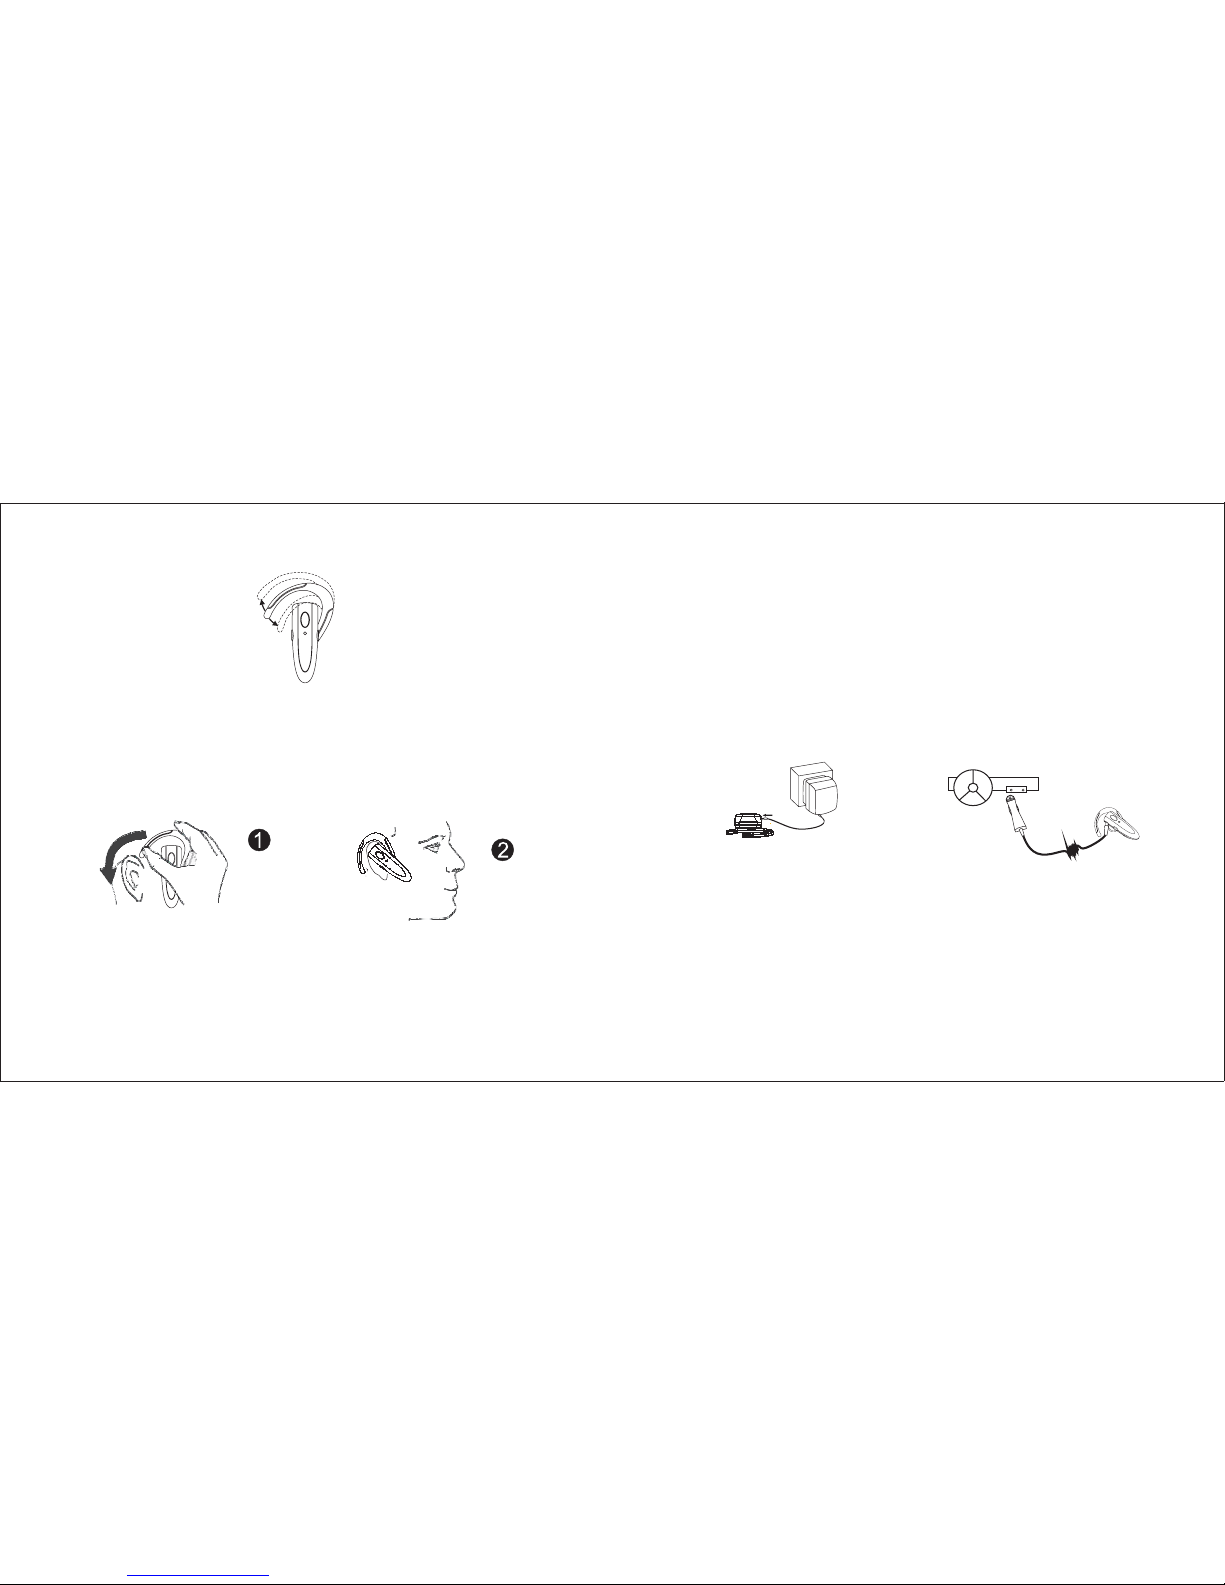
Casque en mode Couplage
Établissement de la liaison Bluetooth
Assurez-vous que le AT-BT110 est complètement chargé et que le câble d'alimentation est
déconnecté avant de lancer le couplage. Quand le AT-BT110 est hors tension, appuyez
sur S1-jusque. LES LED rouge et bleu clignotent en alternance Ce qui indique que le
casque est en mode de couplage.
Suivez les instructions d'utilisation de votre téléphone mobile Bluetooth pour lancer le
couplage. Habituellement, vous devez aller à la page de configuration ou de connexion,
puis vous devez sélectionner les options de découverte de dispositifs Bluetooth. Bluetooth
peut prendre quelques secondes pour établir une connexion.
L'écran de votre téléphone devrait indiquer s'il reconnaît le casque AT-BT110 et vous
demander si vous souhaitez le coupler. Vous devez confirmer cette action. L'écran du
téléphone vous demande alors un passe numérique ou un PIN. Entrez la séquence 0000.
Le LED du casque clignote en bleu toutes les 3 secondes pour indiquer que le couplage a
réussi. Habituellement, le téléphone vous demande également si vous souhaitez modifier
le nom du casque. Nous vous recommandons d'approuver et de conserver le nom AT-
BT110. Vous pouvez coupler autant de dispositifs que vous le souhaitez avec votre
téléphone.
Si le couplage ne se déroule pas comme prévu, désactivez le casque et le téléphone et
patientez 10 secondes. Activez le téléphone et le casque de nouveau et répétez toutes les
étapes depuis le début. Le couplage des dispositifs entre eux, tels que les téléphones
mobiles et les casques, leur permet de se reconnaître de manière réciproque. Cette
opération ne doit être effectuée qu'une seule fois.
Une fois le couplage du AT-BT110 et du téléphone mobile réussi, vous devrez peut-être
établir une liaison Bluetooth entre eux en suivant les instructions du manuel d'utilisation
de votre téléphone. Pour établir la liaison, appuyez brièvement sur S1. Prenons
l'exemple du Nokia 6130i : le téléphone mobile affiche « Acceptez-vous la demande du AT-
BT110 pour établir une connexion ? ». Sélectionnez OUI pour établir la liaison. Vous
pouvez maintenant émettre et réceptionner des appels sur le casque. Pour tout autre
téléphone, veuillez suivre le manuel d'utilisation pour établir la liaison.
!
!
!
!
!
Appels entrants
Attention:
Transfert d'appels
(uniquement sur les téléphones mobiles qui prennent en charge les profils mains
libres)
Sourdine
Fin d'appel
Numérotation vocale :
Le AT-BT110 sonne à l'arrivée d'un appel entrant. Appuyez sur S1 pour répondre à l'appel.
certains téléphones placent la fonction de connexion Bluetooth en mode veille
si elle n'a pas été utilisée pendant une certaine période. Dans le cas d'un appel entrant,
seul le téléphone mobile sonne et quelques secondes s'écoulent avant que l'appel ne soit
également transféré sur le casque (deux à trois sonneries). Vous ne devez prendre l'appel
que lorsque vous entendez la sonnerie dans le casque. Si vous appuyez sur S1 avant que
l'appel ne soit transféré sur le casque, celui-ci tentera d'établir une connexion Bluetooth et
provoquera un conflit sur le téléphone mobile.
Au cours d'un appel, l'appel peut être transféré du téléphone Bluetooth au casque et du
casque au téléphone Bluetooth.
Pour transférer un appel du téléphone Bluetooth vers le AT-BT110, appuyez une fois sur
S1 : l'appel est alors transféré vers le casque. Pour transférer un appel du casque AT-
BT110 vers le téléphone Bluetooth, veuillez suivre les instructions de votre téléphone.
Pour mettre le microphone en sourdine en cours d'appel, appuyez pendant 1 seconde sur
S2 et S3 simultanément et le microphone sera mis en sourdine Un bip est émis à intervalle
régulier quand le microphone est en sourdine.
Pour mettre fin à la sourdine, quand le microphone est en sourdine, appuyez
simultanément sur S2 et S3. La sourdine est désactivée et le bip s'interrompt.
Appuyez sur S1 pendant un appel pris sur le casque pour y mettre fin. Quand l'appel est
terminé, le LED bleu clignote de nouveau normalement.
Assurez-vous que la fonction de numérotation vocale est configurée sur le téléphone
mobile et que le téléphone mobile est dans le rayon du casque. Appuyez brièvement sur
S1 sur le AT-BT110. Après les bips du casque, vous pouvez utiliser les commandes
vocales enregistrées (en énonçant le nom de la personne, par exemple). L'appel sera
rapidement connecté.
13