Atmos HAZE 1400 User manual

User manual
ENGLISH
ATMOS HAZE 1400
Version 1.0

1
3
4
4
4
5
5
6
7
7
8
9
11
16
17
17
17
18
18
Warning
Important safeguards
Caution
Particular waring
Important
Please note:
ATMOS HAZE 1400 Functions Description
Getting ready
Set Up
DMX Connector Pin Assignment Functions
of the buttons
Operation
DMX Chart
Troubleshooting
Power Connected but No Smoke is Emitted
Power Connected, Fog Blasts not Smooth
Other Abnormal Situations:
Maintenance
Product Specification
21
CONTENTS
If the supply cord is damaged, it must be replaced
by the manufacturer, its service agent or similarly
qualified persons in order to avoid a hazard.
Read the manual
Indoor use only
This symbol indicating separate collection for electrical and
electronic equipment
Warning: situations that could cause injury to yourself or
others
Caution: situations that could cause damage to your
machine or other equipment
Note: notes, usage tips, or additional information
!
!
Instructional icons

1
• Useonlyappropriate,groundedelectric power
supply for your unit. See your product
specification label for appropriate power supply.
This appliance must be earthed.
• Disconnectfromelectricmainspowersupply
when not in use, when filling the HAZE fluid
tank, or when changing a fuse. Keep unit dry. If
moisture or liquids enter the Haze machine case,
immediately disconnect power supply. Contact a
service technician to determine safety for use.
• Keepmachineinflatposition,neverputitin
tilted place.
• Beforemovingmachine,alwaysdrain fog fluid
into the tank and tighten the tank cap securely
to avoid spilling.
Thank you for selecting our Atmos serials
DMX Haze machine, you already own
the high-tech, professional DMX Haze!Better
read the manual thoroughly before
operation, follow instruction will help you
have a smooth handling with Atmos serials
DMX Haze machine to achieve the most
satisfactory Haze effect, it will also assist
unit to further prolong life time as a whole.
Warning!
Like all electronic products, ATMOS HAZE
1400 must be used with safety precautions
in mind.
Fill enough fog fluid before plugging in,
empty fluid tank when not in use or moving.

2
• Withoutuser-serviceablepartsinthepackage,
please contact your local agent or qualified
technician for servicing.
• Withoutchangeablestructurebynon-
qualified user, please do not open the up cover
or have any change at will, otherwise, it may
cause accident!
• Hazemachineisforadultuse.Keepoutof
reach of children. Never leave the unit running
unattended.
• Hazemachinenozzlegetshotover200
degrees (centigrade) during use. Don’t touch!
Maintain a safe distance over 100CM. Never
aim the nozzle directly at people.
• Keepcaseclosedwhileoperating.PutHaze
machine in drafty place. Do not insert objects
into air vents. Allow 20cm space or above
around the machine for proper ventilation.
• KeepHazemachineawayfromflamesand
flammable items. Never aim the nozzle at open
flames or sparks. Use only high quality water-
basedHazefluid.Neverputflammable
substances into the tank.
• Machinemustcooldownbeforecleaning,
servicing or storing.
• Neverputanyflammablematerial(lipid,gas,
perfume etc.) into the tank, read the user
manual thoroughly before operation.
• Betteruseourhighqualitywater-basedfog
fluid, random use with other Haze fluid may
jam the pipe, or even erode the components
inside.

3
•Keepsufcientuidintank.Operatingthe
unit without sufficient fluid, the pump will
slowdown the power.
•Ifanyabnormalrunningoccurs,stopit
immediately, empty the fluid, and bring the
done up unit (recommend original box) to
your agent or dealer for servicing. Make sure
all fluid is empty from the tank before moving
or shipping.
•Neverdrinkfoguid.Ifingested,calladoctor
immediately. If fluid contacts eyes or skin, rinse
skin thoroughly with water.
•Readusermanualinstructionsthoroughly
before operating. Follow the instruction. Never
remove warning or informative labels from the
unit.
Important Safeguards
•Readallinstruction
•Productsforindooruseonly.Keepaway
from liquids. Never operate in rain or in damp
conditions.
•Unitmustbegrounded.
•Donnotopenunit,riskofelectricshock.
•Keepmachineinatposition,neverputitin
tilted place.
•Donotimmerseinanyliquid
•Savetheseinstructions.

4
Caution!
There are no user serviceable parts inside this unit. Do
not attempt any repairs yourself, doing so will void your
manufactures warranty. In the unlikely event your unit
may require service please contact your local dealer.
Particular Warning :
Please install the product correctly according to the
instruction of the user manual. To avoid any accident,
it is not allowed to install the product with any way
not instructed on the user manual. If accident happens
because users do not install the product according to
the instruction of the user manual, the manufacturer
will not take any responsibility.
Please note:
Specifications and improvements in the design of this
unit and this manual are subject to change without any
prior written notice.
Important
The wires in this mains lead are colored in
accordance with the following code.
EU
Green and Yellow – Earthed (E)
Blue – Neutral (N)
Brown – Live (L)
Warning: This appliance must be earthed.
USA
Green and Yellow – Earthed (E)
White – Neutral (N)
Black – Live (L)
Warning: This appliance must be earthed.
!

5
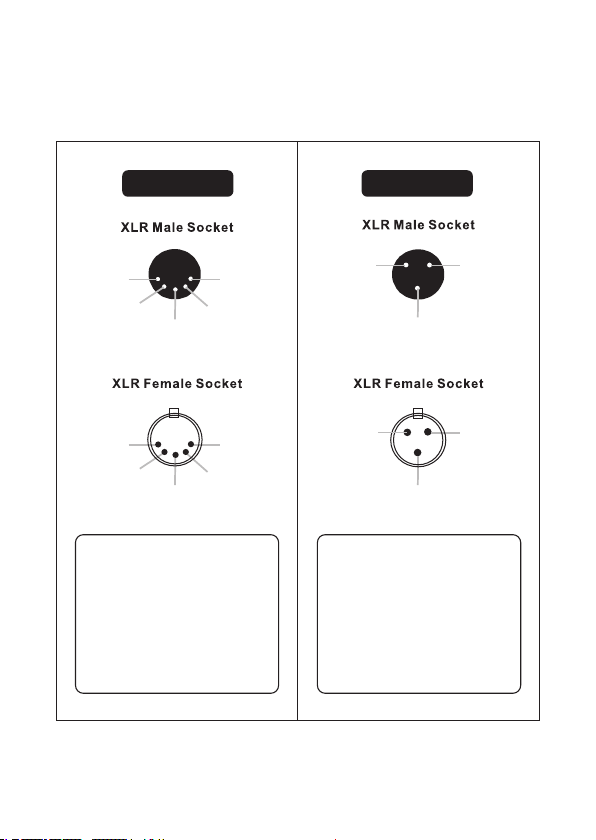
A. Hanging Bracket
B. UniqueAnti-SpillTank
C. Quick Connector
D. Blue LCD screen
E. 6 Buttons
Figure1 ATMOS HAZE 1400 Functions
A
C
B
D
O
M
E
N
M
F. DMX 5 pin XLR Output
G. DMX 5 pin XLR Input
H. DMX 3 pin XLR Output
I. DMX 3 pin XLR Input
J. Fuse Holder or NFB
K. Electric Power Input
L. Fog Output Nozzle
M. Sponge
N. Cushion
O. Fan Net
FN
G
HIJK
M
L
L

6
Description
• Smoothandstablesmokeoutputcontrolfrom5-100%.In
accordance with different wind power, the smoke can be adjusted
fromminimumto100%.Suitableforoperationinanylocations.
• 5-100%fanspeedadjustment.Quietandsmoothfanletthe smoke
disperseunknowingly.100%highfanspeedletthesmokebe thin
andeven,andexpandmorequicklythroughoutthelocation.
• Primaryheatinguptakesveryshorttime,onlyabout60seconds,
shorter than general Haze machines.
• Themachinecanbeinstalledforupsprayorforwardspray.
• Uniquedesignof5.6literliquidtanklethavenoworryofoil leaking
when being operated up spray or side spray. Quick connector makes
replacement direct and easier when performance is ongoing.
• DMXonboard,3DMXmodesforchoice;1CH,2CH,4CH,operate
by any additional DMX controller.
• Multi-functionoperationcontrol.Built-Intimercontrol,manual
fogging control and continuous fogging control.
• Heavy-duty.Abletokeepworkinglongtime.
•Self-cleaningfunction:Themachinedesignofmachinestopsworking
after a delay of 30 seconds, automatically clear the tubing of the
remaining liquid.
• Designofexpeditingliquidsupply:Whenlowsmokeoutput,ittakes
more time for supplying the liquid for the first time. The function of
manual fogging is suggested to be used for expediting liquid supply
and save time.
• EasyunderstandingLCDdisplayandintelligentdesignofsoftware
control.
• Ruggedhigh-qualityshapedesignedwithstrongbracket.Liquidtank
designedforquickfixingandwithprotectionagainstgettingloosen
during transportation. All details are required.

7
Getting Ready
All products are thoroughly tested at the factory and shipped in
perfect condition. If damage has occurred during shipping, or if
components are missing, please contact your local dealer immediately.
Your package should include:
1.One Atmos 1400 DMX Haze
2.One Power Cord
3.One product user manual
Set Up
1. Open the shipping carton and carefully remove the unit from the
shippingcarton;
2. Be sure to remove packing material from around the Haze
machine, especiallynearthenozzle;
3. SettheHazemachineonadry,flatsurface;
4. Connectthequickconnectorwiththeliquidtankcap(Figure1-C).
Be sure of well connection. Use definitely water based liquid of
goodquality;
5. Plug mains power cord from the Haze machine into appropriate
power supply socket. Wait about 60 seconds for heating element to
heatup;
6. Use LCD display for operating control, or connect DMX controller
forsetting;
7. Moving the machine during operation could probably get air
entered into the liquid pipe and affect smoothness of fog blasts. If
this happened, use “Manual” function to force the machine to fog
for a moment. Until the air is dispersed from the pipe, the machine
will recover its normal fogging.
8
DMX Connector Pin Assignment
Themachineprovidesa3-or5-pinXLRconnectorforDMX
connection. The diagram below indicates pin assignment information.
5 pin XLR 3 pin XLR
1. Ground
1. Ground
1. Ground
1. Ground
2. Cold
2. Cold
2. Cold
2. Cold
3. Hot
3. Hot
3. Hot
3. Hot
4. N/A
4. N/A
5. N/A
5. N/A
XLR Pin Configuration
Pin 1= Ground
Pin 2= Data Compliment
(negative)
Pin 3= Data True (positive)
Pin 4= No use
Pin 5= No use
XLR Pin Configuration
Pin 1= Ground
Pin 2= Data Compliment
(negative)
Pin 3= Data True (positive)

9
Functions of the buttons
FUNCTION:Functionswitchingbutton;thenhavethenumericalvalue
changed by using UP and DOWN buttons.
DMX Mode:
DMX mode selection. Single channel, 2 channel
and 4 channel mode can be selected.
DMX Set:
SettingofDMXaddress;Rangeofaddressvalue:
address=001~512. Press ”UP” or “Down” 1.5 seconds
can change value continuously and fast, pressed UP/
DOWN at the same time, value back to 1.
Vol xxx:
Setting output of timing fogging and continuous
Fogging(Volume=5~100%).
Fan xxx:
Setting fan speed of timing fogging and Continuous
Fogging(Fan=5~100%).
DUR. xxx: Setting duration of timing fogging(Duration=3~250s).
INT. xxx: Setting interval of timing fogging(Interval=5~250s).
Fan Speed & Volume Adjustment
Increasing numerical value for Function
Decreasing numerical value
for Function
Timer Fog, adjustable by Function Button
Constant Fog, adjustable by Function Button
Manual Fog,
Max. Fan Speed & Volume
Use only high quality
water - based faze uid!
fz-3.0
!Warning!
Hot Vapor

10
UP: Button for increasing numerical value
DOWN: Button for decreasing numerical value
TIMER: Starting button of timing fogging.
HOLD: Starting button of continuous fogging.
MANUAL: Starting button of manual fogging. Press “Manual”
(without releasing), maximum output and maximum fan
speed fogging. Release “Manual” to recover previous status.
This function can be started forcedly under any status.
• Self-cleaningfunction:Themachinedesignofmachinestops
working after a delay of 30 seconds, automatically clear the tubing
of the remaining liquid.
• Ifwantingtoexpediteliquidsupplywhenpoweredonthemachine,
using function of manual fogging can help.
• Setvaluesareautomaticallysaved.
• Ifuidisrunout,fullthetankwithuidandpress“Manual”toreset.

11
Version:
1.0
Warming
Up……
DMX set
Addr-xxx
Operation
1. Plug mains power cord from the Haze machine into appropriate
powersupplysocket;
4. Waitabout60secondsforheatingelementtoheatup;
6. After the heating up is complete, Please do follow the required
operatingmodes;
2.
3.
5.
Primarypoweron;
2 seconds after, switches to working status:
heatingup;
After heating up, displays the previous functions
listbeforethelastpoweroff;Thepictureshows
thenewmachinedefaultstate;
**REMARK**
To reduce the possibility of that the wind mouth gets humid, the
software will detect the wind value and the fog value, and do proper
adjustment. Under display control mode (timing fogging, continuous
fogging and manual fogging) or DMX control mode : when fog value
isadjustedto100%,thesoftwarewilladjustwindvalue(evenitisset
at5%)to30%automatically;whenwindvalueisadjustedto5%,the
softwarewillreducefogvalueto50%automatically.Thiswillprevent
the wind mouth from getting humid because of too small wind but
too much fog.
*Fog value = Volume, wind value = Fan
12
Timing Fogging Operation..............................................................
DUR. xxx
INT. xxx
-->Duraxxx
Intv xxx
Dura xxx
-->Intvxxx
DUR. xxx
INT. xxx
DMX set
Addr-xxx
(Stop)
Cleaning
1.
3.
5.
6.
8.
7.
Press“Timer”toentertimingfoggingstatus;
Press “Up” or “Down” to adjust the value of
continuoustime(3s–250s);
Press “Up” or “Down” to adjust time value of
interval(5s – 250s). Press “FUNCTION” to move
thearrowupordown;
After setting the timing, press “Timer” to
re-starttimingfogging;
AftertheSelf-cleaningprocessiscomplete,
return to the previous picture status.
Press again “Timer” to stop Timing
fogging. Please note the machine design of
machine stops working after a delay of 30
seconds;automaticallyclearthetubingofthe
remaining liquid
2. Under this status, press “ Function” to get into timing setting
menu,pleasenotetimingfoggingstopsatthesamemoment;
4. Press again “Function” to switch to adjust the value of Interval,
pleasenotetimingfoggingstillstopsatthesamemoment;
• Ifwantingtoexpediteliquidsupplywhenpoweredonthemachine,
using function of manual fogging can help.
• Whenexecutingtimingfogging,canpress“Hold”toswitchto
continuous fogging directly.
• Whenexecutingtimingfogging,canpress“Manual”toswitchto
Manual fogging directly, this function can be started forcedly under
any status.
13
Continuous Fogging Operation ......................................................
-->Volxxx
Fan xxx
-->Volxxx
Fan xxx
Vol xxx
-->Fanxxx
(Stop)
Cleaning
DMX set
Addr-xxx
1.
2.
4.
5.
6.
Press “Hold” to enter continuous fogging
status, please note continuous fogging starts at
thesamemoment;
Press “Up” or “Down” to adjust smoke volume
value(5–100%);
Press “Up” or “Down” to adjust fan speed
(5–100%)Press“FUNCTION”tomovethe
arrowupordown;
Press again “Hold” to stop Continuous fogging.
Please note the machine design of machine
stopsworkingafteradelayof30seconds;
automatically clear the tubing of the remaining
liquid.
AftertheSelf-cleaningprocessiscomplete,
return to the previous picture status.
3. Press “Function” to switch to adjust the speed of fan, please note
continuousfoggingstillworksatthesamemoment;
• Ifwantingtoexpediteliquidsupplywhenpoweredonthemachine,
using function of manual fogging can help.
• Whenexecutingcontinuousfogging,canpress“Timer”toswitch
to Timing fogging directly.
• Whenexecutingtimingfogging,canpress“Manual”toswitchto
Manual fogging directly, this function can be started forcedly under
any status.

14
Manual Fogging Operation.............................................................
Other Operation Tips.......................................................................
DMX Control Operation ..................................................................
Manual
V100 F100
1ch.Axxx
VxxxFxxx
DMX set
Addr-xxx
*Hold
TimeSet
DMX set
Addr-xxx
1.
3.
•
•
•
As long as heating is completed, under any
status, press “ Manual” (without releasing), the
machine with maximum output and maximum
fanspeedfogging;
Upper display DMX mode and DMX address
value, press “Up” or “Down” button to set the
DMXaddress;
In previous status, it is allowed to press
“Function” to enter the selection of functions
listdirectly;
Press “Up” or “Down” to move “*” up or
down, press again “Function” to enter the
function selected by “*”, and setting the
menu like previous timing fogging mode or
continuousfoggingmode;
There is no operator action for two seconds,
thenautomaticallyreverttothepreviousstatus;
2. Release “Manual” to recover previous status.
1. Connect the DMX 512 controller cable to the input socket (G or I
of figure 1) of the fog machine unit. Make sure the signal cable
polarity is correct. When DMX socket receives effective DMX
signals, the machine enter DMX control mode automatically.
2. Thereare3DMXmodesforchoice;1CH,2CH,&4CH,please
choose the mode by Function.

15
1ch.Axxx
VxxxFxxx
2ch.Axxx
VxxxFxxx
4ch.Axxx
VxxxFxxx
4ch.Axxx
VxxxFxxx
VxxxFxxx
DxxxIxxx
4.
5.
6.
8.
7.
Below display current DMX controlled smoke
volumevalueandfanspeed;
Or please press ”Function” to switch to 2CH
modetodoappropriateDMXaddresssetting;
Or please press ”Function” to switch to 4CH
modetodoappropriateDMXaddresssetting;
Press “Function” again to revert to 4ch mode
andDMXaddresssetting;
In 4CH mode, there is no operator action for
two seconds, then automatically revert to the
previous status. Upper display current DMX
controlled volume value and fan speed, below
display current DMX controlled duration and
intervalvalue;
9. Please switch the DMX mode 1ch, 2ch or 4ch by Function.
10. If desired, connect another Haze machine: Plug one end of
another signal cable in to the output socket (F or H of figure 1) on
the back ofthefirstATMOS;plugtheotherendofthesignalcableto
theinput socket(GorIoffigure1)onthebackofthesecond
ATMOS. Follow thesameproceduretolinkmorefogmachine,if
desired; wholelink is daisy chain.
11. Down. Refer to DMX channel chart in Figure 2 make related
settings.NowstartoperatingwithDMXconsole.
•If wanting to expedite liquid supply when powered on the machine,
using function of manual fogging can help.
•Upon receiving DMX signal, except Manual fogging function, all
built-infunctionsareinvalid.
•DMX signals dismissed, machine recovers display control mode, and
built-infunctionsarerecovered.

16
Figure 2 DMX Chart
CH1
5-255Volume5%-100%
Fan100%
0-4Volume0%
Fan5%
CH1 CH2
Volume Fan
5-2555%-100% 16-2556%-100%
0-4Off 0-155%
1 CH
2 CH
4 CH
CH1 CH2 CH3 CH4
Volume Fan Duration Interval
5-2555%-100% 16-2556%-100% 8-2553-250(s) 10-2555-250(s)
0-4Off 0-155% 0-73(s) 0-90(s)
**Interval =0 means constant fog.

17
Troubleshooting
This troubleshooting guide is meant to help solve simple problems.
If a problem occurs, carry out the steps below in sequence until a
solution is found. Once the unit operates properly, do not carry out
following steps. If the problem persists, refer servicing to a qualified
technician.
Power Connected but No Smoke is Emitted:
1. Check the power supply. Plug the unit into grounded electric
power supply socket with proper voltage.
2. Disconnect fog machine from electric power supply. Replace fuse
with one of the same type.
3. Keep sufficient fluid in tank.
4. Check if pump is working (with fluid flow or not).
5. Check if the heater is heating (touch the panel to see if it is
warming).
6. Check your controller if in correct connection.
7. Check your DMX address setting.
Power Connected, Fog Blasts not Smooth:
Moving the machine during operation could probably get air entered
into the liquid pipe and affect smoothness of fog blasts. If this
happened, use “Manual” function to force the machine to fog for
a moment. Until the air is dispersed from the pipe, the machine will
recover its normal fogging.
Should there be any low fog emitted, running noisily or hindered
fogging, pull out the plug immediately. Check if string enough fluid,
if the pipe connected to the tank is clean, if there’s air inside the pipe,
iftheliquidows,ifnot,plug-inagain;stillpersistsabnormalrunning,
and If causation is unclear, stop running to avoid any damage, shut
down to cool it, and bring unit to your local agent or appointed
service place for inspection, prohibit any dismantlement by yourself.
18
Maintenance
Beforedoingmaintenance,pleasemakesurethatthepoweriscut,
the power cord is unplugged, and the machine itself has cooled down.
The maintenance must be done by qualified person.
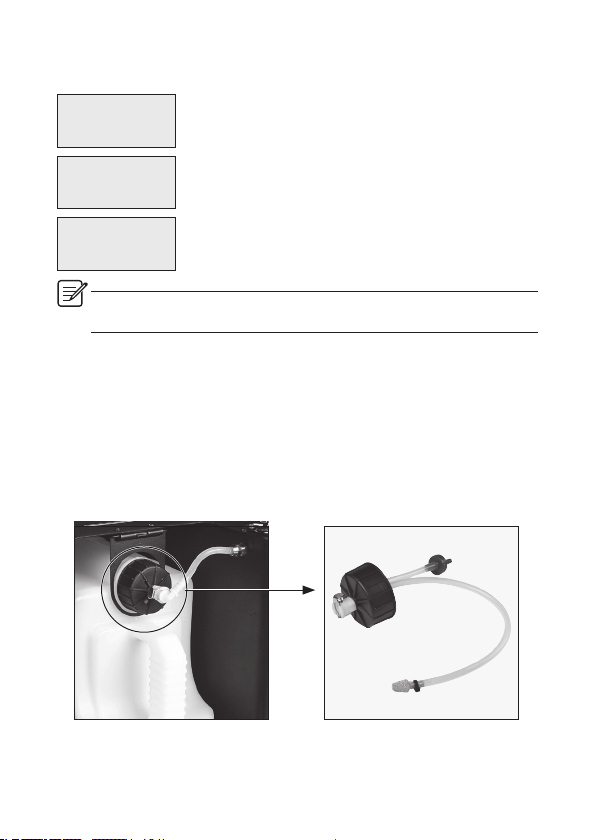
1. The fluid is not allowed to get dirty. Be sure to always clean or
eplace the caps on the tank (Replace the caps on the tank directly.
This kit includes quick connector, cap, pipe and filter) and tight the
cover of the Haze machine tank immediately after filling.
2. Prolonged use, the nozzle may be clogging by impurities,
periodically use tools to clean the nozzles, keep the nozzle
unobstructed.
Other Abnormal Situations:
Heater
Overheat
No
Heating
No
Fluid
Flashing and showing this status, means heater is
toohotorthermossensoriscut;
Flashing and showing this status, means unable
heating;
Flashing and showing this status, means fluid runs
outorpumpingnouid;atthismoment,speed
of the fan will reduce to minimum, and pump will
stop working.
• Ifuidisrunout,fullthetankwithuidandpress“Manual”
to reset.
Table of contents


