ATON CL303 User manual

1
Gigaset SL560 / Aton CL303 / SWZ PTT EN / A31008-M1710-F151-1-7619 / cover.fm / 28.6.06
Aton CL303
User guide

2
Gigaset SL560 / Aton CL303 / SWZ PTT EN / A31008-M1710-F151-1-7619 / cover.fm / 28.6.06

1
Handset at a glance
Gigaset SL560 / Aton CL303 / SWZ PTT EN / A31008-M1710-F151-1-7619 / overview.fm / 10.7.06
Handset at a glance
1Display in idle status
2Battery pack charge status
=eVU(flat to full)
= flashes: battery pack almost flat
e V U flashes: battery pack charging
3Display keys (page 14)
4Message key
Access to calls and message lists;
Flashes: new message or new call.
5End call key, On/Off key
End call, cancel function, go back one menu
level (press briefly), back to idle status (press
and hold), activate/deactivate handset
(press and hold in idle status)
6Hash key
Key lock on/off (press and hold in idle sta-
tus),
Toggle between upper/lower case and digits
7«SwisscomVoicePortal»key(page 15)
8Connection socket for headset and PC in-
terface
9Microphone
10 Recall key
- Confer (Flash)
- Insert a dialling pause (press and hold)
11 Star key
Ringtones on/off (press and hold), with an
open connection: switching between pulse
dialling/touch tone dialling (press briefly)
Open table of special characters
12 Key 1
Select network mailbox (press and hold)
13 Talk key
Answer a call, open last number redial list
(press briefly), start dialling (press and hold)
When writing an SMS: send SMS
14 Handsfree key
Switch between earpiece and handsfree
mode;
Lights up: handsfree activated;
Flashes: incoming call
15 Control key (page 14)
16 Signal strength
Ð i Ñ Ò (high to low)
| flashes: no reception
17 Bluetooth activated (page 46)
Base station at a glance
16 2
3
5
4
6
7
15
14
12
10
11
9
8
1
13
ò
17
SIM card reader
(page 21)
Registration/
Paging key
(page 35)

2
Contents
Gigaset SL560 / Aton CL303 / SWZ PTT EN / A31008-M1710-F151-1-7619 / SL560_AtonCL303IVZ.fm / 10.7.06
Contents
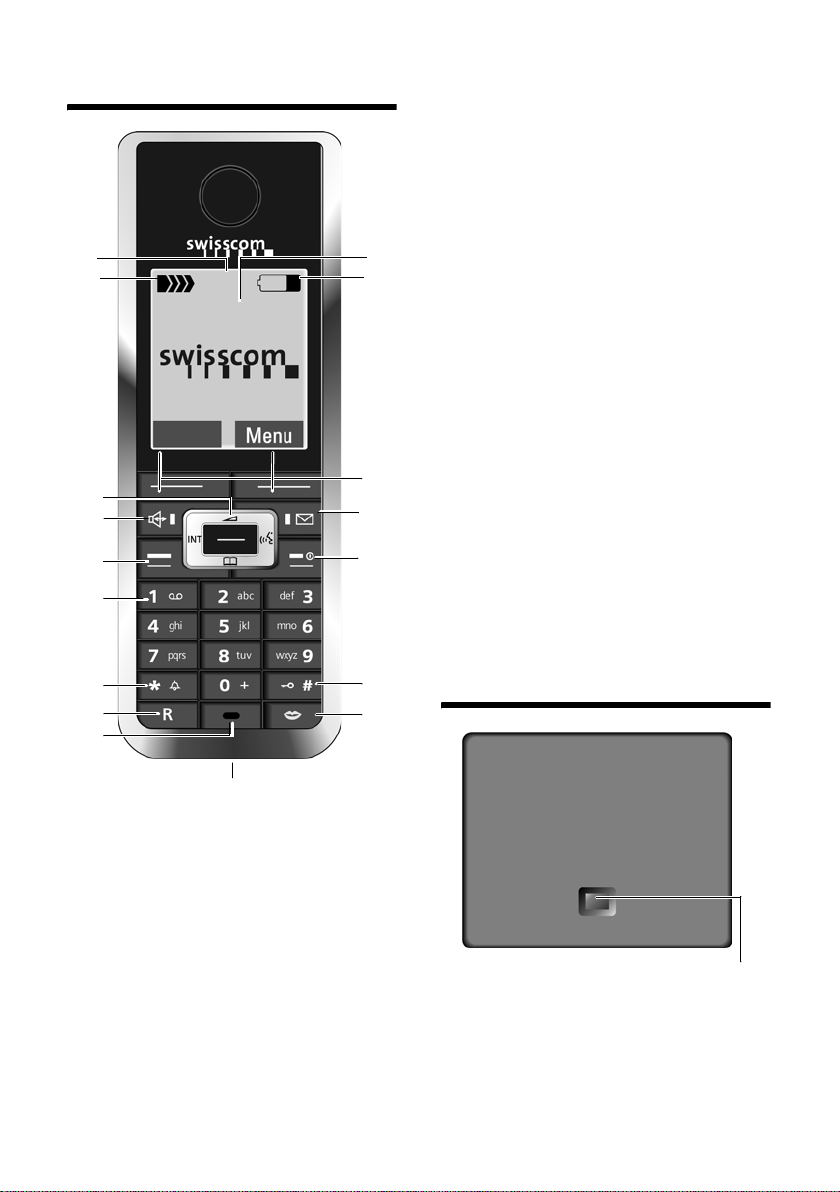
Handset at a glance . . . . . . . . . . . 1
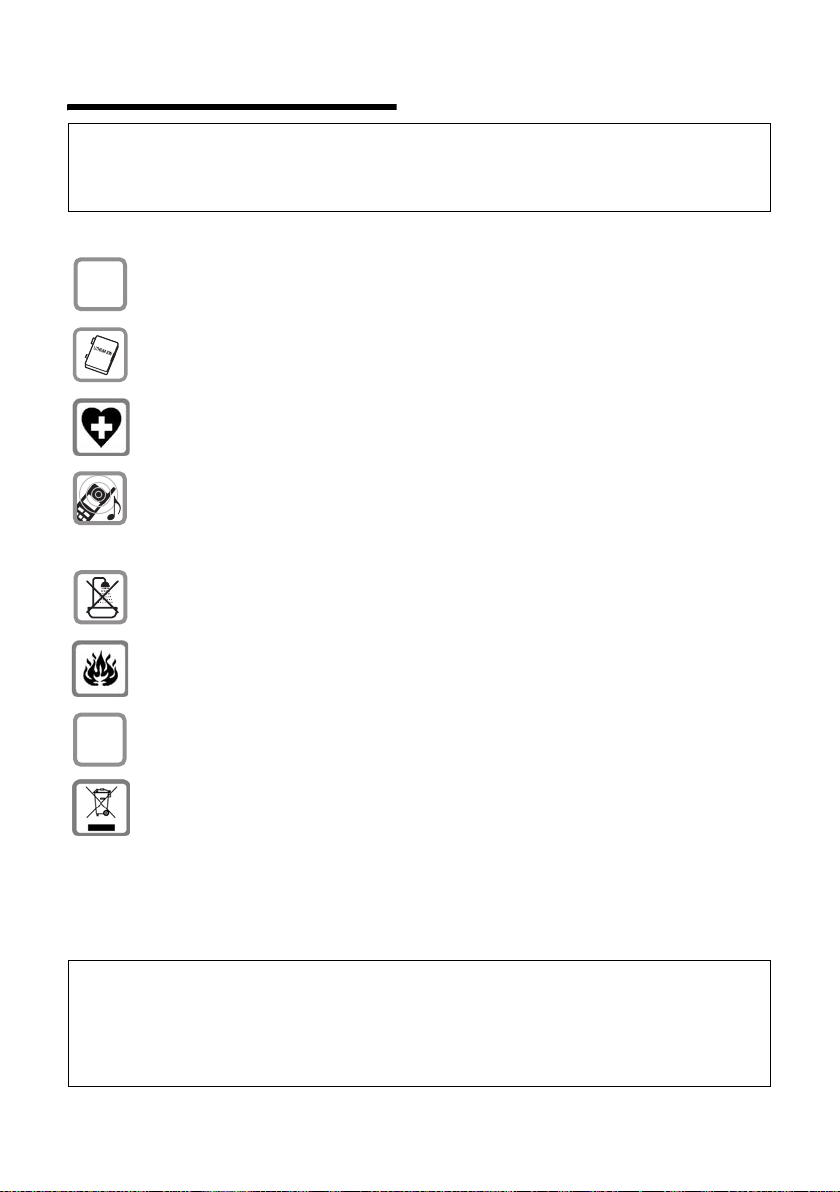
Base station at a glance . . . . . . . 1
Safety precautions . . . . . . . . . . . . 4
Aton CL303 –
more than just a telephone . . . . . 5
First Steps . . . . . . . . . . . . . . . . . . . 5
Pack contents . . . . . . . . . . . . . . . . . . . . 5
Installing the base station
and charging cradle . . . . . . . . . . . . . . . 5
Setting up the handset for use . . . . . . . 6
Menu tree . . . . . . . . . . . . . . . . . . . 9
Making calls . . . . . . . . . . . . . . . . 12
Making an external call . . . . . . . . . . . 12
Ending a call . . . . . . . . . . . . . . . . . . . . 12
Answering a call . . . . . . . . . . . . . . . . . 12
Calling Line Identification . . . . . . . . . 12
Handsfree operation . . . . . . . . . . . . . 13
Muting . . . . . . . . . . . . . . . . . . . . . . . . 13
Operating the handset . . . . . . . . 13
Control key . . . . . . . . . . . . . . . . . . . . . 14
Display keys . . . . . . . . . . . . . . . . . . . . 14
Returning to idle status . . . . . . . . . . . 15
Menu guidance . . . . . . . . . . . . . . . . . 15
"Swisscom Voice Portal" key . . . . . . . . 15
Correcting incorrect entries . . . . . . . . 15
Network services . . . . . . . . . . . . 16
Setting functions for the next call . . . 16
Setting functions for all
subsequent calls . . . . . . . . . . . . . . . . . 16
Functions during a call . . . . . . . . . . . . 16
Functions after a call . . . . . . . . . . . . . 17
Using the directory and lists . . . 18
Directory . . . . . . . . . . . . . . . . . . . . . . . 18
Last number redial list . . . . . . . . . . . . 23
Opening lists with the
message key . . . . . . . . . . . . . . . . . . . . 24
SMS (text messages) . . . . . . . . . 26
Writing/sending an SMS . . . . . . . . . . . 27
Receiving an SMS . . . . . . . . . . . . . . . . 29
Notification by SMS . . . . . . . . . . . . . . 30
SMS mailboxes . . . . . . . . . . . . . . . . . . 31
Setting SMS centre . . . . . . . . . . . . . . . 32
SMS to a PABX . . . . . . . . . . . . . . . . . . . 32
Activating/deactivating the
SMS function . . . . . . . . . . . . . . . . . . . . 32
SMS troubleshooting . . . . . . . . . . . . . 33
Using the network mailbox
(Combox) . . . . . . . . . . . . . . . . . . . 34
Configuring the network mailbox
for fast access . . . . . . . . . . . . . . . . . . . 34
Viewing the network mailbox
message . . . . . . . . . . . . . . . . . . . . . . . 34
Using several handsets . . . . . . . 35
Registering handsets . . . . . . . . . . . . . . 35
De-registering handsets . . . . . . . . . . . 35
Locating a handset ("paging") . . . . . . 35
Changing the base station . . . . . . . . . 35
Making internal calls . . . . . . . . . . . . . . 36
Listening to an external call . . . . . . . . 37
Changing the name of a handset . . . . 37
Changing a handset's internal
number . . . . . . . . . . . . . . . . . . . . . . . . 37
Handset settings . . . . . . . . . . . . . 38
Shortcuts for functions and
numbers . . . . . . . . . . . . . . . . . . . . . . . 38
Setting emergency numbers . . . . . . . 39
Changing the display language . . . . . 39
Setting the display . . . . . . . . . . . . . . . 39
Setting the screensaver . . . . . . . . . . . 39
Setting display illumination . . . . . . . . 40
Activating/deactivating auto answer . 40
Adjusting the loudspeaker volume . . . 40
Changing ringtones . . . . . . . . . . . . . . 40
Activating/deactivating first
ring muting . . . . . . . . . . . . . . . . . . . . . 41
Setting your own dialling code . . . . . . 42
My stuff . . . . . . . . . . . . . . . . . . . . . . . . 42
Activating/deactivating
advisory tones . . . . . . . . . . . . . . . . . . . 43
Setting the alarm clock . . . . . . . . . . . . 44
Setting an appointment (Calendar) . . 44
Displaying missed
appointments, anniversaries . . . . . . . 45
Using Bluetooth devices . . . . . . . . . . . 46
Restoring the handset default
settings . . . . . . . . . . . . . . . . . . . . . . . . 47

3
Contents
Gigaset SL560 / Aton CL303 / SWZ PTT EN / A31008-M1710-F151-1-7619 / SL560_AtonCL303IVZ.fm / 10.7.06
Base station settings . . . . . . . . . 48
Protecting against unauthorised
access . . . . . . . . . . . . . . . . . . . . . . . . . 48
Activating/deactivating the
wait melody . . . . . . . . . . . . . . . . . . . . 48
Repeater support . . . . . . . . . . . . . . . . 48
Restoring default settings to
base station . . . . . . . . . . . . . . . . . . . . 48
Connecting the base station
to the PABX . . . . . . . . . . . . . . . . . 49
Flash time . . . . . . . . . . . . . . . . . . . . . . 49
Save access code . . . . . . . . . . . . . . . . 49
Setting pauses . . . . . . . . . . . . . . . . . . 49
Switching temporarily to
tone dialling (DTMF) . . . . . . . . . . . . . 50
Appendix . . . . . . . . . . . . . . . . . . . 51
Care . . . . . . . . . . . . . . . . . . . . . . . . . . 51
Contact with liquid . . . . . . . . . . . . . . 51
Faults and Self-help with
Troubleshooting . . . . . . . . . . . . . . . . . 51
Warranty/Maintenance/Repair/
Authorisation . . . . . . . . . . . . . . . . . . . 52
Repair/Maintenance . . . . . . . . . . . . . . 52
Specifications . . . . . . . . . . . . . . . . . . . 53
Notes on the
operating instructions . . . . . . . . 54
Symbols used . . . . . . . . . . . . . . . . . . . 54
Example: menu input . . . . . . . . . . . . . 55
Example: multiple line input . . . . . . . 55
PC Interface . . . . . . . . . . . . . . . . . . . . 56
Writing and editing a text message . . 56
Accessories . . . . . . . . . . . . . . . . . 58
Index . . . . . . . . . . . . . . . . . . . . . . 59
Mounting the base on the wall . . . . . 65

4
Safety precautions
Gigaset SL560 / Aton CL303 / SWZ PTT EN / A31008-M1710-F151-1-7619 / security.fm / 10.7.06
Safety precautions
Caution:
Read the safety precautions and the user guide before use.
Explain their contents to your children, and the potential hazards associated with using the tele-
phone.
Only use the mains adapter supplied, as indicated on the underside of the base
station or the back of the charging cradle.
Fit only the approved rechargeable battery pack! Never use a conventional
(non-rechargeable) battery pack as this could damage your health and cause
injury. Use the battery pack as directed in this user guide (page 53).
The operation of medical appliances may be affected. Be aware of the technical
conditions in your particular environment, e.g. doctor's surgery.
Do not hold the rear of the handset to your ear when it is ringing or if you have
activated the handsfree function. This can cause severe, permanent hearing
damage.
The handset may cause an unpleasant humming noise in hearing aids.
Do not install the base or charging cradle in bathrooms or shower rooms.
The base and the charging cradle are not splash proof (page 51).
Do not use the phone in environments with a potential explosion hazard,
e.g. auto paint shops.
If you give your Aton CL303 to someone else, make sure you also give them the
user guide.
Information about disposal
At the end of its service life this product must not be disposed of among the normal house-
hold refuse. Instead, it must be handed in at a sales outlet or at a collection point for recy-
cling electrical and electronic devices in accordance with regulations governing the
return, taking back and disposal of electrical and electronic devices (ORDEA).
The materials can be recycled as indicated. By recycling materials and reusing or utilising
old appliances in any other way you are making an important contribution to the protec-
tion of the environment.
$
ƒ
Note:
– Not all of the functions described in this user guide are available in all countries. CLIP (Calling Line
Identification Presentation), SMS (Short Message Services) and "Swisscom Voice Portal": these
functions depend on the network provider.
– EATONI predictive text: EATONI predictive text helps you when you are writing text messages. It
can be activated or deactivated (page 57).

5
Aton CL303 – more than just a telephone
Gigaset SL560 / Aton CL303 / SWZ PTT EN / A31008-M1710-F151-1-7619 / starting.fm / 10.7.06
Aton CL303 –
more than just a telephone
Your telephone has a clearly laid out
colour display (65K colours) and not only
makes it possible for you to send and
receive SMS over the fixed network, but
also to store up to 250 phone numbers
and e-mail addresses (page 18) – it can do
a whole lot more:
uYou can programme the keys of your
phone with important numbers or fre-
quently used functions. The number is
then dialled or the function started by
simply pressing a key (page 38).
uYou can designate important people as
VIPs so you can tell important calls from
the ringtone (page 18).
uAssign pictures to your callers. You will
then know who is calling you by the
picture on your handset display.
Precondition: Calling Line Identification
(CLIP, page 12).
uStore a voice pattern for important
directory entries – the telephone will
dial on voice command (page 22).
uYou can store appointments (page 44)
and anniversaries (page 20) in your
phone and it will remind you of them in
advance.
Have fun using your new telephone!
First Steps
Pack contents
uone Aton CL303 base station,
uone handset,
uone charging cradle,
uone mains adapter,
uone phone cord,
uone battery pack,
uone battery cover,
uone belt clip,
uuser guide (Ger, Fr, It),
uheadset
Installing the base station
and charging cradle
Base station and charging cradle are
designed for use in closed, dry rooms with
a temperature range of +5 °C to +45 °C.
Set up the base station at a central point in
the apartment or house.
You can find instructions for mounting the
base on the wall at the end of this user
guide.
Please note:
uNever expose the telephone to heat
sources, direct sunlight, other electrical
appliances.
uProtect your Aton CL303 from mois-
ture, dust, corrosive liquids and
vapours.
Range and reception strength
Range:
uUp to 250 m in the open
uUp to 40 m in buildings
Note:
All CLIP, SMS and "Swisscom Voice Portal" func-
tions are dependent on the network provider.

6
First Steps
Gigaset SL560 / Aton CL303 / SWZ PTT EN / A31008-M1710-F151-1-7619 / starting.fm / 10.7.06
Reception strength:
The display shows the quality of the radio
contact between the base station and
handset:
uGood to poor: ÐiÑÒ,
uNo reception: |flashes.
Connecting the base station
¤First connect the mains adapter and
then the phone jack as shown below-
and place the cables in the cable
recesses.
1 Underside of the base station (detailed
view)
2 Mains adapter 230 V
3 Phone jack with phone cord
Please note:
uThe mains adapter must be always
connected, as the phone will not oper-
ate without mains connection.
uIf you buy a replacement phone cord
from a store, ensure that the phone
jack is connected correctly.
Setting up the handset for use
The display is protected
by a plastic film. Please
remove the protective
film!
Fitting the battery pack
¤Insert the battery pack at an angle from
the right introducing the lugs into the
cavity first.
¤Then push the casing from the top,
until the retaining clip on the side of
the battery pack clicks securely into
place in the casing.
Please note:
You must press the retaining clips down in
order to remove the battery pack.
Correct phone jack assignment
1unused
2unused
3a
4b
5unused
6unused
1
3
2
1
1
1
3
2
1
4
5
6
Caution:
Use only the recommended rechargeable bat-
tery pack (page 53). Never use a conventional
(non-rechargeable) battery pack, as this may
cause significant damage to health and prop-
erty. For example, the outer casing of the bat-
tery pack could be destroyed or the battery
pack could explode. The phone could also mal-
function or be damaged as a result of using
batteries that are not of the recommended
type.

7
First Steps
Gigaset SL560 / Aton CL303 / SWZ PTT EN / A31008-M1710-F151-1-7619 / starting.fm / 10.7.06
Closing the battery cover
¤You must first align the notches on the
side of the battery pack with the lugs
on the inside of the casing.
¤Then close the cover so that it clicks
into place.
Attaching belt clip
There are notches for attaching the belt
clip on the side of the handset at approxi-
mately the same height as the display.
¤Press the belt clip onto the back of the
handset so that the lugs on the belt clip
click into the notches.
Opening the battery cover
¤Remove the belt clip if the phone is
mounted.
¤Pick the device up with the keypad
facing the palm of your hand.
¤Insert your forefinger into the notches
on the lower edge.
¤Gently lift the cover up out of the not-
ches.
Placing the handset in the charging
cradle
¤Plug the charging cradle mains adapter
into a mains power socket.
¤Place the handset in the charger with
the display facing forward.
The handset is already registered with the
base station at the factory. INT 1 appears in
the display. You do not have to re-register.
If, nonetheless, you have to register your
handset with the base station, please see
page 35.
Leave the handset in the charging cradle
to charge the battery pack.
For questions and problems see page 51.
Note
You can change the name of the handset
(page 37).
Notes:
– If the handset has switched itself off
because the battery pack is flat and is then
placed in the charging cradle, it will switch
itself on automatically.
– The handset must only be placed in the
designated charging cradle.

8
First Steps
Gigaset SL560 / Aton CL303 / SWZ PTT EN / A31008-M1710-F151-1-7619 / starting.fm / 10.7.06
Initial charging and discharging of the
battery pack
If the handset is activated, the flashing
battery icon ein the top right of the dis-
play indicates that the battery pack is
being charged.
During handset operation, the battery
icon indicates the charge status of the bat-
tery pack (page 1). The correct charge sta-
tus can only be displayed if the battery
pack is first fully charged and discharged.
¤To do this, leave the handset in the
charging cradle continuously for ten
hours. Your handset need not be
switched on for it to charge.
¤Afterwards, remove the handset from
the charging cradle and do not put it
back again until the battery pack is fully
discharged.
Please remember:
uAlways repeat the charging and dis-
charging procedure if you remove the
battery pack from the handset and
insert it again.
uThe battery pack may warm up as it is
charging. This is not dangerous.
uAfter a time the charge capacity of the
battery pack will decrease for technical
reasons.
Setting the date and time
You should set the date and time, in order,
e.g. to ensure that the correct time is
recorded for incoming calls and in order to
use the alarm clock and calendar.
¤If you have not yet set the date and
time, press the display key §Time§ to open
the input field.
To change the time, open the input field
via:
w¢Ð¢Date/Time
¤Change multiple line input:
Date:
Enter day, month and year in 8-digit
format.
Time:
Enter hours and minutes with 4 digits,
e.g. Q M 1 5 for
07:15 a.m.
§Save§ Press the display key.
Once the phone is registered and the time
set, the idle display looks as shown here
(example):
Your phone is now ready for use.
Note:
After the initial charge and discharge you may
replace your handset in the charging cradle
after every call.
ÐV
INT 1
15.11.05 07:15
?SMS

9
Menu tree
Gigaset SL560 / Aton CL303 / SWZ PTT EN / A31008-M1710-F151-1-7619 / menuetree.fm / 10.7.06
Menu tree
Instead of scrolling to locate a menu function, you can select a menu function faster by
opening the menu and keying in the digit combination ("shortcut").
Example: wN211for "Set ringtone for external calls".
With the telephone in idle status, press w(open main menu):
1SMS î
You have activated an SMS mailbox (general or private) without a PIN
1-1 New SMS (page 27)
1-2 Incoming 0 (page 29)
1-3 Outgoing 0 (page 28)
You have activated an SMS mailbox with a PIN or 2-3 mailboxes
1-1 Mailbox 1-1-1 New SMS (page 27)
1-1-2 Incoming 0 (page 29)
1-1-3 Outgoing 0 (page 28)
1-2
to
1-4
Mailbox 1
Mailbox 2
Mailbox 3
1-2-1
to
1-4-1
New SMS (page 27)
1-2-2
to
1-4-2
Incoming 0 (page 29)
1-2-3
to
1-4-3
Outgoing 0 (page 28)
1-6 Settings 1-6-1 Service Centres (page 32)
1-6-2 SMS Mailboxes (page 31)
1-6-3 Notify Number (page 30)
1-6-4 Notify Type (page 30)
1-6-6 Status Report *) (page 26)
2Sel. Services ê
2-3 Withhold No. (page 16)
2-6 All Calls 2-6-1 Call Divert (page 16)
2-6-3 Call Waiting (page 16)
2-6-5 Call Protection (page 16)
2-7 Ringback Off (page 17)
*) Not currently supported by the Swisscom network.

10
Menu tree
Gigaset SL560 / Aton CL303 / SWZ PTT EN / A31008-M1710-F151-1-7619 / menuetree.fm / 10.7.06
3 Data transfer ý
3-1 SIM Card 3-1-1 All entries from SIM (page 21)
3-1-2 Entry from SIM (page 21)
3-1-3 All entries to SIM (page 21)
3-1-4 Entry to SIM (page 21)
3-2 Bluetooth 3-2-1 Activation (page 46)
3-2-2 Search Headset (page 46)
3-2-3 Search Data Device (page 46)
3-2-4 Known Devices (page 46)
3-2-5 Own Device Name (page 47)
3-3 Directory (page 19)
4Add. Features í
4-4 Missed Alarms (page 45)
5 Alarm Clock ì(page 44)
6 Calendar ç(page 44)
7 Resource Dir. Ï
7-1 Screensavers (page 42)
7-2 Caller Pictures (page 42)
7-3 Sounds (page 42)
7-4 Capacity (page 43)

11
Menu tree
Gigaset SL560 / Aton CL303 / SWZ PTT EN / A31008-M1710-F151-1-7619 / menuetree.fm / 10.7.06
8Settings Ð
8-1 Date/Time (page 8)
8-2 Audio Settings 8-2-1 Ringer Settings (page 40)
8-2-2 Advisory Tones (page 43)
8-2-3 Silent Alert (page 41)
8-3 Display 8-3-1 Screen Saver (page 39)
8-3-2 Colour Scheme (page 39)
8-3-3 Contrast (page 39)
8-3-4 Backlight (page 40)
8-4 Handset 8-4-1 Language (page 39)
8-4-3 Auto Answer (page 40)
8-4-4 Add. Emerg. No (page 39)
8-4-5 Register H/Set (page 35)
8-4-6 Select Base (page 35)
8-4-7 Reset Handset (page 47)
8-4-8 Network Directory *)
8-5 Base Settings 8-5-2 Music on hold (page 48)
8-5-3 System PIN (page 48)
8-5-4 Base Reset (page 48)
8-5-5 Add. Features (page 37, page 49)
8-5-7 Calls List Type (page 24)
8-6 Voice Mail 8-6-1 Set Key 1 (page 34)
*) Not currently supported by the Swisscom network.

12
Making calls
Gigaset SL560 / Aton CL303 / SWZ PTT EN / A31008-M1710-F151-1-7619 / telefony.fm / 10.7.06
Making calls
Making an external call
External calls are calls using the public tel-
ephone network.
~c Enter the number and press
the talk key.
Or:
c~ Press and hold the talk key
cand then enter the
number.
You can cancel the dialling operation with
the end call key a.
You are shown the duration of the call
while the call is in progress.
Ending a call
aPress the end call key.
Answering a call
The handset indicates an incoming call in
three ways: by ringing, by a display on the
screen and by the flashing handsfree
key d.
You can accept the call by:
¤Pressing the talk key c.
¤Pressing the §Accept§ display key.
¤Pressing the handsfree key d.
If the handset is in the charging cradle and
the Auto Answer function is activated
(page 40), the handset will take a call
automatically when you lift it off the
charging cradle.
If the ringtone is intrusive, press the dis-
play key §Silence§. You can take the call as
long as it is displayed on the screen.
Answering a call on the Bluetooth headset
Precondition: Bluetooth is activated;
connection has been established between
Bluetooth headset and the handset (see
page 46).
Press the talk key on the headset.
For more details on your headset,
please see the relevant user guide.
Calling Line Identification
When you receive a call, the caller's
number is displayed on the screen if the
following conditions are met:
uYour network provider supports CLIP,
CLI.
– CLI (Calling Line Identification):
number of the caller is transmitted.
– CLIP (Calling Line Identification Pres-
entation): number of the caller is
indicated.
Call display with CLIP/CLI
If the number of the caller is stored in your
directory, you will see their name, if you
have assigned a CLIP picture to the caller,
this will also be displayed.
1Ringsymbol
2 Number or name of caller
Notes:
Dialling using the directory (page 1, page 18)
or call and last number redial list (page 24)
saves time re-entering numbers.
With voice dialling, you can dial numbers sim-
ply by saying the name (page 22).
1
2
Å
1234567890
Accept Silence

13
Operating the handset
Gigaset SL560 / Aton CL303 / SWZ PTT EN / A31008-M1710-F151-1-7619 / telefony.fm / 10.7.06
The following is displayed in place of the
number:
uExternal, if no number is transmitted.
uWithheld, if the caller has withheld
Calling Line Identification (page 16).
uUnavailable, if the caller has not
arranged Calling Line Identification.
Handsfree operation
In handsfree mode, instead of holding the
handset to your ear you can put it down
e.g. on the table in front of you to allow
others to participate in the call.
Activating/deactivating handsfree
Activating while dialling
~d Enter the number and press
the handsfree key.
¤You should inform your caller before
you use the handsfree function so that
they know someone else is listening.
Switching between earpiece and
handsfree mode
dPress the handsfree key.
During a call switch handsfree on or off.
If you wish to place the handset in the
charging cradle during a call:
¤Press and hold the handsfree key d
while placing the handset in the base
station. If handsfree key ddoes not
light up, press the key again.
For how to adjust the volume, see
page 40.
Muting
You can deactivate the microphone in
your handset during an external call.
The other party hears a wait melody.
uPress the control key on the
left to mute the handset.
”Press the display key to reacti-
vate the microphone.
You can switch the wait melody on and off
(page 48).
Operating the handset
Activating/deactivating the handset
aIn idle status, press and hold
the end call key (confirmation
tone).
Activating/deactivating the keypad
lock
#Press and hold the hash key.
You will hear the confirmation beep. The
icon Øappears in the display when the
keypad lock is activated.
The keypad lock is deactivated automati-
cally if someone calls you. It is re-activated
when the call is finished.
If the auto key lock is activated, you will
only be able to dial the emergency num-
bers, see page 39.

14
Operating the handset
Gigaset SL560 / Aton CL303 / SWZ PTT EN / A31008-M1710-F151-1-7619 / telefony.fm / 10.7.06
Control key
In the description below, the side of the
control key (up, down, right, middle left)
which you have to press in the different
operating situations is marked in black,
e.g. vfor "press right on the control
key".
The control key has a number of different
functions:
When the handset is in idle status
sOpen the directory.
wOpen main menu.
uOpen list of handsets.
tSet the ringtone on the hand-
set (page 40).
vInitiate voice dialling, press
and hold (page 23);
Main menu, press briefly.
In the main menu and in input fields
You can use the control key to move the
cursor up t, down s, right vor
left u.
In lists and submenus
t/ sScroll up/down line by line.
wOpen submenu or confirm
selection.
uGo back one menu level, or
cancel.
During an external call
sOpen the directory.
uInitiating internal enquiry call
and muting.
tAdjust loudspeaker volume for
earpiece and handsfree mode.
Display keys
The function of the display keys changes
depending on the particular operating sit-
uation. Example:
1 The display keys' current functions are
shown in the bottom display line.
2 Display keys
The most important display symbols are:
}Left display key, as long as it
has not been assigned a func-
tion (page 38).
©Open the main menu.
§Options§ Open a context-dependent
menu.
WDelete key: deletes one char-
acter at a time from right to
left.
ÎGo back one menu level or
cancel operation.
ŒRetrieve an e-mail address
from the directory.
ÓCopy number into directory.
•Open the last number redial
list.
2
1
?SMS

15
Operating the handset
Gigaset SL560 / Aton CL303 / SWZ PTT EN / A31008-M1710-F151-1-7619 / telefony.fm / 10.7.06
Returning to idle status
You can revert to idle status from any-
where in the menu as follows:
¤Press and hold the end call key a.
Or:
¤Do not press any key: after 2 minutes
the display will automatically revert to
idle status.
Changes that you have not confirmed or
saved by pressing §OK§, §Yes§, §Save§, §Send§ or
Save Entry §OK§ will be lost.
An example of the display in idle status is
shown on page 1.
Menu guidance
Your telephone's functions are accessed
using a menu that has a number of levels.
Main menu (first menu level)
¤Press w with the handset in idle sta-
tus to open the main menu.
The main menu functions are shown in
the display as a list with coloured icons
and names.
To access a function, i.e. open the corre-
sponding submenu (next menu level):
¤Navigate to the function using the con-
trol key q/r. The name of the
function is displayed in the display hea-
der. Press the display key §OK§.
Submenus
The functions in the submenus are dis-
played as lists.
To access a function:
¤Scroll to the function with the control
key qand press §OK§.
Or:
¤Enter the corresponding digit combina-
tion (page 9).
Pressing briefly on the end call key a
returns you to the previous menu level /
cancels the operation.
"Swisscom Voice Portal" key
CPress the key.
Select Swisscom VP and confirm with §OK§.
You will be directly connected to the
Swisscom Voice Portal.
Correcting incorrect entries
You can correct incorrect characters in the
text by navigating to the incorrect entry
using the control key. You can then:
upress Xto delete the character to the
left of the cursor,
uinsert characters to the left of the cur-
sor,
uoverwrite the character (flashing)
when entering the time and date etc.
You will find examples of symbols used,
menu entries and multiple line input in the
appendix to this user guide, page 54.
Note:
This key allows you to connect to the Swisscom
Voice Portal, where you can activate additional
services such as call diversion (Service 21, 61
or 67), call waiting (Service 43) or three-party
conference with a simple voice command. You
can also use voice command to access current
sport, news and weather information.

16
Network services
Gigaset SL560 / Aton CL303 / SWZ PTT EN / A31008-M1710-F151-1-7619 / TNet_Features_SAG.fm / 10.7.06
Network services
Network services are functions that your
network provider makes available to you.
You have to request these services from
your network provider.
¤If you require assistance, please con-
tact your network provider.
Setting functions for the
next call
Withhold No.
Withhold Calling Line Identification for
the next call (CLIR).
w¢ê¢Withhold No.
~Enter number.
cPress talk key.
Setting functions for all
subsequent calls
If you have completed one of the follow-
ing procedures, a code is sent.
¤After confirmation from the telephone
network, press the end call key a.
You can set the following features:
General call diversion
w¢ê¢All Calls ¢Call Divert
¤Change multiple line input:
When:
All Calls / No Answer / When Busy dialling.
Call No.:
Press the display key §Edit§. Enter number
to which call is to be diverted, and press
Save Entry §OK§.
or:
Press s. Select a number from the
directory and press §OK§.
To save, press Save.
Status:
Activating/deactivating call diversion.
¤Press the display key §Send§.
aAfter the announcement,
press the end call key.
Activating/deactivating call waiting
w¢ê¢All Calls ¢Call Waiting
Status: Activating/deactivating.
§Send§ Press the display key.
Call protection
w¢ê¢All Calls ¢Call Protection
Status: Activating/deactivating.
§Send§ Press the display key.
Functions during a call
Initiating callback
You hear the busy tone.
§Options§ ¢Ringback
aPress the end call key.
Consultation
During a call:
§Ext.Call§ Press the display key.
~Enter number.
You have the following options:
uToggling:
¤Use qto toggle between the par-
ticipants.
End the call with one participant:
¤Use qto switch to the caller.
Then: §Options§ End Active Call.
uConference call:
¤Press the display key §Conf.§.
End the conference call (toggle):
¤Press §EndConf§.
uEnd call with both participants:
¤Press the end call key a.

17
Network services
Gigaset SL560 / Aton CL303 / SWZ PTT EN / A31008-M1710-F151-1-7619 / TNet_Features_SAG.fm / 10.7.06
Accepting a waiting call
§Accept§ Press the display key.
You have the option of toggling or holding
a conference call.
Accept call waiting
§Options§ £Accept waiting call
Reject call waiting
§Options§ ¢Reject waiting call
Functions after a call
Cancelling callback
w¢ê¢Ringback Off
Note:
Without CLIP a waiting call is only announced
with a beep.

18
Using the directory and lists
Gigaset SL560 / Aton CL303 / SWZ PTT EN / A31008-M1710-F151-1-7619 / direct_charges.fm / 10.7.06
Using the directory and lists
The options are:
uDirectory,
uLast number redial list,
uSMS list,
uCalls list.
You can store up to 250 entries altogether
in the directory (the actual number
depends on the size of the individual
entries).
You can create a personalised directory for
your own individual handset. You can also
send lists/entries to other handsets
(page 19).
Directory
Directory
In the directory you can store
uup to three numbers and the corre-
sponding first names and surnames,
uVIP identifier and VIP ringtone
(optional),
ue-mail address (optional),
uCLIP pictures (optional)
uAnniversaries with signal.
¤With the handset in idle status, open
the directory by pressing the skey.
Length of entries (directory)
3 numbers: max. 32 digits
First name and surname: max. 16 charac-
ters each
E-mail address: max. 60 characters
Storing a number in the directory
s¢New Entry
¤Change multiple line input:
First Name / Surname:
Enter a name in at least one of the
fields.
Phone (Home) /Phone (Mobile) / Phone (Office)
Enter a number in at least one of the
fields.
E-mail
Enter e-mail address.
Annivers.:
Select On or Off.
When set to On:
Enter Anniversary (Date) and Anniversary
(Time) (page 20) and then select type of
signal: Anniversary (Signal).
¤Save changes: (page 56).
Caller Picture
If necessary, select the picture that
should appear when the user is making
a call (page 42). Precondition: Calling
Line Identification (CLIP).
Selecting entries in the directory
sOpen directory.
You have the following options:
uUse sto scroll through the entries
until the required name is selected.
uEnter the first character of the name (in
the directory: the first character of the
surname or of the first name if only the
first name is entered), if necessary use
sto scroll to the entry.
Dialling with the directory
s ¢s(select entry)
cPress the talk key. The number
is dialled.
Note:
For quick access to a number from the direc-
tory (quick dial), you can assign the number to
a key.
Table of contents
Other ATON Cell Phone manuals