Attacus Star2 User manual

Star2
Star 2 GPS Sports Watch


i
Star 2 GPS Sports Watch
Table of Contents
1Safety Precaution ......................................................1
1.1 Icons for Safety Precautions.............................................................................1
1.2 Safety Precautions............................................................................................1
2Set up Star 2 ..............................................................3
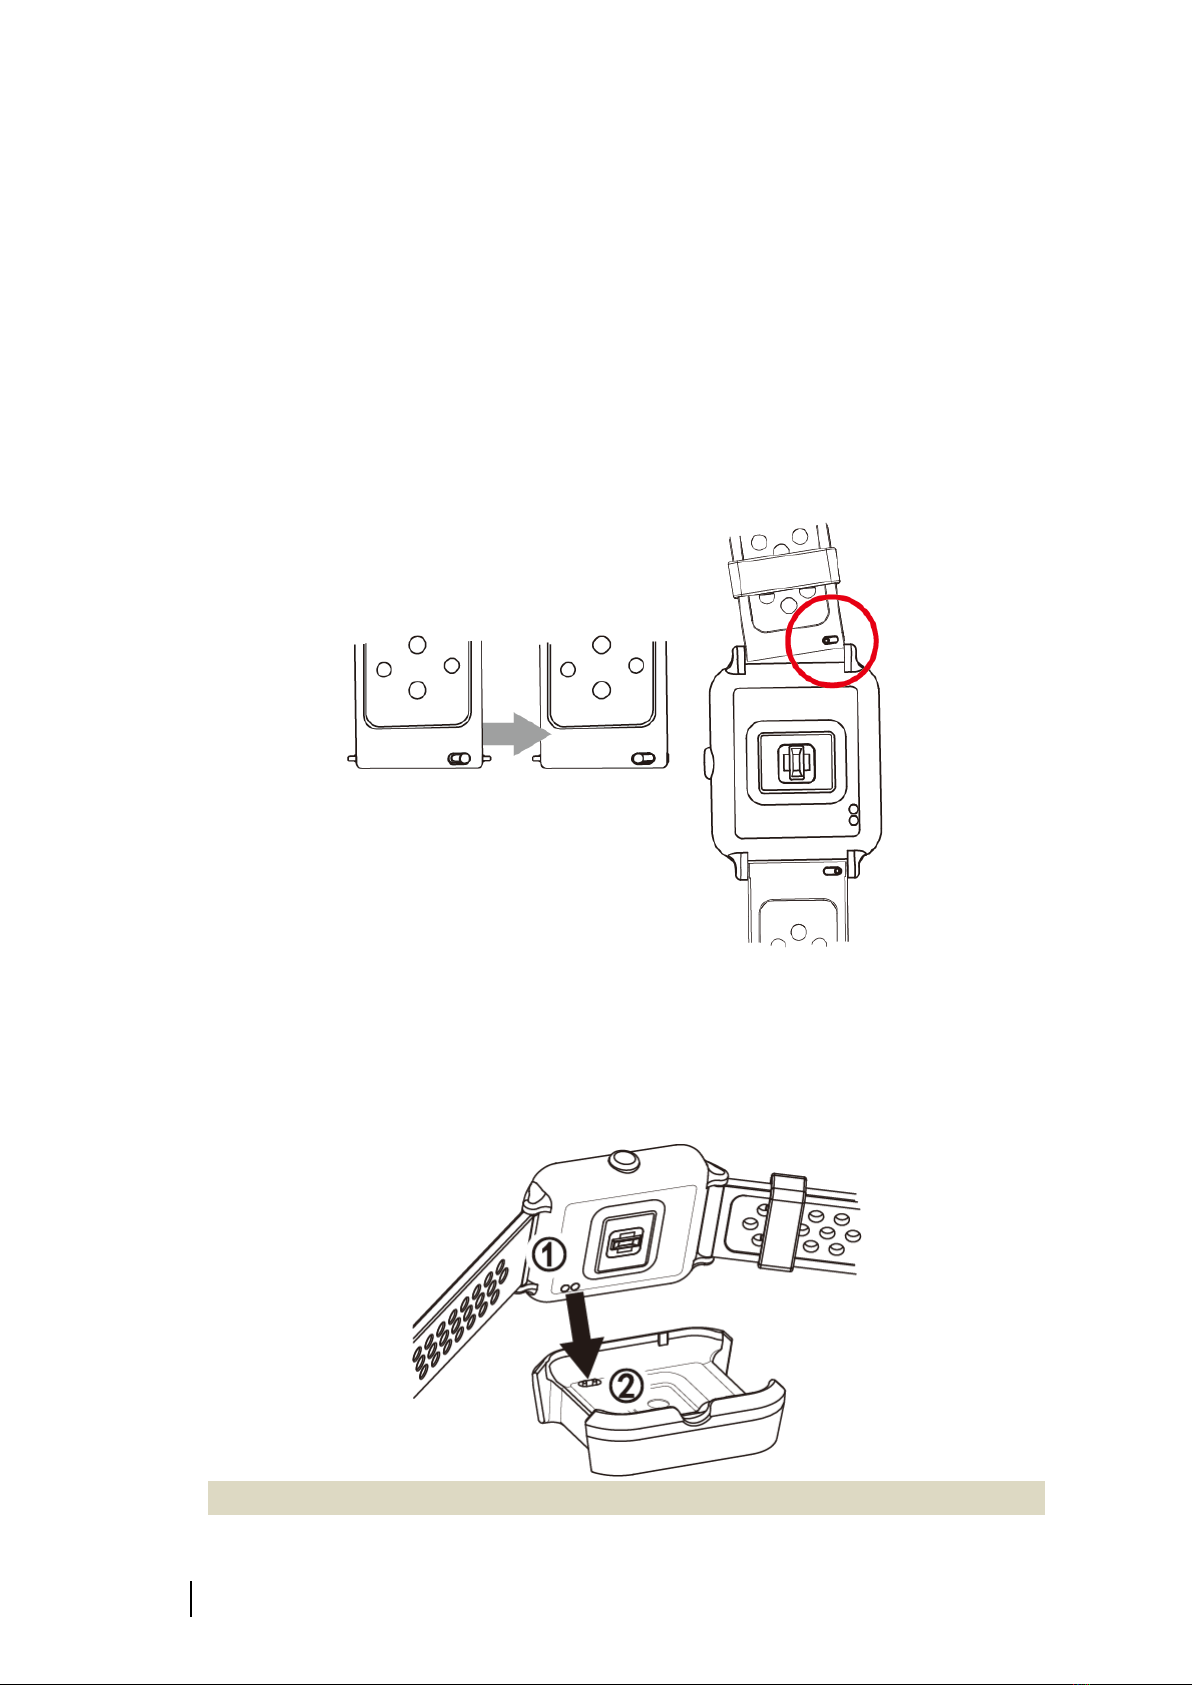
2.1 Installing the Watch Band ................................................................................3
2.2 Charging for Star 2 ...........................................................................................3
2.3 Setting up Star 2...............................................................................................4
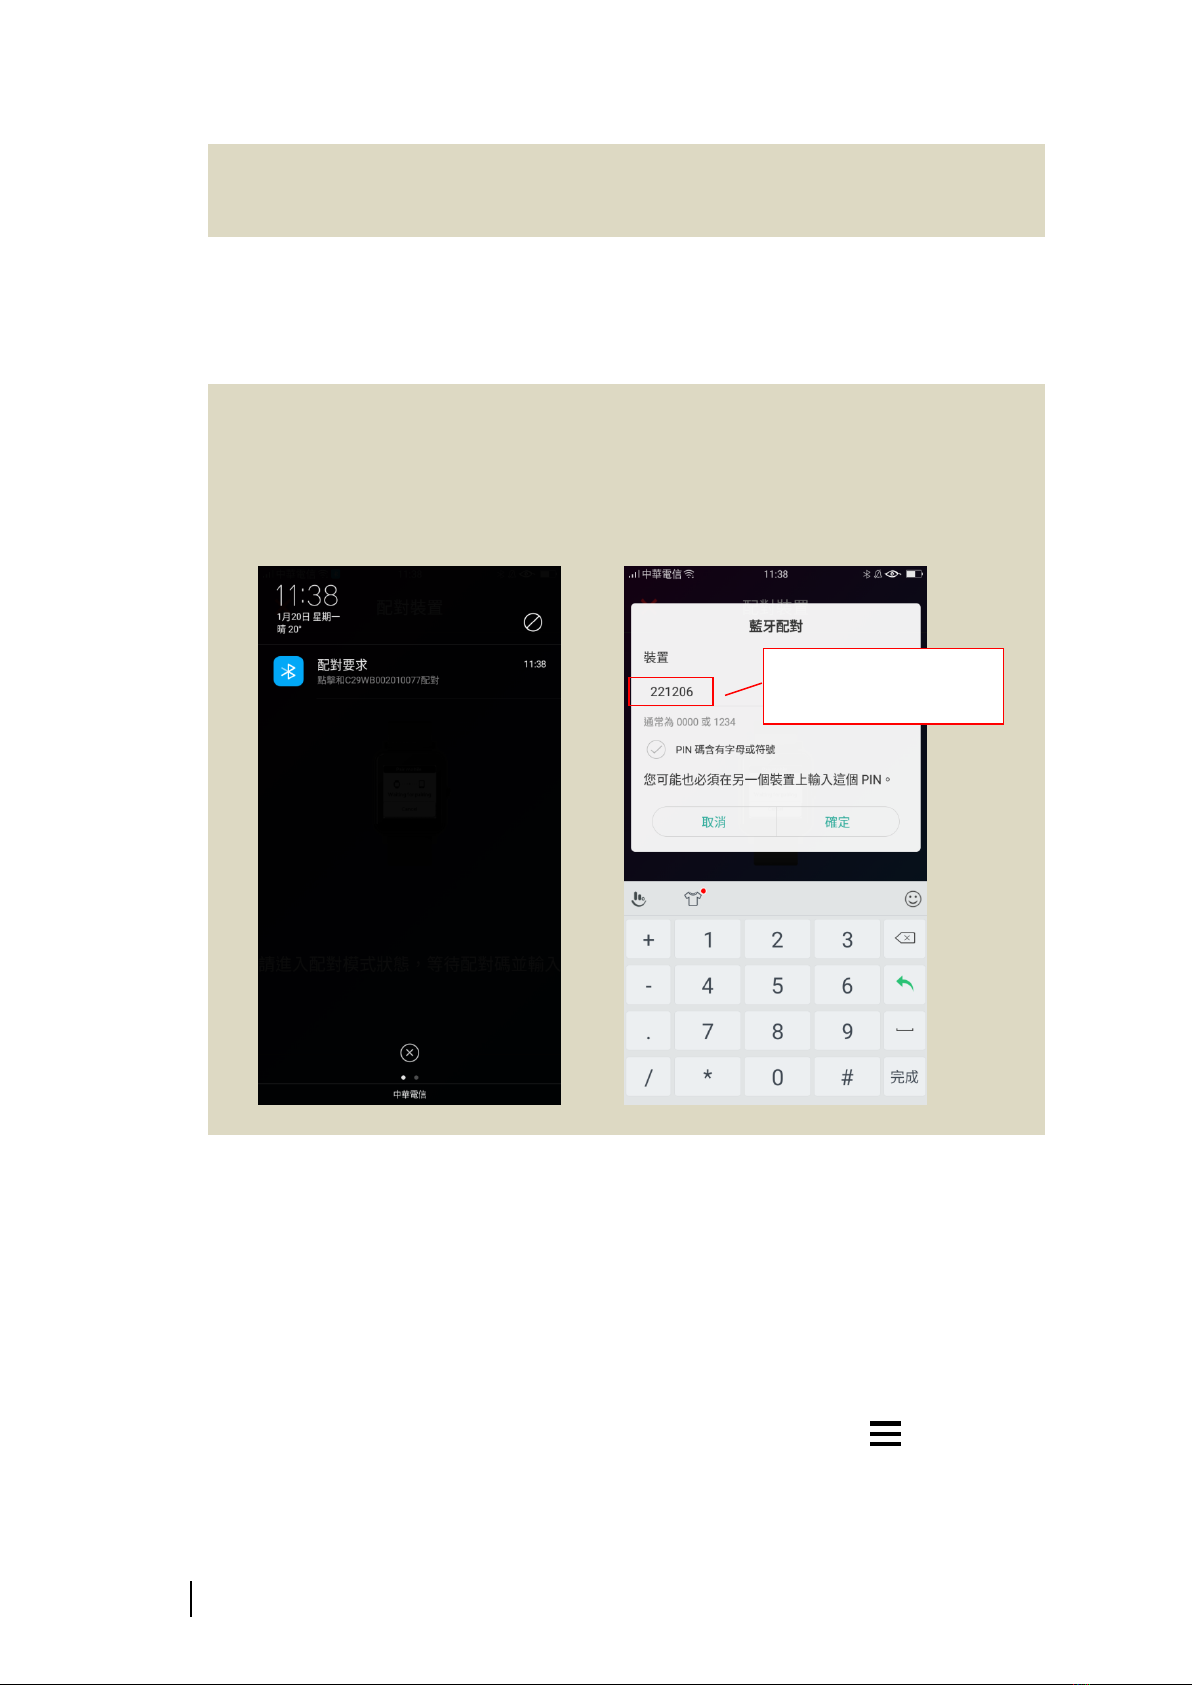
2.4 Pair with Ala Connect App ...............................................................................4
2.5 Update and Set Up Star 2.................................................................................5
3Touch Screen and Button ..........................................7
3.1 On the Time Screen..........................................................................................7
3.2 On the Menu....................................................................................................8
3.3 In Activity Modes .............................................................................................8
4Optical Heart Rate Monitor.......................................9
4.1 Optical Heart Rate Technology.........................................................................9
4.2 Heart Rate Zones and Training Outcome.........................................................9
4.3 Possible Reasons for Inaccurate Measurement.............................................10
5Icons ........................................................................11
6Display Breakdown..................................................12
7Widgets....................................................................13
7.1 Notification ....................................................................................................13
7.2 Heart Rate ......................................................................................................14
7.2.1 Current Heart Rate.................................................................................14
7.2.2 Resting Heart Rate .................................................................................14
7.2.3 Heart Rate Broadcast Mode...................................................................15
7.3 Daily Step Count.............................................................................................15
7.4 Calories Tracking ............................................................................................16
7.5 Temperature...................................................................................................17
7.6 Digital Compass..............................................................................................17
7.7 Altimeter ........................................................................................................18
7.8 Barometer ......................................................................................................18
8Menu .......................................................................20
8.1 History............................................................................................................20

Operation Guide
ii
8.1.1 Activity Records......................................................................................20
8.1.2 Best Records...........................................................................................20
8.1.3 Activity Totals .........................................................................................20
8.1.4 Daily Tracking Log...................................................................................20
8.1.5 Delete.....................................................................................................21
8.2 Activity Preference.........................................................................................21
8.3 Widget Settings..............................................................................................22
8.3.1 Widget Management.............................................................................22
8.3.2 Watch Face.............................................................................................22
8.3.3 Notification ............................................................................................22
8.3.4 Heart Rate ..............................................................................................23
8.3.5 Step Tracking ..........................................................................................23
8.3.6 Digital Compass......................................................................................23
8.3.7 Altimeter ................................................................................................24
8.3.8 Barometer ..............................................................................................24
8.4 Clock...............................................................................................................24
8.4.1 Alarm Clock ............................................................................................24
8.5 Sensors...........................................................................................................25
8.6 Mobile Device ................................................................................................26
8.7 User’s Setting .................................................................................................26
8.8 System Management .....................................................................................26
9Activities..................................................................28
9.1 Starting an Activity.........................................................................................28
9.2 During Your Activity .......................................................................................28
9.3 Ending an Activity...........................................................................................29
10 Specification ............................................................30
11 Appendix .................................................................31
11.1 World Time Zone Table ..................................................................................31
11.2 Wheel Size and Circumference ......................................................................33

1
Star 2 GPS Sports Watch
1Safety Precaution
1.1 Icons for Safety Precautions
Icon
Definition
Warning
This icon indicates actions that may cause serious injury or even
death if neglected and should be read prior to the use of the product.
Attention
Indicates information that should be read prior to the use of the
product, if neglected may cause damage to the product.
Note
This icon indicates important or practical information that helps you
to understand the product better.
Useful Tips
This icon indicates some helpful tips for you to use Star 2.
1.2 Safety Precautions
Warning: Keep the device away from medical devices such as artificial pacemakers, as
well as items operated by magnetic particles such as key cards, credit cards, and
similar items. The device may produce magnetic interference that impacts the
operation of medical or other electronic devices and items with magnetically stored
data.
Warning: All our products are produce in abide with regulated standards; however,
skin allergy may occur to certain individuals, please stop using the product and
consult a physician if such situation does occur.
Warning: Please consult your physician before starting any training plan. Overtraining
may cause serious injury.
Warning: This device is for recreational use only; it is not a medical device.
Warning: Please do not rely solely on the GPS or battery life. Consult a map or other
assisting equipment to ensure your safety.
Warning: Please do not apply any solvent on the product, or the surface may be
damaged.
Attention:Please do not apply insect repellent or insecticide of any kind for it may
damage the surface.
Attention: Please follow in accordance with the local waste disposal act to discard this
device to preserve the environment; do not toss it away as trash.
Attention: Please do not knock or crash the device on hard surfaces for it may be
damaged.
We use advanced sensor and algorithms to produce data and analysis. All the reports
are for your reference to improve your training and workout experience, do not read
it as medical diagnosis.

Operation Guide
2

3
Star 2 GPS Sports Watch
2Set up Star 2
Please charge Star 2 before your initial use and install the Ala Connect App onto your
device. Please update according to the instructions on screen for operations and system
upgrade.
2.1 Installing the Watch Band
The watch band has quick-release pins, slide the spring bar to the left to release or
installing new band. NO additional tool is needed.
2.2 Charging for Star 2
1) Plug the USB cable into a USB dock on your computer or a USB wall charger.
2) Put the watch into the charging dock ②once the charge contacts ①are aligned.
3) Begin to charge until it shows 100% on the bottom of the screen.
A fully charged Star 2 can standby up to 20 days. Under activity modes with GPS
Lock
Release

Operation Guide
4
on, the longest battery life is up to 10 to 13 hours.
Actual battery life may vary due to charge cycle or other factors.
2.3 Setting up Star 2
When turning on Star 2 for the first time, a tutorial for the screen and button operation
will be displayed on the watch screen. The installation process will be shown on the
screen:
1) Select language.
2) Watch the tutorial.
Be sure to follow the instruction on screen to operate and be familiarized with
the touch screen and button.
3) Pair with your phone: Yes, please see 2.4 Pair with Ala Connect APP。
No, please key in the user info on screen.
4) Set up for user info: Gender/units/age/height/weight/time zone/date and time.
For more information on setting up the time zone, please see 8.8 System
Management and 11.1 Time Zone Table.
2.4 Pair with Ala Connect App
Ala Connect App can enrich your user experience. You will be able to:
⚫Register and log in on your Ala Account.
⚫Adjust settings on Star 2: Once you save your preference on the app, the information
will be overwritten on your watch after synchronization.
⚫Software Update: Download the most up to date version and update your Star 2
through synchronization.
⚫Synchronize your workout or activity data to your Ala Connect account or other
activity platforms, such as Strava.
⚫It helps you to share activity, use smart notification, acquire workout analysis, and
activate your Fitpair profile in group training.
System requirement: iOS 9.0 or later,
Android 5.1 or later,
Bluetooth 4.0
Some functions and services require Wi-Fi and/or Cellular connection, there
may be additional charge for your own cellular usage according to the plans or
regulations of your local carriers.
How to pair your Star 2 with Ala Connect?
1) Go to the App Store, Google Play, or scan the QR code on the package and install Ala
Connect.
2) Open Ala Connect; if Bluetoothis off on your device, please turn it on in your
device’s control center.
3) Follow the instructions on your APP to set up your account and preferences.

5
Star 2 GPS Sports Watch
Please key in the accurate personal information so that the system could use the
right data to provide personalized workout analysis and training menu. Your
data is not public by default.
4) On your device, select Device > Add a Device, shown as [+] > select Star 2. You should
be able to see the Star 2 image on screen for you to select.
5) From the search bar, find your watch via the serial rumble (the SN number on the
back of the watch).
6) Key in the PIN numbers on the watch screen to your device to finish pairing.
Some phones or devices do not automatically show the key-in bar, below is one
of the solution for OPPO device:
⚫Swipe down from the top of the screen.
⚫Select “Bluetoothpairing” to pair your device with the watch
(represents by SN numbers). See Figure 1.
⚫Enter the PIN numbers. See Figure 2.
Figure 1. Figure 2.
7) Once the device is added, Ala Connect will overwrite the setting into Star 2.
2.5 Update and Set Up Star 2
Once the device is paired, you can check and perform system update your Star 2:
1) Ensure on your device the Wi-Fi and Bluetoothis turned on.
2) Turn on Ala Connect, wait until the synchronization between the app and your watch
is completed
3) Click on the upper left corner with an icon of three horizontal lines .
4) Go to Device > Star 2 > Check the latest version,download and update to the latest
version. Once update is completed, turn off Ala Connect.
Enter the PIN numbers
shown on your watch

Operation Guide
6
Wi-Fi or Bluetoothdevices might be ineffective in an environment with
wireless interference. If errors do occur during the downloading process, please
consider the following steps:
⚫Turn off the Bluetoothand Wi-Fi on your device and turn it back on.
⚫Close Ala Connect, and reopen it again.
⚫If you receive a message: [ Time out, please restart], turn off Star 2 and
then press and hold the button to restart it.
⚫Avoid any interfering signals, such as power cable, microwave oven,
wireless camera, or wireless phone.
5) Re-open Ala Connect, wait until synchronization is completed.
6) Go to Device >(select your Star 2 device )> Device Setting for general set up
7) Click on Your Profile Picture/Avatar, and set your Activity Preference and your Daily
Tracking goals.
8) Once you have completed, your preference will be set on Star 2 in the next
synchronization.

7
Star 2 GPS Sports Watch
3Touch Screen and Button
Star 2 has only one button, most operations can be done with the touch screen.
3.1 On the Time Screen
⚫Swipe down from the top of the watch screen for the Control Center.
In Control Center, if no additional operation is performed, you can return to the
Time Screen by swiping upward or pressing the button.
Tap to turn off Star 2, if you would like to turn it back on, press and hold
the button.
Tap to lock the screen, to unlock the touch screen, simply press the button.
Tap to enable do not disturb mode for the entire day, and press the button
to return to the Time Screen.
Tap to turn on battery preserve mode, and press the button to return to
the Time Screen.
⚫On the Time Screen, swipe up or down to view the Widgets.
Under specific Widgets, swipe left to view more function.
⚫Press and hold the button to enter Menu.
⚫Press the button to enter Activities.
For the screen:
Select
Swipe Left/ Right
Swipe Up/Down
Swipe down from the top
of the screen
Low power
Lock screen
Power off
Do not disturb
Press the Button
Home (Time)
Start Recording
Lap Key
Press and Hold
Pausing Record

Operation Guide
8
3.2 On the Menu
⚫On the Time Screen, press and hold the button to enter Menu.
⚫Swipe up or down to view.
⚫Tap on the selected option.
⚫Swipe left to enter more setting pages.
⚫Swipe right to cancel and or return to the previous page.
⚫Press the button to cancel and return to the Time Screen.
3.3 In Activity Modes
●On the Time Screen, press and hold the button to enter Activities.
⚫Swipe up or down to view and then select the activity of your choice.
⚫Press the button to start recording.
⚫During the recording period:
Swipe up or down: to scroll the pages and view the real-time data.
Press the button: for lap and segment.
Press and hold the button: to pause, after that, you will be asked to Resume,
Save, or Delete the activity.
⚫Once the activity is saved, press the button to return to the Time Screen.
Attention: the touch screen cannot be operated underwater. Underwater
activities, such as swimming will have other operation method.
For more detailed on activity mode operation, please see 9. Activities.

9
Star 2 GPS Sports Watch
4Optical Heart Rate Monitor
4.1 Optical Heart Rate Technology
Star 2 has built-in optical heart rate sensor that uses light to measure the changes in
tissue caused by blood circulation under the area of the sensor. When you are wearing
Star 2, the optical heart rate monitor can track your heart rate and collect the changes
throughout the day; it can also collect your heart rate for the past 7 days.
4.2 Heart Rate Zones and Training
Outcome
Star 2 can track your heart rate during activities and use a color chart to indicate your
current heart rate intensity. No matter if you are inactive or a fitness guru, you can train
with this chart efficiently and safely.
The heart rate zones chart is an object way to measure one’s current workout intensity
and recover situation.
Heart Rate Zone
Training
Intensity%%
Effort
Feel
Training
Functions
Purpose
%MHR
%HRR
<Z1
Daily Life
~50
~55
Z1
Warm Up
50~60
55~60
Easy
Fully relax
Facilitate
warm-up &
energy recovery
Get fit
Z2
Fat Burn
60~70
60~65
Steady
Talking while
exercising
Improve
metabolism
Lose excess
weight
Z3
Aerobic
70~80
65~75
Moderate
Tired & hard to
Enhance aerobic
Aerobic fitness
Current heart rate
Heart Rate Intensity Zones
Current zone
Today’s Resting
Heart Rate
Resting Heart Rate
for the Past 7 Days
Current Heart Rate
▼-Peak heart rate
for the past 4 hr
▼-Lowest Hear rate
for the past 4 hr
4 Hours Ago
Last 7 Days
Resting HR
56 bpm
Maximum

Operation Guide
10
keep talking
power
Z4
Anaerobic
80~90
75~85
Hard
Feeling
strenuous,
can’t talk
comfortably
Increase speed
& lactate
threshold
Get faster &
stronger
Z5
Maximum
Effort
90~
85~
Very Hard
Out of breath &
short heartbeat
Explosive power
Explosive power
4.3 Possible Reasons for Inaccurate
Measurement
Optical heart rate sensor has been widely applied for its accuracy and applicable quality.
To ensure you receive the most accurate reading possible, please read through some of
the tips regarding wearing methods and movements. Please also note that under some
circumstances, the optical heart rate sensor may not be as accurate:
⚫Your method of wearing the watch:
➢Please be sure to have direct contact between your skin and the optical sensor.
➢Please avoid wearing your watch right on top of your wrist bone, as this may
create gaps between the skin and the sensor and preventing them from direct
contact. Another reason not to do so is that the watch may slide, and the sensor
could not receive accurate reading when it is moving. It is suggested to wear it on
your forearm, beside your wrist bone.
⚫Before your activity, please warm up to enhance blood circulation, this is both
beneficial for your personal safety as well as allowing the sensor to have a better
reading.
⚫Arm movements and flexing muscles, such as gripping a tennis racket, can change the
accuracy of the sensor readings.
⚫Tattoo and darker skin tones may cause inaccurate reading of the sensor due to the
characteristic of optical technology; light is hard to bounce back on a dark surface.
⚫Depending on the condition of use, heart rate might be inaccurate in underwater
activities.
⚫Compare to the electrocardiography (ECG) heart rate strap, Optical Heart Rate
monitor is a more comfortable and accessible solution. However, if you prefer heart
rate chest strap, you can also look up ALATECH Heart Rate Strap (Model: CS010、
CS011、CS012)
Warning: Optical heart rate sensor may not be suitable for every user. The heart
rate may be higher or lower than the actual data depending on the user’s
physical condition or the activity type.

11
Star 2 GPS Sports Watch
5Icons
Power off
Low Power mode (in Control Center)
Do not disturb
Screen lock
Low Battery
Low Power Mode (on the Time Screen)
Charging
New (unread) notification
Phone call
Screen lock (on the Time Screen)
Heart Rate
Heart Rate Broadcast mode
Lost BluetoothConnection
Not paired with phone
Temperature
Altitude
Pressure above sea level

Operation Guide
12
6Display Breakdown
At Time Screen
Activities
Menu
Widgets
Time Screen (Home)
Control Center
More Features
Activity Records
Activity Pref.
Menu
Press and Hold
Press and Hold to Pause
More Features
History
Activity Pref.
Menu
Run
Cycling
Activities
Press to Go
Pause
10'08"
00:00:01
0
TTL. Dist. m
Pace in KM
Total time
00'00"
00:00:00
0
總距離
Pace in KM
Total time
Press the Button
to Go
Press

13
Star 2 GPS Sports Watch
7Widgets
Star 2 is built-in with many useful widgets. You can swipe up or down on the Time Screen
to view them.
If you can’t see the following widgets, please see 8.3.1 Widget Management to
enable your widgets.
Some widgets have line graphs to indicate changes. You can see the most recent
information on the right and the oldest on the left.
7.1 Notification
You can view your messages from your smartphone in Notification.
1) Swipe down from the Time Screen to see Notification.
2) Swipe left to view the pop-up list.
3) Swipe left again to view messages or lookup caller
number.
4) Press the button to return to the Time Screen
Notification will only be enabled when connecting with a compatible device via Ala
Connect.
How to enable phone call and message notification?
⚫If you have an iOS device:
1) To pair your device with Star 2, See 2.4 Pair with Ala Connect App.
2) The iOS system will automatically turn on all the Bluetoothcompatible
notifications. If you would like to receive notification from a certain apps, go
to your Device > Setting > Notification, and select Ala Connect to make sure
it is authorized to receive information from other apps.
3) Go to Ala Connect > > Device > Star 2 > Device Setting > Message
Mode to set up your preference during both the Activity Mode and
Non-Activity Mode.
⚫If you have an Android device:
1) To pair your device with Star 2, See 2.4 Pair with Ala Connect App.
2) Go to Ala Connect > > Setting > Notification Center,agree on [Get
Notification Access], and select the apps you wish to see notification from.
3) Go to Ala Connect> > Device > Star 2 > Device Setting > Message Mode
to set up your preference during both the Activity Mode and Non-Activity
Mode.
If you are still unable to receive information from your mobile device, please try the
following:
⚫After the set up, restart your mobile device.

Operation Guide
14
⚫Reset the Wi-Fi and Bluetoothon your mobile device.
⚫Restart Ala Connect, make sure authorization for notification is enabled.
⚫Make sure Ala Connect and Star 2 are successfully connected.
Awill appear when they
are connected successfully.
If this icon shows, it
means the connection is
lost, or no connection was
made.
⚫Make sure Star 2 and the mobile device is not over 6 meters (19.7ft) apart.
⚫Make sure Do Not Disturb function is off. You can check by seeing if this icon
is on the top of the Time Screen.
7.2 Heart Rate
On the Heart Rate pages, you can see your current heart rate, the resting heart rate, and
the resting heart rate for the past 7 days.
7.2.1 Current Heart Rate
1) On the Time Screen, swipe up for the 4 Hours Ago Heart
Rate.
2) Your current heart rate will show up beside the icon ,
the chart below shows your heart rate in the past 4 hours.
▼Demonstrates the peak heart rate in the past 4 hours
▼Demonstrates the lowest heart rate in the past 4
hours
3) Press the button to return to the Time Screen.
If you have enabled Low Power Mode, the 4 hours ago heart rate cannot be
displayed.
If you ought to turn off Low Power Mode, swipe down from the top of the Time
Screen for the Control Center. Tap on the icon to turn it off; it should turn from
green to black.
7.2.2 Resting Heart Rate
1) On the Time Screen, swipe up for the 4 Hours Ago Heart
Rate.
2) Once you are there swipe left to see Today’s Resting
Heart Rate (shown as Resting HR on screen).
3) The number showed in bpm is your resting heart rate of
the day, and the chart below shows the resting heart rate
of the past 7 days.
4) Press the button to return to the Time Screen.
Be sure to wear Star 2 for the entire day to get accurate reading of your resting
4 Hours Ago
Last 7 Days
Resting HR
56 bpm

15
Star 2 GPS Sports Watch
heart rate.
Through recording and observing your RHR (Resting Heart Rate), you can evaluate
your training routine and determine a better recovery period. If you are not fully
recovered, it may have negative impact on your performance and increase the
possibility of injury!
7.2.3 Heart Rate Broadcast Mode
Once you have pair Star 2 with compatible Bluetoothor ANT+ devices and switch on
the Heart Rate Broadcast Mode on your Star 2, your heart rate data will be displayed on
the device or equipment.
1) On the Time Screen, swipe up for the 4 Hours Ago Heart
Rate.
2) Swipe left pass Today’s Resting HR then to Last 72
Seconds (the Broadcast Mode).
▼Demonstrates the peak heart rate in the past 72
seconds
▼Demonstrates the lowest heart rate in the past 72
seconds
3) Since every device and equipment has its own pairing
method, be sure to read the user’s manual of the device
you wish to pair Star 2 with. Once you have paired the
watch with the compatible sensors and devices, your
watch can broadcast the heart rate from this page to
other devices.
4) If you ought to exit the Broadcast Mode, swipe right and
select [Exit].
5) Press the button to return to the Time Screen.
Due to battery preservation, other pages are not available when the watch is under
Heart Rate Broadcast Mode.
Each compatible Bluetoothand ANT+ device or equipment has different paring
method. Please consult each of its user manual.
⚫Cycling computer
⚫Fitness equipment, such as ATTACUS Treadmill, Spinning Bike, and Rower.
⚫Mobile application, such as Wahoo Fitness and Nike Run Club.
7.3 Daily Step Count
Daily Step Count collects your daily steps and moving distance. It also compares your
day-to-day record for the past 7 days.
Last 72 Seconds

Operation Guide
16
1) On the Time Screen, swipe up to Daily Step Count. The
page will collect your step count of the day in bigger
numbers; the smaller number below is the step goal.
2) Swipe left to see the distance and elevation of the day.
3) Swipe left again to see your average step count of the
past 7 days in a bar char, you can analyze your activity
base by compare and contrast your daily performance.
The y-axis: Every 1,000 steps is present in K, i.e. 5.6K is
5,600 steps.
The X-axis: The step count of past 7 days in bar chart.
4) Press the button to return to the Time Screen.
You can use the default goal or manually set personalized step count goals. See 8.3.5
Step Tracking to adjust your preference. Or, you can also go to Ala Connect > Click on
Your Profile Picture/Avatar > Life Tracking Target and set up your preference. For
more information, see 2.5 Update and Set Up Star 2. Your new preference will be
overwritten to Star 2 in your next synchronization.
7.4 Calories Tracking
Calories Tracking will show your daily calories consumption base on basal metabolic rate
and activity consumption.
1) On the Time Screen, swipe up to Calories Tracking, the
bigger number on top will show you your current calories
consumption; the smaller number on the bottom shows
your calories consumption goal. And the bar in the middle
will show the consumption of the following:
Basal metabolic rate
Activity consumption
2) Swipe left to see today’s calories information, the unit is
Cal.
3) Press the button to return to the Time Screen.
Your watch will estimate your basal metabolic rate and consumption goal based on
your input gender, age, height, and weight. You can set your calories consumption
goal on the app. go to Ala Connect > Click on Your Profile Picture/Avatar > Life
Tracking Target and set up your preference. It will be saved to Star 2 in your next
synchronization. For more information, see 2.5 Update and Set Up Star 2.
BMR (Basal Metabolic Rate) is the basic consumption that sustains life; whereas
TDEE (Total Daily Energy Expenditure) is the sum of your BMR and calories
consumed in activities. Through BMR and TDEE, you can estimate the suitable
calories intake of the day to achieve diet goals, such as losing weight. However,
please also note that over restricting your diet may cause loss in muscle rate. It is
highly recommended to you to establish routine exercise habit and gain muscle
through right amount of weight training. Strong muscles can also help with calories
consumption during rest time.
5000
1800
This manual suits for next models
1
Table of contents
Other Attacus Watch manuals