aTTo Digital TileRec User manual
Disclaimer
Atto Digital cannot be held responsible for any use of the TileRec VoiceRecorder
without the necessary permission(s) needed for recording. The user is directly
responsible for researching and obeying the applicable laws.
Please check the local laws applicable in your area. Regardless of whether state or federal law
governs the situation, it is almost always illegal to record a phone callor private conversation to
which you are not a party, do not have consent from at least one party, and could not naturally
overhear. ATTO Digital can’t be held liable for any loss or damage of whatever nature (direct,
indirect, consequential, or other) which may arise as a result of aperson’s use of (or inability to
use) our products.
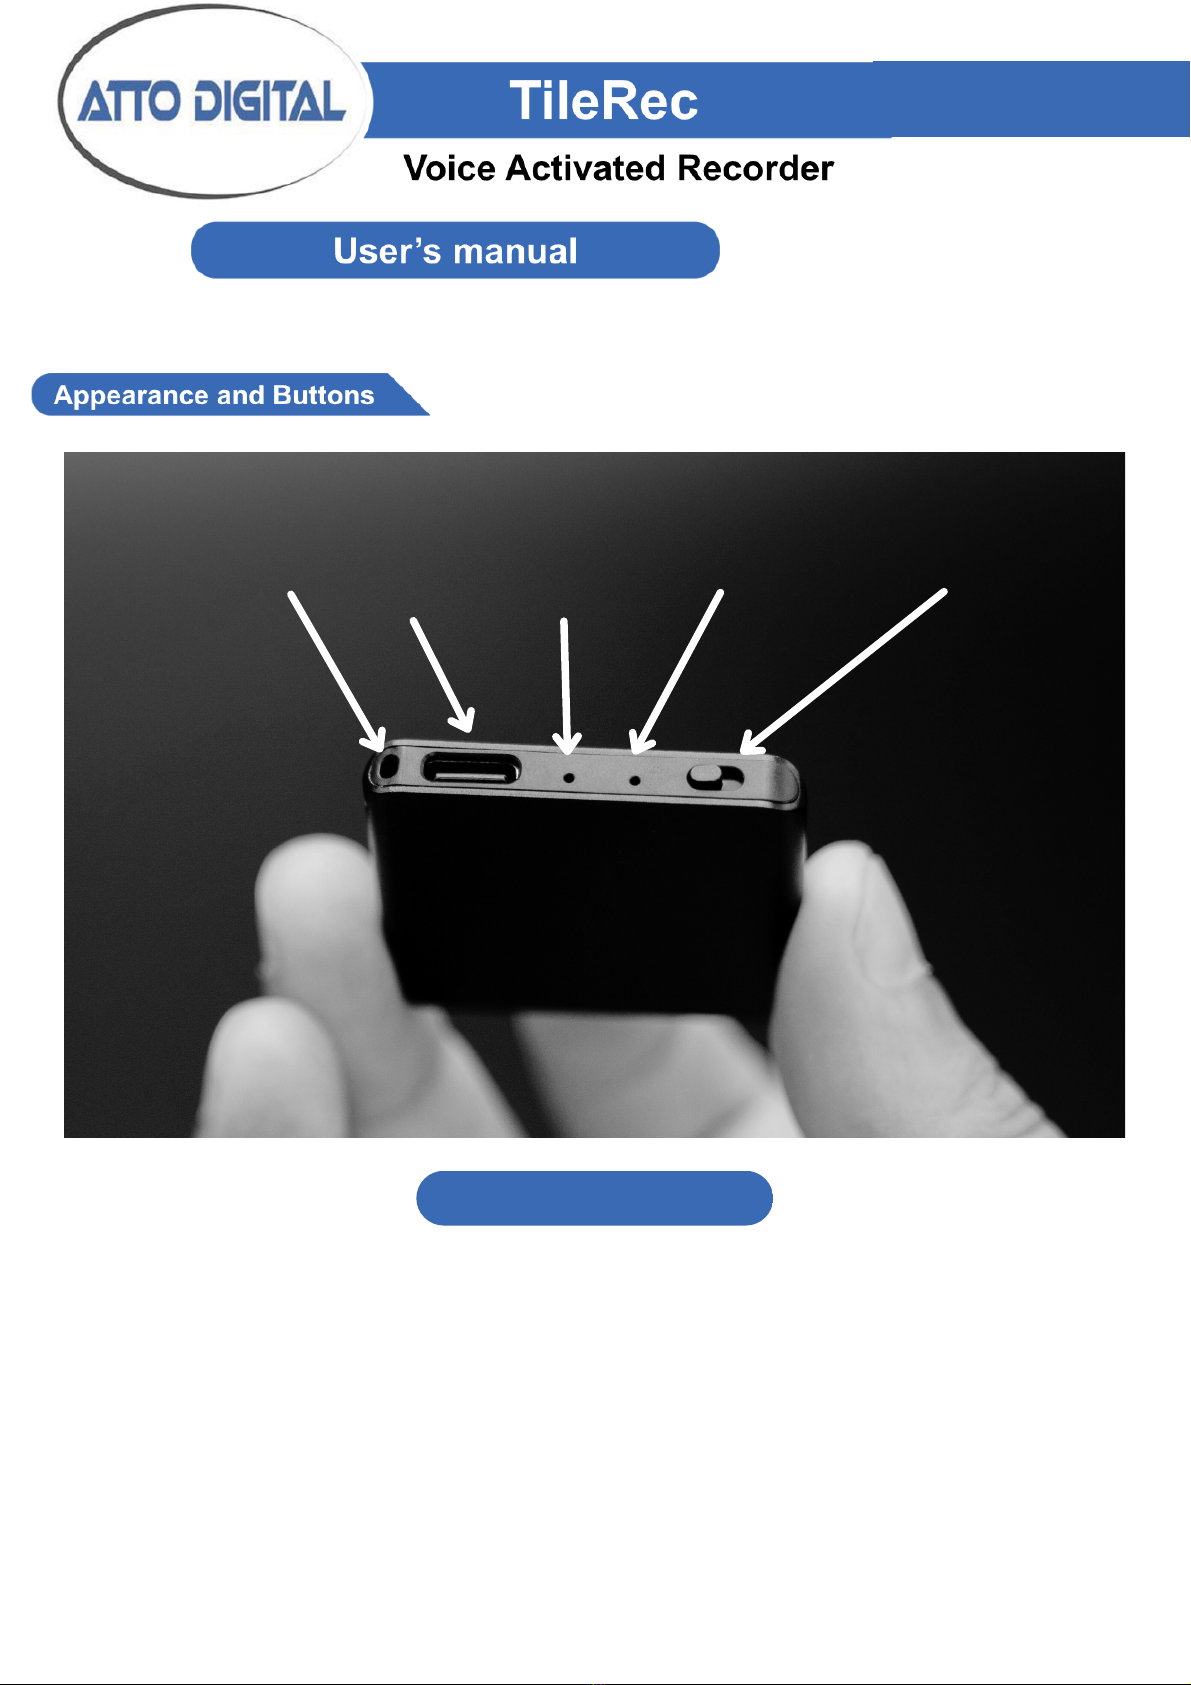
Lanyard
hole
USB-C
port
Reset
button
LED indicator /
Microphone
REC
On/Off Button
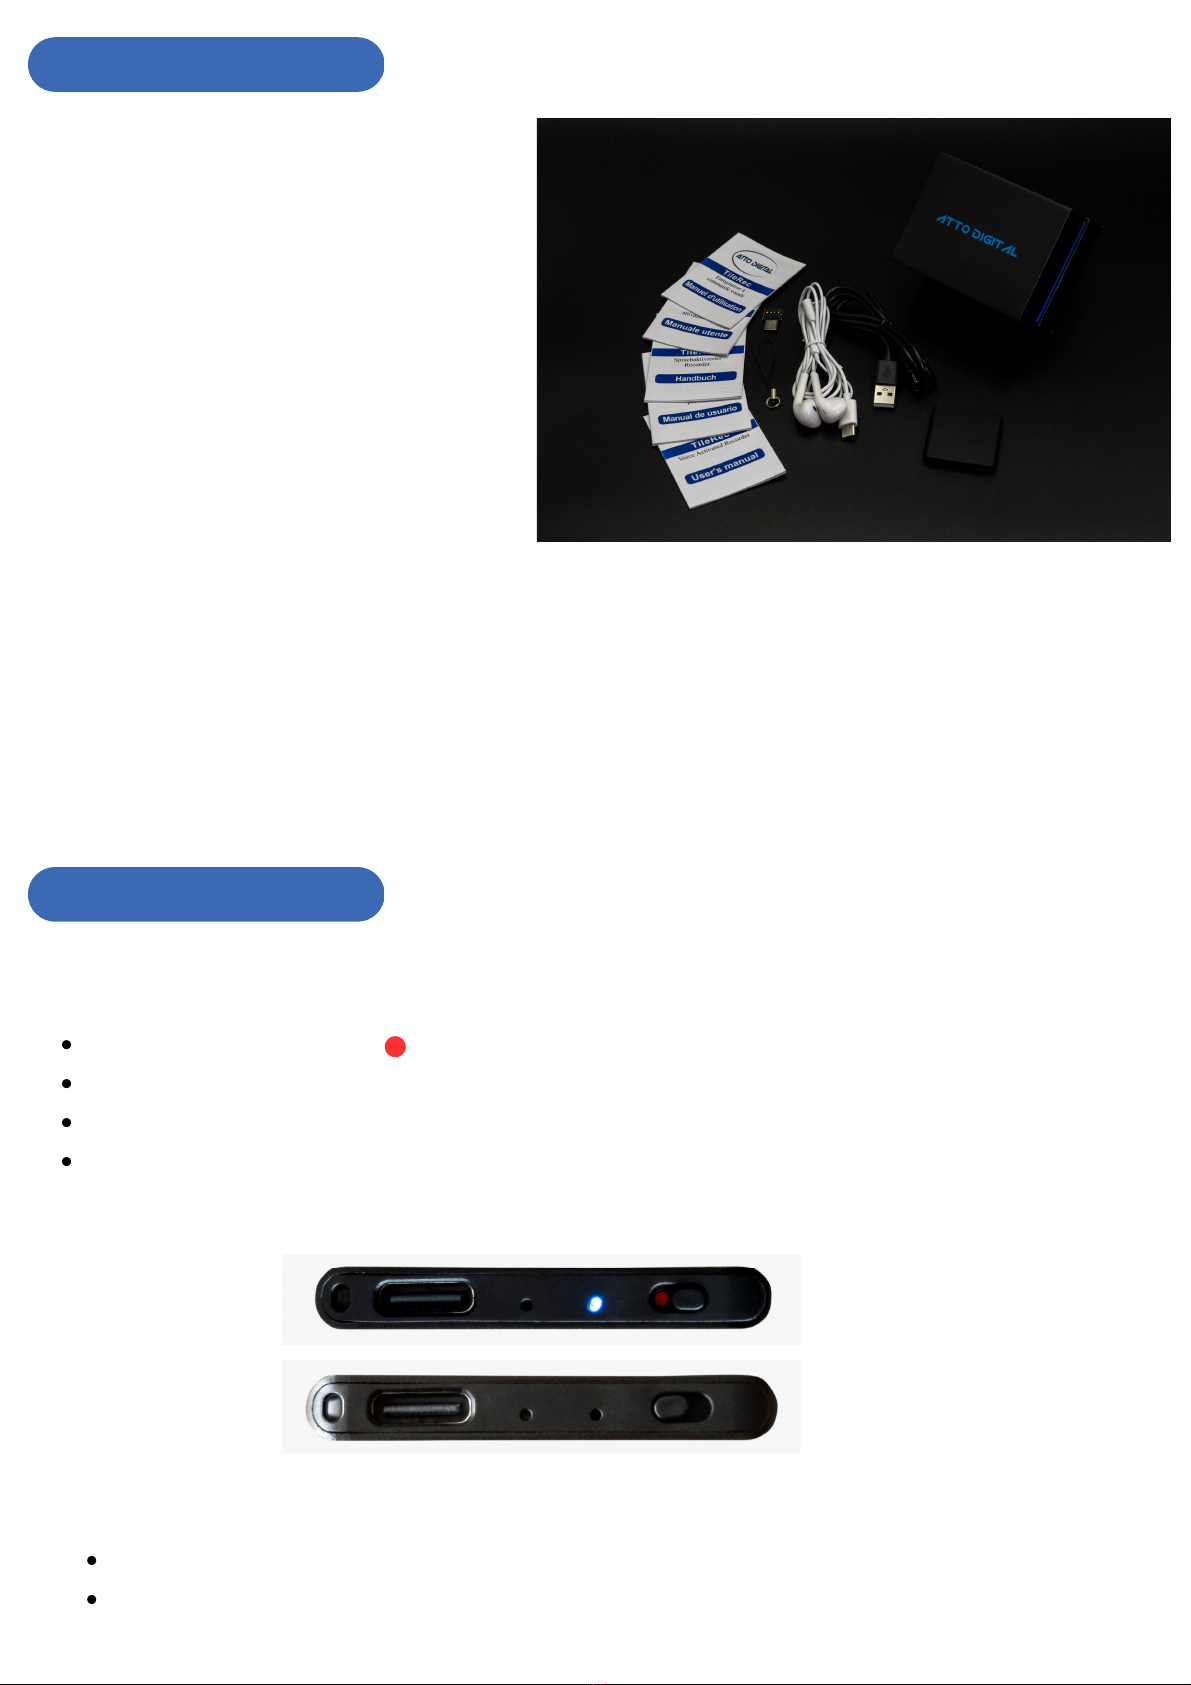
What is in the box
Before diving into the user manual
or connecting any components, it's a
good idea to confirm that all of the
following items are included:”
TileRec Mini Recorder (64 GB)
USB-C Cable
USB-C Connector
USB-C Custom-designed earphones,
equipped with controls for playback
and other audio adjustments.
A comprehensive guide to help you set up and make the most out of your TileRec . Follow
this for initial setup, best practices, and troubleshooting tips.
Two convenient lanyards are included for easy portability. Attach these to the lanyard hole
on your TileRec to carry it around your neck or secure it to other objects.
Please check to ensure that all these components are included in your box. If any of the items are
missing or damaged, contact customer support immediately. Once you've confirmed that all the
components are there, you can move on to setting up your new TileRec Mini Voice Recorder.
How to RECORD
Locate the REC Button ( ) on your TileRec.
Slide the REC button to the ON position.
The light indicator will switch from RED to BLUE, confirming the device is recording.
The LED will flash 10 times to confirm that the microphone is initiating. The it can
remain lit or switch off (depending on your chosen setting option)
Start Voice Recording
ON
OFF
Slide the REC Button to the OFF position.
The audio file will be saved automatically.
Stop Voice Recording
Setting up the recorder
Connect the recorder to a PC via the USB-C
cable provided in the box.
A. Setting Time Stamp
1.
*If the computer has a USB port, conect the cable directly to
it. If the computer has a USB-C port, use the USB-C adapter in
the box to connect the cable.
2. Open the folder RECORD that you will find in the
partition of the device. This will be visible in My PC
(for Windows users) or under Devices (for MacOs
users).
3. Access the text file in the folder. The text file is called RECSET. This file is generated
automatically and you just need to adjust it as needed.
4. Write the current date and time in the format yyyymmddhhmmss, as follows:
yyyy–four digits format for year(ex.2023), mm -is 2 digits for month(ex.for September is 09),
dd - 2 digits day (ex.if today is the 3rd day of the month - you must write 03).
hh - means 2 digits hour format (ex. for 5PM you must write 17, for 6AM is 06,etc).
mm - is 2 digits format for minutes and ss - is 2 digits format for seconds.
Please make sure there are no spaces before or after the string of digits depicting your timestamp.
If for example, you would setup the device on the 1st of October 2023 ,at 11:30 PM, then the
correct timestamp you whould write in the 1st line of the text format is:
20231001233000
Write 1 for voice-activated recording.
Write 0 for continuous recording.
B. Setting Recording Mode
In the second line of the RECSET file:
1.
2.
Keep in mind that voice activated mode means that the device will be turned ON manually but
during silent periods the microphone will pause. It reinitiates again when sounds over 45dB
are in the mic’s range.

Write 1 if you want the LED to flash during recording.
Write 0 if you prefer no LED flash during recording.
When VOS is turned on, the LED lights will flash, and when in continuous recording mode, the LED lights
will remain on. The above is when the LED light is set to on.
C. Setting LED
In the third line of the RECSET file:
Keep in mind that when you turn the device ON the LED will flash 10 times to signal the microphone
initiating, regardless of the setting. After the 10 flashes, the LED will act according to your input.
D. Timed Sectioning for Audio Files
In the fourth line of the RECSET file the value of your preferred length for an audio file.
For example, if you’d like to have 30-minute files, you will need to input 30 in the 4th line of
the text file.
Sectioning audio will allow easier shuffling through information while on the go.
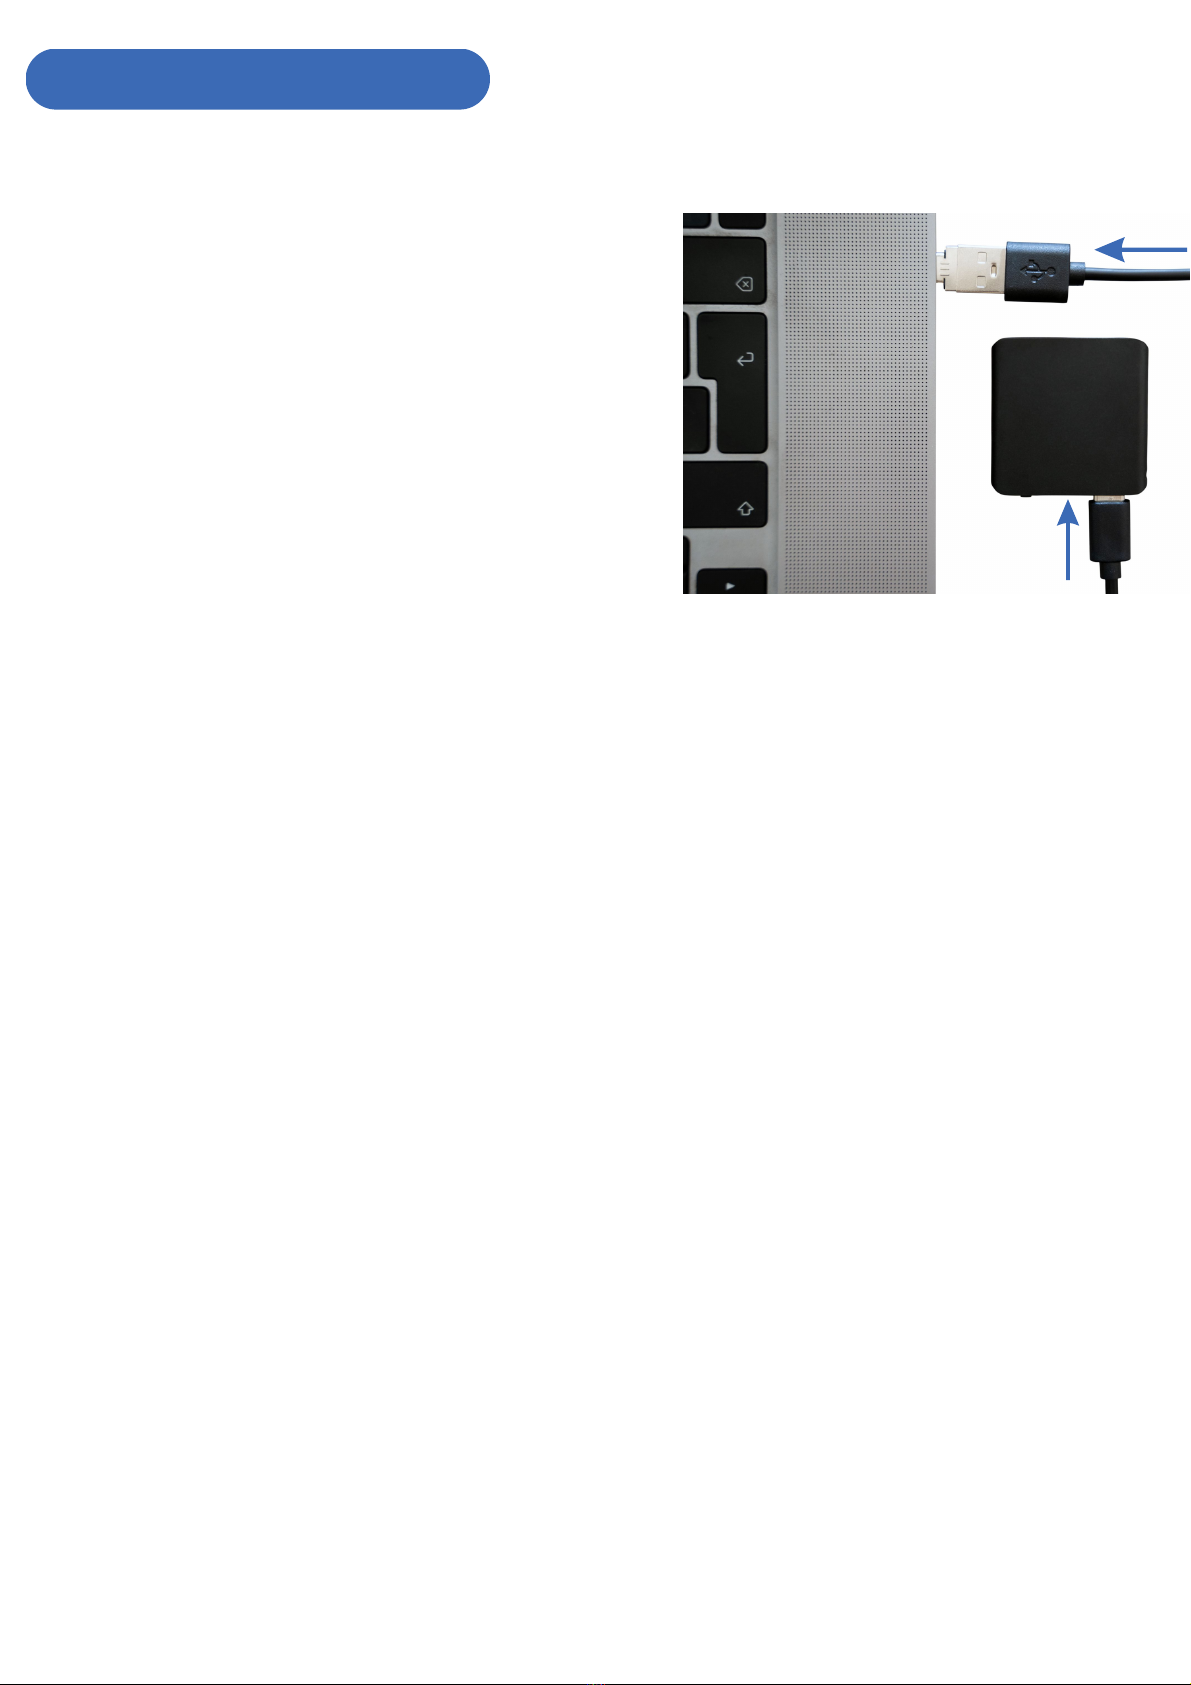
Connect TileRec to a PC
A. Connect to a computer with USB port
1. Make sure your TileRec device is turned off. Slide the REC button to the "OFF" position
to ensure the device is off and to make sure that any ongoing recordings are properly
saved.
2. Make sure your PC is turned on and awake. Unlock the system if it's locked.
3. Insert the USB termination of the cable that came with your TileRec device into the USB
port on your PC.
4. Connect the USB-C end of the cable to the USB-C port on your TileRec Mini Voice
Recorder.
5. To access the recordings, open "My PC" ( for Windows) or "Devices” (for macOS).
6. You should see the TileRec device appear as a new drive. Double-click on it to access
its contents. In the folder RECORD you will find all your recorded audio files.
USB-C Adaptor
B. Connect to a computer with USB-C port
1. Make sure your TileRec device is turned off. Slide the REC button to the "OFF" position
to ensure the device is off and to make sure that any ongoing recordings are properly
saved.
2. Make sure your PC is turned on and awake. Unlock the system if it's locked.
3. Insert the USB-C adaptor to the USB termination of the cable that came with your
TileRec device and the connect it to the USB-C port on your PC.
4. Follow the same steps as per above.
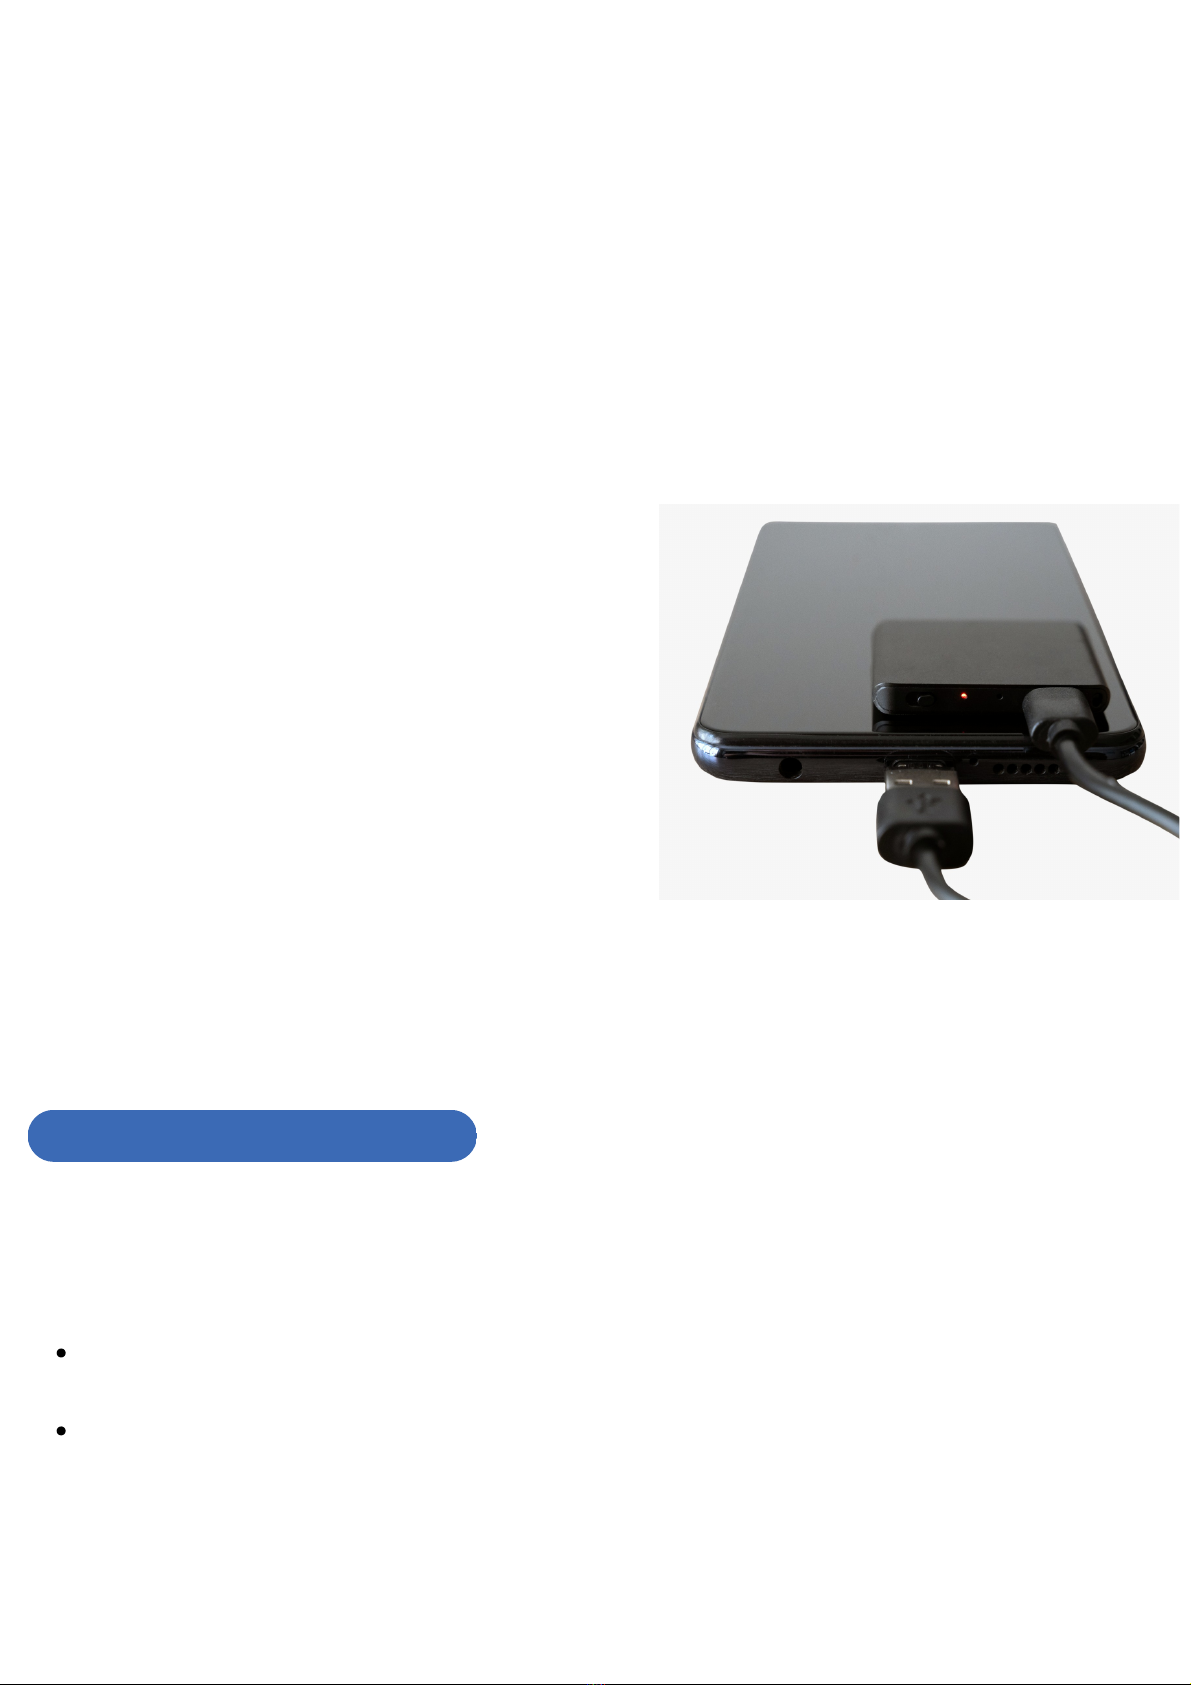
C. Connect to an Android phone
1. Make sure your Android phone is unlocked
and on the home screen.
2. Insert the USB-C connector into your Android
phone's charging port.
3. Plug the USB port of the cable that came with
your TileRec device USB-C adaptor.
4. Attach the other end of the USB cable into the
USB port on your TileRec Mini Voice Recorder.
5. Wait a few moments for your Android phone
to recognize the TileRec device. A notification
should appear indicating that a USB device is
connected.
6. In the file manager, look for a new drive that represents the TileRec device. This may be
listed as 'USB Storage' or similar. Tap on the new drive to open it, and locate the folder
named 'RECORD.
Charging the TileRec
PC or Laptop: Make sure your computer is turned on and awake, so it can supply
power to the device.
Wall Charger: Ensure the wall charger is compatible and provides a stable source of
electricity.
If the RED LED is continuously flashing, this indicates that your device’s battery is running
low and it's time to recharge.
You can recharge the TileRec device by connecting it to the USB port on your PC, laptop, or
using a wall charger.
You’ll know the device is fully charged when the red light indicator stops flashing and
remains steadily lit. Allow approximately 1.5 hours for a full charge, that will ensure up to
30 hours of battery life.

Blue LED: Device is recording.
Green LED: If the device's storage is full, the green LED indicator will flash rapidly for 10
seconds before the device automatically shuts off. Rest assured, the audio file being
recorded will be automatically saved before the device turns off. You will need to free up
some storage space on the recorder. You can do this by either deleting older or
unnecessary files, or transferring them to a different folder on your computer.
Red LED: Battery is low, needs charging. Rest assured, the audio file being recorded will
be automatically saved before the device turns off.
Understanding LED signals
Playback recorded audio
1. Playing Back Recordings on Your Computer
For Windows: Open 'My Computer' or 'This PC' and locate the new drive that
represents the TileRec device.
For Mac: Open 'Finder' and look for the TileRec device under the 'Devices' section.
Connect the TileRec device to your computer using the provided USB-C cable. Insert the
USB-C end into the TileRec and the other end into an available USB port on your
computer.
Navigate to the folder labeled 'RECORD' within the TileRec device storage. This folder
contains all your audio recordings. Double-click on the audio file you wish to play. Your
computer’s default audio player should open and start playing the MP3 file.
2. Playing Back Recordings on Your Android phone
Connect the TileRec device to your Android phone using the provided USB-C cable. A
notification may pop up on your Android device asking for permission to access the
TileRec. Grant permission.
Open your file manager app and navigate to the 'RECORD' folder on the TileRec device
storage. Tap on the audio file you want to play. It should open in your phone's default
audio player and start playing.
3. Playing Back Recordings using Headphones
Insert the USB-C connector of your earphones into the
USB-C port on the TileRec Mini Voice Recorder.
Slide the power button to the ON position on the TileRec
device in order to be able to playback your audio files.

If you suspect your recorder isn't functioning as it should, don't immediately assume it's
defective. Here are some troubleshooting steps to consider:
1. Device Not Detected by Computer
If you connect the TileRec to your computer and can't see its storage partition, make sure
the recorder is turned off before initiating the connection and that you are using a working
USB cord that allows data transfer.
2. Charging Issues
If the recorder doesn't seem to charge, try using an alternative USB cable that also
supports data transfer. Occasionally, your computer may enter standby mode, which can
prevent the device from charging. Ensure your computer is active and the USB port is
configured to allow charging.
3. Storage Full Indicator
If your recorder doesn't appear to record and the green indicator light is flashing rapidly,
it's likely that the device storage is full. Delete unnecessary files to free up space or
foromat in NTFS and then try recording again.
4. Unresponsive Device
If your device becomes unresponsive during operation, use a pin or needle to press the
reset button for 10 seconds. This should restore normal functionality to your recorder.
Important: Always use the "Safely Remove Hardware" option on Windows or the "Eject"
option on macOS when disconnecting the recorder from your computer to preserve its
integrity.
Care Guidelines
Storage Conditions
Do not store or place the recorder in areas with high temperatures, damp conditions, or
excessive dust.
Backup Your Data
Regularly backup your files to another storage device, like your computer, to prevent data
loss due to malfunctions or incorrect operations.
Troubleshooting tips
Volume : Short press the earphones controls “-” and “+” to adjust the volume when
playing back your recordings.
Fast Forward: Keep “+” sign long-pressed to skip to the next audio file.
BackWard: Keep “-” sign long-pressed to skip to the previous audio file.
Mute: Long press the microphone icon to mute the audio.
Use the Headphone Controls

Self-Repair
Do not attempt to disassemble the recorder or replace any internal components yourself.
If you need to send the device for repair, back up your data beforehand as we are not
responsible for data loss during maintenance.
Battery Guidelines
Check local laws and guidelines for proper battery disposal. Store the battery at room
temperature and aim to keep it charged at least to 30%.
Charger Recommendations
Avoid using high-power chargers, such as smartphone fast-chargers, as they may reduce
the lifespan of your battery.
Periodic Charging
Even if you don't use the device regularly, it is recommended to charge the battery at least
once every 6 months to prevent over-discharge.
By following these troubleshooting tips and care guidelines, you can extend the life of your
TileRec voice recorder and maintain its optimal performance.
Technical Specification
Dimensions: 1.6" x 1.6"x 0.25 “
Device Weight: 0.5 oz
Battery Type: 3.7V 240mAh Polymer Battery
Battery Life: 30 Hours
Supported Audio Format: MP3 at 128 Kbps
Available Recording Durations:
32 GB: Approximately 575hours
64 GB: Approximately 1150 hours
Compatible Operating Systems: Windows macOs, Linux, and Android
Internal Storage: Formatted as NTFS
For further issues, you can reach out to us at the following:
Email: [email protected]
Website Support: atto-digital.com/support
Live Chat: www.atto-digital.com
Table of contents
Popular Measuring Instrument manuals by other brands


Primes
Primes PowerMonitor PM Series operating manual

Eaton
Eaton KK650 instruction manual

Gilian
Gilian GilAir Plus Mounting instructions

LP Technologies
LP Technologies LPT-3000 user guide

Celestron
Celestron ELEMENTS WindGuide user manual

SENSIT Technologies
SENSIT Technologies GAS-TRAC LZ-30 instruction manual