Audibax Iowa Pix 300 User manual

Iowa Pix 300
Wash Moving Head 19 x 15W RGBW 4-in-1 LEDs
Cabeza Móvil Wash 19 x 15W LED RGBW 4 en 1
USER’S MANUAL
MANUAL DE USUARIO
www.audibax.comwww.audibax.com
DMX TECHNOLOGY
STAND ALONE MODE ZOOM
MASTER/SLAVE
Iowa Pix 300
COLOUR WHEEL
STROBE PAN & TILT
PRO
PRO

DATA SHEET
• Brand: Audibax Pro
• Product Name: Audibax Pro Iowa Pix 300
• ID: 10242474
• EAN: 7.42724E+12
• Category: Lighting
• Mobile heads
• Lamp Type: Led
• Power: 250W
• Rotating gobos: No
• Number of Gobos:0
• Fixed Gobos: No
• Battery Operation: No
• Exterior Use: No
• Color Mix: RGBW
• Motorized Zoom: Yes
• Housing Color: Black
• Connections: 3-pin XLR
• Motorized Focus: No
• Prism: No
• Iris: No
• Height: 38 cm
• Width: 16.5 cm
• Depth: 25 cm
•Weights: 8Kg
• Number of LEDs: 19
• Power per LED: 15W
• Effect: No
• Wireless Control: No
• IP protection: IP20
• DMX control: Yes
• Opening Angle: 7 - 55º
• Number of Color Wheels: 0
www.audibax.com www.audibax.com
Iowa Pix 300 Iowa Pix 300
INDEX / ÍNDICE
ENGLISH
WELCOME TO AUDIBAX.........................................................................................................................1
SAFETY INSTRUCTIONS..........................................................................................................................1
IMPORTANT INFORMATION..................................................................................................................2
PACKAGE CONTENT.................................................................................................................................3
PRODUCT DESCRIPTION........................................................................................................................3
PRODUCT ILLUSTRATION......................................................................................................................3
THE INSTALLMENT OF LED MOVING HEAD......................................................................................3
THE CONNECTION OF CONTROL CORRESPOND WIRE...............................................................4
THE CONNECTION OF POWER CABLE...............................................................................................5
DIFFICULT PROCESSING........................................................................................................................6
FUNCTIONAL DESCRIPTION.................................................................................................................6
FUNCTIONAL SETTING............................................................................................................................6
PANEL OPERATION..................................................................................................................................7
DISPOSAL....................................................................................................................................................7
ESPAÑOL
BIENVENIDOS A AUDIBAX.....................................................................................................................8
INSTRUCCIONES DE SEGURIDAD........................................................................................................8
INFORMACIÓN IMPORTANTE...............................................................................................................9
CONTENIDO DEL PAQUETE.................................................................................................................10
DESCRIPCIÓN DEL PRODUCTO..........................................................................................................10
ILUSTRACIÓN DEL PRODUCTO...........................................................................................................10
LA INSTALACIÓN DE LA CABEZA MÓVIL LED................................................................................10
LA CONEXIÓN DEL CABLE CORRESPONDIENTE DE CONTROL................................................11
LA CONEXIÓN DEL CABLE DE ALIMENTACIÓN.............................................................................12
PROCESAMIENTO DIFÍCIL....................................................................................................................13
DESCRIPCION FUNCIONAL..................................................................................................................13
AJUSTE FUNCIONAL...............................................................................................................................13
FUNCIONAMIENTO DEL PANEL.........................................................................................................14
RECICLAJE.................................................................................................................................................14
DMX
DMX channel function...................................................................................................................15
Función de canal DMX...........................................................................................................................16
PRO PRO

WELCOME TO AUDIBAX
Thank you very much for choosing Audibax. We hope you enjoy your new product.
It has been developed and designed paying attention to the smallest details, with quality
control with European standards supervised by our great team of professional
technicians, who work every day to offer our customers the best quality.
We make sure that every Audibax product is built to last long. All our references are made
with long lasting materials and our specialists are dedicated to constantly doing quality
controls to guarantee the best result.
Please read carefully this manual in order to use your Audibax product in the best way.
Do not hesitate to visit our website for further information: www.audibax.com
SAFETY INSTRUCTIONS
GENERAL INFORMATION
- It is important to read and follow the instructions carefully.
- Keep all information and instructions in a secure location.
- Always follow the instructions provided.
- Take note of all safety warnings and never remove them from the equipment.
- Use the equipment only as intended and for its intended purpose.
- Ensure that the stands and/or mounts used are sufficiently stable and compatible for
fixed installations. Wall mounts should be properly installed and secured, and the
equipment should be installed securely to prevent falls.
- When installing the equipment, be sure to observe the relevant safety regulations in
your country.
- Do not install or operate the equipment near sources of heat, such as radiators, heat
registers, or ovens, and ensure that it is always cooled sufficiently and cannot overheat.
- Do not place sources of ignition, such as burning candles, on the equipment.
- Keep ventilation slits unobstructed.
- For equipment designed for indoor use only should not be used near water, flammable
materials, fluids, or gases. Special outdoor equipment should be used in accordance with
the manufacturer's instructions.
- Ensure that no dripping or splashed water can enter the equipment and do not place
containers filled with liquids on the equipment.
- Prevent objects from falling into the equipment.
- Use the equipment only with recommended accessories intended by the manufacturer.
- Do not attempt to open or modify the equipment.
- Check all cables after connecting the equipment to prevent accidents or damage due to
tripping hazards.
- During transport, take steps to prevent the equipment from falling and causing damage
or injury.
- If the equipment is not functioning properly, fluids or objects have gotten inside, or is
otherwise damaged, switch it off immediately and unplug it from the power outlet (if
applicable). Only authorized, qualified personnel should repair the equipment.
- Clean the equipment with a dry cloth.
- Comply with all applicable disposal laws and separate plastic and paper/cardboard
during packaging disposal.
- Keep plastic bags out of the reach of children.
Función de canal DMX
23 Canales:
15 Canales:
Encienda la luz LED móvil, conéctela al controlador DMX, después de recibir la señal DMX,
la marca de señal X desapareció, luego la luz está bajo el control del controlador DMX.
En el modo DMX, conectando varias luces juntas, pero desconectándolas con el
controlador DMX, todas las luces pueden funcionar en el mismo paso. Cuando se conecta
el primero al controlador, todo el grupo puede moverse en el mismo paso bajo el control
del controlador DMX.
Iowa Pix 300
www.audibax.com 1www.audibax.com 16
THIS DOCUMENT MAY BE SUBJECT TO MISPRINTS, ERRORS OR TECHNICAL MODIFICATIONS.
ESTE DOCUMENTO PUEDE ESTAR SUJETO A FALLOS DE IMPRESIÓN, ERRORES O MODIFICACIONES TÉCNICAS
Iowa Pix 300
CH 1
Ajuste panorámico
Ajuste panorámico
0----255
CH 2
Panorámico fino
Panorámico fino
0----255
CH 3
Ajuste de inclinación
Ajuste de inclinación
0----255
CH 4
Inclinación fina
Inclinación fina
0----255
CH 5
Velocidad de movimiento de
giro/inclinación
De rápido a lento
0----255
CH 6
Zoom
De cerca a lejos
0----255
CH 7
Atenuación
De oscuro a brillante
0----255
CH 8 Estroboscópico
Sin función
0----15
Luz estroboscópica de lento a rápido 16----255
CH 9 Cambio de color de LEDS
Sin función
0----15
Cambio de color de LEDS
16----255
CH 10
Velocidad de cambio de color
LEDS
De rápido a lento
0----255
CH 11
R1
De oscuro a brillante
0----255
CH 12
G1
De oscuro a brillante
0----255
CH 13
B1
De oscuro a brillante
0----255
CH 14
W1
De oscuro a brillante
0----255
CH 15
R2
De oscuro a brillante
0----255
CH 16
G2
De oscuro a brillante
0----255
CH 17
B2
De oscuro a brillante
0----255
CH 18
W2
De oscuro a brillante
0----255
CH 19
R3
De oscuro a brillante
0----255
CH 20
G3
De oscuro a brillante
0----255
CH 21
B3
De oscuro a brillante
0----255
CH 22
W3
De oscuro a brillante
0----255
CH 23 Reiniciar
Sin función
0----127
Reiniciar
128----255
CH 1
Ajuste panorámico
Ajuste panorámico
0----255
CH 2
Panorámico fino
Panorámico fino
0----255
CH 3
Ajuste de inclinación
Ajuste de inclinación
0----255
CH 4
Inclinación fina
Inclinación fina
0----255
CH 5
Velocidad de movimiento de
giro/inclinación
De rápido a lento
0----255
CH 6
Zoom
De cerca a lejos
0----255
CH 7
Atenuación
De oscuro a brillante
0----255
CH 8 Estroboscópico
Sin función
0----15
Luz estroboscópica de lento a rápido
16----255
CH 9 Cambio de color de LEDS
Sin función
0----15
Cambio de color de LEDS
16----255
CH 10
Velocidad de cambio de color
LEDS
De rápido a lento
0----255
CH 11
R
De oscuro a brillante
0----255
CH 12
G
De oscuro a brillante
0----255
CH 13
B
De oscuro a brillante
0----255
CH 14
W
De oscuro a brillante
0----255
CH 15
Sin función
0----127
Reiniciar
128----255
PRO PRO

DMX channel function
23 Channels:
15 Channels:
Powered on LED Moving light, connect it to the DMX controller, after receving the DMX
signal, the signal mark X disappeared, then light is under DMX controller’s control.
Under DMX Mode, connecting multiple lights together, but disconnect with DMX
controller, all lights can work in the same step. When connected the first one to
controller, the whole group can move in the same step under DMX controller’s control.
FOR DEVICES DESIGNED TO BE CONNECTED TO THE MAIN POWER SUPPLY:
- ATTENTION: If your equipment has a power cord with a grounding plug, it must be
connected to a wall outlet with a ground connection. Never remove the grounding plug
from the power cord.
- If your equipment has been exposed to extreme temperature changes, allow it to reach
room temperature before turning it on. Otherwise, moisture and condensation may
damage the equipment.
- Before plugging in the equipment, make sure that the voltage and frequency of the
power outlet match the specifications of the equipment. If the equipment has a voltage
selector, only connect it to the power outlet if the values match. If the power cord or
adapter does not fit your outlet, contact an electrician.
- Do not step on the power cord. Make sure it is not pinched at the outlet, adapter, or
equipment connection.
- Keep the power cord or adapter within reach and disconnect the equipment from the
power supply when not in use or when cleaning it. Always unplug the cord or adapter by
pulling the plug or adapter, not the cord. Never touch the cord or adapter with wet hands.
- Avoid frequently turning the equipment on and off, as this can reduce its useful life.
- IMPORTANT: Only replace fuses with those of the same type and rating. If a fuse
repeatedly blows, contact an authorized service center.
- To completely disconnect the equipment from the power mains, unplug the power cord
or adapter from the outlet.
- If your device has a Volex power connector, the mating Volex connector must be
unlocked before it can be removed. Be careful when laying cables, as the equipment can
slide or fall if the power cord is pulled.
- Unplug the power cord or adapter before an extended period of disuse or in case of
lightning strike risk.
- Only install the equipment when it is disconnected from the power source.
- To prevent damage and overheating, qualified personnel should regularly clean and
service the equipment depending on ambient conditions like dust, nicotine, and fog.
If the product contains the following symbols, please, read carefully:
IMPORTANT INFORMATION
WARNING! IMPORTANT INFORMATION REGARDING LIGHTING PRODUCTS
1. This product is specifically designed for use in event technology and is not intended to
be used as household lighting.
2. It is important to avoid looking directly at the light beam, even for a short period of
time.
3. Optical instruments, such as magnifiers, should not be used to look directly at the
beam.
4. If you are sensitive to strobe effects, it is possible that they could cause an epileptic
seizure. If you have epilepsy, it is important to avoid places where strobe lights are being
used.
www.audibax.com 2 www.audibax.com 15
CAUTION
Risk of Electric
Shock.
Disconnect all
power sources
before servicing
CAUTION: To reduce the risk of electric shock, do not remove cover (or
back). There are no user serviceable parts inside. Maintenance and repairs
should be exclusively carried out by qualified service personnel.
The warning triangle with lightning symbol indicates dangerous
uninsulated voltage inside the unit, which may cause an electrical shock.
The warning triangle with exclamation mark indicates important operating
and maintenance instructions.
Iowa Pix 300 Iowa Pix 300
CH 1
Pan Adjustment
pan Adjustment
0----255
CH 2
Pan fine
Pan fine
0----255
CH 3
Tilt Adjustment
Tilt Adjustment
0----255
CH 4
Tilt fine
Tilt fine
0----255
CH 5
Pan/tilt moving speed
from fast to slow
0----255
CH 6
Zoom
from near to far
0----255
CH 7
Dimming
from duck to bright
0----255
CH 8 Strobe
no function
0----15
strobe from slow to fast 16----255
CH 9 LEDS color changing
no function
0----15
LEDS color changing
16----255
CH 10
LEDS color changing speed
from fast to slow
0----255
CH 11
R1
from dark to bright
0----255
CH 12
G1
from dark to bright
0----255
CH 13
B1
from dark to bright
0----255
CH 14
W1
from dark to bright
0----255
CH 15
R2
from dark to bright
0----255
CH 16
G2
from dark to bright
0----255
CH 17
B2
from dark to bright
0----255
CH 18
W2
from dark to bright
0----255
CH 19
R3
from dark to bright
0----255
CH 20
G3
from dark to bright
0----255
CH 21
B3
from dark to bright
0----255
CH 22
W3
from dark to bright
0----255
CH 23 Reset
no function
0----127
reset
128----255
CH 1
Pan Adjustment
pan Adjustment
0----255
CH 2
Pan fine
Pan fine
0----255
CH 3
Tilt Adjustment
Tilt Adjustment
0----255
CH 4
Tilt fine
Tilt fine
0----255
CH 5
Pan/tilt moving speed
from fast to slow
0----255
CH 6
Zoom
from near to far
0----255
CH 7
Dimming
from dark to brightness
0----255
CH 8 Strobe
no function
0----15
strobe from slow to fast
16----255
CH 9 LEDS color changing
no function
0----15
LEDs’ Color changing
16----255
CH 10
LEDs color changing speed
from fast to slow
0----255
CH 11
R
from dark to bright
0----255
CH 12
G
from dark to bright
0----255
CH 13
B
from dark to bright
0----255
CH 14
W
from dark to bright
0----255
CH 15
no function
0----127
reset 128----255
PRO PRO
Iowa Pix 300
www.audibax.com 3www.audibax.com 14
PACKAGE CONTENT
1 x Iowa Pix 300
1 x product USER MANUAL
1 x Power source connected lines
1 x signal lines
PRODUCT DESCRIPTION
• Light source: 19*15W RGBW 4-in-1 Osram LED
• Power:250 W
• Control signal: DMX 512, in sets at the automatic procedure
• Channel: 15/23CH, DMX512 channel control
• Motion: level 540°, vertical 280°, horizontal and vertical uses the electronic replacement
function
• Color: 16.7 million kinds of colors changes
• Adjusts the light: 0-100 electron adjusts the light, various colors may alone move also
may mix the color tone
• Strobe: 1-25/second high speed strobe, but single color mixes the color strobe
• ZOOM angle: 7 – 55 degree
• DMX512, Auto, Sound, Master-slave
• Voltage: AC110-260V 50/60Hz
PRODUCT ILLUSTRATION
Our product adopt semiconductor to produce radiation, LED as light origin. With
advantage of operation quietly, less power waste, high brightness, gaily-colored,
astigmatic, high longevity (60-100 thousands hours), non-calorific etc. Our product apply
to use 3 kinds light as red, green, blue LED, synthesize turn colors under election, can
create effect of auto gradual change/skip change color, frequent blinking. Can accept
control by DMX512, real save power, no pollution green lighting tool.
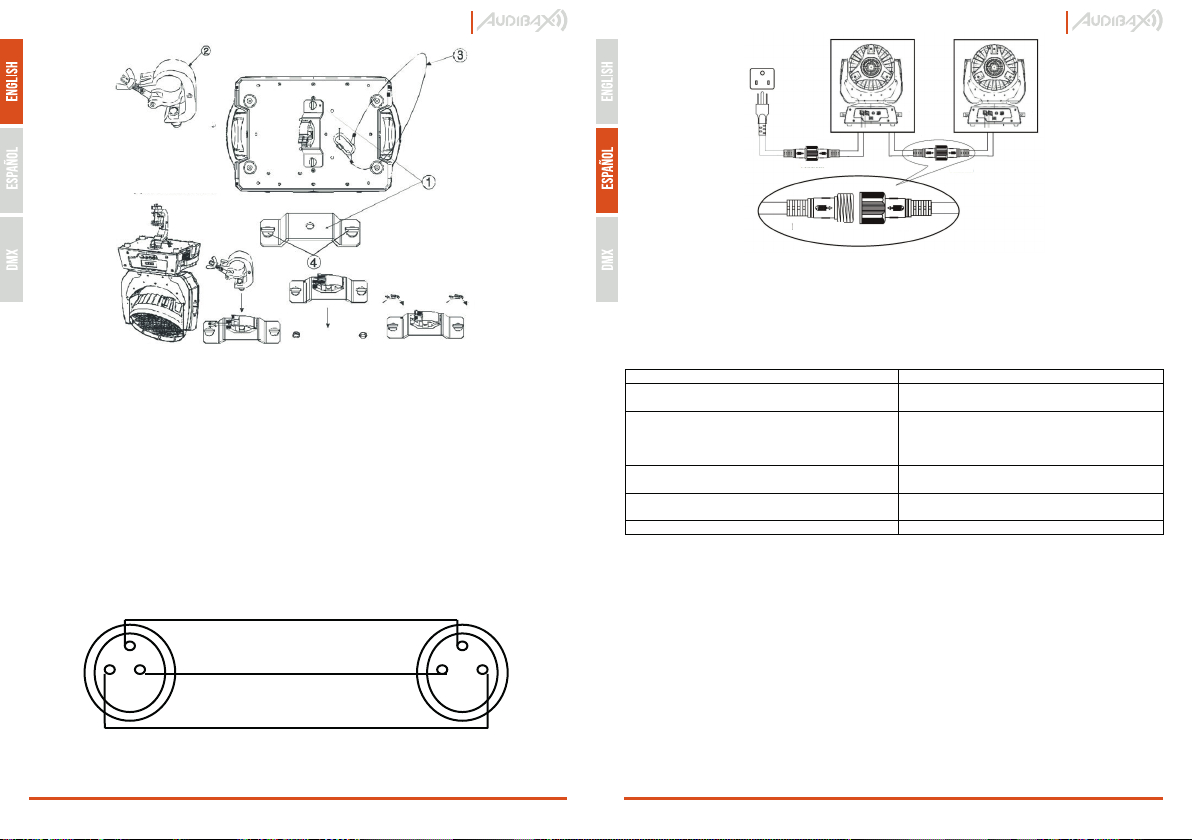
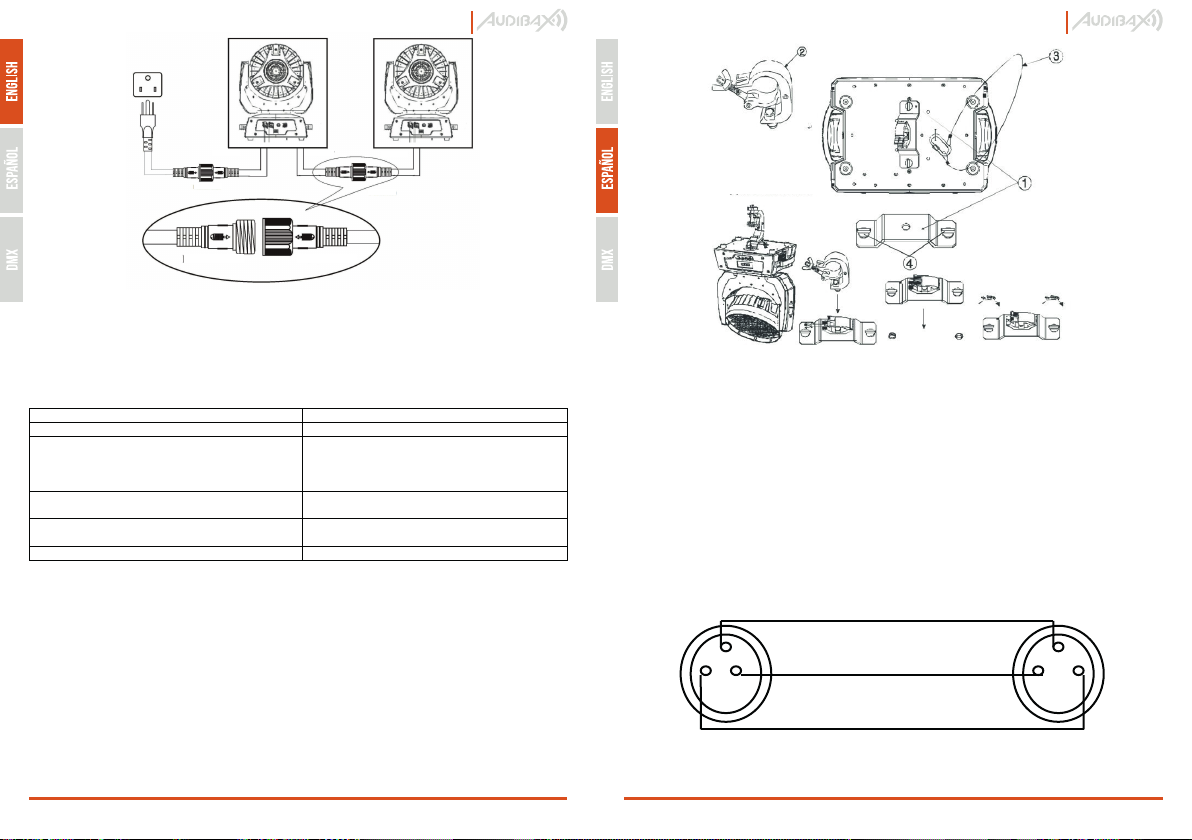
THE INSTALLMENT OF LED MOVING HEAD
Use the four bolts with M8 size by the clip of the LED moving head to install it. Should
guarantee the reliability of the install, this way is to prevent the LED moving head occur
swings and skids when it’s working. The weight is about 8Kg of each LED moving head,
before install, you should confirm the structure whether can support this weight of the
LED moving head light. In order to guarantee the security, you also need to install a safety
chain in the lamp body side handle.
Iowa Pix 300
Embalaje:
1. El embalaje puede ser reciclado utilizando métodos de eliminación
estándar y reintroducido en el ciclo de materiales reutilizables.
2. Por favor, sigue las leyes y regulaciones relativas a la eliminación y el
reciclaje del empaque en tu país.
Dispositivo:
1. Este dispositivo está sujeto a la Directiva de Residuos de Equipos
Eléctricos y Electrónicos (WEEE) de la Unión Europea. Los aparatos
electrónicos usados no deben ser eliminados con los residuos domésticos.
Los dispositivos usados deben ser eliminados a través de una empresa de
eliminación aprobada o una instalación de eliminación municipal. Por favor,
cumple con las regulaciones aplicables en tu país.
2. Por favor, sigue todas las leyes y regulaciones de eliminación en tu país.
3. Como cliente, puedes obtener información sobre opciones de eliminación
respetuosas con el medio ambiente del vendedor del producto o las
autoridades regionales apropiadas.
seleccione el modo DMX, el modo automático o el modo activado por sonido,
• En modo DMX: Pulse "ARRIBA" "ABAJO" para la dirección DMX opcional;
• En el modo autopropulsado: Presione "ARRIBA" "ABAJO" para elegir maestro o esclavo;
• En el modo de sonido: Presione "ARRIBA" "ABAJO" para elegir maestro o esclavo
FUNCIONAMIENTO DEL PANEL
Instrucciones de funcionamiento: presione A para mostrar una función diferente,
presione B o C para cambiar la función, presione D para ingresar.
Instrucciones detalladas de la función:
1. [Conjunto de dirección DMX] para configurar la dirección DMX para la luz
2. [Configuración de modo de trabajo] Para configurar diferentes modos de trabajo, 3
modos funcionan, son DMX512, AUTO, SONIDO activado. Al ingresar AUTO o SONIDO, la
luz enviará señales DMX automáticamente.
3. [Invertir conjunto PAN]
4. [Invertir juego TILT]
5. [Channel Set] Para elegir diferentes modos de canal, dos tipos disponibles, 23 canales o
15 canales.
6. [Restaurar configuración de fábrica]
7. [Restablecer] Para restablecer la luz en el modo de trabajo AUTO, presione el botón
hacia arriba o hacia abajo para elegir el idioma en inglés o chino.
RECICLAJE
A B C D
Pnatalla LCD A. Menú
B. Arriba
C. Abajo
D. Entrar
PRO PRO
ENTRADA DE
ALIMENTACIÓN ENTRADA DE
ALIMENTACIÓN
SALIDA DE ENERGÍA
CONEXIÓN DE
ENERGÍA
CONEXIÓN DE
ENERGÍA
SAIDA DE ENERGÍA ENTRADA DE
ALIMENTACIÓN
Warning: Do not use the hand of the LED moving head to up and down or fix.
THE CONNECTION OF CONTROL CORRESPOND WIRE
The connection of controller between the led moving head lamp and respectively led
moving head lamp should use the twin core shielded cable, and the diameter of each
core at least be 0.3mm. After receives the DMX512 signal, the lamp of nearby the address
switch condition will glisten. When it’s do not receive the DMX signal, the lamp will in
extinguish condition, but if the signal lamp glisten continuously, the mean is the DMX
signal is not be correct.
When installing, uses the DMX signal terminal is much better. It can avoid the digital
control signal breached by the electrical noise. Generally speaking, the DMX terminal is
Cannon plug coupling, it has a 120 ohm resistances between the 2 feet and 3 feet, it will
connected on the last led moving head lamp’s digital plug of the led moving head lamp
chain.
(1) Omega-holders
(2) Clamp
(3) Safety-rope
(4) Quick-lock fastener
www.audibax.com 4 www.audibax.com 13
Iowa Pix 300 Iowa Pix 300
DMX+
DMX-
GND
3
1 2
3
1 2
Limpieza y mantenimiento
Para garantizar que la lámpara de cabeza móvil LED funcione mejor, debe mantener la
lámpara en estado limpio. Sugiere limpiar el cuerpo de la lámpara y el ventilador cada 15
días. Para la placa PVS, debe limpiarla a tiempo. Cuando limpie la pieza de PVC, no use
ningún limpiador soluble,
PROCESAMIENTO DIFÍCIL
DESCRIPCION FUNCIONAL
El controlador puede controlar los tres ejes de la luz del cabezal móvil (eje PAN, eje TITL y
eje Zoom), la luz tiene una lámpara LED RGBW 4IN1 de varios chips y un cabezal móvil
LED RGB tricolor 3IN1, y 3 colores y 4 colores, tiene modo DMX (puede configurar la
dirección DMX), modo autopropulsado (se puede configurar maestro-esclavo), modo de
sonido (se puede configurar maestro/esclavo), la selección de modo se puede configurar
mediante el panel o el controlador DMX 512 (esto debe configurarse en modo DMX); La
luz también tiene estroboscópico/flash de frecuencia aleatoria/estroboscópico hacia fuera
rápido y lento/lento hacia adelante modo estroboscópico más rápido, el salto de
color/gradientes
AJUSTE FUNCIONAL
Configuración de operación rápida
El controlador puede configurar rápidamente el modo de la luz, la interfaz principal,
Pregunta
Respuesta
La lámpara de cabeza móvil LED no puede
encenderse.
Inspecciona el fusible en el panel trasero.
Aunque brilla, la lámpara de cabeza móvil LED
no puede aceptar las instrucciones del
controlador.
Verifique la dirección de inicio digital (ver 09)
ytambién verifique la situación de conexión
de la línea de control de comunicación (ver
03).
La lámpara de cabeza móvil LED solo puede
funcionar de forma intermitente.
Inspeccione la fuente de alimentación yel
voltaje es normal.
No recibe la señal DMX512
Si las líneas de señal hacen contacto bien o
están rotas
El rayo de luz aparece sombríamente.
Inspeccione si la parte óptica está limpia.
PRO PRO
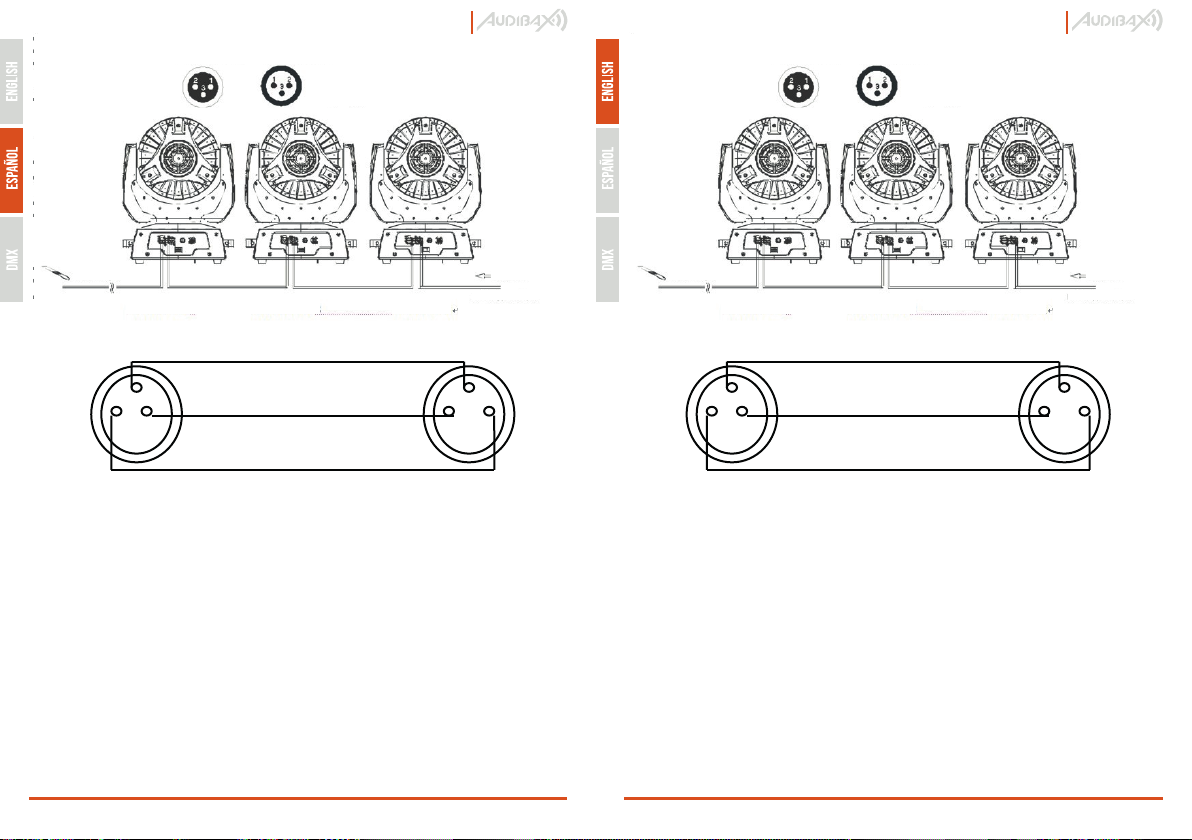
DMX output:
3.Pin XLR Socket
120 Ohms
Address25 Address13 Address1
DMX controller
DMX512
DMX input:
3-Pin XLR Socket
1: Ground
2: Signal (-)
3: Signal (+)
Iowa Pix 300
www.audibax.com 5www.audibax.com 12
Iowa Pix 300
Connecting DMX512 digital signal,
Please using high quality screen line to connect it, for fear interfering.
THE CONNECTION OF POWER CABLE
Use the provided plug to connect the main power to the projector paying attention to the
voltage and frequency marked on the panel of the projector. It is recommended that
each projector be supplied separately so that they may be individually switched on and
off.
IMPORTANT
It is essential that each projector is correctly earthed and that electrical installation
conforms to all relevant standards. Power consumption of this projector is 200VA.
The connection of Power cable between the led moving head lamp and respectively led
moving head lamp should use the three core shielded cable,
Power cable joint (at most 4pcs) in each other, this is the Connector picture as below:
Important Notice: In order to avoid overloading the power supply, the power cable can
only supply power for at most 4 light
DMX+
DMX-
GND
3
1 2
3
1 2
Salida DMX:
Enchufe XLR de 3
pines
120 Ohms
Dirección25 Dirección13 Dirección1
Controlador DMX
DMX512
Entrada DMX:
Zócalo XLR de 3
pines
1: Tierra
2: Señal (-)
3: Señal (+)
Conexión de señal digital DMX512,
Utilice una línea de pantalla de alta calidad para conectarlo, por temor a interferir.
LA CONEXIÓN DEL CABLE DE ALIMENTACIÓN
Utilice el enchufe proporcionado para conectar la alimentación principal al proyector
prestando atención al voltaje y la frecuencia marcados en el panel del proyector. Se
recomienda que cada proyector se suministre por separado para que puedan encenderse
y apagarse individualmente.
IMPORTANTE
Es esencial que cada proyector esté correctamente conectado a tierra y que la instalación
eléctrica cumpla con todos los estándares relevantes. El consumo de energía de este
proyector es de 200VA.
La conexión del cable de alimentación entre la lámpara de cabeza móvil LED y la lámpara
de cabeza móvil LED respectivamente debe usar el cable blindado de tres núcleos,
Empalme del cable de alimentación (como máximo 4 piezas) entre sí, esta es la imagen
del conector como se muestra a continuación:
Aviso importante: para evitar sobrecargar la fuente de alimentación, el cable de
alimentación solo puede suministrar energía para un máximo de 4 luces.
DMX+
DMX-
GND
3
1 2
3
1 2
PRO PRO
POWER IN POWER IN
POWER OUT
POWERCON POWERCON
POWER OUT POWER IN
www.audibax.com 6 www.audibax.com 11
Iowa Pix 300 Iowa Pix 300
Clean maintenance
In order to guarantee the LED moving head lamp can work better, you should keep the
lamp in clean state. Suggests clean the lamp body and fan in each 15 days. For the PVS
board, you need clean it on time. When you cleaning the PVC piece, please do not use
any soluble cleanser,
DIFFICULT PROCESSING
FUNCTIONAL DESCRIPTION
Controller can control Moving head light’s three axes (PAN axis, TITL axis and Zoom axis),
The light have RGBW 4IN1 Multi-Chip LED Lamp, and 3IN1 Tricolor RGB LED Moving Head,
and 3color and 4 color, it have DMX mode (can be set DMX address), self-propelled mode
(can be set up master-slave), Sound mode (can be set master / slave), The mode selection
can be set by the panel or DMX 512 controller (this must be set to DMX mode); The light
also have strobe / random frequency flash / strobe out fast and slow / slow forward faster
strobe mode, the color jump / gradients
FUNCTIONAL SETTING
Fast operation settings
Controller can quickly set the light’s mode, the main interface, followed by "ESC" key to
Advertencia: No utilice la mano del cabezal móvil LED para subir y bajar o fijar.
LA CONEXIÓN DEL CABLE CORRESPONDIENTE DE CONTROL
La conexión del controlador entre la lámpara de cabeza móvil LED y la lámpara de cabeza
móvil LED respectivamente debe usar el cable blindado de doble núcleo, y el diámetro de
cada núcleo debe ser al menos de 0,3 mm. Después de recibir la señal DMX512, la lámpara
cercana al interruptor de dirección brillará. Cuando no recibe la señal DMX, la lámpara se
apagará, pero si la lámpara de señal brilla continuamente, significa que la señal DMX no
es correcta.
Al instalar, utiliza el terminal de señal DMX es mucho mejor. Puede evitar que la señal de
control digital sea violada por el ruido eléctrico. En términos generales, el terminal DMX
es un acoplamiento de enchufe Cannon, tiene una resistencia de 120 ohmios entre los 2
pies y los 3 pies, se conectará en el último enchufe digital de la lámpara de cabeza móvil
LED de la cadena de lámparas de cabeza móvil LED.
(1) Soporte Omega
(2) Abrazadera
(3) Cuerda de seguridad
(4) Agarrador de cierre
rápido
DMX+
DMX-
GND
3
1 2
3
1 2
Question
Answer
The LED moving head lamp can not start.
Inspects the fuse on the rear panel.
Although shines, but the LED moving head
lamp can not accept the instruction of the
controller.
Check the digital start address (sees
09th) and also check the connection situation
of the communication control line the (to see
03rd).
LED moving head lamp onlycan work
intermittently.
Inspect the power supplyand voltage is
whether normal.
Do not receive the DMX512 signal
Whether the signal lines do contact
good or broken
The light beam appears gloomily.
Inspect the optics part is whether clean.
PRO PRO
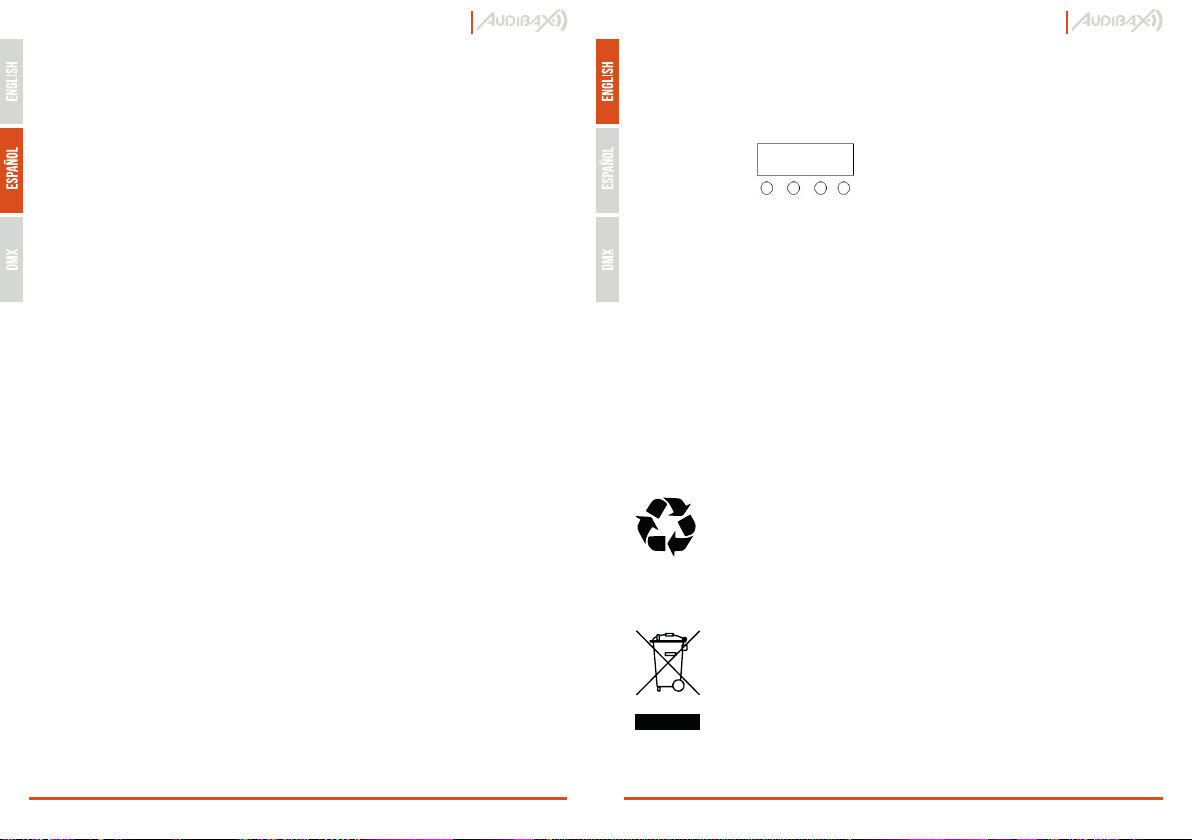
A B C D
LCD Display A. Menu
B. Up
C. Down
D. Enter
3. No se deben utilizar instrumentos ópticos, como lupas, para mirar directamente al haz.
4. Si es sensible a los efectos estroboscópicos, es posible que le provoquen un ataque
epiléptico. Si tiene epilepsia, es importante evitar los lugares donde se usan luces
estroboscópicas.
CONTENIDO DEL PAQUETE
1 x Iowa Pix 300.
1 x MANUAL DEL USUARIO del producto
1 x líneas conectadas a la fuente de alimentación
1 x líneas de señal
DESCRIPCIÓN DEL PRODUCTO
• Fuente de luz: 19*15W RGBW 4 en 1 Osram LED
• Potencia: 250W
• Señal de control: DMX 512, en conjuntos en el procedimiento automático
• Canal: 15/23CH, control de canal DMX512
• Movimiento: nivel 540°, vertical 280°, horizontal y vertical utiliza la función de reemplazo
electrónico
• Color: 16,7 millones de tipos de cambios de colores
• Ajusta la luz: 0-100 electrones ajusta la luz, varios colores pueden moverse solos también
pueden mezclar el tono de color
• Luz estroboscópica: luz estroboscópica de alta velocidad de 1-25/segundo, pero un solo
color mezcla la luz estroboscópica de color
• Ángulo de ZOOM: 7 – 55 grados
• DMX512, Auto, Sonido, Maestro-esclavo
• Voltaje: AC110-260V 50/60Hz
ILUSTRACIÓN DEL PRODUCTO
Nuestro producto adopta semiconductores para producir radiación, LED como origen de
luz. Con la ventaja de un funcionamiento silencioso, menos desperdicio de energía, alto
brillo, colores alegres, astigmatismo, alta longevidad (60-100 mil horas), no calórico, etc.
Nuestro producto se aplica para usar 3 tipos de luz como LED rojo, verde, azul, sintetizar
los colores de giro bajo elección, puede crear un efecto de cambio gradual automático/-
saltar cambio de color, parpadeo frecuente. Puede aceptar el control por DMX512, ahorro
de energía real, herramienta de iluminación verde sin contaminación.
LA INSTALACIÓN DE LA CABEZA MÓVIL LED
Use los cuatro pernos con tamaño M8 junto al clip del cabezal móvil LED para instalarlo.
Debería garantizar la confiabilidad de la instalación, de esta manera se evita que la
cabeza móvil LED se balancee y patine cuando está funcionando. El peso de cada cabezal
móvil LED es de aproximadamente 8 kg. Antes de la instalación, debe confirmar si la
estructura puede soportar este peso del cabezal móvil LED. Para garantizar la seguridad,
también debe instalar una cadena de seguridad en el asa lateral del cuerpo de la
lámpara.
Packaging:
1. The packaging can be recycled using standard disposal methods and
reintroduced into the reusable material cycle.
2. Please follow the laws and regulations regarding disposal and recycling of
packaging in your country.
Device:
1. This device is subject to the Waste Electrical and Electronic Equipment
(WEEE) Directive of the European Union. Used appliances should not be
disposed of with household waste. Used device must be disposed of
through an approved disposal company or a municipal disposal facility.
Please comply with the applicable regulations in your country.
2. Please follow all the disposal laws and regulations in your country.
3. As a customer, you can obtain information on environmentally-friendly
disposal options from the product seller or the appropriate regional
authorities.
select DMX mode, Auto mode or sound-activated mode,
• In DMX mode: Press "UP" "DOWN" to optional DMX address;
• In the self-propelled mode: Press "UP" "DOWN" to choose master or slave;
• In the sound mode: Press "UP" "DOWN" to choose master or slave
PANEL OPERATION
Operating instructions: Press A will show different function, Press B or C for changing
function, Press D for enter.
Detailed function instruction:
1.[DMX Address Set] for setting DMX address for light
2.[Work Mode Set] For setting different work mode, 3 modes workable ,they are
DMX512,AUTO,SOUND Activated.. When entering AUTO or SOUND, Light will send DMX
signals automatically.
3.[Invert PAN Set]
4.[Invert TILT Set]
5.[Channel Set] For choosing different Channel Mode, two kinds available,23 channels or
15 Channels.
6.[Restore Factory Settings]
7.[Reset] For resetting light in AUTO work mode, Press button up or down for choosing
language in English or in Chinese.
DISPOSAL
Iowa Pix 300
www.audibax.com 7www.audibax.com 10
Iowa Pix 300 PRO PRO

PARA DISPOSITIVOS DISEÑADOS PARA SER CONECTADOS A LA FUENTE DE
ALIMENTACIÓN PRINCIPAL:
- ATENCIÓN: Si su equipo tiene un cable de alimentación con un enchufe con conexión a
tierra, debe conectarse a un tomacorriente de pared con conexión a tierra. Nunca retire el
enchufe de conexión a tierra del cable de alimentación.
- Si su equipo ha estado expuesto a cambios extremos de temperatura, permita que
alcance la temperatura ambiente antes de encenderlo. De lo contrario, la humedad y la
condensación pueden dañar el equipo.
- Antes de enchufar el equipo, asegúrese de que el voltaje y la frecuencia del tomacorrien�
te coincidan con las especificaciones del equipo. Si el equipo dispone de selector de
tensión, sólo conéctelo a la toma de corriente si los valores coinciden. Si el cable de
alimentación o el adaptador no se ajustan a su toma de corriente, comuníquese con un
electricista.
- No pise el cable de alimentación. Asegúrese de que no esté pellizcado en la toma de
corriente, el adaptador o la conexión del equipo.
- Mantenga el cable de alimentación o el adaptador al alcance de la mano y desconecte
el equipo de la fuente de alimentación cuando no esté en uso o cuando lo esté limpiando.
Desenchufe siempre el cable o el adaptador tirando del enchufe o del adaptador, no del
cable. Nunca toque el cable o el adaptador con las manos mojadas.
- Evite encender y apagar el equipo con frecuencia, ya que esto puede reducir su vida útil.
- IMPORTANTE: Solo reemplace los fusibles con aquellos del mismo tipo y clasificación. Si
un fusible se quema repetidamente, comuníquese con un centro de servicio autorizado.
- Para desconectar completamente el equipo de la red eléctrica, desenchufe el cable de
alimentación o el adaptador de la toma de corriente.
- Si su dispositivo tiene un conector de alimentación Volex, el conector Volex correspon�
diente debe desbloquearse antes de poder retirarlo. Tenga cuidado al tender los cables,
ya que el equipo puede deslizarse o caerse si se tira del cable de alimentación.
- Desenchufe el cable de alimentación o el adaptador antes de un período prolongado de
desuso o en caso de riesgo de caída de rayos.
- Instale el equipo únicamente cuando esté desconectado de la fuente de alimentación.
- Para evitar daños y sobrecalentamiento, el personal calificado debe limpiar y reparar el
equipo con regularidad según las condiciones ambientales, como polvo, nicotina y niebla.
Si el producto contiene los siguientes símbolos, lea atentamente:
www.audibax.com 8 www.audibax.com 9
Iowa Pix 300 Iowa Pix 300
BIENVENIDO A AUDIBAX
Muchas gracias por elegir Audibax. Esperamos que disfrute de su nuevo producto. Ha
sido desarrollado y diseñado cuidando hasta el más mínimo detalle, con un control de
calidad con estándares europeos supervisado por nuestro gran equipo de técnicos
profesionales, que trabajan día a día para ofrecer a nuestros clientes la mejor calidad.
Nos aseguramos de que cada producto Audibax esté diseñado para durar mucho
tiempo. Todas nuestras referencias están fabricadas con materiales de larga duración y
nuestros especialistas se dedican a realizar constantemente controles de calidad para
garantizar el mejor resultado.
Lea atentamente este manual para utilizar su producto Audibax de la mejor manera.
No dudes en visitar nuestra web para más información: www.audibax.com
INSTRUCCIONES DE SEGURIDAD
INFORMACIÓN GENERAL
- Es importante leer y seguir las instrucciones cuidadosamente.
- Guarde toda la información y las instrucciones en un lugar seguro.
- Siga siempre las instrucciones proporcionadas.
- Tome nota de todas las advertencias de seguridad y nunca las quite del equipo.
- Utilice el equipo únicamente según lo previsto y para el fin previsto.
- Asegúrese de que los soportes y/o soportes utilizados sean lo suficientemente estables y
compatibles para instalaciones fijas. Los soportes de pared deben asegurarse correcta-
mente, y el equipo debe instalarse de forma segura para evitar caídas.
- Al instalar el equipo, asegúrese de observar las normas de seguridad pertinentes de su
país.
- No instale ni utilice el equipo cerca de fuentes de calor, como radiadores, rejillas de calor
u hornos, y asegúrese de que siempre se enfríe lo suficiente y no se sobrecaliente.
- No coloque fuentes de ignición, como velas encendidas, sobre el equipo.
- Mantenga las ranuras de ventilación despejadas.
- Equipos diseñados solo para uso en interiores y no debe usarse cerca de agua,
materiales infamables, líquidos o gases. Se debe usar para exteriores de acuerdo con las
instrucciones del fabricante.
- Asegúrese de que no entren gotas o salpicaduras de agua en el equipo y no coloque
recipientes llenos de líquidos sobre el equipo.
- Evite que caigan objetos dentro del equipo.
- Utilice el equipo únicamente con los accesorios recomendados por el fabricante.
- No intente abrir o modificar el equipo.
- Verifique todos los cables después de conectar el equipo para evitar accidentes o daños
debido a riesgos de tropiezos.
- Durante el transporte, tome medidas para evitar que el equipo se caiga y cause daños o
lesiones.
- Si el equipo no funciona correctamente, se han metido líquidos u objetos en su interior
o está dañado, apáguelo inmediatamente y desenchúfelo de la toma de corriente (si
corresponde). Solo personal autorizado y cualificado debe reparar el equipo.
- Limpie el equipo con un paño seco.
- Cumpla con todas las leyes de eliminación aplicables y separe el plástico y el papel/car-
tón durante la eliminación del embalaje.
- Mantenga las bolsas de plástico fuera del alcance de los niños
INFORMACIÓN IMPORTANTE
¡ADVERTENCIA! INFORMACIÓN IMPORTANTE SOBRE PRODUCTOS DE ILUMINACIÓN
1. Este producto está diseñado específicamente para su uso en tecnología de eventos y no
está diseñado para usarse como iluminación doméstica.
2. Es importante evitar mirar directamente al haz de luz, incluso durante un breve período
de tiempo.
PRECAUCIÓN: Para reducir el riesgo de descarga eléctrica, no retire la tapa
(o la parte trasera). No hay partes reparables por el usuario adentro. El
mantenimiento y las reparaciones deben ser realizados exclusivamente por
personal de servicio cualificado.
El triángulo de advertencia con el símbolo de un rayo indica un voltaje no
aislado peligroso dentro de la unidad, que puede causar una descarga
eléctrica.
El triángulo de advertencia con signo de exclamación indica instrucciones
importantes de operación y mantenimiento.
CAUTION
Risk of Electric
Shock.
Disconnect all
power sources
before servicing
PRO PRO
Table of contents
Other Audibax Light Fixture manuals


