Audibax Monster 200 Hybrid User manual

Monster 200 Hybrid
Hybrid Moving Head 200W White LED
Cabeza Móvil Híbrida 200W LED Blanco
USER’S MANUAL
MANUAL DE USUARIO
www.audibax.comwww.audibax.com
COLD WHITE DMX
TECHNOLOGYGREEN SOLUTION
STAND ALONE MODE
FLICKER FREE ZOOM
CIRCULAR PRISM
FOCUS
MASTER/SLAVE
Monster 200 Hybrid
COLOUR WHEEL
GOBO WHEEL
PRO
PRO

DATA SHEET
• Brand: Audibax Pro
• Product Name: Audibax Monster 200 Hybrid
• EAN: 7427244399791
• Category: Lighting
• Moving Heads
• Lamp Type: LED
• Power: 300W
• Rotating gobos: Yes
• Number of Gobos: 17
• Fixed Gobos: Yes
• Battery Operation: No
• Outdoor Use: No
• Color Mix: CW
• Motorized Zoom: YES
• Housing Color: Black
• Connections: 3 Pin XLR
• Motorized Focus: YES
• Prism: Yes
• Iris: no
• Number of LEDs: 1
• Power per LED: 200W
• Effect: No
• Wireless Control: No
• Protection: IP
• DMX Control: Yes
• Color Temperature: 7500K
• Opening angle: 8º
• Number of Color Wheels: 2
• Height: 34.3cm
• Width: 23.9cm
• Depth: 53.7cm
• Weight: 14.5KG
www.audibax.com www.audibax.com
Monster 200 Hybrid Monster 200 Hybrid
INDEX / ÍNDICE
ENGLISH
WELCOME TO AUDIBAX.........................................................................................................................1
SAFETY INSTRUCTIONS..........................................................................................................................1
IMPORTANT INFORMATION..................................................................................................................2
PACKAGE CONTENT.................................................................................................................................3
PRODUCT DESCRIPTION........................................................................................................................3
MOUNTING AND INSTALLATION..........................................................................................................3
DMX-512 CONTROL CONNECTIONS....................................................................................................4
PHOTOMETRIC DATA...............................................................................................................................5
DISPLAY MENU CONTROL.....................................................................................................................6
DISPOSAL....................................................................................................................................................7
ESPAÑOL
BIENVENIDOS A AUDIBAX.....................................................................................................................8
INSTRUCCIONES DE SEGURIDAD........................................................................................................8
INFORMACIÓN IMPORTANTE...............................................................................................................9
CONTENIDO DEL PAQUETE.................................................................................................................10
DESCRIPCIÓN DEL PRODUCTO..........................................................................................................10
MONTAJE E INSTALACIÓN...................................................................................................................10
CONEXIONES DE CONTROL DMX-512..............................................................................................11
DATOS FOTOMÉTRICOS........................................................................................................................12
CONTROL DEL MENÚ DE LA PANTALLA..........................................................................................13
RECICLAJE.................................................................................................................................................14
DMX
DMX Channels..........................................................................................................................................15
Canales DMX.............................................................................................................................................16
PRO PRO

WELCOME TO AUDIBAX
Thank you very much for choosing Audibax. We hope you enjoy your new product.
It has been developed and designed paying attention to the smallest details, with quality
control with European standards supervised by our great team of professional
technicians, who work every day to offer our customers the best quality.
We make sure that every Audibax product is built to last long. All our references are made
with long lasting materials and our specialists are dedicated to constantly doing quality
controls to guarantee the best result.
Please read carefully this manual in order to use your Audibax product in the best way.
Do not hesitate to visit our website for further information: www.audibax.com
SAFETY INSTRUCTIONS
GENERAL INFORMATION
- It is important to read and follow the instructions carefully.
- Keep all information and instructions in a secure location.
- Always follow the instructions provided.
- Take note of all safety warnings and never remove them from the equipment.
- Use the equipment only as intended and for its intended purpose.
- Ensure that the stands and/or mounts used are sufficiently stable and compatible for
fixed installations. Wall mounts should be properly installed and secured, and the
equipment should be installed securely to prevent falls.
- When installing the equipment, be sure to observe the relevant safety regulations in
your country.
- Do not install or operate the equipment near sources of heat, such as radiators, heat
registers, or ovens, and ensure that it is always cooled sufficiently and cannot overheat.
- Do not place sources of ignition, such as burning candles, on the equipment.
- Keep ventilation slits unobstructed.
- For equipment designed for indoor use only should not be used near water, flammable
materials, fluids, or gases. Special outdoor equipment should be used in accordance with
the manufacturer's instructions.
- Ensure that no dripping or splashed water can enter the equipment and do not place
containers filled with liquids on the equipment.
- Prevent objects from falling into the equipment.
- Use the equipment only with recommended accessories intended by the manufacturer.
- Do not attempt to open or modify the equipment.
- Check all cables after connecting the equipment to prevent accidents or damage due to
tripping hazards.
- During transport, take steps to prevent the equipment from falling and causing damage
or injury.
- If the equipment is not functioning properly, fluids or objects have gotten inside, or is
otherwise damaged, switch it off immediately and unplug it from the power outlet (if
applicable). Only authorized, qualified personnel should repair the equipment.
- Clean the equipment with a dry cloth.
- Comply with all applicable disposal laws and separate plastic and paper/cardboard
during packaging disposal.
- Keep plastic bags out of the reach of children.
Canales DMX. Modo de 18 Canales
Monster 200 Hybrid
www.audibax.com 1www.audibax.com 16
THIS DOCUMENT MAY BE SUBJECT TO MISPRINTS, ERRORS OR TECHNICAL MODIFICATIONS.
ESTE DOCUMENTO PUEDE ESTAR SUJETO A FALLOS DE IMPRESIÓN, ERRORES O MODIFICACIONES TÉCNICAS
Monster 200 Hybrid
CH
Función
Valor DMX
Detalles
1
Panorámico
0-255
Movimiento panorámico
2
Panorámico Fino
0-255
Panorámico fino
3
Inclinación
0-255
Movimiento de inclinación
4
Inclinación Fino
0-255
Inclinación fina
5
Giro
0-255
Control de velocidad de giro de rápido a lento
6
Atenuador
0-255
Atenuador de oscuro a brillante
7
Estroboscópico
0-3
Sin función
4-99
Estroboscópico de lento a rápido
100-149
Pulso estroboscópico de lento a rápido
150-199
Trueno estroboscópico de lento a rápido
200-249
Estroboscópico aleatorio de rápido a lento
250-255
Luz encendida
8
Rueda de color
0-19
Control lineal de color 1
20-39
Control lineal de color 2
……
………………
160-179
Control lineal de color 9
180-199
Control lineal abierto
200-226
Rotación de la rueda de color en el sentido de las agujas del reloj de
rápido a lento
227-278
Sin función
229-255
Rotación de la rueda de colores en sentido contrario a las agujas del reloj
de lento a rápido
9
Rueda de gobos
estáticos
0-4
Abierto
5-54
10 gobos estáticos (cada valor de 5 DMX es un gobo)
55-154
10 efectos de vibración de gobos estáticos (cada valor de 10 DMX es un
gobo)
155-204
Rotación estática de la rueda de gobos en el sentido de las agujas del
reloj de rápido a lento
205-205
Detener
206-255
Rotación estática de la rueda de gobos en sentido contrario a las agujas
del reloj de lento a rápido
10
Rueda de gobos
de rotación
0-9
Abierto
10-79
7 gobos de rotación (cada valor 10DMX es un gobo)
80-159
7 Gobo+efecto de sacudida abierta (Cada valor de 10 DMX es un gobo)
160-206
Rotación de la rueda de gobos en el sentido de las agujas del reloj de
rápido a lento
207-208
Detener
209-255
Rotación de la rueda de gobos en sentido contrario a las agujas del reloj
de lento a rápido
11
El gobo giratorio
gira
0-127
Rotación de la rueda de gobos en sentido contrario a las agujas del reloj
de lento a rápido
128-191
Rotación continua en el sentido de las agujas del reloj de rápido a lento
192-255
Rotación continua en sentido contrario a las agujas del reloj de lento a
rápido
12
Prisma
0-255
0-127 sin prisma, 128-255 prisma
13
Rotación de
prisma de 4
facetas
0-127
Cambiar de posición
128-190
Rotación continua en sentido horario de rápido a lento
191-192
Detener
193-255
Rotación continua en sentido antihorario de lento a rápido
14
Escarcha
0-255
0-127 sin escarcha, 128-255 efecto escarcha
15
Enfocar
0-255
Enfocar
16
Zoom
0-255
Zoom
17
Efecto marco
0-255
0-10 Sin función, 11-130 es enfoque automático (en enfoque automático,
opere contra la función de zoom, y el enfoque del canal 15 es solo un
control preciso del enfoque) 131-160 Detección del sistema, 161-190 Auto 1
,
191-220 Auto 2, 221-255 Sonido activado
18
Resetear y macro
0-255
0-250 Sin función, 251-255 Restablecimiento en 5 segundos
PRO PRO
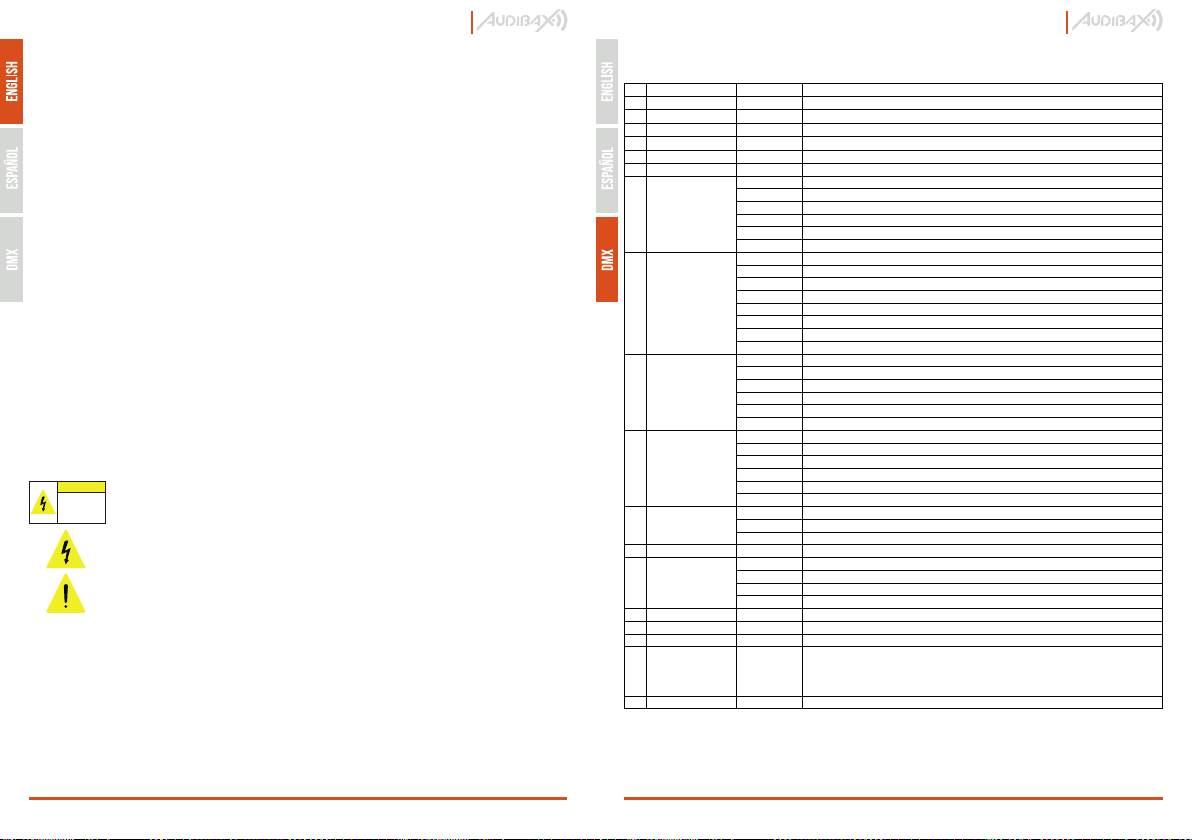
DMX Channels
18 Channel Mode
FOR DEVICES DESIGNED TO BE CONNECTED TO THE MAIN POWER SUPPLY:
- ATTENTION: If your equipment has a power cord with a grounding plug, it must be
connected to a wall outlet with a ground connection. Never remove the grounding plug
from the power cord.
- If your equipment has been exposed to extreme temperature changes, allow it to reach
room temperature before turning it on. Otherwise, moisture and condensation may
damage the equipment.
- Before plugging in the equipment, make sure that the voltage and frequency of the
power outlet match the specifications of the equipment. If the equipment has a voltage
selector, only connect it to the power outlet if the values match. If the power cord or
adapter does not fit your outlet, contact an electrician.
- Do not step on the power cord. Make sure it is not pinched at the outlet, adapter, or
equipment connection.
- Keep the power cord or adapter within reach and disconnect the equipment from the
power supply when not in use or when cleaning it. Always unplug the cord or adapter by
pulling the plug or adapter, not the cord. Never touch the cord or adapter with wet hands.
- Avoid frequently turning the equipment on and off, as this can reduce its useful life.
- IMPORTANT: Only replace fuses with those of the same type and rating. If a fuse
repeatedly blows, contact an authorized service center.
- To completely disconnect the equipment from the power mains, unplug the power cord
or adapter from the outlet.
- If your device has a Volex power connector, the mating Volex connector must be
unlocked before it can be removed. Be careful when laying cables, as the equipment can
slide or fall if the power cord is pulled.
- Unplug the power cord or adapter before an extended period of disuse or in case of
lightning strike risk.
- Only install the equipment when it is disconnected from the power source.
- To prevent damage and overheating, qualified personnel should regularly clean and
service the equipment depending on ambient conditions like dust, nicotine, and fog.
If the product contains the following symbols, please, read carefully:
IMPORTANT INFORMATION
WARNING! IMPORTANT INFORMATION REGARDING LIGHTING PRODUCTS
1. This product is specifically designed for use in event technology and is not intended to
be used as household lighting.
2. It is important to avoid looking directly at the light beam, even for a short period of
time.
3. Optical instruments, such as magnifiers, should not be used to look directly at the
beam.
4. If you are sensitive to strobe effects, it is possible that they could cause an epileptic
seizure. If you have epilepsy, it is important to avoid places where strobe lights are being
used.
www.audibax.com 2 www.audibax.com 15
CAUTION
Risk of Electric
Shock.
Disconnect all
power sources
before servicing
CAUTION: To reduce the risk of electric shock, do not remove cover (or
back). There are no user serviceable parts inside. Maintenance and repairs
should be exclusively carried out by qualified service personnel.
The warning triangle with lightning symbol indicates dangerous
uninsulated voltage inside the unit, which may cause an electrical shock.
The warning triangle with exclamation mark indicates important operating
and maintenance instructions.
Monster 200 Hybrid Monster 200 Hybrid
CH
Function
DMX Value
Details
1
Pan
0-255
Pan movement
2
Pan fine
0-255
Pan fine
3
Tilt
0-255
Tilt movement
4
Tilt fine
0-255
Tilt fine
5
Pan/Tilt
0-255
Pan/Tilt speed control from fast to slow
6
Dimmer
0-255
Dimmer from dark to bright
7
Strobe
0-3
No function
4-99
Strobe from slow to fast
100-149
Pulse strobe from slow to fast
150-199
Thunder strobe from slow to fast
200-249
Random strobe from fast to slow
250-255
Light on
8
Color wheel
0-19
Color 1 linear control
20-39
Color 2 linear control
……
………………
160-179
Color 9 linear control
180-199
Open linear control
200-226
Color wheel colockwise rotation from fast to slow
227-278
No function
229-255
Color wheel anti-clockwise rotation from slow to fast
9
Static gobo
wheel
0-4
Open
5-54
10 Static gobo(Each 5 DMX value is a gobo)
55-154
10 static gobo shake effect(Each 10 DMX value is a gobo)
155-204
Static Gobo wheel colockwise rotation from fast to slow
205-205
Stop
206-255
Static Gobo wheel anti-clockwise rotation from slow to fast
10
Rotation gobo
wheel
0-9
Open
10-79
7 Rotation gobo(Each 10DMX value is a gobo)
80-159
7 Gobo+open shake effect (Each 10 DMX value is a gobo)
160-206
Gobo wheel clockwise rotation from fast to slow
207-208
Stop
209-255
Gobo wheel anti-clockwise rotation from slow to fast
11
Rotaion gobo
rotates
0-127
Change position
128-191
Clockwise continious rotation from fast to slow
192-255
Anti-Clockwise continious rotation from slow to fast
12
Prism
0-255
0-127 no prism, 128-255 prism
13
4 Facet prism
rotation
0-127
Change position
128-190
Clockwise continious rotation from fast to slow
191-192
Stop
193-255
Anti-colokwise continious rotation from slow to fast
14
Frost
0-255
0-127 no frost, 128-255 frost effect
15
Focus
0-255
Focus
16
Zoom
0-255
Zoom
17
Marco effect
0-255
0-10 No function, 11-130 is auto focus(In Auto focus, please operate
against theZoom function, and 15th channel focus is just focus fine
control)131-160 System detection, 161-190 Auto 1, 191-220 Auto 2, 221-255
Sound activated
18
Reset&Macro
0-255
0-250 No function, 251-255 Reset within 5 seconds
PRO PRO
Monster 200 Hybrid
www.audibax.com 3www.audibax.com 14
PACKAGE CONTENT
- 1 x Monster 200 Hybrid
- 1 x User manual
- 1 x Power cord
- 1 x Signal line
- 2 x Omega mounting bracket
PRODUCT DESCRIPTION
• Voltage: AC100-240V,50-60Hz
• Power: 300W
• Led source: 200W White LED
• Color Temperature: 7500K
• Led Life Time: Avereage 50000 Hours
• Channel: 18 DMX channel
• Control: DMX/Master-slav/Auto/Sound activated
• Pan: 540 degree + fine
• Tilt: 270 degree + fine
• Zoom range: 7-21°
• Dimmer: 0-100% smooth linear dimmer
• Strobe: 1-25 Hz with pulse effect
• Color Wheel: 9 colors + open, with half color effect
• Static Gobo Wheel: 10 gobos + open
• Rotation gobo wheel: 7 gobos+open
• Prism: 4 facet prism with bi-direction rotating
• Frost: With frost effect
• Screen: LCD screen, can adjust 180 degree to fit different installation positions
• Size of Dimension:343*239*537 mm
• Packing Dimension: 59*45*45 cm
• Net Weight: 14.5 kg
• Gross Weight: 17.8kg
MOUNTING AND INSTALLATION
Cautions: For added protection mount the fixtures in areas outside walking paths, seating
areas, or in areas were the fixture might be reached by unauthorized personnel. Before
mounting the fixture to any surface, make sure that the installation area can hold a
minimum point load of 10 times the device’s weight.
Fixture installation must always be secured with a secondary safety attachment, such as
an appropriate safety cable.
Never stand directly below the device when mounting, removing, or servicing the fixture
from a periodic safety inspection of all installation material and the fixture. If you lack
these qualifications, do not attempt the installation yourself. Improper installation can
result in bodily injury.
Be sure to complete all rigging and installation procedures before connecting the main
power cord to the appropriate wall outlet.
Monster 200 Hybrid
Embalaje:
1. El embalaje puede ser reciclado utilizando métodos de eliminación
estándar y reintroducido en el ciclo de materiales reutilizables.
2. Por favor, sigue las leyes y regulaciones relativas a la eliminación y el
reciclaje del empaque en tu país.
Dispositivo:
1. Este dispositivo está sujeto a la Directiva de Residuos de Equipos
Eléctricos y Electrónicos (WEEE) de la Unión Europea. Los aparatos
electrónicos usados no deben ser eliminados con los residuos domésticos.
Los dispositivos usados deben ser eliminados a través de una empresa de
eliminación aprobada o una instalación de eliminación municipal. Por favor,
cumple con las regulaciones aplicables en tu país.
2. Por favor, sigue todas las leyes y regulaciones de eliminación en tu país.
3. Como cliente, puedes obtener información sobre opciones de eliminación
respetuosas con el medio ambiente del vendedor del producto o las
autoridades regionales apropiadas.
RECICLAJE
PRO PRO

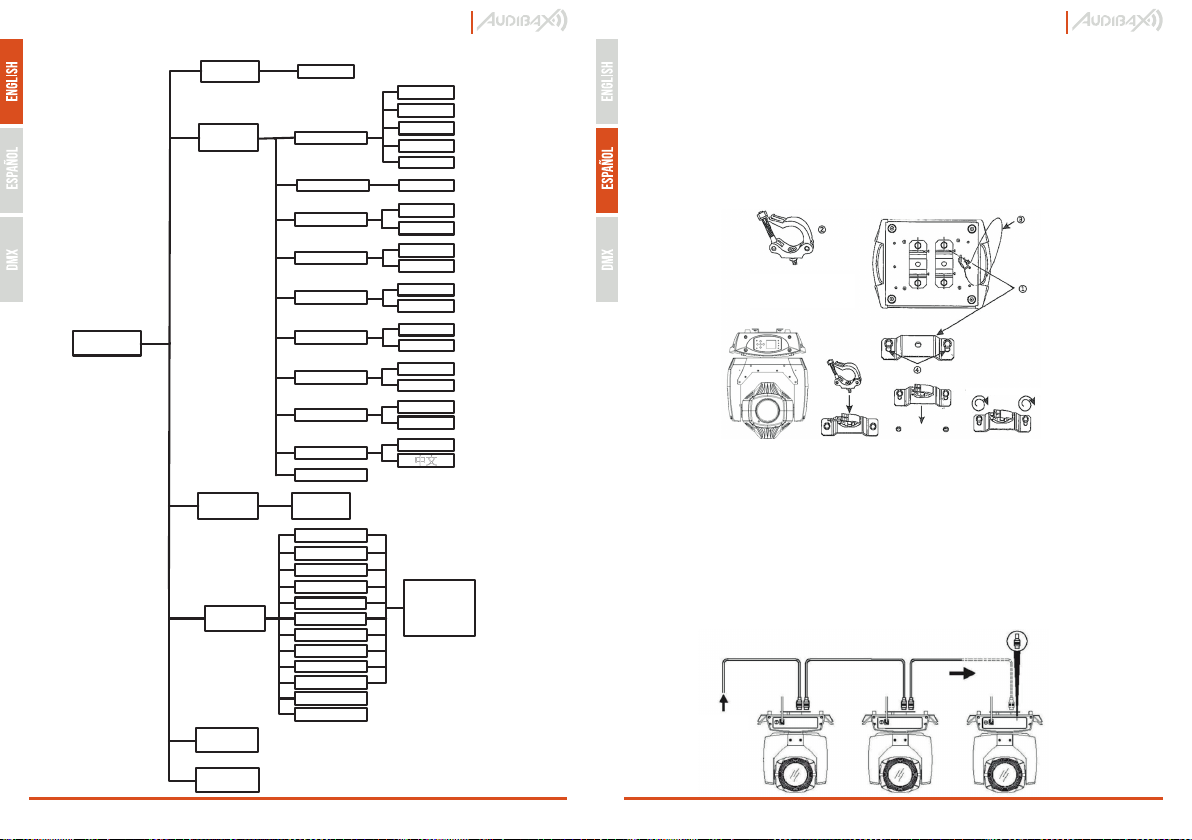
DMX 512
1. Omega Bracket
2. Safety Clamp
3. Safety Cable
4. 1/4 Turn Quick-Lock Fasioners
Turn aroundTurn around
Regardless of the rigging option you choose for your 200W LED spot, always be sure to
secure your fixture with a safety cable. The fixture provides a built-in rigging point for a
safety cable on the hanging bracket as illustrated above. Be sure to only use the
designated rigging point for the safety cable and never secure a safety cable to a carrying
handle.
DMX-512 CONTROL CONNECTIONS
Connect the provided XLR cable to the female 3-pin XLR output of your controller and the
other side to the male 3-pin XLR input of the moving head. You can chain multiple
Moving heads be connected together through serial linking. The cable needed should be
two core, screened cable with XLR input and output connectors. Please refer to the
diagram below.
DMX-512 connection with DMX terminator
Clamp Mounting: The beam spot wash 3-in-1 provides a unique mounting bracket
assembly that integrates the bottom of the base, the included “Omega Bracket,” and the
safety cable rigging point in one unit (see the illustration below). When mounting this
fixture to truss be sure to secure an appropriately rated clamp to the included omega
bracket using a M10 screw fitted through the center hole of the “omega bracket”. As an
added safety measure be sure to attached at least one properly rated safety cable to the
fixture using on of the safety cable rigging point integrated in the base assembly
www.audibax.com 4 www.audibax.com 13
Monster 200 Hybrid Monster 200 Hybrid
CONTROL DEL MENÚ DE LA PANTALLA
MENU
System
Setup Run Mode
DMX
Address
Channel mode
Invert Pan
Invert Tilt
Motor
Calibration
DMX
Sound
Auto 1
Auto 2
Auto 3
001-512
18CH
OFF
ON
OFF
Pan-Tilt Swap OFF
ON
Encoder ON
OFF
No Singal Keep
Clean
Screen Saver On
Off
Language EN
中文
Load Default
Check
Colour
Static Gobo
Rotate Gobo
Gobo Rot
System
Test
System
Info
Don’t change
the data
unless it’s
necessary
ON
Prism
Frost
TILT
PAN
Zoom
Focus
Manual
Drive
MIC
Change code
PRO PRO

DMX Output
3-Pin XLR
Socket
DMX Input
3-Pin XLR
Socket
DMX IN DMX OUT
2=DMX”-”
3=DMX”+”
1: Ground
2: Data (-)
3: Data (+)
25200
lux@4m
11600
lux@6m
6500
lux@8m 7° Beam
Angle
Monster 200 Hybrid
www.audibax.com 5www.audibax.com 12
Monster 200 Hybrid
For installations where the DMX cable has to run a long distance or is in an electrically
noisy environment, such as in a discotheque, it is recommended to use a DMX terminator.
This helps in preventing corruption of the digital control signal by electrical noise. The
DMX terminator is simply an XLR plug with a 120 Ω resistor connected between pins 2
and 3,which is then plugged into the output XLR socket of the last fixture in the chain.
Please see illustrations below.
PHOTOMETRIC DATA
LUX Data of 7 degree beam angle:
LUX Data of 21 degree beam angle:
DATOS FOTOMÉTRICOS
Datos LUX de ángulo de haz de 7 grados:
25200
lux@4m
11600
lux@6m
6500
lux@8m Ángulo de
haz de 7°
Datos LUX de ángulo de haz de 21 grados:
3260
lux@4m
1530
lux@6m
860
lux@8m
Ángulo de
haz de 21°
3260
lux@4m
1530
lux@6m
860
lux@8m
21° Beam
Angle
Enchufe XLR de
3 pines de salida
DMX
Enchufe XLR de
3 pines de
entrada DMX
ENTRADA
DMX
SALIDA
DMX
2=DMX”-”
3=DMX”+”
1=GND
1: Tierra
2: Datos (-)
3: Datos (+)
Para instalaciones en las que el cable DMX tiene que recorrer una gran distancia o se
encuentra en un entorno eléctricamente ruidoso, como en una discoteca, se recomienda
utilizar un terminador DMX. Esto ayuda a prevenir la corrupción de la señal de control
digital por ruido eléctrico. El terminador DMX es simplemente un conector XLR con una
resistencia de 120 Ω conectada entre los pines 2 y 3, que luego se conecta al conector XLR
de salida del último dispositivo de la cadena. Consulte las ilustraciones a continuación.
120
Pin 3
Pin 2
2
1
3
120
Pin 3
Pin 2
2
1
3
PRO PRO
Independientemente de la opción de montaje que elija para su foco LED de 200 W,
asegúrese siempre de asegurar su dispositivo con un cable de seguridad. El accesorio
proporciona un punto de montaje integrado para un cable de seguridad en el soporte
colgante como se ilustra arriba. Asegúrese de usar solo el punto de suspensión designado
para el cable de seguridad y nunca asegure un cable de seguridad a un asa de transporte.
CONEXIONES DE CONTROL DMX-512
Conecte el cable XLR provisto a la salida XLR hembra de 3 pines de su controlador y el
otro lado a la entrada XLR macho de 3 pines del cabezal móvil. Puede encadenar varias
cabezas móviles conectadas entre sí a través de enlaces en serie. El cable necesario debe
ser un cable apantallado de dos núcleos con conectores de entrada y salida XLR. Por
favor, consulte el diagrama a continuación.
Conexión DMX-512 con terminador DMX
Asegúrese de completar todos los procedimientos de montaje e instalación antes de
conectar el cable de alimentación principal al tomacorriente de pared apropiado.
Montaje con abrazadera: El beam spot wash 3-in-1 proporciona un conjunto de soporte de
montaje exclusivo que integra la parte inferior de la base, el "soporte Omega" incluido y el
punto de montaje del cable de seguridad en una sola unidad (consulte la ilustración a
continuación). Cuando monte este accesorio en un truss, asegúrese de asegurar una
abrazadera de clasificación adecuada al soporte omega incluido usando un tornillo M10
colocado a través del orificio central del "soporte omega". Como medida de seguridad
adicional, asegúrese de conectar al menos un cable de seguridad con la clasificación
adecuada al accesorio utilizando uno de los puntos de montaje del cable de seguridad
integrado en el ensamblaje de la base.
www.audibax.com 6 www.audibax.com 11
Monster 200 Hybrid Monster 200 Hybrid
DISPLAY MENU CONTROL
1. Soporte Omega
2. Abrazadera de seguridad
3. Cable de seguridad
4. Fasioners de bloqueo rápido de
1/4 de vuelta
Dar vueltaDar vuelta
MENU
System
Setup Run Mode
DMX
Address
Channel mode
Invert Pan
Invert Tilt
Motor
Calibration
DMX
Sound
Auto 1
Auto 2
Auto 3
001-512
18CH
OFF
ON
OFF
Pan-Tilt Swap OFF
ON
Encoder ON
OFF
No Singal Keep
Clean
Screen Saver On
Off
Language EN
中文
Load Default
Check
Colour
Static Gobo
Rotate Gobo
Gobo Rot
System
Test
System
Info
Don’t change
the data
unless it’s
necessary
ON
Prism
Frost
TILT
PAN
Zoom
Focus
Manual
Drive
MIC
Change code
PRO PRO

3. No se deben utilizar instrumentos ópticos, como lupas, para mirar directamente al haz.
4. Si es sensible a los efectos estroboscópicos, es posible que le provoquen un ataque
epiléptico. Si tiene epilepsia, es importante evitar los lugares donde se usan luces
estroboscópicas.
CONTENIDO DEL PAQUETE
- 1 x Monster 200 Hybrid
- 1 manual de usuario
- 1 cable de alimentación
- 1 línea de señal
- 2 soportes de montaje Omega
DESCRIPCIÓN DEL PRODUCTO
• Voltaje: AC100-240V, 50-60Hz
• Potencia: 300W
• Fuente led: 200W LED blanco
• Temperatura de color: 7500K
• Tiempo de vida del LED: Promedio de 50000 horas
• Canal: 18 canales DMX
• Control: DMX/Maestro-esclavo/Auto/Activado por sonido
• Panorámica: 540 grados + fino
• Inclinación: 270 grados + fina
• Rango de acercamiento: 7-21°
• Atenuador: 0-100% atenuador lineal suave
• Estroboscópico: 1-25 Hz con efecto de pulso
• Rueda de color: 9 colores + abierto, con efecto de medio color
• Rueda de gobos estáticos: 10 gobos + abierto
• Rueda de gobos de rotación: 7 gobos+abierto
• Prisma: prisma de 4 facetas con rotación bidireccional
• Escarcha: Con efecto escarcha
• Pantalla: pantalla LCD, se puede ajustar 180 grados para adaptarse a diferentes
posiciones de instalación
• Tamaño de la dimensión: 343*239*537mm
• Dimensiones del embalaje: 59*45*45 cm
• Peso neto: 14,5 kg
• Peso bruto: 17,8 kg
MONTAJE E INSTALACIÓN
Precauciones: Para mayor protección, monte las lámparas en áreas fuera de los senderos
para caminar, áreas para sentarse o en áreas donde personal no autorizado pueda
alcanzar la lámpara. Antes de montar el accesorio en cualquier superficie, asegúrese de
que el área de instalación pueda soportar una carga puntual mínima de 10 veces el peso
del dispositivo. La instalación del accesorio siempre debe asegurarse con un accesorio de
seguridad secundario, como un cable de seguridad adecuado.
Nunca se pare directamente debajo del dispositivo cuando monte, retire o realice el
mantenimiento de la lámpara de una inspección de seguridad periódica de todo el
material de instalación y la lámpara. Si carece de estas calificaciones, no intente realizar la
instalación usted mismo. La instalación incorrecta puede resultar en lesiones corporales.
Packaging:
1. The packaging can be recycled using standard disposal methods and
reintroduced into the reusable material cycle.
2. Please follow the laws and regulations regarding disposal and recycling of
packaging in your country.
Device:
1. This device is subject to the Waste Electrical and Electronic Equipment
(WEEE) Directive of the European Union. Used appliances should not be
disposed of with household waste. Used device must be disposed of
through an approved disposal company or a municipal disposal facility.
Please comply with the applicable regulations in your country.
2. Please follow all the disposal laws and regulations in your country.
3. As a customer, you can obtain information on environmentally-friendly
disposal options from the product seller or the appropriate regional
authorities.
DISPOSAL
Monster 200 Hybrid
www.audibax.com 7www.audibax.com 10
Monster 200 Hybrid PRO PRO
PARA DISPOSITIVOS DISEÑADOS PARA SER CONECTADOS A LA FUENTE DE
ALIMENTACIÓN PRINCIPAL:
- ATENCIÓN: Si su equipo tiene un cable de alimentación con un enchufe con conexión a
tierra, debe conectarse a un tomacorriente de pared con conexión a tierra. Nunca retire el
enchufe de conexión a tierra del cable de alimentación.
- Si su equipo ha estado expuesto a cambios extremos de temperatura, permita que
alcance la temperatura ambiente antes de encenderlo. De lo contrario, la humedad y la
condensación pueden dañar el equipo.
- Antes de enchufar el equipo, asegúrese de que el voltaje y la frecuencia del tomacorrien�
te coincidan con las especificaciones del equipo. Si el equipo dispone de selector de
tensión, sólo conéctelo a la toma de corriente si los valores coinciden. Si el cable de
alimentación o el adaptador no se ajustan a su toma de corriente, comuníquese con un
electricista.
- No pise el cable de alimentación. Asegúrese de que no esté pellizcado en la toma de
corriente, el adaptador o la conexión del equipo.
- Mantenga el cable de alimentación o el adaptador al alcance de la mano y desconecte
el equipo de la fuente de alimentación cuando no esté en uso o cuando lo esté limpiando.
Desenchufe siempre el cable o el adaptador tirando del enchufe o del adaptador, no del
cable. Nunca toque el cable o el adaptador con las manos mojadas.
- Evite encender y apagar el equipo con frecuencia, ya que esto puede reducir su vida útil.
- IMPORTANTE: Solo reemplace los fusibles con aquellos del mismo tipo y clasificación. Si
un fusible se quema repetidamente, comuníquese con un centro de servicio autorizado.
- Para desconectar completamente el equipo de la red eléctrica, desenchufe el cable de
alimentación o el adaptador de la toma de corriente.
- Si su dispositivo tiene un conector de alimentación Volex, el conector Volex correspon�
diente debe desbloquearse antes de poder retirarlo. Tenga cuidado al tender los cables,
ya que el equipo puede deslizarse o caerse si se tira del cable de alimentación.
- Desenchufe el cable de alimentación o el adaptador antes de un período prolongado de
desuso o en caso de riesgo de caída de rayos.
- Instale el equipo únicamente cuando esté desconectado de la fuente de alimentación.
- Para evitar daños y sobrecalentamiento, el personal calificado debe limpiar y reparar el
equipo con regularidad según las condiciones ambientales, como polvo, nicotina y niebla.
Si el producto contiene los siguientes símbolos, lea atentamente:
www.audibax.com 8 www.audibax.com 9
Monster 200 Hybrid Monster 200 Hybrid
BIENVENIDO A AUDIBAX
Muchas gracias por elegir Audibax. Esperamos que disfrute de su nuevo producto. Ha
sido desarrollado y diseñado cuidando hasta el más mínimo detalle, con un control de
calidad con estándares europeos supervisado por nuestro gran equipo de técnicos
profesionales, que trabajan día a día para ofrecer a nuestros clientes la mejor calidad.
Nos aseguramos de que cada producto Audibax esté diseñado para durar mucho
tiempo. Todas nuestras referencias están fabricadas con materiales de larga duración y
nuestros especialistas se dedican a realizar constantemente controles de calidad para
garantizar el mejor resultado.
Lea atentamente este manual para utilizar su producto Audibax de la mejor manera.
No dudes en visitar nuestra web para más información: www.audibax.com
INSTRUCCIONES DE SEGURIDAD
INFORMACIÓN GENERAL
- Es importante leer y seguir las instrucciones cuidadosamente.
- Guarde toda la información y las instrucciones en un lugar seguro.
- Siga siempre las instrucciones proporcionadas.
- Tome nota de todas las advertencias de seguridad y nunca las quite del equipo.
- Utilice el equipo únicamente según lo previsto y para el fin previsto.
- Asegúrese de que los soportes y/o soportes utilizados sean lo suficientemente estables y
compatibles para instalaciones fijas. Los soportes de pared deben asegurarse correcta-
mente, y el equipo debe instalarse de forma segura para evitar caídas.
- Al instalar el equipo, asegúrese de observar las normas de seguridad pertinentes de su
país.
- No instale ni utilice el equipo cerca de fuentes de calor, como radiadores, rejillas de calor
u hornos, y asegúrese de que siempre se enfríe lo suficiente y no se sobrecaliente.
- No coloque fuentes de ignición, como velas encendidas, sobre el equipo.
- Mantenga las ranuras de ventilación despejadas.
- Equipos diseñados solo para uso en interiores y no debe usarse cerca de agua,
materiales infamables, líquidos o gases. Se debe usar para exteriores de acuerdo con las
instrucciones del fabricante.
- Asegúrese de que no entren gotas o salpicaduras de agua en el equipo y no coloque
recipientes llenos de líquidos sobre el equipo.
- Evite que caigan objetos dentro del equipo.
- Utilice el equipo únicamente con los accesorios recomendados por el fabricante.
- No intente abrir o modificar el equipo.
- Verifique todos los cables después de conectar el equipo para evitar accidentes o daños
debido a riesgos de tropiezos.
- Durante el transporte, tome medidas para evitar que el equipo se caiga y cause daños o
lesiones.
- Si el equipo no funciona correctamente, se han metido líquidos u objetos en su interior
o está dañado, apáguelo inmediatamente y desenchúfelo de la toma de corriente (si
corresponde). Solo personal autorizado y cualificado debe reparar el equipo.
- Limpie el equipo con un paño seco.
- Cumpla con todas las leyes de eliminación aplicables y separe el plástico y el papel/car-
tón durante la eliminación del embalaje.
- Mantenga las bolsas de plástico fuera del alcance de los niños
INFORMACIÓN IMPORTANTE
¡ADVERTENCIA! INFORMACIÓN IMPORTANTE SOBRE PRODUCTOS DE ILUMINACIÓN
1. Este producto está diseñado específicamente para su uso en tecnología de eventos y no
está diseñado para usarse como iluminación doméstica.
2. Es importante evitar mirar directamente al haz de luz, incluso durante un breve período
de tiempo.
PRECAUCIÓN: Para reducir el riesgo de descarga eléctrica, no retire la tapa
(o la parte trasera). No hay partes reparables por el usuario adentro. El
mantenimiento y las reparaciones deben ser realizados exclusivamente por
personal de servicio cualificado.
El triángulo de advertencia con el símbolo de un rayo indica un voltaje no
aislado peligroso dentro de la unidad, que puede causar una descarga
eléctrica.
El triángulo de advertencia con signo de exclamación indica instrucciones
importantes de operación y mantenimiento.
CAUTION
Risk of Electric
Shock.
Disconnect all
power sources
before servicing
PRO PRO
Table of contents
Other Audibax Light Fixture manuals


