Audio Analogue Maestro User manual

AUDIO ANALOGUE
maestro
CD PLAYER 192/24 DAC
SPECIAL EDITION
OWNER’S MANUAL
MANUALE D’ISTRUZIONI
Manual rev1 0
All manuals and user guides at all-guides.com
all-guides.com

2
All manuals and user guides at all-guides.com

3
Dear Audiophile,
congratulations and thank you for choosing the Maestro CD Player 192/24 DAC SE You’re now the owner of a unit that
establishes a new reference point in the category of high-quality and high-versatility stereophonic products
The Maestro CD reduces Jitter problems thanks to an innovative technology developed by Aud o Analogue The
technology is based on a discrete component PLL used to lock the digital signal The whole chain can deliver up to a 192KHz/24bit
digital signal The output utilises a never released before “fully differential” stage that has been configured in a highly particular
manner with the result of extremely low output noise
The excellence of the CD player is completed by a high number of possible settings, which allow the user to choose the many
parameters involved in digital to analog conversion (such as the sample frequency)
The Maestro CD Player 192/24 DAC SE also has a digital input which permits you to use the CD player like a digital to
analogue converter as well In this use the Maestro CD Player 192/24 DAC SE can accept a SPDIF digital audio signal
with a sample frequency of up to 192Khz
The Maestro CD Player 192/24 DAC SE provides zero-compromise circuitry solutions and features capable of satisfying
advanced users’ demands The Maestro CD Player 192/24 DAC SE solutions make the unit a valuable and durable
investment
Caro Audiofilo,
congratulazioni e grazie per aver scelto il
Maestro CD Player 192/24 DAC SE
. Siete ora in possesso di un apparecchio
che stabilisce il nuovo riferimento nella categoria di prodotti stereo caratterizzati da una eccezionale qualità e versatilità.
Il
Maestro CD Player 192/24 DAC SE
riduce i problemi legati al jitter grazie ad una tecnologia innovativa, sviluppata
interamente da
Aud o Analogue
basata su un P a componenti discreti che viene utilizzato per agganciare il segnale
digitale. ’intera catena può arrivare fino a 192KHz/24 bit e lo stadio di uscita utilizza una particolare configurazione” fully
differential”, inedita, a bassissimo rumore di uscita.
Completano l’eccellenza del lettore: l’estrema configurabilità, che permette all’utente di settare numerosi parametri della conversione
(quali ad esempio la frequenza di campionamento) e l’ingresso digitale, grazie al quale si può utilizzare il lettore anche come
convertitore DA per sorgenti a frequenza di campionamento fino a 192KHz.
Il
Maestro CD Player 192/24 DAC SE
associa soluzioni circuitali senza compromessi con caratteristiche funzionali tali
da soddisfare anche l’utente più esigente. e soluzioni adottate rendono il
Maestro CD player 192/24 DAC SE
un
investimento di pregio, durevole nel tempo.
All manuals and user guides at all-guides.com

4
All manuals and user guides at all-guides.com

5
INTRODUCTION
AUDIO ANALOGUE does not take any responsibility in the following cases:
Whenever the operational procedures related to the use and the maintenance of the equipment as described in this manual are not
respected
Whenever damages to the equipment occur because of fixing and modifications made form non-authorized staff or because of
normal deterioration of the system
No part of this manual can be reproduced by any means, transmitted or copied for private or public use without private authorization
from AUDIO ANALOGUE
The information contained in this manual is related to the data kept by AUDIO ANALOGUE at the moment of the issue of this
publication; AUDIO ANALOGUE has the right to make changes to this document without prior notice
The equipment has been projected and manufactured according to the Regulations of the Community 89/336/CEE and is marked CE
This equipment can’t be used for different purposes other than those for which it has been manufactured
AUDIO ANALOGUE does not take any responsibility for accidents or damage due to improper use of the equipment
WARNING
Please respect the safety standards contained in this manual before starting to operate the equipment
Do not open the equipment No further interventions than those described in this manual should be made For technical assistance,
please consult a qualified technician or an AUDIO ANALOGUE dealer
Not respecting the instructions contained in this manual will invalidate the terms and conditions of the guarantee
NECESSARY PRECAUTIONS FOR SAFETY AND MAINTENANCE
ATTENTION: before starting any operation, use or maintenance of the equipment it is strictly necessary to understand the following
manual
To avoid any accidents or hazards it is necessary to follow the following regulations
Activate the equipment only prior checking if the installation has been properly made, and if it is related to the instructions contained
in this manual
Avoid installing the equipment in places subjected to extremely high temperatures or humidity
Check that the labels containing information about safety are always visible and in good condition
Ensure not to obstruct ventilation, to avoid excessive overheating The equipment should be kept at a minimal distance of 15 cm
from any object and not be placed on carpet or other soft surfaces Also the installation close to radiators or in close environments
without ventilation should be avoided
Do not switch on the equipment until it has not been correctly and completely installed
Only supply the equipment with the kind of the electric supply as stated on the appropriate label If in doubt about the kind of supply
available, please consult an expert technician for technical assistance
The equipment needs to be wired to an earth terminal The external case is metal made; a defective connection with the earth may
be dangerous
In case damage occurs to the supply cable, it should be immediately replaced with the same kind of cable This operation should be
only made prior to disconnecting the main supply
Do not place objects on the supply cable and check that this is not positioned in a walkway The cable should not be knotted or curly
Replace the fuses always with others of the same kind
Do not use the equipment close to water or other liquids If liquid has entered the equipment, the plug should be disconnected from
the socket while avoiding touching the metal parts Competent technical staff should be asked to check the equipment before
operating it again
Do not place recipients containing liquids on the equipment - even when it is switched off
Keep the equipment far from sources of heat such as sunlight, kitchens, radiators etc…
Always unplug the supply cable during rainy weather
Always Switch off and unplug the supply cable before cleaning the equipment externally : this operation should be made using a dry
and soft cloth Never use alcohol based cleaning material
If the amplifier was carried from an extremely cold environment to and extremely hot one, it could create internal condensation,
causing possible malfunction
If this occurs, please wait for at least an hour before using it again, to allow it to gradually reach room temperature
When not used for long periods, please unplug the equipment
INSTRUCTIONS TO PUT IT OUT OF SERVICE
Consult qualified staff
Follow the regulations of the current legislation regarding recycling and waste disposal
All manuals and user guides at all-guides.com

6
PREMESSA
AUDIO ANA OGUE non accetta responsabilità nei casi in cui:
e procedure operative di utilizzo e manutenzione dell’apparato descritte nel manuale non siano rispettate.
I danni si verifichino in seguito a riparazioni o modifiche dell’apparato eseguite da personale non autorizzato o a seguito di normale
deterioramento dell’apparato.
Nessuna parte del presente manuale può essere riprodotta con alcun mezzo, trasmessa o copiata per usi pubblici e/o privati senza
la previa autorizzazione di AUDIO ANA OGUE. e informazioni contenute nel presente manuale sono relative ai dati in possesso di
AUDIO ANA OGUE al momento della pubblicazione; AUDIO ANA OGUE si riserva il diritto di apportare cambiamenti al presente
documento senza alcun preavviso.
’apparato è progettato e realizzato in conformità alle Direttive Comunitarie 89/336/CEE e 72/23/CEE e risulta marcato CE.
’apparato non può essere utilizzato per scopi diversi da quelli per cui è stato progettato.
AUDIO ANA OGUE non si assume alcuna responsabilità per incidenti o danni causati da un utilizzo improprio dell’apparato.
AVVERTENZA
Prima di compiere qualunque operazione attenersi alle norme di sicurezza contenute all’interno del manuale
Non aprire l’apparecchio. Nessun ulteriore intervento oltre a quelli descritti in questo manuale dovrebbe essere effettuato. Per
l’assistenza tecnica, rivolgersi a un tecnico qualificato o a un rivenditore AUDIO ANA OGUE.
Il mancato rispetto delle prescrizioni del seguente manuale implica il decadimento della garanzia.
PRECAUZIONI PER A SICUREZZA E MANUTENZIONE
ATTENZIONE: prima dell’utilizzo o manutenzione dell’apparato o di qualsiasi operazione sullo stesso è necessario prendere visione
del seguente manuale.
Al fine di prevenire ogni pericolo di incidente si impongono le seguenti prescrizioni:
Attivare l’apparato solo dopo aver verificato l’adeguatezza dell’installazione e la conformità alle indicazioni contenute nel presente
manuale.
Non installare l’apparecchiatura in luoghi soggetti a sbalzi eccessivi di temperatura e umidità.
Verificare che le etichette contenenti informazioni sulla sicurezza siano sempre ben visibili ed in buono stato.
e fessure di ventilazione non devono assolutamente essere ostruite per evitare surriscaldamento dell’apparato. A tal fine,
posizionare l’unità ad una distanza minima di 15 cm da ogni altro ostacolo e non su tappeti, moquette o altre superfici morbide.
Evitare inoltre di installarlo nei pressi di caloriferi o in ambienti chiusi, privi di una appropriata ventilazione.
Non accendere l’apparato finché non è completamente installato in maniera corretta.
Alimentare l’apparato con il tipo di alimentazione elettrica riportato sull’apposita targhetta. In caso di dubbi sul tipo di alimentazione
disponibile, consultare il servizio di assistenza tecnica.
’apparecchio deve essere sempre collegato a terra. Poiché l’involucro è costituito in metallo, una connessione di terra difettosa o
mancante potrebbe essere pericolosa.
In caso di danneggiamenti al cavo di alimentazione, provvedere immediatamente alla sostituzione con un altro dello stesso tipo.
Questa operazione deve essere effettuata dopo aver disconnesso l’alimentazione primaria.
Non posizionare oggetti sul cavo di alimentazione e verificare che questo non si trovi in una zona di passaggio. Il cavo non deve
essere arrotolato o annodato.
Sostituire i fusibili sempre con altri dello stesso tipo.
Non usare l’apparato in prossimità di acqua o altri tipi di liquidi. Se nell’unità dovesse entrare del liquido, scollegare immediatamente
il cavo di rete dalla presa a muro evitando di toccare le parti metalliche dell’apparecchiatura e rivolgersi al personale tecnico per un
controllo prima del riutilizzo.
Non appoggiare recipienti contenenti liquidi di qualsivoglia natura sopra l’apparato. Anche quando questo è spento.
Tenete l’apparecchio lontano da fonti di calore come la luce solare, cucine, radiatori, etc…
Scollegare sempre il cavo di alimentazione dalla presa durante i temporali.
Spegnere e scollegare sempre l’alimentazione prima di effettuare la pulizia esterna dell’apparato: questa operazione deve essere
effettuata utilizzando un panno asciutto e morbido. Non usare mai solventi o detergenti a base di alcool.
Se l’amplificatore viene trasportato da un ambiente freddo ad un altro caldo, si potrebbe formare condensa al suo interno, causando
possibili malfunzionamenti. Se ciò si dovesse verificare, si prega di attendere almeno un’ora prima dell’uso in modo da permettergli
di raggiungere la temperatura ambiente gradualmente.
In caso di lunghi periodi di inutilizzo, staccare la spina dalla presa di rete.
ISTRUZIONI PER A MESSA FUORI SERVIZIO
Rivolgersi a personale specializzato.
Seguire le prescrizioni della corrente legislazione in materia di riciclaggio e smaltimento dei rifiuti.
All manuals and user guides at all-guides.com
all-guides.com

7
Features
High performance power supply with two transformers (one of which toroidal) and eight different voltage regulation sections
High-performance 192KHz/24bit D/A converter The Over-Sampling of the DAC is present in all configurations and allows the use of
low slope filters
Low-jitter, sample-rate converter
PLL implemented by discrete components
Analogical circuits implemented by discrete components
Highest-quality passive components: lowest-tolerance metallic-layered resistors (MIL standard),
Low-tolerance, non-polarized polyester/polypropylene capacitors
High-speed, low-loss, high-capacity electrolytic capacitors and organic-electrolyte, low-capacity electrolytic capacitors
High-contrast VFD graphic display
Microcontroller system control
Caratteristiche costruttive:
Raffinata alimentazione realizzata con due trasformatori dei quali uno toroidale e otto sezioni di regolazione distinte.
Convertitore D/A al altissime prestazioni, 192kHz/24bit, l'Over-Sampling del DAC resta in tutte le configurazioni e consente di usare
filtri a bassa pendenza.
Convertitore di sample rate a basso jitter.
P a componenti discreti.
Circuitazioni analogiche a componenti discreti.
Componenti passivi di elevatissima qualità: resistenze a strato metallico a bassissima tolleranza a norme MI .
Condensatori non polarizzati in poliestere o polipropilene a bassa tolleranza.
Condensatori elettrolitici di elevata capacità a bassa perdita ed elevata velocità e condensatori elettrolitici di bassa capacità ad
elettrolita organico.
Display Grafico VFD ad elevato contrasto e altissima affidabilità.
Gestione di sistema a microcontrollore.
All manuals and user guides at all-guides.com

8
Front panel
1) STANDBY: When pressing this button you wake up the unit from “stand by mode” or enter the unit into “stand by mode”
2) VFD display
3) CD tray
4) IR receiver
5) OPEN: pressing this button opens/closes the CD tray
6) PLAY/PAUSE: pressing this button starts/interrupts the CD playback
7) STOP: pressing this button stops the CD playback
8) PREV: pressing this button during playback moves you to the previous CD track When playback is stopped, by pressing this
button you can choose the CD track from which to resume playback or to run backward through the CD tracks
9) NEXT: pressing this button during playback moves to the next CD track When playback is stopped, by pressing the switch you
can choose the CD track from which to resume playback or to run forward through the CD tracks
10) REW: pressing this button during playback activates fast rewind search
11) FWD: pressing this button during playback activates fast forward search
Descrizione del pannello frontale
1) STANDBY: a pressione di questo tasto determina l’attivazione/disattivazione dello stand-by.
2) Display VFD.
3) Cassetto porta CD.
4) Ricevitore IR.
5) OPEN: a pressione di questo tasto apre o chiude il cassetto porta CD.
6) P AY/PAUSE: a pressione di questo tasto attiva la riproduzione del disco oppure attiva o disattiva la pausa durante la lettura.
7) STOP: a pressione di questo tasto arresta la riproduzione del disco.
8) PREVIOUS: Durante la lettura del CD la pressione di questo pulsante provoca il salto immediato alla traccia precedente a
quella letta in quel momento. Quando il CD è fermo, è possibile utilizzare questo pulsante per decidere da quale traccia iniziare
la riproduzione, o per scorrere in ordine decrescente le tracce presenti nel CD.
9) NEXT: Durante la lettura del CD la pressione di questo pulsante provoca il salto immediato alla traccia successiva a quella letta
in quel momento. Quando il CD è fermo, è possibile utilizzare questo pulsante per decidere da quale traccia iniziare la
riproduzione, o per scorrere in ordine crescente le tracce presenti nel CD.
10) REW: Durante la lettura del CD la pressione di questo pulsante attiva la funzione di indietro veloce.
11) FFW: Durante la lettura del CD la pressione di questo pulsante attiva la funzione di avanti veloce.
1
2
3
4
8
5
10
6
11
7
9
All manuals and user guides at all-guides.com

9
Back panel
1) S/PDIF DIGITAL IN: Digital In connector
2) S/PDIF DIGITAL OUT: Digital Out connector
3) RIGHT OUT: Unbalanced right digital out connector
4) RIGHT BALANCED OUT: Balanced right digital out connector
5) LEFT OUT: Unbalanced left digital out connector
6) LEFT BALANCED OUT: Balanced left digital out connector
7) Main voltage switch
8) IEC standard power inlet: Connect the provided power cord here
9) Fuses: If necessary, replace with others of the same kind (see back panel)
Descrizione del pannello posteriore
1) S/PDIF DIGITA IN. Connettore di ingresso digitale.
2) S/PDIF DIGITA OUT. Connettore di uscita digitale
3) RIGHT OUT. Connettore di uscita analogica sbilanciata right.
4) RIGHT BA ANCED OUT. Connettore di uscita analogica bilanciata right.
5) EFT OUT. Connettore di uscita analogica sbilanciata left.
6) EFT BA ANCED OUT. Connettore di uscita analogica bilanciata left.
7) Interruttore principale.
8) Presa di rete a norma IEC. Collegare il cavo di alimentazione di rete fornito in dotazione.
9) Fusibili. In caso di necessità ripristinare con fusibili dello stesso tipo (come indicato sul pannello posteriore).
1
4
3
2
5
6
9
8
7
All manuals and user guides at all-guides.com

10
Remote control
•
PLAY /
PAUSE
:
By pressing this button, you start CD playback or interrupt/resume
CD playback (pause)
•
STOP /
OPEN
:
By pressing this button, you stop CD playback or open/close CD
tray
•
PREV /
REW
:
By pressing this button during playback, you move to the previous
CD track or, holding it down for a few seconds, activate fast rewind search When
playback is stopped, you may choose the CD track from which to resume playback or
search backward through the CD tracks
•
NEXT /
FFW: By pressing this button during playback, you move to the next CD
track or, holding it down for a few seconds, activate fast forward search When playback
is stopped, you may choose the CD track from which to resume playback or search
forward through the CD tracks
•123456789 (NUMERIC KEYS): According to the functioning state of the CD player
you have two different actions:
- when the CD player is stopped it is possible to select a track pressing the
number of the correspondent song (the unit waits for PLAY to be pressed)
- when the CD player is playing, pressing the number of the desired song it
immediately skips to the indicated track
•TIME / MENU: this switch controls two different functions: if it is pressed while the unit is
playing it controls the TIME functions, while if it is pressed when the unit is in STOP
mode it lets the unit enter into the setup menu and, if the unit is already in SETUP, it lets
it exit the set up mode and go back to normal operation mode
Time function: pressing the switch when the unit is playing permits you to visualize
different track-time information
- the time that is left until the end of the song, modality “end of track” (the
display shows “_” between the indication of the minutes and the seconds)
- the time that is left until the end of the CD, modality “end of disc” (the
display shows “•“ between the indication of the minutes and the seconds)
- The time that has gone by since the beginning of the CD, modality “total
time” (the display shows “ “ between the indication of the minutes and the
seconds)
Menu function: to manage the menu the unit must be in stop mode For details about
the menu refer to the specific part in this manual
•STANDBY CD: By pressing this button, you activate/deactivate standby mode
•RPT (REPEAT) This key has different functions according to the functioning state of the CD player:
- when the CD player is stopped it is possible to choose to repeat a track or the entire disc by pressing the key once or
twice To choose to repeat a track you press the keys PREV and NEXT to select the track to repeat or select the track
directly by its number using the numeric keys on the remote
- when the CD player is playing, pressing this key in two different moments determines the initial instant (A) and final (B) of
an arbitrary section to repeat When this option is active, you can de-activate it by pressing the key again, and the normal
playback of the CD is re-established
- SHUFFLE function (REPEAT MIX), this playing mode is enabled with the unit in STOP state and permits random playback
of the tracks While playing you can randomly change the played track with the switches NEXT and PREV on the front
panel or on the remote
All manuals and user guides at all-guides.com

11
Descrizione del telecomando
•
PLAY /
PAUSE:
a pressione di questo tasto attiva la riproduzione del disco
oppure attiva o disattiva il momentaneo arresto della lettura (pausa) quando il CD è già
in riproduzione.
•
STOP /
OPEN:
a pressione di questo tasto arresta la riproduzione del disco
oppure apre o chiude il cassetto porta CD.
•
PREV /
REW:
Durante la lettura del CD la pressione di questo pulsante provoca il
salto immediato alla traccia precedente a quella letta in quel momento, oppure,
tenendolo premuto per qualche secondo, attiva la funzione di indietro veloce. Quando il
CD è fermo, è possibile utilizzare questo pulsante per decidere da quale traccia iniziare
la riproduzione, o per scorrere in ordine decrescente le tracce presenti nel CD.
•
NEXT /
FFW
:
Durante la lettura del CD la pressione di questo pulsante provoca il
salto immediato alla traccia successiva a quella letta in quel momento, oppure,
tenendolo premuto per qualche secondo, attiva la funzione di avanti veloce. Quando il
CD è fermo, è possibile utilizzare questo pulsante per decidere da quale traccia iniziare
la riproduzione, o per scorrere in ordine crescente le tracce presenti nel CD.
•01234567 9 (TASTI NUMERICI): a seconda dello stato di funzionamento del CD player
si hanno due differenti comportamenti:
- Quando il CD player è in stop è possibile selezionare una traccia digitando il
numero del brano corrispondente, l’apparecchio rimane in attesa del comando di
riproduzione (P AY).
- Quando il CD player è in riproduzione, digitando il numero del brano desiderato
viene effettuato immediatamente il salto alla traccia indicata.
•TIME / MENU: questo tasto ha una doppia funzione, se premuto durante la riproduzione
di un brano seleziona il comando TIME, mentre se premuto quando l’apparecchio è in
modalità STOP attiva la modalità MENU o, se l’apparecchio è già in SETUP, ne
provoca l’uscita e il ritorno alla modalità di normale funzionamento.
Il comando TIME: permette di visualizzare differenti informazioni sul tempo di
esecuzione. e modalità alternative sono:
- il tempo che rimane fino alla fine del brano, modalità “end of track” (sul
display viene visualizzato “_” tra l’indicazione dei minuti e quella dei
secondi).
- il tempo residuo fino alla fine del CD, modalità “end of disc” (sul display
viene visualizzato “•” Tra l’indicazione dei minuti e quella dei secondi).
- il tempo trascorso dall’inizio del CD, modalità “total time” (sul display viene
visualizzato “.” Tra l’indicazione dei minuti e quella dei secondi).
Il comando MENU: per gestire il MENU è necessario che l’apparecchio non sia in
riproduzione ma in modalità stop. (per la descrizione e informazioni sul menu fare
riferimento alle parti specifiche all’interno di questo manuale).
•STANDBY CD:a pressione di questo tasto determina l’attivazione/disattivazione dello stand-by.
•RPT (REPEAT): Questo tasto ha differenti funzioni a seconda dello stato di funzionamento del CD player.
- quando il CD player è in stop è possibile scegliere di ripetere una traccia oppure l’intero disco premendo una o più volte
questo tasto. a scelta della traccia da ripetere si effettua utilizzando i tasti PREV e NEXT oppure digitando direttamente il
numero della traccia utilizzando i tasti numerici da telecomando.
- quando il CD player è in riproduzione, la pressione di questo tasto in due momenti diversi determina l’istante iniziale (A) e
finale (B) di una sezione arbitraria da ripetere. Quando questa opzione è attiva un’ ulteriore pressione del tasto la disattiva,
ripristinando la normale riproduzione del CD.
- funzione SHUFF E (REPEAT MIX), questa modalità di riproduzione viene abilitata con il lettore in stato di stop. Il lettore
riproduce casualmente tutte le tracce presenti sul CD. Durante la lettura tramite NEXT e PREV si può cambiare, sempre in
modo casuale, la traccia in riproduzione.
All manuals and user guides at all-guides.com
all-guides.com

12
Unpacking and checking CD player package
Carefully open the package to avoid damaging the content The package should contain:
•1 Maestro CD Player 192/24 DAC SE
•1 remote controller
•1 power cord
•2 AAA batteries (already placed in the remote controller)
•1 instruction manual
If one of the items listed above is missing, please contact your Aud o Analogue retailer After extracting the smaller items
from the package, pull out the unit carefully Separate the package from the anti-shock expanded-foam protections
Apertura e ispezione dell’imballo
Aprire la scatola di cartone con cautela per non danneggiare il contenuto. ’imballo deve contenere:
•Un
Maestro CD Player 192/24 DAC SE
•Un telecomando
•Un cavo di alimentazione
•Due batterie AAA (già contenute nel telecomando)
•Questo manuale
Se qualcuno degli oggetti sopra elencati dovesse mancare, contattate il Vostro rivenditore
Aud o Analogue
di fiducia.
Dopo avere estratto le parti di minori dimensioni, estrarre con cautela l’apparecchio dall’imballo. Separare l’imballo dalle imbottiture
antiurto in schiuma espansa.
Where to place the Maestro CD Player 192/24 DAC SE
The Maestro CD Player 192/24 DAC SE is a unit that may generate heat Please locate the unit in a well-ventilated
place In particular, you should leave at least 5cm around and above the unit and avoid placing it close to heat sources (radiators,
heaters, amplifiers, television sets)
Scelta del luogo in cui posizionare il
Maestro CD Player 192/24 DAC SE
Il
Maestro CD Player 192/24 DAC SE
è un apparecchio che può generare calore. Per questo motivo è consigliabile
posizionarlo laddove sia garantita una corretta circolazione d’aria. In particolare, è opportuno garantire uno spazio sufficiente attorno
e sopra l’apparecchio (almeno 5cm), ed evitare posizionamenti vicino a fonti di calore (termosifoni o stufe, amplificatori di potenza,
televisori).
Plugging and connecting the Maestro CD Player 192/24 DAC SE
Before connecting the Maestro CD Player 192/24 DAC SE to an amplifier/integrated amplifier, please be sure that
they’re both unplugged from wall outlets First of all, connect the Maestro CD Player 192/24 DAC SE stereo out to your
amplifier/preamplifier, if any Please use only high-quality cables with gold/rhodium-plated connectors At last, plug the power cord
into the Maestro CD Player 192/24 DAC SE inlet and into the wall outlet
Collegamento del
Maestro CD Player 192/24 DAC SE
Prima di collegare il
Maestro CD Player 192/24 DAC SE
all’amplificatore, verificare che tutti gli apparecchi siano
scollegati dalla rete elettrica. Per prima cosa, collegare l’uscita stereo del
Maestro CD Player 192/24 DAC SE
all’ingresso dell’amplificatore o preamplificatore che si desidera utilizzare. Usare solo cavi della migliore qualità, terminati
possibilmente con connettori dorati o rodiati. Infine, collegare il cavo di alimentazione fornito in dotazione al
Maestro CD
Player 192/24 DAC SE
all’apposita vaschetta. a spina del cavo di alimentazione andrà poi collegata ad una presa di rete.
Notes on the Maestro CD Player 192/24 DAC SE power plugging
The Maestro CD Player 192/24 DAC SE has to be plugged into the electric installation grounding link to guarantee
user’s safety and maximize sound quality Actually, the grounding link is the way to eliminate noise and dispersion: that’s why the
power cord has the grounding prong It is preferable not to interrupt the grounding link (for example, with a two-prong adapter) unless
this operation is necessary to avoid further noise and only when the Maestro CD Player 192/24 DAC SE is connected to
a grounded amplifier Aud o Analogue assumes no responsibility for damage or malfunctioning due to incorrect
Maestro CD Player 192/24 DAC SE power plugging
Note sul collegamento del
Maestro CD Player 192/24 DAC SE
alla rete elettrica.
Il
Maestro CD Player 192/24 DAC SE
deve essere collegato alla terra dell’impianto elettrico per garantire la sicurezza
dell’utilizzatore e per massimizzare le prestazioni sonore. Attraverso il collegamento di terra si attua infatti un percorso preferenziale
per i disturbi e le dispersioni. A tale scopo, il cavo di alimentazione è dotato di spina con contatto di terra. E’ preferibile non
interrompere il collegamento di terra (per esempio con un adattatore a due poli) a meno che ciò non sia necessario per garantire
l’immunità ad eventuali disturbi, e sempre che il
Maestro CD Player 192/24 DAC SE
sia collegato ad un amplificatore a
All manuals and user guides at all-guides.com

13
sua volta collegato a terra.
Aud o Analogue
declina ogni responsabilità per eventuali danni o malfunzionamenti dovuti ad
un incorretto collegamento del
Maestro CD Player 192/24 DAC SE
alla presa di rete.
Powering up Maestro CD Player 192/24 DAC SE
When you plug the Maestro CD Player 192/24 DAC SE to the power outlet and turn on the power switch on back panel,
the unit automatically turns on and enters in “STANDBY” mode This is intended to prevent the unit from suddenly turning on after
power interruption When the “STANDBY” button on the front panel or the “STANDBY CD” button on the remote controller is
pressed, the Maestro CD Player 192/24 DAC SE turns on and a presentation message is shown on the display If a CD
is loaded, the display will show CD information Otherwise, a “NO DISC” signal will be shown If nothing happens, please refer to the
troubleshooting section of the present manual It is suggested that you set the unit in STANDBY mode when unused for short
periods of time or turn the unit off, unplugging it from the outlet when unused for long periods of time or during lightning and electric
storms
Accensione del
Maestro CD Player 192/24 DAC SE
Quando si collega la spina del cavo di alimentazione di rete alla presa di corrente, premendo l’interruttore principale posto sul
pannello posteriore, l’apparecchio entra automaticamente in stand-by. Ciò evita che l’apparecchio si accenda automaticamente in
caso di momentanea interruzione dell’erogazione di corrente. Alla pressione del pulsante “STANDBY” sul pannello frontale o
“STANDBY CD” sul telecomando, il
Maestro CD Player 192/24 DAC SE
si accende e il display presenta un messaggio
di presentazione. Dopo qualche secondo viene visualizzata la schermata relativa alle informazioni del disco se esso è presente
all’interno dell’apparecchio, oppure la dicitura “NO DISC”. Qualora ciò non dovesse accadere, consultare la sezione dedicata alla
risoluzione dei problemi. E’ consigliabile tenere l’apparecchio in stand-by quando non lo si utilizza per brevi periodo di tempo e di
spegnerlo, scollegando la spina dalla presa di rete, quando non viene utilizzato per lunghi periodi di tempo e comunque in occasione
di temporali e tempeste elettriche
Standby mode
You can put the Maestro CD Player 192/24 DAC SE in standby mode either by pressing the “STANDBY CD” button on
the remote controller or by pushing the “STANDBY” switch on the front panel When the CD player is in “standby mode”, only the
microcontroller section is powered while the other parts of the circuit are off Therefore reducing power consumption and minimizing
damage risks When the Maestro CD Player 192/24 DAC SE is in “standby mode”, the display on the front panel is also
off To operate the CD player normally, just press the “STANDBY CD” button on the remote controller or the “STANDBY” switch on
the front panel
Stand-by
Il
Maestro CD Player 192/24 DAC SE
può essere posto in stand-by premendo il tasto “STANDBY CD” sul telecomando
oppure “STANDBY” sul pannello frontale. Quando il lettore CD è in stand-by, soltanto la sezione relativa al microcontrollore viene
alimentata, mentre il resto del circuito viene spento. Ciò riduce i consumi e minimizza il rischio di danni. Quando l’apparecchio è in
stand-by anche il display viene spento. Per uscire dallo stand-by è sufficiente agire di nuovo sul tasto “STANDBY CD” del
telecomando o “STANDBY” del pannello frontale.
How to configure the Digital chain
The Maestro CD Player 192/24 DAC SE is a CD player but it can also work as a DAC (Digital to Analog Converter) In
fact it can work using the CD mechanism as a SPDIF digital source, and so working like a CD Player Moreover, it is also possible to
use the Digital Input with a S/PDIF IN and then the Maestro CD Player 192/24 DAC SE works just like a true DAC The
whole chain, from the digital source to the analogue output, is settable It’s possible to select three different modes: DIRECT MODE,
PLL MODE and SRC MODE A description of the different modes is given below For information about how to choose a mode and
about how to set the different parameters of each specific mode and how to choose the digital input, please refer to the section
regarding Menu SETUP
Come configurare la catena digitale
Il
Maestro CD Player 192/24 DAC SE
è un lettore CD ma può anche funzionare da DAC (Digital to Analog Converter),
può infatti lavorare utilizzando come sorgente SPDIF digitale la meccanica CD, operando in tal caso da lettore CD Player oppure è
possibile selezionare l’ingresso digitale SPDIF e in tal caso il Maestro CD Player 192/24 DAC SE opera a tutti gli effetti
come un DAC. a sua catena digitale, dalla sorgente digitale all’uscita analogica, è totalmente configurabile. E’ possibile infatti
selezionare fra 3 diverse modalità di funzionamento: modalità DIRETTA, modalità P e modalità SRC. Di seguito è data
descrizione delle varie modalità, per informazioni su come scegliere la modalità, su come settare i parametri di ciascuna modalità e
su come selezionare l’ingresso digitale si faccia riferimento alla sezione nella quale vengono descritte le varie voci del Menù SETUP.
Note: in the picture below a schematic of the signal chain from the input to the DAC is given There are two available SPDIF signals
for the audio chain The SPDIF coming from the CD Mechanism which is selected when the unit works as a CD Player and the digital
signal coming from the SPDIF IN input which is selected when the unit works as a DA converter To select the digital input for the
signal path see further details in the Menu SETUP description section In the picture, the square indicated as “S/PDIF RX”
All manuals and user guides at all-guides.com
14
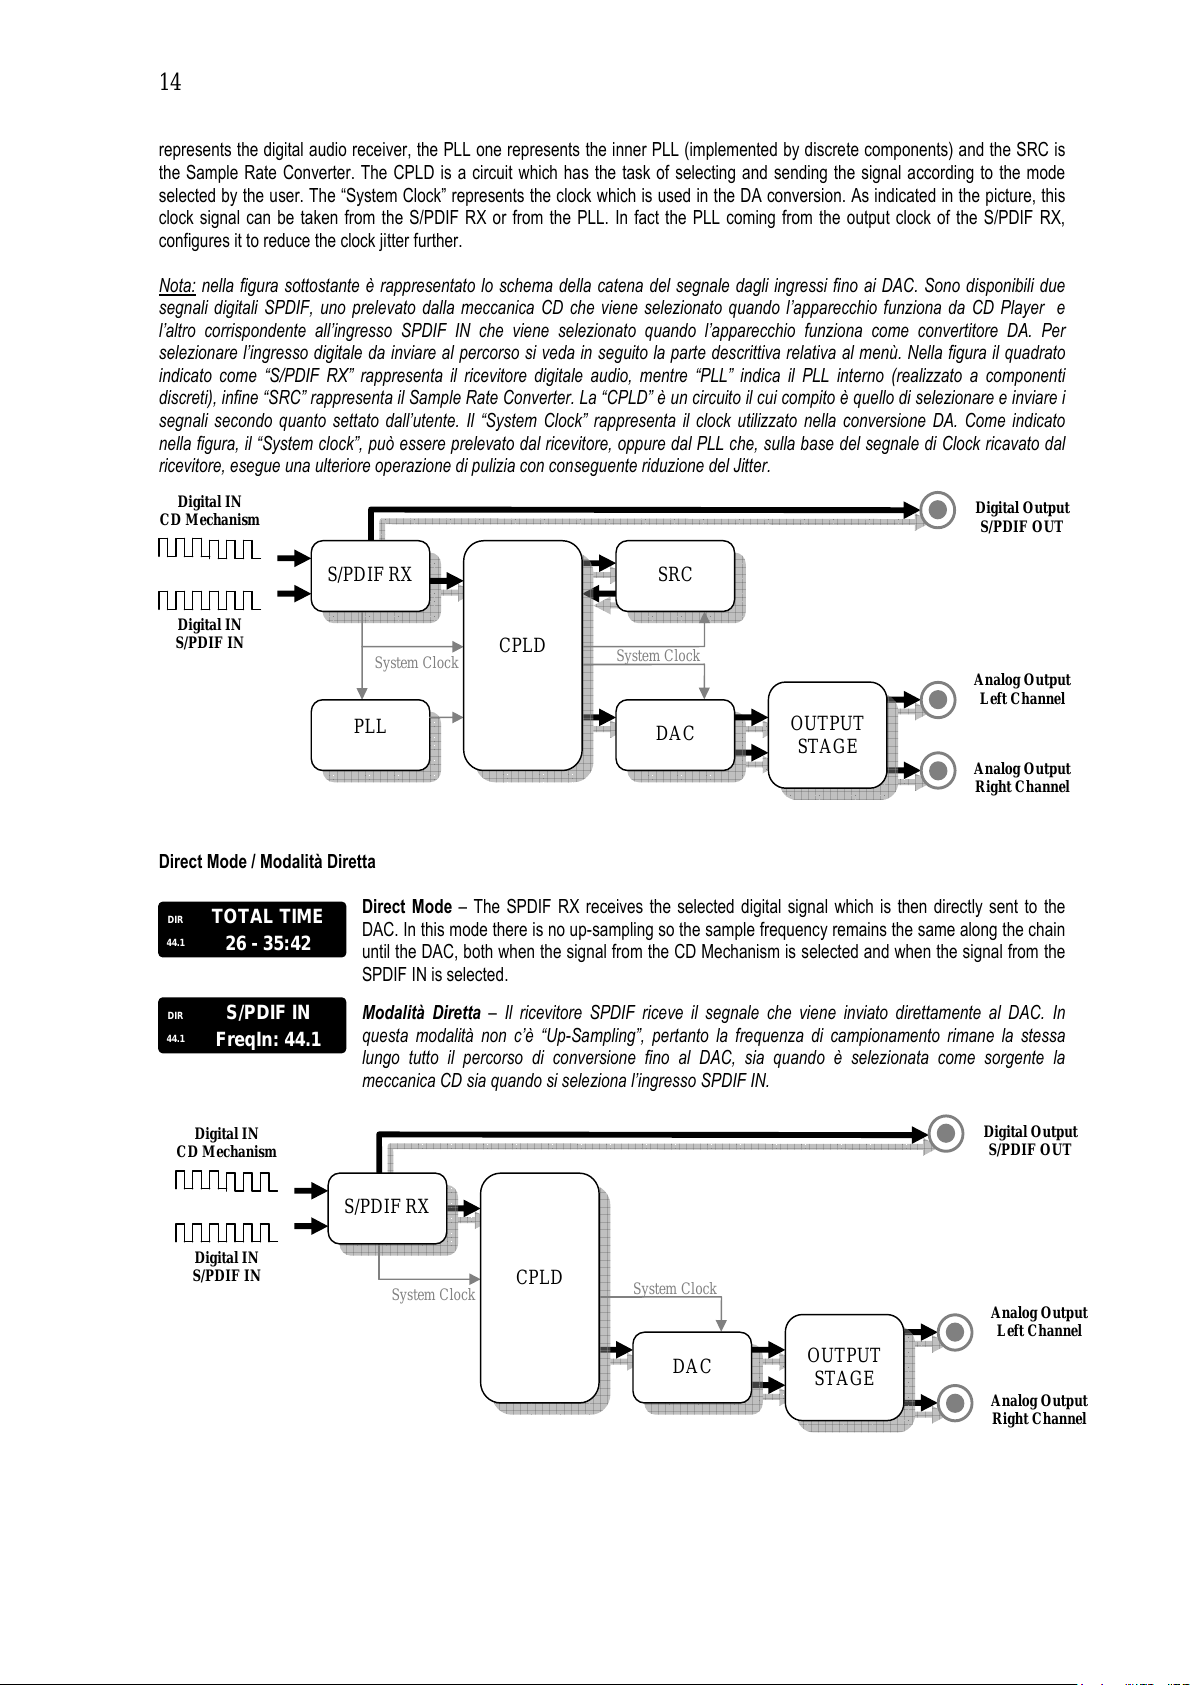
represents the digital audio receiver, the PLL one represents the inner PLL (implemented by discrete components) and the SRC is
the Sample Rate Converter The CPLD is a circuit which has the task of selecting and sending the signal according to the mode
selected by the user The “System Clock” represents the clock which is used in the DA conversion As indicated in the picture, this
clock signal can be taken from the S/PDIF RX or from the PLL In fact the PLL coming from the output clock of the S/PDIF RX,
configures it to reduce the clock jitter further
Nota: nella figura sottostante è rappresentato lo schema della catena del segnale dagli ingressi fino ai DAC. Sono disponibili due
segnali digitali SPDIF, uno prelevato dalla meccanica CD che viene selezionato quando l’apparecchio funziona da CD Player e
l’altro corrispondente all’ingresso SPDIF IN che viene selezionato quando l’apparecchio funziona come convertitore DA. Per
selezionare l’ingresso digitale da inviare al percorso si veda in seguito la parte descrittiva relativa al menù. Nella figura il quadrato
indicato come “S/PDIF RX” rappresenta il ricevitore digitale audio, mentre “P ” indica il P interno (realizzato a componenti
discreti), infine “SRC” rappresenta il Sample Rate Converter. a “CP D” è un circuito il cui compito è quello di selezionare e inviare i
segnali secondo quanto settato dall’utente. Il “System Clock” rappresenta il clock utilizzato nella conversione DA. Come indicato
nella figura, il “System clock”, può essere prelevato dal ricevitore, oppure dal P che, sulla base del segnale di Clock ricavato dal
ricevitore, esegue una ulteriore operazione di pulizia con conseguente riduzione del Jitter.
Direct Mode / Modalità Diretta
Direct Mode – The SPDIF RX receives the selected digital signal which is then directly sent to the
DAC In this mode there is no up-sampling so the sample frequency remains the same along the chain
until the DAC, both when the signal from the CD Mechanism is selected and when the signal from the
SPDIF IN is selected
Modalità Diretta – Il ricevitore SPDIF riceve il segnale che viene inviato direttamente al DAC. In
questa modalità non c’è “Up-Sampling”, pertanto la frequenza di campionamento rimane la stessa
lungo tutto il percorso di conversione fino al DAC, sia quando è selezionata come sorgente la
meccanica CD sia quando si seleziona l’ingresso SPDIF IN.
TOTAL TIME
26
-
35:42
DI
R
44.
1
S/PDIF IN
FreqIn: 44.1
DIR
44.1
PLL
S/PDIF RX
Analog Output
Left Channel
System Clock
System Clock
DAC
Digital IN
CD Mechanism
Digital IN
S/PDIF IN
Analog Output
Right Channel
Digital Output
S/PDIF OUT
SRC
CPLD
OUTPUT
STAGE
S/PDIF RX
Analog Output
Left Channel
System Clock
System Clock
CPLD
DAC
Digital IN
CD Mechanism
Digital IN
S/PDIF IN
Analog Output
Right Channel
Digital Output
S/PDIF OUT
OUTPUT
STAGE
All manuals and user guides at all-guides.com

15
PLL Mode / Modalità PLL
PLL Mode – This mode is available only when the selected digital signal is the one coming from the CD
mechanism The system clock from the SPDIF RX is sent to the PLL, which, if it can lock to it, regenerates and
cleans it reducing the jitter for frequencies higher than 20Hz (according to a second order filter) This improved
clock is then used to “re-synchronize” all the signals inside the CPLD If the signals from the CPLD are then
directly sent to the DAC, it will work just at 44 1KHz as sample frequency, while if the SRC is enabled the sample
frequency can be increased by a factor of 1X, 2X or 4X Such information is shown on the display by: SRCX1,
SRCX2, SRCX4 The sample rate converter factor like all the other parameters can be set in the PLL mode menu
option
Modalità PLL – Questa modalità è disponibile solo quando il segnale digitale selezionato è quello proveniente
dalla meccanica CD. Il segnale di system clock proveniente dal ricevitore S/PDIF viene inviato al P il quale, se
riesce ad agganciarlo, lo rigenera e pulisce riducendo il jitter per le frequenze superiori a 20Hz (filtro del secondo
ordine). Con questo clock rigenerato, vengono risincronizzati tutti gli altri segnali all’interno della CP D. Se il
segnale dalla CP D viene poi inviato direttamente al DAC, questo andrà a lavorare con una frequenza di
44.1KHz, se invece viene abilitato il SRC allora la frequenza di campionamento può essere aumentata secondo
un fattore di: 1X, 2X, or 4X Tale informazione viene mostrata sul display come: SRCX1, SRCX2, SRCX4 Il
fattore di sovra campionamento insieme agli altri parametri vengono settati nella voce di menu relativa alla
modalità P .
SRC Mode / Modalità SRC
SRC Mode – The signals from the SPDIF RX are sent directly to the SRC and from this to the DAC The SRC re-
synchronize the signals with an external reference clock reducing the Jitter to an extremely low level In fact, the
reference clock comes from the quartz crystals used inside the PLL circuit The sample frequency which the DAC
works on can be set to: 44,1kHz, 48kHz, 88,2kHz, 96kHz, 176,4kHz, 192kHz while the bit resolution is always set
to 24bits. The parameters of the mode are set in the dedicated menu option.
Modalità SRC – In questa modalità il segnale dal SPDIF RX viene inviato direttamente al Sample Rate Converter
(SRC) e da questo al DAC. Il SRC risincronizza i segnali di ingresso ad un clock di riferimento che gli arriva
dall’esterno riducendo drasticamente il Jitter. Il clock di riferimento esterno arriva infatti dai quarzi all’interno del
P . a frequenza di uscita può essere fissata a: 44,1kHz, 48kHz, 88,2kHz, 96kHz, 176,4kHz, 192kHz. a
risoluzione è sempre di 24bit I parametri della modalità sono settati nella voce di menu dedicata
The different modes described above can be chosen and their parameters set and changed using the relevant menu
I modi di funzionamento descritti sopra possono essere scelti e i parametri configurati e modificati attraverso le relative voci di menu.
TOTAL TIME
26
-
35:42
PLL
SRC x4
TOTAL TIME
26
-
35:42
SRC
192.0
S/PDIF IN
FreqIn: 44.1
SRC
192.0
PLL
S/PDIF RX
Analog Output
Left Channel
System Clock
System Clock
DAC
Digital IN
CD Mechanism
Digital IN
S/PDIF IN
Analog Output
Right Channel
Digital Output
S/PDIF OUT
CPLD
SRC
OUTPUT
STAGE
S/PDIF RX
Analog Output
Left Channel
System Clock
System Clock
DAC
Digital IN
CD Mechanism
Digital IN
S/PDIF IN
Analog Output
Right Channel
Digital Output
S/PDIF OUT
SRC
CPLD
OUTPUT
STAGE
All manuals and user guides at all-guides.com

16
SETUP
1.
DIRECT
SETUP
2. PLL
SETUP
3. SRC
SETUP
4. SELECT INPUT
SETUP
5. OUTPUT
SETUP
6. PRESET
SETUP
1. DIRECT
SETUP: DIRECT
1.1: Exit
SETUP: DIRECT
1.2: ON
Menu SETUP
The SETUP menu can be entered pressing the switch: “TIME/MENU” on the remote when the unit is not playing (STOP Mode).
When the unit is in the menu it is possible to move between the different menu parts using the switches: ▲(2) e ▼(8) on the remote
and the switch OK(5) on the remote to enter an inner menu if available and to set and memorize a value or configuration. To go back
to the previous level of the menu just press the ◄ (4) button on the remote. To exit the menu simply push the “TIME/MENU” switch
on the remote. Please note that when you have confirmed a setting you automatically exit the menu mode and come back to the
normal functioning mode. Once in the Menu the first layer options are reported below, each one represent a sub menu where the
different inner parameters can be set.
Menù SETUP
Si può entrare nel Menù di SETUP premendo il tasto “TIME/MENU” sul telecomando quando l’apparecchio non è in riproduzione
(modalità STOP). All’interno del Menu è possibile muoversi con i tasti ▲(2) e ▼(8) del telecomando per selezionare la voce
desiderata. Utilizzare il tasto OK(5) per confermare e memorizzare la configurazione o il valore settato, o per entrare nel sotto-menù
dove disponibile. Per ritornare al livello superiore al sottomenu premere il tasto ◄ (4) sul telecomando. Per uscire in qualsiasi
momento dal Menu basterà premere il tasto “TIME/MENU” da telecomando. Si noti che quando si conferma un valore settato si esce
automaticamente dalla modalità menu e si torna al normale funzionamento dell’apparecchio. Sono riportate sotto, le voci di primo
livello disponibili una volta entrati nel Menù di setup, ciascuna rappresenta un sotto menù dove si possono settare i vari parametri.
Pressing OK(5) enters the Direct Mode sub menu
Premendo OK(5) si entra nel sottomenu relativo alla modalità Diretta
Pressing OK(5) enters the PLL Mode sub menu
Premendo OK(5) si entra nel sottomenu relativo alla modalità P
Pressing OK(5) enters the SRC Mode sub menu
Premendo OK(5) si entra nel sottomenu relativo alla modalità SRC (Sample Rate Converter)
Pressing OK(5) enters the sub menu where the digital signal is chosen between: CD Mechanism or
S/PDIF IN
Premendo OK(5) si entra nel sottomenu dove viene selezionato il segnale digitale tra: Meccanica CD e
S/PDIF IN.
Pressing OK(5) enters the sub menu where it is possible to de-activate the audio digital output
Premendo OK(5) si entra nel sottomenu dove è possibile disattivare la uscita audio digitale
Pressing OK(5) enters the sub menu where it is possible to manage the PRESETs
Premendo OK(5) si entra nel sottomenu dove è possibile la gestione dei PRESET.
Direct Mode Sub Menu
Sotto menu Modalità Diretta
Exit from the Menu setup menu
Uscire dal menu setup.
To confirm the activation of the direct Mode and exit the set up, the unit goes back to the
normal operation state
Conferma la attivazione della Modalità Diretta e esce dal setup, l’apparecchio torna allo stato di
normale funzionamento.
All manuals and user guides at all-guides.com
all-guides.com

17
SETUP
2. PLL
SETUP: PLL
2.2.1: SRC OFF
SETUP: PLL
2.2.2: SRC X1
SETUP: PLL
2.2.3: SRC X2
SETUP: PLL
2.2.4: SRC X4
SETUP: PLL
2.1: Exit
SETUP: PLL
2.2: ON
PLL Mode Sub Menu
Sotto menu Modalità PLL
Exit from the setup menu
Uscire dal menu setup.
Confirm the activation of the PLL Mode Pressing OK(5) enters a specific submenu where you
can enable or disable the SRC and select the Up-Sampling factor
Conferma l’attivazione della modalità P . In questo caso premendo OK(5) si entra in un sotto
menù specifico dove è possibile attivare o meno il SRC e selezionare il fattore di UP-Sampling.
De-active the SRC (so the DAC will work at the frequency of 44,1KHz) and it exits the
setup, the unit goes back to the normal operation state
Permette di disattivare il SRC, (In questo modo il DAC lavora alla frequenza di
44,1KHz), ed esce dal setup, l’apparecchio torna allo stato di normale funzionamento.
Select the Up-Sampling rate to X1 (the system clock to the SRC is supplied by the PLL)
and it exits the set up, the unit goes back to the normal operation state
Seleziona il tasso di Up-Sampling a X1 (il system clock al SRC è fornito dal P ) ed
esce dal setup, l’apparecchio torna allo stato di normale funzionamento
Select the Up-Sampling rate to X2 (the system clock to the SRC is supplied by the PLL
The DAC works at the sample frequency of 44,1KHz by two that’s say 88,2KHz) and it
exits the set up, the unit goes back to the normal operation state
Seleziona il tasso di Up-Sampling a X2 (il system clock al SRC è fornito dal P . Il DAC
lavorerà alla frequenza di 44,1KHz per 2, ovvero a 88,2KHz) ed esce dal setup,
l’apparecchio torna allo stato di normale funzionamento.
Select the Up-Sampling rate to X4 (the system clock to the SRC is supplied by the PLL
The DAC will work at the frequency of 44,1KHz by four, that’s say: 176,4KHz) and it
exits the set up, the unit goes back to the normal operation state
Seleziona il tasso di Up-Sampling a X4 (il system clock al SRC è fornito dal P . Il DAC
lavorerà alla frequenza di 44,1KHz per 4, ovvero a 176,4KHz) ed esce dal setup,
l’apparecchio torna allo stato di normale funzionamento.
Note: In PLL Mode it is not possible to select the S/PDIF digital input as input for the audio chain but this modality works only with the
CD mechanism SPDIF digital audio output signal
Nota: In modalità P non è possibile selezione l’ingresso digitale S/PDIF come ingresso per la catena audio digitale, infatti la
modalità P è applicabile solo al segnale digitale SPDIF proveniente dalla meccanica CD.
All manuals and user guides at all-guides.com

18
SETUP
3. SRC
SETUP: SRC
3.2: SRC ON
SETUP: SRC
3.2.1: Exit
SETUP: SRC
3.2.2: 44.1KHz
SETUP: SRC
3.1: Exit
SETUP: SRC
3.2.3: 48.0KHz
SETUP: SRC
3.2.4: 88.2KHz
SETUP: SRC
3.2.
5
: 96.0KHz
SETUP: SRC
3.2.
6
: 176.4KHz
SETUP: SRC
3.2.
7
: 192.0KHz
SRC Mode Sub menu
Sotto menu Modalità SRC (Sample Rate Converter)
Exit from the setup menu
Uscire dal menu setup .
Confirm the activation of the SRC Mode Pressing OK(5) enters a specific submenu where you
can choose the sample frequency
Conferma l’attivazione della modalità SRC. In questo caso premendo OK(5) si entra in un sotto
menù specifico dove è possibile selezionare la frequenza di campionamento.
Exit from the setup menu
Uscire dal menu setup.
Select the frequency of 44,1KHz and it exits the setup, the unit goes back to the normal
operation state
Seleziona la frequenza pari a 44,1KHz ed esce dal setup, l’apparecchio torna allo stato
di normale funzionamento.
Select the frequency of 48KHz and it exits the setup, the unit goes back to the normal
operation state
Seleziona la frequenza pari a 48KHz ed esce dal setup, l’apparecchio torna allo stato di
normale funzionamento.
Select the frequency of 88,21KHz and it exits the setup, the unit goes back to the
normal operation state
Seleziona la frequenza pari a 88,2KHz ed esce dal setup, l’apparecchio torna allo stato
di normale funzionamento.
Select the frequency of 96KHz and it exits the setup, the unit goes back to the normal
operation state
Seleziona la frequenza pari a 96KHz ed esce dal setup, l’apparecchio torna allo stato di
normale funzionamento.
Select the frequency of 176,4KHz and it exits the setup, the unit goes back to the
normal operation state
Seleziona la frequenza pari a 176,4KHz ed esce dal setup, l’apparecchio torna allo
stato di normale funzionamento.
Select the frequency of 192KHz and it exits the setup, the unit goes back to the normal
operation state
Seleziona la frequenza pari a 192KHz ed esce dal setup, l’apparecchio torna allo stato
di normale funzionamento.
All manuals and user guides at all-guides.com

19
SETUP
4. SELECT INPUT
SETUP: INPUT
4.1: CD
SETUP: INPUT
4.2: SPDIF
-
IN
SETUP
5. OUTPUT
SETUP: OUTPUT
5.1: ON
SETUP: O
UTPUT
5.2: OFF
Setup selected INPUT Sub menu / Sotto menu di Selezione dell’ingresso
The Maestro CD Player 192/24 DAC SE works not only as CD Player, but it can also work like a DAC (Digital to Analog
Converter) In fact, it is possible to select the source to play: between the CD mechanism or the S/PDIF input.
Il
Maestro CD Player 192/24 DAC SE
non è solo un CD Player, ma è anche un DAC. Infatti è possibile selezione
l’ingresso da riprodurre: la meccanica CD oppure l’ingresso S/PDIF.
Select the CD Mechanism such as Digital In to play and it exits the setup, the unit goes back to
the normal operation state (See Note *)
Seleziona la meccanica CD come ingresso digitale da riprodurre ed esce dal setup,
l’apparecchio torna allo stato di normale funzionamento.
Select the S/PDIF IN such as the digital input, and it exits the setup, the unit goes back to the
normal operation state
Seleziona l’ingresso SPDIF IN come ingresso riprodurre ed esce dal setup, l’apparecchio torna
allo stato di normale funzionamento.
(*) Note: if the digital signal is detected and stable then the signal measured frequency and the selected input are shown on the
display, otherwise, if the signal is lost or the frequency is not stable, “UNLOCKED” is showed on the display and the input is not
selected and elaborated When the input selected is changed the working mode is also automatically changed and the unit is set to a
default mode: when the input is switched to the CD Mechanism the unit is set to work in a SRC Mode with 192Khz whereas when the
sample frequency input is switched to the SPDIF IN the unit is set to work in Direct Mode
(*) Nota: se è presente un segnale in ingesso ed è stabile, viene visualizzato a display la frequenza rilevata del segnale e la sorgente
è segnalata, altrimenti, in assenza di segnale, o in presenza di un segnale instabile, viene visualizzato sul display “UN OCKED” e
l’ingresso non viene selezionato né elaborato. Quando l’ingresso selezionato viene cambiato la modalità di lavoro viene cambiata
automaticamente e l’apparecchio viene settato in un mode di default: quando l’ingresso passa a quello della meccanica CD
l’apparecchio viene settato in modalità SRC con una frequenza di campionamento di 192KHz mentre se l’ingresso selezionato è
quello digitale SPDIF IN l’apparecchio è settato in modalità diretta.
Setup OUTPUT Sub menu / Sotto menu Gestione Uscita Digitale
It’s possible to de-activate and to re-activate the S/PDIF Output by this menu. The S/PDIF Output is an active default setting.
E’ possibile disattivare o attivare l’uscita S/PDIF mediante questo menu. Di default l’uscita S/PDIF è attiva.
Activate the S/PDIF digital Output and it exits the setup, the unit goes back to the normal
operation state
Attiva l’uscita digitale S/PDIF OUT e esce dal setup, l’apparecchio torna allo stato di normale
funzionamento.
De-activate the S/PDIF digital Output and it exits the setup, the unit goes back to the normal
operation state
Disattiva l’uscita digitale S/PDIF OUT e esce dal setup, l’apparecchio torna allo stato di normale
funzionamento.
Setup Preset Sub menu
Sotto menu Gestione Preset
The Maestro CD Player 192/24 DAC SE allows the user to store their preferred settings in the memory of the microcontroller for the
fast reloading of settings The Presets are managed by the commands: Save (Save a setting into a preset) or Load (Load a setting previously
saved in a Preset) managed in the Setup Preset sub Menu These presets are stored permanently in the microcontroller memory There are 4
already loaded and unchangeable presets corresponding to 4 different settings of the unit working as a CD player and there are other 4 presets that
can be loaded with the users preferred settings The first two free presets are specifically dedicated: one for the unit working in CD Mode (indicated
as CD) and the other for the unit working in DAC mode (indicated as DIN) The remaining two free presets can store settings in which both the CD
mechanism signal and the SPDIF IN signal can be selected and are indicated as Pre1 and Pre2 The Presets are indicated as “Empty” if no
configuration has been loaded in that position, and in such cases selecting the menu option has no effect
All manuals and user guides at all-guides.com

20
SETUP
6. PRESET
SETUP: PRESET
6.1: LOAD
LOAD PRESET
6.1.1: Default
LOAD PRESET
6.1.2: DIRECT
LOAD PRESET
6.1.3: PLL
LOAD PRESET
6.1.4: SRC
LOAD PRESET
6.1.5: CD EMPTY
LOAD PRESET
6.1.5: DIN EMPTY
Il
Maestro CD Player 192/24 DAC SE
permette di memorizzare nel microcontrollore i settagli preferiti per un rapido ricaricamento delle
configurazioni. I Preset vengono gestiti mediante i comandi di: Save (salva la configurazione in un Preset) e oad (carica una configurazione
precedentemente salvata in un preset) all’interno del sotto menu dei Preset. I Preset sono memorizzati in modo permanente all’interno della
memoria del microcontrollore. Vi sono 4 Preset già caricati e non modificabili che corrispondono a configurazioni della macchina quando lavora
come lettore CD e vi sono altri 4 Preset liberi che possono essere caricati con i settagli scelti dall’utente. I primi due preset configurabili dall’utente
sono specificamente dedicati, uno ad una configurazione per l’apparecchio funzionante come lettore CD (tale preset viene indicato come CD) e
l’altro per l’apparecchio funzionante come convertitore DA (tale preset è indicato come DIN). I rimanenti due preset configurabili dall’utente possono
contenere settaggi nei quali l’ingresso selezionato è sia quello che proviene dalla meccanica CD che quello proveniente dal segnale digitale
esterno. Tali preset sono indicati come Pre1 e Pre2. I preset sono indicati come “Empty” se nessuna configurazione è stata memorizzata, in tal
caso selezionare la voce di menu non da’ nessun effetto.
Pressing OK(5) enters the sub menu from where the different preset can selected
Premendo OK(5) si richiama il sotto menu che permette di selezionare i vari preset di configurazione:
Loads the default setting which defines the CD Mechanism as the digital input and sets the SRC
Mode with a sample frequency of 192KHz The unit loads the configuration and exits the setup,
returning to normal operation mode
Carica la configurazione definita di default nella quale: viene selezionato come ingresso digitale l’
Ingresso dalla meccanica CD e viene selezionata la Modalità SRC con una frequenza di
campionamento di 192KHz 24Bit. ’apparecchio carica la configurazione e esce dal menu
riportandosi in una condizione di normale funzionamento.
Loads the configuration where the input selected is that coming from the CD Mechanism and sets
the Direct mode The unit loads the configuration and exits the setup mode returning to normal
operation mode
Carica la configurazione che seleziona il segnale proveniente dalla meccanica CD come ingresso
e la modalità diretta. ’apparecchio carica la configurazione e esce dal menu riportandosi in una
condizione di normale funzionamento.
Loads the configuration where the input selected is that coming from the CD Mechanism and sets
the PLL mode with an over sampler factor of 4X The unit loads the configuration and exits the
setup mode returning to normal operation mode
Carica la configurazione che seleziona il segnale proveniente dalla meccanica CD come ingresso
e la modalità P con un fattore di sovra campionamento di 4X. ’apparecchio carica la
configurazione e esce dal menu riportandosi in una condizione di normale funzionamento.
Loads the configuration where the input selected is that coming from the CD Mechanism and sets
the SRC mode with a sample frequency of 192KHz The unit loads the configuration and exits the
stand by mode returning to normal operation mode
Carica la configurazione che seleziona il segnale proveniente dalla meccanica CD come ingresso
e la modalità SRC con una frequenza di campionamento di 192KHz.. ’apparecchio carica la
configurazione e esce dal menu riportandosi in una condizione di normale funzionamento.
Pressing OK(5) loads the configuration (which has the CD Mechanism signal as selected) set by
the user in this preset The unit loads the configuration and exits the stand by mode returning to
normal operation mode If nothing has been stored, “EMPTY” is shown on the display and if
OK(5) is pressed nothing happens and the menu remains on this option If you want to exit at any
time from the menu remember that this is possible by pressing the TIME /Menu switch on the
remote
Premendo il tasto OK(5) viene caricata la configurazione (che prevede il segnale proveniente
dalla meccanica come segnale digitale) salvata dall’utente in questo preset ’apparecchio carica
la configurazione e esce dal menu riportandosi in una condizione di normale funzionamento. Se
non è stata salvata nessuna configurazione in questa posizione, sul display viene visualizzato
“EMPTY” e se si preme il tasto OK(5) il menu rimane su questa voce. Si ricorda che se si vuole
uscire dal menu lo si può fare in ogni momento premendo il tasto TIME/MENU sul telecomando.
Pressing OK(5) loads the configuration (which has the SPDIF signal coming from the SPDIF IN
as selected) set by the user in this preset The unit loads the configuration and exits the stand by
mode returning to normal operation mode If nothing has been stored, “EMPTY” is shown on the
display and if OK(5) is pressed nothing happens and the menu remains on this option If you
want to exit at any time from the menu remember that this is possible by pressing the TIME /Menu
switch on the remote
All manuals and user guides at all-guides.com
Other manuals for Maestro
5
Table of contents
Other Audio Analogue CD Player manuals

Audio Analogue
Audio Analogue Maestro User manual

Audio Analogue
Audio Analogue Maestro User manual

Audio Analogue
Audio Analogue Crescendo User manual

Audio Analogue
Audio Analogue Primo Tube CD User manual

Audio Analogue
Audio Analogue CDP 2.0 User manual

Audio Analogue
Audio Analogue Maestro 192 User manual

Audio Analogue
Audio Analogue Primo VT cd player User manual

Audio Analogue
Audio Analogue PRIMO CD 2.0 User manual

Audio Analogue
Audio Analogue Rossini 2.0 User manual

Audio Analogue
Audio Analogue Crescendo CD User manual


