Audio Analogue Rossini 2.0 User manual

AUDIO ANALOGUE
Rossini 2.0
VT CD PLAYER
OWNER’S MANUAL
MANUALE D’ISTRUZIONI
Manual rev 1.1a

2

3
Dear Audi phile,
C ngratulati ns and thank y u f r ch sing R ssini CD Player. Y u’re n w the wner f a unit that establishes a new reference in
the categ ry f high-quality and high-versatility stere ph nic pr ducts. R ssini CD Player pr vides circuital s luti ns with n
c mpr mises and features capable t satisfy advanced users’ demands. We built ur CD player with high-perf rmance circuits,
ptimized utput secti n f r maximum s und transparency and quality. R ssini CD Player s luti ns make the unit a valuable and
durable investment.
Features
Refined p wer supply with a t r idal transf rmer and f ur separated set-up secti ns.
High-perf rmance tube anal g circuits.
Highest-quality passive c mp nents.
Micr c ntr ller system c ntr l.
High-c ntrast LCD display
Caro Audiofilo,
congratulazioni e grazie per aver scelto il Rossini CD player. Sei ora in possesso di un apparecchio che stabilisce il nuovo
riferimento nella categoria di prodotti stereo caratterizzati da una eccezionale qualità e versatilità. l Rossini CD player associa infatti
soluzioni circuitali senza compromessi con caratteristiche funzionali tali da soddisfare anche l’utente più esigente. Un CD player
realizzato con circuitazioni ad elevate prestazioni, stadio di uscita ottimizzato per massimizzare la trasparenza del suono e quindi le
prestazioni nell’ascolto. Le soluzioni adottate rendono il Rossini CD player un investimento di pregio durevole nel tempo.
Caratteristiche costruttive
Alimentazione realizzata con un trasformatore toroidale e quattro sezioni di regolazione distinte.
Circuitazioni analogiche a valvole ad elevate prestazioni.
Componenti passivi di elevatissima qualità.
Gestione di sistema a microcontrollore.
Display LCD ad elevato contrasto.

4
INTRODUCTION
AUDIO ANALOGUE d es n t take any resp nsibilities in the f ll wing cases:
Whenever the perati nal pr cedures related t the use and the maintenance f the equipment as described in this manual are n t
respected.
Whenever damages t the equipment ccur because f fixing and m dificati ns made f rm n n-auth rized staff r because f
n rmal deteri rati n f the system.
N part f this manual can be repr duced by any means, transmitted r c pied f r private r public use with ut private auth rizati n
fr m AUDIO ANALOGUE.
The inf rmati n c ntained in this manual is related t the data kept by AUDIO ANALOGUE at the m ment f the issue f this
publicati n; AUDIO ANALOGUE has the right t make changes t this d cument with ut pri r n tice.
The equipment has been pr jected and manufactured acc rding t the Regulati ns f the C mmunity 89/336/CEE and is marked CE.
This equipment can’t be used f r different purp ses ther than th se f r which it has been manufactured.
AUDIO ANALOGUE d es n t take any resp nsibilities f r accidents r damages due t impr per use f the equipment.
WARNING
Please d respect the safety standards c ntained in this manual bef re starting t perate the equipment.
D n t pen the equipment. N further interventi ns than th se described in this manual sh uld be made. F r technical assistance,
please c nsult a qualified technician r an AUDIO ANALOGUE dealer.
N t respecting the instructi ns c ntained in this manual will invalidate the terms and c nditi ns f the guarantee.
NECESSARY PRECAUTIONS FOR SAFETY AND MAINTENANCE
ATTENTION: bef re starting any perati n, use r maintenance f the equipment it is strictly necessary t understand the f ll wing
manual.
T av id any accidents r hazards it is necessary t f ll w the f ll wing regulati ns.
Activate the equipment nly pri r checking if the installati n has been pr perly made, and if it is related t the instructi ns c ntained
in this manual.
Av id installing the equipment in places subjected t extremely high temperatures r humidity.
Check that the labels c ntaining inf rmati n ab ut safety are always visible and in g d c nditi ns.
Ensure t n t bstruct ventilati n, t av id excessive verheating. The equipment sh uld be kept t a minimal distance f 15 cm
fr m any bject and n t t place n carpet r ther s ft surfaces. Als the installati n cl se t radiat rs r in cl se envir nments
with ut ventilati n sh uld be av ided.
D n t switch n the equipment until it has n t been c rrectly and c mpletely installed.
Only supply the equipment with the kind f the electric supply as stated n the appr priate label. If in d ubts ab ut the kind f supply
available, please c nsult an expert technician f r technical assistance.
The equipment needs t be wired t an earth terminal. The external case is metal made; a defective c nnecti n with the earth may
be danger us.
In case damages ccurs t the supply cable, it sh uld be immediately replaced with the same kind f cable. This perati n sh uld be
nly made pri r t disc nnecting the main supply.
D n t place bjects n the supply cable and check that this is n t p siti ned in way thr ugh. The cable sh uld n t be kn tted r
curly.
Replace the fuses always with ther f the same kind.
D n t use the equipment cl se t the water r ther liquids. If liquid entered the equipment, the plug sh uld be disc nnected fr m
the s cket av iding t t uch the metal parts. C mpetent technical staff sh uld be asked t check the equipment bef re perating it
again.
D n t place recipients c ntaining liquids n the equipment. Even when it is switched ff.
Keep the equipment far fr m s urces f heat such as the s lar light, kitchens, radiat rs etc…
Always unplug the supply cable during rainy weather.
Always Switch ff and unplug the supply cable bef re cleaning the equipment externally.: this perati n sh uld be made using a dry
and s ft cl th. Never use alc h l based cleaning material.
If the amplifier was carried fr m an extremely c ld envir nment t and extremely h t ne, it c uld create internal c ndensati n,
causing p ssible bad functi ning.
If this ccurs, please wait f r at least an h ur bef re using it again, t all w it t gradually reach r m temperature.
When n t used f r l ng peri ds, please unplug the equipment.
INSTRUCTIONS TO PUT IT OUT OF SERVICE
C nsult qualified staff
F ll w the regulati ns f the current legislati n regarding recycling and waste disp sal.

5
PREMESSA
AUD O ANALOGUE non accetta responsabilità nei casi in cui:
Le procedure operative di utilizzo e manutenzione dell’apparato descritte nel manuale non siano rispettate.
danni si verifichino in seguito a riparazioni o modifiche dell’apparato eseguite da personale non autorizzato o a seguito di normale
deterioramento dell’apparato.
Nessuna parte del presente manuale può essere riprodotta con alcun mezzo, trasmessa o copiata per usi pubblici e/o privati senza
la previa autorizzazione di AUD O ANALOGUE. Le informazioni contenute nel presente manuale sono relative ai dati in possesso di
AUD O ANALOGUE al momento della pubblicazione; AUD O ANALOGUE si riserva il diritto di apportare cambiamenti al presente
documento senza alcun preavviso.
L’apparato è progettato e realizzato in conformità alle Direttive Comunitarie 89/336/CEE e 72/23/CEE e risulta marcato CE.
L’apparato non può essere utilizzato per scopi diversi da quelli per cui è stato progettato.
AUD O ANALOGUE non si assume alcuna responsabilità per incidenti o danni causati da un utilizzo improprio dell’apparato.
AVVERTENZA
Prima di compiere qualunque operazione attenersi alle norme di sicurezza contenute all’interno del manuale
Non aprire l’apparecchio. Nessun ulteriore intervento oltre a quelli descritti in questo manuale dovrebbe essere effettuato. Per
l’assistenza tecnica, rivolgersi a un tecnico qualificato o a un rivenditore AUD O ANALOGUE.
l mancato rispetto delle prescrizioni del seguente manuale implica il decadimento della garanzia.
PRECAUZ ON PER LA S CUREZZA E MANUTENZ ONE
ATTENZ ONE: prima dell’utilizzo o manutenzione dell’apparato o di qualsiasi operazione sullo stesso è necessario prendere visione
del seguente manuale.
Al fine di prevenire ogni pericolo di incidente si impongono le seguenti prescrizioni:
Attivare l’apparato solo dopo aver verificato l’adeguatezza dell’installazione e la conformità alle indicazioni contenute nel presente
manuale.
Non installare l’apparecchiatura in luoghi soggetti a sbalzi eccessivi di temperatura e umidità.
Verificare che le etichette contenenti informazioni sulla sicurezza siano sempre ben visibili ed in buono stato.
Le fessure di ventilazione non devono assolutamente essere ostruite per evitare surriscaldamento dell’apparato. A tal fine,
posizionare l’unità ad una distanza minima di 15 cm da ogni altro ostacolo e non su tappeti, moquette o altre superfici morbide.
Evitare inoltre di installarlo nei pressi di caloriferi o in ambienti chiusi, privi di una appropriata ventilazione.
Non accendere l’apparato finché non è completamente installato in maniera corretta.
Alimentare l’apparato con il tipo di alimentazione elettrica riportato sull’apposita targhetta. n caso di dubbi sul tipo di alimentazione
disponibile, consultare il servizio di assistenza tecnica.
L’apparecchio deve essere sempre collegato a terra. Poiché l’involucro è costituito in metallo, una connessione di terra difettosa o
mancante potrebbe essere pericolosa.
n caso di danneggiamenti al cavo di alimentazione, provvedere immediatamente alla sostituzione con un altro dello stesso tipo.
Questa operazione deve essere effettuata dopo aver disconnesso l’alimentazione primaria.
Non posizionare oggetti sul cavo di alimentazione e verificare che questo non si trovi in una zona di passaggio. l cavo non deve
essere arrotolato o annodato.
Sostituire i fusibili sempre con altri dello stesso tipo.
Non usare l’apparato in prossimità di acqua o altri tipi di liquidi. Se nell’unità dovesse entrare del liquido, scollegare immediatamente
il cavo di rete dalla presa a muro evitando di toccare le parti metalliche dell’apparecchiatura e rivolgersi al personale tecnico per un
controllo prima del riutilizzo.
Non appoggiare recipienti contenenti liquidi di qualsivoglia natura sopra l’apparato. Anche quando questo è spento.
Tenete l’apparecchio lontano da fonti di calore come la luce solare, cucine, radiatori, etc…
Scollegare sempre il cavo di alimentazione dalla presa durante i temporali.
Spegnere e scollegare sempre l’alimentazione prima di effettuare la pulizia esterna dell’apparato: questa operazione deve essere
effettuata utilizzando un panno asciutto e morbido. Non usare mai solventi o detergenti a base di alcool.
Se l’amplificatore viene trasportato da un ambiente freddo ad un altro caldo, si potrebbe formare condensa al suo interno, causando
possibili malfunzionamenti. Se ciò si dovesse verificare, si prega di attendere almeno un’ora prima dell’uso in modo da permettergli
di raggiungere la temperatura ambiente gradualmente.
n caso di lunghi periodi di inutilizzo, staccare la spina dalla presa di rete.
STRUZ ON PER LA MESSA FUOR SERV Z O
Rivolgersi a personale specializzato.
Seguire le prescrizioni della corrente legislazione in materia di riciclaggio e smaltimento dei rifiuti.
6
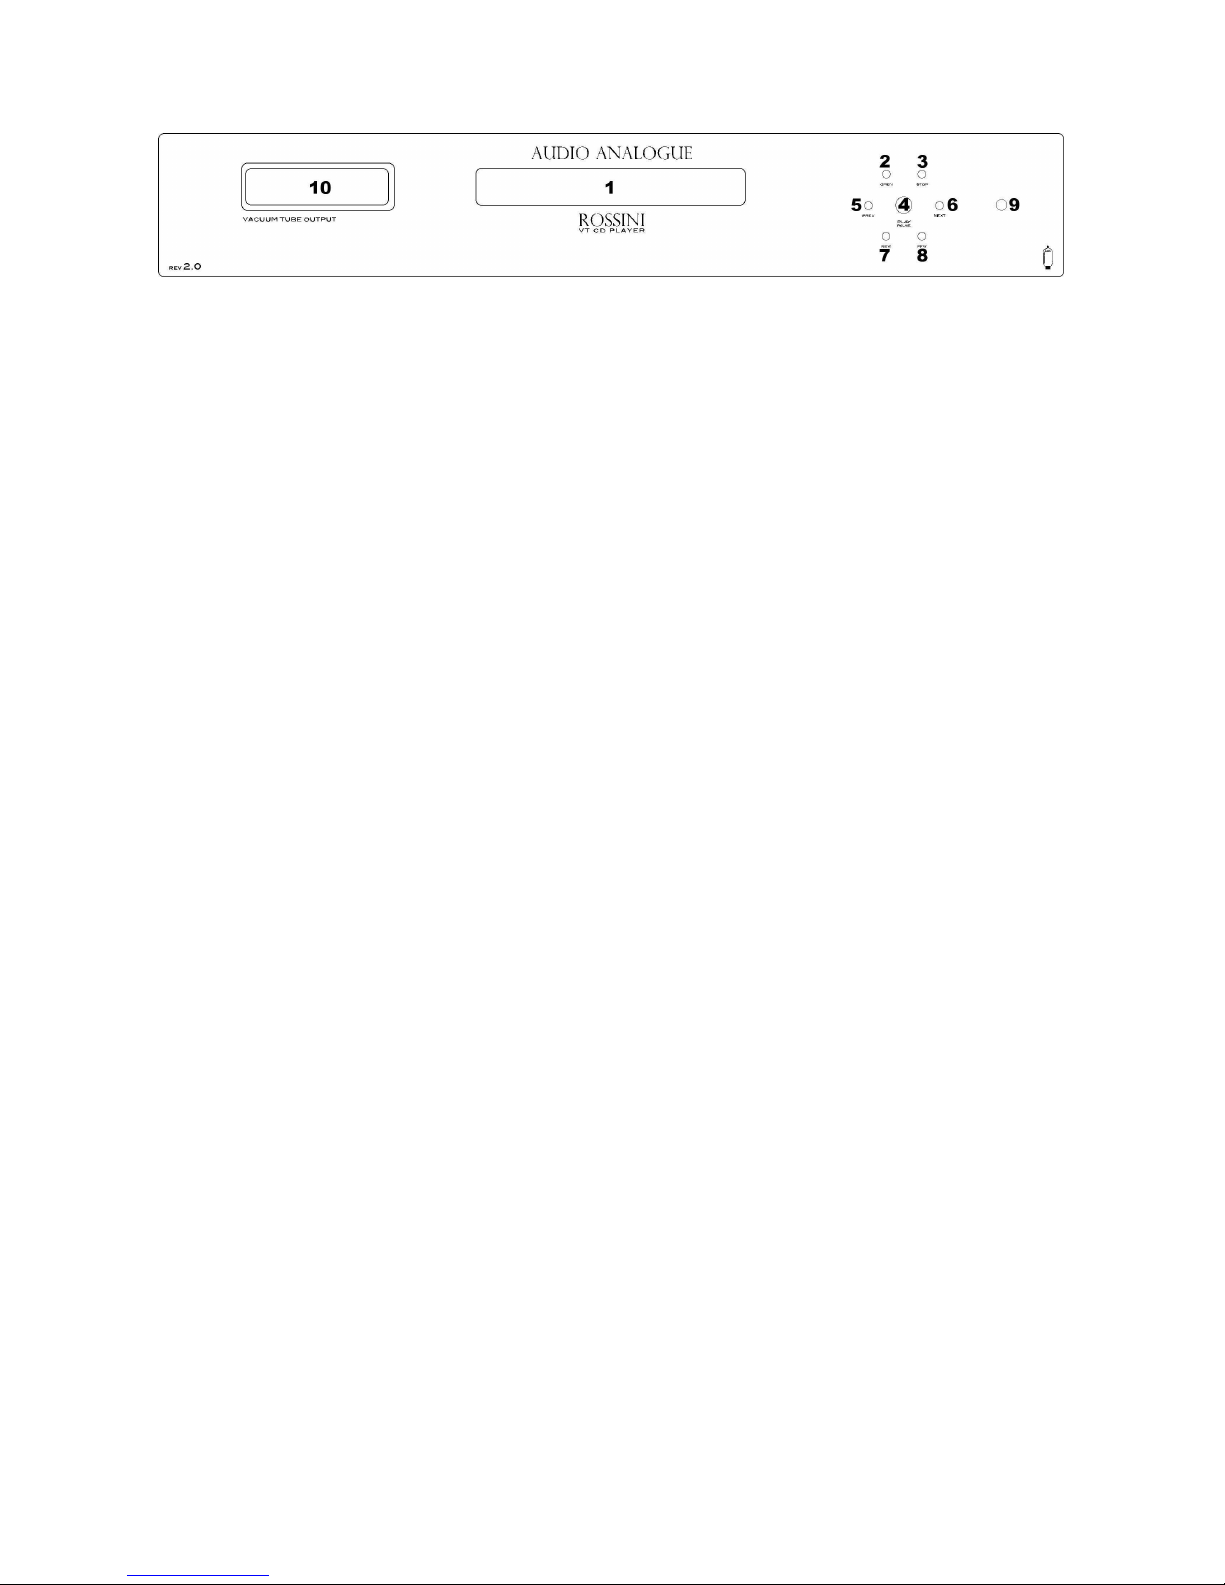
Front panel
1) CD tray.
2) OPEN. Open/cl se CD tray
3) STOP: St ps CD playback.
4) PLAY/PAUSE. Starts/pauses CD playback.
5) PREV. During playback, starts previ us CD track playback. When playback is st pped, it all ws ch sing the CD track fr m
which resuming playback r search CD tracks backward.
6) NEXT. During playback, starts next CD track playback. When playback is st pped, it all ws ch sing the CD track fr m which
resuming playback r search CD tracks f rward.
7) REW. Fast rewind search.
8) FWD. Fast f rward search.
9) IR receiver.
10) LCD display.
Descrizione del pannello frontale
1) Cassetto porta CD.
2) OPEN. La pressione di questo tasto apre o chiude il cassetto porta CD.
3) STOP. La pressione di questo tasto arresta la riproduzione del disco.
4) PLAY/PAUSE. La pressione di questo tasto attiva la riproduzione del disco oppure ne attiva o disattiva la pausa durante la
lettura.
5) PREV. Durante la lettura del CD la pressione di questo pulsante provoca il salto immediato alla traccia precedente a quella letta
in quel momento.Quando il CD è fermo, è possibile utilizzare questo pulsante per decidere da quale traccia iniziare la
riproduzione, o per scorrere in ordine decrescente le tracce presenti nel CD.
6) NEXT. Durante la lettura del CD la pressione di questo pulsante provoca il salto immediato alla traccia successiva a quella letta
in quel momento. Quando il CD è fermo, è possibile utilizzare questo pulsante per decidere da quale traccia iniziare la
riproduzione, o per scorrere in ordine crescente le tracce presenti nel CD.
7) REW. Durante la lettura del CD la pressione di questo pulsante attiva la funzione di indietro veloce.
8) FFW. Durante la lettura del CD la pressione di questo pulsante attiva la funzione di avanti veloce.
9) Ricevitore R.
10) LCD Display.
7
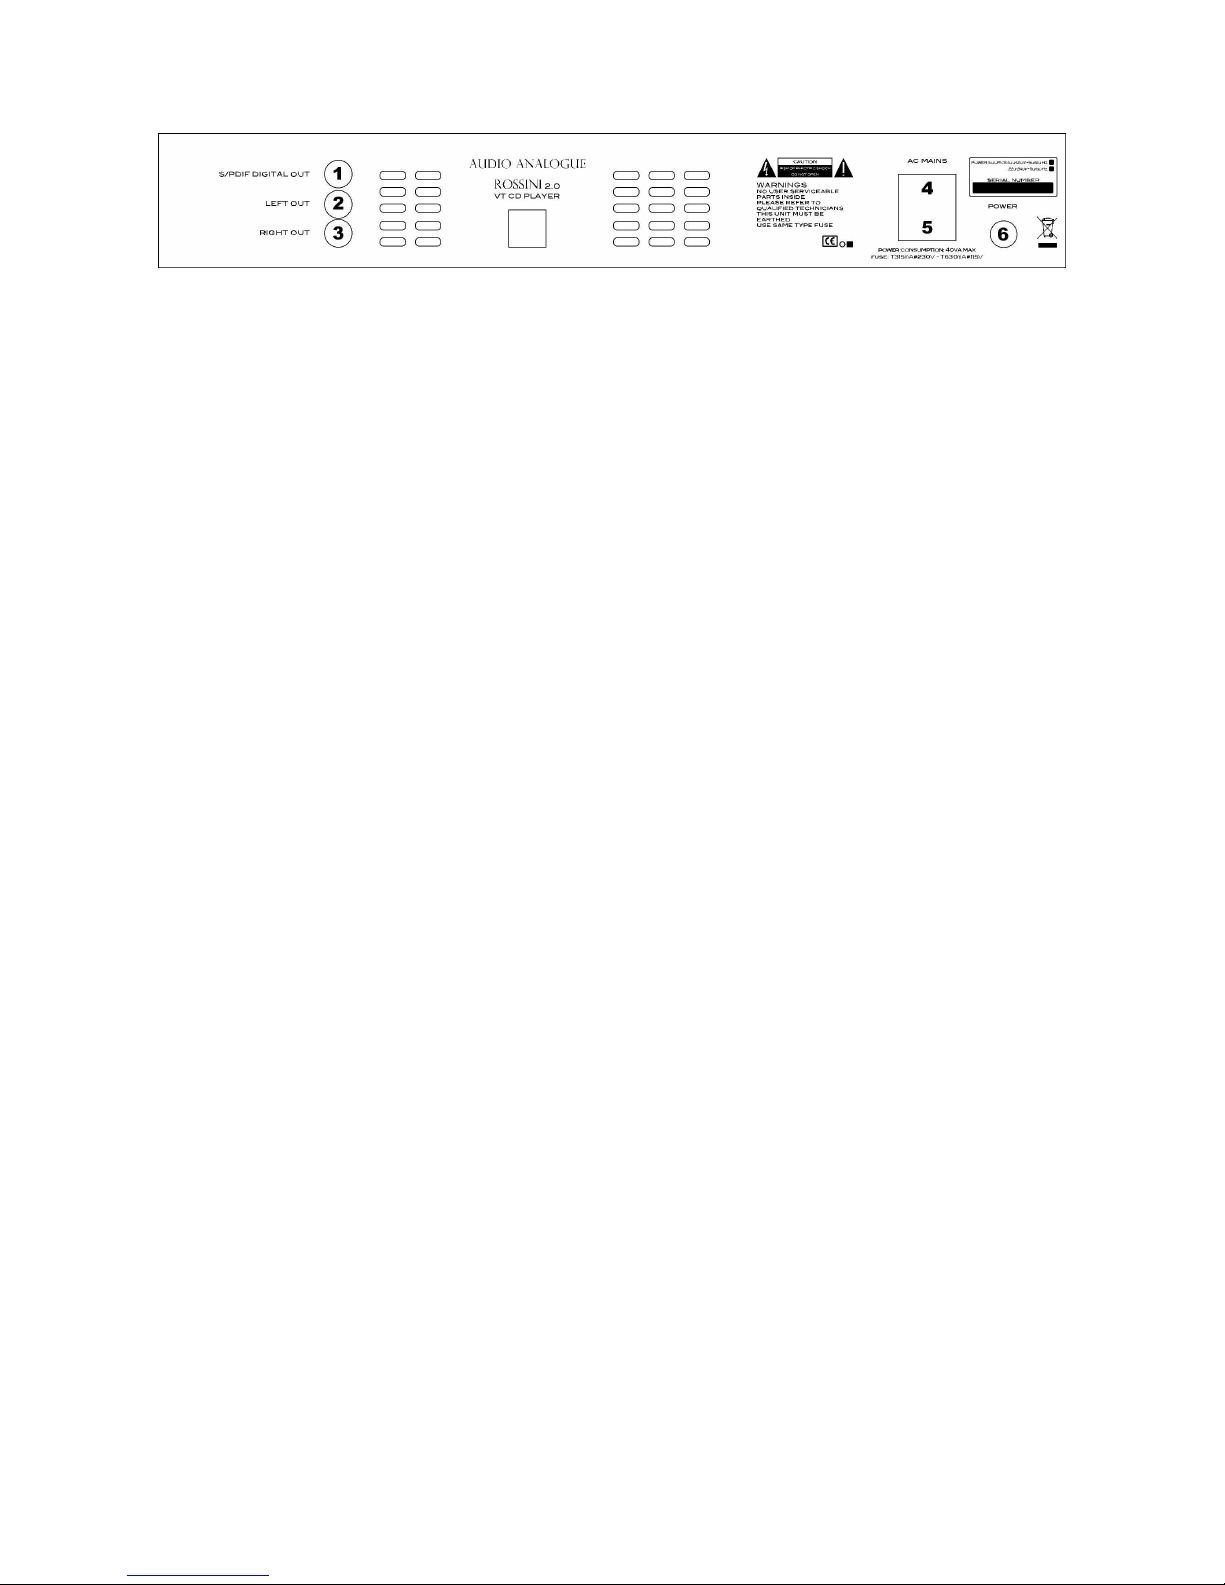
Back Panel
1) S/PDIF DIGITAL OUT. Digital utput c nnect r.
2) RIGHT OUT. Unbalanced right anal g utput c nnect r.
3) LEFT OUT. Unbalanced left anal g utput c nnect r.
4) IEC standard p wer inlet. C nnect here the pr vided p wer c rd.
5) Fuses. If necessary, replace them with thers f the same kind (see back panel).
6) Main v ltage switch
Descrizione del pannello posteriore
1) S/PD F D G TAL OUT. Connettore di uscita digitale.
2) R GHT OUT. Connettore di uscita analogica right.
3) LEFT OUT. Connettore di uscita analogica left.
4) Presa di rete a norma EC. Collegare il cavo di alimentazione di rete fornito in dotazione.
5) Fusibili. n caso di necessità ripristinare con fusibili dello stesso tipo (come indicato sul pannello posteriore).
6) nterruttore principale.
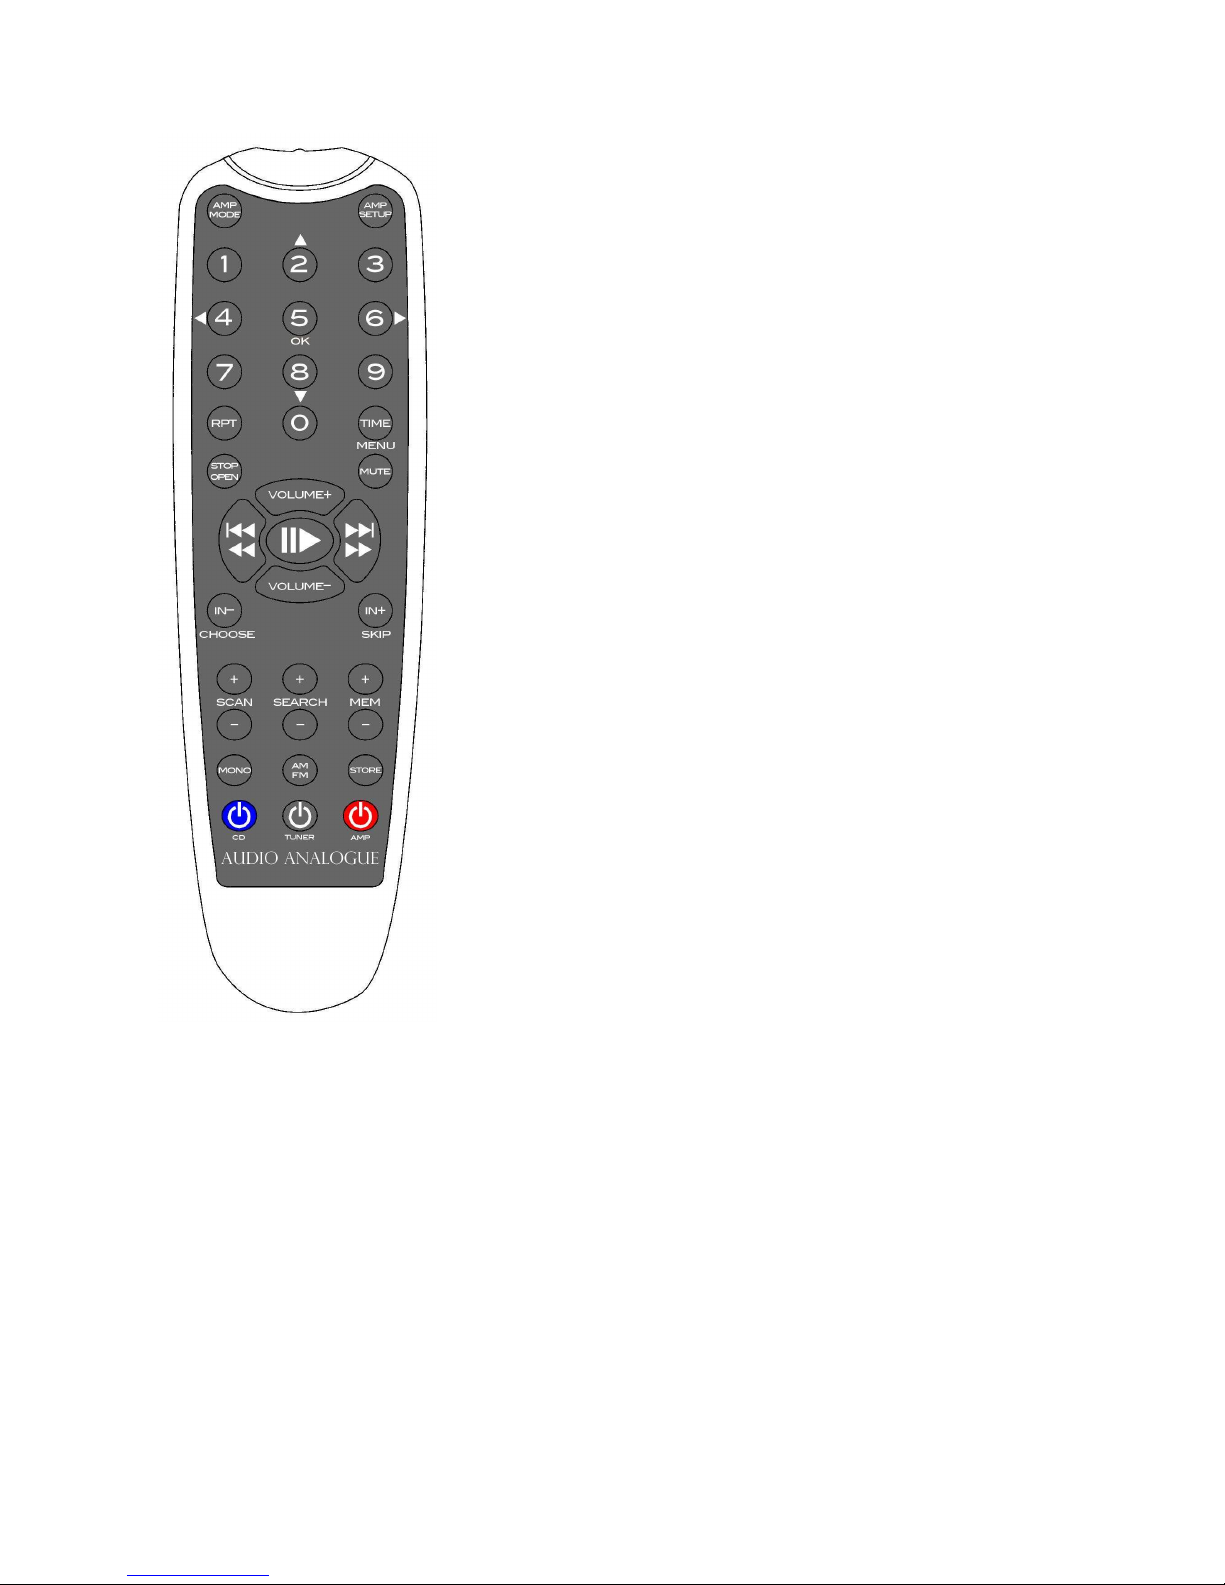
Description of the remote controller
CD PLAYER F nctions
•
PLAY /
PAUSE: f r its descripti n refer t the user manual.
•
STOP /
OPEN: f r its descripti n refer t the user manual.
•
PREV /
REW: f r its descripti n refer t the user manual.
•
NEXT /
FFW: f r its descripti n refer t the user manual.
•0123456789 (NUMERIC KEYS): Acc rding t the functi ning state f the
CD player y u have tw different acti ns:
-when the CD player is in st p it is p ssible t select a track pressing
the number f the c rresp ndent s ng (the unit waits f r PLAY t be
pressed).
-When the CD player is playing, pressing the number f the desired
s ng it immediately skips t the indicated track.
•TIME: pressing this key it is p ssible t visualize different inf rmati n n
the repr ducing time. The alternative m dalities are:
-the time that is left until the end f the s ng, m dality “end f track” ( n
the display it appears in “_” between the indicati n f the minutes and
the sec nds).
-The time that is left until the end f the CD, m dality “end f disc” ( n
the display it appears in “-“ between he indicati n f the minutes and
the sec nds).
-The time that has g ne by since the beginning f the CD, m dality
“t tal time” ( n the display it appears in “.“ between the indicati n f
the minutes and the sec nds).
•STANDBY CD: it switches- n and switches- ff the unit.
•RPT (REPEAT): This key has tw different functi ns acc rding t the
functi ning state f the CD player.
-When the CD player is in st p it is p ssible t ch se t repeat a track
r the entire disc by pressing the key nce r twice. T ch se t
repeat a track y u press the keys PREV and NEXT r pressing directly
the number f the track using the numeric keys.
-When the CD player is repr ducing, pressing this key in tw different
m ments determines the initial instant (A) and final (B) f a rand m
secti n t repeat. When this pti n is active, y u can de-activate it by
pressing the key again, and the n rmal repr ducti n f the CD is re-
established.

Descrizione del telecomando
Funzioni del CD PLAYER
•
PLAY /
PAUSE: per la descrizione della funzione fare riferimento al
manuale utente.
•
STOP /
OPEN: per la descrizione della funzione fare riferimento al
manuale utente.
•
PREV /
REW: per la descrizione della funzione fare riferimento al
manuale utente.
•
NEXT /
FFW: per la descrizione della funzione fare riferimento al
manuale utente.
•
0123456789 (TAST NUMER C ): a seconda dello stato di funzionamento
del CD player si hanno due differenti comportamenti:
-Quando il CD player è in stop è possibile selezionare una traccia
digitando il numero del brano corrispondente, l’apparecchio rimane in
attesa del comando di riproduzione (PLAY).
-Quando il CD player è in riproduzione, digitando il numero del brano
desiderato viene effettuato immediatamente il salto alla traccia
indicata..
•
TIME: premendo questo tasto è possibile visualizzare differenti
informazioni sul tempo di esecuzione. Le modalità alternative sono:
-il tempo che rimane fino alla fine del brano, modalità “end of track” (sul
display viene visualizzato “_” tra l’indicazione dei minuti e quella dei
secondi).
-il tempo residuo fino alla fine del CD, modalità “end of disc” (sul
display viene visualizzato “·” Tra l’indicazione dei minuti e quella dei
secondi).
-il tempo trascorso dall’inizio del CD, modalità “total time” (sul display
viene visualizzato “.” Tra l’indicazione dei minuti e quella dei secondi).
•
STANDBY CD: accende e spegne l’apparecchio.
•
RPT (REPEAT): Questo tasto ha due differenti funzioni a seconda dello
stato di funzionamento del CD player.
-Quando il CD player è in stop è possibile scegliere di ripetere una
traccia oppure l’intero disco premendo una o più volte questo tasto. La
scelta della traccia da ripetere si effettua utilizzando i tasti PREV e
NEXT oppure digitando direttamente il numero della traccia utilizzando
i tasti numerici..
-Quando il CD player è in riproduzione, la pressione di questo tasto in
due momenti diversi determina l’istante iniziale (A) e finale (B) di una
sezione arbitraria da ripetere Quando questa opzione è attiva una
ulteriore pressione del tasto la disattiva, ripristinando la normale
riproduzione del CD.

Unpacking and checking CD player package
Carefully pen the package t av id damaging the c ntent. The package sh uld c ntain:
•
1 R ssini CD Player
•
1 rem te c ntr ller
•
1 p wer c rd
•
2 AAA batteries
•
1 instructi n manual
If ne f the items listed ab ve is missing, please c ntact y ur Audi Anal gue retailer. After extracting the smallest items fr m the
package, pull ut the unit carefully. Separate the package fr m the anti-sh ck expanded-f am pr tecti ns. If batteries are n t
already placed in the rem te c ntr ller battery sl t, pen the sl t, insert batteries acc rding t the indicated p larity, then cl se the
battery sl t.
Apertura e ispezione dell’imballo
Aprire la scatola di cartone con cautela per non danneggiare il contenuto. L’imballo deve contenere:
•
Un Rossini CD player
•
Un telecomando
•
Un cavo di alimentazione
•
Due batterie AAA
•
Questo manuale
Se qualcuno degli oggetti precedentemente elencati dovesse mancare, contattate il Vostro rivenditore Audio Analogue di fiducia.
Dopo avere estratto le parti di minori dimensioni, estrarre con cautela l’apparecchio dall’imballo. Separare l’imballo dalle imbottiture
antiurto in schiuma espansa. Se le batterie non si trovano già all’interno del telecomando, aprire il coperchio del vano portapile del
telecomando ed inserirle nelle posizioni corrette; quindi chiudere il coperchio del vano portapile.
Where to place Rossini CD Player
R ssini CD Player is a unit that may generate heat. Please l cate the unit in a well-ventilated place. In particular, y u sh uld leave at
least 5cm ar und and ab ve the unit and av id placing it cl se t heat s urces (radiat rs, heaters, amplifiers, televisi n sets).
Scelta del luogo in cui posizionare il Rossini CD pla er
l Rossini CD player è un apparecchio che può generare calore. Per questo motivo è consigliabile posizionarlo laddove sia garantita
una corretta circolazione d’aria. n particolare, è opportuno garantire uno spazio sufficiente attorno e sopra l’apparecchio (almeno
5cm), ed evitare posizionamenti vicino a fonti di calore (termosifoni o stufe, amplificatori di potenza, televisori).
Pl gging in and connecting p Rossini CD Player
Bef re c nnecting R ssini CD Player t an amplifier, please be sure that they’re b th unplugged fr m wall utlets. First f all,
c nnect the R ssini CD Player stere utput t y ur amplifier/preamplifier’s input y u want t use. Please use nly high-quality c rds
with g ld plated c nnect rs. Be sure that the main switch is in p siti n OFF.
At last, plug the p wer c rd int the R ssini CD Player inlet and int the wall utlet.
Collegamento del Rossini CD pla er
Prima di collegare il Rossini CD player all’amplificatore, verificare che tutti gli apparecchi siano scollegati dalla rete elettrica.
Per prima cosa, collegare l’uscita stereo del Rossini CD player all’ingresso dell’amplificatore o preamplificatore che si desidera
utilizzare. Utilizzare solo cavi della migliore qualità, terminati possibilmente con connettori dorati. Controllare che l’interruttore
principale sia in posizione OFF.
nfine, collegare il cavo di alimentazione fornito in dotazione al Rossini CD player all’apposita vaschetta. La spina del cavo di
alimentazione andrà poi collegata ad una presa di rete.

11
Powering p Rossini CD Player
ATTENTION: before t rning on the RossiniCD player be s re that the integrated amplifier or preamplifier which the
RossiniCD is connected to has the vol me set to zero!!!
Turn n the main switch, the unit aut matically enter in STANDBY m de and visualizes: "stand by" n the display f r s me sec nds,
then the written disappears.
When the “STBY” butt n n the rem te c ntr ller r the “PLAY” butt n n the fr nt panel is pressed, R ssini CD Player turns n and
a presentati n message is sh wn n the display. After a few sec nds, the display will sh w a message, that lasts ar und ne
minute, c ncerning the heating status f the tube. A new message sh ws when tube is heathen up and ready t be used. After a few
sec nds the display will sh w the CD data r a “NO DISC” message. If n thing happens, please refer t the tr ublesh ting secti n
f the present manual. Please set the unit n STANDBY m de when unused f r sh rt peri ds f time and turn ff the unit by the
mains v ltage switch when unused f r l ng peri ds f time . Unplugg the unit fr m the utlet during lightning and electric st rms!
Accensione del Rossini CD pla er
ATTENZIONE: prima di accendere il RossiniCD pla er verificare che il volume dell’integrato o preamplificatore a cui il
RossiniCD è connesso sia a zero!!!
Premere l’interruttore principale posteriore, in questo modo l’apparecchio entra in standby e visualizza per qualche secondo la
scritta “stand by” sul display . Quando la suddetta scritta sparisce, alla pressione del pulsante “STBY” sul telecomando o alla
pressione del pulsante “PLAY” sul pannello frontale, il lettore si accende e il display mostra un messaggio di presentazione. Dopo
qualche secondo viene visualizzata l’indicazione dello stato di attesa per il riscaldamento della valvola, attesa che dura circa un
minuto. Quindi viene indicato l’avvenuto riscaldamento della valvola e dopo qualche secondo viene visualizzata la schermata relativa
alle informazioni del disco, se esso è presente all’interno dell’apparecchio, oppure la dicitura “NO D SC”. Qualora ciò non dovesse
accadere, consultare la sezione dedicata alla risoluzione dei problemi. E’ consigliabile tenere l’apparecchio in stand-by quando non
lo si utilizza per brevi periodo di tempo, spegnerlo con l’interruttore principale posteriore quando non viene utilizzato per lunghi
periodi di tempo e spegnerlo e rimuovere il cavo di alimentazione in occasione di temporali e tempeste elettriche.
Standby mode
Y u can put R ssini CD Player in standby m de either pressing the “STBY” butt n n the rem te c ntr ller r h lding the “STOP”
butt n n the fr nt panel f r a few sec nds when the unit is in STOP m de. When the CD player is in standby m de, the anal g
circuits are ff, reducing p wer c nsumpti n and minimizing damage risks due t verl ads r lightning. Please set the unit n
stand-by m de when unused f r sh rt peri ds f time r turn the unit ff unplugging it fr m the utlet when unused f r l ng peri ds
f time r during lightning and electric st rms.
Stand-b
l Rossini CD player può essere posto in stand-by premendo il pulsante “STBY” sul telecomando o mantenendo premuto il pulsante
STOP sul pannello frontale per alcuni secondi quando l’apparecchio è in STOP. Quando il Rossini è in stand-by, i circuiti analogici
sono spenti per minimizzare i consumi ed i rischi di danni conseguenti a sovratensioni o fulmini che colpiscano la linea elettrica. Si
consiglia di tenere l’apparecchio in stand-by tra un ascolto e l’altro, e di scollegare la spina di rete quando non lo si utilizza per lunghi
periodi di tempo e in occasione di tempeste elettriche o temporali

12
Specifications
Parameter Meas rement conditions Val e
Channels: - 2
Maximum utput v ltage: - 1.9Vrms
Frequency resp nse: - 20Hz-20kHz +0/-3dB
N ise level Band limits 0Hz-20kHz -120dB under 1Vrms
Signal/n ise rati 22Hz-22kHz 98dB
P wer requirements: - 230V 50-60Hz r 115V 50-60Hz
P wer c nsumpti n: - 40VA
Specifiche Tecniche
Parametro Condizioni di misura Valore
Numero di canali: - 2
Tensione max di uscita - 1,9Vrms
Risposta in frequenza - 20Hz-20kHz +0/-3dB
Livello di rumore Limiti di banda 0Hz-20kHz -120dB sotto 1Vrms
Rapporto segnale/rumore 22Hz-22kHz 98dB
Alimentazione: - 230V 50-60Hz oppure 115V 50-60Hz
Assorbimento: - 40VA
TROUBLESHOOTING
Symptome Ca se Remedy
Unit is in stand-by m de Push STBY butt n n the rem te
c ntr ller r any butt n n the fr nt panel
P wer c rd inc rrectly plugged Make sure the p wer c rd is c rrectly
plugged int the wall utlet
Display is ff
N s und
Burned- ut fuses
Check fuses in the fuse panel (after
unplugging the p wer c rd fr m the wall
utlet) ab ve the IEC inlet and replace
them with new nes f the same type
Faulty r inc rrectly plugged c nnect rs
between R ssini CD Player and the
amplifier
Check c rds and their c nnecti n
Display is n
N s und
ncorrectly selected source on the amplifier
Check that Rossini CD Player is correctly
selected through the amplifier inputs
CD player is on but the display is off
Faulty front panel
Contact your Audio Analogue retailer for
connections check and front panel
substitution
No battery/ worn-out battery Place/replace battery (2 ‘AAA’ batteries)
Remote controller doesn’t work You’re standing too far or on an exceeding
angle from the front panel Get closer to the unit or reduce angle
The unit is on but there is no sound Worn-out or damaged fuse Contact your Audio Analogue retailer for
fuse check and substitution
If the suggested remedies should not work or the problem is not shown in the list above, please contact our local Audio
Analogue retailer.

13
RICERCA GUASTI
Sintomo Causa Rimedio
L’apparecchio è in stand-by
Togliere l’apparecchio dallo stato di stand-
by premendo il tasto STBY sul
telecomando o un tasto sul pannello
frontale
Cavo di alimentazione non correttamente
collegato
Controllare che il cavo di rete sia
correttamente collegato all’apparecchio e
alla presa di rete
Display spento
Nessun suono
Fusibili di rete bruciati
Controllare (dopo aver staccato il cavo di
alimentazione dalla presa di rete) i fusibili
nel portafusibili della presa EC ed
eventualmente sostituire con altri dello
stesso tipo
Cavi di segnale tra Rossini CD player e
amplificatore non connessi correttamente
oppure difettosi
Controllare lo stato dei cavi e/o la corretta
connessione
Display acceso
Nessun suono
Sorgente non selezionata correttamente
sull’amplificatore
Controllare che il Rossini CD player sia
selezionato correttamente con il selettore
degli ingressi dell’amplificatore
l CD player funziona
ma il display è spento
Scheda frontale non collegata
correttamente oppure difettosa
Contattare il vostro rivenditore Audio
Analogue per una verifica dei collegamenti
ed eventuale sostituzione della scheda
Batterie scariche o mancanti Inserire o sostituire le batterie (2
ministilo tipo ‘AAA’)
Il telecomando non funziona Eccessiva distanza dal pannello frontale
dell’apparecchio o angolo non corretto
Avvicinarsi di più all’apparecchio o
cambiare angolo
L’apparecchio risponde ai comandi ma non
si sente alcun suono Valvola esaurita o danneggiata
Contattare il vostro rivenditore Audio
Analogue per una verifica ed eventuale
sostituzione della valvola
Se i rimedi suggeriti non dovessero funzionare oppure il problema non è riportato nella lista, contattate il vostro rivenditore
Audio Analogue
WARNING!
All of o r CD players may not be able to read some specific CD’s man fact red
with a niq e protection system against copying. If in do bt, please try to read
the CD sing a PC CD-ROM drive. When the CD-ROM drive is incapable of
accessing the tracks on the CD, please do not play the CD in q estion with the
o r CD players. Altho gh there is generally no problem with hybrid SACD’s,
please check for any copy protection system in the CD layer. O r CD players
are able to reprod ce CD’s protected with the IFPI system, whose symbol is
made of two circles containing two triangles.
ATTENZIONE!
I nostri lettori CD potrebbero non essere in grado di leggere alcuni CD prodotti
con un particolare sistema di protezione anti-copia. Se in dubbio, si consiglia di
provare prima a far leggere il CD dal CD-ROM di un PC. Nel caso in cui il CD-
ROM non riuscisse ad accedere alle tracce del CD, evitare di riprodurlo con i
nostri lettori. Non è invece stato riscontrato alcun problema con i SACD ibridi,
che vengono regolarmente letti. Verificare comunque che lo strato CD di un
SACD ibrido non sia stato a sua volta protetto contro la copia. I nostri lettori
sono in grado di leggere i CD protetti col sistema IFPI, rappresentato dal
simbolo dei due cerchi contenenti due triangoli.
Attenti n: Y ur pr duct is marked with this symb l. It
means that used electrical and electr nic pr ducts
sh uld n t be mixed with general h useh ld waste.
There is a c llecti n system f r these pr ducts.
Attenzione: il dispositivo è contrassegnato da questo
simbolo, che segnala di non smaltire le
apparecchiature elettriche ed elettroniche insieme ai
normali rifiuti domestici. Per tali prodotti è previsto un
sistema di raccolta a parte.
A. INFORMATION ON DISPOSAL FOR USERS (PRIVATE HOUSEHOLDS)
1 In The E ropean Union
Attenti n: If y u want t disp se f this equipment, please d n t use the rdinary dust bin.
Used electrical and electr nic equipment must be treated separately and in acc rdance with legislati n that requires
pr per treatment, rec very and recycling f used electrical and electr nic equipment.
F ll wing the implementati n by member states, private h useh lds within the EU states may return their used electrical
and electr nic equipment t designated c llecti n facilities free f charge*. In s me c untries* y ur l cal retailer may als
take back y ur ld pr duct free f charge if y ur purchase a similar new ne.
*) Please c ntact y ur auth rity f r further details.
If y ur used electrical r elctr nic equipment has batteries r accumulat r, please disp se f these separately bef re and
acc rding t l cal requirements.
By disp sing f this pr duct c rrectly y u will help ensure that the waste underg es the necessary treatment, rec very
and recycling and thus prevent p tential negative effects n the envir nment and human health which c uld therwise
arise due t inappr priate waste handling.
2. In other co ntries o tside the EU
If y u wish t discard this pr duct, please c ntact y ur l cal auth rities and ask f r the c rrect meth d f disp sal.
F r Switzerland: Used electrical r electr nic equipment can be returned free f charge t the dealer, even if y u d n’t
purchase a new pr duct. Further c llecti n facilities are listed n the h me page f www.swisc .ch r www. Sens.ch
B. Information on Disposal for Business Users
1. In the E ropean Union
If this pr duct is used f r business purp ses and y u want t discard it:
Please c ntact y ur Audi Anal gue dealer wh will inf rm y u ab ut the take-back and recycling. Small pr ducts (and
small am unts) might be taken back by y ur l cal c llecti n facilities.
F r Spain: Please c ntact the established c llecti n system r y ur l cal auth rity f er take-back f y ur used pr ducts.
2. In other Co ntries o tside the EU
If y u wish t discard f this pr duct, please c ntact y ur l cal auth rities and ask f r the current meth d f disp sal.
A. INFORMAZIONI SULLO SMALTIMENTO PER GLI UTENTI (PRIVATI)
1 Nell’Unione europea
Attenzione: Per smaltire il presente dispositivo, non utilizzare il normale bidone della spazzatura!
Le apparecchiature elettriche ed elettroniche usate devono essere gestite a parte in conformità alla legislazione che
richiede il trattamento, il recupero e il riciclaggio adeguato dei suddetti prodotti.
n seguito alle disposizioni attuate dagli Stati membri, i privati residenti nella UE possono conferire gratuitamente le
apparecchiature elettriche ed elettroniche usate a centri di raccolta designati*.
n alcuni paesi*, anche il rivenditore locale può ritirare gratuitamente il vecchio prodotto se l’utente acquista un altro nuovo
di tipologia simile.
*) Per maggiori informazioni di prega di contattare l’autorità locale competente.
Se le apparecchiature elettriche o elettroniche usate hanno batterie o accumulatori, l’utente dovrà smaltirli a parte
preventivamente in conformità alle disposizioni locali.
Lo smaltimento corretto del presente prodotto contribuirà a garantire che i rifiuti siano sottoposti al trattamento, al
recupero e al riciclaggio necessari prevenendone il potenziale impatto negativo sull’ambiente e sulla salute umana, che
potrebbe derivare da un’inadeguata gestione dei rifiuti.
2 In paesi che non fanno parte dell’UE
Se si desidera eliminare il presente prodotto,contattare le autorità locali e informarsi sul metodo di smaltimento corretto.
Per la Svizzera: Le apparecchiature elettriche o elettroniche possono essere restituite gratuitamente al rivenditore, anche
se non si acquista un prodotto nuovo. Altri centri di raccolta sono elencati sulla homepage www.swis .ch di
www.sens.ch.
B. INFORMAZION SULLO SMALTIMENTO PER GLI UTENTI COMMERCIALI
1. Nell’Unione Europea
Se il prodotto è impiegato a scopi commerciali. Procedere come segue per eliminarlo.
Contattare il proprio rivenditore Audio Analogue che fornirà informazioni circa il ritiro del prodotto. Potrebbero essere
addebitate le spese di ritiro e riciclaggio. Prodotti piccoli e quantitativi ridotti potranno essere ritirati anche dai centri di
raccolta locali.
Per la Spagna: Contattare il sistema di raccolta ufficiale o l’ente locale preposto al ritiro dei prodotti usati
2. In paesi che non fanno parte dell’UE
Se si desidera eliminare il presente prodotto, contattare le autorità locali e informarsi sul metodo di smaltimento corretto.

15

Audio Analogue
Manufactured and Distributed by:
AUDIO FUTURA spa
Via Maestri Del Lav r 583
51015 M nsumman Terme (PT) Italy
Tel. 0572 954513 fax 0572 958099
www.audi anal gue.c m - inf @audi anal gue.c m
Other manuals for Rossini 2.0
1
Other Audio Analogue CD Player manuals

Audio Analogue
Audio Analogue Maestro User manual

Audio Analogue
Audio Analogue Paganini 192/24 User manual

Audio Analogue
Audio Analogue Crescendo User manual

Audio Analogue
Audio Analogue Maestro User manual

Audio Analogue
Audio Analogue Maestro User manual

Audio Analogue
Audio Analogue Paganini 192/24 User manual

Audio Analogue
Audio Analogue PRIMO CD 2.0 User manual

Audio Analogue
Audio Analogue CDP 2.0 User manual

Audio Analogue
Audio Analogue Primo Tube CD User manual

Audio Analogue
Audio Analogue Rossini 2.0 User manual


