Audio Analogue Maestro User manual

AUDIO ANALOGUE
maestro
CD PLAYER 192/24
CURRENT OUTPUT DAC
REV2.0
OWNER’S MANUAL
MANUALE D’ISTRUZIONI
Manual ev1.4
All manuals and user guides at all-guides.com
all-guides.com

2
All manuals and user guides at all-guides.com
3
Dea Audiophile,
Cong atulations and thank you fo choosing Maest o CD 192/24. You’ e now the owne of a unit that establishes a new efe ence in
the catego y of high-quality and high-ve satility ste eophonic p oducts. Maest o CD 192/24 p ovides ci cuital solutions with no
comp omises and featu es capable to satisfy advanced use s’ demands. We built ou CD playe with high-pe fo mance ci cuits,
192kHz/24 bit D/A conve sion system, function-based and channel-based ci cuit sections, PC and house-automation systems
connection, high-cont ast VFD display, optimized output fo maximum sound t anspa ency and quality. Maest o CD 192/24 solutions
make the unit a valuable and du able investment.
Caro Audiofilo,
congratulazioni e grazie per aver scelto il Maestro CD 192/24. Sei ora in possesso di un apparecchio che sta ilisce il nuovo
riferimento nella categoria di prodotti stereo caratterizzati da una eccezionale qualità e versatilità. Il Maestro CD 192/24 associa
infatti soluzioni circuitali senza compromessi con caratteristiche funzionali tali da soddisfare anche l’utente più esigente. Un CD
player realizzato con circuitazioni ad elevate prestazioni, sistema di conversione D/A a 192kHz e 24 it, sezioni circuitali divise per
funzione e canale, interfaccia ilità con PC o impianti di home automation, display VFD ad elevato contrasto, stadio di uscita
ottimizzato per massimizzare la trasparenza del suono e quindi le prestazioni nell’ascolto. Le soluzioni adottate rendono il Maestro
CD un investimento di pregio durevole nel tempo.
All manuals and user guides at all-guides.com
4
INTRODUCTION
AF GROUP SRL does not take any esponsibilities in the following cases:
Wheneve the ope ational p ocedu es elated to the use and the maintenance of the equipment as desc ibed in this manual a e not
espected.
Wheneve damages to the equipment occu because of fixing and modifications made fo m non-autho ized staff o because of
no mal dete io ation of the system.
No pa t of this manual can be ep oduced by any means, t ansmitted o copied fo p ivate o public use without p ivate autho ization
f om AF GROUP SRL.
The info mation contained in this manual is elated to the data kept by AF GROUP SRL at the moment of the issue o f this
publication; AF GROUP SRL has the ight to make changes to this document without p io notice.
The equipment has been p ojected and manufactu ed acco ding to the Regulations of the Community 89/336/CEE and is ma ked CE.
This equipment can’t be used fo diffe ent pu poses othe than those fo which it has been manufactu ed.
AF GROUP SRL does not take any esponsibilities fo accidents o damages due to imp ope use of the equipment.
WARNING
Please do espect the safety standa ds contained in this manual befo e sta ting to ope ate the equipment.
Do not open the equipment. No fu the inte ventions than those desc ibed in this manual should be made. Fo technical assistance,
please consult a qualified technician o an AF GROUP SRL deale .
Not especting the inst uctions contained in this manual will invalidate the te ms and conditions of the gua antee.
NECESSARY PRECAUTIONS FOR SAFETY AND MAINTENANCE
ATTENTION: befo e sta ting any ope ation, use o maintenance of the equipment it is st ictly necessa y to unde stand the following
manual.
To avoid any accidents o haza ds it is necessa y to follow the following egulations.
Activate the equipment only p io checking if the installation has been p ope ly made, and if it is elated to the inst uctions contained
in this manual.
Avoid installing the equipment in places subjected to ext emely high tempe atu es o humidity.
Check that the labels containing info mation about safety a e always visible and in good conditions.
Ensu e to not obst uct ventilation, to avoid excessive ove heating. The equipment should be kept to a minimal distance of 15 cm
f om any object and not to place on ca pet o othe soft su faces. Also the installation close to adiato s o in close envi onments
without ventilation should be avoided.
Do not switch on the equipment until it has not been co ectly and completely installed.
Only supply the equipment with the kind of the elect ic supply as stated on the app op iate label. If in doubts about the kind of supply
available, please consult an expe t technician fo technical assistance.
The equipment needs to be wi ed to an ea th te minal. The exte nal case is metal made; a defective connection with the ea th may
be dange ous.
In case damages occu s to the supply cable, it should be immediately eplaced with the same kind of cable. This ope ation should be
only made p io to disconnecting the main supply.
Do not place objects on the supply cable and check that this is not positioned in way th ough. The cable should not be knotted o
cu ly.
Replace the fuses always with othe of the same kind.
Do not use the equipment close to the wate o othe liquids. If liquid ente ed the equipment, the plug should be disconnected f om
the socket avoiding to touch the metal pa ts. Competent technical staff should be asked to check the equipment befo e ope ating it
again.
Do not place ecipients containing liquids on the equipment. Even when it is switched off.
Keep the equipment fa f om sou ces of heat such as the sola light, kitchens, adiato s etc…
Always unplug the supply cable du ing ainy weathe .
Always Switch off and unplug the supply cable befo e cleaning the equipment exte nally.: this ope ation should be made using a d y
and soft cloth. Neve use alcohol based cleaning mate ial.
If the amplifie was ca ied f om an ext emely cold envi onment to and ext emely hot one, it could c eate inte nal condensation,
causing possible bad functioning.
If this occu s, please wait fo at least an hou befo e using it again, to allow it to g adually each oom tempe atu e.
When not used fo long pe iods, please unplug the equipment.
INSTRUCTIONS TO PUT IT OUT OF SERVICE
Consult qualified staff
Follow the egulations of the cu ent legislation ega ding ecycling and waste disposal.
All manuals and user guides at all-guides.com
5
PREMESSA
AF GROUP SRL non accetta responsa ilità nei casi in cui:
Le procedure operative di utilizzo e manutenzione dell’apparato descritte nel manuale non siano rispettate.
I danni si verifichino in seguito a riparazioni o modifiche dell’apparato eseguite da personale non autorizzato o a seguito di normale
deterioramento dell’apparato.
Nessuna parte del presente manuale può essere riprodotta con alcun mezzo, trasmessa o copiata per usi pu lici e/o privati senza
la previa autorizzazione di AF GROUP SRL. Le informazioni contenute nel presente manuale sono relative ai dati in possesso di AF
GROUP SRL al momento della pu licazione; AF GROUP SRL si riserva il diritto di apportare cam iamenti al presente documento
senza alcun preavviso.
L’apparato è progettato e realizzato in conformità alle Direttive Comunitarie 89/336/CEE e 72/23/CEE e risulta marcato CE.
L’apparato non può essere utilizzato per scopi diversi da quelli per cui è stato progettato.
AF GROUP SRL non si assume alcuna responsa ilità per incidenti o danni causati da un utilizzo improprio dell’apparato.
AVVERTENZA
Prima di compiere qualunque operazione attenersi alle norme di sicurezza contenute all’interno del manuale
Non aprire l’apparecchio. Nessun ulteriore intervento oltre a quelli descritti in questo manuale dovre e essere effettuato. Per
l’assistenza tecnica, rivolgersi a un tecnico qualificato o a un rivenditore AF GROUP SRL.
Il mancato rispetto delle prescrizioni del seguente manuale implica il decadimento della garanzia.
PRECAUZIONI PER LA SICUREZZA E MANUTENZIONE
ATTENZIONE: prima dell’utilizzo o manutenzione dell’apparato o di qualsiasi operazione sullo stesso è necessario prendere visione
del seguente manuale.
Al fine di prevenire ogni pericolo di incidente si impongono le seguenti prescrizioni:
Attivare l’apparato solo dopo aver verificato l’adeguatezza dell’installazione e la conformità alle indicazioni contenute nel presente
manuale.
Non installare l’apparecchiatura in luoghi soggetti a s alzi eccessivi di temperatura e umidità.
Verificare che le etichette contenenti informazioni sulla sicurezza siano sempre en visi ili ed in uono stato.
Le fessure di ventilazione non devono assolutamente essere ostruite per evitare surriscaldamento dell’apparato. A tal fine,
posizionare l’unità ad una distanza minima di 15 cm da ogni altro ostacolo e non su tappeti, moquette o altre superfici mor ide.
Evitare inoltre di installarlo nei pressi di caloriferi o in am ienti chiusi, privi di una appropriata ventilazione.
Non accendere l’apparato finché non è completamente installato in maniera corretta.
Alimentare l’apparato con il tipo di alimentazione elettrica riportato sull’apposita targhetta. In caso di du i sul tipo di alimentazione
disponi ile, consultare il servizio di assistenza tecnica.
L’apparecchio deve essere sempre collegato a terra. Poiché l’involucro è costituito in metallo, una connessione di terra difettosa o
mancante potre e essere pericolosa.
In caso di danneggiamenti al cavo di alimentazione, provvedere immediatamente alla sostituzione con un altro dello stesso tipo.
Questa operazione deve essere effettuata dopo aver disconnesso l’alimentazione primaria.
Non posizionare oggetti sul cavo di alimentazione e verificare che questo non si trovi in una zona di passaggio. Il cavo non deve
essere arrotolato o annodato.
Sostituire i fusi ili sempre con altri dello stesso tipo.
Non usare l’apparato in prossimità di acqua o altri tipi di liquidi. Se nell’unità dovesse entrare del liquido, scollegare immediatamente
il cavo di rete dalla presa a muro evitando di toccare le parti metalliche dell’apparecchiatura e rivolgersi al personale tecnico per un
controllo prima del riutilizzo.
Non appoggiare recipienti contenenti liquidi di qualsivoglia natura sopra l’apparato. Anche quando questo è spento.
Tenete l’apparecchio lontano da fonti di calore come la luce solare, cucine, radiatori, etc…
Scollegare sempre il cavo di alimentazione dalla presa durante i temporali.
Spegnere e scollegare sempre l’alimentazione prima di effettuare la pulizia esterna dell’apparato: questa operazione deve essere
effettuata utilizzando un panno asciutto e mor ido. Non usare mai solventi o detergenti a ase di alcool.
Se l’amplificatore viene trasportato da un am iente freddo ad un altro caldo, si potre e formare condensa al suo interno, causando
possi ili malfunzionamenti. Se ciò si dovesse verificare, si prega di attendere almeno un’ora prima dell’uso in modo da permettergli
di raggiungere la temperatura am iente gradualmente.
In caso di lunghi periodi di inutilizzo, staccare la spina dalla presa di rete.
ISTRUZIONI PER LA MESSA FUORI SERVIZIO
Rivolgersi a personale specializzato.
Seguire le prescrizioni della corrente legislazione in materia di riciclaggio e smaltimento dei rifiuti.
All manuals and user guides at all-guides.com

6
Featu es
Refined powe supply with two t ansfo me s (one to oidal) and eight sepa ated set-up sections.
High-pe fo mance 192KHz/24bit D/A conve te .
Low-jitte , sample- ate conve te .
Analogical ci cuits with sepa ated components.
Highest-quality passive components; lowest-tole ance metallic-laye ed esiste s (MIL standa d); low-tole ance, non-pola ized
polyeste /p opylene capacito s; high-speed, low-loss, high-capacity elect olytic capacito s; o ganic-elect olyte, low-capacity
elect olytic capacito s.
Multiple sou ce system cont ol: f ont panel, IR emote cont ol, RS-232 inte face.
Mic ocont olle system cont ol
High-cont ast VFD display
Caratteristiche costruttive
Raffinata alimentazione realizzata con due trasformatori di cui uno toroidale e otto sezioni di regolazione distinte.
Convertitore D/A al altissime prestazioni, 192kHz/24 it.
Convertitore di sample rate a asso jitter.
Circuitazioni analogiche a componenti discreti.
Componenti passivi di elevatissima qualità: resistenze a strato metallico a assissima tolleranza a norme MIL, condensatori non
polarizzati in poliestere o polipropilene a assa tolleranza, condensatori elettrolitici di elevata capacità a assa perdita ed elevata
velocità, condensatori elettrolitici di assa capacità ad elettrolita organico.
Sistema di gestione a controllo multiplo concorrente: da pannello frontale, da telecomando e da interfaccia RS-232.
Gestione di sistema a microcontrollore.
Display VFD ad elevato contrasto.
All manuals and user guides at all-guides.com
all-guides.com

7
F ont panel
1) STANDBY. When p essing this button you activate/deactivate standby mode.
2) Standby indicato . Lights blue when Standby mode is activated. PLED display is tu ned off.
3) VFD display.
4) CD t ay.
5) IR eceive .
6) OPEN. When p essing this button you open/close CD t ay.
7) PLAY/PAUSE. When p essing this button you sta t/inte upt CD playback.
8) STOP: when p essing this button you stop CD playback.
9) PREV. When p essing this button du ing playback, you move to the p evious CD t ack. When playback is stopped, you may
choose the CD t ack f om which esuming playback o sea ch CD t acks backwa d.
10) NEXT. When p essing this button du ing playback, you move to the next CD t ack. When playback is stopped, you may choose
the CD t ack f om which esuming playback o sea ch CD t acks fo wa d.
11) REW. When p essing this button du ing playback, you activate fast ewind sea ch.
12) FWD. When p essing this button du ing playback, you activate fast ewind sea ch.
Descrizione del pannello frontale
1) STANDBY. La pressione di questo tasto determina l’attivazione/disattivazione dello stand- y.
2) Indicatore di stand- y. Si illumina di lu quando è stata attivata la modalità di stand- y. Contestualmente si spegne il display.
3) Display VFD.
4) Cassetto porta CD.
5) Ricevitore IR.
6) OPEN. La pressione di questo tasto apre o chiude il cassetto porta CD.
7) PLAY/PAUSE. La pressione di questo tasto attiva la riproduzione del disco oppure attiva o disattiva la pausa durante la lettura.
8) STOP. La pressione di questo tasto arresta la riproduzione del disco.
9) PREVIOUS. Durante la lettura del CD la pressione di questo pulsante provoca il salto immediato alla traccia precedente a
quella letta in quel momento. Quando il CD è fermo, è possi ile utilizzare questo pulsante per decidere da quale traccia iniziare
la riproduzione, o per scorrere in ordine decrescente le tracce presenti nel CD.
10) NEXT. Durante la lettura del CD la pressione di questo pulsante provoca il salto immediato alla traccia successiva a quella letta
in quel momento. Quando il CD è fermo, è possi ile utilizzare questo pulsante per decidere da quale traccia iniziare la
riproduzione, o per scorrere in ordine crescente le tracce presenti nel CD.
11) REW. Durante la lettura del CD la pressione di questo pulsante attiva la funzione di indietro veloce.
12) FFW. Durante la lettura del CD la pressione di questo pulsante attiva la funzione di avanti veloce.
1
9
6
7
12
3
5
8
10
11
4
2
All manuals and user guides at all-guides.com
8
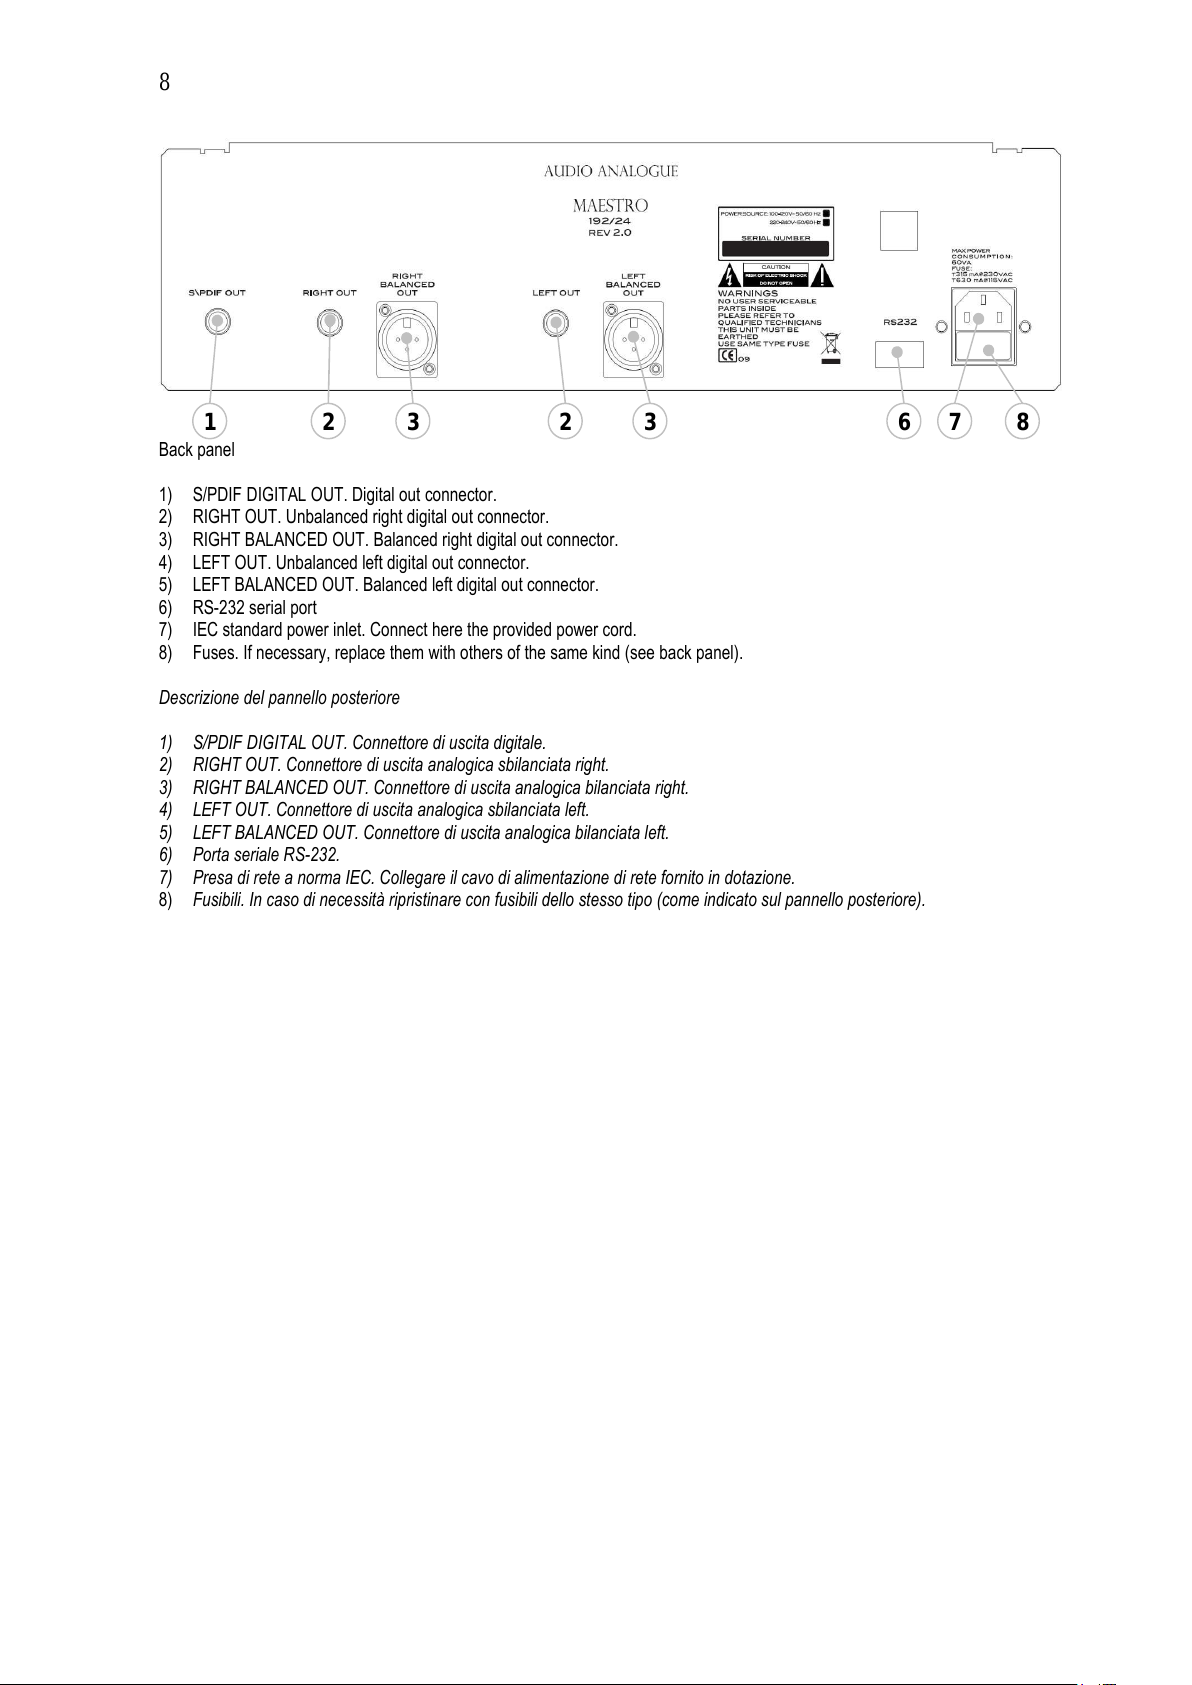
Back panel
1) S/PDIF DIGITAL OUT. Digital out connecto .
2) RIGHT OUT. Unbalanced ight digital out connecto .
3) RIGHT BALANCED OUT. Balanced ight digital out connecto .
4) LEFT OUT. Unbalanced left digital out connecto .
5) LEFT BALANCED OUT. Balanced left digital out connecto .
6) RS-232 se ial po t
7) IEC standa d powe inlet. Connect he e the p ovided powe co d.
8) Fuses. If necessa y, eplace them with othe s of the same kind (see back panel).
Descrizione del pannello posteriore
1) S/PDIF DIGITAL OUT. Connettore di uscita digitale.
2) RIGHT OUT. Connettore di uscita analogica s ilanciata right.
3) RIGHT BALANCED OUT. Connettore di uscita analogica ilanciata right.
4) LEFT OUT. Connettore di uscita analogica s ilanciata left.
5) LEFT BALANCED OUT. Connettore di uscita analogica ilanciata left.
6) Porta seriale RS-232.
7) Presa di rete a norma IEC. Collegare il cavo di alimentazione di rete fornito in dotazione.
8) Fusi ili. In caso di necessità ripristinare con fusi ili dello stesso tipo (come indicato sul pannello posteriore).
1
2
3
8
7
2
3
6
All manuals and user guides at all-guides.com

9
Remote CD functions
To use the emote with the CD Playe you have to select the CD mode on the emote. Fo such pu pose simply
push the switch on the emote.
To check the emote mode just shake the emote and see if the switch at the top left of the emote lights
is on.
•CD
: sets the emote into CD mode
.
•CD STANDBY
: activates/deactivates standby mode if this function is available.
•SELECT
: changes the selected sou ce if this function is available.
•SETUP
: activates the set-up if this functions is available.
•PLAY
: by p essing this button, you sta t CD playback o
inte upt/ esume CD playback (pause).
•PAUSE
: by p essing this button, you inte upt/ esume CD playback.
•STOP/OPEN
: by p essing this button, you stop CD playback o open/close
CD t ay.
•PREV/NEXT
: by p essing this button du ing playback, you move to the
p evious/next CD t ack. When playback is stopped, you may choose the CD t ack f om which to esume
playback o sea ch backwa d/fo wa d th ough the CD t acks.
•FFW
: by p essing this button du ing playback activate fast fo wa d
sea ch.
•REW
: by p essing this button du ing playback activate fast ewind
sea ch.
•RPT
: this key has diffe ent functions acco ding to the functioning
state of the CD playe .
•TI E/ ENU
: this switch cont ols two diffe ent functions: if it is p essed while
the unit is playing it cont ols the TIME functions, while if it is p essed when the unit is in STOP mode it lets
the unit ente into the setup menu (if this function is available) and, if the unit is al eady in SETUP, it lets it
exit the set up mode and go back to no mal ope ation mode.
•Numeric Switches ..
: when the CD playe is stopped it is possible to select a t ack
p essing the numbe of the co espondent song (the unit waits fo PLAY to be p essed). when the CD
playe is playing, p essing the numbe of the desi ed song it immediately skips to the indicated t ack.
Note: Please replace the remote batteries in case:
- the remote backlight brightness decreases
- the remote backlight turns off immediately after a switch is pressed
- the commands from the remote are not correctly received.
All manuals and user guides at all-guides.com

10
Funzioni CD
Per poter essere utilizzato con un lettore CD è necessario selezionare la modalità CD. A tal fine premere
semplicemente il tasto:
Per verificare che il telecomando sia in modalità CD asta scuotere il telecomando e controllare che il tasto
in alto a sinistra si illumini.
•CD
: setta il telecomando in modalità CD.
•CD STANDBY
: attiva/disattiva la modalità stand y se questa funzione è
disponi ile.
•SELECT
: commuta la sorgente se questa funzione è disponi ile.
•SETUP
: richiama il setup se questa funzione è disponi ile.
•PLAY
: la pressione di questo tasto attiva la riproduzione del disco
oppure attiva o disattiva il momentaneo arresto della lettura (pausa) quando il CD è già in riproduzione
.
•PAUSE
: attiva o disattiva il momentaneo arresto della lettura (pausa)
quando il CD è già in riproduzione
•STOP/OPEN
: la pressione di questo tasto arresta la riproduzione del disco
oppure apre o chiude il cassetto porta CD.
•PREV/NEXT :
durante la lettura del CD la pressione di questo pulsante
provoca il salto immediato alla traccia precedente/successiva a quella letta in quel momento. Quando il CD
è fermo, è possi ile utilizzare questo pulsante per decidere da quale traccia iniziare la riproduzione, o per
scorrere in ordine decrescente/crescente le tracce presenti nel CD.
•
FFW
: la pressione di questo tasto attiva la funzione di avanti veloce.
•REW
: la pressione di questo tasto attiva la funzione di indietro
veloce.
•RPT
: questo tasto ha differenti funzioni a seconda dello stato di
funzionamento del CD player.
•TIME/MENU
: questo tasto ha una doppia funzione, se premuto durante la
riproduzione di un rano seleziona il comando TIME, mentre se premuto quando l’apparecchio è in
modalità STOP attiva la modalità SETUP(se questa funzione è disponi ile) o, se l’apparecchio è già in
SETUP, ne provoca l’uscita e il ritorno alla modalità di normale funzionamento.
•Numeric Switche ..
: quando il CD player è in stop è possi ile selezionare una
traccia digitando il numero del rano corrispondente, l’apparecchio rimane in attesa del comando di
riproduzione (PLAY). Quando il CD player è in riproduzione, digitando il numero del rano desiderato
viene effettuato immediatamente il salto alla traccia indicata.
Nota: So tituire le batterie al telecomando nel ca o in cui:
- la retroilluminazione del telecomando i affievoli ce.
- la retroilluminazione i pegne immediatamente dopo la pre ione di un ta to.
- nel ca o i verifichino malfunzionamenti o mancata ricezione dei comandi.
All manuals and user guides at all-guides.com

11
Unpacking and checking CD player package
Ca efully open the package to avoid damaging the content. The package should contain:
•1 Maest o CD 192/24
•1 emote cont olle
•1 powe co d
•2 AAA batte ies (al eady placed in the emote cont olle )
•1 inst uction manual
If one of the items listed above is missing, please contact you Audio Analogue etaile . Afte ext acting the smallest items f om the
package, pull out the unit ca efully. Sepa ate the package f om the anti-shock expanded-foam p otections.
Apertura e i pezione dell’imballo
Aprire la scatola di cartone con cautela per non danneggiare il contenuto. L’im allo deve contenere:
•Un Maestro CD 192/24
•Un telecomando
•Un cavo di alimentazione
•Due atterie AAA (già contenute nel telecomando)
•Questo manuale
Se qualcuno degli oggetti sopra elencati dovesse mancare, contattate il Vostro rivenditore Audio Analogue di fiducia.
Dopo avere estratto le parti di minori dimensioni, estrarre con cautela l’apparecchio dall’im allo. Separare l’im allo dalle im ottiture
antiurto in schiuma espansa.
Where to place aestro CD 192/24
Maest o CD 192/24 is a unit that may gene ate heat. Please locate the unit in a well-ventilated place. In pa ticula , you should leave
at least 5cm a ound and above the unit and avoid placing it close to heat sou ces ( adiato s, heate s, amplifie s, television sets).
Scelta del luogo in cui po izionare il Mae tro CD 192/24
Il Maestro CD 192/24 è un apparecchio che può generare calore. Per questo motivo è consiglia ile posizionarlo laddove sia
garantita una corretta circolazione d’aria. In particolare, è opportuno garantire uno spazio sufficiente attorno e sopra l’apparecchio
(almeno 5cm), ed evitare posizionamenti vicino a fonti di calore (termosifoni o stufe, amplificatori di potenza, televisori
Plugging and connecting aestro CD 192/24
Befo e connecting Maest o CD 192/24 to an amplifie , please be su e that they’ e both unplugged f om wall outlets. Fi st of all,
connect the Maest o CD 192/24 ste eo out to you amplifie /p eamplifie , if any. Please use only high-quality cables with
gold/ hodium-plated connecto s. At last, plug the powe co d into the Maest o CD 192/24 inlet and into the wall outlet.
WARNING! aestro CD 192/24 HAS NO power switch. It means that it turns on any time it is plugged to a wall outlet. Power
plugging has ALWAYS to be done at last.
Collegamento del Mae tro CD 192/24
Prima di collegare il Maestro CD 192/24 all’amplificatore, verificare che tutti gli apparecchi siano scollegati dalla rete elettrica.
Per prima cosa, collegare l’uscita stereo del Maestro CD 192/24 all’ingresso dell’amplificatore o preamplificatore che si desidera
utilizzare. Utilizzare solo cavi della migliore qualità, terminati possi ilmente con connettori dorati o rodiati.
Infine, collegare il cavo di alimentazione fornito in dotazione al Maestro CD 192/24 all’apposita vaschetta. La spina del cavo di
alimentazione andrà poi collegata ad una presa di rete.
ATTENZIONE! Il Maestro CD 192/24 NON è dotato di interruttore di rete, per cui quando viene collegato alla rete elettrica risulta
sempre alimentato. Il collegamento di rete deve SEMPRE essere effettuato per ultimo!
All manuals and user guides at all-guides.com
all-guides.com

12
Notes on aestro CD 192/24 power plugging
Maest o CD 192/24 has to be plugged to the elect ic installation g ounding link to gua antee use ’s safety and maximize sound
quality. Actually, the g ounding link is the way to eliminate noise and dispe sion: that’s why the powe co d has the g ounding p ong.
It is p efe able not to inte upt g ounding link (fo example, with a two-p ong adapte ) unless this ope ation is necessa y to avoid
fu the noise and only when Maest o CD 192/24 is connected to a g ounded amplifie . Audio Analogue assumes no esponsibility fo
damage o malfunctioning due to inco ect Maest o CD 192/24 powe plugging.
Note ul collegamento del Mae tro CD 192/24 alla rete elettrica.
Il Maestro CD 192/24 deve essere collegato alla terra dell’impianto elettrico per garantire la sicurezza dell’utilizzatore e per
massimizzare le prestazioni sonore. Attraverso il collegamento di terra si attua infatti un percorso preferenziale per i distur i e le
dispersioni. A tale scopo, il cavo di alimentazione è dotato di spina con contatto di terra. E’ preferi ile non interrompere il
collegamento di terra (per esempio con un adattatore a due poli) a meno che ciò non sia necessario per garantire l’immunità ad
eventuali distur i, e sempre che il Maestro CD 192/24 sia collegato ad un amplificatore a sua volta collegato a terra. Audio Analogue
declina ogni responsa ilità per eventuali danni o malfunzionamenti dovuti ad un incorretto collegamento del Maestro CD 192/24 alla
presa di rete.
Correct power phase
Due to the asymmet ic st uctu e of the powe t ansfo me winding, it is ve y impo tant to co ectly plug Maest o CD 192/24 acco ding
to the powe phase. Only one of the two possible powe pluggings gua antees the best playback pe fo mance. The diffe ence
between the co ect and the inco ect plugging esults in sound cla ity, dynamic and t idimensionality. To unde stand which plugging
is the most efficient fo playback, it is sufficient to listen to the p oduced sound. If you p efe to inst umentally check it, please use a
phase-detecting sc ewd ive : the co ect plugging is the one that doesn’t make the sc ewd ive led light on o makes it light on feebly
when the sc ewd ive is in contact with the unit chassis. Do not sea ch the co ect phase unless the unit is unplugged. To make
plugging easy, Audio Analogue ma ked the Maest o CD 192/24 powe co d pin that has to be plugged into the inlet phase hole. It is
then sufficient to ve ify which outlet hole is the phase hole and plug the powe co d in inse ting the phase pin into the phase hole.
Corretta fa e dell’alimentazione
A causa della struttura asimmetrica degli avvolgimenti del trasformatore di alimentazione, assume particolare importanza la messa in
fase del Maestro CD 192/24 in relazione all’alimentazione di rete. Delle due posizioni in cui la spina può essere inserita nella presa,
solo una delle due garantisce le massime prestazioni sonore. La differenza tra un corretto inserimento ed un s agliato può essere
percepita in termini di pulizia generale del suono, dinamica e tridimensionalità della scena sonora. Un attento ascolto
dell’apparecchio nelle due possi ili configurazioni di collegamento alla rete è sufficiente per decidere quale è quella giusta. Per chi
volesse una conferma strumentale, suggeriamo di utilizzare un semplice cacciavite cercafase: la posizione della spina nella presa
che non determina l’accensione della spia del cacciavite quando questo tocca lo chassis dell’apparecchio, o che ne determina
l’accensione più fle ile, è di norma quella corretta. La prova con il cercafase deve essere effettuata con l’apparecchio scollegato
dall’impianto.
Per semplificare la procedura di collegamento, Audio Analogue ha contrassegnato la spina del cavo di rete del Maestro CD 192/24
in corrispondenza del pin che deve essere collegato alla fase della presa di rete. E’ quindi sufficiente che l’utente verifichi con il
cercafase quale foro della presa di corrente porta la fase, e colleghi la spina dell’apparecchio in modo che il pin contrassegnato
venga inserito in quel foro.
Powering up aestro CD 192/24
When you plug Maest o CD 192/24 into the powe outlet, the unit automatically tu ns on in the STANDBY mode. This is intended to
p event the unit to suddenly tu n on afte powe inte uption. When the “STANDBY” button on the f ont panel o the “STBY” button on
the emote cont olle is p essed, Maest o CD 192/24 tu ns on and a p esentation message is shown on the display. If a CD is
loaded, the display will show CD info mation. Othe wise, a “NO DISC” signal will be shown. If nothing happens, please efe to the
t oubleshooting section of the p esent manual. Please set the unit on STANDBY mode when unused fo sho t pe iods of time o tu n
the unit off unplugging it f om the outlet when unused fo long pe iods of time o du ing lightning and elect ic sto ms.
Accen ione del Mae tro CD 192/24
Quando si collega la spina del cavo di alimentazione di rete alla presa di corrente, l’apparecchio entra automaticamente in stand- y.
Ciò evita che l’apparecchio si accenda automaticamente in caso di momentanea interruzione dell’erogazione di corrente. Alla
pressione del pulsante “STANDBY” sul pannello frontale o “STBY” sul telecomando, il Maestro CD 192/24 si accende e il display
presenta un messaggio di presentazione. Dopo qualche secondo viene visalizzata la schermata relativa alle informazioni del disco
se esso è presente all’interno dell’apparecchio, oppure la dicitura “NO DISC”. Qualora ciò non dovesse accadere, consultare la
sezione dedicata alla risoluzione dei pro lemi. E’ consiglia ile tenere l’apparecchio in stand- y quando non lo si utilizza per revi
periodo di tempo e di spegnerlo, scollegando la spina dalla presa di rete, quando non viene utilizzato per lunghi periodi di tempo e
comunque in occasione di temporali e tempeste elettriche
All manuals and user guides at all-guides.com

13
Standby mode
You can put Maest o CD 192/24 in standby mode p essing eithe the “STBY” button on the emote cont olle o the “STANDBY”
button on the f ont panel. When the CD playe is in standby mode, only the mic ocont olle section is powe ed while the est of the
ci cuit is off, educing powe consumption and minimizing damage isks. When Maest o CD 192/24 is in standby mode, the display
on the f ont panel is off and the powe led lights blue. To ope ate the CD playe no mally, just p ess the “STBY” button on the emote
cont olle o the “STANDBY” button on the f ont panel.
Stand-by
Il Maestro CD 192/24 può essere posto in stand- y premendo il tasto “STBY” sul telecomando oppure “STANDBY” sul pannello
frontale. Quando il lettore CD è in stand- y soltanto la sezione relativa al microcontrollore viene alimentata, mentre il resto del
circuito viene spento. Ciò riduce i consumi e minimizza il rischio di danni. In questo caso il pannello frontale presenterà il display
spento e il led lu acceso. Per uscire dallo stand- y è sufficiente agire di nuovo sul tasto “STBY” del telecomando o “STANDBY” del
pannello frontale.
All manuals and user guides at all-guides.com

14
How to use the serial port
Maest o CD 192/24 is equipped with a standa d RS-232 se ial po t. You may emotely cont ol the CD playe connecting it to a PC o
a home-automation unit th ough this po t. This featu e allows you to integ ate Maest o CD 192/24 into a multi- oom o house-
automation system and enjoy its sound eve ywhe e in you house. Fo technical details about the setting pa amete s of the po t and
the commands please see the table below.
Note ull’utilizzo della porta eriale
Il Maestro CD 192/24 è dotato di una porta seriale in standard RS-232. Tramite questa porta è possi ile controllare l’apparecchio
tramite un PC o una centralina per l’home automation. Questa caratteristica permette di inserire il Maestro CD in impianti multi-room
o di home automation e usufruire delle sue prestazioni sonore in tutta la casa. Per maggiori dettagli circa il settaggio dei parametri
della porta e per i comandi si veda la seguente ta ella.
Description of commands for RS-232 operation
Port settings: Baud ate: 19200 Data bits: 8 Pa ity: None Stop bit: 1 Handshake: None
Command syntax: Parameters range Description
%AAFFD<CR><LF> - Toggles the Fast Fo wa d featu e when the unit is in play.
%AAFRW<CR><LF> - Toggles the Fast Rewind featu e when the unit is in play.
%AANXT<CR><LF> - Jumps to next t ack when in play. Select the next t ack to be afte wa ds
played when in stop.
%AAOPN<CR><LF> - Opens o closes the t ay. Note: when the unit is in play, this command
fo ces the unit to stop befo e opening the t ay.
%AAPLY<CR><LF>
%AAPLY,dd<CR><LF>
-
dd=00..99
Sta ts disc ep oduction f om the active t ack (e.g. the fi st t ack o the
t ack selected with the %AAPVS o %AANXT commands) when ‘dd’ is
not specified, othe wise ep oduction sta ts f om the ‘dd’ t ack (if it exists
in the TOC). Note: ‘dd’ MUST be a two digits numbe .
%AAPSE<CR><LF> - Toggles the pause featu e when the unit is in play.
%AAPVS<CR><LF> - Jumps to p evious t ack when in play. Select the p evious t ack to be
afte wa ds played when in stop.
%AARPT<CR><LF> - Equivalent to the REPEAT key on the emote cont ol, please ead the
use manual fo details.
%AASTB<CR><LF> - Toggles the standby featu e.
%AASTP<CR><LF> - Stops the ep oduction when in play, esets the active t ack when in stop.
%AATIM<CR><LF> - Equivalent to the 10+ key on the emote cont ol when the unit is in play,
please ead the use manual fo details.
%AAVBS,n<CR><LF> n=0..1 Enables (n=1) o disable (n=0) the delive y of t ack and time info mation
to the cont olle via the RS232 inte face. These data can be used to
epo t play info mation to the use via the system’s touchsc een. Note:
when this featu e is enabled, it is safe to send commands to the unit ight
afte eceiving a data st ing, in o de to avoid ove lapping of data and
answe
%AAVER<CR><LF> - Retu ns the fi mwa e ve sion numbe .
Note: all commands a e echoed to the cont olle . All command except %AAVER a e answe ed with ‘Done<CR><LF>’ when
executed. %AAVER is answe ed with the ve sion numbe st ing. Invalid commands a e igno ed. Valid commands with invalid
pa amete s a e eithe not answe ed o answe ed with ‘Failed<CR><LF>’.
Note on S\PDIF digital output
Caution, when the CD playe is not playing, the digital output is disconnected.
Nota ull'u cita digitale S\PDIF
Attenzione, quando il disco non è in riproduzione l'uscita digitale è disattivata.
All manuals and user guides at all-guides.com
15
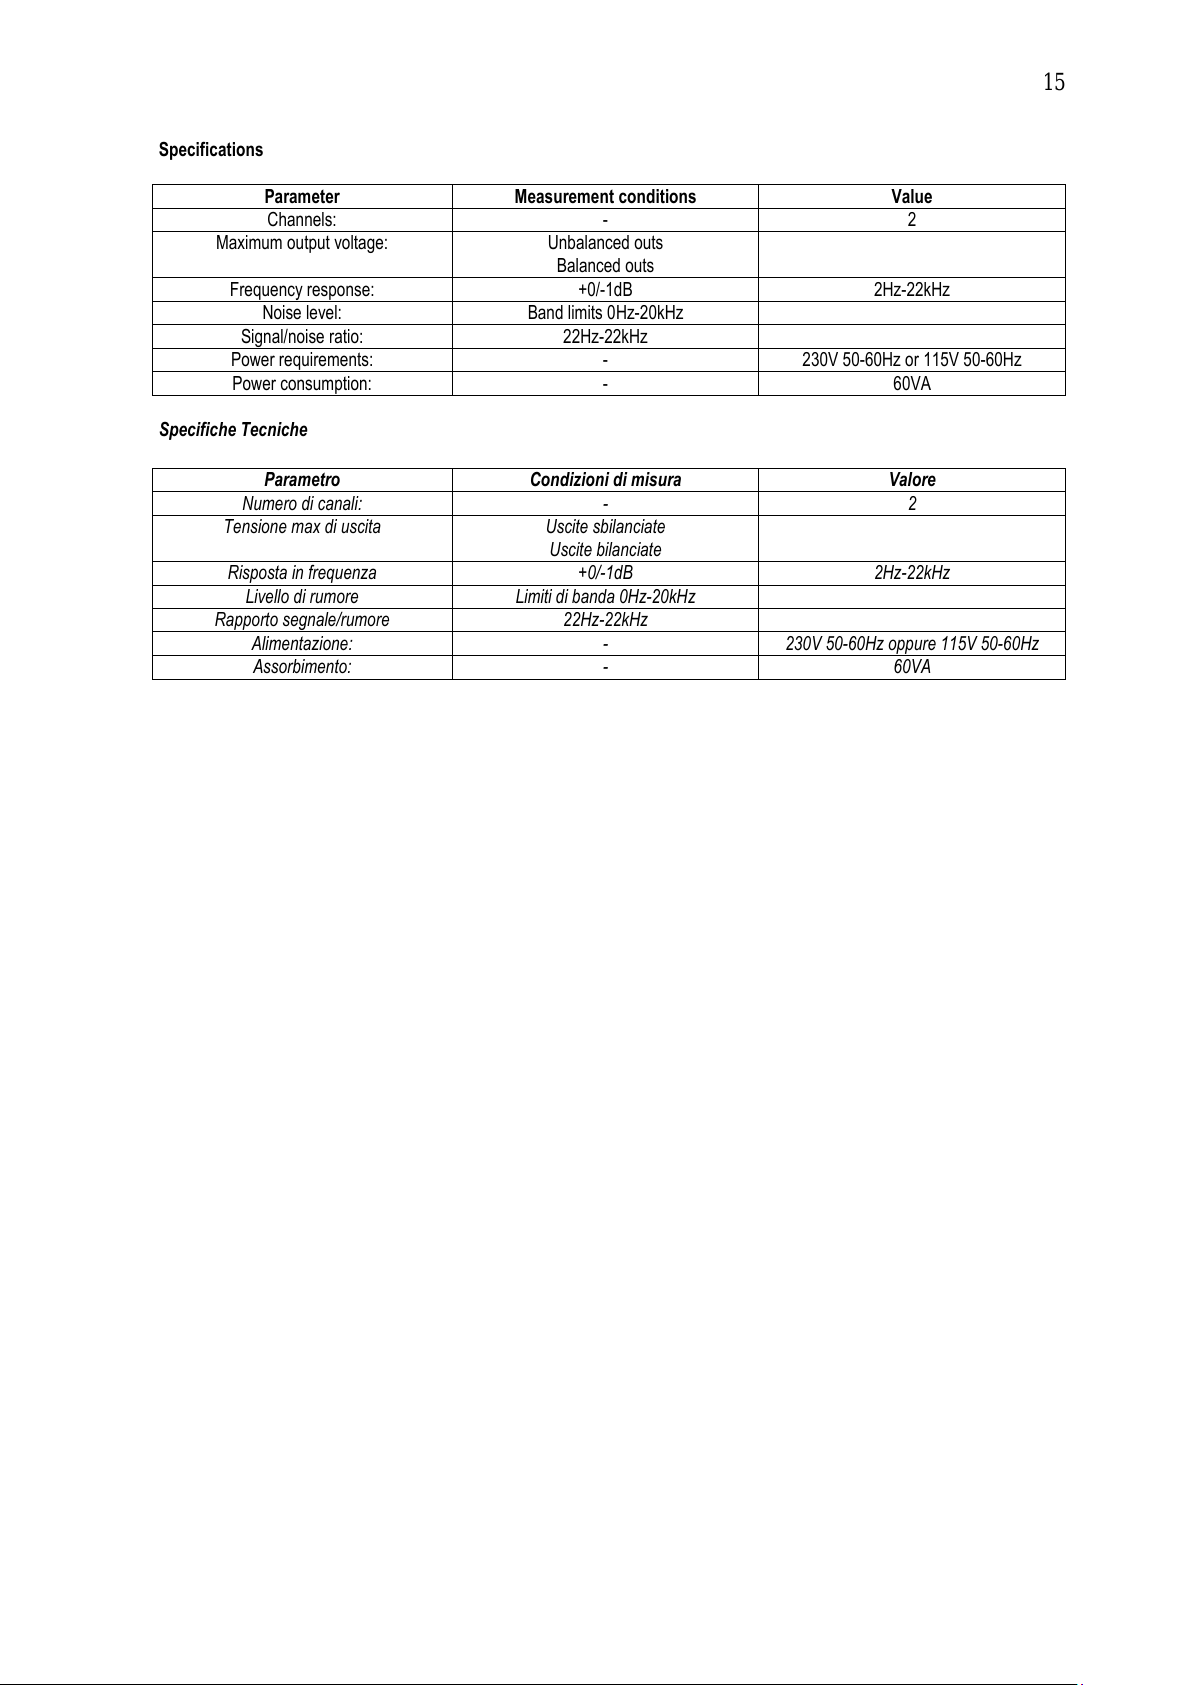
Specifications
Parameter easurement conditions Value
Channels: - 2
Maximum output voltage: Unbalanced outs
Balanced outs
F equency esponse: +0/-1dB 2Hz-22kHz
Noise level: Band limits 0Hz-20kHz
Signal/noise atio: 22Hz-22kHz
Powe equi ements: - 230V 50-60Hz o 115V 50-60Hz
Powe consumption: - 60VA
Specifiche Tecniche
Parametro Condizioni di mi ura Valore
Numero di canali: - 2
Tensione max di uscita Uscite s ilanciate
Uscite ilanciate
Risposta in frequenza +0/-1dB 2Hz-22kHz
Livello di rumore Limiti di anda 0Hz-20kHz
Rapporto segnale/rumore 22Hz-22kHz
Alimentazione: - 230V 50-60Hz oppure 115V 50-60Hz
Assor imento: - 60VA
All manuals and user guides at all-guides.com

16
Troubleshooting
Symptom Cause Remedy
Powe co d inco ectly plugged Make su e the powe co d is co ectly
plugged into the wall outlet
Display is off
No sound
Bu ned-out fuses Check fuses in the fuse panel (afte
unplugging the powe co d f om the wall
outlet) above the IEC inlet and eplace
them with new ones of the same type
Faulty o inco ectly plugged connecto s
between Maest o CD 192/24 and the
amplifie
Check co ds and thei connection Display is on
No sound
Inco ectly selected sou ce on the amplifie
Check that Maest o CD 192/24 is co ectly
selected th ough the amplifie ins
CD playe wo ks but the display is off
Faulty f ont panel Contact you Audio Analogue etaile fo
connections check and f ont panel
substitution
No batte y/ wo n-out batte y Place/ eplace batte y (2 ‘AAA’ batte ies) Remote cont olle doesn’t wo k
You’ e standing too fa o on an exceeding
angle f om the f ont panel
Get close to the unit o educe angle
If the suggested remedies should not work or the problem is not shown in the list above, please contact your local Audio
Analogue retailer.
RICERCA GUASTI
Sintomo Cau a Rimedio
Cavo di alimentazione non inserito
correttamente
Controllare che il cavo sia en inserito
nella presa di rete
Display spento
Nessun suono
Fusi ili ruciati Controllare i fusi ili nel portafusi ili (dopo
aver staccato il cavo di alimentazione dalla
presa di rete) sopra la presa IEC ed
eventualmente sostituire con altri dello
stesso tipo
Cavi di segnale tra Maestro CD 192/24 e
amplificatore non connessi correttamente
oppure difettosi
Controllare lo stato dei cavi e/o la corretta
connessione
Display acceso
Nessun suono
Sorgente non selezionata correttamente
sull’amplificatore
Controllare che il Maestro CD 192/24 sia
selezionato correttamente con il selettore
degli ingressi dell’amplificatore
Il CD player funziona
ma il display è spento
Scheda frontale difettosa Contattare il vostro rivenditore Audio
Analogue per una verifica dei collegamenti
ed eventuale sostituzione della scheda
Batterie scariche o mancanti Inserire o sostituire le atterie (2 ministilo
tipo ‘AAA’)
Il telecomando non funziona
Eccessiva distanza dal pannello frontale
dell’apparecchio o angolo non corretto
Avvicinarsi di più all’apparecchio o
cam iare angolo
Se i rimedi uggeriti non dove ero funzionare oppure il problema non è riportato nella li ta, contattate il vo tro rivenditore
Audio Analogue
All manuals and user guides at all-guides.com
all-guides.com

17
WARNING!
All of our CD players may not be able to read some specific CD’s manufactured with a unique
protection system against copying. If in doubt, please try to read the CD using a PC CD-RO drive.
When the CD-RO drive is incapable of accessing the tracks on the CD, please do not play the CD in
question with the our CD players. Although there is generally no problem with hybrid SACD’s, please
check for any copy protection system in the CD layer. Our CD players are able to reproduce CD’s
protected with the IFPI system, whose symbol is made of two circles containing two triangles.
ATTENZIONE!
I no tri lettori CD potrebbero non e ere in grado di leggere alcuni CD prodotti con un particolare
i tema di protezione anti-copia. Se in dubbio, i con iglia di provare prima a far leggere il CD dal CD-
ROM di un PC. Nel ca o in cui il CD-ROM non riu ci e ad accedere alle tracce del CD, evitare di
riprodurlo con i no tri lettori. Non è invece tato ri contrato alcun problema con i SACD ibridi, che
vengono regolarmente letti. Verificare comunque che lo trato CD di un SACD ibrido non ia tato a
ua volta protetto contro la copia. I no tri lettori ono in grado di leggere i CD protetti col i tema
IFPI, rappre entato dal imbolo dei due cerchi contenenti due triangoli.
All manuals and user guides at all-guides.com

18
Attention: You p oduct is ma ked with this symbol. It
means that used elect ical and elect onic p oducts
should not be mixed with gene al household waste.
The e is a collection system fo these p oducts.
Attenzione: il dispositivo è contrassegnato da questo
sim olo, che segnala di non smaltire le
apparecchiature elettriche ed elettroniche insieme ai
normali rifiuti domestici. Per tali prodotti è previsto un
sistema di raccolta a parte.
A. INFORMATION ON DISPOSAL FOR USERS (PRIVATE HOUSEHOLDS)
1 In The European Union
Attention: If you want to dispose of this equipment, please do not use the o dina y dust bin.
Used elect ical and elect onic equipment must be t eated sepa ately and in acco dance with legislation that equi es
p ope t eatment, ecove y and ecycling of used elect ical and elect onic equipment.
Following the implementation by membe states, p ivate households within the EU states may etu n thei used elect ical
and elect onic equipment to designated collection facilities f ee of cha ge*. In some count ies* you local etaile may also
take back you old p oduct f ee of cha ge if you pu chase a simila new one.
*) Please contact you autho ity fo fu the details.
If you used elect ical o elct onic equipment has batte ies o accumulato , please dispose of these sepa ately befo e and
acco ding to local equi ements.
By disposing of this p oduct co ectly you will help ensu e that the waste unde goes the necessa y t eatment, ecove y
and ecycling and thus p event potential negative effects on the envi onment and human health which could othe wise
a ise due to inapp op iate waste handling.
2. In other countries outside the EU
If you wish to disca d this p oduct, please contact you local autho ities and ask fo the co ect method of disposal.
Fo Switze land: Used elect ical o elect onic equipment can be etu ned f ee of cha ge to the deale , even if you don’t
pu chase a new p oduct. Fu the collection facilities a e listed on the home page of www.swisco.ch o www. Sens.ch
B. Information on Di po al for Bu ine U er
1. In the European Union
If this p oduct is used fo business pu poses and you want to disca d it:
Please contact you Audio Analogue deale who will info m you about the take-back and ecycling. Small p oducts (and
small amounts) might be taken back by you local collection facilities.
Fo Spain: Please contact the established collection system o you local autho ity foe take-back of you used p oducts.
2. In other Countries outside the EU
If you wish to disca d of this p oduct, please contact you local autho ities and ask fo the cu ent method of disposal.
A. INFORMAZIONI SULLO SMALTIMENTO PER GLI UTENTI (PRIVATI)
1 Nell’Unione europea
Attenzione: Per smaltire il presente dispositivo, non utilizzare il normale idone della spazzatura!
Le apparecchiature elettriche ed elettroniche usate devono essere gestite a parte in conformità alla legislazione che
richiede il trattamento, il recupero e il riciclaggio adeguato dei suddetti prodotti.
In seguito alle disposizioni attuate dagli Stati mem ri, i privati residenti nella UE possono conferire gratuitamente le
apparecchiature elettriche ed elettroniche usate a centri di raccolta designati*.
In alcuni paesi*, anche il rivenditore locale può ritirare gratuitamente il vecchio prodotto se l’utente acquista un altro nuovo
di tipologia simile.
*) Per maggiori informazioni di prega di contattare l’autorità locale competente.
Se le apparecchiature elettriche o elettroniche usate hanno atterie o accumulatori, l’utente dovrà smaltirli a parte
preventivamente in conformità alle disposizioni locali.
Lo smaltimento corretto del presente prodotto contri uirà a garantire che i rifiuti siano sottoposti al trattamento, al
recupero e al riciclaggio necessari prevenendone il potenziale impatto negativo sull’am iente e sulla salute umana, che
potre e derivare da un’inadeguata gestione dei rifiuti.
2 In pae i che non fanno parte dell’UE
Se si desidera eliminare il presente prodotto,contattare le autorità locali e informarsi sul metodo di smaltimento corretto.
Per la Svizzera: Le apparecchiature elettriche o elettroniche possono essere restituite gratuitamente al rivenditore, anche
se non si acquista un prodotto nuovo. Altri centri di raccolta sono elencati sulla homepage www.swiso.ch o di
www.sens.ch.
B. INFORMAZION SULLO SMALTIMENTO PER GLI UTENTI COMMERCIALI
1. Nell’Unione Europea
Se il prodotto è impiegato a scopi commerciali. Procedere come segue per eliminarlo.
Contattare il proprio rivenditore Audio Analogue che fornirà informazioni circa il ritiro del prodotto. Potre ero essere
adde itate le spese di ritiro e riciclaggio. Prodotti piccoli e quantitativi ridotti potranno essere ritirati anche dai centri di
raccolta locali.
Per la Spagna: Contattare il sistema di raccolta ufficiale o l’ente locale preposto al ritiro dei prodotti usati
2. In pae i che non fanno parte dell’UE
Se si desidera eliminare il presente prodotto, contattare le autorità locali e informarsi sul metodo di smaltimento corretto.
All manuals and user guides at all-guides.com

19
All manuals and user guides at all-guides.com

Audio Analogue
Dist ibuted by:
AF GROUP srl
www.audioanalogue.com
afg oups l@audioanalogue.com
All manuals and user guides at all-guides.com
Other manuals for Maestro
5
Table of contents
Other Audio Analogue CD Player manuals

Audio Analogue
Audio Analogue Paganini 192/24 User manual

Audio Analogue
Audio Analogue Rossini 2.0 User manual

Audio Analogue
Audio Analogue Maestro User manual

Audio Analogue
Audio Analogue Primo Tube CD User manual

Audio Analogue
Audio Analogue Primo VT cd player User manual

Audio Analogue
Audio Analogue Crescendo User manual

Audio Analogue
Audio Analogue PRIMO CD 2.0 User manual

Audio Analogue
Audio Analogue Maestro User manual

Audio Analogue
Audio Analogue CDP 2.0 User manual

Audio Analogue
Audio Analogue Paganini 192/24 User manual


