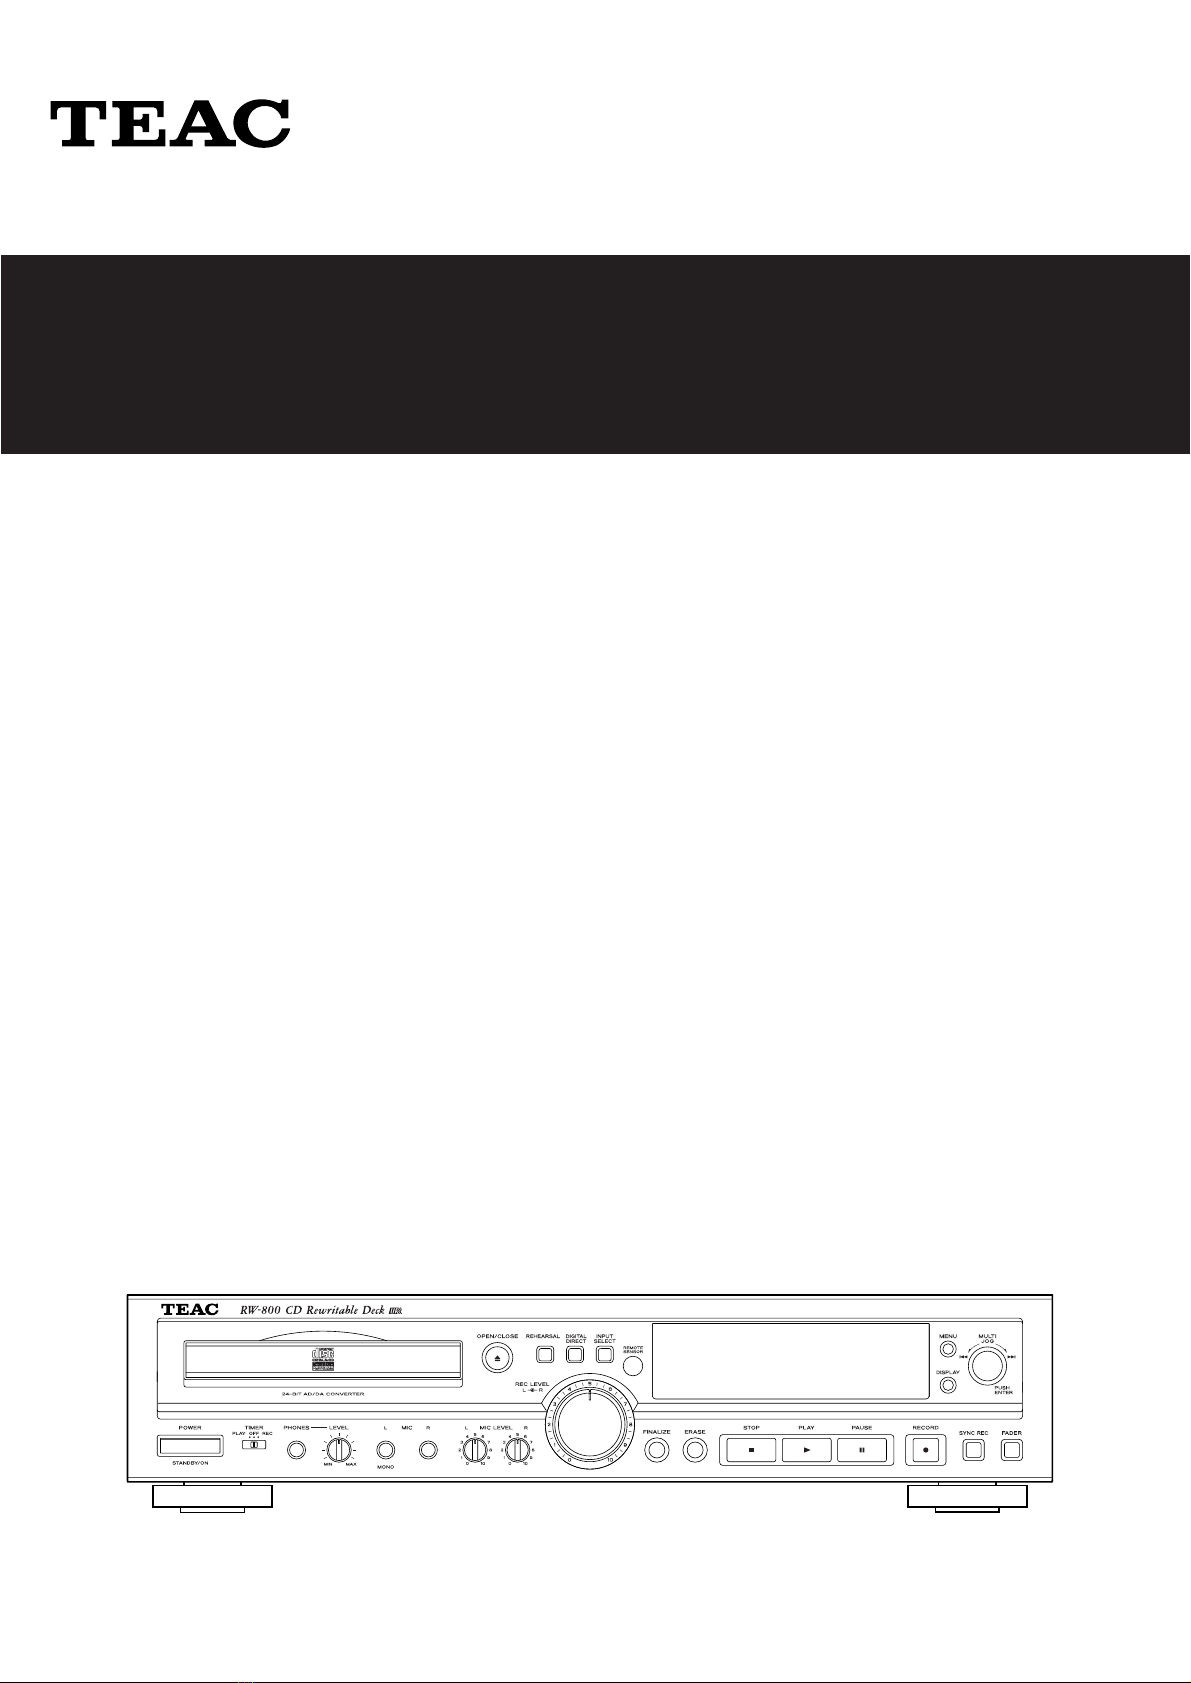
Teac RW-800 User manual

3D0034100A
RW-800
CD Rewritable Deck
OWNER’S MANUAL
MANUEL DU PROPRIETAIRE

2
WARNING: TO PREVENT FIRE OR SHOCK HAZARD, DO NOT EXPOSE THIS APPLIANCE TO RAIN OR MOISTURE.
CAUTION: TO REDUCE THE RISK OF ELECTRIC SHOCK, DO NOT REMOVE COVER (OR BACK). NO USER-
SERVICEABLE PARTS INSIDE. REFER SERVICING TO QUALIFIED SERVICE PERSONNEL.
Y
E
RTHE EXCLAMATION POINT WITHIN AN EQUILATERAL TRIANGLE IS INTENDED TO ALERT THE USER TO THE PRESENCE OF IMPORTANT
OPERATING AND MAINTENANCE (SERVICING) INSTRUCTIONS IN THE LITERATURE ACCOMPANYING THE APPLIANCE.
THE LIGHTNING FLASH WITH ARROWHEAD SYMBOL, WITHIN AN EQUILATERAL TRIANGLE, IS INTENDED TO ALERT THE USER TO THE
PRESENCE OF UNINSULATED "DANGEROUS VOLTAGE" WITHIN THE PRODUCT’S ENCLOSURE THAT MAY BE OF SUFFICIENT MAGNITUDE TO
CONSTITUTE A RISK OF ELECTRIC SHOCK TO PERSONS.
AC POWER CORD CONNECTION
CAUTION:
TO PREVENT ELECTRIC SHOCK, MATCH WIDE BLADE OF PLUG TO
WIDE SLOT, FULLY INSERT.
CORDE DE CONNEXION CA
ATTENTION:
POUR ÉVITER LES CHOCS ÉLECTRIQUES, INTRODUIRE LA LAME
LA PLUS LARGE DE LA FICHE DANS LA BORNE
CORRESPONDANTE DE LA PRISE ET POUSSER JUSQU’AU FOND.
For CANADA Pour le CANADA
Optical pickup :
Type : KRS-202A or KRS-220B
Manufacturer : SONY Corporation
Laser output : Less than 0.1 mW(Play) and 32 mW(Record)
on the objective lens
Wavelength : 777 - 787 nm
CAUTION
<DO NOT REMOVE THE PROTECTIVE HOUSING USING
SCREWDRIVER.
<USE OF CONTROLS OR ADJUSTMENTS OR PERFORMANCE OF
PROCEDURES OTHER THAN THOSE SPECIFIED HEREIN MAY
RESULT IN HAZARDOUS RADIATION EXPOSURE.
<IF THIS PRODUCT DEVELOPS TROUBLE, MAKE A CONTACT
WITH OUR SERVICEMAN, AND DO NOT USE THE PRODUCT IN A
TROUBLED STATE.
TO THE USER
This equipment has been tested and found to comply with the limits for a Class B digital device, pursuant to Part 15 of the FCC Rules. These
limits are designed to provide reasonable protection against interference in a residential area. This device generates and uses radio
frequency energy and if not installed and used in accordance with the instructions, it may cause interference to radio or TV reception. If
this unit does cause interference with TV or radio reception you can try to correct the interference by one or more of the following
measures :
a) Reorient or relocate the receiving antenna.
b) Increase the separation between the equipment and the receiver.
c) Plug the equipment into a different outlet so that it is not on the same circuit as the receiver. If necessary, consult the dealer or an
experienced radio/TV technician for additional suggestions.
CAUTION
Changes or modifications to this equipment not expressly approved by TEAC CORPORATION for compliance could void the user's authority
to operate this equipment.
For U.S.A.
Important Safety Instructions
This product has been designed and manufactured according to
FDA regulations “title 21, CFR, chapter 1, subchapter J, based on the
Radiation Control for Health and Safety Act of 1968“, and is
classified as class 1 laser product. There is not hazardous invisible
laser radiation during operation because invisible laser radiation
emitted inside of this product is completely confined in the
protective housings.
The label required in this regulation is shown ①.
For U.S.A.
①

3
CAUTION
<Read all of these Instructions.
<Save these Instructions for later use.
<Follow all Warnings and Instructions marked on the audio equipment.
1) Read Instructions — All the safety and operating instructions should
be read before the product is operated.
2) Retain Instructions — The safety and operating instructions should
be retained for future reference.
3) Heed Warnings — All warnings on the product and in the operating
instructions should be adhered to.
4) Follow Instructions — All operating and use instructions should be
followed.
5) Cleaning — Unplug this product from the wall outlet before cleaning.
Do not use liquid cleaners or aerosol cleaners. Use a damp cloth for
cleaning.
6) Attachments — Do not use attachments not recommended by the
product manufacturer as they may cause hazards.
7) Water and Moisture — Do not use this product near water — for
example, near a bath tub, wash bowl, kitchen sink, or laundry tub; in a
wet basement; or near a swimming pool; and the like.
8) Accessories — Do not place this product on an unstable cart, stand,
tripod, bracket, or table. The product may fall, causing serious injury to
a child or adult, and serious damage to the product. Use only with a
cart, stand, tripod, bracket, or table recommended by the manufacturer,
or sold with the product. Any mounting of the product should follow the
manufacturer’s instructions, and should use a mounting accessory
recommended by the manufacturer.
9) A product and cart combination should be moved
with care. Quick stops, excessive force, and uneven
surfaces may cause the product and cart combination
to overturn.
10) Ventilation — Slots and openings in the cabinet
are provided for ventilation and to ensure reliable operation of the
product and to protect it from overheating, and these openings must not
be blocked or covered. The openings should never be blocked by
placing the product on a bed, sofa, rug, or other similar surface. This
product should not be placed in a built-in installation such as a
bookcase or rack unless proper ventilation is provided or the
manufacturer’s instructions have been adhered to.
11) Power Sources — This product should be operated only from the
type of power source indicated on the marking label. If you are not sure
of the type of power supply to your home, consult your product dealer
or local power company. For products intended to operate from battery
power, or other sources, refer to the operating instructions.
12) Grounding or Polarization — This product may be equipped with a
polarized alternating-current line plug (a plug having one blade wider
than the other). This plug will fit into the power outlet only one way. This
is a safety feature. If you are unable to insert the plug fully into the
outlet, try reversing the plug. If the plug should still fail to fit, contact
your electrician to replace your obsolete outlet. Do not defeat the safety
purpose of the polarized plug.
13) Power-Cord Protection — Power-supply cords should be routed so
that they are not likely to be walked on or pinched by items placed upon
or against them, paying particular attention to cords at plugs,
convenience receptacles, and the point where they exit from the
product.
14) Outdoor Antenna Grounding — If an outside antenna or cable
system is connected to the product, be sure the antenna or cable
system is grounded so as to provide some protection against voltage
surges and built-up static charges. Article 810 of the National Electrical
Code, ANSI/NFPA 70, provides information with regard to proper
grounding of the mast and supporting structure, grounding of the lead-
in wire to an antenna discharge unit, size of grounding conductors,
location of antenna-discharge unit, connection to grounding electrodes,
and requirements for the grounding electrode.
Note to CATV system installer:
This reminder is provided to call the CATV system installer’s attention to
Section 820-40 of the NEC which provides guidelines for proper
grounding and, in particular, specifies that the cable ground shall be
connected to the grounding system of the building, as close to the point
of cable entry as practical."
15) Lightning — For added protection for this product during a lightning
storm, or when it is left unattended and unused for long periods of time,
unplug it from the wall outlet and disconnect the antenna or cable
system. This will prevent damage to the product due to lightning and
power-line surges.
16) Power Lines — An outside antenna system should not be located in
the vicinity of overhead power lines or other electric light or power
circuits, or where it can fall into such power lines or circuits. When
installing an outside antenna system, extreme care should be taken to
keep from touching such power lines or circuits as contact with them
might be fatal.
17) Overloading — Do not overload wall outlets, extension cords, or
integral convenience receptacles as this can result in risk of fire or
electric shock.
18) Object and Liquid Entry — Never push objects of any kind into this
product through openings as they may touch dangerous voltage points
or short-out parts that could result in a fire or electric shock. Never spill
liquid of any kind on the product.
19) Servicing — Do not attempt to service this product yourself as
opening or removing covers may expose you to dangerous voltage or
other hazards. Refer all servicing to qualified service personnel.
20) Damage Requiring Service — Unplug this product from the wall
outlet and refer servicing to qualified service personnel under the
following conditions:
a ) when the power-supply cord or plug is damaged.
b ) if liquid has been spilled, or objects have fallen into the product.
c ) if the product has been exposed to rain or water.
d)if the product does not operate normally by following the operating
instructions. Adjust only those controls that are covered by the
operating instructions as an improper adjustment of other controls may
result in damage and will often require extensive work by a qualified
technician to restore the product to its normal operation.
e) if the product has been dropped or damaged in any way.
f)when the product exhibits a distinct change in performance _ this
indicates a need for service.
21) Replacement Parts — When replacement parts are required, be
sure the service technician has used replacement parts specified by
the manufacturer or have the same characteristics as the original part.
Unauthorized substitutions may result in fire, electric shock, or other
hazards.
22) Safety Check — Upon completion of any service or repairs to this
product, ask the service technician to perform safety checks to
determine that the product is in proper operating condition.
23) Wall or Ceiling Mounting — The product should be mounted to a
wall or ceiling only as recommended by the manufacturer.
24) Heat — The product should be situated away from heat sources
such as radiators, heat registers, stoves, or other products (including
amplifiers) that produce heat.
ANTENNA
LEAD IN
WIRE
ANTENNA
DISCHARGE UNIT
(NEC SECTION 810-20)
GROUNDING CONDUCTORS
(NEC SECTION 810-21)
GROUND CLAMPS
POWER SERVICE GROUNDING
ELECTRODE SYSTEM
(NEC ART 250. PART H)
NEC - NATIONAL ELECTRICAL CODE
ELECTRIC
SERVICE
EQUIPMENT
Example of Antenna Grounding
as per National Electrical
Code, ANSI/NFPA 70
GROUND
CLAMP
Important Safety Instructions

ENGLISH FRANÇAIS
Contents Sommaire
4
Thanks for buying a TEAC. Read this manual
carefully to get the best performance from
this unit.
Nous vous remercions pour l’achat d’un
appareil TEAC. Lire ce manuel avec
attention pour obtenir les meilleures
performances possibles de cet appareil.
Before Use.................................................... 5
Compact Disc............................................... 6
Connections.................................................. 8
Remote Control Unit ................................... 9
Basic Operation......................................... 10
Playback...................................................... 11
Repeat Playback........................................ 14
Shuffle Playback........................................ 14
Programmed Playback ............................. 15
Before Recording ...................................... 17
How to copy a CD...................................... 18
Basic Recording ........................................ 19
Mixing Recording ...................................... 22
Synchronized Recording.......................... 24
Advanced Recording ................................ 25
Rehearsal.................................................... 30
Finalize......................................................... 32
Erase or Unfinalize a CD-RW................... 33
Time Display............................................... 34
Setting the Clock........................................ 35
Setting the Timer ....................................... 36
Error Message ........................................... 37
Troubleshooting......................................... 38
Specifications ............................................ 38
Voltage Conversion
(General export models only)
Be sure to remove the power cord from
the AC outlet before repositioning the
voltage converter switch.
1. Locate the voltage selector on the rear
panel.
2. Using a flat-bladed screwdriver, set to
the appropriate 230V or 120V position
according to your area.
IN NORTH AMERICA USE ONLY ON 120 V
SUPPLY.
Changement de tension
(Modèles s'exportation générale
seulement)
Bien débrancher le cordon d'alimentation
de la prise secteur avant de repositionner
le sélecteur de changement de tension.
1. Localiser le sélecteur de tension par le
arrièle du appareil.
2. En utilisant un tournevis à lame plate,
régler sur la position appropriée 230V
ou 120V en fonction de la tension
locale.
DANS L'AMÉRIQUE DU NORD:
UTILISABLE SUR 120 V D'ALIMENTATION
UNIQUEMENT.
CAUTION:
Recording pre-recorded tapes, records, or
other published or broadcast material may
infringe copyright laws. Check before
recording.
MISE EN GARDE:
Le réenregistrement d’oeuvres
enregistrées sur cassette ou sur disque,
ou diffusées sur les ondes peut
contrevenir à la législation sur les droits
d’auteur. Renseignez-vous avant
d’effectuer un tel enregistrement.
Avant Utilisation........................................... 5
Disques Compacts ...................................... 6
Connexions................................................... 8
Boîtier de télécommande........................... 9
Fonctionnement de base.......................... 10
Lecture ........................................................ 11
Lecture répétitive ...................................... 14
Lecture dans un ordre aléatoire ............. 14
Lecture programmée ............................... 15
Avant d'enregistrer ................................... 17
Pour copier un CD ..................................... 18
Enregistrement simple.............................. 19
Enregistrement mixte................................ 22
Enregistrement synchronisé.................... 24
Enregistrement avancé ............................ 25
Répétition.................................................... 30
Finalisation.................................................. 32
Effacer ou définaliser un CD-RW............ 33
Affichage du temps................................... 34
Réglage de l'heure .................................... 35
Réglage du programmateur..................... 36
Message d'erreur...................................... 37
Dépannage ................................................. 39
Caractéristiques ........................................ 39

5
ENGLISH FRANÇAIS
Before Use Avant Utilisation
Lire ceci avant de faire fonctionner
l'appareil
<La température nominale doit être
comprise 5°C et 35°C (41°F et 95°F). Le
graveur/lecteur de disques compacts est
plus sensible aux températures extrêmes
que les lecteurs de disques compacts
ordinaires.
<Le taux d'humidité relative doit être
compris entre 30 et 90° sans
condensation.
<L'appareil pouvant dégager de la chaleur
lorsqu'il fonctionne, laisser un
dégagement suffisant au-dessus de
l'appareil afin de permettre une
ventilation naturelle.
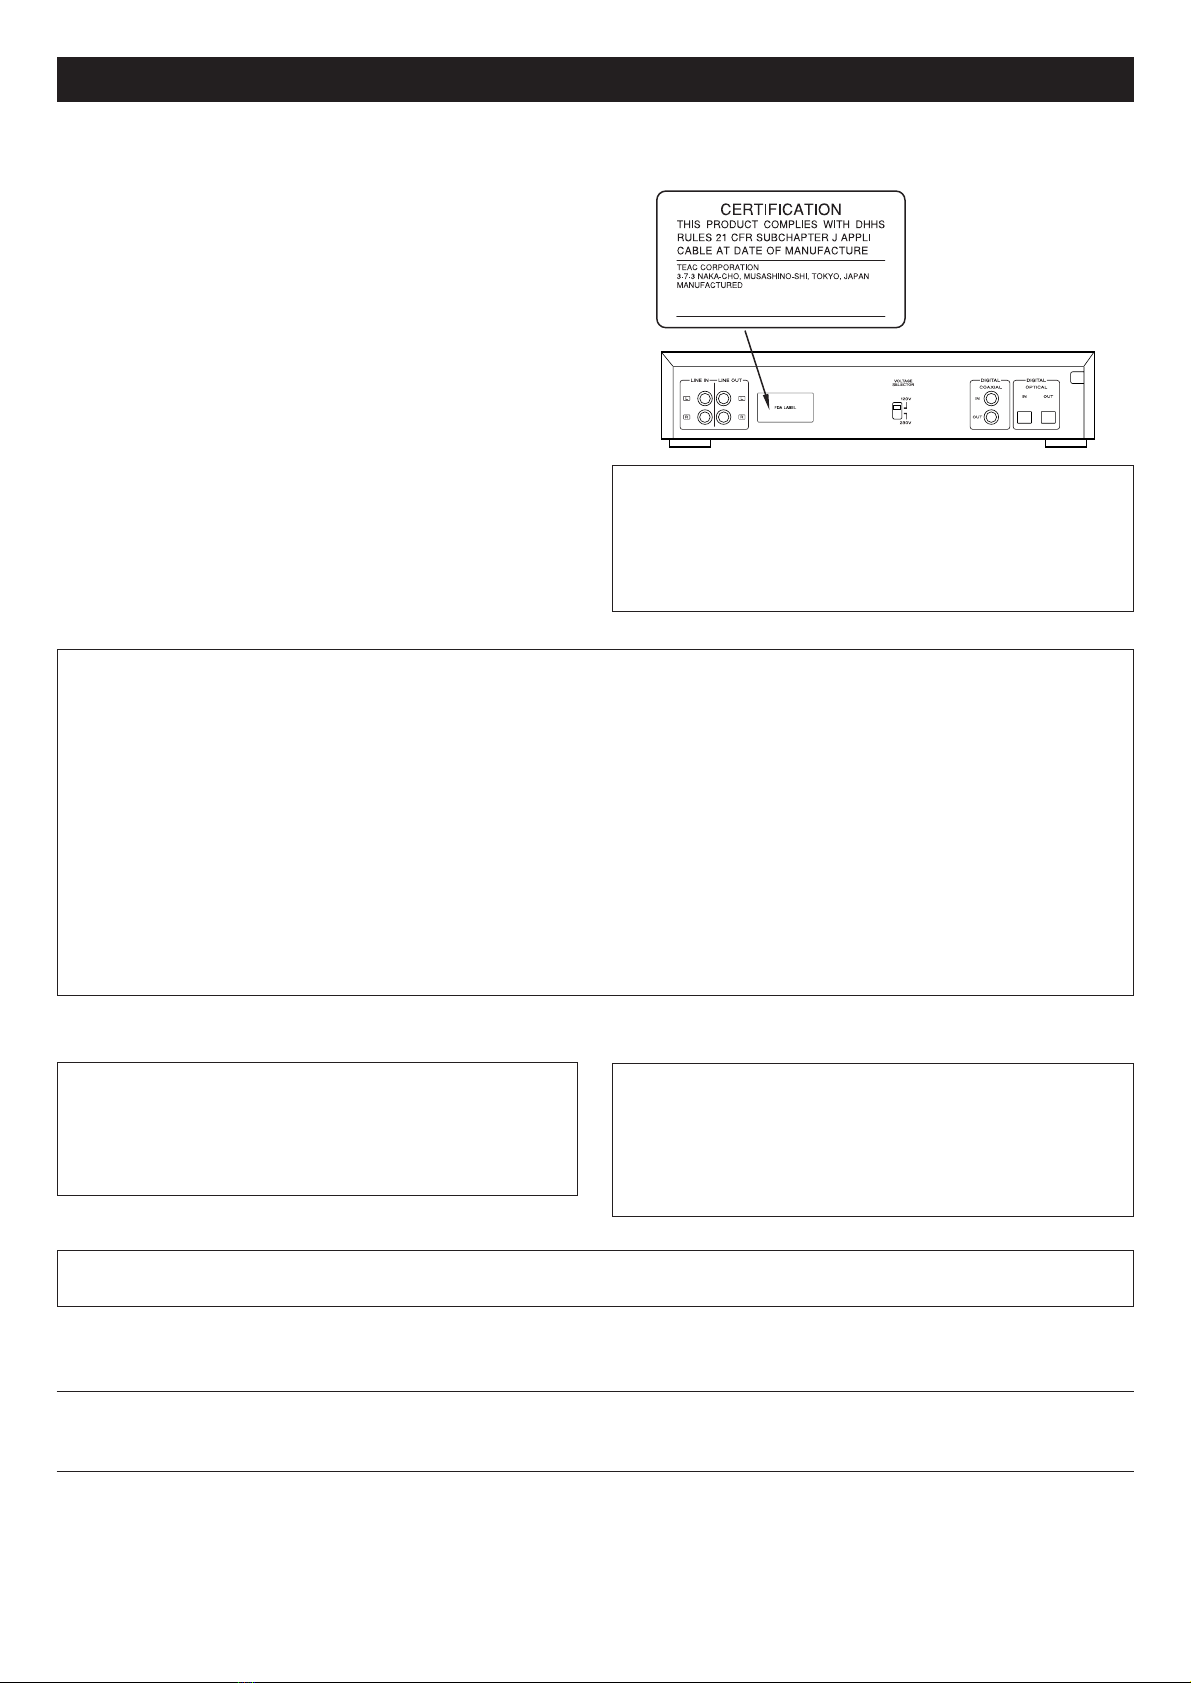
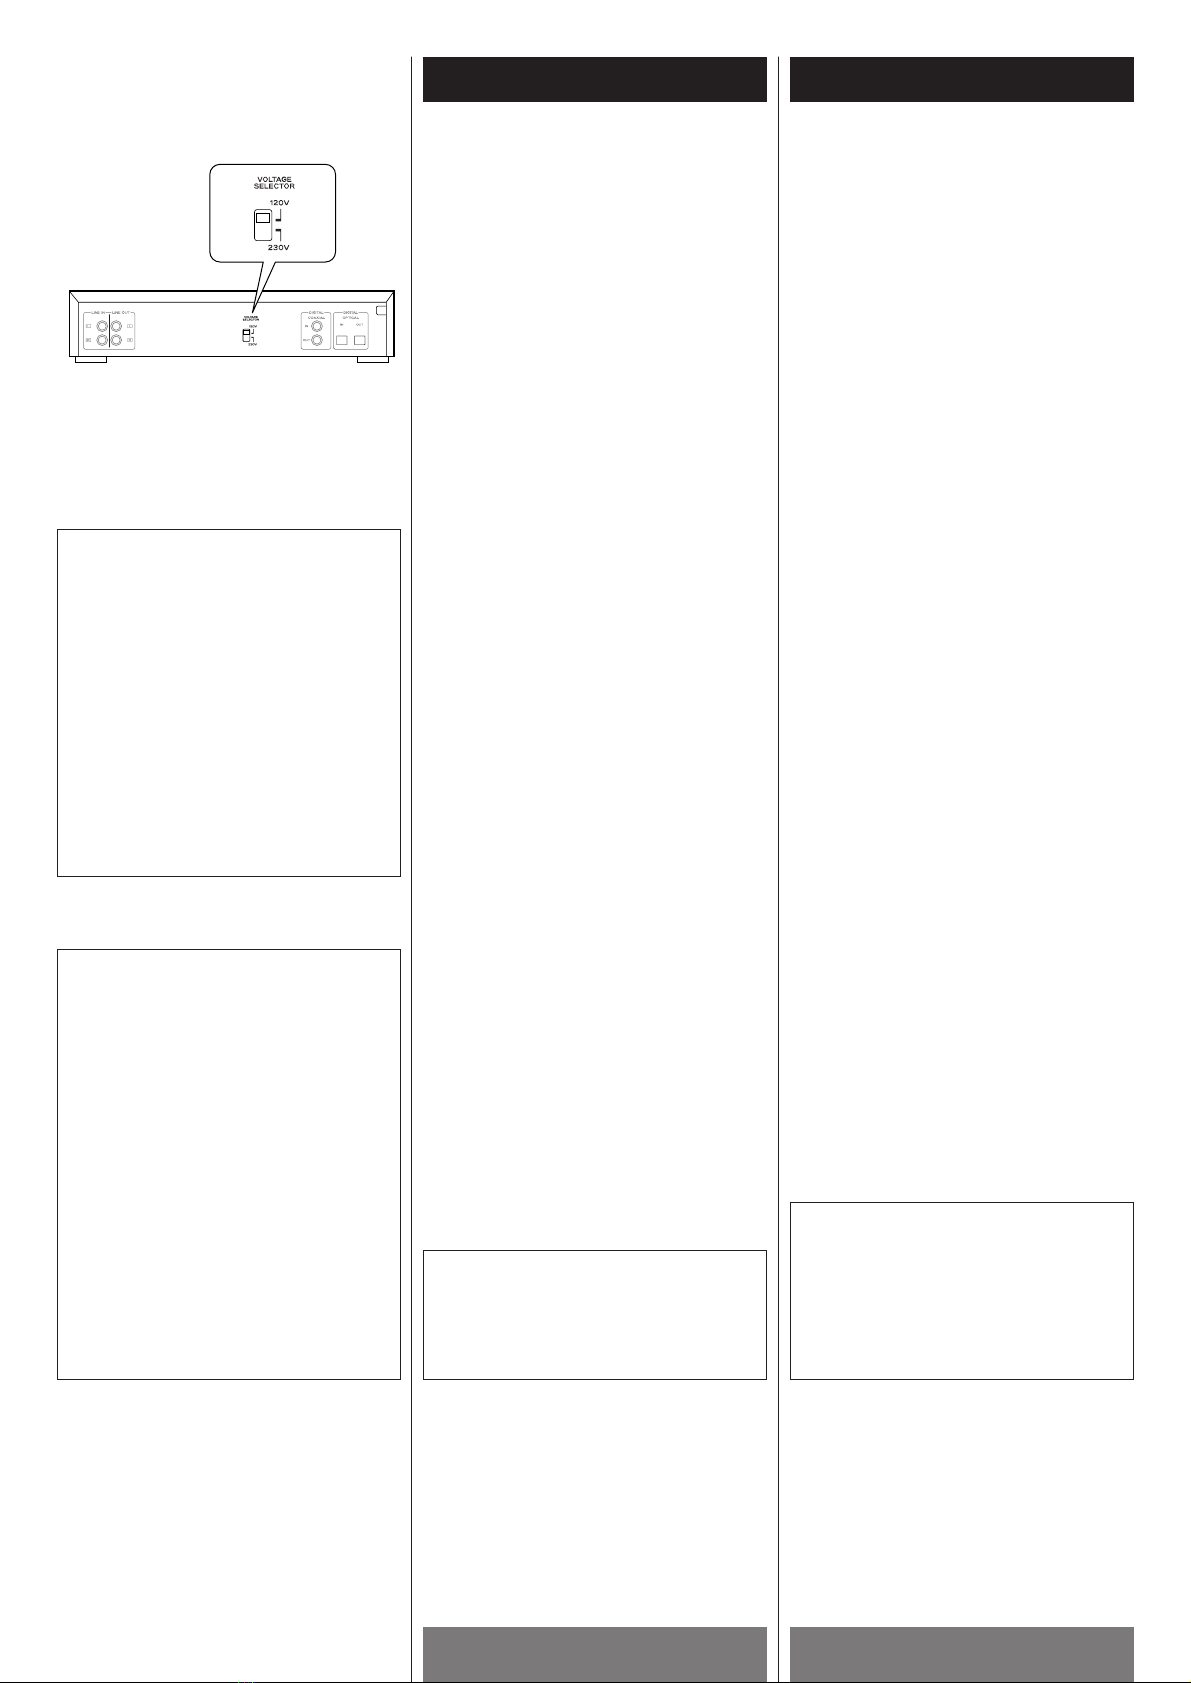
<La tension d'alimentation de l'appareil
doit être celle indiquée à l'arrière de
l'appareil. En cas de doute, contacter un
électricien.
<Choisir avec soin l'endroit où vous
placerez votre appareil. Eviter de le
placer directement au soleil ou près
d'une source de chaleur. Eviter aussi les
endroits sujets à des vibrations, à de la
poussière excessive, à la chaleur, au
froid ou à l'humidité.
<Ne pas placer RW-800 sur le dessus de
l’amplificateur/récepteur.
<Ne pas ouvrir le coffret car ceci
risquerait de provoquer des dommages
aux circuits ou des chocs électriques. Si
un objet rentre dans l'appareil, contacter
votre revendeur.
<Lors du débranchement du cordon
d'alimentation de la prise murale,
toujours tirer sur la fiche et non sur le
cordon.
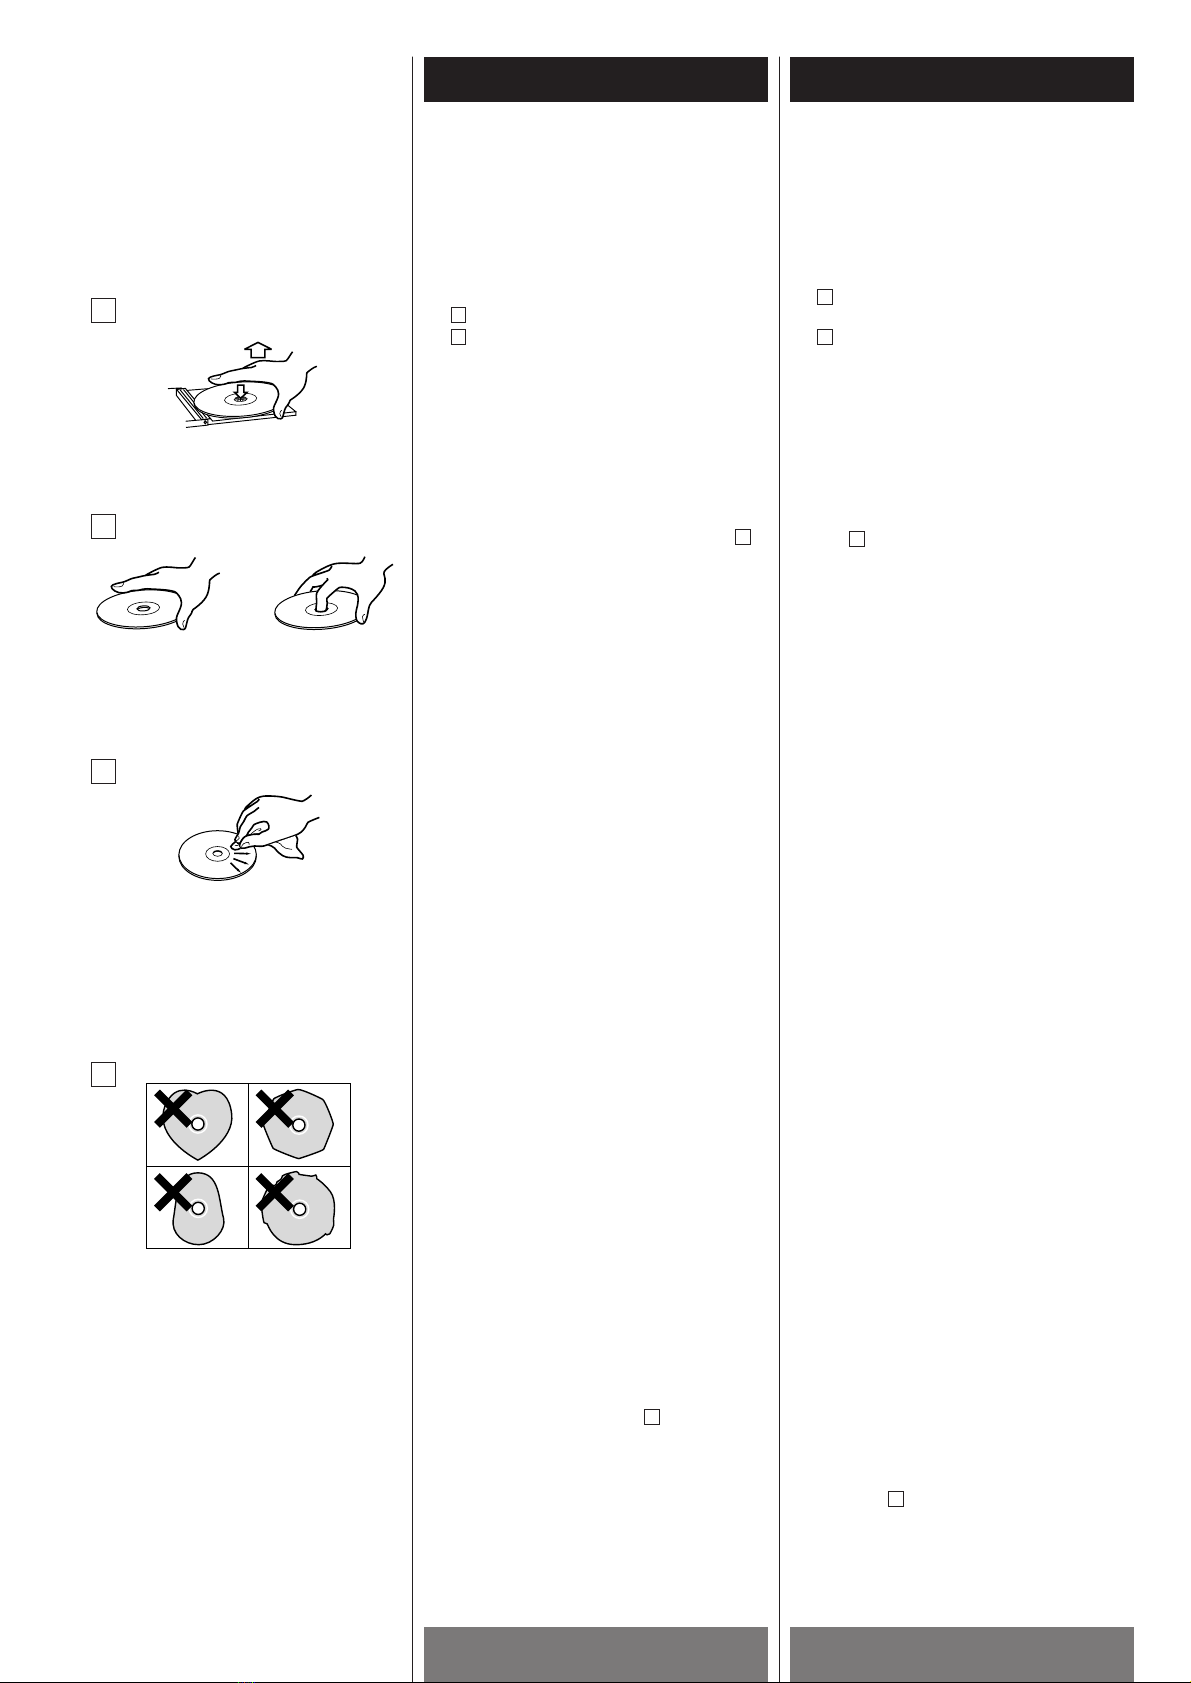
<Pour garder le capteur laser propre, ne
pas y toucher et ne pas oublier de fermer
le tiroir du disque.
<Ne pas essayer de nettoyer l'appareil
avec des solvants chimiques car ceci
pourrait endommager le fini de l'appareil.
Utiliser un chiffon propre et sec.
<Garder soigneusement ce manuel
d'instructions pour une référence
ultérieure.
Read this before operation
<The nominal temperature should be
between 5°C and 35°C (41°F and 95°F).
The CD-RW recorder is more sensitive to
extremes of temperature than ordinary
CD players.
<Relative humidity should be 30 to 90
degrees non-condensing.
<As the unit may become hot during
operation, always leave sufficient space
above the unit for ventilation.
<The voltage supplied to the unit should
match the voltage as printed on the rear
panel. If you are in any doubt regarding
this matter, consult an electrician.
<Choose the installation location of your
unit carefully. Avoid placing it in direct
sunlight or close to a source of heat. Also
avoid locations subject to vibrations and
excessive dust, heat, cold or moisture.
<Do not place the unit on the
amplifier/receiver.
<Do not open the cabinet as this might
result in damage to the circuitry or
electrical shock. If a foreign object
should get into the set, contact your
dealer.
<When removing the power plug from the
wall outlet, always pull directly on the
plug, never yank the cord.
<To keep the laser pickup clean, do not
touch it, and do not forget to close the
disc tray.
<Do not attempt to clean the unit with
chemical solvents as this might damage
the finish. Use a clean, dry cloth.
<Keep this manual in a safe place for
future reference.
IMPORTANT(for U.K.Customers)
DO NOT cut off the mains plug from this
equipment. If the plug fitted is not suitable
for the power points in your home or the
cable is too short to reach a power point,
then obtain an appropriate safety approved
extension lead or consult your dealer.
If nonetheless the mains plug is cut off,
remove the fuse and dispose of the plug
immediately, to avoid a possible shock
hazard by inadvertent connection to the
mains supply.
If this product is not provided with a mains
plug, or one has to be fitted, then follow the
instructions given below:
IMPORTANT. DO NOT make any
connection to the larger terminal which is
marked with the letter E or by the safety
earth symbol |or coloured GREEN or
GREEN-and-YELLOW.
The wires in the mains lead on this product
are coloured in accordance with the
following code:
BLUE : NEUTRAL
BROWN : LIVE
As these colours may not correspond with
the coloured markings identifying the
terminals in your plug proceed as follows:
The wire which is coloured BLUE must be
connected to the terminal which is marked
with the letter N or coloured BLACK.
The wire which is coloured BROWN must
be connected to the terminal which is
marked with the letter L or coloured RED.
When replacing the fuse only a correctly
rated approved type should be used and be
sure to re-fit the fuse cover.
IF IN DOUBT — CONSULT A COMPETENT
ELECTRICIAN.
Beware of condensation
When the unit (or a disc) is moved from a
cold to a warm place, or used after a sudden
temperature change, there is a danger of
condensation; vapor in the air could
condense on the internal mechanism,
making correct operation impossible. To
prevent this, or if this occurs, leave the unit
for one or two hours with the power turned
on. Then the unit will stabilize at the
temperature of its surroundings.
The equipment draws nominal
nonoperating power from the AC outlet
with its POWER switch in the STANDBY
position.
Obs! nätströmställaren skiljer ej hela
apparaten fran nätet.
Risque de condensation
En cas de déplacement de l'appareil (ou
d'un disque) d'un endroit froid vers un
endroit chaud, ou en cas d'utilisation après
un changement de température brutale, il y
a un risque de condensation. La vapeur
contenue dans l'air peut se condenser sur le
mécanisme interne et affecter le bon
fonctionnement de l'appareil. Pour éviter
ceci, ou au cas où cela venait à se produire,
laisser l'appareil sous tension pendant une
heure ou deux. Ceci lui permettra de se
stabiliser à la température ambiante.

ENGLISH FRANÇAIS
Compact Disc 1 Disques Compacts 1
6
About CD-R and CD-RW discs
Caution:
Please use CD-R and CD-RW discs bearing
the "DIGITAL AUDIO" mark.
CD-R and CD-RW discs designed for
computing systems cannot be used with this
unit.
In this manual, although we refer to "CD-R"
and CD-RW" discs, we always mean "CD-R
Digital Audio" and "CD-RW Digital Audio",
even when this is not explicitly stated.
CD-R discs can be recorded once only. Once
they have been used for recording, they
cannot be erased or re-recorded. However,
if space is available on the disc, additional
material can be recorded. The packaging of
CD-R discs will include the following logo :
By contrast, a CD-RW disc can be used in
much the same way as a CD-R disc, but the
last track or tracks recorded can be erased,
and the space on the disc can be re- used
for other recordings. The packaging of CD-
RW discs will include the a logo similar to
the following :
However, you should note that an audio CD
created using a CD-RW disc may not play
back satisfactorily on every audio CD player.
CD-R, by contrast, may be played
satisfactorily on the majority of audio CD
players.
B
A
Remarques concernant les
disques compacts CD-R et CD-RW
Précautions:
Utiliser toujours des disques CD-R et CD-RW
portant la mention "DIGITAL AUDIO".
Les disques CD-R et CD-RW conçus pour les
systèmes informatiques ne doivent en aucun
cas être utilisés sur cet appareil.
Bien que dans ce manuel, il soit fait
référence aux disques "CD-R" et CD-RW", il
s'agit toujours de disques "CD-R Digital
Audio" et "CD-RW Digital Audio", même
lorsque ceci n'est pas explicitement précisé.
Les disques CD-R ne permettent qu'un seul
enregistrement. Lorsqu'ils ont été utilisés
pour un enregistrement, ils ne peuvent plus
être effacés ou ré-utilisés pour un autre
enregistrement. Cependant, s'il reste de la
place sur le disque, il est possible
d'enregistrer sur cet espace disponible. Le
logo suivant figure toujours sur l'emballage
des disques CD-R :
Un disque CD-RW s'utilise de la même façon
qu'un disque CD-R, à ceci près que la ou les
dernière(s) pistes enregistrées peuvent être
effacées et l'espace ainsi libéré sur le
disque peut être ré-utilisé pour d'autres
enregistrements. Le logo suivant figure
toujours sur les disques CD-RW :
Il convient toutefois de noter qu'un disque
compact audio créé à partir d'un disque CD-
RW risque de ne pas fonctionner
correctement sur tous les lecteurs de
disques compacts audio.
Par contre, un CD-R fonctionnera
correctement sur la majorité des lecteurs de
disques compacts.
B
A
Finalisation
Bien qu'il soit possible d'enregistrer des
données audio sur un CD-R ou un CD-RW,
un lecteur de disque compact standard ne
pourra pas lire ce type de disque tant que
vous n'aurez pas créé une table des
matières finalisée au début du disque.
Ce processus, qui consiste à créer la table
des matières s'appelle la finalisation. Une
fois cette table créée, il n'est plus possible
d'enregistrer d'autres données sur le
disque.
Il convient de noter que dans le cas d'un
CD-RW, après avoir été finalisé, celui-ci
peut être "définalisé". Ceci permet
d'enregistrer d'autres titres, sous réserve,
toutefois qu'il reste de la place sur le disque.
Disques enregistrables
Le terme "disque enregistrable" tel qu'utilisé
dans ce manuel, désigne un CD-R ou un CD-
RW non finalisé, sur lequel il reste
suffisamment de place pour enregistrer un
autre morceau.
Finalizing
Although audio data may be written on a CD-
R or CD-RW disc, a standard CD player will
not be able to play back the audio until a
final table of contents (TOC) has been
written at the start of the disc.
The process of writing this table of contents
is known as "finalizing". Once this has been
done, no further data can be written to the
disk.
Note that a CD-RW disc that has been
finalized can be "unfinalized". This allows
further tracks to be recorded to the disc,
provided that there is space on the disc.
[Recordable discs]
In this manual, we use the term "recordable"
disc to describe a CD-R or CD-RW disc that
has not been finalized, and has enough
space to record.
A B

7
ENGLISH FRANÇAIS
A
<Always place the disc on the disc tray
with the label side uppermost. (Compact
discs can be played or recorded only on
one side.)
<To remove a disc from its storage case,
press down on the center of the case and
lift the disc out, holding it carefully by the
edges.
How to remove the disc
How to hold the disc
<Never touch the recording (non-label)
side of a disc on which you will be
recording. Recording on a disc requires a
cleaner surface than playing back, and
fingerprints, dust, grease, etc. can cause
errors in the recording process.
<Should the disc become dirty, wipe the
surface radially with a soft, dry cloth :
<Never use such chemicals as record
sprays, antistatic sprays or fluid, benzine
or thinner to clean the discs. Such
chemicals will do irreparable damage to
the disc's plastic surface.
<Discs should be returned to their cases
after use to avoid dust and scratches
that could cause the laser pickup to
"skip."
<Do not expose discs to direct sunlight or
high humidity and temperature for
extended periods. Long exposure to high
temperatures will warp the disc.
<CD-R and CD-RW discs are more
sensitive to the effects of heat and
ultraviolet rays than ordinary CDs. It is
important that they are not stored in a
location where direct sunlight will fall on
them, and which is away from sources of
heat such as radiators or heat-generating
electrical devices.
<Printable CD-R and CD-RW discs aren't
recommended, as the label side might be
sticky and damage the unit.
<Do not stick papers or protective sheets
on the discs and do not use any
protective coating spray.
<Use a soft oil-based felt-tipped pen to
write the information on the label side.
Never use a ball-point or hard-tipped pen,
as this may cause damage to the
recorded side.
<Never use a stabilizer. Using
commercially available CD stabilizers
with this unit will damage the
mechanisms and cause them to
malfunction.
<Do not use irregular shape CDs
(octagonal, heart-shape, etc.). CDs of the
sort can damage the unit:
<If you are in any doubt as to the care and
handling of a CD-R/CD-RW disc, read the
precautions supplied with the disc, or
contact the disc manufacturer directly.
D
C
B
A
Compact Disc 2 Disques Compacts 2
C
D
B
<Placer toujours le disque sur le plateau, la
face imprimée sur le dessus (les disques
compacts ne sont enregistrés que sur une
seule face.)
<Pour sortir un disque de son emballage,
appuyer sur la partie centrale de l'étui et sortir
le disque en veillant à bien le tenir par les
bords.
Comment sortir un disque de son
emballage
Comment tenir le disque.
<Ne jamais toucher la face enregistrable (celle
sans étiquette) d'un disque sur lequel vous
souhaitez réaliser un enregistrement. Un
enregistrement exige une surface encore plus
propre qu'en lecture; des traces de doigts, de
poussière, ou de gras peuvent compromettre
une lecture correcte du disque.
<Si la surface du disque est sale, l'essuyer
soigneusement à l'aide d'un chiffon doux et
sec :
<Ne jamais utiliser de produits chimiques, tels
que des sprays, des liquides antistatiques, de
l'essence ou des diluants pour nettoyer les
disques. Ces produits chimiques risquent de
provoquer des dégâts irréparables sur la
surface en plastique du disque.
<Ranger les disques dans leur étui après
utilisation afin d'éviter de les rayer ou que de
la poussière ne se dépose, ceci pouvant
compromettre la lecture par la tête laser
<Ne pas exposer les disques à la lumière
directe du soleil, à une température élevée ou
à une humidité excessive pendant une période
prolongée. De telles expositions risquent de
provoquer une déformation du disque.
<Les disques CD-R et CD-RW sont plus
sensibles aux effets de la chaleur et aux
rayons ultraviolets que les disques compacts
ordinaires. Il est donc particulièrement
important de les ranger dans un endroit à
l'abri de la lumière directe du soleil et de toute
source de chaleur, telle que des radiateurs ou
des appareils électriques, susceptibles de
dégager de la chaleur.
<Il est déconseillé d'utiliser des disques CD-R
et CD-RW inscriptibles, la face portant
l'étiquette risquant d'être collante et
d'endommager l'appareil.
<Ne jamais coller d'étiquette ou de feuille de
protection sur le disque; ne pas utiliser de
spray destiné à déposer sur le disque une
couche de protection.
<Utiliser, pour écrire des informations sur la
face portant l'étiquette, un feutre utilisant une
encre à base d'huile. Ne jamais utiliser de
stylo bille ou de stylo à pointe dure, qui
risquerait d'abîmer la surface enregistrée du
disque.
<Ne jamais utiliser de stabilisateurs.
L'utilisation, avec cet appareil, de
stabilisateurs pour CD disponibles dans le
commerce, pourrait endommager les
mécanismes de l'appareil et provoquer son
dysfonctionnement.
<Ne pas utiliser de CD ayant une forme
irrégulière (octogonale, en forme de coeur,
etc.), ceux-ci risquant d'endommager
l'appareil :
<En cas de doute quant à la manipulation des
CD-R ou CD-RW, lire les instructions fournies
avec le disque ou contacter directement le
fabricant du disque.
D
C
B
A

ENGLISH FRANÇAIS
Connections Connexions
8
<Be sure to insert each plug securely. To
prevent hum and noise, do not bundle the
connection cords with the power cord or
speaker cord.
DIGITAL IN/OUT terminals
Connect the component with coaxial
cables or optical cables.
DIGITAL IN wDIGITAL OUT(CD,MD, etc.)
DIGITAL OUT wDIGITAL IN(MD, etc.)
<When using DIGITAL OPTICAL IN/OUT
terminals, remove the caps from the
terminals. When you do not use them,
leave the caps in place :
<Connect either DIGITAL COAXIAL IN or
DIGITAL OPTICAL IN. It is possible to
connect them to other equipment at the
same time. However, the unit can receive
signals from only one input at a time.
AC Power Cord
Plug this AC power cord into an AC wall
socket.
C
E
B
<Assurez-vous que chaque fiche est
enfoncée bien à fond. Pour éviter le
ronflement, éloignez les câbles de
raccordement du cordon d’alimentation
et des câbles des haut-parleurs.
Bornes DIGITAL IN/OUT
Raccorder l'appareil à l'aide de câbles
coaxiaux ou optiques.
DIGITAL IN wDIGITAL OUT(CD,MD, etc.)
DIGITAL OUT wDIGITAL IN(MD, etc.)
<Si vous utilisez les bornes DIGITAL
OPTICAL IN/OUT, enlever les bouchons
de protection placés sur ces bornes. En
cas de non utilisation, les laisser en
place:
<Connecter l'appareil sur l'une des deux
prises suivantes DIGITAL COAXIAL IN ou
DIGITAL OPTICAL IN.
Il est également possible de les
raccorder à d'autres appareils.
Cependant l'appareil ne peut recevoir
que l'une de ces deux sources.
Cordon d’alimentation (CA)
Branchez ce cordon d’alimentation CA
sur une prise de courant CA murale.
C
E
B
LLRR
PLAYREC
DIGITAL OUT
DIGITAL IN DIGITAL IN
DIGITAL OUT
CD-R / MD / TAPE
A
B
C
CD, MD, etc.
MD, DAT, etc.
E
L
R
L
R
<Turn off the power of all the equipment
before making connections.
<Read instructions of each component you
intend to use with RW-800.
LINE IN/OUT jacks
Connect the LINE IN/OUT jacks to the
amplifier by audio signal connection
cords.LINE IN wCD-R REC
LINE OUT wCD-R PLAY
<Make sure to connect :
white plug wwhite jack(L:left)
red plug wred jack(R:right)
D
A
<Coupez l’alimentation électrique de tout
l’équipement avant de faire les
branchements.
<Lisez les instructions de chaque appareil
que vous avez l’intention d’utiliser avec
votre lecteur-enregistreur RW-800.
Connecteurs LINE IN/OUT
Branchez ces prises sur l’Amplificateur à
l’aide du câble à fiches coaxiales.
LINE IN wCD-R REC
LINE OUT wCD-R PLAY
<Assurez vous de connecter :
Fiche blanche
wconnecteur blanc (L:gauche)
Fiche rouge
wconnecteur rouge (R:droit)
D
A
D
Amplifier/Amplificateur

9
ENGLISH FRANÇAIS
Remote Control Unit Boîtier de télécommande
Battery Installation
Remove the battery compartment cover.
Insert two “AA“ (R6, SUM-3) dry batteries.
Make sure that the batteries are inserted
with their positive “+“ and negative “_“
poles positioned correctly.
Close the cover.
Battery Replacement
If the distance required between the remote
control unit and main unit decreases, the
batteries are exhausted. In this case replace
the batteries with new ones.
Precautions concerning batteries
<Be sure to insert the batteries with
correct positive “+“ and negative “_“
polarities.
<Use batteries of the same type. Never use
different types of batteries together.
<Rechargeable and non-rechargeable
batteries can be used. Refer to the
precautions on their labels.
<When the remote control unit is not to be
used for a long time (more than a month),
remove the batteries from the remote
control unit to prevent them from leaking.
If they leak, wipe away the liquid inside
the battery compartment and replace the
batteries with new ones.
<Do not heat or disassemble batteries and
never dispose of old batteries by throwing
them in a fire.
3
2
1
The provided Remote Control Unit allows the
unit to be operated from a distance.
When operating the remote control unit,
point it towards the REMOTE SENSOR on the
front panel of the unit.
<Even if the remote control unit is operated
within the effective range, remote control
operation may be impossible if there are
any obstacles between the unit and the
remote control.
<If the remote control unit is operated near
other appliances which generate infrared
rays, or if other remote control devices
using infrared rays are used near the unit,
it may operate incorrectly. Conversely, the
other appliances may operate incorrectly.
Mise en place des piles
Retirer le couvercle du compartiment des
piles.
Introduire deux piles “AA“ (R6, SUM-3).
S'assurer que les piles sont correctement
mises en respectant les polarités plus +
et moins _.
Fermer le couvercle jusqu'au déclic.
Remplacement des piles
Si vous remarquez que la distance entre le
boîtier de télécommande et le lecteur
devient plus courte pour un fonctionnement
correct, ceci indique que les piles sont
usées. Dans ce cas, remplacer les piles par
des nouvelles.
Précautions à observer concernant les piles
<Bien placer les piles en respectant les
polarités plus +et moins _.
<Utiliser des piles du même type. Ne
jamais essayer d'utiliser des types de pile
différents ensemble.
<Des piles ou des batteries peuvent être
utilisées. Se référer à leurs étiquettes
pour les précautions à respecter.
<Si le boîtier de télécommande n'est pas
utilisé pendant une longue période (pluss
d'un mois), retirer les piles du boîtier de
télécommande pour éviter des fuites de
pile. Si elles coulent, essuyer le liquide
dans le compartiment des piles et
remplacer les piles par des neuves.
<Ne pas chauffer, démonter les piles ni les
mettre au feu.
3
2
1
Le boîtier de télécommande fourni permet la
commande à distance defourni permet la
commande à distance de l'appareil. Pour
l'utilisation du boîtier de télécommande, le
diriger vers le détecteusation du boîtier de
télécommande, le diriger vers le détecteur
de télécommande du panneau avant de
l'appareil.
<Même si le boîtier de télécommande est
activé dans la zone de fonctionnement, la
commande à distance peut être
impossible s'il y a des obstacles entre le
lecteur et le boîtier de télécommande.
<Si le boîtier de télécommande fonctionne
dans le voisinage d'autres appareils
générant des rayons infrarouges, ou si
d'autres télécommandes utilisant des
rayons infrarouges sont utilisées près du
lecteur, le lecteur peut de ne pas bien
fonctionner. Dans la situation inverse, les
autres apaareils peuvent ne pas bien
fonctionner.

ENGLISH FRANÇAIS
Basic Operation Fonctionnement de base
10
MULTI JOG, MUSIC SKIP, ENTER
In most cases, pressing the MUSIC SKIP
buttons of the remote control unit is
equivalent to rotating the MULTI JOG,
and pressing the ENTER button is
equivalent to pressing the MULTI JOG.
A
Shuffle Program Continue
PLAY MODE
Every time the PLAY MODE button of the
remote control unit is pressed, the
playback mode is changed as follows:
<"CONTINUE" is the normal playback
mode.
B
ENTER
MUSIC
SKIP
MULTI JOG
PLAY MODE
Listening through headphones
Insert the headphone plug into the
PHONES jack, and adjust the volume.
CEcoute casque
Insérez la fiche casque dans la prise
PHONES (écouteurs) et réglez le volume.
C
MULTI JOG, MUSIC SKIP, ENTER
Dans la plupart des cas, le fait d'appuyer
sur les touches MUSIC SKIP de la
télécommande a le même effet que si
vous actionnez le bouton MULTI JOG, et
le fait d'appuyer sur la touche ENTER
produit le même effet que si vous
appuyez sur la touche MULTI JOG.
A
MODE LECTURE
Pour passer d'un mode de lecture à un
autre, il vous suffit d'appuyer sur la
touche PLAY MODE de la télécommande:
<le mode de lecture normale est le mode
"CONTINUE".
B
A
B
C

11
ENGLISH FRANÇAIS
Playback 1
1
Lecture 1
This unit can be used to play back CDs
including CD-R and CD-RW discs that
have been recorded and finalized on
other types of recorder.
Press the POWER switch to turn the unit
ON.
Press the OPEN/CLOSE button(L).
Place a disc on the disc tray with the
label side uppermost.
Press the OPEN/CLOSE button(L) to
close the disc tray.
When a disc is loaded into the unit, the
display briefly shows TOC Reading as it
determines the contents of the disc.
When the TOC has been read, the display
will show one of the following:
4
3
2
1
CD:
A commercial pre-recorded CD or a
finalized CD-R
CD-R, NO TOC:
A CD-R which has yet to be finalized
CD-RW, NO TOC:
A CD-RW which has yet to be finalized
CD-RW:
A finalized CD-RW
blank:
No disc or unreadable disc
The music calendar light, to show the
available unplayed tracks. If there are
more than 20 tracks on a disc, the track
number 1-20 and OVER indicator will light.
Press the PLAY button(y) to start
playback.
5
1 5
2
4
3
3
2
4
5
nombre total
de plages
durée totale d'écoute
total number of the tracks
total play time
elapsed time
track number
music calendar
temps écoulé
numéro de la plage
Affichage du Calendrier
des plages
Cet appareil permet de lire des disques
compacts et notamment des disques CD-
R et CD-RW enregistrés et finalisés sur
d'autres types d'appareils.
Appuyer sur la touche POWER pour
mettre l'appareil sous tension.
Appuyer sur la touche OPEN/CLOSE(L).
Mettre un disque dans le tiroir à disque
en veillant à ce que la face imprimée
soit visible.
Appuyer sur la touche OPEN/CLOSE(L)
pour fermer le tiroir.
Dès lors que vous avez chargé un disque
dans l'appareil, l'indication TOC apparaît
sur l'afficheur, indiquant que l'appareil lit
le contenu du disque. Une fois cette
opération terminée, l'afficheur indique
l'une des mentions suivantes, qui précise
le type de disque placé dans l'appareil:
4
3
2
1
CD: Disque compact du commerce
pré-enregistré ou CD-R finalisé
CD-R, NO TOC: CD-R non finalisé
CD-RW, NO TOC: CD-RW non finalisé
CD-RW: CD-RW finalisé
Aucune mention:
Absence de disque ou disque illisible
Le voyant "sommaire musical", indique le
nombre de pistes disponibles. Si le
disque comporte plus de 20 pistes, le
voyant 1-20 et OVER s'allume.
Appuyer sur la touche PLAY(y) pour
faire démarrer la lecture
5

ENGLISH FRANÇAIS
Playback 2 Lecture 2
12
A
B
C
To stop playback
Press the STOP button(H) to stop
playback.
AArrêt de la lecture
Appuyer sur la touche STOP(H) pour
mettre fin à la lecture.
A
Pour passer au morceau suivant
Tourner le bouton MULTI JOG jusqu'à ce
que vous ayez atteint le morceau désiré.
Celui-ci sera alors lu depuis le début.
<Si vous tournez le sélecteur MULTI JOG
vers la gauche (dans le sens anti-horaire)
en cours de lecture, le morceau en cours
sera repris depuis le début. Pour revenir
au début du morceau précédent, appuyer
deux fois de suite sur ce bouton.
<En mode "Arrêt" ou "Pause", le lecteur se
met en mode pause au début du morceau
sélectionné. Appuyer alors sur la touche
PLAY pour démarrer la lecture.
<En cas de lecture d'un programme, ce
sera le morceau précédent ou le
morceau suivant qui sera lu.
<Remarque: En cas de sélection du
morceau suivant, alors que le dernier
morceau du disque est en cours de
lecture, celui-ci reviendra au premier
morceau du disque, et en cas de
sélection du morceau précédent alors
que le disque se trouve sur le premier
morceau, le disque se repositionnera sur
le dernier morceau.
<Le calendrier musical affiche le morceau
sélectionné.
D
C D
A B
D
To skip to the next or a previous track
Turn the MULTI JOG until the desired
track is found. The selected track will be
played from the beginning.
<When the MULTI JOG is clicked
counterclockwise once during playback,
the track being played will be played from
the beginning. To return to the beginning
of the previous track, click the MULTI
JOG twice.
<In the stop or pause mode, the deck
enters pause mode at the beginning of
the selected track. Press the PLAY button
to start playback.
<During program playback, the next or
previous track in the program is played.
<Note that going forward from the last
track of the disc will "wrap round" to track
1, and going backward from the first track
of the disc will "wrap round" to the last
track of the disc.
<The music calendar will show the
selected track.
D
To open the disc tray
Press the OPEN/CLOSE button(L) to
open the disc tray.
COuverture du tiroir à disque
Appuyer sur la touche OPEN/CLOSE(L)
pour ouvrir le plateau à disque.
C
To suspend playback temporarily (pause
mode)
Press the PAUSE button(J). Playback
stops at the current position. To resume
playback, press the PAUSE button(J) or
PLAY button(y).
BSuspendre provisoirement la lecture
(mode pause)
Appuyer sur la touche PAUSE(J). Le
disque s'arrête sur le morceau en cours
de lecture. Pour reprendre la lecture,
appuyer à nouveau sur la touche PAUSE
(J) ou sur la touche PLAY(y).
B

13
ENGLISH FRANÇAIS
Playback 3 Lecture 3
Direct playback
Press the numeric buttons of the remote
control unit. Playback starts from the
selected track.
To play tracks 1 through 9, simply press
the appropriate button (1 through 9).
To play a track whose number is higher
than 9, press the +10 button an
appropriate number of times to set the
"tens" digit of the track number, followed
by a single button to set the "units" digit.
<If you press the numeric button in the
pause mode, the deck enters pause mode
at the beginning of the selected track.
<If a track number which doesn't exist on
the disc is selected during TOC reading,
the last track of the disc will be played.
<Direct playback isn't possible during
shuffle playback and program playback.
F
7:
23 :
F
E
Lecture directe
Pour une lecture directe d'un titre
sélectionné, utiliser les touches
numériques de la télécommande. La
lecture démarre alors directement sur le
morceau sélectionné.
Pour écouter un morceau compris entre
les numéros 1 et 9, appuyer sur la touche
numérique correspondante (1 à 9).
Pour écouter un morceau dont le numéro
est supérieur à 9, appuyer sur la touche
+10 plusieurs fois de suite de façon à
afficher le chiffre des dizaines
correspondant au morceau désiré, puis
sur la touche correspondante pour
sélectionner le chiffre des unités.
<Si vous appuyez sur une touche
numérique en mode pause, le lecteur se
met en mode pause au début du titre
sélectionné.
<En cas de sélection d'un numéro de titre
erroné (qui n'existe pas sur le disque)
pendant la lecture de la table des
matières (TOC), le lecteur sélectionne par
défaut le dernier titre du disque
<Le mode lecture directe ne peut pas être
sélectionné en cas de lecture des titres
dans un ordre aléatoire ou en cas de
lecture d'un programme pré-sélectioné.
F
Search for a part of a track
During playback, hold down the SEARCH
button(mor,) of the remote control
unit and release it when the part you
want to listen to is found.
ERecherche d'une partie d'un titre
En cours de lecture, maintenir le bouton
SEARCH(mou,) de la télécommande
enfoncé et le relâcher dès que vous avez
identifié la partie recherchée.
E

ENGLISH FRANÇAIS
Repeat Playback Lecture répétitive
14
Every time the REPEAT button of the
remote control unit is pressed, the mode
is changed as follows;
Repeat one track
Press the REPEAT button and select
"REPEAT 1" during playback. The track
being played will be played repeatedly. If
you select another track in REPEAT 1
mode, the track you selected will be
played repeatedly.
It is also possible to select a track in the
stop mode. Press the REPEAT button and
then select the track number by the
numeric buttons.
Repeat All the Track
All the tracks of the disc will be played
repeatedly.
Press the REPEAT button and select
"REPEAT ALL".
During program playback, programmed
tracks will be played repeatedly.
Every time the PLAY MODE button of the
remote control unit is pressed, the mode
is changed as follows;
Select SHUFFLE to play the tracks
randomly.
If you click the MULTI JOG clockwise
during shuffle playback, next track will be
randomly selected and played. If you
click the MULTI JOG counterclockwise,
the currently played track will be played
from the beginning.
<To stop shuffle playback, press the STOP
button(H) or OPEN/CLOSE button(L).
<To cancel the shuffle playback mode,
press the PLAY MODE button of the
remote control unit, or remove the power
plug from the AC outlet.
<Shuffle playback does not work with the
program playback and repeat playback.
Shuffle Playback
Lecture dans un ordre aléatoire
REPEAT
PLAY MODE
REPEAT ALL REPEAT 1 (OFF)
Shuffle Program Continue
Chaque pression sur la touche REPEAT
de la télécommande permet de modifier
le mode de lecture. Cette modification se
fait dans l'ordre suivant:
Répétition d'un titre
Appuyer sur la touche REPEAT et
sélectionner "REPEAT 1" pendant la
lecture du morceau. Celui-ci sera repris
en continu. Si vous sélectionnez un autre
titre, alors que vous êtes en mode
REPEAT 1, le morceau sélectionné sera
repris de façon répétée.
Il est également possible de sélectionner
un morceau en mode Arrêt. Appuyer sur
la touche REPEAT puis sélectionner le
morceau désiré à l'aide des touches
numériques.
Répétition de tous les titres
Tous les titres du disques seront lus en
continu.
Appuyer sur la touche REPEAT puis
sélectionner l'option "REPEAT ALL".
En cas de lecture d'un programme pré-
sélectionné, l'ensemble des titres
programmés seront relus en continu.
A chaque action sur la touche PLAY
MODE de la télécommande, le mode de
lecture change, dans l'ordre suivant:
Sélectionner l'option SHUFFLE (lecture
aléatoire) pour écouter les différents
titres dans un ordre aléatoire.
Si vous tournez le bouton MULTI JOG
vers la droite en cours de lecture, le titre
suivant sera sélectionné de façon
aléatoire. Si vous tournez ce même
bouton vers la gauche, le titre en cours
de lecture sera repris depuis le début.
<Pour mettre fin au mode de lecture
aléatoire, appuyer sur la touche STOP(H)
ou OPEN/CLOSE(L).
<Pour annuler le mode Lecture aléatoire,
appuyer sur la touche PLAY MODE de la
télécommande ou débrancher le cordon
d'alimentation de la prise.
<Le mode Lecture Aléatoire ne fonctionne
pas en cas de lecture d'un programme
pré-sélectionné et de lecture répétitive.

15
ENGLISH FRANÇAIS
Programmed Playback 1
1
Lecture programmée 1
<If you start programming during playback,
the track being played will be
programmed.
<During playback, the MULTI JOG cannot
be used to program tracks, as they work
as SKIP buttons.
<If you made a mistake, press the CLEAR
button and enter the track number.
<You can program up to 25 tracks. "PGM
Full!" is displayed when no more tracks
can be programmed.
<"
--
:
--
" is displayed when the total
programmed time reaches 100 minutes or
more.
<If you press the PLAY button(y) with no
track programmed, program mode is
canceled and the normal playback starts
from the first track.
Up to 25 tracks can be programmed in the
desired order.
Shuffle playback does not work during
program playback.
2
3
1, 2, 3 ...
PLAY MODE
PLAY
Press the PLAY MODE button of the
remote control unit repeatedly until the
display shows Program.
1
Cet appareil vous permet de programmer
jusqu'à 25 titres qui seront lus dans l'ordre
que vous aurez défini.
Le mode Lecture Aléatoire en fonctionne
pas en cas de lecture d'un programme
prédéfini.
Appuyer sur la touche PLAY MODE de la
télécommande plusieurs fois de suite
jusqu'à ce que l'indication "Program"
apparaisse sur l'afficheur.
A l'aide des touches numériques de la
télécommande, (ou du sélecteur MULTI
JOG), sélectionner les titres désirés.
2
1
<Si vous commencez votre programmation
alors qu'un disque est en cours de
lecture, le titre en cours sera
automatiquement inclus dans le
programme.
<En cours de lecture, il n'est pas possible
d'utiliser le sélecteur MULTI JOG pour
programmer des titres, ceux-ci ne
pouvant être sélectionnés qu'avec les
touches SKIP.
<En cas d'erreur, appuyer sur la touche
CLEAR et entrer le numéro du titre désiré.
<Vous pouvez programmer jusqu'à 25
titres au total. Le message "PGM Full!"
(programme complet) s'affiche une fois le
nombre maximum de titres programmé.
<"
--
:
--
" s'affiche lorsque la durée totale
du programme atteint ou dépasse les 100
minutes.
<Si vous appuyez sur la touche PLAY(y)
sans avoir au préalable programmé
aucun titre, le mode "Programme" sera
automatiquement annulé et la lecture du
disque commencera normalement par le
premier titre.
the track number the total time of
the program so far
the program number
numéro du titre durée totale du
programme défini
numéro du programme
Press the numeric button of the remote
control unit (or turn and press the MULTI
JOG) to select the tracks.
2
When the selection of track numbers has
been finished, press the PLAY button
(y)to start program playback.
<If you turn the MULTI JOG during
program playback, the next or previous
track in the program will be played.
3Une fois la sélection des titres terminée,
appuyer sur la touche PLAY(y) pour
faire démarrer la lecture du programme.
<Si vous actionnez le sélecteur MULTI
JOG en cours de lecture du programme,
le titre suivant ou le titre précédent du
programme seront lus.
3

ENGLISH FRANÇAIS
Programmed Playback 2
A
Lecture programmée 2
16
To add a track
Press the desired track number. The
track is added to the end of the current
program.
A
REPEAT
1, 2, 3 ...
PLAY MODE
STOP
POWER
CLEAR
OPEN/CLOSE
B
D
C
Pour ajouter un titre à un programme
Appuyer sur le numéro du titre désiré. Le
titre ainsi sélectionné sera ajouté à la fin
du programme en cours.
A
To repeat the programmed tracks
Press the REPEAT button and select
"REPEAT ALL". The programmed tracks
will be played repeatedly.
DPour reprendre la lecture du programme
Appuyer sur la touche REPEAT et
sélectionner l'option "REPEAT ALL".
L'ensemble des titres du programme sera
lu de façon répétitive.
D
To clear program
To clear all tracks, press the
OPEN/CLOSE button(L), or the STOP
button(H) in the stop mode.
To cancel the program playback mode,
press the PLAY MODE button or POWER
button.
CPour effacer un programme
Pour effacer tous les titres d'un
programme, appuyer sur la touche
OPEN/CLOSE(L).
Pour effacer tous les titres d'un
programme, appuyer sur la touche
STOP(H) en mode "Arrêt".
Pour annuler le mode Lecture de
Programme, appuyer sur la touche PLAY
MODE ou sur la touche POWER.
C
To delete a track
Press the CLEAR button. The last track in
the program is deleted.
BPour supprimer un titre d'un programme
Appuyer sur la touche CLEAR. Le dernier
titre du programme sera sélectionné.
B

17
ENGLISH FRANÇAIS
Before Recording Avant d'enregistrer
Before you start recording, make sure that you understand the
following points:
<The unit requires Digital Audio CD-R or CD-RW media for
recording. Computer CD-R or CD-RW discs do not work with this
unit.
<Once you have recorded on a CD-R disc, the data cannot be
erased from it.
<You can add tracks to an unfinalized recordable disc. Once
finalized, a CD-R disc is "fixed" and behaves in the same way as a
CD. Finalized CD-RW discs, however, can be erased, refreshed
and re-recorded.
<Due to the system restriction of CD, a track cannot be less than
four seconds in length, and there can be a maximum of 99 tracks
on an audio CD.
<When the recording is finished, "PMA Writing" is displayed for a
few seconds, and the unit then goes into stop mode. Do not apply
shock or vibration to the unit during recording.
<If the disc reaches the end during recording, the unit will start a
fade-out over a few seconds (the display shows FADE OUT).
When the fade-out has finished, the display shows "Disc Full!!"
and "PMA Writing" for a few seconds, and the unit then goes into
stop mode.
<If the tracks reach 99 during recording, the display shows "Disc
Full!!" and "PMA Writing" for a few seconds, and the unit then
goes into stop mode.
Avant de commencer un enregistrement, assurez-vous des points
suivants:
<L'appareil n'accepte pour l'enregistrement que des disques
Audio numériques de type CD-R ou CD-RW. Les disques CD-R ou
CD-RW pour équipements informatiques ne fonctionnent pas sur
cet appareil.
<Les données enregistrées sur un disque CD-R, ne peuvent plus
être effacées.
<Il est toutefois possible d'ajouter des titres sur un disque
enregistrable non finalisé. Une fois finalisé, un disque CD-R est
"définitif" et doit être traité exactement comme un disque
compact ordinaire. Les disques CD-RW finalisés peuvent quant à
eux être effacés, ré-initialisés puis ré-enregistrés.
<Du fait des limites mêmes liées à un disque compact, un titre ne
pas faire moins de 4 secondes, et le nombre maximum de titres
sur un CD audio ne peut pas excéder 99.
<Une fois l'enregistrement terminé, le message "PMA Writing"
s'affiche pendant quelques secondes puis l'appareil se met en
mode Arrêt. Ne jamais bousculer ou soumettre l'appareil à des
vibrations en cours d'enregistrement.
<Si le disque arrive en fin de piste en cours d'enregistrement,
l'appareil passera en mode fondu enchaîné pendant quelques
secondes (le message FADE OUT apparaît).
Une fois ce fondu enchaîné terminé, l'afficheur indiquera "Disc
Full!!" (Disque plein) puis "PMA Writing" pendant quelques
secondes et l'appareil s'arrêtera..
<Si le nombre de titres atteint 99 en cours d'enregistrement, le
message "Disc Full!!" apparaît sur l'afficheur suivi du message
"PMA Writing" pendant quelques secondes. Ensuite l'appareil
passe automatiquement en mode Arrêt.
Serial Copy Management System
This unit is in compliance with the Serial Copy Management
System standard. This standard has been elaborated to restrict
digital-to-digital copying to only the first generation. The basic
rules governing this system are as follows:
Rule 1
A digital recording is possible from a digital source such as a CD,
DAT or MD onto a recordable CD-R, CD-RW, MD or DAT through
a digital input connection. However, further digital-to-digital
recording is prohibited for the second and later generations.
Rule 2
When an analog source such as an analog disc or FM broadcast
is digitally recorded by using a CD-R, CD-RW, MD or DAT, this
recorded source can be digitally recorded on another CD-R, CD-
RW, MD or DAT. However, further digital copying is prohibited.
SCMS (Système de gestion de copie en série)
Cet appareil répond à la norme SCMS (Système de Gestion de
Copie en série). Cette norme a été élaborée pour restreindre les
copies de type numérique - analogique à la première génération
uniquement. Les règles de base régissant ce système sont les
suivantes:
Règle 1
Il est possible de réaliser un enregistrement numérique à partir
d'une source numérique telle qu'un CD, un support DAT ou un
MD sur un support enregistrable de type CD-R, CD-RW, MD ou
DAT en raccordant l'appareil via l'entrée numérique. Cependant
l'enregistrement depuis une source numérique sur une source
numérique est interdit pour la seconde génération et les
générations suivantes.
Règle 2
En cas d'enregistrement numérique d'une source analogique
telle qu'un disque analogique ou une source FM à l'aide d'un CD-
R, d'un CD-RW, d'un MD ou d'un DAT, cette source peut être
enregistrée numériquement sur un autre CD-R, CD-RW, MD ou
DAT. Cependant, toute reproduction numérique de cet
enregistrement est interdite.

ENGLISH FRANÇAIS
How to copy a CD
1
Pour copier un CD
18
Press the RECORD button.
The unit enters record pause mode.
The display shows "Now OPC" (Optimum
Power Control) for a few seconds, as the
unit prepares to record on the disc.
Press the MENU button.
1. Select Auto Track ON by rotating the
MULTI JOG.
2. Press the MENU button repeatedly until
"S_LVL" is shown.
Turn the MULTI JOG counterclockwise,
and set to "-72dB".
3. Press the MENU button repeatedly until
"VOLUME" is shown.
Turn the MULTI JOG and set to "0dB".
Press the MULTI JOG to confirm the
setting.
Press the SYNC REC button.
"SYNC" appears on the display.
Start the playback of CD.
Synchronous recording will start when
the sound comes in.
<When the playback of CD is finished, the
unit enters record pause mode. Press the
STOP button(H) to stop the recording.
7
6
5
4
Press the POWER switch to turn the unit
ON.
Load a recordable CD-R or CD-RW into
the unit.
Press the OPEN/CLOSE button(L), place
a disc on the disc tray with the label side
uppermost, and then press the
OPEN/CLOSE button(L) to close the disc
tray.
Select "Optical In" or "Coaxial In" by
pressing the INPUT SELECT button.
3
2
1
Optical In:
To record a source connected to the
DIGITAL OPTICAL IN terminal.
Coaxial In:
To record a source connected to the
DIGITAL COAXIAL IN terminal.
1 4 6
2 53
3
2
5
4
6
Mettre l'appareil sous tension en
appuyant sur l'interrupteur POWER.
Charger un CD-R ou un CD-RW
enregistrable dans l'appareil.
Appuyer sur la touche OPEN/CLOSE(L),
mettre un disque dans le tiroir à disque
en veillant à ce que la face portant
l'étiquette soit visible, puis appuyer sur la
touche OPEN/CLOSE(L) pour refermer le
tiroir à disque.
Sélectionner la source d'entrée désirée
"Optical In" ou "Coaxial In" à l'aide du
sélecteur d'entrée INPUT SELECT.
3
2
1
Optical In:
Pour enregistrer depuis une source
raccordée à la borne DIGITAL
OPTICAL IN.
Coaxial In:
Pour enregistrer à partir d'une source
raccordée à la borne DIGITAL
COAXIAL IN.
Appuyer sur la touche RECORD.
L'appareil se met alors en mode pause.
L'afficheur indique "Now OPC" (Contrôle
d'alimentation Optimum) pendant
quelques secondes, le temps nécessaire
pour que l'appareil se prépare à
enregistrer sur le disque.
Appuyer sur la touche MENU.
1. Sélectionner l'option Auto Track ON à
l'aide du sélecteur MULTI JOG.
2. Appuyer sur la touche MENU plusieurs
fois de suite, jusqu'à ce que l'indication
suivante s'affiche "S_LVL".
Tourner le sélecteur MULTI JOG vers la
gauche et régler le niveau sur "-72dB".
3. Appuyer sur la touche MENU plusieurs
fois de suite jusqu'à ce que l'indication
"VOLUME" apparaisse.
Tourner le sélecteur MULTI JOG et régler
la valeur affichée sur "0dB".
Appuyer sur le bouton MULTI JOG pour
confirmer le réglage effectué.
Appuyer sur la touche SYNC REC
(Enregistrement Synchronisé).
L'indication "SYNC" apparaît sur
l'afficheur.
Faire démarrer la lecture du CD.
L'enregistrement synchronisé démarre
dès que le son apparaît.
<Une fois la lecture du CD terminée,
l'appareil se met en mode Pause.
Appuyer alors sur la touche STOP(H)
pour terminer l'enregistrement.
7
6
5
4

19
ENGLISH FRANÇAIS
Basic Recording 1 Enregistrement simple 1
<For the details of Mixing recording, see
page 22.
Press the RECORD button.
The unit enters record pause mode.
The display shows "Now OPC" (Optimum
Power Control) for a few seconds, as the
unit prepares to record on the disc.
Select the mode of track number
assignment.(Auto Track)
Select Auto Track ON or OFF by MENU
button and MULTI JOG.(see page 25)
5
4
Press the POWER switch to turn the unit
ON.
Load a recordable CD-R or CD-RW into
the unit.
Press the OPEN/CLOSE button(L), place
a disc on the disc tray with the label side
uppermost, and then press the
OPEN/CLOSE button(L) to close the disc
tray.
Select the source to be recorded.
Every time the INPUT SELECT button is
pressed, the input is changed as follows:
3
2
1
Analog In:
To record a source connected to LINE
IN and MIC jacks.
Optical In:
To record a source connected to the
DIGITAL OPTICAL IN terminal.
Coaxial In:
To record a source connected to the
DIGITAL COAXIAL IN terminal.
Opt + Analog:
Mixing recording of the source
connected to the DIGITAL OPTICAL IN
terminal and LINE IN/MIC jacks.
Coax + Analog:
Mixing recording of the source
connected to the DIGITAL COAXIAL IN
terminal and LINE IN/MIC jacks.
1
3
2
1 4
2 53
4
5
Appuyer sur la touche POWER pour
mettre l'appareil sous tension.
Placer un CD-R ou un CD-RW
enregistrable dans l'appareil.
Appuyer sur la touche OPEN/CLOSE(L),
mettre un disque dans le tiroir à disque
en veillant à ce que la face portant
l'étiquette soit visible, puis appuyer sur la
touche OPEN/CLOSE(L) pour refermer le
tiroir à disque.
Sélectionner la source à partir de
laquelle vous souhaitez réaliser
l'enregistrement.
Pour sélectionner la source d'entrée
désirée, appuyer sur la touche INPUT
SELECT; les différentes sources d'entrée
s'affichent dans l'ordre suivant:
3
2
1
Analog In:
Pour enregistrer à partir d'une source
raccordée aux bornes LINE IN et MIC.
Optical In: Pour enregistrer à partir
d'une source raccordée à la borne
DIGITAL OPTICAL IN.
Coaxial In:
Pour enregistrer à partir d'une source
raccordée à la borne DIGITAL
COAXIAL IN.
Opt + Analog:
Enregistrement mixte à partir d'une
source connectée à la borne DIGITAL
OPTICAL IN et aux connecteurs LINE
IN ou MIC.
Coax + Analog:
Enregistrement à partir d'une source
raccordée à la borne DIGITAL
COAXIAL IN et aux connecteurs LINE
IN ou MIC.
<Pour plus de détails sur la façon de
procéder à un enregistrement mixte, se
reporter à la page 22.
Appuyer sur la touche RECORD.
L'appareil se met en mode Pause.
L'indication "Now OPC" (Optimum Power
Control) apparaît sur l'afficheur pendant
quelques secondes, temps nécessaire
pour que l'appareil se prépare à procéder
à l'enregistrement sur le disque.
Sélectionner le mode d'affectation des
numéros de piste.(Auto Track)
Sélectionner le mode Auto Track ON ou
OFF à l'aide de la touche MENU et du
sélecteur MULTI JOG.(voir page 25)
5
4

ENGLISH FRANÇAIS
Basic Recording 2
6
Enregistrement simple 2
20
If you need, adjust the recording
level.(see page 25)
Play the source to be recorded and
adjust the recording level so that the
loudest sound does not exceed "OVER"
indicator of the peak level meter.
Digital:
Adjust the recording level by using the
digital volume.
Press the MENU button repeatedly until
the display shows "VOLUME ***dB", and
adjust the volume by rotating the MULTI
JOG. Then press the MULTI JOG to
confirm the setting.
<Unlike analog equipment, digital audio
units produce extremely unpleasant
sounds when distorted, and there is no
"headroom" after the 0 mark. When you
record digitally from a commercially-
produced CD, set the digital volume to 0
dB. This will maintain all the dynamic
range of the source CD without clipping.
Only boost the signal if the source is
exceptionally quiet.
Analog:
Press the MENU button repeatedly until
the display shows VOLUME ***dB, and
set to 0 dB. Use the REC LEVEL control to
adjust the recording level.
Press the PLAY button(y) or the PAUSE
button(J) to start recording.
Play the source to be recorded.
7
6
7
Si vous désirez régler le niveau
d'enregistrement, procéder comme
indiqué page 25.
Faire démarrer la source à enregistrer et
régler le niveau d'enregistrement de
manière à ce que le niveau maxi ne
dépasse pas le voyant lumineux "OVER"
sur l'indicateur du niveau de crête.
Numérique:
Régler le niveau d'enregistrement en
vous référant au volume numérique.
Appuyer sur la touche MENU plusieurs
fois de suite jusqu'à ce que l'indication
"VOLUME ***dB" apparaisse sur
l'afficheur puis régler le volume à l'aide
du sélecteur MULTI JOG. Appuyer
ensuite sur le bouton MULTI JOG pour
confirmer le réglage ainsi effectué.
<Contrairement aux équipements
analogiques, les appareils audio
numériques donnent un son
particulièrement désagréable, lorsque
celui-ci est déformé et il n'y a pas de
"marge" au-dessus du repère 0. En cas
d'enregistrement numérique à partir d'un
disque compact acheté dans le
commerce, régler le volume numérique
sur 0 dB. Ceci permettra de conserver
toute la gamme dynamique du CD source,
sans "écrêtage". N'amplifier le signal que
si la source est particulièrement
silencieuse.
Analogique:
Appuyer sur la touche MENU plusieurs
fois de suite jusqu'à ce que l'indication
VOLUME ***dB apparaisse sur l'afficheur
et régler le niveau à 0 dB. Régler le
niveau d'enregistrement à l'aide de la
commande REC LEVEL.
Appuyer sur la touche PLAY(y) ou
PAUSE(J) pour démarrer l'enregistrement.
Faire démarrer la source que vous
souhaitez enregistrer.
7
6
76
6
MIC
LINE IN
DIGITAL IN
RECORD
(Analog)
(Analog)
(Optical/Coaxial)
Other manuals for RW-800
1
Table of contents
Other Teac Recording Equipment manuals

Teac
Teac CD-RW901SL User manual

Teac
Teac AD-RW900 User manual

Teac
Teac CD-RW890 User manual

Teac
Teac CD-RW890MK2 User manual

Teac
Teac TU-PGRS-G User manual

Teac
Teac HS-2 Manual

Teac
Teac Tascam MD-801MKII User manual

Teac
Teac CDR56S-4XX User manual

Teac
Teac TASCAM 388 STUDIO 8 Troubleshooting guide

Teac
Teac BB-1000CD How to use

Teac
Teac AD-RW900 User manual

Teac
Teac MT-20D-IO User manual

Teac
Teac CD-RW890 User manual

Teac
Teac Multitrack Series User manual

Teac
Teac GF-650 User manual

Teac
Teac RW-D280 User manual

Teac
Teac Tascam Porta-02MKII Ministudio User manual

Teac
Teac Tascam CD-RW700 User manual

Teac
Teac HD-R1 User manual

Teac
Teac GF-550 User manual